The post Weekly Photo Challenge: Just Add Light appeared first on Digital Photography School. It was authored by Sime.
I have been thinking about light a lot recently, adding light to images by using lots of different sources, flash, led panels, torches, bedside lamps etc, but I have to level with you, while I love experimenting with light, I’m not a master of ‘all of the settings’ and I mess up often – and that’s ok, we learn.
We thought it might be a fun idea to do another “more than one image” challenge to see what adding light, however you like, can lift an image.
Share your photo on social media and tag them #dPSWeeklyChallenge and #dPSJustAddLight
So today when I went with my 11yo and my camerabag to an often empty walking path nearby to take a couple of photographs of him hitting his Jigsaw Jump, the goal being to light him and get a dramatic photo in the spot I’d chosen, shaded by trees, almost like a tunnel of darker trees… All was well until I realised I’d forgotten my glasses and couldn’t find all the settings I needed on these new flashes, anyway! Onward!
The idea is that you have a photograph you take, and then you take it again but add a lightsource of some kind to change the image for better or for worse, and when you share them, you share the images together. You can use any lightsource, I’ve used a flash in the photo below.
Seb fighting against gravity
And in this photo of my grinder I used a torch and a small Aputure LED panel with a piece of red paper as my background.
Grinds You Down
You can either join two images into one image, or you can post two separately, whatever you would prefer! You can post in the comments below, or over in our private Facebook group.
The post Weekly Photo Challenge: Just Add Light appeared first on Digital Photography School. It was authored by Sime.
The post 12 Tips For Gorgeous Indoor Natural Light Photography appeared first on Digital Photography School. It was authored by Dena Haines.
Feeling frustrated with indoor photography? Want to know how you can capture beautiful indoor photos with only natural light?
Working with natural light indoors can be tricky. So in this article, I’m going to share plenty of tips and tricks I use in my own photography. And I’ll also share plenty of examples along the way – so that you can see my advice in action!
Let’s dive right in.
1. It’s all about the windows
Indoor photography comes with a significant problem:
A lack of light. And without light, you can’t get beautiful, well-exposed photos.
So what do you do? Some photographers turn to artificial lighting, such as studio strobes and flashes. But I prefer to keep things natural, which is why I look for light coming through windows, and I use it to illuminate my subject.
In fact, as soon as you’ve chosen a subject, walk around your indoor space. Think about the quality of light that the different windows provide; does it flood the room softly? Does it beam in, bouncing off the walls and floors? How would it look when illuminating your subject?
Soft light will add a soft glow, and harsh light will give a dramatic or moody look.
Also recognize that the color of light changes throughout the day. Light looks warm at sunrise, cool at midday, and warm at sunset.
Once you know indoor lighting well, you’ll be able to use it to achieve the perfect effects.
2. Turn off the lights
Natural light doesn’t like competition.
Specifically, natural light doesn’t like electric lights, which cause two problems:
Electric lights cast unexpected shadows and will interfere with the directionality of your main window light.
Electric lights produce warmer or cooler illumination, which contrasts with the color of the natural light.
In particular, skin tones can look odd when artificial and natural light start to mix.
The easiest way to fix this?
Just turn off all electric lights! That way, you can keep your colors looking natural while focusing on a single light source.
3. Shoot in Aperture Priority mode
In Aperture Priority mode, you choose the aperture while your camera chooses the shutter speed. This gives you flexibility over your exposure without stepping over into the Wild West of Manual mode.
Aperture Priority is generally marked with an AV or an A, as shown below:
So what settings should you dial in for the best indoor natural light photography?
I’d recommend starting with a wide-open aperture to let in lots of light. Choose a low f-number such as f/2.8 or f/1.8 to keep your exposure nice and bright.
Plus, when you use a wide aperture, your depth of field will be shallow. So your subject will stay in focus while your background is left soft and blurry. This adds a beautiful effect to portrait, nature, and product shots.
Note that, for portraits, an aperture of around f/5.6 or f/6.3 will keep the entire face in focus (though this will depend on your focal length and your distance from the subject). Focus on your subject’s eyes for best results.
Also, shoot in RAW. A RAW file will give you a lot more to work with when editing – so you can enhance your indoor photos for stunning results.
4. Choose your white balance in advance
Some photographers like to select their white balance during post-processing (so they’ll leave their camera set to Auto White Balance when shooting).
But while this can work, it’s often easier to get the white balance right before taking a photo (plus, it’ll save you lots of time during editing).
So take your camera off Auto White Balance. Observe the light and consider which white balance preset works best for your situation.
For instance, I generally use Daylight for indoor portrait photography, though you might also pick Cloudy for a warmer look. And the other white balance presets can work, too, depending on the effect you’re after.
Honestly, I’d recommend you try several different white balance settings when first starting out – that way, you can determine which looks you like and which looks you’d prefer to avoid.
(Always bear in mind, however, that the white balance results will change depending on the quality of the light. Applying a Cloudy white balance to a shot lit by cloudy light will give a neutral look, while applying a Cloudy white balance to a shot lit by warm evening light will actually enhance the warm effect.)
And remember:
If all else fails, you can always adjust your white balance while editing.
5. Use a light-catching backdrop
Remember how I said that indoor settings tend to lack light?
That’s why you’ll need to maximize existing light. And a simple way to do this is with a reflective backdrop.
Specifically, a white backdrop will help catch the light and bounce it back onto your subject. Here’s the type of setup I’m talking about:
The white material helps cradle the light around the flowers:
And creating a simple light-catching backdrop isn’t hard, either. The one featured in the above photo was made with a freestanding collapsible clothes rack and a long piece of white material.
(It’s very easy to set up and very easy to move around!)
6. Use a light box
A light box will create a similar effect as a reflective backdrop, but it will help control the light even more.
In fact, you can construct a light box with lots of cloth – but instead of putting it behind your subject, wrap it all around. Here’s a makeshift light box I used for this food still life:
And here’s the final image:
7. Use a reflector
A reflector bounces light back toward your subject.
And it’s a great way to keep your entire subject nicely lit.
For the shots below, I set up a backdrop and positioned my daughter so that her left side faced the window. She held a reflector in her right hand, which helped lighten the shadows:
And here’s a behind-the-scenes photo:
8. Use a mirror
A mirror is another great way to control natural light. Simply hang a mirror in the window; I used a large suction cup with a hook to hang the mirror pictured below:
Then have your model look in the mirror. As you take your shot, make sure your reflection doesn’t appear. (It can take some patience to get the angles and reflections under control, but it’s worth it.)
I used a small handheld mirror for this shot. A larger mirror would require less cropping:
9. Tidy up
There are often things lying around the house, especially if you have kids. And this clutter can be distracting in a photograph. It’s worth taking a couple minutes to tidy up before you start shooting.
In fact, a backdrop can serve a double purpose here: it can control light, while also covering up all the background clutter! It can help make a small space more workable.
For most of the photos in this article, I pushed our sofa and table into the middle of the living room, then I set up in front of our largest window. Without the backdrop, this location would look far too busy.
10. Place your subject close to the window
Earlier in this article, I talked about the importance of windows when doing indoor photography.
But it’s not enough to just use windows. You also need to carefully position your subject.
Specifically, place your subject a foot or two away from the light source. That way, you’ll make use of the natural light, and you’ll also avoid the harsh contrast that comes from being too close to the window.
One more tip:
Experiment with lighting effects. Try backlighting, sidelighting, and frontlighting (just have your model face in different directions and follow them with your camera!).
11. Use the curtains
If the light is harsh, you’ll get unpleasant shadows and contrasty subjects – unless you can diffuse it!
So here’s what I recommend:
Use curtains or blinds!
If you have translucent curtains, let them cover the window completely. If your curtains are opaque, consider closing them partway, then let the light feather onto your subject.
Alternatively, if your curtains aren’t suitable for diffusing the light, you could hang a piece of diffusive material over your curtain rods.
12. Shoot reflective objects
Natural light can turn the most common thing (like the moisture on the window pictured below) into something beautiful.
Personally, I think reflective objects look gorgeous when hit by sunlight. Here are just a few examples:
So have fun playing around with reflective objects and natural light. The light will create all sorts of interesting reflections, and it’ll even glisten off shiny objects:
Indoor natural light photography: You’ve got to love it!
It’s easy to love indoor natural light photography.
The setup is inexpensive, portable, and easy to use, plus you can create beautiful photos no matter the weather or time of day.
Don’t forget to have fun and let that inner beauty shine through!
Now over to you:
Have you tried indoor natural light photography? Let me know how your natural light shoots go by commenting below!
The post 12 Tips For Gorgeous Indoor Natural Light Photography appeared first on Digital Photography School. It was authored by Dena Haines.
The post Here’s How to Shoot in Harsh Light [Video] appeared first on Digital Photography School. It was authored by Jaymes Dempsey.
It’s a tip often given to beginners:
Only photograph when the light is soft and beautiful.
But what if you can’t find the time to get out during the soft light, and you still want to take photos? Or what if you’re in a jaw-dropping, once-in-a-lifetime location and the light is just too bright? What then?
That’s when it pays to know how to create stunning shots in harsh light.
In this video, professional photographer Nigel Danson explains how to capture gorgeous images even in the worst lighting situations. Danson’s discussion centers around landscape photography, but the tips apply to many photographic genres.
To discover how to create beautiful images in harsh light, check out the video below. And then leave a comment with your favorite tip, trick, or piece of advice for harsh light photography!
The post Here’s How to Shoot in Harsh Light [Video] appeared first on Digital Photography School. It was authored by Jaymes Dempsey.
The post Weekly Photo Challenge – Artificial Light appeared first on Digital Photography School. It was authored by Sime.
There’s no question that when we start out in photography, at some point, we find ourselves needing to add light to an image we have in our mind.
But you only use ‘natural light’ I hear you say? Well, flash is available, so is a desk lamp or a torch – this is the week to try them out!
This week’s photo challenge is ‘Artificial Light’ you can use any light source that isn’t the sun (or you can combine the sun with artificial) for your photo. Use the hashtag #dPSLight
Light comes in MANY shapes and sizes, my first try with adding light to a photo came from a funny little desk lamp (We called it ghetto lighting) I used to stand around trying to get the ceiling light (one of those big paper ball things) in the right spot to give me the light I wanted, the addiction starting mostly on the 29th of September, 2008…
These days lighting comes in many (as many as it always has, plus a couple more?) forms, I’ll share the ones I use – I have a single flash, it’s a Jinbei HD-2 Pro and a very capable little unit! If I need more power, and what I use on any commercial shoot, as well as the HD-2 Pro, are my two Westcott FJ-400 studio lights, they’re very nice, powerful enough for pretty much anything I need them for. Other lights I love and use often are the two little Aputure AL-MW lights (they’re waterproof) and I have two Spiffy RGB LED lights, too… A collection of many years I guess you’d say!
BUT you don’t need to have “proper lighting gear” you need to have a desire to learn and a desk lamp! SO for this week’s challenge, we want you to use ANY sort of artificial light in your photograph (Just one photograph for the challenge, folks) and share it in the comments below or via social media (Tag us!) and make sure you tag #dPSLight on social media.
Missed a Challenge? Don’t sweat it, find all of our previous challenges here!
Share on Instagram or Twitter and use the hashtag #dPSEyes so we can see them!
How do I upload my photo to the comments?
Simply upload your shot into the comments field (look for the little camera icon in the Disqus comments section) and they’ll get embedded for us all to see. Or, if you’d prefer, upload them to your favorite photo-sharing site and leave the link to them.
Have a great weekend!
If you get stuck, leave a comment below or drop us a note on the dPS help desk! support@digital-photography-school.com
The post Weekly Photo Challenge – Artificial Light appeared first on Digital Photography School. It was authored by Sime.
The post How to Photograph Into the Light for Stunning Results appeared first on Digital Photography School. It was authored by Simon Bond.
In this article, I’ll explain how to photograph into the light.
This technique is sometimes called contre-jour, a French term that literally translates to “against the light.”
Now, there are various ways you can approach this style of photography. You can choose to photograph stunning silhouettes, or you can attempt to mitigate dark areas in your photo through post-processing.
To discover the best ways of photographing into the light, read on!
Why should you photograph into the light?
Photographing into the light is a great way to add drama to your photos.
(Note that photographing into the light is also known as backlit photography.)
But to get nice images, you’ll need to have a good understanding of how the light will interact with your camera.
Now, almost everyone will have shot against the light at some point (e.g., when photographing a sunrise or sunset).
But if you can understand how to control the light across your frame, you can create especially incredible results.
For instance, one of the most obvious effects you’ll see when doing backlit photography is a silhouette, which I discuss in the next section.
How to create stunning silhouettes
Silhouettes are shapes formed by objects in front of a brighter background.
They’re very appealing to photographers because you can produce powerful shapes, which will give your images a very graphic feel.
Shapes and patterns are important when silhouetting an image.
You won’t get good silhouettes by just pointing the camera into the light, however. Some planning is needed to get the best result.
Specifically, you’ll want:
A low angle: Silhouettes are best when the entire silhouetted shape sits against the bright background. Since the background is usually the sky, getting down to a low angle to photograph upward is best.
A clear horizon line: Other than the objects you want to silhouette, try to avoid placing other elements on the horizon line. This often means a clear horizon line is best. Also, avoid having objects overlap with the main subject you’re silhouetting.
To expose for the sky: Expose for the bright background; this will lead to dark, beautifully silhouetted foreground objects.
Other elements: Include other elements such as framing, lines, and repetition that draw the eye toward your silhouette.
Here, I got down on the ground for a nice low angle. That way, I was able to capture the entire silhouette.
Drama in the sky
The sky is an important part of your photos, especially if you’re a landscape photographer. And photographing into the light can lead to some of the best results.
What you’re looking for are beautiful sunset colors, rays of light coming through clouds, and perhaps a starburst effect from the sun.
You’ll need to choose the correct time of day to improve your results – often sunrise or sunset. The hour before sunset and the hour after sunrise are also optimal.
The final key element is often about 30% cloud coverage.
Here are a few quick tips for photographing backlit landscapes:
Pay attention to the weather forecast: Check ahead for the forecast and use satellite images of the clouds in your area. That way, you can know with greater certainty if the sky will look good.
Arrive early: Arriving an hour ahead of the ideal light will help you plan your photo, and you’ll be ready if you get unexpected rays of sunshine breaking through the clouds ahead of when you want to photograph.
Compose with leading lines: If possible, use leading lines to guide the eye toward the sun or to an interesting area of the sky.
You can also photograph against artificial light sources. Here, the background is wire wool.
Balancing the light
When photographing silhouettes, an underexposed foreground is what you want – but what if you’re after a detailed background and a detailed foreground?
For the best result, you’ll need to balance the light throughout your photo. Otherwise, you’ll produce an overexposed sky or an underexposed foreground.
There are two approaches you can use; one is in-camera, and the other uses post-processing.
Filters: Graduated neutral density filters are a great way to balance the light across your photo. These come in different strengths, so you can adapt your setup to the scene in front of you.
Digital blending: Combine a series of bracketed photos in post-processing. This approach uses luminosity masks and layers in Photoshop.
Combination: The best approach is to combine the above methods. Get the exposure as correct as possible in-camera, then use post-processing to enhance your results further.
How to handle flare
Photographing into the light can lead to flare in your photos.
While flare can be used artistically, you’ll at least want to control it. And you’ll sometimes need to prevent the flare entirely.
Use the following tips to control flare in your photos:
Choose your lens carefully: A lens with a smaller number of elements will cause less flare. So use a prime lens when possible.
Add a lens hood: Use your lens hood to block stray light.
Use a narrow aperture: When the sun is partially obscured by clouds, tree leaves, or the horizon line, use a small aperture such as f/11; you can give the sun a starburst effect.
Block the sun: Stick your hand in the image and cover the sun. Then take a second photo, this time without your hand. You can combine these two images in post-processing using layer masking. The final image won’t have your hand or flare.
The sun in this photo looks like a star due to a small aperture.
Natural or artificial?
Photographing into the light usually means photographing toward the sun, or photographing from a dark location (e.g., under a bridge) toward the light.
In such cases, the light source is natural and can’t be controlled. However, if you use off-camera flash, you can control the direction of the light.
So try using strobes to produce silhouettes or to backlight your subject. And at night, try light painting, and make sure the light source is behind your main subject.
Photographing into the light is right!
Photos of a sunset are always taken into the light. I merged a series of bracketed photos to balance light across the frame.
Successfully photographing into the light can be a bit of a challenge.
But with the right approach and the correct camera settings, you’ll get great results!
Now over to you:
Do you enjoy photographing into the light? What are your favorite situations for producing backlit images? Share your thoughts and photos in the comments below!
The post How to Photograph Into the Light for Stunning Results appeared first on Digital Photography School. It was authored by Simon Bond.
The post A Beginner’s Guide to Light Modifiers (For Stunning Portraits) appeared first on Digital Photography School. It was authored by Gina Milicia.
Light modifiers are a powerful way to shape or control light.
And with the right approach, you can use modifiers to achieve beautifully lit, gorgeous portraits.
In this article, I’m going to share everything you need to know about modifiers. I’ll take you through all the most popular modifiers – and I’ll explain precisely what they do and why you might want to use them.
By the time you’re done, you’ll be a light modification expert!
Let’s get started.
Are light modifiers really necessary?
Technically, you can do portrait photography without modifiers. You can shoot with a subject and an unmodified flash.
However, a naked flash produces hard light and harsh shadows, which I think look really unflattering.
That’s why I rarely work without some sort of diffusion modifier. It softens the light, softens the shadows, and gives you a flattering end result.
Nobody is ever going to tell you, “Wow, I love the way your hard lighting has captured and enhanced every single pore, line, and blemish on my skin. I actually look ten years older. Thanks!”
Hence, it’s often a good idea to start with soft, carefully modified lighting.
There are, of course, many really cool uses for hard lighting, and some photographers can make it look brilliant. I’m just not one of them. I like to control the light and only illuminate certain areas of my shot.
Therefore, for me, modifiers are absolutely essential.
A quick note about light modifier costs
Every kind of light modifier will have a top-of-the-line version and a really cheap version.
The main difference is that the cheaper versions won’t be as durable. This becomes important when you’re using them every single day.
So once you become an experienced studio photographer, it makes sense to invest in high-quality modifiers.
When you’re learning to use modifiers, however, I recommend choosing cheap versions. They’ll perform just fine, and you’ll save yourself a lot of money.
How to choose the perfect modifier for a photoshoot
Different modifiers affect the light in different ways.
Some modifiers broaden the beam to soften the light. Other modifiers narrow the beam to harden the light.
So when selecting a modifier, ask yourself:
What kind of lighting am I trying to create?
If you’re after the soft, diffused effect you’d get from an overcast sky, you might want to consider one of these modifiers:
If you want the soft light produced by early morning, twilight, open shade, or overcast skies, then choose a modifier that produces soft light such as a scrim, umbrella, or a softbox.
But if you want a harder light source like the sun on a cloudless day, try one of these modifiers instead:
As a general rule of thumb, if you are after hard light, then opt for a gridspot, beauty dish, Fresnel light, or even a naked flash.
Note that, if you’re shooting outside or near windows, your choice of modifier should depend on the ambient light. Harsh sunlight should be combined with hard modifiers, and cloudy light should be combined with soft modifiers.
Make sense?
When picking a modifier, it’s also important to consider the mood you’re after. Soft light gives ethereal, beautiful portraits, whereas hard light tends to be more intense, in-your-face, and dramatic.
Now let’s take a look at the different light modifiers in much greater detail, starting with:
The umbrella
An umbrella creates a quality of light that is soft, abundant, and very forgiving.
Umbrellas are a great choice if you want to light a large area with flat, even lighting. Because umbrellas are easy to use and relatively cheap, they are a good beginner’s light modifier.
On the other hand, umbrellas tend to over-light scenes, spreading lots of light around.
Lots of light. All over the place. Like a hose with its spray nozzle set to “everywhere.”
So think of umbrellas as an only-use-in-case-of-emergency style of lighting. If you overuse them, things tend to get a bit ugly.
An umbrella throws light everywhere.
Types of umbrella light shapers
There are a few types of umbrellas you should consider:
Silver/gold reflective umbrella: These babies throw light everywhere. They are great for lighting large groups of people. The silver umbrella will give you a slightly cooler light while the gold umbrella creates warmer light. Both produce a slightly harder result than the white reflective umbrella.
White reflective umbrella: This umbrella creates soft light with slightly less spread and contrast than the silver and gold reflective umbrellas. Because the style of light allows people to move around a lot while staying in a consistently even source of light, white umbrellas are great to use when you are shooting groups and couples under pressure, such as for an event.
White shoot-through umbrella: These are perfect as your first light modifier, as they diffuse and spread light quite evenly.
White shoot-through umbrella.
Umbrellas are a great first light modifier
When my children were young, I taught them how to ride bikes using training wheels. The wheels boosted their confidence. After a while, I took the training wheels off, and they rode on two wheels as if they’d been doing it all their lives.
I think using flash with an umbrella is the same. Use an umbrella as a learning tool until you get your balance, then move on to a better bike.
A final note on umbrellas
Umbrellas are great for indoor lighting.
But they’re tricky – and even downright dangerous – to use outside.
I’ve had countless (expensive) lights blown over when using umbrellas. So if you must use them outdoors, then please make sure you have somebody holding them or sandbags to keep them in place.
The scrim
After you’ve ditched your umbrella training wheels, the next step is to work with a scrim panel.
A scrim is a square or rectangular frame with a fabric diffusion material stretched across, like this:
Scrims are a really cool way to create large areas of soft, diffused light as if you’re shooting next to a large window or have clouds over the sun. And they’re great for diffusing flash, continuous light, and sunshine.
Remember: The larger the light source, the softer the light.
In fact, of all the light modifiers, a scrim is probably the most versatile and a must have in your kit.
This is a piece of equipment that you can easily make yourself. I used a DIY scrim for my first 10 years as a photographer.
The softbox
Softboxes are low-cost and versatile modifiers that create a beautiful, soft, easily controllable light source.
If I could only pick one light modifier to take to a deserted island, it would have to be the softbox. Small, medium, or large, this little puppy is my go-to light source for 80% of my shoots.
Why? The quality of light is soft, flattering, and malleable. Changing the angle and proximity of the softbox to the sitter easily changes the hardness of the light and the direction of the shadow.
It’s one of the light modifiers that most accurately recreates the effect of soft daylight coming through a window. I think what I like most about this light modifier is that it’s subtle. Highlights gently merge into shadows.
This image of a racecar driver, Glauco Junior Solleri, was taken using a speedlight and a small Lumiquest softbox:
For the above photo, I only wanted to light Glauco’s face and let the background fade to black. If I had used an umbrella, I would’ve sprayed light everywhere, illuminating the entire background and killing my moody vibe.
In fact, I think I love this light modifier more than Nutella.
(There! I said it.)
Softbox options
I use a few different kinds of softboxes depending on where and what I’m shooting.
If I’m doing a studio shoot, I love using a softbox with a white reflective interior. The white interior creates a softer look, and this particular softbox has an extra layer of diffusion on the inside, adding even more softness to the light.
Some photographers remove the interior panel because they like the added contrast of harder light, but I prefer less contrast.
You can also increase the spread and contrast of your light by using silver or gold interior panels.
The beauty dish
The beauty dish differs from other light modifiers because it gives you a distinctive circular, soft-contrast light, which is perfect for lighting faces and defining bone structures such as cheekbones and chin lines.
Beauty dishes also create a circular catchlight in your model’s eyes, which looks quite natural.
(You can see why these modifiers are popular with fashion/beauty and celebrity photographers.)
The downside of beauty dishes is that the falloff from light to dark is very rapid, so you’ll often get shadows under your model’s chin and nose. You can compensate for the shadows by adding a fill board, like a white reflector, to reflect light up into your subject’s face.
The beauty dish I have was pretty cheap, which goes to show that you don’t need to shell out a lot of money for every piece of equipment. I like mine because it works with my speedlight, my Elinchrom monolight, and my battery flashes.
I like that kind of versatility in equipment because it means I have more options on the day of the shoot and less to carry around!
Why should you use a beauty dish?
A beauty dish gives you a certain look. It will light a small area and flatten out your model’s features.
Beauty dishes make people look great, but you need to light your model in a very specific way – from above – to really pull it off.
The gridspot
The gridspot is a bit of kit you can use in conjunction with a speedlight, monolight, or battery-operated flash. The width of the grid and the size of the holes will affect the width of the light beam hitting your subject.
A gridspot creates hard, focused light. I love to use gridspots in the same way I use beauty lights.
Here are some portrait images I did with Australian actor Scott McGregor, showing lighting without a gridspot (left) and with a gridspot (right):
Why should you use a gridspot?
I like using gridspots because they create a similar light to beauty dishes. The light is a bit harder, but gridspots are perfect for single portraits; you can pop light onto someone’s face and shoulders without impacting the background mood.
Gridspots are also perfect for outdoor use as they won’t get blown about.
Beauty dish with a gridspot.
Fresnel light
A Fresnel is a light modifier that can be focused. They were first used in lighthouses, then the technology was developed in continuous lighting for movies and television.
The Fresnel light modifier gives a soft, crisp, and very distinct look to portraits.
In this photo of Australian actor Robbie Magasiva, I’ve placed the Fresnel light slightly to camera right to create a shadow. I’ve softened the light with an umbrella to increase the amount of daylight fill.
Fresnel lighting is soft and crisp, reminiscent of 1940s portrait lighting. It’s a style that has become really popular lately, particularly with fashion and editorial photographers.
The downside of this type of lighting is that it’s pretty expensive.
Octabox
Octabox with the front panel in.
An octabox is what you’d get if a softbox and an umbrella merged into one.
An octabox serves up soft light just like a softbox. But it spreads its light around more, just like an umbrella.
Octaboxes are fantastic for lighting large groups evenly. Plus, they give round catchlights.
Here are two different ways to use the Rotalux Deep Octabox. The image on the left of actor Firass Dirani is shot with a deep octabox as a beauty dish. The light source is hard and drops off rapidly under Dirani’s chin to add contrast; this not only defines and sculpts his features but also gives the image an edgy look.
The image on the right, of actor Harley Bonner, is shot using the same Rotalux Deep Octabox. But this time, I’ve added the interior and exterior baffle to give a much softer light, and this blends in with the muted light and low-key feel I was going for.
I don’t own a standard octabox because I’m not a huge fan. But my Rotalux Deep Octabox offers more directed lighting and is a match made in heaven for lighting single portraits.
Octabox with interior baffle exposed.
Octabox as a beauty dish.
Mixing modifiers
Model credit: Fat Tony and Co. Image courtesy of Nine Network Australia.
I often mix my lighting modifiers to make my images more interesting.
In this television promotional shot I did for Fat Tony and Co., I used a medium-deep octabox as my main light and a gridspot as a hair light. I also added an umbrella for fill light on camera left because the deep octabox alone was too moody, and I wanted more detail in the shadows.
So don’t be afraid to use several different modifiers in a single shot!
A beginner’s guide to light modifiers: conclusion
Well, there you have it!
You’re now ready to use light modifiers like a professional.
So grab a modifier or two, start shooting, and have fun!
Now over to you:
Which of the light modifiers on this list appeals to you the most? Which is your favorite? Share your thoughts (and example images!) in the comments below.
The post A Beginner’s Guide to Light Modifiers (For Stunning Portraits) appeared first on Digital Photography School. It was authored by Gina Milicia.
The post Sigma Announces the 28-70mm f/2.8 – Small, Light, and Well-Priced appeared first on Digital Photography School. It was authored by Jaymes Dempsey.
Earlier this week, Sigma announced its upcoming lens:
The 28-70mm f/2.8 DG DN Contemporary, designed for Sony E-mount and Leica L-mount, and billed as “the world’s smallest f/2.8 standard zoom for mirrorless systems.”
Sigma already sells a 24-70mm f/2.8 ART lens, but the new 28-70mm features a few key improvements, including the smaller size, plus a near-50% weight reduction for an impressively portable package.
Unlike most f/2.8 zooms, the Sigma 28-70mm is ideal for travel photography, street photography, and even casual walkaround photography. I’m not sure I’d label it as truly compact, but it’s certainly small for an f/2.8 zoom, and will appeal to plenty of on-the-go photographers who require both low-light capabilities and flexibility.
If you’ve previously found yourself frustrated by the mirrorless, big-lens-on-a-small-body problem, the 28-70mm may be exactly what you need. Take a look at the lens mounted on a mirrorless body:
The setup looks comfortable, well-balanced, and just all-around nice to use.
Compared to most standard f/2.8 zooms, you do lose a few millimeters on the wide end. Is that a problem? That depends on your shooting style, because the difference between 24mm and 28mm isn’t trivial – you’ll lose out on the opportunity to get that sweeping wide-angle look – but assuming you don’t plan to use the 28-70mm for frequent landscape or architecture shooting, you should be fine.
Sigma claims “superb build quality,” and from the pictures, I can certainly believe it. Check out the 28-70mm f/2.8 up close:
There’s just something about the modern Sigma design that screams quality, and – bonus! – the lens looks pretty darn sleek.
Of course, no great lens is complete without stellar optics, and the 28-70mm f/2.8’s sharpness remains to be seen. But Sigma is confident in the 28-70mm’s performance, stating that “this large-aperture standard zoom delivers outstanding image quality that rivals Art line lenses.”
If Sigma’s evaluation is accurate, then I can certainly see the 28-70 making its way into the bags of quite a few photographers – including the aforementioned travel photographers and street photographers, but also portrait photographers, event photographers, and even landscape photographers who don’t mind the limited focal length.
As for the price, it’s a very reasonable$ 899. That’s cheaper than the Sigma 24-70mm f/2.8 and the Tamron 24-70mm f/2.8 (plus there’s the Nikon and Canon versions for mirrorless, but those are unmentionably expensive).
So if you’re a Sony mirrorless or L-mount shooter and you’re after a compact f/2.8 zoom that won’t put a huge dent in your wallet, the Sigma 28-70mm f/2.8 is certainly worth a look.
It’ll begin shipping on March 12th, but you can currently preorder the Sony version here and the L-mount version here.
Now over to you:
What do you think of this new lens from Sigma? Is it one you’ll consider purchasing? Share your thoughts in the comments below!
The post Sigma Announces the 28-70mm f/2.8 – Small, Light, and Well-Priced appeared first on Digital Photography School. It was authored by Jaymes Dempsey.
The post Beginner’s Guide to Light Painting appeared first on Digital Photography School. It was authored by Bruce Wunderlich.
Do you want to use light painting for stunning results? Do you want to discover all the ins-and-outs of light painting so you can create otherworldly images at night?
You’ve come to the right place.
In this article, I’m going to share everything you need to know about light-painting techniques.
And by the time you’re done, you’ll be able to light-paint your images with ease!
Let’s dive right in.
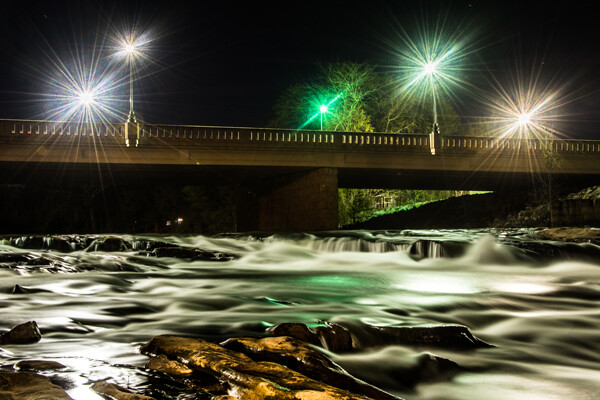
Mill Falls in Logan, Ohio. The main source of light for this scene was the street lights on the bridge over the river. The bridge was light-painted with a high-powered spotlight. I also added light to the rocks in the foreground. The exposure was 69 seconds, and I set the aperture to f/14 to maximize the starburst on the street lights. This image won me a Photographer’s Choice award in the 2014 Shoot the Hills photo contest.
What is light painting?
Light painting is a photography technique that uses a moving light source (e.g., a flashlight) to add light to a subject while taking a long-exposure photograph. A scene or object can be brought to life by painting with a beam of light.
When light painting, you, the photographer, become an entirely different kind of artist. Instead of just capturing an image as it’s presented, you create the image that the camera is capturing.
Now, light painting may take lots of patience and practice to perfect, but the results can be very rewarding.
And it’s important to recognize the simplicity of lighting painting – it’s a lot like any low-light photography, except you are putting an external light source in motion to enhance an image.
Let’s take a look at some of the basics for beautiful light painting photography.
Schoolhouse in the snow. This was a long, 170-second exposure, shot at f/8 (for depth of field) and ISO 100. Notice the light coming from inside the schoolhouse, added from the outside by shining a flashlight through windows at the back of the building.
Tools for light painting
Before you start doing light painting, you’ll need to make sure you have the proper tools:
Camera – Any digital camera capable of manual settings (including Bulb mode).
Tripod – One of the most important tools to produce light paintings. In most cases, your shutter is going to be open for several minutes, and it is very important that your camera does not move during the exposure.
Shutter release – Either use a cable release or a remote shutter release to begin your exposure. If you don’t have either of these, use your camera’s self-timer function to initiate the shot. It is very important that you never touch your camera or tripod during the exposure.
Stopwatch – A stopwatch or some other way of timing your exposures is helpful, since most light-painting exposures will use Bulb mode.
Light source – Many different types of lights can be used for light painting. These light sources are your “brushes” and may include flashlights, torch lights, lasers, glow sticks, flashes, cell phones, and even candles. Just about anything that can produce light can be used for light painting. Note that different light sources will produce different colors of light. For example, an LED light source will produce a cooler (blue) colored light, while a halogen source will produce a much warmer (orange) colored light.
Color gels – Color gels can be used to alter the tint of your light and add color to your painting.
30 seconds | f/8
Camera settings
Now let’s take a look at the best camera settings for light painting:
Mode – Shoot in Manual mode, which allows you to set your shutter speed and aperture.
Image quality – Set your image quality to RAW, which allows you to capture as much information as possible. (This is not a necessity, but it is an important recommendation.)
White balance – If you want to balance out your artificial light source, choose either the Incandescent or Tungsten white balance setting. However, sometimes experimenting with other white balance settings can produce some interesting light effects. Daylight white balance is a good starting point if you want to maintain the original colors of your artificial light sources. Auto White Balance is not recommended.
ISO – Use a low ISO, such as 100.
F-stop or aperture – Stop down to f/8 or f/10, which allows you to get more depth of field and enables you to use a longer shutter speed.
Shutter speed – Set your shutter speed to Bulb mode (your final shutter speed will be determined by the amount of ambient light in the scene).
LCD brightness – Lower the brightness of your LCD preview, because the normal setting is too bright at night and will make your image look bright when it’s actually underexposed.
Histogram – Use your histogram to check your exposure. If the histogram skews heavily to the left, your image is going to be too dark.
Blinkies – Turn on your blinkies (a highlight warning) to help you determine if your highlights are exposed properly. It is perfectly acceptable for your brightest highlights to be slightly clipped if the rest of your image is properly exposed.
Image stabilization – Set this to Off. With your camera on a tripod, having image stabilization turned on can actually fool your camera or lens and cause blurring in your image.
Long exposure noise reduction – The recommended setting is Off. This can be set to On, but it will cause your exposure time to double (because the camera takes a second black exposure to help remove noise). If your camera is set to a reasonable ISO, the noise level will be low enough in most cases that in-camera noise reduction is unnecessary. Still, it is a good idea to check your noise levels in advance, and some older cameras may require this setting to be On to get acceptable noise levels.
This vase was backlit with a candle and I painted the flowers with a small penlight. 30 seconds | f/16 | ISO 100.
Begin with ambient light
The first step – before the actual light painting – is to determine the correct exposure for any ambient light in your scene.
Unfortunately, determining base exposures can be time-consuming when you’re experimenting with three- to four-minute shutter speeds.
Here’s a little trick that can help expedite this process:
Set your ISO to six stops higher than the ISO you plan to ultimately use. For example, if you are planning to shoot at ISO 100, set your ISO to 6400.
With your camera set to ISO 6400, experiment to find out how many seconds you will need for a nice exposure. Every second of exposure at ISO 6400 is equal to one minute at ISO 100.
Once you’ve determined the proper shutter speed at ISO 6400, set your ISO back to 100 and prepare your exposure in minutes instead of seconds. (Many camera’s lowest ISO is 200, so 6 stops higher would be ISO 12800. And if your camera’s lowest ISO is 50, six stops higher would be ISO 3200.)
A 30-second exposure at ISO 800. For this image, I increased the ISO to shorten the exposure to 30 seconds, because a longer exposure would cause a noticeable blur on the stars. Light painting was applied from the front of the subject, without letting the light shine directly back at the camera.
Focusing
Correctly focusing your camera is an important step – and in the dark, it can sometimes be difficult to pull off. The simplest way to get perfect focus is to shine a light source at a spot in your scene that you’ve determined must be in focus.
Then, using autofocus, focus on the light.
Finally, switch your lens from autofocus to manual focus (so that your focus point won’t change).
But remember:
If you move the camera, you must turn your autofocus back on and refocus.
(Back button focusing is another great way to achieve focus when light painting.)
The exposure
At this point, you should have determined your exposure time, and your camera should be focused on your subject.
So now it’s time to begin your exposure and start painting!
Most cameras allow you to set exposures of up to 30 seconds. For exposures over 30 seconds, set your shutter speed to Bulb. Use your cable release or remote to trigger your shutter button. Your shutter will remain open until you press the release again. Use your stopwatch, or the timer on your phone, to time the exposure length.
This vintage 1971 bus was painted using one LED flashlight on the outside, with a second light inside to illuminate the bus interior.
Painting techniques
Light painting is subjective, so you’re free to approach it however you like.
But here is some advice for getting the most impressive results:
Paint from the sides – Don’t just stand behind your camera and wave the light across your image. Painting flat surfaces from the side will allow you to bring out textures.
Use lots of different angles – For instance, when painting the ground, hold the beam low and pan the light along the floor. This will keep the ground from appearing flat, and it’ll bring out all the details of the surface. Also, by adding light from many angles, the resulting image will have an interesting three-dimensional effect.
Don’t stand between the camera and your light source – If you do this, you will show up as a silhouetted ghost in the final photo!
Wear dark, non-reflective clothing and keep moving – Again, you do not want to appear as a ghost in your image!
Don’t shine the light source back at the camera – Otherwise, you’ll create a bright spot in the image.
Use a flashlight with a red filter when you check your camera to make adjustments. The red light will keep you from ruining your night vision.
Different surfaces are going to react to light differently – Wood surfaces may require more light than shiny surfaces such as metal or glass, because rougher surfaces absorb more light than smooth surfaces.
Keep your light moving – Move the beam in slow strokes to add lots of light and make faster strokes in areas where less light is needed.
Paint in up-and-down or side-to-side strokes, just like you’d work with real paint.
You probably won’t get the shot you want on the first try – It may take multiple attempts to get an image that you’re satisfied with. For this reason, try to keep track of how much light you add to each surface. Develop a plan so that you can make adjustments to each exposure until you get the image you’ve visualized.
A beginner’s guide to light painting: Conclusion
I’ve shared lots of tips and techniques to get you started with light painting, but there is so much more you can do with the medium! Be creative and fearless about trying new things.
Once you start to get the hang of light painting, there is no limit to the images you can create – all you need is a camera and a few creative light sources.
Now over to you:
Which of these light painting tips is your favorite? Have you tried light painting before? Do you have any additional tips or tricks for great light painted photos? Share your thoughts in the comments below!
The post Beginner’s Guide to Light Painting appeared first on Digital Photography School. It was authored by Bruce Wunderlich.
The post Weekly Photo Challenge – Light Painting appeared first on Digital Photography School. It was authored by Sime.
We had some great photos for last week’s ‘Wheels’ challenge, this week it’s a bit harder and maybe new for some, we’re going to try our hand at light painting!
Missed a challenge? Go back and do them all! Click Here
Not sure what light painting is, think it’ll be too hard? there’s a full blog post here that we’ve written to help – have a read and then come back and submit your photo!
SEE THE HOW-TO POST HERE
Make sure to include the tags #dPSLightPainting if you share your photo on Instagram or Facebook.
Great! Where do I upload my photos?
Simply upload your shot into the comments field (look for the little camera icon in the Disqus comments section) and they’ll get embedded for us all to see. Or, if you’d prefer, upload them to your favourite photo-sharing site and leave the link to them.
Share in the dPS Facebook Group
You can also share your images in the dPS Facebook group as the challenge is posted there each week as well.
If you tag your photos on Flickr, Instagram, Twitter or other sites – tag them as #DPSWheels to help others find them. Linking back to this page might also help others know what you’re doing so that they can share in the fun.
Follow us on Instagram?
The post Weekly Photo Challenge – Light Painting appeared first on Digital Photography School. It was authored by Sime.
The post How to Shoot in Low Light – 9 Commonly Asked Questions appeared first on Digital Photography School. It was authored by Bruce Wunderlich.
This image of a moonrise over Marietta, Ohio was taken 20 minutes after sunset during the blue hour; the sun had set and the sky was a dark blue. The city lights create a great warm glow over the city.
According to British photojournalist Donald McCullin, “There is no such thing as bad light, just misunderstood light.” Yet many photographers still consider low light to be bad light.
The purpose of this article is to encourage you to not consider low light as inferior or unusable, but to instead look for subjects that work well with the available low light. Shooting in low light can often be a struggle, however, which is why I’ll answer nine of the most frequently asked questions about low light photography.
Keep in mind that low light photography is not exclusively night photography. Low light photography opportunities may appear at any time of the day.
For instance, shooting waterfalls in low light allows you to use a slow shutter speed, prevents overexposure of the white water of the falls, and helps you create a beautiful silky effect (by blurring the moving water).
Using a flash will light up any subject, of course, but let’s take a look at how to improve your photography in naturally-occurring low light.
Low light photography FAQs
Low light creates very dramatic scenes. Dark storm clouds turned this potential sunrise into a great low light opportunity.
1. My low light images are blurry. Would a better lens alleviate the blur?
The short answer to this question is, “Yes.” A fast lens with a maximum f-stop of f/1.8, for instance, will give you better results than a kit lens with a maximum f-stop of f/3.5 or f/5.6.
But even the faster, more expensive lenses will give you undesirable results if you’re using the wrong settings. You see, the wider aperture opening on fast lenses allows you to use a faster shutter speed, which helps you capture a sharper image – but unless you dial in the correct shutter speed, your shots will often turn out blurry anyway!
Lenses with larger maximum apertures are called “fast” because they allow you to shoot with faster shutter speeds, thanks to the additional light that enters your camera through the bigger aperture opening.
2. What are the best camera settings for shooting in low light?
These are the best low light camera settings:
Manual mode
Shooting in Manual mode is essential for successful low light photography, as it allows you to control every functional aspect of your camera.
Once in Manual mode, you basically have three ways to get more light onto your camera sensor:
Shutter speed
Aperture
ISO
These three controls are together called the exposure triangle, and each of the settings can have a positive or negative result on your image’s exposure.
Therefore, learning how to use shutter speed, aperture, and ISO for the best result is the key to low light photography.
Note that your in-camera light meter will reveal where adjustments should be made to the camera settings, and well-exposed images will be the result.
Shutter speed
If you are shooting handheld, a good rule of thumb is to set your shutter speed to match the reciprocal of your focal length.
For example, if you are shooting at 50mm, your shutter speed shouldn’t be any slower than 1/50s. Of course, if the subject of your photo is moving, then you will need to increase your shutter speed to freeze the action. Because while choosing a slower shutter speed will allow more light into your camera, you’ll also risk getting a blurry result.
A great blue heron in a fight was the subject of this low light image. I shot this at 1/250s, f/5.6, and ISO 1250. Using a combination of a slower shutter speed and a higher ISO, I was able to create the blurry wings while panning to match the speed of the fight.
Aperture
In most low light situations, you will probably need to shoot with your aperture wide open.
But if there is enough light to shoot with a smaller f-stop, you’ll get an increased depth of field.
So here’s what to consider:
Choosing a wider aperture will let more light into your camera, but will decrease your depth of field. And this could lead to an important part of your image being out of focus.
So what should you do?
Generally, it’s better to risk an out-of-focus shot than to guarantee a blurry one – so, if necessary, widen that aperture!
ISO
The higher the ISO, the brighter the resulting shot.
But there’s an important trade-off here:
The higher the ISO, the more digital noise you’ll be adding to your image.
So keep your ISO as low as possible, and only increase your ISO after you have decreased your shutter speed and widened your aperture.
Shoot in RAW
For the best results, shooting in RAW is recommended.
This is for one simple reason: Your camera will save more shadow detail in RAW format compared to the compressed JPEG format.
Also, it is very helpful to learn how to check your histogram; that way, you don’t have to just rely on what you see on your camera’s LCD screen. Use the histogram to check your exposure, and avoid clipping the highlights and shadows.
I used the low light at Huntington Beach, California to create this black and white image with a five-second exposure.
3. How do I take low light action shots?
Shooting action in low light can be very challenging, and it is almost always going to require you to shoot with your aperture at its widest setting.
Once your aperture is set, adjust your shutter speed to match the action you are trying to freeze. Of course, depending on the situation, there may simply not be enough light. If that is the case, adjust the ISO to a higher setting until a good exposure is set. If your ISO setting is so high that you are getting an unacceptable amount of digital noise, you have two options:
Either add light with a flash or some other source, or live with the noise and try to remove some of it in post-processing.
Sometimes, with the noise issue, it comes down to getting the shot with noise versus not taking the shot at all.
4. How do I reduce the digital noise level in low light images?
The simple answer to this question is to shoot at the lowest ISO that you can. But it is also a good idea to know the ISO at which your camera produces noise that you consider unacceptable.
And always make sure your exposure is correct. Even at a low ISO, if your image is underexposed, you will have some noise in the shadow areas.
A cloudy day at Blackwater Falls, West Virginia allowed for a long exposure without blowing out the highlights.
5. How do I focus in low light?
Another reason for blurry images in low light is the fact that some cameras just aren’t manufactured to focus properly with less light.
So what should you do?
Try shining a light on your subject to give your camera enough light to focus. You can also use your lens’s focusing ring to fine-tune your focus.
Focusing via the central AF point may also help, as it usually focuses faster and more accurately than surrounding AF points.
6. How can I take pro-like images in low light?
Here are four things that most pros do in low light:
Use a tripod
Shoot in RAW
Shoot in Manual mode
Use the histogram
Low light makes for great silhouettes!
7. How do I choose the best white balance for low light?
Set your white balance to match your environment:
Tungsten for photographing indoors with light from a regular lightbulb
Fluorescent for light from fluorescent bulbs
Cloudy for low light created by an overcast day
Shade for shooting in a shaded or shadowy area
One thing to remember:
If you are shooting in RAW, you can adjust your white balance later in post-processing.
But if you are shooting JPEGs, it is very important to get your white balance correct in-camera. For this reason, if your camera is set to capture JPEGs, you should not use the automatic white balance function. White balance is hard, and sometimes impossible, to correct later in a JPEG.
8. Should I raise my ISO or lower my shutter speed in low light?
Assuming that you are shooting with your aperture wide open, in most situations this is an easy one to answer:
Adjust your shutter speed!
And only raise your ISO as a last resort.
Remember that raising your ISO is going to add more noise into the image.
Now, most new DSLRs do a much better job with noise levels at higher ISO settings. But as I mentioned earlier, it is a good idea to know what noise levels are unacceptable, and what ISOs these correspond to. In situations where your subject is moving, it may become necessary to boost the ISO to keep your shutter speed fast enough to freeze the action.
Fog created the low light conditions in this fall image.
9. Why aren’t my low light shots sharp even when I use a tripod?
Remember that, in most low light, you will be shooting with your aperture wide open (or nearly so).
Hence, your depth of field will be very shallow (which can lead to blurry results).
So be extra careful to lock your focus (you can even try back-button focus) on the part of your scene that needs to be in sharp focus.
Case in point:
When shooting a low light portrait, it is important to have the subject’s eyes in focus. So focus on the eyes!
Also, if your subject is moving, increase your shutter speed until the subject is frozen by your camera. And when shooting with a tripod, make sure your camera’s image stabilization is turned off, because it can actually create blur!
10. A bonus tip
In low light, the LCD screen on the back of your camera is going to look very bright – and this will give you an inaccurate sense of your photo’s exposure.
So if your camera has an adjustment for the brightness of your LCD screen, turn it down. You want to ensure your image will not seem overly bright when you view it!
How to shoot in low light: conclusion
The trick to low light photography is to take control of your camera, and know that every action or setting will have a reaction.
Now, how is that different from photography in any other type of light?
It’s not, really. Just consider photography in low light as an opportunity to be creative.
Now over to you:
What subjects do you like to shoot in low light? And do you have any low light shooting tips? Share your thoughts in the comments!
The post How to Shoot in Low Light – 9 Commonly Asked Questions appeared first on Digital Photography School. It was authored by Bruce Wunderlich.


You must be logged in to post a comment.