Blog

  • Hasselblad to open first own branded retail store

    Camera manufacturer Hasselblad will be opening its first own retail store on 30th June. The store will be located at the Fotografiska center for contemporary photography in Stockhom, Sweden and carry the full range of Hasselblad cameras, lenses and accessories, encouraging visitors to explore the Hasselblad brand. Hasselblad and Fotografiska will also partner to host photography workshops for both amateur and professional photographers.

    Johan Åhlén, Chief Marketing Officer of Hasselblad, said: “Our cameras were born from a love of photography and we are excited to partner with Fotografiska to spread our passion and inspire a more conscious world through the power of photography. Our new store and workshops represent our commitment to Hasselblad users and our desire to enhance the future of photography.”

    Per Broman, founder of Fotografiska, said: “We are honoured to collaborate with an iconic Swedish camera brand like Hasselblad on the opening of its first store. We share the same values and devotion for photography and together with Hasselblad’s renowned technical excellence and creative vision, we aim to welcome photography enthusiasts around the world. It is a perfect match for our 535 000 guests who visit us every year for inspiration via the very inclusive art form of photography.”

    The shop’s location at the entrance of Fotografiska looks like a perfect choice for Hasselblad. The center has an exhibition space of 2,500 square meters and features four major and between 15 and 20 minor exhibitions per year. Past highlights include exhibitions of the works of such renowned photo artists as Annie Leibovitz, David LaChapelle, Anton Corbijn as well as Hasselblad ambassador’s Erik Johansson, Hans Strand and Cooper & Gorfer.

    Press Release:

    2017-06-27

    Hasselblad partners with Fotografiska in Stockholm to open its first Hasselblad branded store

    On 30th June Hasselblad will be opening its first own retail store. The store will be located at Fotografiska in Stockholm, a centre for contemporary photography. The Hasselblad store will be home to a full range of Hasselblad cameras, lenses and products, while encouraging visitors to explore the Hasselblad brand.

    Hasselblad and Fotografiska represent and showcase the world’s best photography. The collaboration will enable Hasselblad and Fotografiska to provide access to a full range of Hasselblad cameras, while also sharing their joint knowledge on the expertise and art of photography. The two companies will also partner to host inspirational photography workshops to help develop both amateur and professional photographers’ skills.

    Johan Åhlén, Chief Marketing Officer of Hasselblad, said: “Our cameras were born from a love of photography and we are excited to partner with Fotografiska to spread our passion and inspire a more conscious world through the power of photography. Our new store and workshops represent our commitment to Hasselblad users and our desire to enhance the future of photography.”

    Per Broman, founder of Fotografiska, said: “We are honoured to collaborate with an iconic Swedish camera brand like Hasselblad on the opening of its first store. We share the same values and devotion for photography and together with Hasselblad’s renowned technical excellence and creative vision, we aim to welcome photography enthusiasts around the world. It is a perfect match for our 535 000 guests who visit us every year for inspiration via the very inclusive art form of photography.”

    The shop will be located at the entrance of Fotografiska, an international meeting place where everything revolves around photography. The museum has an exhibition space of 2,500 square meters, and features four major exhibitions per year and approximately 15-20 minor exhibitions. Past exhibitions have showcased the work of Annie Leibovitz, David LaChapelle, Anton Corbijn as well as Hasselblad ambassador’s Erik Johansson, Hans Strand and Cooper & Gorfer.

    To discover more about the collaboration, visit fotografiska.eu/Hasselblad.

    Articles: Digital Photography Review (dpreview.com)

  • Announcing…our mid year sale! Starting with ebooks and posing guides for $9

    If you’ve been eying off one of our photography eBooks, courses or presets packs – this week you’re in luck because today we kick off our mid year sale where we’ll be offering you some amazing discounts on dPS products as well as some special offers from our partners.

    If you’re subscribed to our newsletter you’ll get notified of each of the deals as they come out but while you’re reading this – let me tell you about todays deal.

    DEAL 1: All dPS eBook are just $ 9 USD

    To get our mid year sale started, we’re offering all our ebooks and posing guides at just $ 9 each.

    That’s up to 80% off what yo’d normally pay!

    There are 23 eBooks and posing guides to choose from on everything from understanding the basics of your camera to portrait lighting as well as how to use natural light and improving your post production of your landscapes and much more.

    Here are 3 of our most popular ebook guides:

    • Going Pro. Normally $ 49, get it today for just $ 9 (USD)
    • Living Landscapes. Normally $ 19, today just $ 9 (USD)
    • Portraits: Making the Shot. Normally $ 19, today just $ 9 (USD)

    But that’s just scratching the surface of what is on offer – be sure to checkout all 23 titles here to find the guide that will take your photography to the next level.

    Whether you pick up just one of our titles or pick the whole library – this is a fantastic way to invest in your photographing learning – but don’t wait long – this deal only lasts another 30 hours so don’t delay.

    The post Announcing…our mid year sale! Starting with ebooks and posing guides for $ 9 by Darren Rowse appeared first on Digital Photography School.


    Digital Photography School

  • Samsung launches ISOCELL image sensor brand

    Samsung Electronics has introduced its image sensor brand ISOCELL at the 2017 Mobile World Congress (MWC) Shanghai. Samsung originally launched the ISOCELL technology, which reduces crosstalk between pixels through physical barriers, in 2013 and has now decided to use the moniker as a brand name.

    “Samsung ISOCELL is a brand that represents the essence of our leading pixel technologies. We expect the ISOCELL brand to help consumers easily acknowledge and confide in camera performance as well as overall quality of the device,” said Ben Hur, Vice President of System LSI marketing at Samsung Electronics. “With our advanced image sensor technologies, Samsung will continue to bring innovation to cameras used in smartphones and other applications.”

    ISOCELL sensors comprises four sub-brands: Bright, Fast, Slim and Dual which are tailored to specific mobile device market demands:

    • ISOCELL Bright sensors deliver bright and sharp images with high color fidelity and reduced noise in low light environments
    • ISOCELL Fast sensors provide fast autofocus onto still or moving objects even when dark
    • ISOCELL Slim sensors adopt the smallest pixel sizes available in the market at 0.9-1.0um, yet produce high quality images for the slimmest devices
    • ISOCELL Dual sensors can be mixed and matched in various combinations on consumer devices to bring about features demanded in the latest dual camera trend

    The latter works in a similar way to the dual-camera modules in more recent Huawei high-end phones. combining an RGB with a monochrome sensor. If the rumors are true we will see the ISOCELL Dual sensors for the first time in the upcoming Samsung Note 8 which is likely to be launched around the IFA trade show in Berlin at the beginning of September.

    Articles: Digital Photography Review (dpreview.com)

  • 4 Tips for Post-Processing Images on the Road

    In this article I will share some of my tips for post-processing your images on the road or while traveling. That way you can share images and keep up on social media. Let’s see why that’s important.

    Social media pressures

    Much can be said about social media and its influence on photography. But the hard truth is that for many of us we live under a constant pressure to regularly release new content on various platforms, such as Instagram. Studies show that posting an average of one image per day is what will result in the highest engagement amongst current (and new) followers.

    One can say that social media has become just as much about documenting as about presenting your finest work. But still, you do want to maintain a certain quality of your images.

    Tips for Post-Processing Images on the Road

    An image I processed from the back of our rented caravan on Iceland

    In this article, I’ll share several tips on how you can keep up with the pressure of posting new content while being on the road and how you can make sure that the images you post during that period are still of a quality that reflects positively on your overall gallery.

    Why Post on the Road

    Before we get into the tips on how you can process your images on the road, let’s quickly look at why you want to keep posting new images when you’re traveling.

    As I mentioned above, studies show that posting an average of one image per day is what will bring the highest engagement amongst current and new followers. If social media is a big part of your marketing strategy then you should attempt to maintain this average. Of course, there’s no big harm in missing a day or two every now and then but if you’re absent for a week, or even more, you quickly loose engagement with your followers.

    Since most photographers follow a lot of people on social media (both friends and people who inspire them), it won’t take much to forget about you and your work, making it harder to regain their engagement on your images.

    Tips for Post-Processing Images on the Road

    I chose to quickly process this in Lightroom to share something on my Facebook page related to my current travels.

    So, if you’re traveling for a week or longer, it’s a good idea to keep posting new content as often as you can in order not to lose too much engagement.

    4 Tips for Post-Processing on the Road

    The four tips I’ll be sharing will require that you have access to a laptop (or computer) with your preferred editing tool installed. Normally, when I travel I tend to always bring my laptop (except for shorter trips) so that I can quickly process some images on the road and document my current travels.

    That being said, the images that I process on the road rarely become portfolio worthy shots and I will go back and reprocess them later on when I’m back at my desk and have access to the equipment I prefer working with.

    #1 – Calibrate your Monitor

    It’s most likely that your processing images on a laptop when you’re on the road. If you’re a serious photographer and you spend time fine tuning your images it’s also likely that at some point you’ve calibrated the monitor on which you’re working regularly. (If you haven’t calibrated your monitor before I strongly recommend investing in a tool such as Spyder 5 Elite and calibrating ASAP!)

    Tips for Post-Processing Images on the Road

    I use the Spyder 4 Elite to calibrate both my monitor and laptop (also my iPad when I had one).

    However, it’s not only your main monitor that should be calibrated. If you spend time processing images on your laptop as well, it’s equally important that it is calibrated too. You don’t want to process an image and then later realize that the colors are all off, right?

    #2 – Find the Time

    Time is often limited when you’re on the road as most of the day is either spent traveling, exploring, scouting or photographing. Still, I recommend trying to find the time to process at least one image during the day. This could be while you’re having lunch at a cafeteria or even quickly before going to sleep.

    When processing images on the road it’s not crucial to focus on the details. Instead, spend a few minutes in a software such as Adobe Lightroom and adjust the highlights, contrast, and white balance. Often, you don’t need to make big adjustments for an image to look okay.

    Tips for Post-Processing Images on the Road

    A quick edit done in Lightroom to show the amazing light we had that particular evening. I later reprocessed this image to better suit my style.

    If you’re pressured to upload images on the road (this could even due to a client request) it’s better to have something to put out, and then reprocess it when you’re back home.

    #3 – Find Balanced Light

    If you’re like me and would rather spend a night in a tent or campervan than a hotel, finding a place to process your images isn’t always the easiest. Most places outside are challenging due to harsh light reflecting on your laptop, making it difficult to properly see how the adjustments are applying on the image.

    Try looking for a shadowy area to work in, or if you can’t find one, make your own. This may sound (and look) stupid but using a jacket or something similar to cover yourself and the laptop will make it easier to view the screen and see how you’re processing the image.

    #4 – Use Presets

    To be quite honest, presets are something I very rarely use. In fact, I don’t think I’ve ever used them more than a handful of times. However, I do see the value of them when you need to quickly get content out and you have a certain style to your images.

    Tips for Post-Processing Images on the Road

    I used the dPS LR presets to process this image from Germany.

    Presets are the quickest way to process your images and in many cases, they do a good job. Just make sure that the particular preset works well for the image you’re working on, and if needed, make some minor adjustments.

    Last Words

    As I’ve mentioned several times in this article, and I want to end with saying, that processing on the road should only be done in order to continuously upload new content on social media either to document, engage or to satisfy a client. The images you sell or include in your portfolio should be reprocessed, as you’ll most likely notice a few errors when you return back home and have more than a few minutes to process the image.

    Love it or hate it but this is the world that we (or at least many of us) live in today! How do you work on the road? Do you have any other post-processing tips for when you’re away from home? Please share in the comments below.

    The post 4 Tips for Post-Processing Images on the Road by Christian Hoiberg appeared first on Digital Photography School.


    Digital Photography School

  • Analog revival rolls on: Rollei Vario Chrome slide film coming soon

    Dear film photographers! Rollei Vario Chrome 135-36 is a medium to high-speed color reversal film that is intended for photography under low-level daylight illumination or under other light sources using proper filtration. Rollei Vario Chrome has a medium degree of sharpness, its image results are characterized by a slightly visible grain and a warmish image tone. As the name of the film suggests it has a broad exposure latitude from 200 to 400 ISO (DX coded at 320 ISO). If you intend to project the slides we suggest to shoot the film at 200 ISO whereas 320-400 ISO is preferable for scanning applications. Pre-sale will start next week on Monday July 3rd. We expect the supplies to arrive in week 28 so that we’ll be able to start shipping between July 10th and 14th. We hope you’ll like the film as much as we do and thank you all for the support.

    A post shared by macodirect (@macodirect) on

    Well this is some unexpected, but exciting news: German photography shop and producer of Rollei-branded film, Maco Direct, has announced Rollei Vario Chrome 135-36. It’s an ISO 320 color reversal film stock with medium sharpness and a warm tone, which sounds perfect for grey Seattle days.

    That brings the count to four new, reformulated or resurrected film stocks that will become available this year. The others include: Kodak Ektachrome, Ferrania P30 b/w film, and a reformulation of LomoChrome Purple 400 film. Not to mention Lomography also announced three new single-use cameras and German film maker ADOX announced it will doubled the size of its film plant. All this means more options for analog diehards.

    You can pre-order a roll (or more) of Rollei Vario Chrome come July 3rd, and orders will begin shipping as soon as the middle of the month. Of course, it makes some sense to wait and see what images from this new film look like, unless you’re the gambling type. In that case, please share your results as soon as possible.

    Has this Rollei news whet your appetite for film? Here are 10 excellent, affordable film cameras that are easy to track down and get started with.

    Articles: Digital Photography Review (dpreview.com)

  • 10 Must-Have Photography Accessories

    You finally have your new camera and after the first few weeks of taking it out, you begin to realize that there may be other things that you need. Sometimes it is hard to know what photography accessories are really necessary and which are more “nice to have” items. It’s certainly possible to spend a lot of money on extra photography gear so it pays to put a bit of thought into it.

    Of course, what you need will depend on the kind of photography you will be doing. A landscape photographer will need lots more things than a city street photographer. A studio portrait shooter will have a whole shopping list of expensive lights and stands required (not to mention the studio space in which to put it all).

    But let’s start at the beginning, what are the most basic and necessary photographic accessories.

    1. Extra Camera Batteries

    Having a spare camera battery is a lifesaver, especially if you have remembered to charge it in advance. There is nothing worse than running out of power for your camera when you are away from home. You can choose to buy the branded battery to suit your camera, but there are also more cost effective third party options. My preference is to stick with branded, I have found they perform better over the life of the battery.  Feel free to run your own experiments though.

    For anyone shooting in very cold weather, it’s recommended that you have several batteries and some way of keeping them warm. Very cold weather chews through battery power, as do taking long exposures or lots of burst shooting.

    Necessary Photography Accessories

    2. Spare Memory Cards

    Opinion is divided on whether you should have a few high capacity memory cards, or several smaller capacity ones. The theory is if a card gets corrupted, with a smaller capacity card you run the risk of losing less images. Check which memory cards are recommended or preferred for your camera as there are several brands available, but not all perform at the same level.

    Check the speed of the card as well, if you are likely to do a lot of fast shooting. How well the card can process those bursts of images can have impact on the performance of your camera. If a card is too slow you will get buffer overuns as the card struggles to keep up saving all the frames.

    Necessary Photography Accessories

    Once you have several memory cards, it also makes sense to have some way of organizing and storing them. Some people have different systems to indicate when cards are full or empty. Come up with a plan so you know which cards are exposed and which are ready to go.

    Necessary Photography Accessories

    3. A Camera Bag

    I am quite convinced that the perfect camera bag is like the Holy Grail – impossible to find. Everyone has different requirements which mean there is no one solution. Backpacks, roller bags, sling bags, waist packs, straps, clips, belts, and body harnesses are all available options.

    Necessary Photography Accessories

    My sling bag for walking around the city, or times I only want to take the very basics.

    There are so many choices and it can be easy to get confused, here are a few things to keep in mind when shopping for a camera bag:

    • Look for good padding in the shoulder straps.
    • That the bag is the right length for your back (I am an average height woman and a lot of bags are too long for me).
    • It has enough pockets to keep useful stuff like filters and batteries and for them to be easily accessible
    • The bag is as light as possible.
    • How does it behave when you put it on the ground, does it tip over?
    • That it is waterproof (water resistant material, flaps over the zips and the best bags come with a built in rain cover).
    • There is enough room to store all your stuff safely with sufficient padding and dividers.
    • There are good cheststraps and waist belts on backpack style bags (they take up a surprising amount of the load off your shoulders if you use them).

    Over time you will probably try several different styles of bag until you find an option that is the best compromise for what you want versus what you can find.

    Necessary Photography Accessories

    My main bag is a backpack, the F-stop Kashmir designed for women. This is the closed position.

    Necessary Photography Accessories

    Backpack in the open position. Different bags can be accessed in different ways.

    4. Footwear

    Pretty much everywhere you go with your camera will involve some form of walking for able bodied people. This means you need to have good supportive comfortable footwear which is suitable to your conditions. Don’t forget good quality socks as well (my preferred brand is Thorlo). When looking for shoes or boots take into consideration weight, fit, comfort, flexibility, waterproofness and of course the price.

    Necessary Photography Accessories

    These shoes are very light and breathable, however they are not very waterproof and the soles can be a bit slippery on wet rocks. But they are super comfortable to wear all day, which is the most important thing.

    Heavy boots are really tiring to walk in for long periods but you might need them for really cold weather. Depending on the type of walking and situations you will encounter, you may even consider more than one set of footwear.

    5. Jackets and Outer Layers

    Modern technology has made outdoor clothing very light, and it is recommended that you build up layers to adjust to changing conditions. Being too hot and sweating in very cold conditions is uncomfortable but also may contribute to hypothermia, particularly if wind chill is a factor.

    Necessary Photography Accessories

    Hunters Element hunting jacket in green, and Kathmandu grey windproof jacket.

    So build up a selection of light technical layers you can wear or carry easily in your bag or pocket. I have three jackets, the grey one is very light and warm and scrunches down into all the corners of my pack.  The green jacket is a heavier hunting jacket that has excellent wind protection, with huge pockets in the front. Not shown is a rain shell to layer over the grey jacket for added dryness protection.

    6. Extra Protection

    Hats and gloves are also a necessity to keep you warm and dry. Particularly if you are outside doing landscapes or nature photography and you are sitting still for long periods. Again, layering up is useful, pictured are my thin windproof but quite warm gloves, with some heavier gloves to put on over top. The heavier gloves make it difficult to use the camera, which is why two layers of protection help me to function and stay warm.

    The bottom half also needs protection. These are rain trousers that are designed to pull on over top of your standard leg layers.

    Necessary Photography Accessories

    Your backpack and camera also deserve consideration for protection as well. Pictured below are my orange backpack rain cover and a rain cover for my camera that allows shooting in the rain.

    Necessary Photography Accessories

    7. Tripod

    Unless you are a hardcore street photographer (needing to be light and mobile) then a tripod will likely be a requirement at some point. Necessary for sharp landscape images, long exposures, astrophotography, macro and all kinds of studio work.

    A tripod requires two components to work – the legs and the head. Sometimes you can purchase them bundled together, or you may wish to purchase them separately to suit certain requirements. Here are some key things to look for in a tripod:

    • Are the legs tall enough for you? I was surprised to find many tripods too short for me at 5’6″ – having the right sized legs makes it easier on your neck and reduces the need to use the center pole.
    • Does the center pole adjust to horizontal mode? Very useful for doing still life and macro work.
    • Is it a clip or a twist-lock type of leg extension? People prefer different options – wildlife photographers often use twist-lock legs as they are quieter.
    • How heavy is it? Carbon fiber is the lightest option, but it is also very expensive and in comparison, not always that light. Plus a heavier tripod offers more stability when used outside.
    • Is there at least one leg wrapped? Carrying a bare metal pole on a cold frosty night is unpleasant.

    Tripod head

    Tripod heads come in many variations as well. Ball and socket are quite common but take two hands to utilize. A good quality head will be made out of solid material and be strong enough to hold your camera and its heaviest lens at a variety of angles. Do your research on weight tolerances and creep before purchasing.

    Additional tripod accessories worth considering are L-plates for your camera body, and if you are into macro, nodal rails as well. Also learn how to take your tripod legs apart and clean, especially when used in water or in the ocean.  This will extend the life of your tripod and save you money.

    Take time to invest in a good tripod/head combination and it will last you for many years.

    Necessary Photography Accessories

    Manfrotto legs with an Acratech head. My preference is for click adjustable legs.

    8. Camera Manual

    It’s small and light and easy to tuck into your camera bag and really handy to have when you need it. It may never get used, but it’s good to have on hand. Take your camera manual with you!

    Necessary Photography Accessories

    9. Card Reader

    There are several different ways to transfer data from your camera to your computer. Some new camera bodies have wireless, or can be connected via a cable to the computer for data transfer. However, that tends to chew up battery power quite quickly on the camera.

    My preference is to use a USB card reader. USB 3 or the newer USB-C provide fast data transfer for those in a hurry. Additionally having a small portable reader allows you to take it with you when traveling, allowing you to download on the road.

    Card readers are cheap, light, easy to pack and come in really useful when traveling. Get one with lots of different ports to cover any requirements.

    Necessary Photography Accessories

    Necessary Photography Accessories

    10. Other Useful Stuff

    There are other non-photo things that are useful to have around as well such as; change for parking meters or entry fees, a compass, sunscreen (mine is on a carabiner clipped to the outside of my backpack for easy access), and a pen and paper is always useful.

    Other items that may come in handy are; business cards, model release forms, snacks, your cell phone loaded with a variety of useful apps, and the list goes on.

    Conclusion

    What you need in terms of photography accessories will depend on the type of photography you do and where you do it. This list should cover the basics that any new photographer is likely to need, or at least might need to think about investing in at some point. Being aware of your options is important as good bags and tripods can be expensive, so you will need to budget for them.

    Many people forget about their own personal comfort and think cheaper clothing options will be okay. For general purpose photography that may well be the case, but anyone heading into nature should be as prepared as they can be. Good quality outdoor clothing will last and be an investment. No one wants to miss a sunrise because they were cold and wet and in an unpleasant situation.

    Remember to look after yourself as well as your camera gear.

    The post 10 Must-Have Photography Accessories by Stacey Hill appeared first on Digital Photography School.


    Digital Photography School

  • Blackmagic Design slashes Video Assist prices

    Blackmagic Design has dropped the prices of its Video Assist external monitor/recorders for a limited time. The smaller, 1080-capable model with its 5″ screen has $ 100 knocked off its price, taking it down to $ 395 while the 7″, Video Assist 4K drops $ 300 to a price of $ 595.

    We recently took a look at the benefits of using an external monitor/recorder, and have been pretty impressed with our experiences of using the Video Assist 4K thus far.

    The company has given no further details of the firmware update which promises the addition of Waveform and Vectorscopes, which was due to be released in June. We’ll be publishing a review once the update is available.

    Press Release:

    Blackmagic Design Announces Summer Special Price for Video Assist and Video Assist 4K

    Fremont, California – June 27, 2017 – Blackmagic Design today announced a new summer special promotion for Blackmagic Video Assist and Blackmagic Video Assist 4K. During this promotion, customers can save US$ 100 on the purchase of a Blackmagic Video Assist, and US $ 300 on the purchase of a Blackmagic Video Assist 4K. That means Blackmagic Video Assist can now be purchased for only US $ 395 and Blackmagic Video Assist 4K can be purchased for US$ 595 from Blackmagic Design resellers worldwide while stocks last.

    The Video Assist summer special makes it easier than ever for customers to add professional monitoring and broadcast quality recording to any SDI or HDMI camera. With the new summer special pricing for limited stock, customers will be able to buy a Video Assist for each of their cameras.

    The Blackmagic Video Assist family of products gives customers better monitoring and higher quality recording than is available on many cameras. Older cameras often feature custom and hard to use file or tape formats, while lower cost consumer cameras often have poor quality file formats and small screens, limiting their professional use. Blackmagic Video Assist solves this problem because it works with every type of camera from DSLRs to older tape based camcorders, and even the latest digital film cameras. Customers get a large professional on set monitor, along with 10-bit broadcast quality ProRes and DNxHR recording.

    In addition to professional monitoring and recording, the Blackmagic Video Assist 4K model will also support powerful built in scopes such as a waveform monitor, RGB parade, vectorscope and histogram in the upcoming Video Assist 2.5 Update, along with extremely high fidelity audio recording and microphone inputs.

    “Video Assist is an incredibly versatile tool and has become an indispensable part of everyone’s production kit,” said Grant Petty, Blackmagic Design CEO. “It’s the perfect portable field monitor and recorder, and now customers can get them at an even lower price so they can add them to all of their cameras while stocks last!”

    Blackmagic Video Assist 4K Key Features

    • 7 inch LCD touch screen with 1920 x 1200 high resolution monitor.
    • Professional 10-bit 4:2:2 ProRes or DNxHD recording up to Ultra HD 3840 x 2160p30
    • Dual high speed UHS-II SDHC card recorders use readily available, inexpensive SD card media.
    • Dual recorders allow non-stop recording and provide a backup if one fails.
    • 2 mini XLR connectors with 48V phantom power for connecting microphones.
    • -128dBV electrical noise floor for high quality audio recording.
    • LANC connection for remote control.
    • Auto start/stop recording using HDMI or SDI triggers.
    • Includes slots for 2 hot pluggable batteries as well as 12V DC power input.
    • Full compatibility with editing software such as DaVinci Resolve, Final Cut Pro X, Avid and Premier Pro.
    • All in one design, mount to cameras, hold in your hand or set up on a table with the included kickstand.
    • Includes 6G-SDI input allowing it to be used as an Ultra HD monitor.

    Blackmagic Video Assist Key Features

    • 5 inch LCD touch screen with1080p high resolution monitor.
    • Professional 10-bit 4:2:2 ProRes and DNxHD recording in HD.
    • Includes slots for 2 hot pluggable batteries as well as 12V DC power input.
    • Full compatibility with editing software such as DaVinci Resolve, Final Cut Pro X, Avid and Premiere Pro.
    • All in one design, mount to cameras, hold in your hand or set up on a table with the included kickstand.
    • Includes 6G-SDI input with downconverter allowing it to be used as an Ultra HD monitor.

    Availability and Price

    Blackmagic Video Assist is available for US$ 395 and Blackmagic Video Assist 4K is available for US$ 595 during the Summer Special promotion, with limited stock now available from Blackmagic Design resellers worldwide.

    Articles: Digital Photography Review (dpreview.com)

  • How To Shoot A Compelling Photo Essay

    I frequently encourage people who attend my photography workshops to approach the day as though they have been assigned to shoot for a magazine editor and need to provide a strong series of images for a photo essay. One of the locations we visit is the local fresh market here in Chiang Mai, Thailand, so I’ll use images from this market to illustrate the point in this article.

    How To Shoot A Compelling Photo Essay

    The time it takes you to create a photo essay may be determined somewhat by your chosen subject. If you’re photographing your child’s birthday party, a social gathering at work, or a football match, you will have time constraints. With other subjects, you may have the luxury of being able to return many times over a period of days, weeks, or months to continue building your pictorial story. Whatever you choose as your subject you will be able to apply the points in this article to help you produce a strong series of photographs that a picture editor would welcome.

    Approach to making photo essay

    There are two main ways of approaching a photo essay – thematically or narratively.

    How To Shoot A Compelling Photo Essay

    I’ve chosen a series of images for my photo essay here with a thematic structure, showing the market as the overall theme. You may like to choose a narrative structure and tell a story with a beginning, middle, and end. To follow a narrative storyline at the markets I could choose to follow someone who arrives to do the buying for their restaurant, follow one of the porters who haul produce for shoppers or spend time with a vendor documenting their daily routine.

    Whether you take a thematic or narrative approach, applying some basic guidelines to the way you shoot and how you make your final selection of photos will result in a strong series of images.

    You want to look for three types of images; wide, medium, and close-up. By shooting these three image types you will build up a broader perspective on your subject.

    Wide Shots

    Photo essay tips 01

    At a market, I’m always looking to capture a great wide shot showing the lively hustle and bustle and feel of the overall vibe of the market. This is difficult to capture because I have no control over what’s happening. It’s important in situations like this to take your time. Find a good location where the lighting and background are pleasing and you will not be obstructing anyone, and shoot a lot. Be observant.

    Watch and see the flow of what’s happening and anticipate the best time to shoot. If your chosen subject is more static you might want to include a single prominent feature in some of your wide shots. For example, if you are making a photo essay of your local park, try including one of the park benches, a drinking fountain, or a flowerbed in your wide compositions rather than taking just a wide shot with no main focus.

    Medium Shots

    Medium shots are best composed with one main subject as the focus, and including relevant aspects of the location as well. These shots will show a more intimate view of your subject, draw the viewer deeper in, and help them connect with your story.

    At the markets, I like to shoot environmental portraits, often of the people who work there. Including some of their surroundings supports the theme by developing the context of my story.

    How To Shoot A Compelling Photo Essay

    Showing the mango vendor with her cart, produce, scales, and umbrella helps build the essay more than if I was to crop in tight and to make a portrait of only her.

    How To Shoot A Compelling Photo Essay

    Including some action in these shots makes for interesting photos too, as with this photo (above) of the butcher sharpening his knife. Neither of these photos was posed, but sometimes it’s a good idea to take a little control of the situation and ask someone to pause so you can make a portrait.

    How To Shoot A Compelling Photo Essay

    I asked this fishmonger with the lovely smile tray of smoked mackerel to pose for me.

    Close-Up Shots

    Coming in close to capture the details will definitely add depth to your photo essay. Look for elements to include in your close-up compositions that others may overlook. Single colors, patterns, and textures all work well as close up shots.

    How To Shoot A Compelling Photo Essay

    How To Shoot A Compelling Photo Essay

    How To Shoot A Compelling Photo Essay

    How To Shoot A Compelling Photo Essay

    The neatly stacked fish in the blue plastic tub, the basket of (live) frogs, the bundle of soup ingredients for 5 baht and the bunch of flowers made from pandan leaves all add variety and interest to my market photo essay.

    If you’re photographing a birthday party your close-up shots may be of the detail on the cake, some of the wrapped or unwrapped gifts, or tightly cropped happy children’s faces. Look for detail shots which fit in with the overall feel of your photo essay.

    Other Considerations

    As you are shooting, consider how your images will fit in with your overall story. Think about the five “W” questions – who, what, where, when, and why. Answering them with your photos will build up a very good impression for someone viewing your photo essay or picture story.

    How To Shoot A Compelling Photo Essay

    How To Shoot A Compelling Photo Essay

    Traditionally, this market is where the people of Chiang Mai have gotten food. The market is over 160 years old, so it has real character.

    When you’re shooting your photo essay be aware of the overall tone and feeling of the situation you are photographing. Become a part of it, not an outsider with a camera, and you will produce more intimate, interesting photographs. If you have time on your side, even consider visiting the location where you’ll make your photo essay without a camera. Doing this will give you a different perspective and may help you connect with your subject more easily.

    Choosing Your Photos

    Once you’ve completed your shoot and have downloaded the photos to your computer, begin by discarding any that are technically inferior. You don’t want to include shots which are out of focus, poorly exposed, or your timing was off. Remember, you are aiming to please the photo editor of a magazine (just pretend this is the case, even if you are shooting just for yourself, it will help you to have this mindset) and they will reject any images not up to their technical standards.

    Photo essay tips 13

    Photo essay tips 14

    Take your time to look over your photos. Grouping them into the three types, wide, medium and close-up will help your decision-making process. Compare your photos within these groups and look for the strongest pictures that support your overall story. Think about how they might be laid out on the pages of a magazine and what they will communicate to someone viewing them that is not familiar with the subject of your photo essay. Finally, you will want to choose one main shot to be the feature image. The one you are most happy with that best conveys your feeling for the story you are telling.

    Conclusion

    So even if you have no aspirations to shoot for a magazine, this is a good exercise to help you put together a better photo essay. Consider printing a book or your completed project for yourself or to share with friends or fellow travelers.

    Please put your comments and questions in the space below, and share your photo essay images.


    The post How To Shoot A Compelling Photo Essay by Kevin Landwer-Johan appeared first on Digital Photography School.


    Digital Photography School

  • 2017 iPhone Photography Award Winners Announced

    The grand prize (left), first place (top right), and second place (bottom right) winners of the 2017 iPhone Photography Awards. Photos courtesy of IPPA, individual credits below.

    When the iPhone Photography Awards were established in 2007, the first iPhone had just been released and its 2MP images were… well, they were nothing to write home about. Fast-forward to 2017, and the winners of this year’s 10th annual IPPAs are stunning, taking full advantage of a decade’s technological advancement.

    This year’s winners were selected from ‘thousands’ of entries that poured in from over 140 countries around the world. Let’s take them one by one:

    Grand Prize

    This year’s grand prize and title of iPhone Photographer of the year went to Sebastian Tomada for his photograph titled ‘Children of Qayyarah’. Photo © Sebastian Tomada

    The grand prize winner, titled ‘Children of Qayyarah’, was captured by Sebastian Tomada, a photojournalist based in New York City and the Middle East.

    As the title suggests, the image was captured in Qayyarah, Iraq. It was shot on November 4th, 2016 after Islamic State militants set fire to oil wells in the city. The image was captured with an iPhone 6s.

    1st Place

    First place went to photographer Brendan O Se from Ireland, for her striking photograph titled ‘Dock Worker’. Photo © Brendan O Se

    Photographer Brendan O Se—a university teacher/teacher trainer in Cork, Ireland—was awarded 1st place in the competition for his portrait of hands titled ‘Dock Worker’.

    The photograph was taken on an early morning walk around the docks in Jakarta in April of 2016. “These were the hands of a dock worker who was taking a break,” says O Se. “I was struck by the texture created by the accumulated dirt on his hands.”

    This photo was also taken with an iPhone 6s.

    2nd Place

    Second place was awarded to photographer Yeow-Kwang Yeo of Singapore for his portrait titled ‘The Performer’. Photo © Yeow-Kwang Yeo

    Coming in 2nd behind O Se and Tomada is photographer Yeow-Kwang Yeo, formerly a Mechanical Engineer and Business Administrator who decided to change tracks and devoted himself entirely to photography in 2007.

    His photograph, ‘The Performer’, was captured at a performance of traditional Chinese street opera.

    “Instead of shooting their performance, I decided to go the back of the stage to capture the performers’ preparation activity,” says Yeo. “I spotted this experience performer who is taking a short rest and was waiting for his turn to perform. I was attracted by the lighting of the old plastic curtain, electric fan, and the overall calm atmosphere.”

    The photo was captured with an iPhone 6 Plus.

    3rd Place

    Third place in the overall competition was awarded to photographer Kuanglong Zhang of Shenzhen, China for his image ‘The City Palace’. Photo © Kuanglong Zhang

    The 3rd and final award handed out in the IPPA’s main Photographer of the Year category went to Chinese photographer Kuanglong Zhang, a freelance photographer living in Shenzhen city. This photograph was taken in Udaipur, a city Zhang calls ‘one of the most romantic in India.’

    “In the City palace, I snapped a moment of one of the staff gazing out of the window,” says Zhang. “[It’s] as if he saw the slowly historic course of the palace’s construction, which was quite an attractive moment.”

    The photo was taken with an iPhone 7.

    To see more winning images from the other 19 categories the IPPA ran, or if you’d like to learn more about each of the photographers above, visit the IPPA website by clicking here.


    All photos used with permission, courtesy of IPPA.

    Articles: Digital Photography Review (dpreview.com)

  • Behind the Curtain Wall: Theatrical Facade Rotates Around Cultural Center

    [ By WebUrbanist in Architecture & Offices & Commercial. ]

    This mesmerizing mobile facade is an aesthetic and engineering marvel, but one has to wonder: could the mechanisms behind it be appropriated for other architectural purposes, like: providing light and shade on demand or on a schedule?

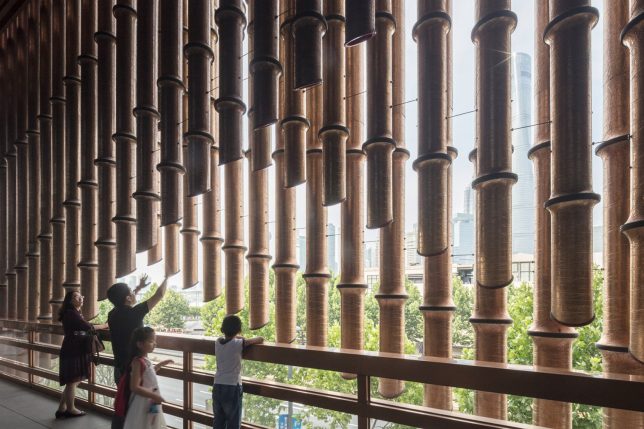
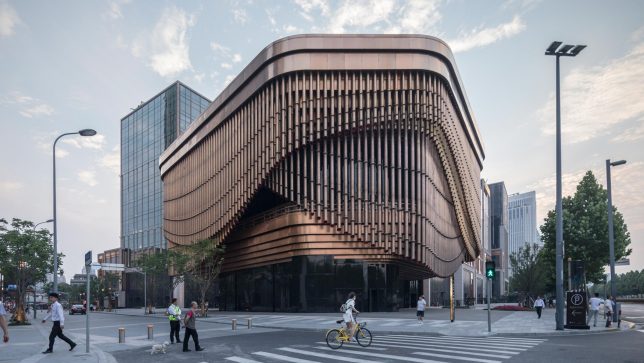
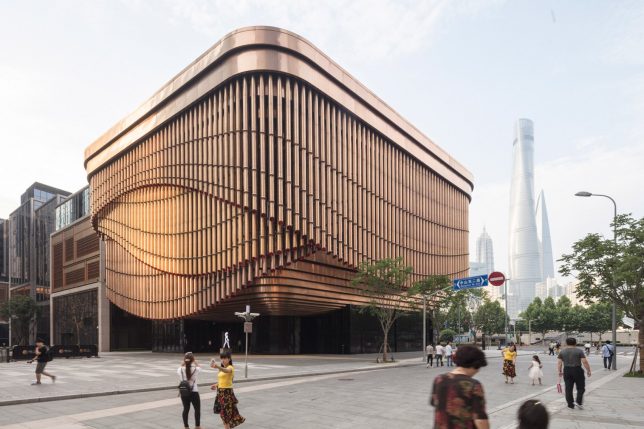
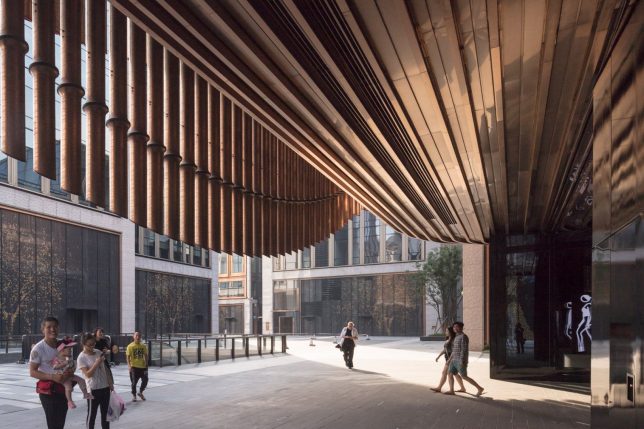
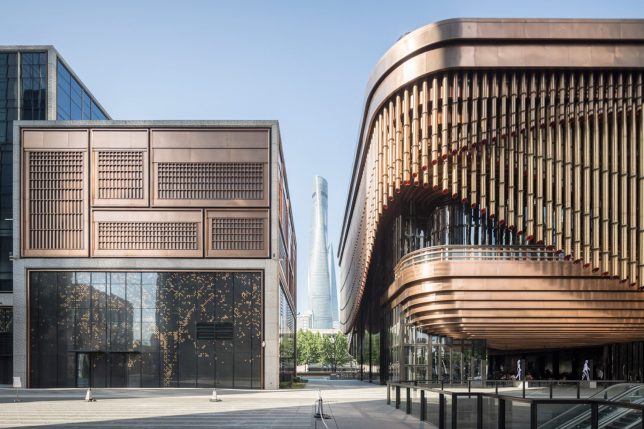
    The dynamic design wraps a new cultural center in Shanghai, part of a 190,000-square-meter development by Foster + Partners in collaboration with Heatherwick Studio (images by Laurian Ghinitoiu).

    It was inspired by Chinese theaters with bamboo-like bronze tubes set in three layers around the perimeter, constituting what the designers describe as “a moving veil, which adapts to the changing use of the building, and reveals the stage on the balcony and views towards Pudong.” The effect is certainly stunning, but despite the description, it seems to be mostly for show — an novelty experience for visitors and viewers.

    The same kinds of systems, however, could be deployed more strategically, using other kinds of semi-opaque screens, for instance, that could automatically position themselves throughout the day to provide layers of shade. Such an application would have practical benefits, reducing cooling costs inside structures and increasing human comfort.

    Alternatively, a similar screen system could be controllable by occupants, allowing building users to block off sections for things like meetings or film screenings requiring different amounts of natural light. For now, it remains a fascinating one-off work, but hopefully architects will consider adding this as a tool in their kit, applying similar technical sophistication to solve other site-specific design problems.

    Share on Facebook


    [ By WebUrbanist in Architecture & Offices & Commercial. ]

    [ WebUrbanist | Archives | Galleries | Privacy | TOS ]


    WebUrbanist