Blog

  • 7 Tips to Help You Start and Grow a Photography Business

    I have been a Digital Photography School writer for the past three years and I have to say, I absolutely love writing and sharing my photography experiences and knowledge. Every time one of my articles get published, my Facebook page and my website get a lot of visitors. I know this is because I use google analytics for my website which tracks visitors on any given day and shows where they spend most of their time (I highly recommend using Google Analytics for your website). I also get a ton of questions on my Facebook business page and the recurring theme of the questions is always something like this, “I love photography, but can you advise me on how to start my photography business and make money from it?”

    So I decided to address that burning question in the hopes that it resonates with so many other photographers, who are thinking the same thing and are perhaps a little nervous to write in for the fear of showing their vulnerability. If you are, please don’t be, because everyone, including me, started somewhere and we all had similar thoughts.

    #1 – Just Start

    If you are thinking about starting a photography business to such a large extent that you cannot think about doing anything else, then just start. Go ahead and take that first step towards making your passion your career. Remember that “done” is so much better than “perfect”.

    We, photographers, are always learning new things every day, be it in business, technology or photography skills. If you wait to be a perfect photographer, you will be waiting a long time. Now, I am not saying that you should not invest time and effort in understanding and practice. Skill is very important. But if you are considering learning the craft and the art of photography, then there is no better time than now!

    7 Tips to Help You Start and Grow a Photography Business

    My lovely friend and fellow photographer during a casual meet up where we exchanged headshots and talked shop over coffee and cupcakes!

    # 2 – Use Social Media

    Social media has exploded over the past few years in terms of the number of people who are using it for business, no matter what business they are in. Because so much of social media is both visual and text, photographers and writers have a slight advantage in terms of creating and sharing quality content.

    So as a photographer, it behooves you to take advantage of the channel at your disposal. But be aware that the whole point of social media is to be social online, showcase your work, show who you are as a photographer and a person. Network, connect and interact online. It is one of the relatively inexpensive ways to make yourself know and recognized.

    7 Tips to Help You Start and Grow a Photography Business

    I love Instagram and think it is one of the best tools out there, especially for photographers. It is so visual and by engaging the right way, you can get a loyal following, new clients, and industry contacts. But like anything else it takes time and a concentrated, thoughtful approach.

    # 3 – Practice, Learn and Practice Some More

    Photography is an art form with many different nuances. Each aspect of photography has many different interpretations and to really excel in photography, you have to know and understand the basics.

    Light, color, composition, emotion, and movement are all critical aspects of a good photograph. You have to learn them, practice them, and then put your own spin on them to make your own photographs go from good to great. There is no time limit for learning photography. The only way you can get better is to keep at it and photograph every chance you can get.

    I carry my camera everywhere I go. I have been doing this for so long that it’s second nature now and I don’t think twice about it. Sometimes I will only shoot ten to twelve frames and sometimes I will shoot several hundred. But what I tell myself every time I bring the camera to my face is that this time I have to try something different and create something I have not created before.

    7 Tips to Help You Start and Grow a Photography Business

    I always give myself permission and time to play – sometimes it’s with florals from my neighbor’s backyard.

    7 Tips to Help You Start and Grow a Photography Business

    Whereas other times it is a quick click while hiking in the mountains around Boulder. The snow and the clear blue sky made for a pretty backdrop for this ranger outpost!

    #4 – Market Your Work

    Marketing is crucial to any business but so few of us really put much into it. Most of us have the mindset that if you produce quality work, then your photography will speak for itself and clients will line up outside your studio for all eternity.

    But sadly, that is far from the truth. Like any good product or service, we have to take the time and the effort to educate our clients and our potential clients on why working with us is a great idea. The more you think about promoting your work on a daily basis, the more effort and heart you will put into your marketing. And remember, marketing takes a lot of time. Very rarely does a marketing effort pay off immediately.

    7 Tips to Help You Start and Grow a Photography Business

    One of my marketing pieces for a show that I am participating in – the show is aimed towards other businesses as well as creative women entrepreneurs!

    #5 – Use Your Network

    Unless you live in a personal bubble, you have a network. Networks can be social (i.e. friends and family), professional (peers or work colleagues), or industry related (other businesses that support photography).

    So I challenge you to do a network analysis (sorry, I am a computer science major from my previous life so I love all this technical jargon!) and figure out who are all the people that you can reach out to and tap into for work. They might not be your direct clients but they may know someone, who knows someone, who knows someone, who is looking for a photographer. Never underestimate the power of word of mouth marketing.

    7 Tips to Help You Start and Grow a Photography Business

    Word-of-mouth and referrals are the best kind of marketing you can ever invest in and they are free (for the most part). Your only expenses – making genuine connections and friends among your networks!

    #6 – Hustle

    You have probably heard this adage before – there is no such thing as a free lunch. There are no shortcuts to anything in life, so what makes you think that there are shortcuts to photography?

    Photography, like any other profession, is extremely competitive with a relatively low barrier to entry. This means you have to hustle that much harder and longer to make an impression and to have an impact on your business bottom line. If you are starting out, try many genres of photography.

    If you are starting out, try many genres of photography. Use any opportunity you can to improve your skills. Make friends with others in the industry and share experiences. Give it your all and eventually, you will reap the benefits.

    7 Tips to Help You Start and Grow a Photography Business

    I met these two local creatives via social media. We really hit it off well and collaborated on a beautiful spring tablescape inspiration shoot.

    7 Tips to Help You Start and Grow a Photography Business

    7 Tips to Help You Start and Grow a Photography Business

    I also routinely go out for shootouts with many other photographers. It is a chance to make friends in the industry and geek out on all things photography!

    #7 – Share

    Share your work, your knowledge, and your expertise. The more open and willing you are to share among your peers, your competitors, and your clients, the more satisfying the journey to photography business success will be.

    People, especially clients, will understand that you are genuine in building professional and personal relationships and the next time they hear of any photography work, they will connect with you. Photography friends and peers will refer clients if they are booked, help you when you are in a pinch, and work with you on creative projects – all of which as so important for your personal growth and growth of your business.

    Conclusion

    If you have other tips on growing a photography business, feel free to share with the larger dPS community in the comments below. Remember it’s not what you know, but how good you are building a community.

    The post 7 Tips to Help You Start and Grow a Photography Business by Karthika Gupta appeared first on Digital Photography School.


    Digital Photography School

  • CityTree: High-Tech Green Wall Cleans as Much Pollution as a Forest

    [ By SA Rogers in Conceptual & Futuristic & Technology. ]

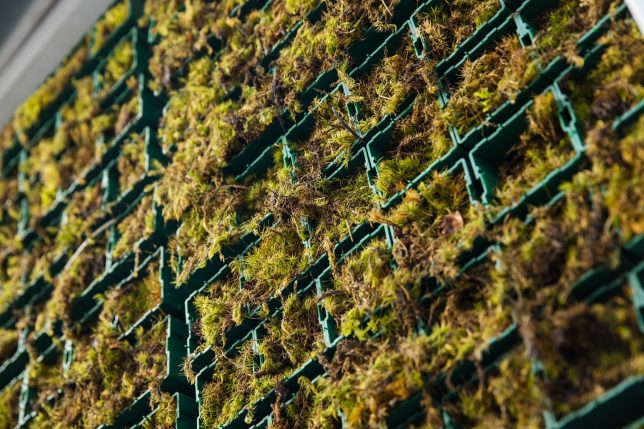
    A 13-foot-tall high-tech green wall encased in a concrete frame is capable of cleaning as much polluted air as an entire forest, combining the Internet of Things and biotechnology to collect data while it improves the urban environment. Created by Green City Solutions, the ‘tree’ isn’t really a tree at all, but rather a moss culture that removes dust, nitrogen dioxide and ozone gases from the air while also collecting weather data, providing electricity via solar panels and filtering its own rainwater.

    Wifi sensors measure factors like temperature, water quality and soil humidity that help each CityTree self-regulate while also allowing the creators to measure how efficient it is at its job. Over a period of a year, each one can remove up to 240 metric tons of climate change-inducing CO2 from the air. Each one features a display for information or advertising. It also features optional benches on either side, and can be vandalism-proofed and customized according to a city or company’s needs. Green City Solutions takes care of the maintenance, and there’s a slim-line version measuring one square meter for smaller spaces.

    Asia’s first CityTree went up in Hong Kong last summer, and around 20 others have been installed in cities like Oslo, Paris and Brussels. More are planned, but red tape tends to get in the way, stalling its growth to additional cities. The German-based company plans to introduce the CityTree to lower-income countries like India as well. While it’s definitely not enough to combat urban air pollution on its own, it’s an interesting element to integrate into a more comprehensive strategy.

    Share on Facebook


    [ By SA Rogers in Conceptual & Futuristic & Technology. ]

    [ WebUrbanist | Archives | Galleries | Privacy | TOS ]


    WebUrbanist

  • Rare Nikon D500 ‘Rex Edition’ still works despite run-in with German Shepherd

    Just a day after purchasing the camera new, a customer of Belgian camera shop PCH brought his Nikon D500 back in with some, uh, unique cosmetic modifications. His German Shepherd ‘Rex’ got ahold of the camera and gave it a bit of a makeover, chewing through most of the lens hood and memory card port cover.

    As highlighted in the video above, the D500’s magnesium-alloy build prevented Rex from doing any real structural damage. And amazingly, the camera seems to be in perfect working condition, aside from a lingering dog-chew-toy-smell noted by PCH. If nothing else, it’s a testament to the D500’s toughness, and reminder to dog owners to keep new cameras out of reach from curious pets.

    Articles: Digital Photography Review (dpreview.com)

  • OnePlus 5 updated to Oxygen 4.5.2 with camera optimizations and more

    The newly launched OnePlus 5 has been updated to Oxygen OS version 4.5.2, gaining a variety of bug fixes and optimizations, including to the camera. The update is being delivered to handset owners who got their hands on a device early over-the-air. Anyone purchasing a phone starting tomorrow will find the latest OS already installed. Though OnePlus details the phone elements that are improved by the update, it doesn’t go into any details about how they’re optimized.

    The OnePlus 5, like some other recent flagship smartphones, features a dual-camera comprising one 16MP and one 20MP camera. According to the Oxygen OS 4.5.2 changelog, the camera has been ‘optimized’, though no details are provided. The update also brings improved network, Bluetooth, and system stability, as well as better compatibility with third-party apps. The update also fixes the app installation issue that some users experienced and the system update failure bug.

    Via: Android Central

    Articles: Digital Photography Review (dpreview.com)

  • Pete Souza talks about life as a presidential photographer

    Photojournalist Pete Souza served as the presidential photographer for both Ronald Reagan and Barack Obama. In an interview with Pulitzer Prize-winner Marcia Nighswander at Ohio University, he tells the story behind several of his most noteworthy images from the Obama presidency. Some of his most memorable photos of Obama were taken at the Christ the Reedemer statue in Rio and while crossing the Edmund Pettus Bridge in Selma, Alabama.

    Souza has a popular Instagram account and will be publishing a book with 300 photos from the eight years he spent in the Obama White House.

    Articles: Digital Photography Review (dpreview.com)

  • Google Pixel owners can compete to have their images shown as Chromecast backgrounds

    Who hasn’t spent a few minutes watching Chromecast’s rotation of bliss-inducing, long exposure landscape photography? What better buffer is there between the end of a 30 Rock Netflix marathon and a return to reality than a never-ending loop of HDR cityscapes and peaceful beach sunsets? None better, and now regular folk like us can have our photos considered for inclusion in Chromecast’s screen saver repertoire, provided you own a Google Pixel or Pixel XL.

    If you’re interested in that kind of fame and glory, you can submit photos taken with your Pixel phone to Google’s attention by posting them to Twitter, Instagram or Google+ and tagging it #teampixel. The company is looking for images that fit the established Chromecast background aesthetic, so landscape orientation is recommended, as are landscapes, architecture, wildlife and abstract subjects. Portraits and images with logos are discouraged, extreme HDR treatment optional.

    Articles: Digital Photography Review (dpreview.com)

  • Italian Nikon distributor sets world record for largest human camera

    Nikon is keeping the 100th anniversary party going with a new one-of-a-kind feat: assembling the world’s largest ‘human camera’. Italian distributor Nital and Media Italia put on the event, and over a thousand volunteers answered the call to don black, grey, white and red t-shirts. On June 17th, the human camera components were assembled into the unmistakable shape of a Nikon DSLR.

    In case there was any doubt, a judge from the Guinness World Records was on hand to declare that it was indeed the largest human camera ever created. In any case, it seems like about a thousand people had a decent time and got a free t-shirt and hat out of the deal.

    Articles: Digital Photography Review (dpreview.com)

  • Cull Your Photos Carefully – 5 Steps to Follow Before You Hit Delete

    When to keep and when to hit delete on an image can be a tough decision to make sometimes. In this article I’ll give you five things you consider before you hit delete to help you with the process of how to cull your photos.

    The emotional attachment lessens with time

    I was shooting high on a mountain pass this past winter. Low clouds and scattered sun danced across the snow-covered slopes, blown by a chill wind from the north. The view below came and went as fog blew past, opening and closing the scene like curtains. Enthralled, I snapped photos, the stark mountains, the pale sun, the glowing patches of light on the snow. “These shots are going to be awesome.” I thought to myself.

    Cull Your Photos Carefully - 5 Things to Consider Before You Hit Delete

    A few hours later, I opened my computer and downloaded the images. And I could see then, that they were awesome. I sat and I stared, certain that these were some of the best of the trip. The way the light played across the mountains, the storm-light on the rock and snow slopes. Yeah, these were great.

    A week later, as I was putting together images from the trip, I revisited those photos. Huh, I thought, I could have sworn those were better. I mean, they were decent, but not extraordinary. What happened?

    Cull Your Photos Carefully - 5 Things to Consider Before You Hit Delete

    I had distanced myself from the images for a time, and was able to separate myself emotionally from the experience of making them. I’d been able to view those shots almost as though someone else had made them. As a result, many more of those photos ended up in the delete pile than I would have expected at first glance.

    But time away from your photos is just one thing to can do as you try to segregate the keepers from those to delete. Here are the five things to keep in mind as you cull and assess your images.

    Cull Your Photos Carefully - 5 Steps to Follow Before You Hit Delete

    Step #1 – Check the technical Details

    After importing the photos of a recent shoot into my Lightroom Catalog, look at each image quickly, at full-screen size, and assess each for any technical faults.

    Is the image out of focus (check at 100% or 1:1 view)? Is the composition obviously wonky? What about exposure, is the exposure so wrong that you can’t correct it? If the answer is “Yes” to any of these questions, immediately delete the image (or flag it as a reject by hitting X) and move on to the next.

    Cull Your Photos Carefully - 5 Steps to Follow Before You Hit Delete

    The trick in this first step is not to try and go beyond the technical details. This is not the time to try and gauge overall image quality. This is the time, merely to delete the obvious screw-ups.

    Step #2 – The second round

    If I’m eager to spend some time with my photos, or I’ve got a deadline, I’ll go back through them quickly a second time. Lightroom, and many other catalog programs, give you the ability to flag images with different colors, and/or rating codes.

    Scrolling through the images, I’ll color code the good and bad standouts. Images that I like get coded green, purple or blue (the color relates to my own filing system), while images that I don’t particularly like, for one reason or another, get flagged red.

    Cull Your Photos Carefully - 5 Steps to Follow Before You Hit Delete

    Red flagged images are imperfectly sharp, have clear composition issues or other technical problems, while the green images are selects and the un-marked images are ones to hold onto for future consideration.

    Some images do not get flagged at all. These are usually images to which I’m ambivalent. They are good enough not to get the dreaded red flag, but not so good that I want to highlight them immediately.

    At this point, I’ll start post-processing my favorites, but I don’t delete anything. Not yet.

    Cull Your Photos Carefully - 5 Steps to Follow Before You Hit Delete

    A screenshot of my Lightroom Catalog after a shoot of this Rufescent Tiger Heron in Argentina. Of the 26 images, I selected two as keepers, one vertical, and one horizontal image.

    Step #3 – Let them rest

    Immediately following a shoot, we get emotionally caught up in our images, for better or for worse. If a shoot went well, like my experience on the mountain, you may have the feeling that your images are better than they actually are. If it went poorly, you may feel like they all suck, when in fact, they may not.

    The solution is to give the images some space. Pull back for a few days, don’t look at them, don’t edit them. Put your new photos out of sight, and give yourself some emotional distance from the experience of making your images.

    After a few days, a week, or even longer, you can have another go.

    Step #4 – Consider how your images will be used

    As you dive back into your collection, think for a moment about how an image will be put to use. If you are shooting for a client, then you may already have a good idea of the kind of images you needed to make. For example, the conservation groups I work for usually provide me a brief on the project. In that document, they will note specific types of images or video they need or want. As I’m pulling selections for them, I’ll consider their needs, and put special effort into finding and editing images that match.

    Usually, there are no clients telling me which images are best. Without anyone guiding me, I lean toward variety.

    Cull Your Photos Carefully - 5 Steps to Follow Before You Hit Delete

    Variety includes more than framing, but also panoramic compositions like this one.

    When I first started shooting seriously, I saved almost every image. I was too attached to each one. Later, as my image catalog and hard drives began to swell, I became heartless with images, deleting all but one or two from a series, even good alternatives to my selects. Now, I’ve settled somewhere in between because I don’t always know how an image will be put to use, so I like to have some variety available.

    Magazine editors will often be looking for images with big areas of negative space which can be used for text placement. Large size wall prints require images that are immaculately sharp and high resolution. Illustrative shots, often sold for stock, or for small use in publications, need to be tight with only the bare minimum of room around the subject. While editing, I plan for these eventualities and select four or five images, in a variety of compositions, from any given scene, but not more.

    Keep some variety of shots

    As an example, below are my five selects from an encounter with a Brown Bear in southeast Alaska. Each of the five images have been published in national magazines. Each time, the editor wanted the image for a different layout, some involving text, some as a simple stamp-size illustration. The bottom line is you never know what is going to appeal to different viewers, so retain some diversity from within your shoots.

    Cull Your Photos Carefully - 5 Steps to Follow Before You Hit Delete

    Throw Away Your Photos Carefully - 5 Things to Consider Before You Hit Delete

    Throw Away Your Photos Carefully - 5 Things to Consider Before You Hit Delete

    Throw Away Your Photos Carefully - 5 Things to Consider Before You Hit Delete

    Cull Your Photos Carefully - 5 Steps to Follow Before You Hit Delete

    Don’t get caught up in what you think is the best image from a series. Rather, give thought to how you might want to use images from the shoot in the future. Red code (or however you tag your images) the faulty ones, or near-duplicates, but retain some variety.

    Step #5 – The final cut

    By this time, your collection of images will be a checkerboard of red and green. The red images flagged for deletion, the greens (and other colors) set aside as “keepers”. If you are like me, you’ve made enough duplicate, failures, and screw-ups that the reds wildly outnumber the greens and unlabeled images.

    Throw Away Your Photos Carefully - 5 Things to Consider Before You Hit Delete

    This image lay in my Lightroom for years before I finally noticed that it was pretty decent.

    Before I hit delete, I give each image one more look, just to make sure I’m not cutting something that I might want to keep. Sometimes if an image is unique, even if it’s not what I think of as “good”, I’ll decide to hold onto it.

    Throw Away Your Photos Carefully - 5 Things to Consider Before You Hit Delete

    This image was taken Mexico in 2010. I found it a month ago, lingering on a hard drive. I had completely forgotten about that sunset over the Caribbean. Hard drive surprises can be great, but I recommend being more organized than I was at the time.

    More than once, I’ve scrolled back through my Lightroom Catalog and stumbled on an image that, for one reason or another, I never gave a close look. At the time I created it, I must have considered it unremarkable, but didn’t consider it bad enough to delete. Years later, I’ve found some gems in those un-flagged images.

    Bottom Line

    Selecting keepers from a series of images is not always as straight forward as what is “good” and what is “bad”. Consider each image carefully, and use your delete key, but don’t get too enthusiastic pushing that button. Deleted images can never be recovered.

    The post Cull Your Photos Carefully – 5 Steps to Follow Before You Hit Delete by David Shaw appeared first on Digital Photography School.


    Digital Photography School

  • The Earth as a Canvas: 25 Monumental Works of Land-Based Art

    [ By SA Rogers in Art & Installation & Sound. ]
    Treating the Earth like a canvas and natural objects like rocks, sticks, sand and ice as art materials, we alter the natural environment to reflect ourselves and our own artistic impulses – even if only temporarily, until these works of land-based art are erased by nature itself.

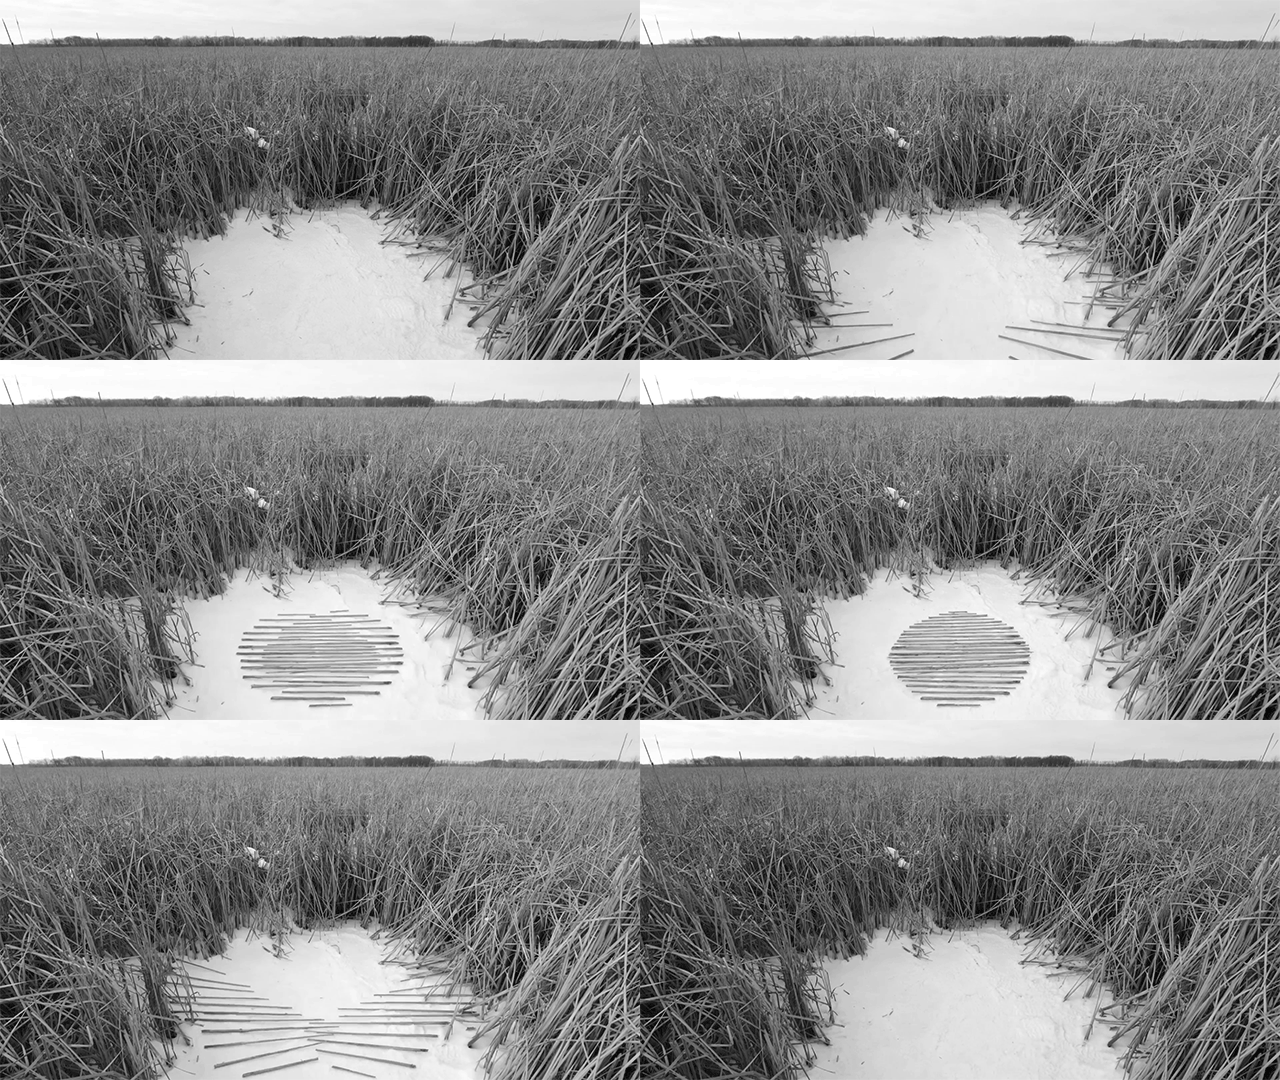
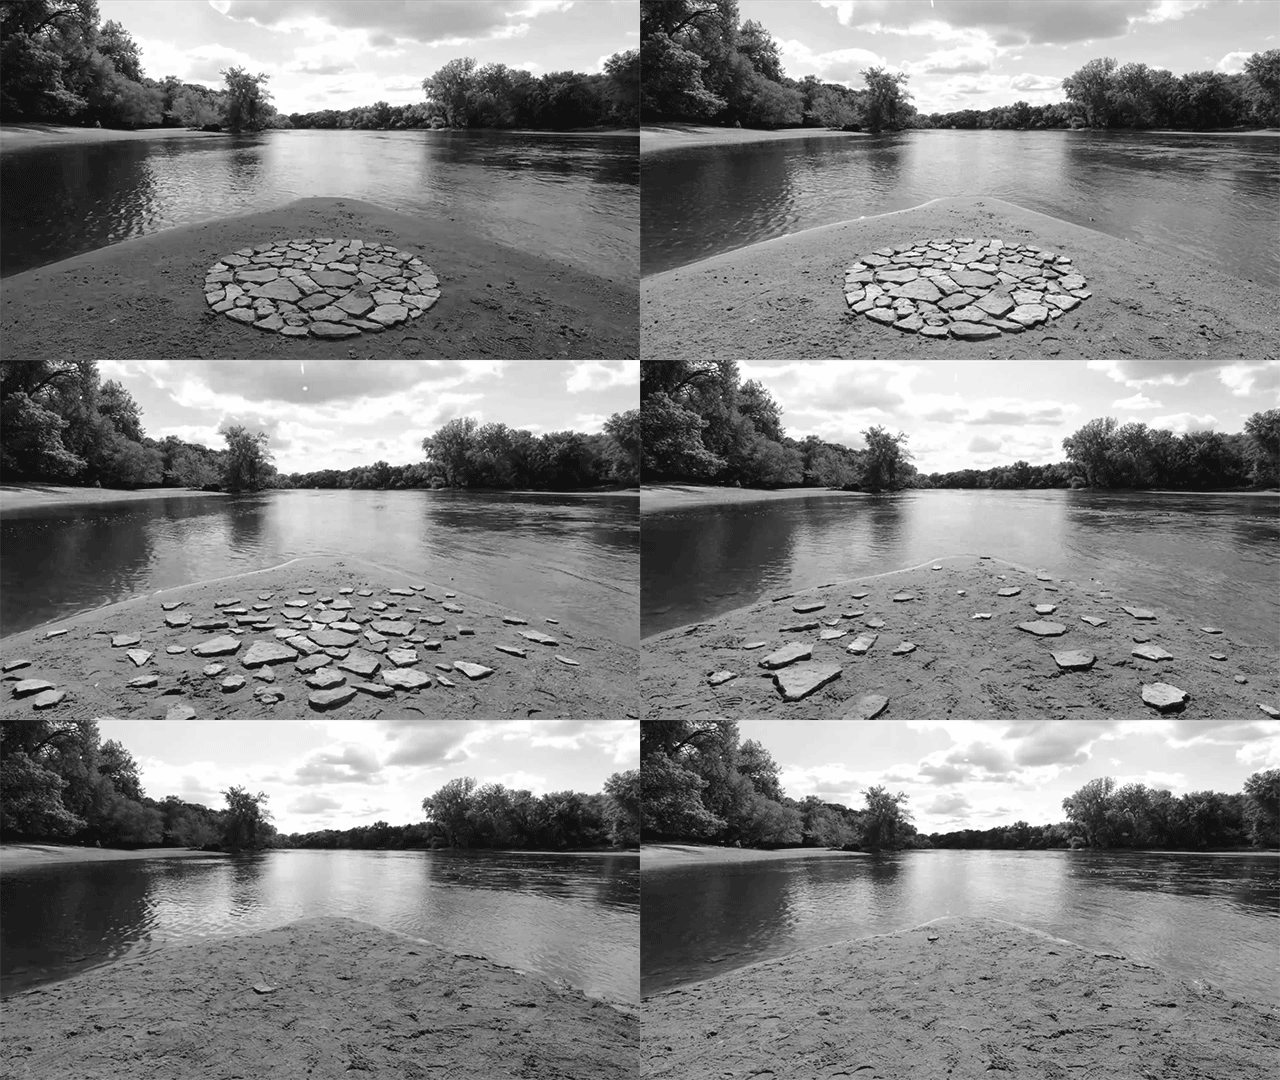
    Animated Land Art by Paul Johnson

    For his ‘Earthworks in Motion’ series, artist Paul Johnson takes inspiration from such legendary land artists as Andy Goldsworthy and Jim Denevan, using some of the same techniques but crafting them into stop-motion animations filmed in parks and nature preserves around Minneapolis/St. Paul, Minnesota.

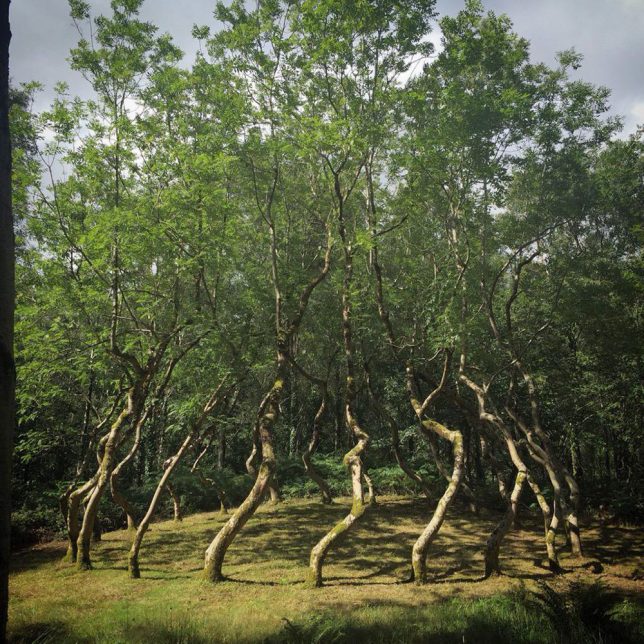
    Ash Dome by David Nash

    In 1977, sculptor David Nash secretly planted and trained a circle of 22 ash trees to grow into a shape resembling a vortex on an area of land in Wales. 40 years later, they’ve grown enough for the shape to be discernible. Nash says that at the time, during the Cold War and other unrest, planting something that couldn’t be properly enjoyed until the 21st century seemed like a leap of faith.

    Van Gogh’s ‘Olive Trees’ Planted in a Field

    Vincent Van Goh’s masterpiece painting ‘Olive Trees,’ completed in 1889, comes to life – literally – in a Minneapolis field as artist Stan Herd uses nature as his canvas and paints. The piece was viewable from the air during autumn 2015 and then mowed down in concentric circles reminiscent of Van Gogh’s painting strokes.

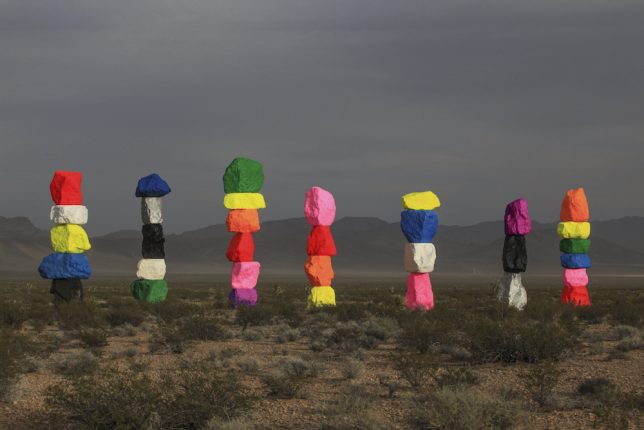
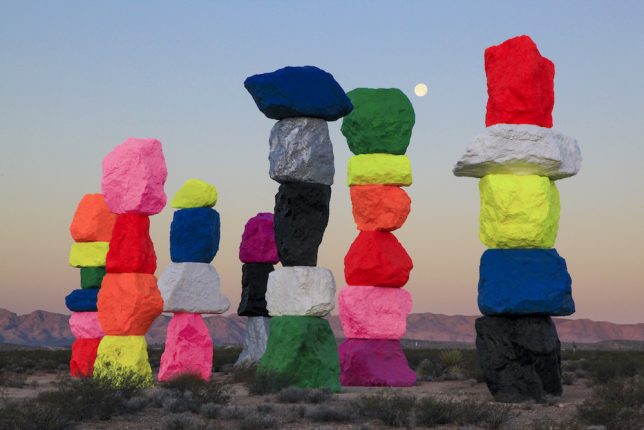
    Seven Magic Mountains by Ugo Rondinone

    Each of Swiss artist Ugo Rondinone’s ‘Seven Magic Mountains’ made of stacked limestone stands between 30 and 35 feet tall painting in dayglo yellow, red, pink, silver and other colors. They’re set just south of Las Vegas as a monumental work of land art, installed in May 2016 and due to remain in place until May 2018, so there’s still time to see it in person.

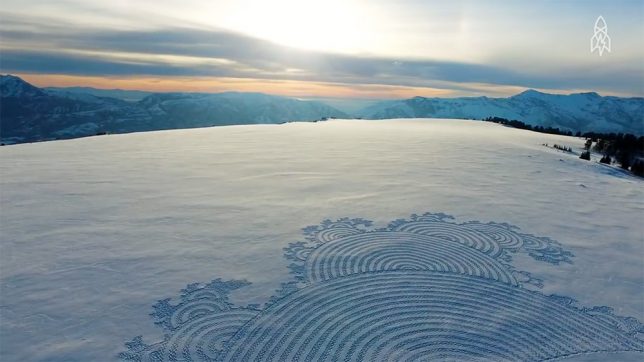
    Snow Murals by Simon Beck

    Simon Beck uses snowshoes to manually imprint dazzling patterns and shapes into snowy fields, photographs them from above and then allows them to be blown away, covered by more snow or trampled. It can take up to 5,000 steps an hour for 10 hours at a time to complete an average piece.

    Next Page – Click Below to Read More:
    The Earth As A Canvas 25 Monumental Works Of Land Based Art

    Share on Facebook


    [ By SA Rogers in Art & Installation & Sound. ]

    [ WebUrbanist | Archives | Galleries | Privacy | TOS ]


    WebUrbanist

  • Adobe acquires Mettle SkyBox suite of VR plug-ins

    Adobe has acquired Mettle, the makers of the popular SkyBox suite of 360-degree-video and VR editing tools for Adobe Premiere Pro and After Effects. Mettle founder Chris Bobotis takes on the role of director, professional video at Adobe.
    The SkyBox suite will no longer be available for separate purchase but existing SkyBox customers will continue to have the same contact and support process through Mettle. The suite will be integrated into Adobe Creative Cloud by the end of the year. Until then Adobe CC subscribers will be able to access the SkyBox tools by sending an email to dvaplugin@adobe.com. You should inlude your Adobe ID and first and last name as it appears on your account. Adobe then will get back to you within a week.

    Adobe says that many of its users have been relying on the SkyBox Suite of plug-ins from Mettle for VR transitions, titles, and effects and it therefore made sense to make the plug-ins available to all subscribers through Creative Cloud.

    “We believe that making virtual-reality content should be as easy as possible for creators. The acquisition of SkyBox plugins and Mettle technology allows us to deliver a more highly integrated VR editing and effects experience to the film and video community by the end of the year,” said Bill Roberts, Adobe senior director of professional video product management. You can read the full announcement on the Adobe Blog.

    Articles: Digital Photography Review (dpreview.com)