Blog

  • Dream Deep: Trippy Maps Reenvisioned by Google’s Artificial Neural Network

    [ By WebUrbanist in Art & Drawing & Digital. ]

    FaceApp and similar reality-warping applications are especially fun to use in ways their designers never intended. Along similar lines, Google’s DeepDream (designed for photo manipulation) creates fascinating results using photographs but is even more stunning when applied to representations of cityscapes.

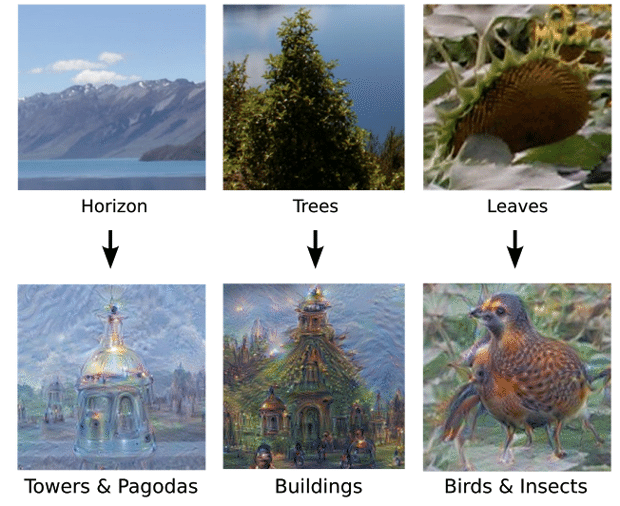
    While training DeepDream (a neural network that adapts like a brain to new inputs) to identify, differentiate and understand images, Google researchers discovered it could “over-interpret” results as well. In short: it could start to “read into” images from previous experience, resulting in an array of beautiful (if disturbing) hybrids.

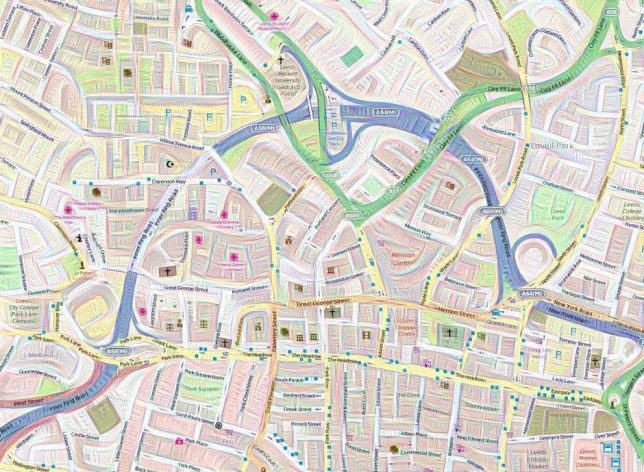
    Once it went public, mapmakers were among those intrigued by the possibilities of geo-visualization, turning flat maps into seemingly living landscapes. Tim Waters, a geospatial developer, began taking OpenStreetMap data and running it through the system, generating these strangely psychedelic urban environments.

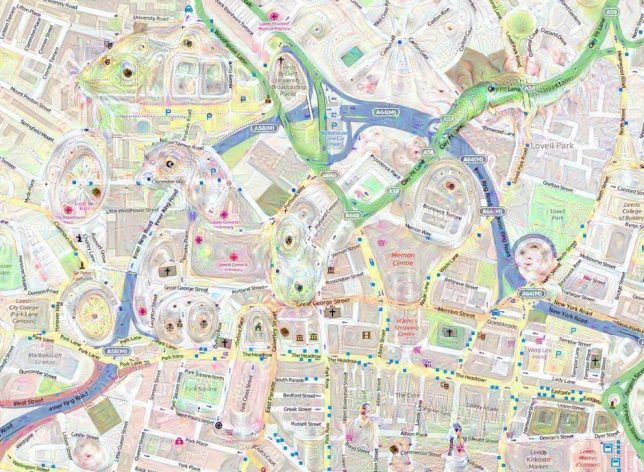
    He discovered that a short run could create fractal and quilting effects, while longer and reiterated processing started to introduce faces and creatures to the mix.

    Above: monkeys and frogs seem to emerge from the grid, while a coastal region forms the head of a bear, making the landscape look like a giant bearskin rug. Overall, the effects are quite beautiful, creating a sense of depth and adding character to what would otherwise be fairly generic representations.

    Share on Facebook


    [ By WebUrbanist in Art & Drawing & Digital. ]

    [ WebUrbanist | Archives | Galleries | Privacy | TOS ]


    WebUrbanist

  • Video: First look at the Canon EOS 6D Mark II

    Quite a lot has changed since Canon first debuted its budget-oriented full frame option, the EOS 6D, back in 2012. Five years later its successor, the 6D Mark II is here, and with a lot to offer including an updated AF system, vari-angle touchscreen and 1080/60p video capture. But is the update worth the wait? Watch our video to find out.

    Articles: Digital Photography Review (dpreview.com)

  • Sony’s Mavica FD71 likes floppy disks, hates magnets

    In the earliest days of consumer digital photography, back when the ‘smart’ in ‘smart phone’ was the same as the ‘smart’ in ‘a smart pair of pants’, almost every aspect of capturing, transferring, storing, sharing and printing digital images was so fraught with technical challenges and costly disappointments that it still amazes me that it ever took off at all. The secret to the eventual, inevitable, triumph over film were those most compelling of all disruptive drivers of change: convenience and immediacy.

    No matter that back in the late 1990’s the pioneering digital photographer had to lay out thousands of dollars on a camera, a computer, a (color) monitor and the seemingly endless cables, cards and connectors needed to make it all work (and, it must be said, the time, expertise and patience required to tame all that technology).

    We didn’t care that you could go get yourself a coffee between shots thanks to the painfully slow write speeds, or that we’d be lucky to get 20 minutes of shooting from a set of batteries or that transferring the images via serial cable took longer than the average Super Bowl, or that for the most part the end results looked like a VHS tape on pause and had the resolution of a watercolor painting.

    The FD71 had an amazing (for the time) 1cm macro mode. Here, in all it’s VGA glory is the best you could hope to capture with 300,000 pixels and a decent subject.

    We early adopters didn’t care about any of that, because the magic of taking a picture and seeing it appear (almost) immediately on the rear screen, and the freedom to shoot to our heart’s content without having to pay for film or processing (and without the need to scan images) was the most exciting thing to happen to photography since the Box Brownie.

    And given that most early adopters of digital cameras were also early adopters of the home computer, our pain tolerance was higher to begin with. After all, we were used to spending hours fixing SCSI conflicts and trying to get onto bulletin boards using our screeching, temperamental modems.

    For me, as a Mac user in the 1990’s, the biggest pain point by far was the supposedly simple process of getting the images off the camera and onto my hard drive, thanks to the lack of removal media (and the lack of card readers where there was removable media) and the horribly slow and Mac-unfriendly serial transfer process most cameras used for transfer.

    And then, in late 1997, along comes Sony with the first Mavica digital stills cameras, the FD5 and FD7 (which added a rare 10x zoom), offering sophisticated feature sets and – critically – storage on the ubiquitous and universally available 3.5” floppy disk.

    It may seem painfully archaic today, but back in 1996 when I first started seriously reviewing digital cameras I used to dream of a camera that shot directly onto floppies, which could be picked up for under a dollar each at any office supplier, and – critically – could be read without any additional equipment by almost every home and office PC on the planet.

    The first DSC Mavicas sold incredibly well for this reason alone (and they continued to be used by schools and government agencies for years after they were discontinued). It didn’t matter that the results from the 320 x 240-pixel interlaced CCD looked like video stills or that the fixed-power flash was only usable if your subject was half a mile away (otherwise everything got washed out) or that it was agonizingly slow – it was immeasurably more convenient and made sharing (in a pre-internet era) as easy as handing over a floppy disk.

    Above: it may seem run of the mill now, but in-camera effects like this were quite the novelty back in 1998.

    Showing the wisdom of never buying version one of anything, it was only six months or so after the FD5 and FD7 were released that Sony launched replacements, in the shape of the FD51 and (yes, I finally got round to the subject of this week’s TBT) the 10x zoom FD71.

    The FD71 brought a wealth of enhancements and fixes over its predecessor, including a faster floppy drive, faster processing, a new ‘true VGA’ progressive scan 640 x 480-pixel sensor, an improved LCD, a disk copy mode (making sharing even easier) and a new slimmer design. Even by 1998 standards though, it was still a monster, weighing in at around 1.3 lbs (590g) and roughly sharing the size and ergonomics of a full size hard disk drive.

    Multi mode – 9 QVGA frames in 2.5 seconds. Great for catching the action (or in this case, inaction). A zoom lens and a sepia mode and I was an accomplished portraitist…

    The FD71’s innovative feature set didn’t just solve the annoyance of slow serial transfer, it also sported a huge (for the time) 2.5” LCD screen (you could disable the back light and use reflectance to illuminate the image, meaning it could be – more or less – used in bright sunlight) and an InfoLithium battery that was capable of keeping the camera – and the power-hungry floppy drive inside – going for up to 2.5 hours or 2000 shots. (Sony even offered three different ‘strengths’ of battery.)

    The FD71 also boasted a 10x zoom (this was at a time when a 3x zoom was still a big selling point), fast autofocus, a vari-power flash, full photographic controls and a selection of in-camera special effects including a ‘multi’ mode that captured 9 small images in about 2.5 seconds and combined them into a single collage. It’s hard to imagine today, but almost all of these features were unheard of on consumer level digital cameras.

    At the wide end the image quality was pretty much what you’d expect for a VGA (0.3MP) camera in 1998… … but how about that zoom! 10x was pretty rare when the FD71 was launched.

    All of this, including the fact that – despite having to save its images to a floppy disk – the FD71 was actually faster and more responsive than many of its competitors, made the FD71 a lot of fun to use, and despite the low resolution (most competitors were moving to 1 or 1.3 megapixels) it was a huge hit and a firm favorite in my office at the time.

    Writing about the FD71 I said “I may not have much use for the small images, and I sure can’t fit it in my pocket, but… the FD71 is the most enjoyable digital camera I have ever used, and proves Sony can still teach the traditional camera manufacturers.”

    A few more pictures for your, ahem, pleasure…

    Articles: Digital Photography Review (dpreview.com)

  • Hands-on with Canon EOS Rebel SL2 / EOS 200D

    Hands-on with Canon’s EOS Rebel SL2 / EOS 200D

    Canon’s latest DSLR is one of its smallest ever. The new EOS Rebel SL2 (EOS 200D outside of North America) DSLR on the market. The SL1 was a likable, if rather limited camera in its day, and we’re pleased to see that Canon hasn’t abandoned the idea of an ultra-portable entry-level Rebel.

    We had the chance recently to handle the SL2, and get a feel for what’s changed, and what remains the same.

    Hands-on with Canon’s EOS Rebel SL2 / EOS 200D

    One thing that hasn’t changed significantly is the SL2’s size, compared to its predecessor. Although the new camera is in fact slightly bigger, the difference is very subtle (122.4 x 92.6 x 69.8mm compared to 117 x 91 x 69mm, if you were curious). The SL2 is bundled with the same slower 18-55mm F4-5.6 kit zoom that was introduced alongside the Rebel T7i.

    A more welcome change compared to the SL1 is the SL2’s sensor. We’re told that the 24MP APS-C sensor in the new camera is essentially the same as the one used in the EOS 77D. Capable of shooting from ISO 100-25,600 there’s no reason not to expect excellent low and medium ISO image quality from the SL2.

    Hands-on with Canon’s EOS Rebel SL2 / EOS 200D

    My hands are pretty average-sized. As you can see, the SL2 really is pretty tiny. This view shows off the minimal top-mounted controls, which include the standard Canon EOS exposure mode dial, and front control dial, just behind the shutter release. This dial has been redesigned, from the plastic ‘cog’ we’ve been used to for years, to a high-end PowerShot-style knurled metal finish. Also new is the combined movie mode / on / off toggle switch, just to the right of the exposure mode dial.

    On the far left of the SL2’s top plate is a dedicated Wi-Fi button, which indicates Canon’s intended user base of smartphone and compact camera upgraders.

    Hands-on with Canon’s EOS Rebel SL2 / EOS 200D

    As we’d expect, the rear of the SL2 is dominated by a large, 3″ touch-sensitive LCD. Despite its entry-level positioning, Canon hasn’t skimped on specifications – this appears to be the same 1040k-dot display offered on the full-frame EOS 6D Mark II. Note the indent at the upper right, so you can get your finger in there to grab the screen.

    The SL2’s viewfinder is unremarkable (it’s the typical lower cost pentamirror design, with 95% frame coverage) and its conventional autofocus system is pretty basic (9-points, covering the central portion of the frame). But impressively, in live view and movie modes the SL2 offers the same excellent Dual Pixel AF system as the EOS 80D. That means fast and accurate AF for still and moving subjects, with none of the ‘hunting’ typical of more basic contrast-detection live view AF systems.

    Hands-on with Canon’s EOS Rebel SL2 / EOS 200D

    This alone is a huge selling point over the original SL1, and made even mode useful by the fact that the Rebel SL2’s rear screen can be fully articulated for live view and movie shooting. Arguments will continue over whether a tilting screen or flip-out type is superior, but the flip-out design is certainly better when shooting vertically.

    Like its close-relation the Rebel T7i, the SL2 features a simplified screen interface in PASM modes, intended to educate beginners about the effect of using certain exposure variables.

    Hands-on with Canon’s EOS Rebel SL2 / EOS 200D

    Another view of the top of the camera, highlighting again the small, compact body of the Rebel SL2. Despite its low-end positioning, the general fit and finish of control points is of a high standard.

    The SL2 is predominantly made from polycarbonate, and Canon makes no claims about environmental sealing, but there’s no creak or give in the body seams.

    Hands-on with Canon’s EOS Rebel SL2 / EOS 200D

    Despite its entry-level positioning, the SL2 is an impressively fast camera. Claimed startup time is a respectable 0.2 sec (which is the same as the EOS 6D Mark II), and the SL2 features a maximum continuous shooting rate of 5 fps. It’s reasonably customizable, too. Although it (obviously) can’t hold a candle to Canon’s professional DSLRs, 11 custom functions do allow for a decent amount of fine-tuning of the camera’s operation.

    A small built-in flash pops up when required in fully automatic shooting, and can be activated manually in PASM modes. You can expect 650 shots per charge from the LP-E17 with 50% flash use, increasing to more than 800 with no flash (CIPA).

    Hands-on with Canon’s EOS Rebel SL2 / EOS 200D

    A nice deep handgrip makes the SL2 easy and comfortable to hold and use, despite its small size.

    What do you make of the new Rebel SL2? Let us know in the comments.

    Articles: Digital Photography Review (dpreview.com)

  • Meet the EOS 6D Mark II – Canon’s entry-level full-frame DSLR

    Hands-on with Canon EOS 6D Mark II

    Meet the new 6D – it looks a heck of a lot like the old 6D, but before you jump to the comments to complain about how nothing exciting ever happens in the camera industry anymore, read this article first.

    Because appearances are deceptive…

    Hands-on with Canon EOS 6D Mark II

    One of the most notable upgrades compared to the original 6D is an entirely new 26.2MP full-frame CMOS sensor, with a native ISO sensitivity span of 100-40,000.

    We haven’t been able to conduct any lab testing yet, but from our initial shooting it appears (unsurprisingly) to deliver better image quality than the 20MP sensor inside the 6D. The bump in resolution from 20 to 26 Megapixel won’t make as much difference to maximum print sizes as the bare number might suggest, but as a general rule, more pixels = better image quality.

    Hands-on with Canon EOS 6D Mark II

    Ergonomically, the 6D Mark II is exactly what you’d expect. Button layout is virtually identical to the original EOS 6D, and anyone with experience of a recent EOS-series DSLR will be able to find their way around without any trouble at all.

    Hands-on with Canon EOS 6D Mark II

    It’s the same story on the back of the Mark II, with one very obvious difference. The LCD is now touch-sensitive, and fully articulating.

    Hands-on with Canon EOS 6D Mark II

    Like so. Operationally, this makes the 6D Mark II behave very much like the APS-C format EOS 80D. It even shares the same 45-point phase detection autofocus system, with the same Dual Pixel AF implementation in live view and movie modes too, covering 80% of the frame both vertically and horizontally.

    Speaking of movie mode, the EOS 6D Mark II offers a fairly standard (ahem – standard for Canon) video feature, with a maximum resolution of 1080/60p. If you want 4K, you’ll have to save up for an EOS 5D Mark IV, I’m afraid.

    Hands-on with Canon EOS 6D Mark II

    Spot the difference – externally, the 6D Mark II (on the left) is extremely similar to its predecessor. It’s basically the same weight, too – 685g (1.5 lb) compared to 680g.

    Hands-on with Canon EOS 6D Mark II

    And aside from the redesigned screen, it’s pretty much identical from the back, too. Which is fine – the 6D was a pleasant, intuitive camera, and aside from some very minor styling differences (the card access lamp is now above the memory card door, not below – tell all your friends!) the Mark II barely alters the basic recipe.

    While the simultaneously announced EOS Rebel SL2 features a dedicated Wi-Fi button, setting up the 6D’s wireless system is all done through the camera’s menu system. The 6D II supports NFC for easy pairing with Android devices as well as Bluetooth for maintaining a constant connection with your mobile device. Like its predecessor, the EOS 6D Mark II also offers a built-in GPS for image geotagging.

    Hands-on with Canon EOS 6D Mark II

    Note the raised collar around the hotshoe. This forms a weatherproof seal when the 6D Mark II is used with one of Canon’s high-end flashguns.

    As usual, Canon is coy when it comes to the extent of the EOS 6D Mark II’s weather-sealing, but I am in the unusual position of having been able to test a pre-production unit in moderately heavy rain. You’ll be reassured to know that while I got quite soggy, the camera didn’t stop working, explode or fall apart in my hands.

    Hands-on with Canon EOS 6D Mark II

    For almost 30 years, non-pro Canon SLRs have sported the same distinctive exposure mode dial. This is where you’ll find the standard PASM shooting modes, as well as auto exposure modes, including full-auto, custom shooting settings and scene modes (‘SCN’). The 6D Mark II’s main power switch is just below.

    Hands-on with Canon EOS 6D Mark II

    Some readers might be disappointed with the 6D Mark II’s single SD card slot (and lack of UHS-II support,) but a lot of enthusiasts and advanced amateurs probably won’t care. With card capacities of 64GB+ and built-in Wi-Fi, some 6D II users might find themselves swapping cards very rarely.

    That said, with a maximum shooting rate of 6.5 fps, the 6D Mark II will rip through card space quicker than its predecessor (which maxed-out at 4.5 fps) especially in Raw mode.

    Hands-on with Canon EOS 6D Mark II

    The LP-E6N battery is compatible with most high-end Canon DSLRs, which is great news for anyone considering a 6D Mark II as a second camera alongside an original 6D or recent 5D-series body. Battery life is quoted as 1200 shots in viewfinder shooting mode, dropping to ~400 in live view.

    Hands-on with Canon EOS 6D Mark II

    Like the 5D and 1D-series bodies, the 6D Mark II is compatible with Canon’s Remote Switch RS-80N3, and the programmable TC-80N3. The remote switch socket is positioned at the front of the camera, safely out of the way of the handgrip.

    Hands-on with Canon EOS 6D Mark II

    Standard HDMI and USB I/O ports can be found on the side of the 6D Mark II, alongside a mic socket. We’re pleased to see that the mic socket is offset, which means that it shouldn’t snag the articulating screen during movie shooting.

    You can read more about using the EOS 6D Mark II in my shooting experience.


    What do you make of the EOS 6D Mark II? Let us know in the comments below.

    Articles: Digital Photography Review (dpreview.com)

  • Canon EOS 6D Mark II pre-production sample gallery

    Just shy of its fifth birthday, the Canon EOS 6D was ripe for replacement. Its successor will ship in August, but we had a chance just a few weeks ago to put it to work photographing some of the most stunning landscapes in the US.

    Take a look at how the Canon EOS 6D Mark II fared on a recent Canon-organized trip to Yellowstone, and stay tuned for a full gallery once we’re able to get our hands on a full-production model.

    See our Canon EOS 6D Mark II
    pre-production sample gallery

    Please note that the samples in this gallery were shot with a pre-production camera. As such, image quality may not be representative of final shipping cameras (although it is likely to be extremely close), and at Canon’s request, Raw files are not available for download.

    Articles: Digital Photography Review (dpreview.com)

  • The same but different: Canon EOS 6D Mark II shooting experience

    Spot the difference: on the outside, the Canon EOS 6D Mark II looks a lot like its predecessor, but it’s a considerably more powerful camera.

    The Canon EOS 6D is something of an oddity in digital camera terms, having been in continuous production for almost five years. But finally, the time has come for an update to one of Canon’s most popular models, and it has arrived in the shape of the EOS 6D Mark II.

    Unusually for a new Canon product, we had the chance earlier this month to use a late pre-production EOS 6D Mark II ahead of its official announcement. What follows is a first take on how the camera performs, based on a two-day shooting excursion, organized by Canon, to the Yellowstone National Park in Wyoming.

    Detail is rendered well by the 6D Mark II’s new 26MP sensor, and Raw files sharpen up nicely.

    EF 24-70mm F2.8 II | 1/400 sec | F8 | ISO 100

    The first thing that struck me about the EOS 6D Mark II is how similar it feels to the original 6D. Ergonomically, Canon really hasn’t changed the basic recipe much. When the two cameras are compared side by side, it’s pretty hard to tell them apart from a moderate distance and even in use, there are more similarities between the models than there are differences.

    Key specifications:

    • 26.2MP full-frame Dual Pixel CMOS sensor
    • 45-point PDAF autofocus system (all cross-type)
    • Dual Pixel live view / movie AF (80% coverage vertical / horizontal)
    • 7560-pixel RGB+IR metering sensor
    • ISO 100-40,000 (expandable between ISO 50-102,400)
    • 6.5fps continuous shooting
    • 1.04 million dot, 3″ fully-articulating touchscreen
    • 1080/60p video
    • Built in Wifi + NFC and GPS

    The major operational difference is also the most obvious. The 6D Mark II’s rear LCD is fully articulating, and touch-sensitive, in line with recent Canon DSLRs like the EOS 80D. In fact, the 6D Mark II handles a lot like a slightly up-sized 80D in general. It also shares a lot of the same technology, in particular the same 45-point PDAF system and Dual Pixel autofocus in live view and movie modes.

    The 6D Mark II handles a lot like a slightly up-sized EOS 80D

    As such, for 80D users looking to make the jump into full-frame, the 6D Mark II would be a very sensible upgrade – aside from the lack of a built-in flash on the 6D, there’s virtually no learning curve.

    From behind, you can see that the 6D Mark II offers almost exactly the same control layout as the original 6D. There’s no dedicated AF joystick, but the rear 8-way controller can be configured for direct control over AF point positioning via a custom function.

    The 6D Mark II incorporates a latest-generation Digic 7 processor, which enables an impressively fast continuous shooting rate of 6.5 fps. I haven’t had a chance to shoot any action with the 6D II yet, but even during extended shooting of bracketed Raw images it didn’t keep me waiting. Canon claims a burst depth of 25 Raw + JPEG Fine shots at 6.5fps with a fast UHS-I card and this seems accurate, based on my experience.

    The downside of adopting the 80D’s PDAF autofocus system is obvious when you put your eye to the viewfinder

    The 6D Mark II’s viewfinder experience is pleasant, thanks to a magnification of 0.71x and 98% coverage vertically and laterally. Sub-100% viewfinder coverage is just one of several differentiators that Canon uses to distinguish its non-professional models (a single card slot being another) but the loss of that 2% is unlikely to cause any problems in normal photography.

    Autofocus response in one-shot mode is fast and positive, but the downside of adopting the 80D’s PDAF autofocus system is obvious when you put your eye to the viewfinder. Because it is inherited from a cropped-sensor camera, the AF array occupies a comparatively small, central area of the 6D II’s frame. The relative lack of lateral AF coverage means that the 6D Mark II won’t be particularly versatile when it comes to off-center compositions or tracking, but to be quite honest, I suspect that most potential buyers won’t care.

    If you really need super-accurate AF tracking from a Canon DSLR, you’ll need to save up for an EOS-1D X Mark II. But based on our experience of the closely-related 80D, the 6D II’s 45-point cross-type AF system, coupled with the 7560-pixel RGB+IR metering sensor is likely to be more than adequate for everyday shooting of mostly static subjects.

    A handheld shot at the long end of Canon’s latest 100-400mm telezoom, straight out of the camera. At ISO 1250, some noise is visible, but it’s not problematic.

    EF 100-400mm F4.5-5.6 II | 1/320 sec | F5.6 | ISO 1250

    By contrast (no pun intended), autofocus in live view and movie modes is peerless, thanks to Canon’s Dual Pixel AF system. With 80% vertical and lateral coverage, and the option to set focus point by touch, the 6D II arguably offers better autofocus with the mirror locked up than it does in conventional viewfinder shooting mode.

    Video: No 4K, and nothing flashy.

    I didn’t shoot much video in Yellowstone (certainly nothing good enough to include in this article) but the 6D Mark II’s video mode is essentially the same as other recent non-professional Canon DSLRs. That means 1080/60p with a familiar, standard feature set. No 4K, and nothing flashy. Sorry, videographers – the 6D Mark II isn’t the low-cost 4K B-camera you might have been hoping for.

    Some people will be largely ambivalent about this. After all, this isn’t 2009 anymore and following the arrival of Sony’s a7-series there are plenty of other options out there for enthusiast videographers that want to shoot 4K video with Canon EF lenses. It’s a shame though, because an affordable 4K-capable camera with Dual Pixel AF really would be a wonderful thing. Maybe one day…

    At any rate, I have no doubt that several video-dedicated sites are typing furious blog posts about it even as we speak.

    Despite the unexciting video specification, Dual Pixel AF does makes the 6D Mark II a very simple, relatively versatile movie-shooting camera, and certainly an enjoyable one, especially for casual hand-held shooting.

    A big difference compared to the original 6D is the Mark II’s articulating screen. This is great for tripod-mounted shooting, and for grabbing low-angle stills. It’s useful in video mode, too, where setting focus by touch is especially handy. The 6D Mark II’s Dual Pixel AF system in live view and video is excellent.

    Even for stills, the articulating touch-sensitive LCD is extremely handy. The majority of my dawn and dusk shooting in Yellowstone was conducted with the 6D Mark II on a tripod, in live view mode with exposure simulation turned on. Compared to a fixed screen, the 6D II’s articulating LCD is a lot more useful, as well as being a lot more comfortable to use from waist height. And while some people will always make the case for tilting, as opposed to side-articulating displays, I came to really appreciate the ability to pop the screen out for vertical compositions, too.

    A tripod-mounted shot, taken at as long an exposure as I could manage without an ND filter. This image was composed vertically, in live view mode. Although the 6D Mark II doesn’t offer focus peaking, the magnification feature in live view mode provides a detailed enough on-screen image for accurate manual focus.

    EF 24-70mm F2.8 II | 0.3 sec | F14 | ISO 100

    Canon’s live view implementation is pretty mature at this point, and features like a real-time histogram, and powerful magnification for accurate manual focus are very useful. I wish the electronic horizon could be overlaid on the live view display, but it’s not hard to work around. I also wish the 6D Mark II offered focus peaking, but in practice the 10X magnified live view display offered enough contrast for accurate focus, even in pre-dawn light. And of course Dual Pixel AF is so good that there’s less need for manual focus anyway.

    I don’t know what this insect is (perhaps a reader could tell me?)* but I think it enjoyed the 6D Mark II’s flip-out screen as much as I did.

    The 1.04 million dot LCD features an anti-smudge coating, but not an anti-reflective coating. As such, dirt and fingerprints clean off the screen very easily, but I did find myself increasing screen brightness for live view work in bright conditions.

    * UPDATE: A reader tells me that this is a Salmon Fly (Pteronarcys dorsata). That was quick!

    While I wasn’t able to perform any controlled testing, the 6D Mark II’s newly developed 26MP sensor appears to deliver excellent results across its native ISO sensitivity span. In good light, at low / medium ISO sensitivities, images look exactly as I’d expect from a modern Canon DSLR. I don’t really care for Canon’s default JPEG rendition, which tends towards rather mushy detail at a pixel level, but the colors are great and there’s a lot of detail in Raw files.

    Because of the current lack of 3rd-party Raw support (and to honor a request from Canon) my workflow up to now has been to perform a basic tonal conversion in Canon’s bundled DPP software, before outputting files as 16-bit TIFFs to Photoshop for sharpening. While I’d probably never find myself shooting in the ‘Landscape’ Picture Style except by accident, I did find that applying (and then modifying) this profile in DPP gave pleasantly bright, vibrant images of the Yellowstone springs.

    The 6D Mark II is dust and weather-sealed (but only with a lens attached). This view shows the remote control port, to the lower right of the lens mount, covered with a rubber cap.

    You’ll find plenty of images in our samples gallery, but I’m reserving judgement on exactly how well the files from the 6D Mark II compare to competitive cameras until we’ve received robust ACR support. According to Canon representatives, the 6D Mark II should outperform the original 6D (which it very evidently does) but may not offer the same kind of dynamic range and absolute resolution of the EOS 5D Mark IV.

    When shadow areas are lifted by a couple of stops, there’s no obvious banding, but noise becomes prominent

    I had the opportunity to accidentally run a kind of halfway test on the 6D Mark II’s shadow dynamic range when shooting bracketed images of a dawn eruption from Old Faithful, heavily backlit by the rising sun. When shadow areas are lifted by a couple of stops, there’s no obvious banding, but noise becomes prominent, suggesting that the 6D Mark II’s sensor probably isn’t ISO-invariant. This isn’t a surprise, but watch this space for confirmation from our lab testing once we receive a shipping sample.

    This shot was deliberately exposed for the highlighted vapor cloud of Old Faithful’s eruption, lit from behind by the rising sun. I adjusted the exposure in Canon’s DPP software to recover midtones and shadows.

    EF 24-70mm F2.8 II | 1/400 sec | F11 | ISO 100

    Something that prospective 6D upgraders should be aware of is that the increase in resolution from 20MP to 26MP will show up flaws in cheaper lenses. I was mostly shooting with Canon’s excellent 16-35mm F4L and 24-70mm F2.8L II on the trip, both of which deliver very good edge-to-edge sharpness, but images from the cheaper 24-105mm F4L II don’t look great towards the edges. That said, I am probably more inclined towards pixel-peeping than the average 6D II buyer will be (certainly more than they should be) and at normal viewing distances, even a stickler like me wouldn’t know the difference.

    In summary

    Every new generation of cameras brings performance improvements, and after almost five years, it’s no surprise that the 6D Mark II is a considerably more powerful camera than its predecessor. It’s fast, very responsive, impressively easy to use, and offers a good balance of user-friendly ergonomics and customization options (28 in all), which should appeal to its intended user base.

    Another tripod-mounted shot, taken at sunset. Although I rarely shoot in anything other than default JPEG Picture Style, I found that applying the Landscape style to Raw files in DPP and then modifying the tones gave a good starting point for sunrise and sunset shots.

    EF 16-35mm F4 | 1/5 sec | F16 | ISO 100

    Like the original 6D, the 6D Mark II is a solid, predictable, easy to use camera that appears to be capable of excellent image quality. It’s pretty compact, but impressively well built, too, including some degree of weather-sealing. As usual, we don’t know exactly what that means, but I can tell you that during the Yellowstone trip, my 6D II shrugged off a fairly good soaking in an unexpected downpour without any ill-effects.

    The 6D Mark II makes an excellent lower-cost alternative for someone considering an EOS 5D Mark IV

    The 6D II is unlikely to to be able to rival competitors like the venerable Nikon D750 when it comes to autofocus performance and Raw dynamic range, and I wish there was a dedicated AF positioning joystick, but for a lot of photographers these will count as minor complaints.

    On the face of it then, the 6D Mark II makes an excellent lower-cost alternative for someone considering an EOS 5D Mark IV, and a sensible upgrade for 80D users looking to move up to full-frame.

    Canon EOS 6D Mark II Samples (pre-production)

    $ (document).ready(function() { SampleGalleryV2({“containerId”:”embeddedSampleGallery_1238315273″,”galleryId”:”1238315273″,”isEmbeddedWidget”:true,”standalone”:false,”selectedImageIndex”:0,”startInCommentsView”:false,”isMobile”:false}) });

    Please note that the samples in this gallery were shot with a pre-production camera. As such, image quality may not be representative of final shipping cameras (although it is likely to be extremely close), and at Canon’s request, Raw files are not available for download.

    Articles: Digital Photography Review (dpreview.com)
  • Laptop/Rooftop: Chicago Apple Store is Crowned with a Giant MacBook

    [ By SA Rogers in Architecture & Offices & Commercial. ]

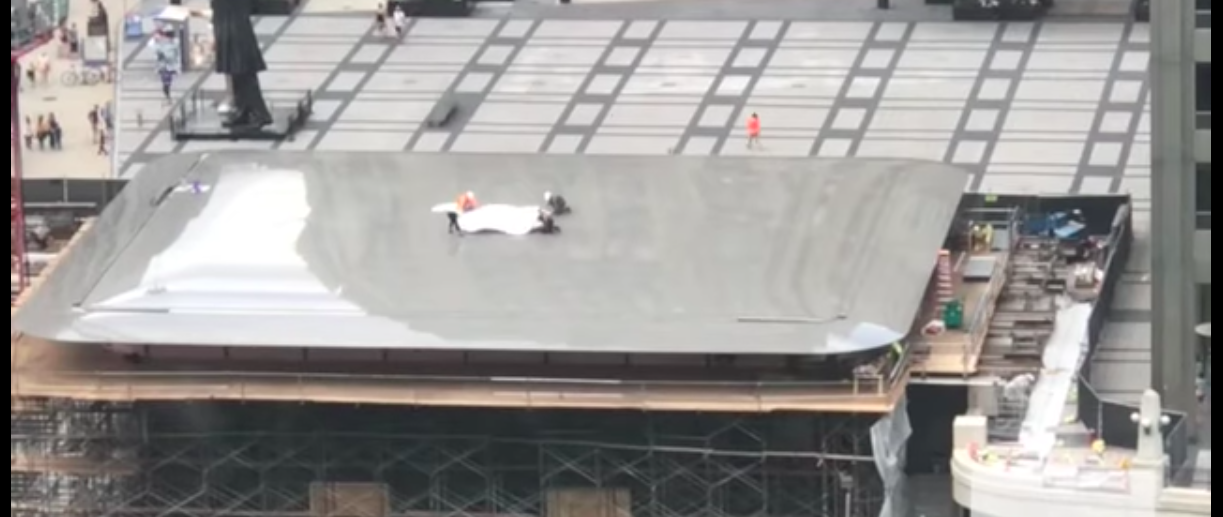
    Construction is in full swing on Chicago’s new Apple store by Foster + Partners, revealing a surprise design feature that wasn’t visible in the firm’s early renderings: a gigantic MacBook for a roof. When the project was initially unveiled in 2015, the drawings depicted a sleek two-story structure with river views, glass walls and a slimline roof canopy that looks like it’s precariously balancing on slender supports. But construction crews recently added a shiny metallic silver finish to that canopy – and a familiar white Apple logo.

    The store is a relocation of Apple’s Chicago flagship, and will measure about 20,000 square feet. The glass walls range from 14 to 32 feet in height, but there’s little danger of breakage, as they consist of four layers of half-inch-thick glass melded with additional layers of thicker laminated glass. The carbon fiber roof is made of a similar material as yacht hulls, which is what gives it that iconic sheen. It’s four feet thick in the center and just four inches thick at its tapered edges.

    You can see this unexpected addition in action in the video above. DNA Chicago reports that crews affixed the logo and left it in place for no more than 60 minutes before removing it again, but it seems likely that it’ll return, especially since the Chicago Tribune reported back in March that the logo would be part of the design. The Tribune has more photos of the construction process.

    Share on Facebook


    [ By SA Rogers in Architecture & Offices & Commercial. ]

    [ WebUrbanist | Archives | Galleries | Privacy | TOS ]


    WebUrbanist

  • Video: Removing a stuck lens filter… with a band saw

    What do you do when your cheap lens filter is so badly stuck on your very expensive Canon 24-70mm F2.8L II USM lens, that even a specially-designed filter wrench won’t get it off? If you are former MythBuster Adam Savage, you take that puppy to your band saw and scare the crap out of the lens owner.

    That’s what he did for one of the latest videos on the Tested YouTube channel, when fellow host Norman Chan got yet another filter stuck (the second one in 6 months) on his $ 1,800 lens.

    The footage is a bit terrifying for gear lovers, but have no fear: no lenses were hurt in the making of this video. What Savage does is cut two small notches into the rim of the lens filter, one on either side. Then, after expanding those notches with a file, he slots in a solid metal ruler and uses it to torque the filter clean off.

    The moment of truth…

    Watch the video up top to see the whole cringe-worthy process for yourself, and then send this video to the biggest Canon gear head on your mailing list. Nothing like a mild heart attack to really get you over that Wednesday hump…

    Articles: Digital Photography Review (dpreview.com)
  • Architecture for Animals: 13 Structures Designed with Non-Human Use in Mind

    [ By SA Rogers in Architecture & Public & Institutional. ]

    If we’re going to keep animals in artificial environments to make money off gawking at them, you’d hope we’d at least design these structures sensitively, hiring top architects to give them the kind of loving care we’d give to our own homes. Whether building spacious zoo enclosures mimicking natural environments, bat-friendly bridges, stables to house horses in ultimate comfort or wildlife crossings over highways, this collection of animal-centric architecture aims to be the next best thing to leaving animals in the wild where they belong, and giving them plenty of space from human activity.

    Panda House by Bjarke Ingels Group / BIG

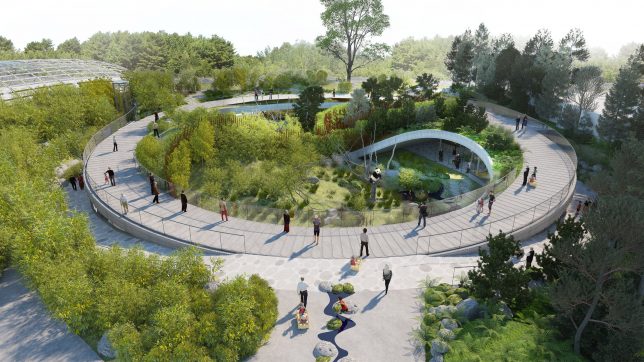
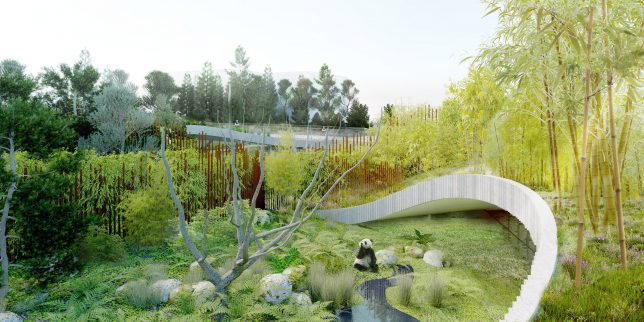
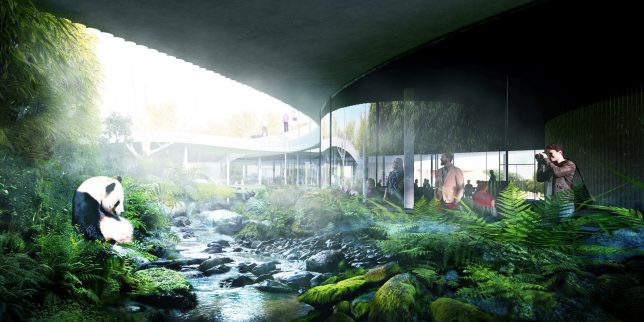
    BIG designed a circular indoor/outdoor enclosure for giant pandas at the Copenhagen Zoo, set to open in 2018. The spacious and lushly planted structure will house two pandas relocated from Chengdu, China in a layout inspired by the Chinese yin-yang symbol, with each half tilting up at either end. There’s a bamboo forest on one side and a denser ‘misty’ forest on the other to represent the panda’s habitats in the wild.

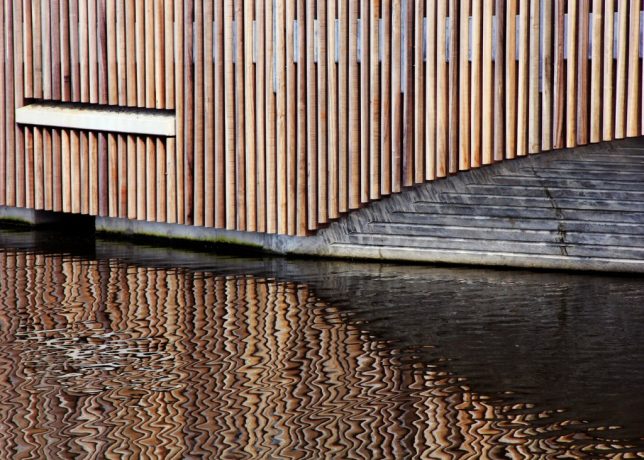
    Bat-Friendly Bridge by NEXT Architecture

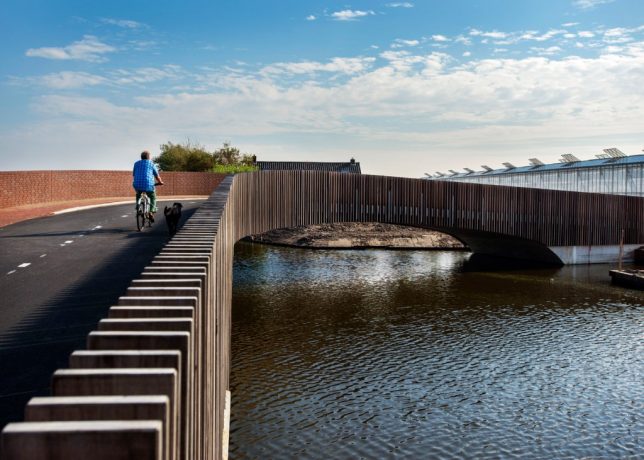
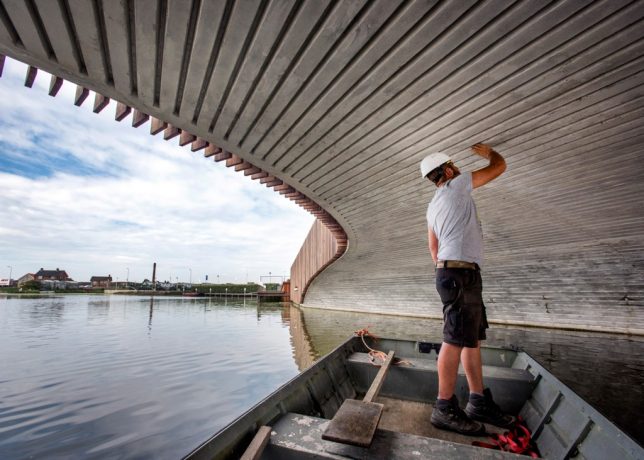
    This bridge by Next Level Architecture in South Holland doubles as a bat habitat, with just a few modifications to a conventional bridge design, providing an example that could be replicated all over the world. Spanning a river that’s an important natural pathway for the local bat population, the bridge features extra-thick concrete to increase its thermal mass, making it warm for winter hibernation and a cool summer nesting spot.

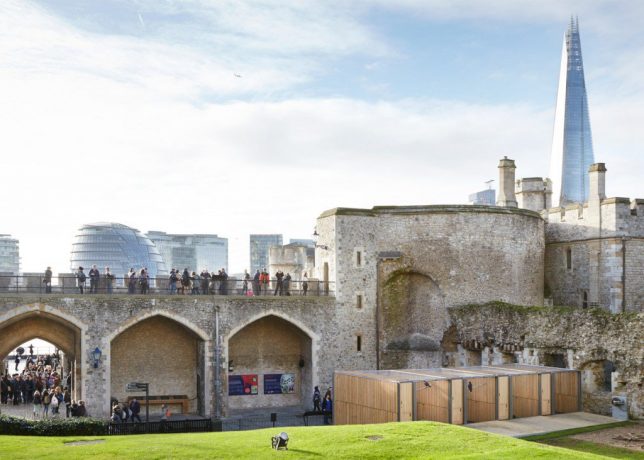
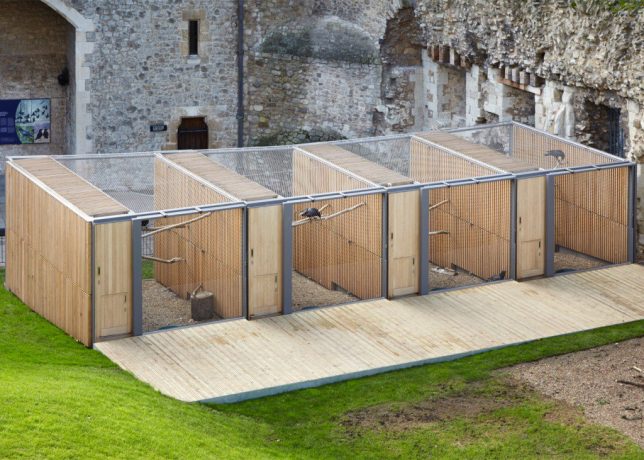
    Raven Enclosure at the Tower of London by Llowarch Llowarch Architects

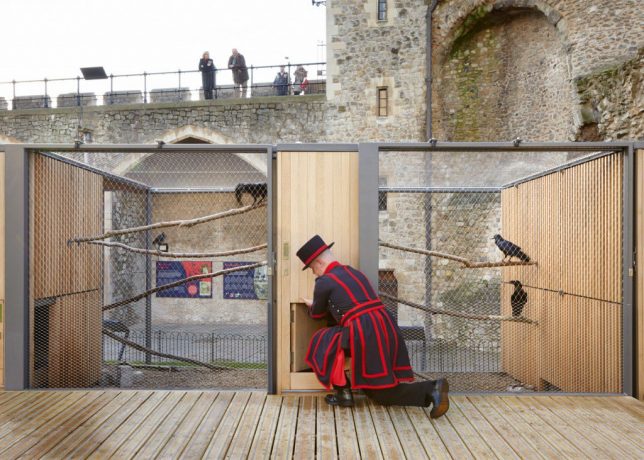
    Five oak and mesh aviaries by Llowarch Llowarch Architects contrast with the ancient forms of the Tower of London, replacing the ‘ad hoc collection of sheds’ once used to house the complex’s famous resident ravens. According to English legend, if the ravens ever leave the Tower of London, the kingdom will fall – so the birds have been protected inhabitants of the historic palace, fortress and prison since the 17th century. Of course, different ravens have come and gone over the years.

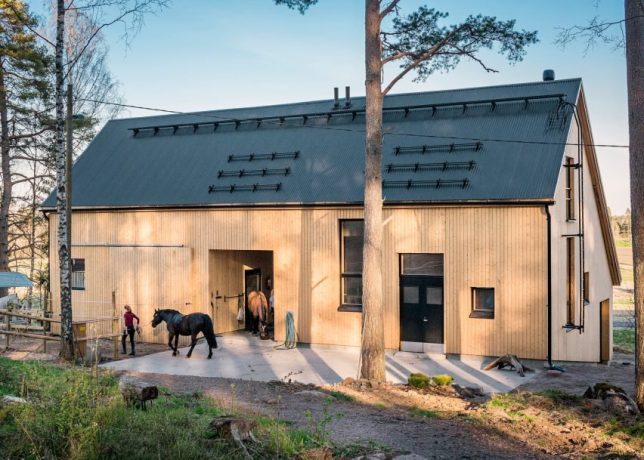
    Finnish Stables by Pook

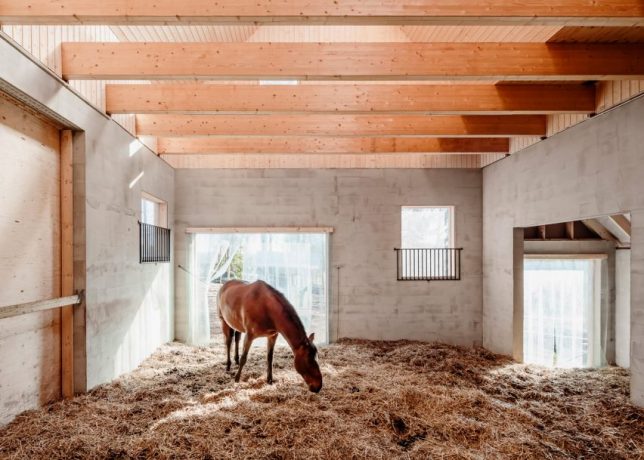
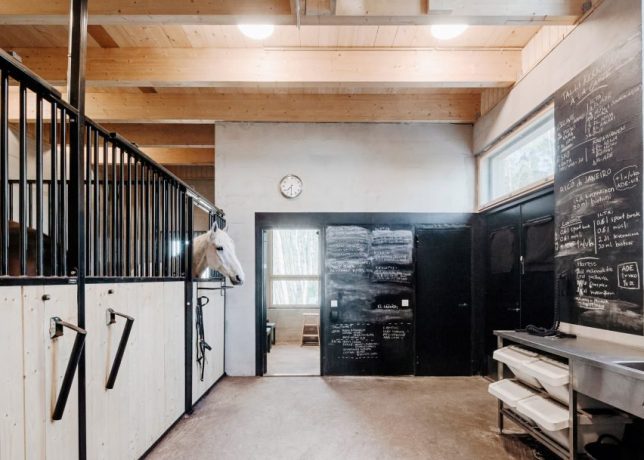
    Local architecture studio Pook designed this stylish stable on the edge of a Finnish forest to blend in with the rural setting and complement the local architectural vernacular. The layout creates wind shelters in outdoor spaces to protect the horses against the southwestern winds. Inside, there’s an open room for feeding and walking the horses, storage for equipment and a barn for manure. The use of untreated pine in the cladding helps naturally control the humidity of the environment for the horses’ health.

    Kangaroo Enclosure by White Arkitekter

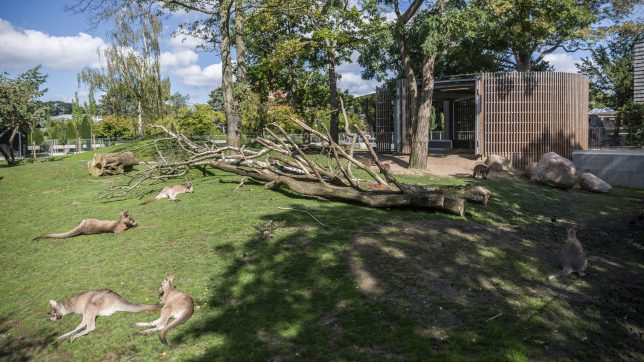
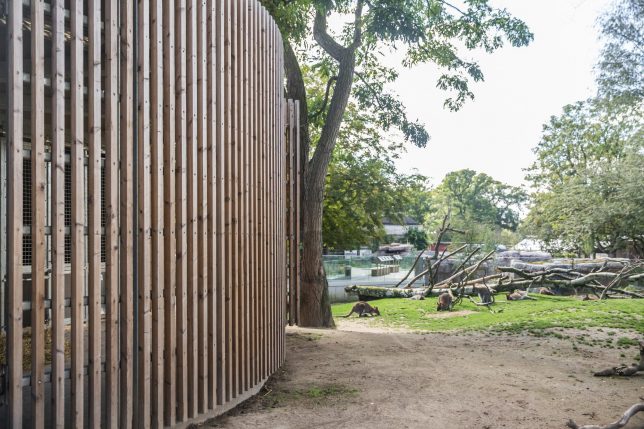
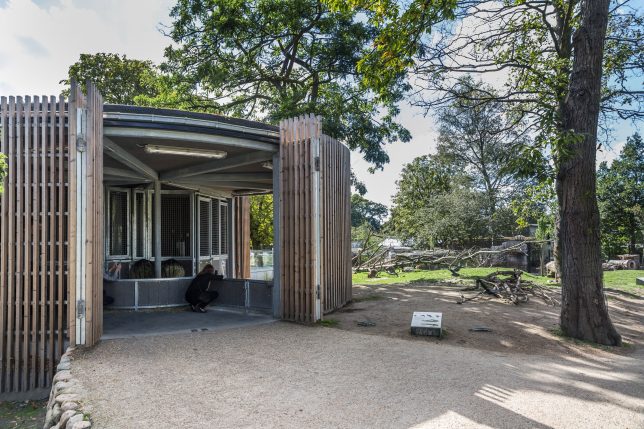
    Another modern addition to the Copenhagen Zoo is this cylindrical house for Tasmanian kangaroos by White Arkitekter, which allows visitors to enter the kangaroos’ enclosure without stressing the animals. Part of the enclosure is for the kangaroos themselves, with a heated concrete floor to keep them warm in winter. The slatted timber doors can be folded back to open parts of the space to the wider enclosure, while others remain closed so shy kangaroos can have their privacy.

    Next Page – Click Below to Read More:
    Architecture For Animals 13 Structures Designed With Non Human Use In Mind

    Share on Facebook


    [ By SA Rogers in Architecture & Public & Institutional. ]

    [ WebUrbanist | Archives | Galleries | Privacy | TOS ]


    WebUrbanist