Blog

  • Pixelmator 3.7 update adds High Sierra and HEIF support

    Pixelmator has released version 3.7 Mount Whitney of its comprehensive image editing app for Mac. The update brings support for macOS High Sierra and the new HEIF (High Efficiency Image File Format) image format that was introduced with the iPhone 8 series and iPhone X.

    In addition, Pixelmator can now directly be launched from the Photos app and any edits you make within the more powerful editor will be saved to the original image in the Photos library as well. The option to edit with Pixelmator will appear in the Photos Image menu as soon as the app has been installed or updated to the latest version.

    “People love using Pixelmator on the Mac, and one of the biggest reasons is its extensive integration with macOS,” said Saulius Dailide, one of the founders of the Pixelmator Team. “And with Pixelmator 3.7 Mount Whitney, we think users are really going to love the much more seamless experience of launching Pixelmator right from the Photos app and automatically saving changes back to the same image in the Photos library.”

    The update also includes improvements to the Repair Tool to make it faster and more accurate, as well as improved support for PSD images. The updated Pixelmator can be downloaded from the App Store for $ 30.

    Articles: Digital Photography Review (dpreview.com)

  • Nine things you should know about the Google Pixel 2

    Nine things you should know about the Google Pixel 2

    With all the hype surrounding the release of the Google Pixel 2 and Pixel 2 XL and their “world’s highest rated smartphone camera,” it’s easy to lose the forest for the trees. What’s important about this new phone? Where did Google leave us wanting more? How is this phone’s camera better than its predecessor? And why should photographers care about the technology baked into Google’s new flagship?

    After covering the launch in detail and spending some time with the Pixel 2 in San Francisco, we’re setting out to answer those questions (and a few others) for you.

    Dual Pixel AF

    The new Pixel phones sport a very clever feature found on higher-end Canon cameras: split left- and right-looking pixels behind each microlens on the camera sensor. This allows the camera to sample left and right perspectives behind the lens, which can then be used to focus the camera faster on the subject (it’s essentially a form of phase-detect AF).

    It’s officially called dual pixel autofocus, and it has the potential to offer a number of advantages over the ‘focus pixels’ Apple phones use: every pixel can be dedicated to focus without any impact to image quality (see this illustration). We’ve been impressed with its implementation on the Samsung Galaxy S7 and on Canon cameras. So we’re expecting fast autofocus for stills, even in low light, as well as very smooth autofocus in video with little to no hunting. Given how good the Pixel 2’s stabilized 4K video is, you might even make some professional-looking clips from these new phones.

    Dual pixel + machine learning driven portraits

    The split pixels have another function: the left-looking and right-looking pixels underneath each microlens essentially sample two different perspectives that are slightly shifted from one another. Google then build a rudimentary depth map using this set of separated images and some help from its machine learning algorithms.

    Clever. However, the stereo disparity between the two images are likely to be very small compared to a dual camera setup, which is likely to make it difficult for the Pixel 2 cameras to distinguish background from subject for more distant subjects. This might explain the poor results in DXO’s comparison, but better results in the image above where Allison is much closer to the camera.

    On the plus side, Portrait mode now renders full resolution 12MP files (you only got 5MP files on the original Pixels), and the ‘lens blur’ Google uses is generally more pleasing than Apple’s more Gaussian blur. Out of focus highlights are rendered as more defined circles compared to Apple’s results. This comes at a cost though: the blurring algorithm is computationally intensive so you’ll generally wait a few seconds before seeing the result (and you can’t see it in real time as you can with Apple).

    Hardier hardware

    Unsurprisingly if you’ve been following the rumor mill, the hardware specs on the new Pixel 2 phones didn’t particularly impress any more than what we’ve seen from other phones. They’re nice devices, and both are far more durable with IP67 ratings (a huge step up from the poor IP53 ratings of the previous Pixel phones, which were prone to quick wear and tear), but hardware-wise there’s not too much to be excited about.

    We’ve lost the headphone jack but gained stereo speakers in the front. The XL has less of a bezel, but it’s still not as bezel-less as Samsung phones. No dual-cameras. RAM and processor are what you get in other Android phones. You can invoke the Assistant with a squeeze, but… well…

    Nothing really stands out. But wait, there’s more to the story.

    AI First

    If there’s one point Google CEO Sundar Pichai continuously makes in his presentations, it’s that we’re moving from a ‘Mobile First’ to an ‘AI First’ world. He’s referring to the move away from thinking of mobile devices simply as pocketable computation devices but, instead, intelligent devices that can adapt to our needs and make our lives easier. And Google is a leader here, thanks to the intelligence it acquires from its search services and apps like Maps and Photos.

    AI is increasingly being used in many services to make them better, but often transparently. CEO Pichai recently cited an example of the Fitness app: every time he opens it he navigates to a different page. But rather than have the app team change the default page, or add an option to, he figures AI should just learn your preference transparently.

    What’s that mean for photography and videography? We’re purely speculating here, but, imagine a camera learning your taste in photography by the way you edit photos. Or the photos you take. Or the filters you apply. Or the photos you ‘like’. How about learning your taste in music so when Google Assistant auto-builds videos from your library of photos and videos, they’re cut to music you like?

    The possibilities are endless, and we’re likely to see lots of cool things make their way into the new Pixel phones, like…

    Google Lens

    Sundar Pichai first talked about Google Lens at the I/O Developer Conference earlier this year. It marries machine vision and AI, and is now available for the first time in the Photos app and within Google Assistant on the new Pixel phones. Google’s machine vision algorithms can analyze what the camera sees, and use AI to do cool things like identify what type of flower you’re pointing your camera at.

    This sort of intelligence is applicable to photography as well: Pichai talked about how AutoML has improved Google’s ability to automatically identify objects in a scene. Anything from a fence to a motorbike to types of food to your face: Google is getting increasingly better at identifying these objects and understanding what they are – automatically using reinforcement learning.

    And once you understand what an object is, you can do all sorts of cool things. Remove it. Re-light it. Identify it so you can easily search for it without every keywording your photos. The Photos app can already pull up pictures of planes, birthdays, food, wine, you name it. We look forward to seeing how the inclusion of Google Lens in the new phones makes Photos and Assistant better.

    Maybe intelligent object recognition could even fix flare issues by understand what flare is… though this may not be necessary for the new phone…

    Goodbye ugly lens flare

    Thankfully, the nasty flare issues that plagued the first-gen Pixel phones appear to be remedied by lifting the camera module above the glass backing, which has also been reduced and streamlined to fit flush with the rest of the phone.

    The camera unit is raised from the back ever-so-slightly though, but that’s a compromise we’re willing to accept if it means the camera isn’t behind a piece of uncoated glass – a recipe for flare disaster. The only flare we’ve seen so far with our limited hands-on time is what DXO witnessed in their report: the lens element reflections in corners you sometimes see even in professional lenses. That’s something we’ll gladly put up with (and that some of us even like).

    If flare bugged you on the previous Pixel phones (it certainly bugged me), consider it a non-issue on the new phones.

    Incredibly smooth video

    When the original Pixel launched, Google claimed its camera beat other cameras with optical image stabilization (OIS) despite lacking OIS. It claimed its software-based stabilization approach allowed it to get better with time as algorithms got better. Omitting OIS was also crucial to keeping the camera small such that it fit within the slim body.

    Google is singing a different tune this year, including both OIS and electronic image stabilization (EIS) in its larger camera unit that extends ever-so-slightly above the back glass. And the results appear to be quite impressive. The original Pixels already had very good stabilization in video (even 4K), but combining OIS + EIS appears to have made the video results even smoother. Check out the video from Google above.

    For low light photography, OIS should help steady the camera for longer shutter speeds. You should also get better macro results and better document scanning. Hey, that’s worth something.

    Equally as important as what the new phones offer is what the new phones don’t offer…

    Color management? HEIF?

    Notably absent was any talk about proper color management on the new phones. The previous Pixels had beautiful OLED displays, but colors were wildly inaccurate and often too saturated due to lack of any color management or proper calibrated display modes.

    iPhones have some of the most color accurate screens out there. Their wide gamut screens now cover most of DCI-P3 but, more importantly, iOS can automatically switch the screen’s gamut between properly calibrated DCI-P3 and standard gamut (sRGB) modes on-the-fly based on content.

    This means you view photos and movies as they were intended. It also means when you send an image from your iPhone to be printed (using a service that at least understands color management, like Apple’s print services), the print comes back looking similar, though perhaps a bit dimmer.*

    The Samsung Galaxy S8 also has calibrated DCI-P3 and sRGB modes, though you have to manually switch between them. The new Pixel phones made no mention of calibrated display modes or proper color management, though Android Oreo does at least support color management (though, like Windows, leaves it up to apps). But without a proper display profile, we’re not sure how one will get accurate colors on the Pixel 2 phones.


    *That’s only because prints aren’t generally illuminated as much as bright backlit LCDs that these days reach anywhere from 6 to 10 times the brightness prints are generally viewed at.

    HDR display?

    Sadly there was no mention of 10-bit images or HDR display of photos or videos (using the HDR10 or Dolby Vision standards) at Google’s press event. This leaves much to be desired.

    The iPhone X will play back HDR video content using multiple streaming services, but more importantly for photographers it will display photos in HDR mode as well. Remember, this has little to do with HDR capture but, instead, the proper display of photos on displays—like OLED—that can reproduce a wider range of tones.

    To put it bluntly: photos taken on an iPhone X and viewed on an iPhone X will look more brilliant and have more pop than anything else you’re likely to have seen before thanks to the support for HDR display and accurate color. It’s a big deal, and Google seems to have missed the boat entirely here.

    HDR displays require less of the tonemapping traditional HDR capture algorithms employ (though HDR capture is still usually beneficial, since it preserves highlights and decreases noise in shadows). Instead of brightening shadows and darkening bright skies after capture, as HDR algorithms like the Pixel 2’s are known to do post-capture (above, left), leaving many of these tones alone is the way to go with high dynamic range displays like OLED.

    In other words, the image above and to the right, with its brighter highlights and darker shadows, may in fact be better suited for HDR displays like that of the Pixel 2, as long as there’s still color information present in the shadows and highlights of the (ideally 10-bit) image. Unfortunately, Google made no mention of a proper camera-to-display workflow for HDR capture and display.

    Articles: Digital Photography Review (dpreview.com)

  • RED unveils Monstro 8K VV full-frame sensor with 17+ stops of dynamic range

    RED has just announced its new Monstro 8K VV full-frame sensor for Weapon cameras. The device features a 35.4MP 40.96mm x 21.60mm sensor and is able to record at a full 8K/60fps resolution. RED explains that the Monstro 8K VV replaces its existing DRAGON 8K VV sensor, and that anyone who has ordered the DRAGON 8K VV will be offered the Monstro as of October 5th.

    The Monstro 8K VV sensor has full support for RED’s IPP2 image processing pipeline, as well as an “unprecedented dynamic range [of 17+ stops] and breathtaking color accuracy,” according to RED President Jarred Land. When coupled with the Weapon 8K VV, the device can simultaneously record Redcode RAW and either Avid DNxHD/HR or Apple ProRes, likewise offering data speeds up to 300MB/s. The sensor’s full technical spec sheet is insane, and available for your viewing pleasure here.

    Existing carbon fiber Weapon customers have the option of upgrading for $ 29,500, while the new Weapon with the full-frame Monstro sensor is priced at $ 79,500. New orders for the device will start shipping to customers in early 2018.

    Press Release

    RED ANNOUNCES THE NEW MONSTRO 8K VV

    Today RED announced a new cinematic Full Frame sensor for WEAPON cameras, MONSTRO™ 8K VV. MONSTRO is an evolutionary step beyond the RED DRAGON 8K VV sensor with improvements in image quality, including dynamic range and shadow detail.

    This new camera and sensor combination, WEAPON 8K VV, offers Full Frame lens coverage, captures 8K full format motion at up to 60 fps, produces ultra-detailed 35.4 megapixel stills, and delivers incredibly fast data speeds of up to 300 MB/s. Like all of RED’s DSMC2 cameras, WEAPON shoots simultaneous REDCODE RAWand Apple ProRes or Avid DNxHD/HR recording and adheres to RED’s dedication to OBSOLESCENCEOBSOLETE—a core operating principle that allows current RED owners to upgrade their technology as innovations are unveiled as well as move between camera systems without having to purchase all new gear.

    “RED’s internal sensor program continues to push the boundaries of pixel design and MONSTRO is the materialization of our relentless pursuit to make the absolute best image sensors on the planet,” says Jarred Land, President of RED Digital Cinema. “The Full Frame 8K VV MONSTRO provides unprecedented dynamic range and breathtaking color accuracy with full support for our IPP2 pipeline.”

    The new WEAPON will be priced at $ 79,500 (for the camera BRAIN) with upgrades for carbon fiber WEAPONcustomers available for $ 29,500. MONSTRO 8K VV will replace the current RED DRAGON 8K VV sensor in RED’s lineup, and customers that had previously placed an order for a RED DRAGON 8K VV sensor will be offered this new sensor beginning today. New orders will start being fulfilled in early 2018.

    RED has also announced a comprehensive service offering for WEAPON carbon fiber camera owners called REDARMOR-W. RED ARMOR-W offers enhanced and extended protection beyond basic RED ARMOR, and also includes one sensor swap each year.

    “‘Good’ has never been ‘good enough’ for RED,” says Land. “We put ourselves in the shoes of our customers and see how we can improve how we can support them. RED ARMOR-W builds upon the foundation of our original extended warranty program and includes giving customers the ability to move between sensors based upon their shooting needs.”

    Additionally, RED’s enhanced image processing pipeline (IPP2) is now available in-camera for all cameras with HELIUM and MONSTRO sensors through today’s v7.0 release firmware update. IPP2 offers a completely overhauled workflow experience, featuring enhancements such as smoother highlight roll-off, better management of challenging colors, an improved demosaicing algorithm, and more.

    Articles: Digital Photography Review (dpreview.com)

  • Billingham introduces the tiny ‘72’ for premium compacts and small mirrorless kits

    Premium British bag manufacturer Billingham has launched a new small shoulder bag called the Billingham 72, aimed at users of fixed lens premium cameras and those with small mirrorless bodies. The Billingham 72 features a new padding design that puts a double layer of high-density foam all around the body of the bag in a continuous form that leaves no spaces between the sides and the base.

    Traditional Billingham canvas or FibreNyte finishes are available, both of which are weather, water and heat resistant for the entire life of the bag. All fittings are made from leather and brass, and a quick release catch allows easy access to the cover whether the bag is over the shoulder or attached to your belt.

    The bag is available in a choice of five color combinations that will go on sale in the UK tomorrow for £100. Sales in the USA are expected to begin after Christmas.

    For more information visit the Billingham website.

    Press Release

    Small and perfectly formed. Billingham announces the ‘72’

    High quality, lightweight, compact bag with dense foam padding offers outstanding protection for fixed prime lens and small system cameras

    Designed for owners of fixed prime lens cameras and the growing range of small mirrorless and compact systems, Billingham has today announced the Billingham 72. The new, high quality, lightweight bag will be available to view and order for the first time at the Digital Splash 17 exhibition in Liverpool, 7-8 October.

    The Billingham 72 will come in five colour combinations and will cost £100 inc. VAT:

    • Sage FibreNyte & Chocolate Leather
    • Khaki Canvas & Tan Leather
    • Burgundy Canvas & Chocolate Leather
    • Black Canvas & Tan Leather
    • Black FibreNyte & Black Leather

    At 150 x 130 x 190mm (WxDxH), the Billingham 72 is the ideal size for premium fixed lens cameras such as the Leica Q, Fujifilm X100 range or Sony DSC-RX1R series, and many small mirrorless system cameras with one standard lens, such as the Fujifilm X-T2, Olympus OMD E-M series, Leica M rangefinders or Canon EOS M kits. The bag itself, with shoulder sling attached, weighs just 0.46kg.

    Made in England at the Billingham factory, the 72 offers extensive protection thanks to a newly-designed arrangement of structured, highly dense foam in a continuous double layer around the whole body of the bag. This special fortified padding safeguards the entire camera and lens, keeping all edges and corners fully protected.

    Heavier camera bodies with small lenses fit perfectly into the Billingham 72 interior with the grip facing upwards. A padded inner lid over the main compartment completely covers the top end of the camera, but allows the photographer quick access to their equipment when required. Ideal for travelling, or when working in large crowds, the equipment is shielded on all sides from any knocks or bumps.

    With an outer body constructed of either Billingham canvas or FibreNyte, the Billingham 72 offers the ultimate in water resistance and provides full defence against inclement weather conditions. Both materials are hard-wearing yet lightweight and never require reproofing, remaining moisture- and heat-resistant for their entire life. FibreNyte is an extra-rugged material that is colour-fast, and delivers exceptional durability and protection against wear and tear.

    The bag’s Quick Release System comprises a strong leather tab and brass ClogBall, enabling fast opening with one hand to retrieve the camera, while securing the equipment in transit. Each model is reinforced with the finest top-grain leather, and all fittings are made from solid brass.

    For maximum versatility, the Billingham 72 comes with a comfortable, detachable shoulder sling made of extra strong, shuttle-woven spun polyester, which is long enough to be worn across the body. It also incorporates a wide belt loop for those who prefer to keep their camera a little closer.

    A precisely-formed removable foam base and a vertical padded divider attached with Velcro® are included with the Billingham 72, enabling the photographer to configure the bag and adjust it to fit their individual requirements. A small pocket on the front provides storage for a spare battery, lens cap or memory cards.

    As with all Billingham bags, the 72 is manufactured with extreme precision, meeting meticulous technical standards. Once it has passed Billingham’s strict quality controls, each bag is adorned with a laser-engraved woven label containing an individual 10-digit barcoded serial number as part of the company’s Unique Identifier (UI) system, allowing the bag to be registered, identified and tracked throughout its life.

    Harry Billingham, director at M. Billingham & Co, said, “The idea for the Billingham 72 was conceived by our newly formed in-house design team, following extensive research into the market. They identified a need for a secure but lightweight bag to protect smaller systems or fixed lens cameras, particularly those with heavier bodies, that also gives photographers immediate access to their equipment. It makes a perfect addition to our range, providing owners of small premium cameras with a smart, reliable and robust way of protecting their valuable kit from the elements and daily wear and tear.”

    The Billingham 72 comes with a 5 year manufacturer’s guarantee.

    A collection of leather accessories is available for all Billingham bags, including fine leather luggage tallies and shoulder pads, to complement the colour and style of each model.
    More information on the Billingham range can be found at www.billingham.co.uk.

    Billingham 72 technical specifications:

    • External dimensions: 150 x 130 x 190mm (WxDxH)
    • Internal dimensions: 110 x 90 x 140mm (WxDxH)
    • Capacity: 1.38 litres
    • Weight: 0.33 kgs (without shoulder sling) / 0.46 kgs (with shoulder sling)
    • Sling: Adjustable between 99cm and 172cm in length
    • Front pocket: 110 x nominal x 120mm (WxDxH)

    Availability

    The Billingham 72 is available to order now from Billingham stockists in the UK.

    Articles: Digital Photography Review (dpreview.com)

  • Slinky Chairs: Accordion-Style Transforming Furniture Stretches & Bends

    [ By SA Rogers in Design & Furniture & Decor. ]

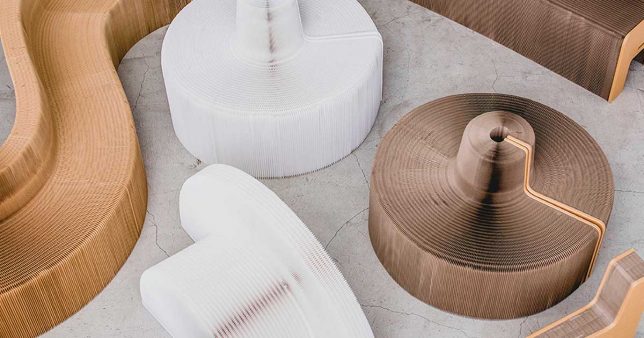
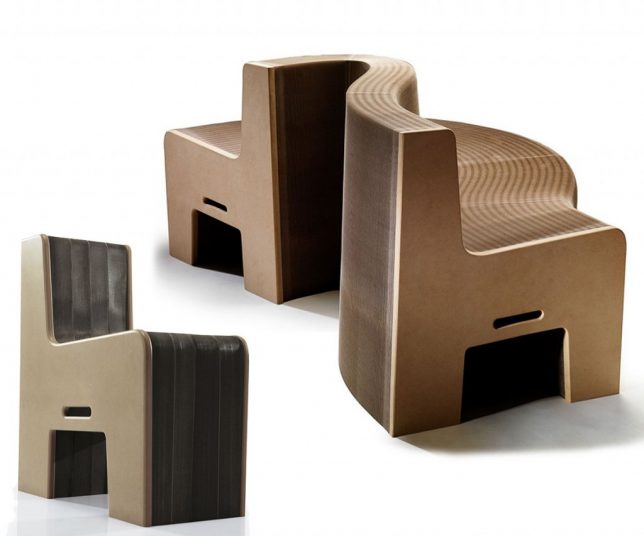
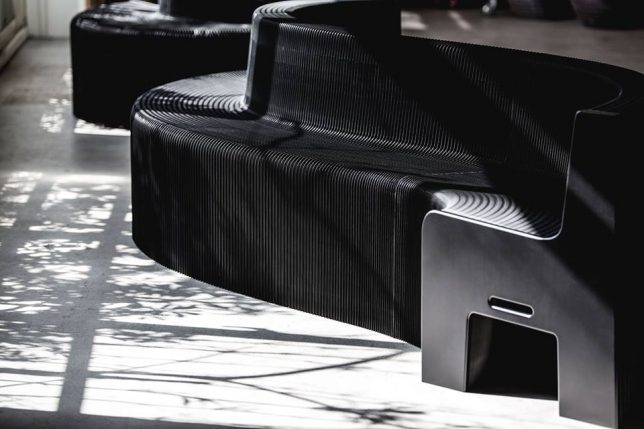
    What starts as a flat, stackable, highly portable package expands more than ten times its original size when you pull on either end, bending and curling to become a sofa for a group. The Flexible Love Sofa and Chair are made from 100% recycled paper, yet they’re surprisingly strong, with the longer sofa holding up to 4,232 pounds at once when fully expanded. Designed in Taiwan, the series is available in ‘marble’ white, ‘lava’ black and ‘earth’ brown, and measures just over 5 inches across when collapsed.

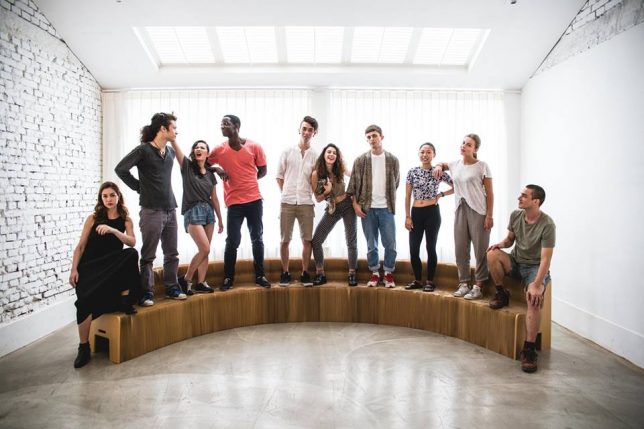
    The Flexible Love company shows off what the seats can do in a series of videos, so you can see it in action. It looks remarkably easy to manipulate, and somehow stays in place when you curl it into an S-shape or bend one end to the ground. If you’re skeptical that it can really hold as much weight as the company claims when expanded to its full 30-foot width, they’ve provided several images in which a group of people all stand on the seat at once.

    With furniture like this, you’d never need to worry about accommodating extra guests again. It’s fun to see the different ways in which it can be arranged around tables. Each piece is hand-crafted of FSC-certified materials, assembly-free, recyclable and made with non-toxic finishing. Though the Flexible Love website is currently down for maintenance, you can purchase both the sofa and chair model at Expand Furniture in the meantime, with prices starting at $ 380.

    Share on Facebook


    [ By SA Rogers in Design & Furniture & Decor. ]

    [ WebUrbanist | Archives | Galleries | Privacy | TOS ]


    WebUrbanist

  • On1 Photo RAW 2018 announced: Adds HDR processing, advanced masking and more

    $ (document).ready(function() { SampleGalleryV2({“containerId”:”embeddedSampleGallery_1486583421″,”galleryId”:”1486583421″,”isEmbeddedWidget”:true,”standalone”:false,”selectedImageIndex”:0,”startInCommentsView”:false,”isMobile”:false}) });

    On1 just released the newest version of its stand-alone RAW photo manager and non-destructive editor: On1 Photo RAW 2018. Put another way, there’s now yet another alternative to Lightroom out there, and with this new update the program is more capable than ever, adding features like HDR merge and panorama stitching, advanced masking capabilities, and more.

    You can get a decent overview of the new features in the 2018 version in the video below:

    The main additions to this version of On1 Photo RAW are On1 HDR, panorama stitching, new advanced masking options like Feather and Density that allow you to alter a mask globally, Color range masking, versioning, selective noise reduction, and an updated UI that On1 characterizes as “clean and modern.” There’s also a new “Paint with Color Brush” that allows you to either paint with a solid color or leave the luminosity of the underlying layer intact to change things like eye or hair color.

    You can get a full breakdown of these and other new features on the On1 blog.

    The app is being released as a free Beta on Friday, with an official release slated for the end of October. The full app—which promises ‘much more’ when it arrives after the beta period—will cost $ 120 for new users, while current On1 users will have the option to upgrade for a discounted price of just $ 80 (usually $ 100). Both the full version and upgrade package are already available for pre-order.

    To learn more about the app or pre-order your copy, head over to the On1 blog by clicking here.

    Articles: Digital Photography Review (dpreview.com)

  • From the sidelines to the driver’s seat: A photographer’s evolution

    I have worked as a race photographer, a wedding photographer, landscape photographer; I photographed architecture, food, portraits and hot air balloons.

    One of the most incredible things about a photography career is how it has this magical ability to open doors—how my camera has, time and again, taken me from a spectator on the sideline and put me right in the middle of the action.

    In my own career, I’ve experienced this many times. Here are just three of those stories (and some shooting tips along the way).

    A teenager at the race track

    I was fortunate as a teenager when a race car driver threw me a rag and told me to get under his race car and clean it from the tire rubber that was stuck to the underside. I had gone to the racetrack after spending earlier years building models of these very race cars. I wanted to see the real deal.

    From that relationship, I grew to become a professional photographer, since I was lucky enough to sell all of the images from my first roll of film to the drivers at that same racetrack. I always had a desire to drive one of those 200mph “funny cars.”

    This wonderful eye-opening experience led me to create work for the NHRA, AP and many racing magazines creating story-telling images of these now 300mph plus vehicles across the country.

    Shooting Tips

    What is most important to me when capturing cars in the drag racing world is to isolate the car from the distractions near the racecar. Generally, I let the car move down the track, away from the starting line crowds, creating a soft, dimensional background in order to allow the car to stand out.

    By using a telephoto lens like my EF 200-400mm f/4L IS USM Extender 1.4x on my Canon 1DX Mark II, I can create a background made of the heat and exhaust, totally drawing the viewers attention to the razor sharp car. Compression is a wonderful tool to use in order to maintain a story-telling image, but first and foremost seeing every detail of the subject: the race car.

    Another technique that I use commonly in my motorsports imagery is panning with the moving car as it goes by. Panning emphasizes speed by keeping the camera moving at the same speed as the race car. This then blurs the background, making the car look as if it is moving very quickly.

    A slow shutter speed helps illustrate the movement. I may select shutter speeds of 1/30 – 1/500 sec depending upon the speed of the car that I am photographing. For this effect I am choosing to use the TV or shutter priority setting in order to allow me to maintain that certain amount of motion blur. I still try to include some of the race signage to continue that story-telling aspect of your imagery. This image was created with my workhorse EF 70-200mm 2.8L II IS lens.

    While capturing the cars on the racetrack is a wonderful way to spend the day, I do look to see what I can do to add some personal element by visiting the drivers as they are strapped in to their cockpits or as they sit peacefully, contemplating their upcoming run.

    One of the last tips that I would like to share with you about capturing image of powerful race cars is about the launch. I prefer to stand down track and create interesting edges to frame the main part of the composition. A drag race uses a “Christmas tree” of lights to indicate when to go. Many cars have perfected the weight transfer of the start of the race which lifts the front wheels high in the air.

    The fun of flying and photography

    Not too long after that amazing career-carving experience of photographing race cars, I drove to Norwalk, Connecticut in order to see and photograph a small hot air balloon festival. A few weeks later, I needed another balloon festival fix and drove north to Glens Falls, NY where I would buy my first hot air balloon ride.

    All I can say is “Wow.” The hook was in. I would soon become a hot air balloon pilot.

    Fast forward to today: I will soon head out to New Mexico for AIBF happening October 7th-15th, 2017. I will be there to both fly and photograph this magnificent spectacle.

    5 a.m. comes early in the chilly desert air. My team and I need to be at the launch field for a 6:15 am pilot briefing in order for me and nearly 600 other pilots to take to the air filling the New Mexican blue skies with our colorful fabrics. I will be photographing right up until the time that I need to begin my inflation.

    We are treated to “Dawn Patrol” when eight to twelve hot air balloons will go aloft into the dark sky about 1 hour before the rest of us do, showing what the winds are doing that day.

    Shooting Tips

    As most balloon events happen in the still of the early morning, we are treated to the rising sun illuminating the rich, colorful, flowing fabric that can be backlit showing leading lines and the abstract beauty that surrounds them. Wide angle lenses as well as longer telephotos are often used here to create diversely different dimensional images.

    As a pilot, I so enjoy the ability to capture images from the air looking down to see so many unique compositions. This image of the “Mass Ascension” shows how you can create gorgeous landscape images as we fly over and into the river for a “splash and dash.” Pilots descend to gently float along in the rivers current.

    I choose to fly with the EF 28-300mm 3.5-5.6 IS L lens so I can create images that are either wide angle or zoom in to make a tight composition while carrying only one camera body. My best tip to you when you go aloft in a balloon is to be ready to react with lightning reflexes: images come and disappear quickly as everything is moving in many different directions all at once.

    I prefer to use TV or shutter priority in order to use a pre-determined shutter speed that should guarantee sharp images while moving along.

    My final tip as you walk amongst the bags of fabric that will soon grow to be a balloon as tall as a 10 story building is to search out a very pretty, colorful foreground that could nicely balance a floating balloon slowly flying past, creating a multidimensional look like the above image captured through the EF 28-300mm IS L lens.

    I can create images of hot air balloon events with hundreds of other balloons around me or I can fly in the desert at sunrise or sunset to have a unique perch in order to take some beautiful landscape images. It certainly puts a smile on my face whenever I get to fly, either in a balloon or even a small fixed-wing aircraft, all to enjoy being off the ground as well as seeing images from a different perspective.

    Taking to the skies… again

    My last story of coming from the sidelines into the driver’s seat (or in this case cockpit) would be when I furthered my flying abilities and accomplished my fixed-wing license that would carry me to locations that driving just would not allow in a relatively short time.

    My first flight after successfully adding to my airmen’s license was to head to the beautiful island off the Massachusetts coast called Martha’s Vineyard. From my home on Long Island, it would take me 5-6 hours to reach the ferry that would bring you over to the island. I could fly the same route in 45 minutes.

    I would do this a few times a year to go have lunch and shoot on the island before heading home for the day, very content. Photographing the beauty, flying and navigating and enjoying some remarkable culinary delights makes for a wonderful day!

    Shooting Tips

    Whether I’m in a fixed wing plane or a helicopter, I need to select the best lens that will be able to reach out beyond the boundaries of the aircraft to capture what I am looking for.

    I will then make sure to remove my lens hood and anything else that could come off the camera while flying along at over 100 mph, and set my ISO high enough to give me a shutter speed of at least 1/1000 sec for the sharpest images.

    Personally, I enjoy flying with the EF 100-400 mm f/4 IS L lens because it’s both compact and provides a great range of focal lengths. I find it important to crop my photographs in the camera, taking advantage of each and every mega-pixel my Canon gives me. Zoom lenses like this allow me to be exact in my cropping.

    I always consider the lighting as a part of the planning of the flight time. I want to be able to fly in the most dimensional light possible. That lighting will provide shadows that will define the landscape below. What a great way to see and create images of iconic locations but from a different perspective.

    Shape, shadow and color are very important tools that I make use of as often as possible. It may be the warm light of a sunset on the red rocks of the desert southwest or the cool morning flight over the lava fields of Hawaii. You can reserve any aircraft for the time that you would like to fly, so, select that right time for the image that you see in your mind’s eye.

    In order to create the best images of any subject, you need to be intimately familiar with that subject. Throughout my photographic career, I have been able to succeed at photographing anything as long as I had some knowledge of what I was photographing.

    Having knowledge of the race cars that I was learning about working on gave me the edge to be able to create story-telling imagery. I then took that and ran in order to be the best that I could be. The same followed when I chose to be a hot air and fixed wing pilot—photography opened the door to be more than a spectator, but then the experience provided me the knowledge and platform to succeed.

    So much of being a successful photographer comes down to being knowledgeable of the subject and the relationships that you make along the way. From there, it’s up to you to continue to drive to be the best that you can—you are only as good as your most recent project.

    I hope that, at least, will be an incentive for you to continue to grow and improve your skills. It certainly worked for me!


    Ken Sklute is a multi-talented photographer and Canon Explorer of Light with over 42 years of professional photography experience. Over the course of his career, he’s photographed people, professional sports, architecture, weddings and landscapes (among other things).

    To see more of his work, be sure to visit his website, or by following him on Facebook and Instagram.

    Articles: Digital Photography Review (dpreview.com)

  • Fujifilm releases firmware updates for X-T2, X-Pro2 and two lenses

    Fujifilm has released firmware updates for its X-T2 and X-Pro2 camera bodies. The update to version 2.12 on the X-T2 and version 3.12 on the X-Pro2 fixes an issue that could occasionally cause the cameras to lock up when shooting in continuous high speed mode.

    The X-T2 and X-Pro2 firmware updates are available to download at the links below:

    • X-T2 Firmware ver. 2.12
    • X-Pro2 Firmware ver. 3.12

    Additionally, the company released updates for its XF 18-55 and XF 10-24 lenses. The new versions of the lens firmware fix an issue that could cause the focal length to be displayed incorrectly, and/or cause shaking in peripheral parts of images, even with focal length focus fixed.

    You can download those updates by clicking on the links below.

    • XF18-55 Firmware ver. 3.22
    • XF10-24 Firmware ver. 1.12

    Articles: Digital Photography Review (dpreview.com)

  • Pixelstick creators unveil the Colorspike: An incredibly versatile LED lighting strip

    The inventors of pixelstick have launched a new Kickstarter campaign to fund their latest creation: a strip of LEDs they’re calling the ‘colorspike.’ Like the pixelstick, it can be controlled via an app to produce a range of effects; unlike the pixelstick, the colorspike panel is more about lighting and color than it is about fun effects or light painting.

    At about two feet long, the colorspike consists of a strip of LED lights that the user can program to produce a massive range of different colors and pulsating lighting effects. The results, when used in concert with, say, portrait photography, can be striking:

    The idea is that stills and video photographers can use these to add easily controlled color to their shoots, while videographers can also include flashing lights to emulate emergency vehicles, fire, lightning and any interrupted lighting.

    The colorspike panels are controlled via a smartphone app that allows colors and effects to be selected from an existing menu or to be custom mixed for the occasion (and saved for later use). Finally, groups of color spikes can be controlled together from the app to create more complex set-ups, and users can determine brightness, color and pulsation patterns via the app or the interface on the panel itself.

    For on-location shooting, a battery is supplied that the company claims will last at least 45 minutes; and for those working near a mains power supply, a DC adapter also comes included the kit.

    The colorspike is being launched on Kickstarter with a price of $ 270, and kits of four can be had for the discounted price of $ 1,000. The company, Bitbanger, expects delivery to begin in March next year if the target of $ 120,000 is reached—and given they’ve already reached over half of that goal with a full 42 days left in the campaign, chances are good the colorspike will become a reality

    For more information on this nifty new lighting accessory, visit the colorspike Kickstarter page or Bitbanger’s website.

    Articles: Digital Photography Review (dpreview.com)

  • 5 Tips for Taking and Caring for Your Camera Equipment in Far Away Places

    If the thought of being away from all your camera equipment stresses you out, this article is exactly what you need! I can safely say that being on the road for over two and a half months teaches you a thing or two about need and necessity versus wants.

    Road trip

    For the longest time, one of my dreams has been to live away from home and travel with my family for an extended period of time. I used to dream about all the places I could travel to, and how much fun I would have living a nomadic life. Of course, then I would wake up and the realities of my responsibilities would take over.

    However, earlier this year after suffering a big life setback with the loss of my mom to cancer, I decided that my life was too short to not make my dreams come true. After several months of discussion and planning, my husband and I decided that our little family would spend our summer in India – traveling and visiting family. Somewhere along the way a trip to Ladakh, London, Zurich and Rome got added to my roster and pretty soon I was in charge of planning and packing for a life on the road for two and a half months living out of just four suitcases – one for each one of us. Being a photographer, I knew that somewhere in there I had to pack my camera equipment along with my essentials.

    Taking and Caring for Your Camera Equipment in Far Away Places

    Sunsets along Lake Zurich were magical – one of my favorite cities that I have ever visited!

    Here are a few things that really helped me make the most of my time away from home. It is very likely that I have missed some key photographic opportunities but overall I am very happy with my time away, the opportunities that my family has experienced, and the images that I have created. And as an added bonus, all the camera equipment I did take made it back without any major mishaps along the way.

    #1 – Gear Choices

    Let’s face the reality of life as a photographer – we all love and want all the gear that we think we need wherever we go. When I was packing I realized that as a photographer I had so many things I wanted to bring, but as a mom, the need for gear was quickly overruled by the need for practical things like clothes, shoes, books, toys, etc. I had to make some very hard choices on the camera equipment that I could take, versus the gear I wanted to take. I narrowed down my list based on where my travels would take me and what gear I could realistically carry and transport safely without any damage.

    So, in the end, I settled for this kit:

    • A wide zoom lens – Canon EF 24-70mm f/2.8.
    • A simple point and shoot camera (yes, this was my backup as weight was a concern when flying to and from Asia with layovers on the way there and back).
    • One telephoto lens – Canon 70-200mm f/2.8L.
    • One camera body – Canon 5D MK III.
    • Four camera batteries.
    • One battery charger.
    • A small travel tripod – just a generic brand – mine fits in my carry-on bag.
    • A remote trigger.
    • Five camera CF cards ranging from 8GB to 32GB.
    • Two 2TB External Hard drives ( primary photo storage and a backup photo storage).
    • Two generic lens and camera cleaner kits.

    All of these things comfortably fit into my REI brand hiking backpack. I use this bag for everything and store my gear in individual soft-cover bags inside the pack. This is what I have done since day one and something that has worked well for me.

    The one thing I wish I had taken with me was a rain cover for my camera. My backpack had its own rain cover which I used numerous times during the trip because we got caught in sudden downpours in the mountains. But without a separate rain over my camera, I was not able to use my gear in the rain.

    #2 – Be Prepared and Organized

    For me, being prepared and organized included having a rough idea of where I was going and the kind of environment I was going to expose myself and my gear to. Before I left, I jotted down all the serial numbers, make, and brand for my camera equipment and stored them in a document on my cloud-based Dropbox account. All my external hard drives were stored off-site at a friend’s place as well as the remainder of my gear.

    Now, obviously, this is a friend I trust. But another option would be to lock it in off-site storage facility. As part of your research, another good thing to keep in your back pocket is the name, address, and contact information of authorized service dealers for your gear in the country you are visiting. Sometimes things just go wrong no matter how prepared you are. Being prepared with this information about services centers and authorized dealers for your gear is a time saver especially when you are traveling in areas where the internet connection is not very reliable.

    Taking and Caring for Your Camera Equipment in Far Away Places

    An hour’s hike from our campsite in the Himalayas got us to this beautiful alpine lake. But by the time I could get the camera and tripod out, the fog set it…and it was magical!

    During my travels, my gear choices on the road would depend on the activities that were planned for the day and the fact that this was a family travel trip, not just a photography expedition. In Rome and Zurich we traveled everywhere either on foot or used public transportation. So I just carried my camera body and the 24-70mm lens among other daily necessities in my backpack. The rest of my camera equipment was either packed away in the hotel room safe or locked away in my suitcase.

    When we hiked and camped in the Himalayas, my camera along with both my lenses were always on my person, and the tripod was handed off to the porters that were carrying our camping gear. For my camping trip, I just carried all my CF cards and ditched the charger and external hard drive at the house where we were staying because it was highly unlikely I’d find a charging port on that journey.

    All these choices were possible because of the research I had done ahead of time.

    Taking and Caring for Your Camera Equipment in Far Away Places

    Much of Ladakh is dry and barren and upwards of 10,000 feet above sea level. Altitude sickness is very real and sometimes your gear also acts up. Of course, these dramatic views almost make up for any hardships.

    Additionally, a good mindset to have when you travel to far-off exotic locations is one of acceptance of physical and mental limitations – both for yourself and your camera gear. I experienced some altitude sickness in Ladakh as we were traveling on roads at almost 17,000 feet above sea level. I also found my gear did not function as efficiently at that altitude. My batteries did not last as long and the camera also did not shoot as fast. The first few times it happened I freaked out. But then I just accepted it as something beyond my control and gave myself some extra time to be patient in getting the shot that I wanted.

    #3 – Know Your Gear

    This one is too basic to include here but it is amazing how many of us don’t follow this simple tip. We are so enamored with the latest and greatest gear available, but yet don’t quite know how to use the stuff that we do own.

    The best way to get over this is to really limit yourself to a few key pieces of camera equipment for an extended period of time. One of my goals for this trip was to try and capture star trails and The Milky Way when I traveled to Ladakh. After all, I was going to be in a remote part of the country at an altitude of almost 15,000-17,000 feet above sea level. Barring any bad weather, I should be able to get relatively clear shots of The Milky Way and star trails.

    Now astrophotography is not my thing. I always limited myself from trying it out because I don’t usually travel with a tripod, nor do I own an intervalometer. So this time I actually downloaded the camera manual on my phone and studied it before I left. With that information, I was able to comfortably and confidently use the B (a.k.a Bulb mode) on my camera to capture star trails in Ladahk. It was quite a thrilling experience for my maiden attempt.

    Taking and Caring for Your Camera Equipment in Far Away Places

    A 26-minute exposure while sleeping in the car near Jisp along the drive to Leh was one of the highlights of my trip. This is one of my first star trails shot and now I find myself looking out for stars every night! This would have been impossible without a tripod and proper remote trigger.

    Another good thing to practice before you head out is gear maintenance. I had to routinely clean my lens and camera throughout this trip. I made the decision to carry two camera cleaning kits just because I knew my gear would get a lot of use. Before every major outing, I spent the time to clean out the dirt and dust from the camera and the lens. The dust pen was kept in my camera bag just in case I needed it while I was out and about photographing.

    #4 – Be Local and Think Like a Local

    I have to include this one in any travel photography related article because it does relate indirectly to taking care of yourself and your gear. Often times I find photographers I meet along my journeys have a fake sense of entitlement. When you are a guest in someone’s house, are you not on your best behavior? Why is it that when you are a guest in another country, common sense and basic manners seem to fly out the window.

    Locals are still people who deserve the same amount of respect and courtesy as anyone. Put yourself in their shoes and try to imagine what they experience when someone shoves a camera in their face without so much as a hello or a smile.

    While in Ladhak, we visited a lot of beautiful monasteries. Most of them are still in use and we saw many temples where the monks were in prayer. Even if there is no sign discouraging photography, please use common sense to not invade their private space especially when they are chanting. I cannot tell you how many times I came across tourists that almost jumped over each other or hanging out of moving cars just to take pictures of them chanting and praying. Seeing this rude behavior almost made me embarrassed to take my camera out.

    Taking and Caring for Your Camera Equipment in Far Away Places

    The infamous cable cars in Lucern, Switzerland…the clouds adds a certain mystery and aura to these engineering marvels!

    Additionally flashing your fancy gear around is almost begging for the wrong kind of attention. I remember this one evening in Rome, I was out with my kids taking photos around some of the beautiful horse-drawn carriages. We lost track of time and soon found ourselves in a fairly deserted alley. I quickly put my gear away in my backpack, stuffed it with our jackets, grabbed my kids, and sprinted towards a more crowded piazza.

    #5 – Make Friends with Local Photographers

    The internet is an amazing tool for almost anything. It is such a great resource to find and connect with other photographers, especially if you are traveling to areas that are new and foreign to you. I was able to connect with some photographers in India as well as in Rome this summer. We chatted on the phone, met for dinner and just became friends.

    They even gave me advice on some of the local, non-touristy spots to photograph as well as offered to lend me gear if I needed it. We tried to plan a shoot in India but the timing was not right, I know that the next time around we are going to create some magic, though.

    Taking and Caring for Your Camera Equipment in Far Away Places

    I met up with another photographer and we attempted to do night photography in Mumbai. But the moisture in the air because of the monsoons was causing some weird light trails against all the lights. So we went for ice cream instead! But it was a cool experience none the less.

    Conclusion

    I hope these tips are helpful as you plan your next vacation in a far-off destination. If you have other tips and tricks that worked for you, please share them with the community so we may all learn new ways to have an exciting and creatively satisfying vacation.

    The post 5 Tips for Taking and Caring for Your Camera Equipment in Far Away Places by Karthika Gupta appeared first on Digital Photography School.


    Digital Photography School