Blog

  • Pop-Up Parking Garage & Rooftop Green Space Rises Higher When it Rains

    [ By SA Rogers in Architecture & Public & Institutional. ]

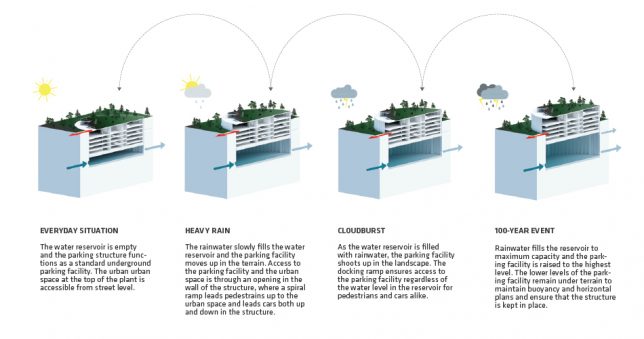
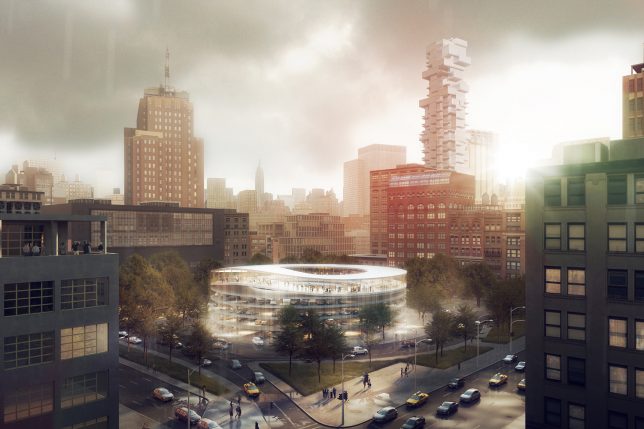
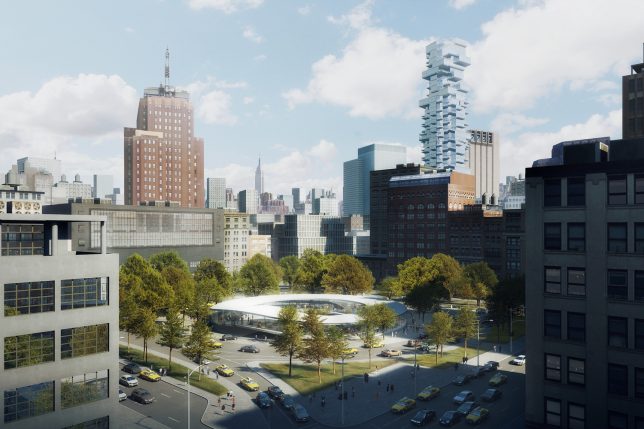
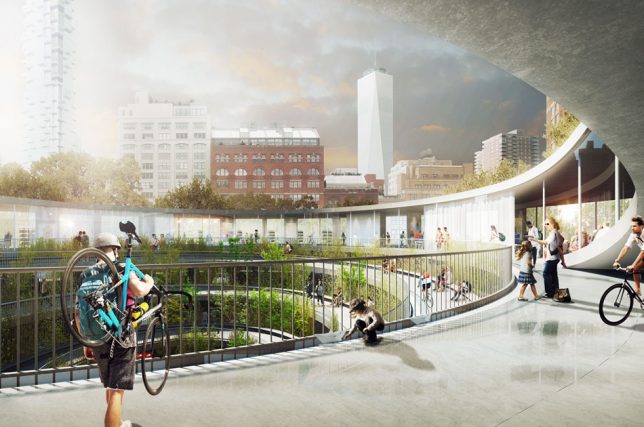
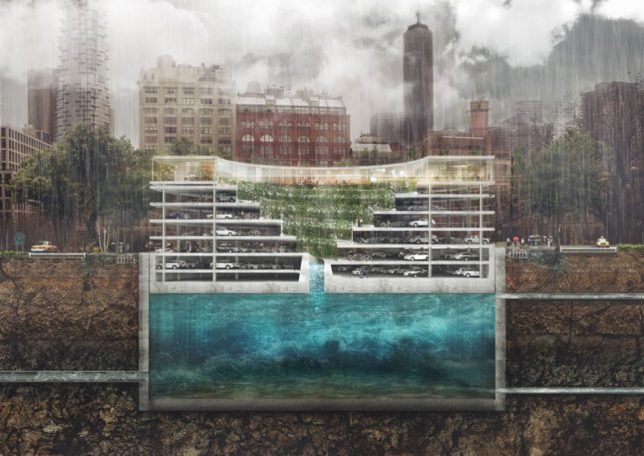
    Stormwater flooding, too few places to park and a lack of green space are three of the main issues plaguing every major city, and this strange but kind of brilliant building concept attempts to solve all three at once. ‘POP-UP’ by Danish architecture firm THIRD NATURE places a five-level parking garage topped with a public park on top of a stormwater reservoir, with the building’s height changing depending on how much it has rained lately.

    On a dry day, all that’s visible of the POP-UP structure is the rooftop park, which essentially sits at ground level. But when rain falls, it fills the underground reservoir, causing the parking structure to rise higher in the landscape, highlighting its adaptability in the face of changing weather. The architects present it as an alternative to constructing a rainwater reservoir that’s empty most of the time or a mono-functional parking facility that takes up valuable urban space.

    “By 2050, the Earth’s population is expected to grow to over 9 billion people,” says THIRD NATURE. “The migration to cities is on the rise and urban spaces are under pressure from the growing numbers of cars and traffic in the streets. With the quest for green, livable and human-scale cities cars and car parking have become an increasing challenge fighting for m2 in the dense cities – often at the price of urban areas and parks.”

    “At the same time, climate changes require cities to handle huge amounts of stormwater generated by more and more powerful cloudbusts – this by building large water reservoirs under roads and squares. The situation calls for a rethinking of the way we establish parking, storage of stormwater and new urban spaces.”

    They compare the building to a piece of cork in a glass of water. Hydraulic and mechanical lifts would help balance the weight ratios of parked cars in the structure to make sure it’s able to move up and down smoothly without changing the water level underneath. The two lowest levels of the parking structure would be off-limits, remaining underground to ensure the stability and buoyancy of the building.

    Though an approach that reduces the number of individual vehicles allowed into a city would arguably be more practical, it’s also true that many places (especially in the United States) are likely to remain car-centric for the foreseeable future. Is this a realistic compromise?

    Share on Facebook


    [ By SA Rogers in Architecture & Public & Institutional. ]

    [ WebUrbanist | Archives | Galleries | Privacy | TOS ]


    WebUrbanist

  • Google Clips is an AI-enabled hands-free camera that costs $250

    Meet Google Clips

    After some expected hardware update announcements, Google’s “one more thing” turned out to be Clips, a tiny, hands-free camera designed to automatically capture everyday moments.

    Meet Google Clips

    Small and lightweight, Clips is sold with a case that, uh, clips to things. Demo objects included toys and books. Point it at you and your loved ones, and Clips will do its thing without you ever needing to push the shutter button (although you can still push the shutter button if you want).

    Meet Google Clips

    Clips uses AI to identify and remember frequent subjects. When it detects a familiar subject smiling, for example, it will capture a burst of images. What’s more, Google says that it gets smarter over time, capturing more of the moments you want and fewer moments you’ll ultimately throw away.

    Meet Google Clips

    Clips works with the Pixel 2, naturally, but a rep we talked to said it will also work with an iOS app. It captures bursts of images from which videos (without audio) or stills can be extracted. Clips can be trimmed in the accompanying app, and they can be exported as GIFs as well.

    Meet Google Clips

    Clips will sell for $ 250, and eager customers can join a pre-order ‘waitlist’ now.

    Articles: Digital Photography Review (dpreview.com)

  • 6 Tips for Getting Consistent Results Shooting in Low Light

    It’s often challenging for photographers to get consistent results in low light. Problems encountered may include camera shake, out of focus photos, and noisy images. There are three main reasons that these things happen.

    How to Get Consistent Results Shooting in Low Light

    1. You may not be using shutter speeds fast enough to hand-hold your camera without getting camera shake.
    2. Your camera may struggle to focus properly in low light.
    3. Your photos might be noisy because of high ISO settings, underexposure, or a combination of both.

    With this in mind, let’s look at some steps you can take to get consistent results when shooting in low light conditions.

    1. Take your camera off full automatic

    If you’re using your camera in a fully automatic exposure mode, such as portrait or night scene, it’s time to stop. You have little or no control over your camera’s settings by using these modes. That stops you from getting the best results in low light.

    The only modes I recommend that you ever use are Aperture Priority, Shutter Priority, Program Auto or Manual (the last one only if you really know what you’re doing).

    How to Get Consistent Results Shooting in Low Light

    For best results in low light avoid your camera’s fully automatic exposure modes!

    2. Avoid using the built-in flash

    Fully automatic exposure modes may also engage the camera’s built-in flash in low light. The problem is that built-in flash doesn’t provide high-quality light.

    Don’t get me wrong. There will always be circumstances where it’s more important to get the photo than to worry about its aesthetic qualities. If you’re photographing a friend or loved one in the dark, it’s better to use the flash and capture the moment, however ugly the light, than not capture it all. But if you want to create beautiful photos, then you will want to either learn to use off-camera flash or make the most of the available light.

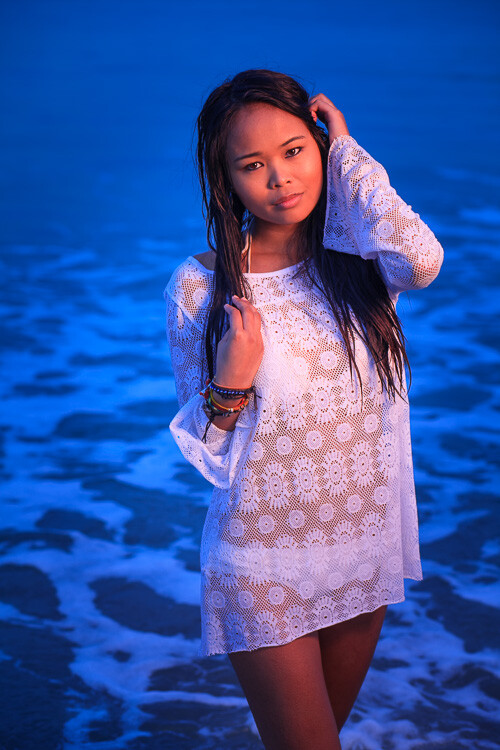
    I made this photo at dusk using an off-camera flash with a softbox. There’s no way you can replicate this quality of the light in this image without the right equipment.

    How to Get Consistent Results Shooting in Low Light

    3. Use Image Stabilization

    Image Stabilization lets you take sharp photos using longer shutter speeds than you could with a non-stabilized lens. This is useful to know if your photos tend to suffer from camera shake in low light.

    There are two types of Image Stabilization. Canon and Nikon build it into their lenses. That means the technology only works if you have the right lens. As most kit lenses are image stabilized it is likely you own at least one image such lens you can use in low light.

    Other manufacturers, like Olympus and Panasonic, place the image stabilization mechanism in the camera body. The advantage of this system is that it works with any lens. If you’re not sure how image stabilization works with your camera then check your manual for the details.

    Most image stabilization systems give you a four-stop advantage. Let’s look at what that means in practice.

    Let’s say you’re using an 18-55mm kit lens on an APS-C camera. Ideally, without image stabilization, you need a shutter speed of around 1/125 second to achieve a sharp image with a hand-held camera (some photographers may argue you could use a slower shutter speed). An image stabilization system that gives you a 4 stop advantage means you can drop the shutter speed to 1/8th of a second and still get a sharp image. That’s very helpful in low light.

    For example, I made this photo in a dimly lit museum with a non-stabilized 18-55mm lens at 1/160 second, f5.6, ISO 1600. If the lens was image stabilized I would have had the option of using ISO 100 and 1/10th of a second, giving me a much cleaner image with less noise.

    How to Get Consistent Results Shooting in Low Light

    4. Don’t be afraid of high ISO

    Most modern digital cameras give you excellent performance at high ISOs. It’s quite possible your camera is capable of giving great results at ISO 3200, 6400, or even higher. You won’t know until you try. This is another good reason for taking your camera off fully automatic. Now you can decide what ISO to use, rather than leaving it up to your camera.

    The best thing to do is test your camera at all its high ISO levels to find your noise tolerance level. For example, you might find that ISO 6400 is the highest setting you’re comfortable using. Once you’ve decided this, you know the ISO range you can work with for your camera.

    This photo is taken at ISO 6400, the highest ISO I’m comfortable using on my camera. I had to use the high ISO setting because the photo was taken indoors in low light.

    Low light

    5. Use a prime lens

    If you don’t have one already then it’s worth considering buying a prime lens. For example, most 18-55mm kit lenses have a maximum aperture of f/5.6 at the 55mm end. But on a 50mm prime lens that maximum aperture could be f/1.8 (or even wider). That’s a difference of over three stops (eight times more light), which means that you can take photos in much lower light conditions.

    The only caveat is that there is much less depth of field at wide apertures. But you can use this to your advantage by exploring the use of bokeh in your low light photos. I made this photo of a Chinese lantern, taken at night, using an 85mm lens set to f/2.

    Low light

    6. Use a tripod

    A tripod comes in really handy for taking photos of landscapes and cityscapes in low light. All the methods listed so far, such as using a high ISO, Image Stabilization, prime lenses and so on, have disadvantages. Noise increases at high ISOs, wide apertures don’t give much depth of field, and even Image Stabilization has its limits.

    The benefit of a tripod is that you can use your camera at its lowest ISO setting (giving good image quality), and a small aperture such as f/8 or f/11 (allowing for a greater depth of field).

    Shutter speeds will slow right down at these settings. Again, use this to your advantage. Slow shutter speeds are great for landscape photography because moving parts of the landscape, like water, become a silky blur. With cityscapes, the light from passing traffic becomes long streaks of light.

    A tripod also opens up techniques like long exposure photography (photos taken with shutter speeds between a minute and eight minutes long) and painting with light (using flash or torchlight to illuminate the scene during a long exposure).

    Low light

    I used a tripod to create this landscape photo, which needed an exposure of 30 seconds at f/8 and ISO 100. The water blurred during the exposure, which helps add mood and atmosphere to the photo.

    Conclusion

    The key to getting consistent results shooting in low light is understanding the limitations of your equipment and taking control of your camera to make it do what you need, rather than what it wants. With a bit of work and patience, you can learn to take great photos in low light. The benefit is that low light conditions are often beautiful. Most places and landscapes look beautiful at dusk. Shooting at these times will help you take moody photos.

    Do you have any ideas for shooting in low light? Let us know in the comments!


    If you enjoyed this article and would like to learn more about the creative side of photography then please check out my ebook Mastering Photography. It shows you how to take control of and be creative with your digital camera, no matter what your skill level!

    The post 6 Tips for Getting Consistent Results Shooting in Low Light by Andrew S. Gibson appeared first on Digital Photography School.


    Digital Photography School

  • It’s Alive! 14 Algae-Powered Inventions for Food, Light, Energy & Oxygen

    [ By SA Rogers in Conceptual & Futuristic & Technology. ]

    If we could just get beyond pesky hiccups like catastrophic climate change and wanting to obliterate each other with nuclear weapons, we humans could learn from our mistakes and create a future that’s actually cooler and more sustainable than anything we dreamed up during the 20th century. Making the most of microalgae, one of the most ancient and prolific organisms on earth, we could produce abundant clean energy and healthy foods while also reducing the amount of CO2 in the air and producing more oxygen. These designs show just how this symbiotic process could manifest in our lives.

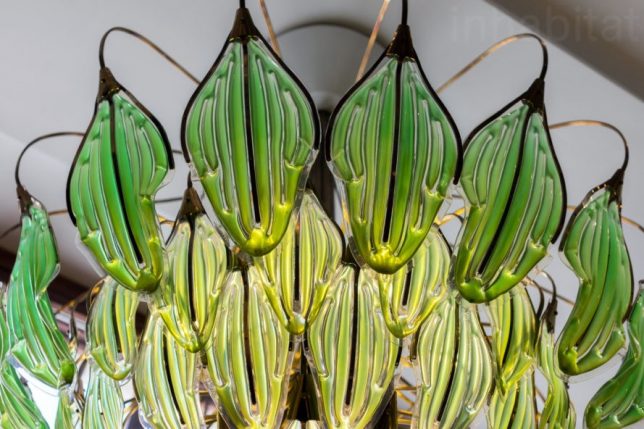
    Living Chandelier Filled with Algae

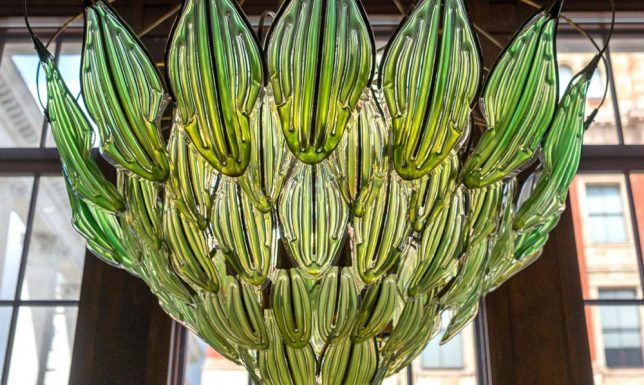
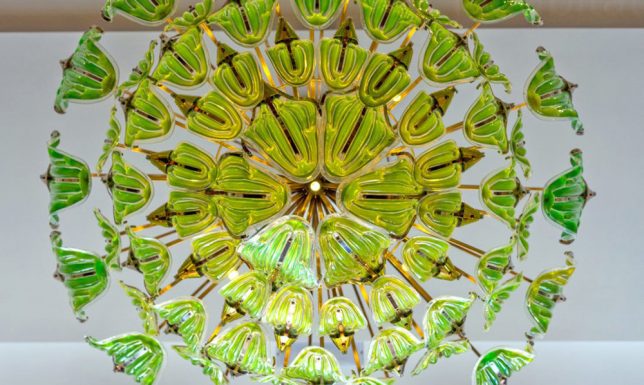
    Embedded with LED bulbs and sustained by daylight, ‘Exhale’ by Julian Melchiorri is a living chandelier with beautiful glass components filled with various shades of green algae. The glass ‘leaves’ take in CO2 from the room and release oxygen, too, making it a striking air purifier. Melchiorri is a designer and engineer, but he’s also a leading biochemical technology researcher, and he’s been working on his ‘artificial leaf’ concept for years.

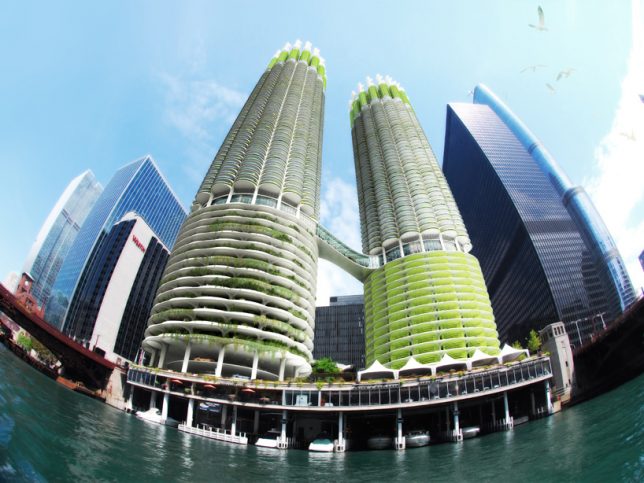
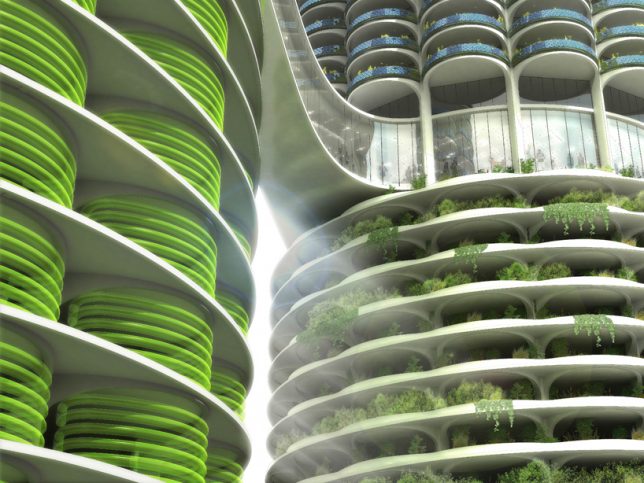
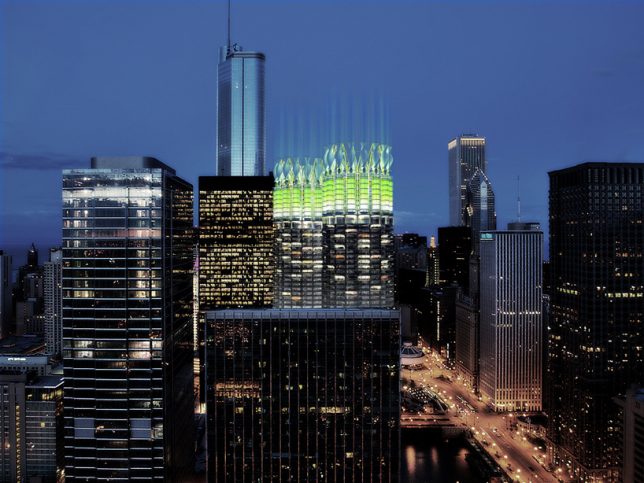
    ‘Algae Green Loop’ Proposal for Chicago’s Marina City Towers

    Architecture office Influx Studio imagines a dramatic makeover for the Marina City Towers in Chicago, retrofitting them to absorb CO2 through loops of bioreactors to help mitigate climate change. The closed-loop system sequesters carbon from the air, absorbs it through vegetal photosynthesis and produces its own energy through the same wind turbines that suck in CO2 and through the algae bioreactors that process it.

    Photosynthetic Algae Furnishings

    [vimeo128654962]

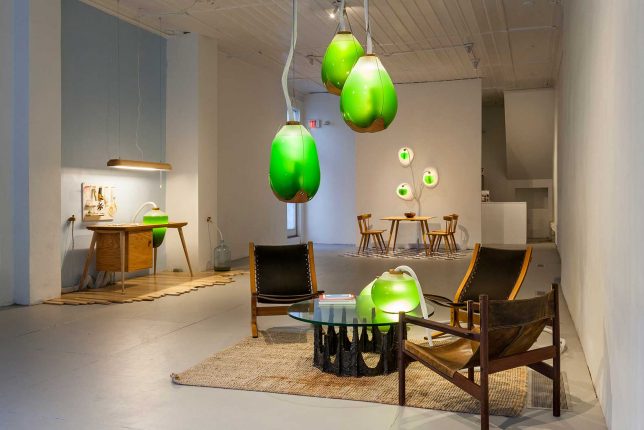
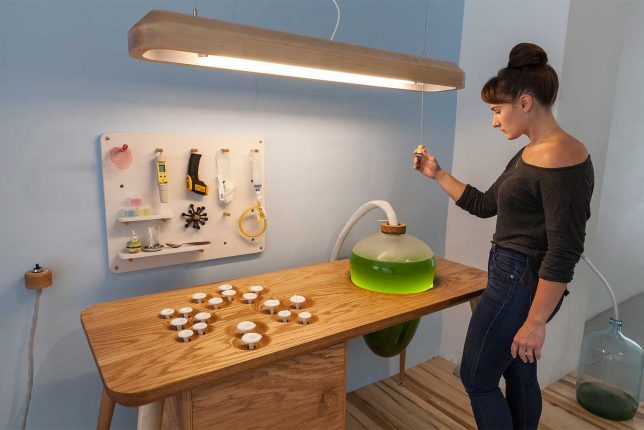
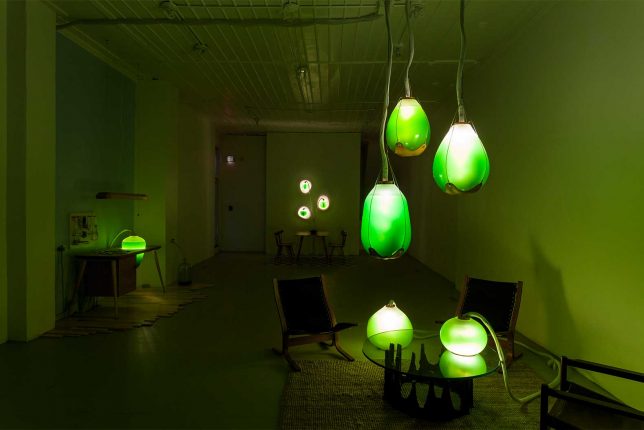
    ‘Living Things’ is a series of bio-powered furnishings exploring ‘symbiotic living,’ his which micro-algae help light up our homes. Presented in a series of vignettes, the project contains furniture and lamps that are both beautiful and beneficial. “The morphologies of hand-blown glass vessels function both as lighting and heating elements for the human occupants, and high functioning photobioreactors which provide heat, light, agitation, air supply nutrient and waste control to the living algae inside.”

    World’s First Algae-Powered Building

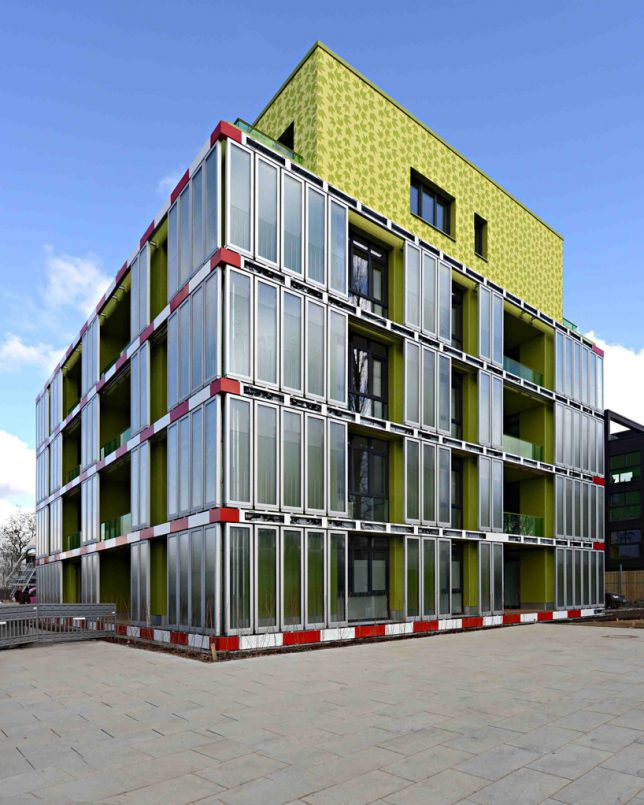
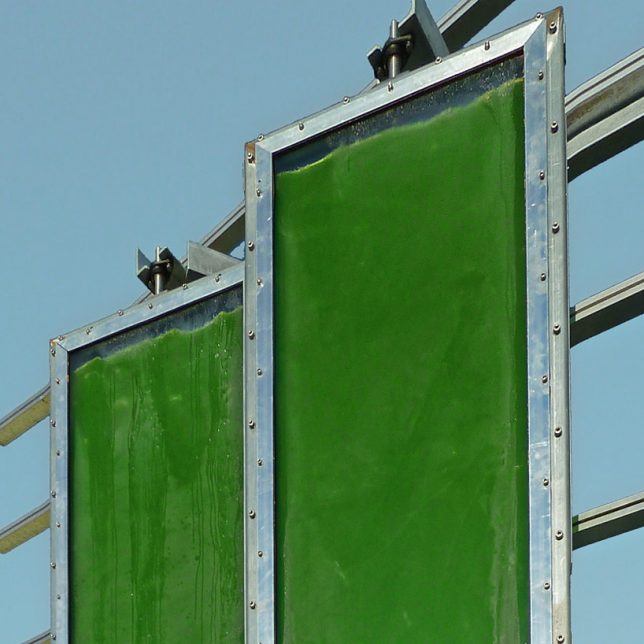
    Lots of concepts tout the ability to power an entire building on algae, but have you ever actually seen one built? BIQ House in Hamburg, Germany by Austrian firm Splitterwerk features the world’s first iso-adaptive facade in the form of algae-filled glass panels shading the southeast and southwest faces of the building. The algae is sourced from a nearby tributary of the Elbe River and constantly changes color as it grows. The panes produce biomass as the algae multiplies, and reduce the amount of energy needed for cooling inside the building.

    Living Portraits Made with Microscopic Algae

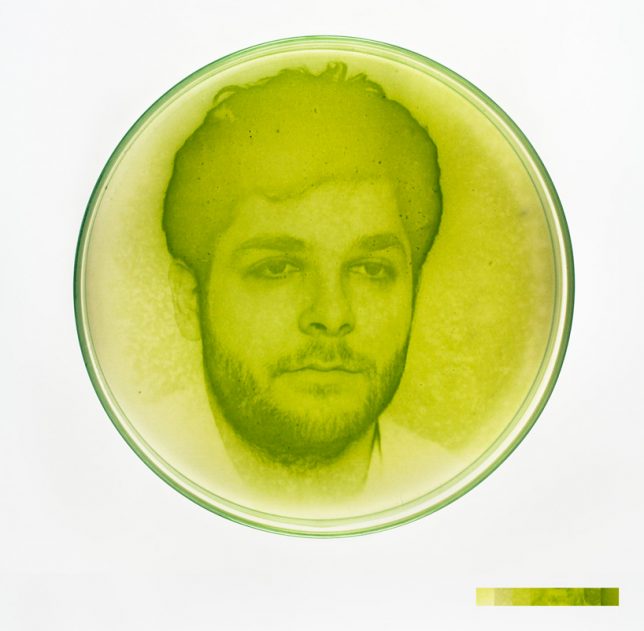
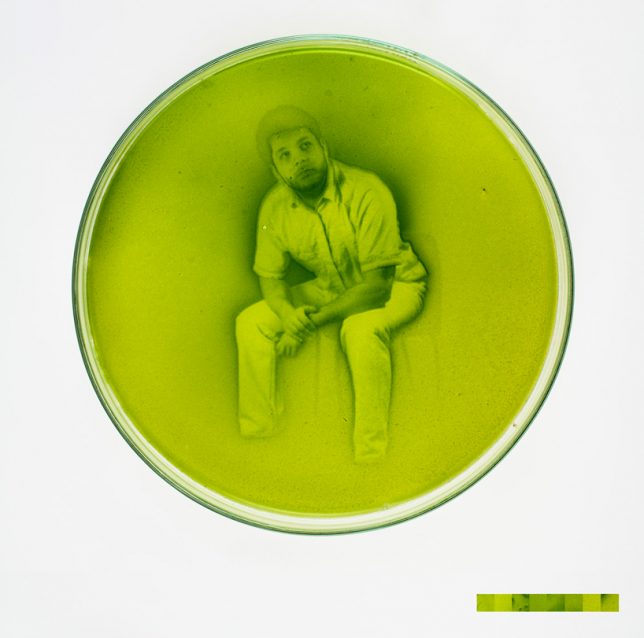
    Living algae cultured in petri dishes clump together to form images in a living twist on traditional photography techniques. Artist and researcher Lia Giraud places a mix of chemical nutrients in the dish and exposes them to an image, and the cells react to the light and form solids of various densities, resulting in the different shades of green that produce the image.

    Next Page – Click Below to Read More:
    Its Alive 14 Algae Powered Inventions For Food Light Energy Oxygen

    Share on Facebook


    [ By SA Rogers in Conceptual & Futuristic & Technology. ]

    [ WebUrbanist | Archives | Galleries | Privacy | TOS ]


    WebUrbanist

  • Camera+ 10 brings depth editing and HEIF support

    Third party camera apps are a great way of customizing operation and expanding the feature set of your smartphone camera. However, with mobile imaging technology advancing at lightning speed app makers are constantly having to catch up with the device makers’ latest hard and software developments.

    The makers of Camera+, one of the most popular third party apps for the iPhone, have now just done that and released version 10 of their app which brings support for Apple’s new HEIF image format and selective depth editing.

    The latter makes use of the dual-camera features on the iPhone 7 Plus and 8 Plus and lets you sharpen, tint and otherwise edit different depth levels in an image that contains depth information.

    In addition there are a new “Smile to shoot” trigger mode and a completely overhauled camera interface to incorporate the new features. Camera+10 is available for $ 2.99 on the Apple App Store.

    Articles: Digital Photography Review (dpreview.com)

  • Benefits of Using a Large Aperture and Tips for Shooting Wide Open

    Upon first glance of one of my most prized lenses, the Canon 50mm f/1.2L USM, a bewildered remark typically arises from professionals and hobbyists alike. Though absolutely spectacular photographers in the industry love working with a wide open aperture, there are equally as many who wouldn’t touch anything lower than a f/4.0 with a ten foot pole.

    I’d never shoot as wide as f/1.2” is a common comment I’ve encountered over the years of working as a professional photographer.

    Stylistic choices aside, upon further inquiry as to why the response to a f/1.2, f/1.8, or f/ 2.0 f-stop yielded such results the truth came out. There are common misunderstandings of how to use and work with a wide open aperture! If your artistic aesthetic drools over soft, dreamy photographs and creamy bokeh, then you better get ready to play with some low, low, low numbers.

    Tips for Overcoming Common Misunderstanding of Shooting Wide Open

    Before we get to the “how”, let’s discuss the “why”. There are several beneficial reasons to shoot with a wide open aperture, aside from simply liking the result.

    Benefit #1 – Working with a Difficult Location

    Depending on the type of photography that you do, you may not always have the option of utilizing an ideal location. Maybe your client is only able to commute to one place? Maybe the location of a shoot that was booked months prior has changed for the worse upon your arrival on site? Or maybe you just have to get a specific photo done pronto and you aren’t able to find a new spot?

    Whatever the reason for your woes, a wide open aperture is here to help! With the depth-of-field being so shallow, whatever troubles you about the background can easily melt into a beautiful creamy bokeh. Utilizing an f-stop of f/2.0 or lower helps you work with a less than immaculate location, as the extremely shallow depth of field allows you to mask the flaws.

    Tips for Overcoming Common Misunderstanding of Shooting Wide Open

    Benefit #2 – Excellent for Detail Shots

    A shallow depth of field can make for very beautiful detail shots. If you look through current wedding photography trends, you may find that several heavy-hitters in the industry are turning to wide open apertures to capture photographs of the bouquets, rings, and table settings. This is because photographs taken with a large aperture allow all of the focus to lie on the subject, and the background ceases to remain a distraction.

    With events such as weddings, where the arrangements can appear cluttered if you only want to focus on one little aspect of the set-up, a shallow depth of field will keep the interest solely on your single subject. Music photography adores wide apertures for the same exact reason. If you want to bring out a detail while photographing behind-the-scenes of a recording session, f/1.2 is wonderful.

    Tips for Overcoming Common Misunderstanding of Shooting Wide Open

    Benefit #3 – Create a Dreamy Photographs without Post-Processing

    With all of the technology available for photo editing, almost anything is possible with the right knowledge. However, rather than spending countless hours in the editing room creating a specific look artificially, why not get it right in the camera?

    For those who adore dreamy, ethereal, or soft photographs, a wide aperture will quickly become your most trusted friend. Filmmakers consistently utilize wide open apertures in order to create a soft focus with a shallow depth of field to give the viewer the illusion of a dream-like state. When we dream, it is often hard to clearly and sharply recollect some of those thoughts when we wake. So the idea of soft and not perfectly in focus images came to mind.

    We can replicate this using an aperture of f/1.2 easily, especially if you have objects in the foreground which are just as out of focus as the objects in the background.

    Tips for Overcoming Common Misunderstanding of Shooting Wide Open

    Benefit #4 – Makes Low Light Photography a Breeze

    Possibly one of the most dreaded phrases in photography is “low light”. Two very short, simple words that cause some of the biggest photographer headaches. This is because there isn’t a lot of available light to play with, and as such, getting the right exposure can be hard.

    However, if you want to take a well exposed photo in low light, you need a lens with a wide enough aperture to let in more light. Using a lens that goes down to f/1.8, for example, is a great way to let enough light in and make the frame bright. Remember, the aperture is the hole the light passes through in your lens. The wider the aperture, the more light that enters the camera.

    Tips for Overcoming Common Misunderstanding of Shooting Wide Open

    Now that we’ve covered some of the “why”, let’s have a nice chat about the “how.” Many of the challenges associated with a wide aperture revolve around the focus and photographing in bright light. From a recent poll I took, here are the primary issues troubling photographers about low f-stops, and some solutions to help you solve them.

    Tip #1 – Shooting in Bright Sunlight Without Overexposing

    With the aperture being the opening that lets light in through the lens, and a wide aperture which lets in a lot of light, one may think that shooting in the bright sunlight is off-limits. The solution to this dilemma is taking advantage of tinted filters that darken your lens, such as a neutral-density (or ND) filter. The purpose (and benefit) of an ND filter is to reduce the amount of light entering the lens. Doing so allows you to utilize a wide aperture that would otherwise produce overexposed pictures.

    Benefits of Using a Large Aperture and Tips for Shooting Wide Open

    Tip #2 – Getting Critical Focus

    To quickly refresh you of the basics, when you focus your camera on a subject, it establishes a focal plane. To get your subject in focus, it has to be on the focal plane. Focal planes happen on an x (horizontal) and y (vertical) axis. This means anything along either of those axes will be in focus, and anything not on them will be out of focus.

    Simple, right? Well, the difficulty with a wide open aperture is that your focal plane is quite small. As you decrease your aperture number and make the opening wider, the invisible area in front and behind the plane of focus will get smaller and smaller, leaving you with much less wiggle-room. As such, distance from the subject plays a key role in your focus.

    When shooting wide open, even the smallest diversion from either of the focal plane axes will cause your subject to be out-of-focus photo. You cannot take a step forward or back without the need to refocus when shooting at a wide aperture. But by keeping this in mind, you can adjust your photography technique to better accommodate the small focal plane.

    Benefits of Using a Large Aperture and Tips for Shooting Wide Open
    A trick to help make sure that what you want in focus is indeed sharp, is to use single point autofocus. By default, your camera will probably select either the object that’s closest to the camera or what’s in the center of the frame. By using single point autofocus, you tell the camera exactly where to focus, which is extremely helpful with low aperture numbers. Refer to your camera model’s manual to find how to change the focus setting!

    Benefits of Using a Large Aperture and Tips for Shooting Wide Open

    Tip #3 – Getting Multiple Subjects Sharp

    Keeping in mind how the focal plane works, there are several things you can do to ensure your multiple subjects are all in focus. First, try to set up all of your subjects on the same axis. Keep everything you want perfectly in focus the same distance from the camera.

    Secondly, the farther away you are from the subject, the easier it is to get the subjects all in focus. If you have a large group of subjects you’d like in focus, move further away from them!

    Benefits of Using a Large Aperture and Tips for Shooting Wide Open

    Tip #4 – Getting Sharp Images Generally

    Sharpness is an interesting concept. How sharp a subject appears is a matter of two things: the focus the camera captures and the amount of contrast on your subject. The term “sharpness” is, in fact, an illusion. You see, for an image to be considered sharp, it needs to have contrast. If the there is little contrast in the image, the subject will not look three-dimensional regardless of whether the focus is perfect or not.

    Biologically, the way that our eyes work, our vision naturally detects edges to register sharpness, and shadows and highlights in order to record the depth in a subject. This is a very important concept to understand when answering the question of how to make images look sharp.

    With this now in your knowledge arsenal, proper lighting aids significantly in making your images look sharp. The other factor in an image being sharp is, of course, the focus. Ensuring that your subject is in focus using the aforementioned techniques, combined with great lighting, will make certain that your images come out sharp.

    Benefits of Using a Large Aperture and Tips for Shooting Wide Open

    Now that you know how to take advantage of those low numbers and wide openings, go forth, and create!

    Benefits of Using a Large Aperture and Tips for Shooting Wide Open

    The post Benefits of Using a Large Aperture and Tips for Shooting Wide Open by Anabel DFlux appeared first on Digital Photography School.


    Digital Photography School
  • Adobe unveils Photoshop Elements 2018: Can open closed eyes, find your best photos and more

    A before and after of Photoshop Elements’ new Open Closed Eyes featured at work.

    While the professional photography market waits with bated breath to see what Adobe has in store for us at AdobeMAX, the company behind Lightroom and Photoshop unveiled something that appeals to a bit broader of an audience today: Photoshop Elements 2018 and Premiere Elements 2018.

    The new, user-friendly versions of Adobe’s photo and video editors come with some really creative and easy-to-use features that the company says are aimed at “memory keepers.” The idea was to create two programs that make finding, enhancing and sharing the precious memories hidden away inside random memory cards, hard drives and (most likely) smartphones almost totally automatic.

    Photoshop Elements 2018

    Photoshop Elements 2018 tackles the same problem that everyone—Google’s Photos App, Apple Photos, etc.—is trying to tackle: how do you help the typical shutterbug find their best images out of the thousands they take every week on their smartphone, and enhance those images so they look ‘professional’ and worth sharing on social media?

    As with everybody else, Adobe is leaning heavily on machine learning and computer vision (different types of ‘AI’) for this trick.

    It starts with an easy-to-use Organizer view and something called Auto Curation, which uses computer vision and some nifty algorithms to guess (because it can’t REALLY know, can it?) which of your images are the best. So if you have a group of 200 images, you can ask Photoshop Elements to cull those down automatically to just 15.

    Once you’ve selected your shots, you can use the program’s new Guided Edits and a new feature called Automatic Selection to do things like drop in a new background, create a double exposure effect using two of your images, or add ‘artistic’ overlays.

    The coolest feature, though, has to be Open Closed Eyes, which allows you to select two frames, and replace the closed eyes in one with the open eyes from another. The results are incredibly lifelike given that whole thing can be done in a matter of seconds.

    Premiere Elements 2018

    Like Photoshop Elements, Premiere Elements 2018 also leans heavily on AI-powered features to make video editing as automatic and pain-free as possible.

    Smart Trim does for videos what Auto Curate does for photos, namely: it asks you what ‘style’ of video you want to create, tries to intelligently find the best clips that match this style, and tosses out the rest to create a coherent clip.

    Another interesting addition is a feature called Candid Moments, which tries to find the best candid ‘photo’ hidden within a video clip and pull it out for you. With new smartphones like the iPhone 8 Plus shooting gorgeous 4K 60p, we could see this feature being a huge hit with those ‘memory keepers’ Adobe is all trying to target.

    Admittedly, neither Photoshop Elements 2018 nor Premiere Elements 2018 are really targetted at more professional photographers out there (read: many of the people who enjoy reading DPReview). But as these beginner-focused programs get more and more powerful, amateur photographers who are allergic to the subscription model and don’t like to do much post-processing anyhow might actually enjoy using Photoshop and Premiere Elements 2018.

    Of course, that’s not to say we won’t be keeping a very close eye on AdobeMAX this year.

    To learn more about Photoshop Elements 2018 and Premiere Elements 2018, head over to the Adobe blog by clicking here, or visit their dedicated landing pages by clicking on the program names above. Both programs are available now for $ 100 new or $ 80 as an upgrade. You can also buy them together for $ 150 new or upgrade both programs at once for $ 120.

    Articles: Digital Photography Review (dpreview.com)

  • Cravar unveils new Rana Series of leather messenger bags for photographers

    Leather goods company Cravar has launched a new range of Rana Series messenger bags, and its attempting to crowdfund the release through Kickstarter. The new series is comprised of four leather messenger bags designed for photographers to use as either a camera bag or an everyday carry. All four bags feature solid brass hardware, a full grain veg-tanned leather exterior, closed-cell foam padding, and an interior made with linen and Sunbrella fabrics.

    The Cravar Rana Series is comprised of the Rana 7, Rana 10, Rana 13, and Rana 15 leather messenger bags—each number approximates the bag’s width.

    The Rana 15 is the largest of the bunch, and is able to accommodate most 15″ laptops as well as a full-frame DSLR and three lenses or more, depending on the size of said lenses. The bag has an aluminum-reinforced top flap, three vertical and two stack dividers, a luggage handle slot, two front pockets, and one rear pocket.

    Similar, but slightly smaller, is the Rana 13 which is also able to fit a full-frame DSLR and three or more lenses, in addition to a smaller 13″ laptop. The Rana 10, meanwhile, can fit a full-frame DSLR, two or more lenses, and a 9.7 – 10.5″ tablet. Finally, Rana 7 can accommodate a full-frame DSLR and one or more lenses, depending on size, plus an iPad mini or other small tablet.

    Cravar is offering the Rana Series bags at the following Kickstarter pledge prices ahead of the higher planned retail costs (assuming the bags are successfully funded and brought to market):

    • Rana 7: $ 165 or more
    • Rana 10: $ 195 or more
    • Rana 13: $ 245 or more
    • Rana 15: $ 275 or more

    To learn more about these bags or order your own, head over to Kickstarter. Shipping to backers is expected to start in February 2018.

    Articles: Digital Photography Review (dpreview.com)

  • On1 Photo RAW 2018 announced: Adds HRD processing, advanced masking and more

    $ (document).ready(function() { SampleGalleryV2({“containerId”:”embeddedSampleGallery_1486583421″,”galleryId”:”1486583421″,”isEmbeddedWidget”:true,”standalone”:false,”selectedImageIndex”:0,”startInCommentsView”:false,”isMobile”:false}) });

    On1 just released the newest version of its stand-alone RAW photo manager and non-destructive editor: On1 Photo RAW 2018. Put another way, there’s now yet another alternative to Lightroom out there, and with this new update the program is more capable than ever, adding features like HDR merge and panorama stitching, advanced masking capabilities, and more.

    You can get a decent overview of the new features in the 2018 version in the video below:

    The main additions to this version of On1 Photo RAW are On1 HDR, panorama stitching, new advanced masking options like Feather and Density that allow you to alter a mask globally, Color range masking, versioning, selective noise reduction, and an updated UI that On1 characterizes as “clean and modern.” There’s also a new “Paint with Color Brush” that allows you to either paint with a solid color or leave the luminosity of the underlying layer intact to change things like eye or hair color.

    You can get a full breakdown of these and other new features on the On1 blog.

    The app is being released as a free Beta on Friday, with an official release slated for the end of October. The full app—which promises ‘much more’ when it arrives after the beta period—will cost $ 120 for new users, while current On1 users will have the option to upgrade for a discounted price of just $ 80 (usually $ 100). Both the full version and upgrade package are already available for pre-order.

    To learn more about the app or pre-order your copy, head over to the On1 blog by clicking here.

    Articles: Digital Photography Review (dpreview.com)

  • How To Trick Someone Into Thinking You’re Really, Really, Ridiculously Photogenic

    In a world of digital keepsakes and endless selfies, there’s a definite pressure to be camera-ready at any moment. Between Youtuber friends and Instagram-addicts, you never know when you’ll next be thrown under the lens, so it never hurts to have a few tricks up your sleeve to help you look as good as you can, and feel happy with Continue Reading

    The post How To Trick Someone Into Thinking You’re Really, Really, Ridiculously Photogenic appeared first on Photodoto.


    Photodoto