Blog

  • Video: Watch the Milky Way ‘appear’ as you get farther and farther from LA light pollution

    According to much of the Interwebz, the residents of Los Angeles were so shocked to see the Milky Way during a 1994 blackout, that many of them called 911. The real story is a bit less dramatic—people called observatories, NOT 911, to ask about the ‘strange sky’ they had seen—but the sad fact remains that LA and many other cities suffer from light pollution so intense that you can’t see more than a few stars in the night sky, let alone the Milky Way.

    This fact inspired landscape and astrophotographer Asif Islam to create this short film titled Where are the Stars? The film is a simple collection of timelapses, created by Asif at progressively darker locations he found while driving farther and farther away from Los Angeles.

    What begins with a timelapse of a heavily light-polluted night sky above LA, totally devoid of stars, ends with an impossibly bright and saturated Milky Way timelapse captured in the Great Basin desert.

    Asif’s goal was to inspire us to get away from light pollution, while simultaneously showing just how bad it’s become in major metropolitan areas like LA and NYC. “We are losing our connection with the night sky,” he writes in the video’s description. Which is a shame, he maintains, because staring at the night sky has the ability to, “keep our overworked, politicized lives simple, and makes us kind [and] thoughtful.”

    Watch the video for yourself up top, and then head over to Facebook or Instagram to see more of Asif’s beautiful astrophotography.

    Articles: Digital Photography Review (dpreview.com)

  • 3 Tips to Help You Take Better Autumn Photos

    I’ve recently returned from leading a photography workshop in the Alaska Range, south of my home in Fairbanks, Alaska. The trip was timed with the peak of fall colors. My students and I spent dozens of hours over the week, exploring the vibrant colors, and trying really hard to make the weird orange, red, and yellow landscape look the way we wanted it to in our autumn photos.

    It occurred to me that autumn, photographically speaking, is weird. It throws our perception of colors through a loop. The world, normally a mix of blues and greens, suddenly shifts to crazy warm tones of yellow, orange, and red.

    4 Tips to Help You Take Better Autumn Photos

    To effectively photograph autumn colors, you need to refocus not just your camera, but also your brain. The standard compositional “rules” of landscape photography shift quite a bit during the fall. The background, which for much landscape work is the actual subject of the image (think big mountains) becomes the setting rather than the subject in the autumn. Our attention falls to the foreground, where the colors are exploding.

    In this article, I’m going to cover three composition types for autumn: details, broad landscapes, and local landscapes. When mixed together, these three types of images will help you tell a compelling visual story of your autumn experience.

    #1 – The Details

    4 Tips to Help You Take Better Autumn Photos

    Photographing details lies in the fuzzy gray area between macro and landscape photography. Sometimes it’s one or the other, sometimes it is a little bit of both. In general, however, I see photographing the details as another part of landscape work. These images tell a small, but important part of the story.

    Mentally, details give us a starting point for seeing the way a landscape will come together, and they also play an important role in providing a sense of scale. The small bits of the scene are rarely captured in a big landscape photo, and yet they are a very important part of our experience in the field. The details too should be an important part of the story we are telling our audience.

    4 Tips to Help You Take Better Autumn Photos

    Lens choice

    Close-up work requires a lens capable of a relatively close focus, or a powerful telephoto. I’ve used big 500mm and 600mm for this kind of shot and I’ve used wide angles that have the ability to focus a few inches away from the lens. But most often I use a moderate telephoto with decent macro capabilities. Nothing fancy, just a good lens that lets me get close to the subject.

    4 Tips to Help You Take Better Autumn Photos

    Whichever you choose, these kinds of images rarely have a great deal of depth. Even photos from a low perspective only show a few inches from front to back. Therefore detail shots are usually about pattern and color. Here are a few things to look at as you compose:

    1. Consider how the lines in the image interact. Do they cross distractingly or guide your eye around the frame in a pleasing way?
    2. Which color dominates? In the autumn, colors like red can be overwhelming and often need to be balanced by cooler greens or blues.
    3. Isolate your subject by cropping out extraneous details, or using a shallow depth of field.
    4. Embrace the autumn colors, but don’t overwhelm your viewer with too much of the same thing. Good images usually show a variety of textures and colors.

    #2 – The Local Landscape

    4 Tips to Help You Take Better Autumn Photos

    When you zoom back a bit from the details, you get local scenes within the landscape. This type of image is rarely shot wide, rather you apply medium to strong telephotos to isolate compelling parts of the scene. I really like these kinds of shots. They allow enough space to apply the elements of both depth and scale, and yet are tight enough that distractions are more easily avoided and make great autumn photos.

    4 Tips to Help You Take Better Autumn Photos

    This type of shot is particularly suited to autumn photography because the fall colors are by nature, patchy. Using a short to moderate telephoto, you can select the patches of dramatic color that may be surrounded by brown in late autumn or green early in the season.

    Consider using focal lengths in the 70-200mm range, and select a part of the landscape that draws your eye. Find lines that guide your image through the frame, not out of it, or look for juxtapositions of color and texture.

    #3 – The Grand Scene

    4 Tips to Help You Take Better Autumn Photos

    I’m going to be honest here. In the fall, when the colors of my home state are going off like fireworks, it is rarely the wide open scenes that draw my eye. However, sometimes the scope and size of the landscape cannot be ignored. It is in those rare moments that I reach for my wide angle lenses.

    And yet, my focus often remains close to me. The foreground in the autumn, perhaps even more than other times of the year, is vital. When shooting wide, I will often get low, using my background not as the subject, but as the setting for something bright, flashy and interesting close by.

    4 Tips to Help You Take Better Autumn Photos

    Use the foreground

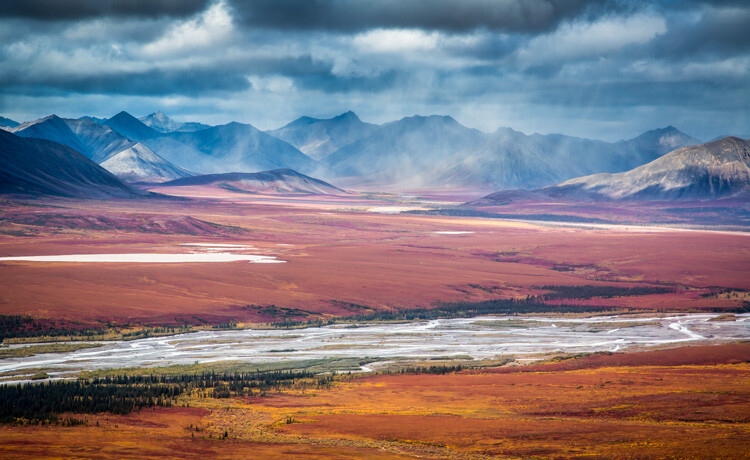
    I was shooting in late August in Denali National Park. The colors were bright and beautiful, and on one sunny day, the mountains of the Alaska Range, including Denali itself, had emerged from behind the clouds to loom, white and glaciated, over the landscape. It was beautiful, and yet my focus kept falling on the colors in front of me. I didn’t ignore that dramatic backdrop, but I used it as just that, a backdrop.

    When shooting wide, don’t forget about the details I noted earlier, nor the patterns of local landscapes. Those two are integral to the wide scene and will help you understand how the elements of the landscape fall together.
    4 Tips to Help You Take Better Autumn Photos

    I once heard it said that wide-angle landscapes were easy. I disagree entirely, wide angles are the hardest because there is so much space for distraction. Understanding and including compelling foreground subjects, like a splash of fall color will take you a long way toward creating a dynamic wide angle landscape.

    Bonus tip – Bring it all together

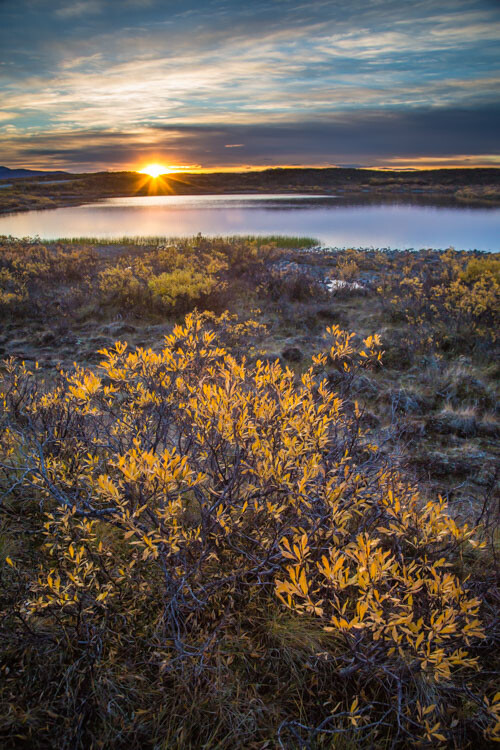
    In a world where most of our images end up on Facebook and Instagram, the art of a photo story is fading. Stand-alone shots get the most attention, the most likes, hearts, or whatever, on social media, but they do a lousy job of telling the whole story. Details, local scenes, and wide landscapes in combination are far superior.
    4 Tips to Help You Take Better Autumn Photos

    In conclusion, I encourage you to tell the whole story by embracing numerous shots. Use the focal lengths available to you, all of them. Through your lens, explore the fall landscape, and share your autumn photos in the comments section below.

    The post 3 Tips to Help You Take Better Autumn Photos by David Shaw appeared first on Digital Photography School.


    Digital Photography School

  • Playful Kirigami: Touch-Activated Paper Animals Pop into Action

    [ By WebUrbanist in Design & Products & Packaging. ]

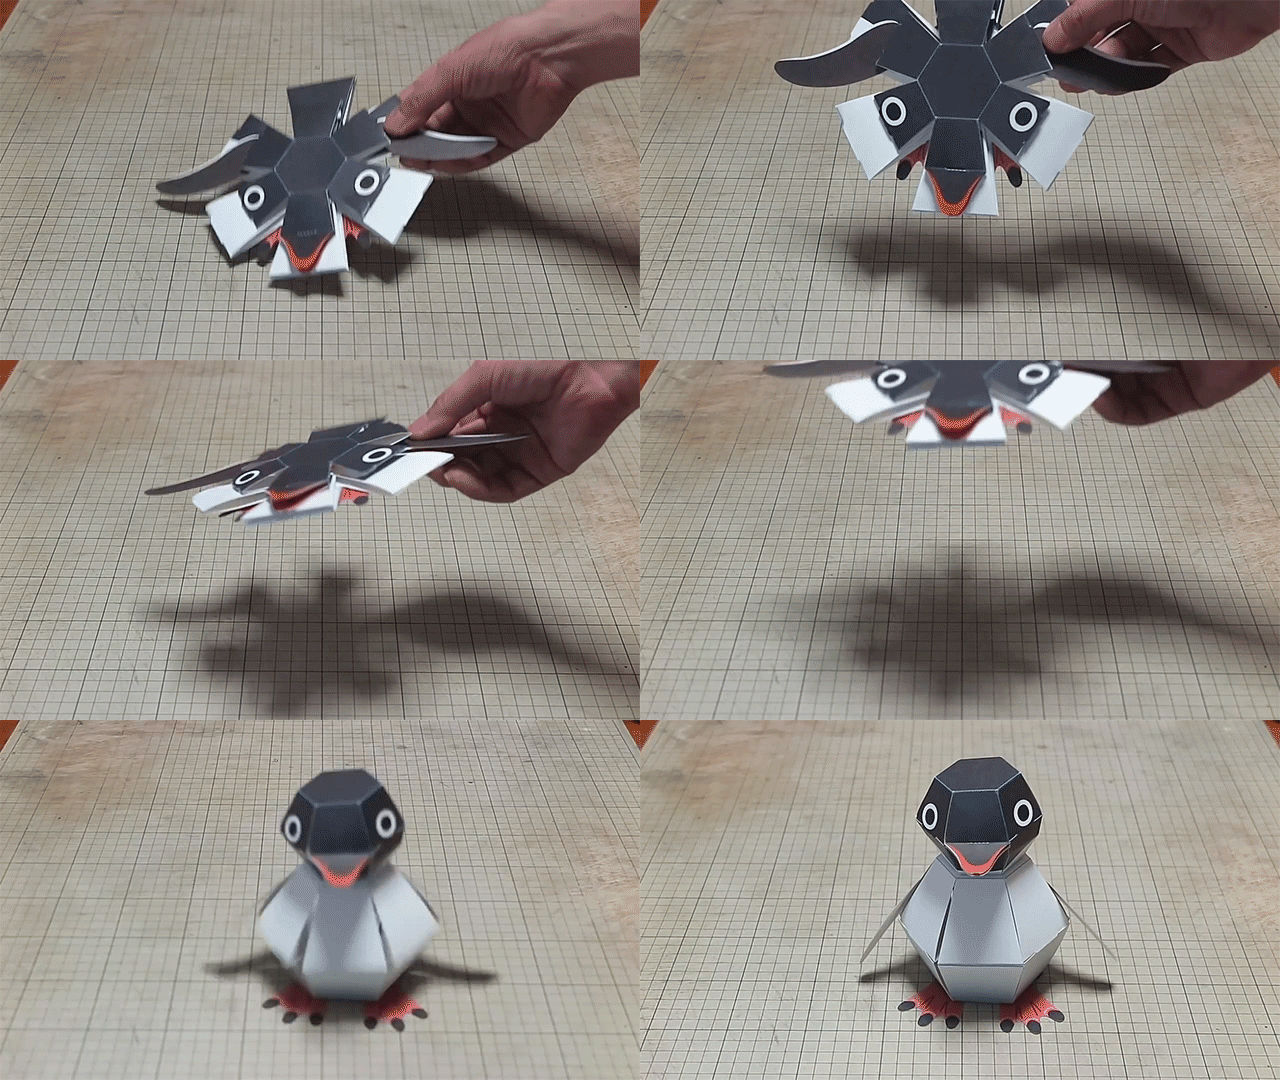
    Acting out scenes from storybooks or animating real activities, these deceptively simple-looking, folded-paper toys leap, bounce, roll and hatch into action when played with.

    Japanese designer Haruki Nakamura was inspired by the ancient art of kirigami, a variation on origami that involves cuts as well as folds, but takes it to the next level with his playful animals.

    The specific behaviors of the toys often follow the natural reactions of a given animal, like an armadillo rolling itself up for protection when threatened.

    Combining kirigami with karakuri, the art of mechanical puppets actived by touch, led him to these neat hybrid creatures that one can poke, prod, press or drop into action.

    In some cases, the activities are innocent and entertaining, like a turtle popping into its shell or a chick hatching from an egg. Others are humorously sinister, showing wolves in sheep’s clothing or a tortoise being eaten by an alligator. For now, alas, these works are only available in Japan.

    Share on Facebook


    [ By WebUrbanist in Design & Products & Packaging. ]

    [ WebUrbanist | Archives | Galleries | Privacy | TOS ]


    WebUrbanist

  • How to Make a Little Planet Quickly and Easily in Photoshop

    Do you find your panoramas a bit flat? Would you like to create a whole little planet out of a single street or square? Do you want to make fun, eye-catching images in just a few minutes without any new equipment or apps? Then this article is for you!

    What is a Little Planet

    Maybe you’ve heard about the “tiny planet” or “little planet” effect but don’t know exactly what that is. Maybe you have seen them but don’t know how to do them. Well, let’s start by explaining that a tiny planet is a spherical panorama and is technically called a stereographic projection.

    The result of this effect is that your traditional landscape will now be circular and thus look like a planet floating in space, water, or sky depending on the background of the panorama you’re using.

    PlanetReggio - How to Make a Little Planet Quick and Easy in Photoshop

    Little planets are very trendy since it became possible to capture 360 x 180 degree panoramic shots. However, in this tutorial I’m going to show you how to do them from any straightforward bi-dimensional rectangular photo. I’m using Photoshop for this, but you can do it in most post-processing programs, even the free ones like GIMP.

    Subjects for a Little Planet

    A landscape or a panorama are the best choices, however you can get interesting results applying this effect to other kind of scenes. For example, I used it in this photo from the interior of a library, see how the spiral lines add depth to the space?

    Library How to Make a Little Planet Quick and Easy in Photoshop

    Also, if you apply it to a portrait the result is like looking through a peephole.

    Clown How to Make a Little Planet Quick and Easy in Photoshop

    How to Make a Little Planet

    Okay, back to the instructions. First you need to open your image in Photoshop and alter the proportions of your photo so that it becomes a square. To do this go to Menu > Image > Image Size. Once the Image Size pop-up window opens, make sure you deactivate the “constrain proportions” option or else the entire image will resize proportionally. Once you do that, make sure the width and the height values are the same.

    Size How to Make a Little Planet Quick and Easy in Photoshop

    Now you will see your image distorted, like stretched out. Don’t worry about it, that’s what we were looking for here.

    Rotate the Image

    Distortion How to Make a Little Planet Quick and Easy in Photoshop

    Now that you have your square you need to rotate it. To do it you go to Menu > Image > Image Rotation > 180 degrees.

    Rotation

    Now you will see the image upside down.

    Upsidedown

    *Note: if you want your planet to be inside out you skip this step! At the end, I’ll show you the results with and without this rotation.

    Apply the Effect

    The final stage is to apply the effect. Go to Menu > Filter > Distort > Polar Coordinates. In the pop-up window you will see a preview of your little planet; make sure that the Rectangular to Polar option is marked and click OK.

    PolarCoordinates

    Voila a Little Planet

    There you go, your own little planet! You can rotate the image (like you did in step 2) until you find the orientation that works best for your image. You can also use the clone tool if you need to blend the merging of the borders or iron out any final details. And of course, you can fix contrast and exposure, as you would do with any photo.

    Final How to Make a Little Planet Quick and Easy in Photoshop

    And here is the one inside out if you skipped the second step and didn’t rotate the image:

    Insideout How to Make a Little Planet Quick and Easy in Photoshop

    So you see, it was only a matter of three steps. However, to get better results, especially if it’s your first few planets let me give you some tips and tricks:

    Tips and Tricks

    Use a photo with a wider ratio, like 2:1 and more. If you don’t have that, a landscape (horizontal) photo will still do better than portrait (vertical) one.

    StartLandscape How to Make a Little Planet Quick and Easy in Photoshop

    Compose your photo with the rule of thirds leaving the top and bottom sections with minimal information and the details in the middle area. In this example, I have the sky on the top, trees in the middle, and ground on the bottom.

    Make sure the horizon line is completely straight. If it wasn’t like that in the original shot, it’s very easy to fix. First, pick the ruler tool from the toolbox (if you don’t see it just press and hold the eyedropper and you’ll find it). Then click and drag a straight line from one side to the other. Finally, click on the Straighten Layer button on top.

    Ruler How to Make a Little Planet Quick and Easy in Photoshop

    The edges will merge better in the planet if the left and right edges of your panorama are similar. When possible, like it would be in the case of a forest, for example, you can copy the left side, flip it and paste it on the right side. That way they will match perfectly.

    Edges How to Make a Little Planet Quick and Easy in Photoshop

    Your Turn

    Now you can create a whole universe of little planets from nature to urban landscapes, the possibilities are endless.

    UrbanPlanet

    I invite you to share your planets here in the comments section below.

    The post How to Make a Little Planet Quickly and Easily in Photoshop by Ana Mireles appeared first on Digital Photography School.


    Digital Photography School
  • Video: Meet the world’s fastest camera slider

    Photographer, filmmaker, and ultra-creative YouTuber Daniel DeArco recently put together something really interesting: the world’s fastest camera slider. At least, he *thinks* it’s the world’s fastest camera slider. But even if it isn’t, the practical effects he’s able to get by shooting with this slider are really interesting.

    In the two videos embedded here, he (above) shows off some of his experiments with his new toy—including regular motion shots and some interesting slow motion panning and zooming movements—before diving into a behind the scenes look and outtakes (below).

    According to DeArco, one of his main goals is to create a faux bullet time or ‘Matrix’ effect by shooting slow motion while moving the camera at high speed.

    I shoot a lot of movement and action, and wanted to shoot high speed, WITH the camera in high speed––since you can’t fake gravity. My goal was to achieve a similar effect to what you see in, “The Matrix”, when Neo is dodging bullets.

    Check out the results for yourself in the two videos embedded here, and then head over to DeArco’s YouTube channel or Instagram account to see more of his creative work.

    Outtakes

    Articles: Digital Photography Review (dpreview.com)

  • The camera I almost bought (again and again): The Canon PowerShot G5

    At this point in my life, I could probably write a series of articles on cameras that I considered buying, almost bought, or actually did buy before reconsidering and returning them. Of all of the cameras that would make that list, the Canon PowerShot G5 is probably the model that I almost bought more times than any other.

    Released in 2003, the PowerShot G5 was in that respect a companion model to the EOS 10D – my first personal DSLR. The G-series was traditionally marketed at enthusiasts and semi-pros, with the idea being that while most photographers couldn’t afford or quite justify a DSLR, cameras like the G5 could deliver a similar user experience, with comparatively good image quality and limited system cross-compatibility, for less money.

    The thinking was that photographers making the expensive transition away from film and towards digital, might use the G-series as an affordable halfway point before investing fully in a DSLR. Conversely, professionals or well-heeled amateurs that owned a 10D or EOS-1D-series DSLR might consider a camera like the G5 as a second body, for backup and travel.

    To court both sets of customers, Canon made sure that the G5 looked and worked broadly like the EOS-series DSLRs that it was marketed alongside. It was black, for one thing, which immediately made it look more ‘professional’ than the silvery G2 and G3 that proceeded it. It offered Raw mode, and was powered by the same ubiquitous BP-511 battery as the 10D and 300D. The G5 also featured the familiar EOS exposure mode dial and front control dial of the EOS-series, and it even had a hot shoe, for full E-TTL compatibility with Canon’s range of Speedlites.

    And like a DSLR it had an optical viewfinder. A blurry, low-accuracy tunnel-type viewfinder, sure, and nowhere near a match even for the dim finder in the EOS 300D, but it was better than nothing, and handy in some situations. More useful was the fully-articulating rear LCD screen on the back, which no DSLR could match.

    As far as image quality was concerned, the G5 was a solid performer by the standards of its time, but not spectacular. Its lens range of 35-140mm equivalent and reasonably fast maximum aperture of F2-3 were decent for 2003, but the zoom was limited at the long end, and while adapters were available to extend the range, they were clumsy and heavy (because they were lens adapters).

    There was even a general feeling, amusing to recall now, that 5MP represented a degree of ‘maturity’ when it came to digital imaging.

    I remember the G5 being more desirable to me than the G3 simply by virtue of being matte black, and (mostly) metal-bodied, but looking at it now, it seems blocky and inelegant. In my opinion the more-rounded G1, G2 and G3 have actually aged a little better, despite being physically a little larger. Opinion in the DPReview office on this point is divided (by which I mean Dan disagrees with me).

    Apart from its color, the biggest differentiator between the G5 and the earlier G3 was the bump in pixel count from 4 to 5 megapixels. In practical terms, the increase in effective resolution was very modest (“not worth it” as we opined in our review at the time) but 5MP came to be regarded as something of a benchmark among enthusiasts and within the photo press. From 1-4MP, each megapixel jump had brought noticeably improved resolution, but from 4/5MP onwards, generational increases in image quality became more subtle.

    There was even a general feeling, amusing to recall now, that 5MP represented a degree of ‘maturity’ when it came to digital imaging. Perhaps this was more of a psychological benchmark than anything, but it was real nonetheless.

    One of the reasons I nearly bought the PowerShot G5 so often is that my EOS 10D spent so much of the first year of its life being sent repeatedly back to Canon to have its autofocus system adjusted. In the end though, I just couldn’t afford it (the G5 retailed for $ 799 in the US when it was new, which from memory worked out at about £600). After a frustrating few months, my 10D was (finally) fixed, and at that point I didn’t have any need for a backup. The following year I ended up buying an IXUS 50 (SD400 Digital ELPH) for social photography and low-profile shots at concerts, which was a good deal more pocketable than the G5. The PowerShot G6, which replaced the G5 in 2004, offered greater resolution and a more refined user experience in a more stylish body, but the tacky silver chrome finish turned me off.

    I did buy a PowerShot G5 eventually though, after fifteen years of thinking about it. This past weekend, for $ 9 at my local thrift shop. As you can see from the images in this article, it’s cleaned up pretty nicely. Another itch scratched off the list.

    Do you have any cameras in your past that ‘got away’ at the time? Let me know.

    Read our PowerShot G5 review

    Canon PowerShot G5 samples gallery (2003)

    $ (document).ready(function() { SampleGalleryV2({“containerId”:”embeddedSampleGallery_5830030407″,”galleryId”:”5830030407″,”isEmbeddedWidget”:true,”standalone”:false,”selectedImageIndex”:0,”startInCommentsView”:false,”isMobile”:false}) });
    Articles: Digital Photography Review (dpreview.com)

  • Nokia pulls the plug on the Ozo VR camera, will lay off up to 310 employees

    Nokia Technologies has announced that it will be reducing its investments in VR due to “slower-than-expected development of the VR market,” and this means putting an end to its Ozo VR camera. While Nokia will fulfill its commitments to customers who have already purchased the camera, the company explains that it will not develop future versions of Ozo.

    Nokia revealed the change of plans in a statement yesterday, in which the company also detailed a business restructuring plan that includes laying off up to 310 employees—a significant percentage of Nokia Technologies’ 1,090 worker base. These layoffs will primarily happen in the US, UK and Finland, and are part of a shift towards “digital health and brand and technology licensing.”

    Presently, the Ozo+ camera is still listed as available in Nokia’s online store for $ 25,000 USD.

    Press Release

    Nokia focuses on patent, brand and technology licensing and targets faster growth in digital health with sharpened strategy for Nokia Technologies

    Press Release

    • Increased focus on digital health and brand and technology licensing balanced with optimized investments in virtual reality
    • Planned changes expected to impact Nokia Technologies employees mainly in Finland, the US and the UK
    • Nokia’s successful patent licensing business is not in scope of planned changes

    October 10, 2017

    Espoo, Finland – Nokia today announced plans to sharpen the focus of Nokia Technologies on digital health, and accelerate growth in that market, while optimizing investments in virtual reality (VR). Nokia Technologies will also focus on growing brand and technology licensing while leaving its successful patent licensing business untouched.

    The shift deepens Nokia’s commitment to fully leverage its digital health portfolio acquired through the purchase of Withings in 2016. Through a more focused, more agile digital health business, Nokia aims to have larger impact with consumers and the medical community.

    In digital media, the slower-than-expected development of the VR market means that Nokia Technologies plans to reduce investments and focus more on technology licensing opportunities. The unit aims to halt development of further versions of the OZO VR camera and hardware, while maintaining commitments to existing customers.

    The potential reductions are expected to affect up to 310 of the roughly 1090 employees in Nokia Technologies, mainly in Finland, the US and the UK. To start the process, Nokia today has invited employee representatives of Nokia Technologies in Finland to cooperation negotiations.

    “Nokia Technologies is at a point where, with the right focus and investments, we can meaningfully grow our footprint in the digital health market, and we must seize that opportunity,” said Gregory Lee, president of Nokia Technologies. “While necessary, the changes will also affect our employees, and as a responsible company we are committed to providing the needed support to those affected.”

    Articles: Digital Photography Review (dpreview.com)

  • This is why the Pentax 645Z DxOMark score of 101 was never published

    If you dive into the comments on the recent news of the Nikon D850’s chart-topping DxOMark score of 100, you’ll notice a trend: people claiming that the Pentax 645Z actually scored 101 way back in 2015… before that score was unceremoniously scrubbed from the DxOMark website. So what’s going on here? Conspiracy? Foul play? Piles of money being passed around under corporate board room desks?

    Not quite. The truth, as is so often the case, is a little less salacious.

    A full review of the Pentax 645Z was never published, and that score of 101 only appeared online as part of a top cameras chart that showed up in DxOMark’s review of the Sony RX1R II sensor. The chart (below) showed Pentax on top with a score of 101, followed by the Sony A7R II with a score of 98. People asked about the score in the comments and were told a full review was “delayed” but “on its way,” yet that review never arrived. Later, the score was quietly removed and the chart was replaced.

    Speaking to DxOMark earlier today, photography blog PetaPixel finally learned why DxOMark decided to pull that score: not for some nefarious reason, but because they never actually finished the review. Before they could publish, the company decided to pause medium format sensor reviews altogether.

    “We made a pause on medium format a few years ago just because of our production bandwidth,” a DxOMark spokesperson told PetaPixel, explaining that they simply couldn’t keep up with the other tests they needed to do. “We will now soon republish this type of camera, and Pentax 645Z should be published soon […] in a matter of days.”

    That last part is very exciting news. As medium format—and especially mirrorless medium format—becomes more affordable, people will be very curious indeed to see how these larger sensors stack up against the amazing full-frame sensors we’ve seen lately in cameras like the Nikon D850 and Sony a7R II.

    We’ve had our own request for comment about this same issue out to DxOMark for a couple of days now, and will update this post with a full statement as soon as we hear back. But in the meantime, it sounds like the Nikon D850 might not retain its chart-topping score for long… at least not if it has to go head-to-head against medium format sensors.

    Articles: Digital Photography Review (dpreview.com)

  • DJI launches Zenmuse X7 Super 35mm camera module with Raw video capture

    $ (document).ready(function() { SampleGalleryV2({“containerId”:”embeddedSampleGallery_8541344997″,”galleryId”:”8541344997″,”isEmbeddedWidget”:true,”standalone”:false,”selectedImageIndex”:0,”startInCommentsView”:false,”isMobile”:false}) });

    DJI has launched the Zenmuse X7, a Raw video capable Super 35 camera module. The camera/gimbal system which mounts to the company’s drones features a new, proprietary lens mount.

    The camera can shoot 6K CinemaDNG Raw or 5.2K Apple ProRes footage at up to 30p or 3.9K CinemaDNG and 2.7K ProRes at up to 59.94p. The company claims 14 stops of dynamic range but, like all video manufacturers, doesn’t specify how this is assessed.

    It uses the new “DJI Cinema Color System” based around a D-Log Curve and D-Gamut RGB color space.

    The camera includes two exposure modes, one that varies amplification gain and an “EI” mode that always uses minimal amplification (~base ISO) with metadata tags to denote the intended final brightness, to preserve DR. This is increasingly common practice in the video sphere but has yet to make its way across to stills photography.

    The previous model (the Zenmuse X5) was based around a Micro Four Thirds mount and came with a distinctly Panasonic-like 15mm F1.7 lens. Instead the Zenmuse X7 is based around the company’s own ‘DL’ mount.

    Alongside the camera, the company is releasing 16mm, 24mm, 35mm and 50mm F2.8 lenses, the longest three of which will include mechanical shutters. The carbon fiber bodied lenses will cost $ 1,299 each, with the exception of the 50mm, which is $ 100 cheaper, though a camera bundled with all four lenses will cost just $ 4,299.

    The camera on its own will cost around $ 2699 and will be available from November.

    Press Release:

    DJI Reveals Zenmuse X7, The World’s First Super 35 Digital Film Camera Optimized for Professional Aerial Cinematography

    October 11, 2017 – DJI, the world’s leader in civilian drones and aerial imaging technology, today introduced the Zenmuse X7, the world’s first Super 35 digital film camera optimized for professional aerial cinematography. Designed to work seamlessly with the DJI Inspire 2 drone, the Zenmuse X7 delivers superior image quality, interchangeable lenses, and a new DJI Cinema Color System for post-production to give film and video professionals more creative freedom.

    “The Zenmuse X7 offers everything professional content creators need to make their aerial footage as stunning and vivid as they demand,” said Paul Pan, Senior Product Manager at DJI. “From the large Super 35 sensor to a new mount, lenses, and color system, the Zenmuse X7 gives cinematographers and professional photographers an unmatched set of tools that work seamlessly with the DJI Inspire 2 drone to capture high-quality footage that is easily integrated into projects shot with industry-leading handheld cameras.”

    Greater Expressive Freedom

    The Zenmuse X7 is equipped with a Super 35 video sensor featuring 14 stops of dynamic range for more detail in low-light conditions. Its low-noise image capture enhances grading flexibility by preserving details in both highlight and dark areas while enabling a shallow cinematic depth of field.

    To meet the rigorous requirements of filmmakers and television production professionals, the Zenmuse X7 captures the highest image resolutions ever for an integrated drone camera. It is capable of shooting 6K CinemaDNG RAW or 5.2K Apple ProRes at up to 30 FPS, as well as 3.9K CinemaDNG RAW or 2.7K ProRes at up to 59.94 FPS to integrate seamlessly into industry-standard post-production workflows.

    Enhanced Imaging Potential

    The Zenmuse X7 uses a dedicated aerial mount system, the DJI DL-Mount, featuring an ultra-short flange focal distance to carry prime lenses optimally. Available with focal lengths of 16 mm, 24 mm, 35 mm, and 50 mm, each lens has a maximum aperture of F/2.8 and is crafted out of carbon fiber, making them durable and lightweight for high-performance aerial cinematography with the DJI Inspire 2 drone.

    To allow for advanced setting adjustment and fine-tuning, the 16mm lens is equipped with a built-in ND 4 filter, and the 24 mm, 35 mm, and 50 mm lenses feature a mechanical shutter.

    Higher Flexibility in Post-Production

    DJI has also introduced a new DJI Cinema Color System (DCCS) making the Zenmuse X7 an asset on every film set for movies, TV series, commercials, documentaries, and more.

    “For the Zenmuse X7, we took our color science to the next level,” continued Pan. “We consulted the world leading authorities in color science, Technicolor. With their guidance, our engineers developed an optimized gamma curve for the X7 allowing more latitude without sacrificing image quality.”

    DCCS features a new D-Log Curve and D-Gamut RGB color space to give more flexibility and color options during the post-production process. The D-Log further extends the dynamic range, while the D-Gamut RGB color space preserves more color information to support the most demanding filmmaking scenarios, providing accurate color for quick and easy post-processing.

    The new EI Mode mimics the way a film camera works to help cinematographers capture as much information as possible in every scene while balancing the dynamic range and noise with different log curves for more flexibility during the post-production process.

    The Zenmuse X7 gimbal system weighs just 631 grams with the 16 mm lens. The DJI Inspire 2 has a flight time of up to 23 minutes with the Zenmuse X7. For more info about the Zenmuse X7, visit www.dji.com/zenmuse-x7.

    Price and Availability

    The Zenmuse X7 camera is priced at $ 2,699 USD. The 16 mm, 24 mm and 35 mm lenses will be available for $ 1,299 each, and the 50 mm for $ 1,199. Customers can purchase the Zenmuse X7 prime lens combo including all 4 lenses for $ 4,299. The Zenmuse X7 will start shipping in early November 2017 from store.dji.com, in DJI Flagship Stores and through DJI Authorized Dealers worldwide.

    DJI Care Refresh will be available for the Zenmuse X7 camera gimbal system as well as for the Inspire 2 drone. For more info, visit www.dji.com/service/djicare-refresh.

    Articles: Digital Photography Review (dpreview.com)

  • Picnic at the Border: Artist JR Hosts Bi-National Meal at a Giant Table

    [ By SA Rogers in Art & Street Art & Graffiti. ]


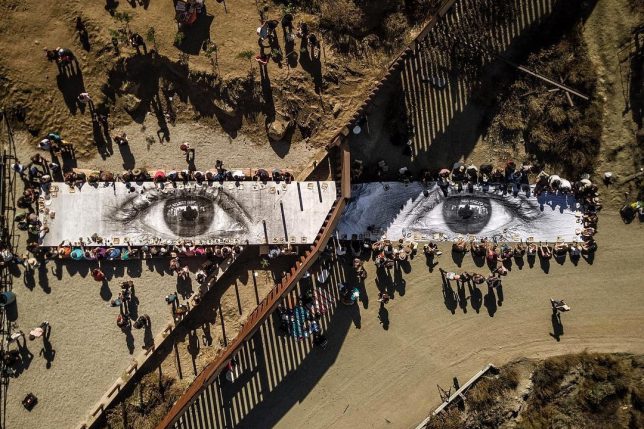
    At one small point on the United States-Mexico border, where two towns named Tecate are separated by a fence, residents of both countries sat down to the same picnic at a gigantic table printed with ‘The Eyes of the Dreamer.’ This new event, held on October 8th, comes just weeks after the artist rolled out a massive 65-foot-tall photographic installation of a toddler peering over the fence from the Mexico side.

    “GIANT PICNIC at the border today in Tecate … people eating the same food, sharing the same water, enjoying the same music (half of the band on each side) around the eye of a dreamer … we forgot the wall for a minute …” says JR in a Facebook post.

    Picnic-goers sat down to the same meal at one big table for the single-day installation, which was apparently pulled off with the help of a sympathetic border guard. A band played, with some of its members sitting on the U.S. side and others on the Mexico side.

    JR is well known for these black-and-white photographic installations, which are put up all over the world, often without official permission. The subjects of his portraits are usually everyday people who live in the area. The TED Prize winner says he aims to use art to “turn the world inside out.”

    Share on Facebook


    [ By SA Rogers in Art & Street Art & Graffiti. ]

    [ WebUrbanist | Archives | Galleries | Privacy | TOS ]


    WebUrbanist