Blog

  • HDR is enabled by default on the iPhone 8 Plus, and that’s a really good thing

    Capturing HDR (high dynamic range) photos using an iPhone or iPad camera isn’t a new feature, but using it in the iPhone 8 Plus is the first time I’ve been wowed by it.

    HDR images are balanced and realistic, to the point where you may not even think about whether a photo is HDR or not. In fact, in the iPhone 8 and iPhone 8 Plus, Apple is so confident in the results that HDR is an automatic setting. When I mentioned to a friend that I was testing the HDR feature, he visibly winced, but there’s no need: Apple’s implementation shows that the term “HDR” doesn’t have to be associated with the garish, hyperreal look of a lot of HDR imagery. They’re often just darn good photos.

    HDR Auto by default

    On iPhone 7, iPhone 7 Plus, and earlier models, even under iOS 11, the HDR mode can be manually turned on, off, or set to Auto in the capture interface. On those devices, Auto means the camera decides whether HDR should kick in to improve a photo when capturing scenes under low light or with a lot of tonal contrast (such as a bright sky and dark foreground). A small yellow “HDR” icon appears at the top of the screen when it’s active.

    Capturing the HDR photo saves two images: the original metered image and a single HDR version that is a blend of three exposures (regular, light, and dark, which are recorded and combined in-camera, not saved as individual images). You can opt to hold onto that original by going to Settings > Camera > HDR (High Dynamic Range) and choosing Keep Normal Photo.

    For the iPhone 8 and iPhone 8 Plus (and the forthcoming iPhone X), however, auto HDR is enabled by default. And it’s not exactly the same HDR effect used by previous devices. The 8 and 8 Plus include an image sensor with larger pixels and improved silicon – a new ISP (image signal processor) and more powerful A11 Bionic main processor. Together they add more processing oomph, resulting in more dramatic HDR effects – without taking it too far.

    I tested using an iPhone 8 Plus, but the feature applies to the iPhone 8 and iPhone X, as well.

    HDR in the Real World

    Taking the iPhone 8 Plus outside on a sunny day provided dramatic results. In fact, it may subtly alter the way you take photos with the iPhone. Bright areas, such as clouds in the sky, appeared blown out while framing the shot. Typically, the way to compensate for that would be to reduce the exposure before you take the photo (tap the screen to set the focus and exposure, and then drag the brightness indicator down to darken the scene). However, in the captured photo, the HDR feature restored detail in the clouds and often presented blue skies where they weren’t visible in the preview.

    Preview image
    Final image

    If you’re shooting with Live Photos turned on (which records a few seconds of video around the still image), when you review your images in the Photos app, the “before” image briefly appears before cross-dissolving into the final HDR image.

    Comparing iPhone 8 Plus and iPhone 7 Plus

    Capturing the same scene with an iPhone 8 Plus and an iPhone 7 Plus reveals general improvement in the new model. Although both cameras’ HDR did a good job dealing with overexposed clouds, the iPhone 8 Plus tended to offer more graduated tones. Overall, it also did a better job of filling in shadows; the iPhone 7 Plus pulled more toward reducing exposure throughout to compensate for the brightness.

    HDR photo with iPhone 7 Plus
    HDR photo with iPhone 8 Plus

    That adjustment is welcome when photographing people. Often you don’t want to turn on HDR for portraits, because the effect exaggerates the contrast in facial features. But if Auto HDR is always available, you won’t have that control (unless you turn off Auto HDR in the Camera settings). Since the iPhone 8 Plus is also lifting the shadows, the effect isn’t as pronounced.

    iPhone 7 Plus iPhone 8 Plus

    Sometimes, Auto HDR didn’t engage under conditions when I expected it would, and still produced good results. When photographing in low-light, the iPhone 8 Plus turns first to increasing ISO and other software processing to create a usable image.

    iPhone 8 Plus telephoto lens, no HDR
    iPhone 8 Plus wide angle lens, no HDR

    Conclusion

    Making HDR a transparently automatic feature on the iPhone 8, iPhone 8 Plus, and iPhone X is a smart move on Apple’s part. Intelligent HDR application was one of the things that made the Google Pixel’s camera so good, so it seems wise for Apple to follow suit. Although Auto HDR can be turned off in the Camera settings, letting you choose when to activate HDR mode, in my testing I found little reason to do so.

    Articles: Digital Photography Review (dpreview.com)

  • Tips for Taking Documentary Style Travel Photos

    Documentary style photography has long been of great fascination to me. The sheer act of photographing people and places to document spontaneous moments and the imperfections associated with it gives such photography, and the photographer, a sense of being authentic, real, and free to exercise his/her creative freedom.

    Officially, documentary style photography has many technical definitions. As per Wikipedia, documentary style of photography is used to chronicle events and environments in a naturally occurring state very much like photojournalism. I like to think of a documentary style of photography as the letting go of my inhibitions and preconceived notions of perfection. That I’m documenting people and places in their natural environment – being or doing what they do on any given day.

    Tips for Taking Documentary Style Travel Photos

    This scene literally happened right in front of me in Jaipur, India – the classic story of the billy goats!

    I find that by approaching travel photography in a documentary fashion, I am able to have a richer travel experience. Because I can relieve my mind of the pressures of photographing just like everyone else and also walk away with some unique frames that speak to my own experiences.

    To that end, here are a few tips to keep in mind for a documentary style approach towards your travel photography.

    #1 – Be present in the moment

    Being present in every moment of every day is a life lesson we all can benefit from. It doesn’t just apply to travel photography. Great moments happen every day around us that are worth documenting not just for our clients but also for ourselves so that we can live a richer, fuller life.

    Tips for Taking Documentary Style Travel Photos

    People watching is a great exercise in training your eye to really catch that which is unusual and unique to a place – these boys in the market in Jaipur were observing me just as much as I was observing them!

    By training your mind to really live life in the moment and not worry about all the other distractions will also help you really “see” what is around you. More often than not, you likely travel with a very tight agenda and timeline. No sooner than you get to your destination, you are already mentally prepared to move on to the next stop. Instead, try and plan a single excursion for a day and really focus on learning and experiencing that place or activity before moving on.

    #2 – Be observant of your surroundings

    Life is happening all around you all the time. People interacting with each other, people interacting with nature, nature putting on a grand show during sunrise, sunset, or even during a thunderstorm. But don’t wait for some preconceived notion of the perfect moment to take your camera out and take a photo.

    At the same time, don’t see the world simply through your viewfinder. Observe the scene, anticipate the shot that you really want to get and be ready to take the shot. Don’t just fire away at every situation only to get home to realize that you completed missed the moment and hence missed the shot as well.

    Tips for Taking Documentary Style Travel Photos

    I once found myself in the middle of a village festival/ritual when I was traveling in India. I had no idea what was going on but knew I had to document this. Luckily a female photographer was somewhat of a rarity in this village and I was given a special seat in the middle of all the action (without a word spoken amongst me and these women)! It was fascinating to see and experience.

    Tips for Taking Documentary Style Travel Photos

    I later found out that these women were taking one of the female members of their family to each house to get blessings as she was supposed to be possessed by a female deity and have god-like powers…certainly an experience I will never forget!

    #3 – Be real about your travel photography goals

    A very famous travel quote says, “We travel not to escape life, but so that life does not escape us” really hits the nail on the head for me. Be real about why you travel and what you want to gain out of each travel experience. If you are traveling to a marketplace and want to get a true sense of local lifestyles and customs, then look for naturally occurring scenes. Don’t look for people that you can pose or stage to get your shot.

    Tips for Taking Documentary Style Travel Photos

    This is by no means a perfect shot but I love the fact that this angle shows just how crazy transportation choices can be in smaller villages and towns in some countries!

    #4 – Be aware of your gear choices

    Packing for any sort of travel is an art in itself, especially if you are going away for an extended period of time. Documentary style travel photography requires a slightly different mindset in terms of gear than say perhaps wildlife or portrait photography.

    I find that for documentary style travel photography a zoom lens like the ultra-wide angle focal length like the Canon 16-35mm f/4 or one like the Canon 24-70mm f/2.8 works well for me. While a fast lens is ideal, I don’t usually find myself photographing at an aperture lower than f/4 or f/5.6. More often than not, I have more than one subject in the scene and also want to capture some of the background in order to provide content to the shot.

    Tips for Taking Documentary Style Travel Photos

    I was in Rome for three days this past summer but couldn’t get the famous Spanish Steps without people no matter what time of the day I tried. So instead, I chose to embrace the crowds and showcase this famous monument as the tourist attraction it really is!

    #5 – Be confident in your skills

    Documentary style photography is generally quite fast paced. You are trying to capture a scene as it is playing out in front of you. You don’t really have the time or the opportunity to re-compose the shot and then click the shutter. However, this does not mean

    However, this does not mean that you have to just fire away at the maximum fps (frames per second) that your camera can handle, then pick the best of the lot in post-processing. Instead, use your technical as well as artistic skills to read the scene, analyze the light, assess the right camera settings, imagine the outcome, anticipate the shot and then take the picture. Oh, by the way, bear in mind that you will not likely get a redo.

    Portland Mountains from the flight - Tips for Taking Documentary Style Travel Photos

    I had almost no time to really plan this shot out…I knew I wanted to try and get all three of the famous peaks of the Pacific Northwest in one frame while at about 35,000 feet in the air.

    Conclusion

    I hope these tips convey my love for documentary style photography and do not scare you away from it. This style of photography has its own charm. Even though it may appear to be highly unplanned and random, it is also a good mix of carefully anticipated planning and authenticity. Give it a try the next time you travel and let me know how it goes.

    The post Tips for Taking Documentary Style Travel Photos by Karthika Gupta appeared first on Digital Photography School.


    Digital Photography School

  • A New Spin: 125-Year-Old Windmill Turned into a Towering Guest House

    [ By WebUrbanist in Architecture & Houses & Residential. ]

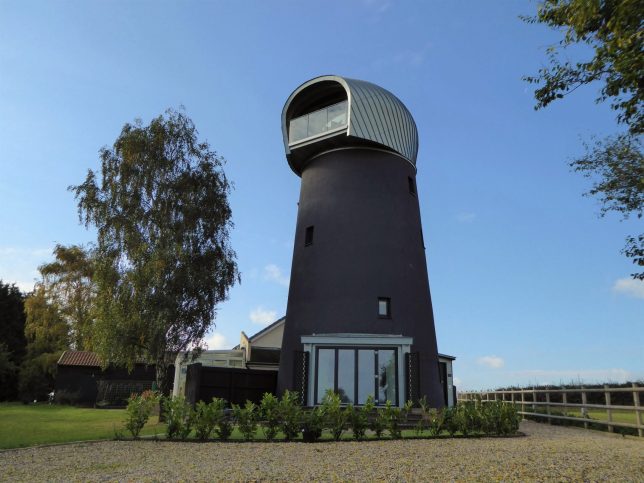
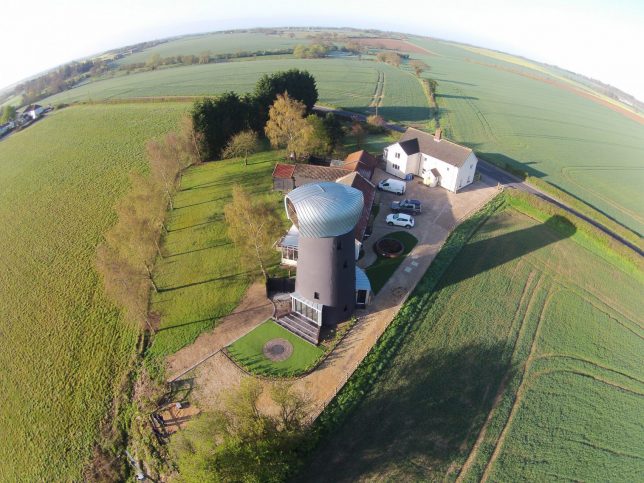
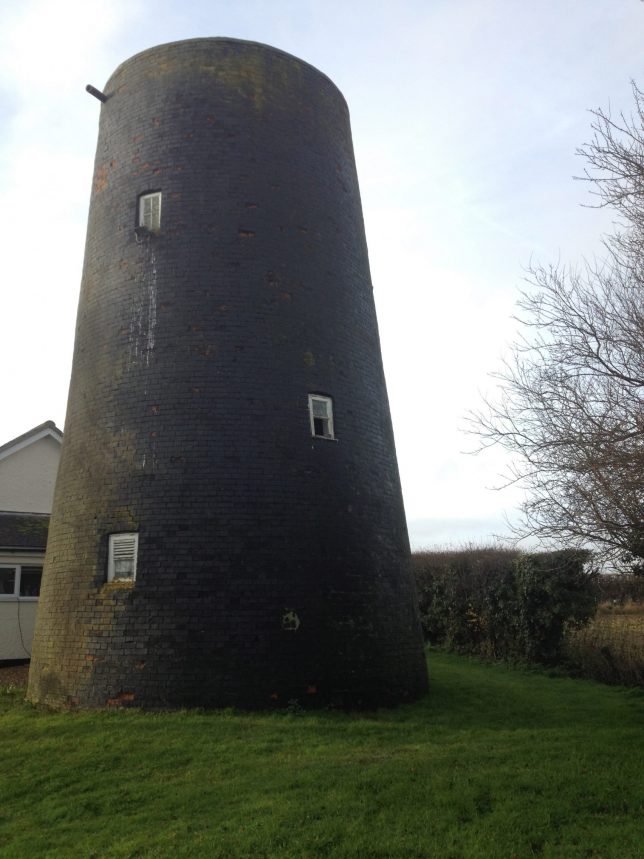
    From barns and sheds to windmills, rural farm structures have a habit of falling into disrepair when they cease to serve their old functions. In Suffolk, England, one such old structure has found new life as a guest house.

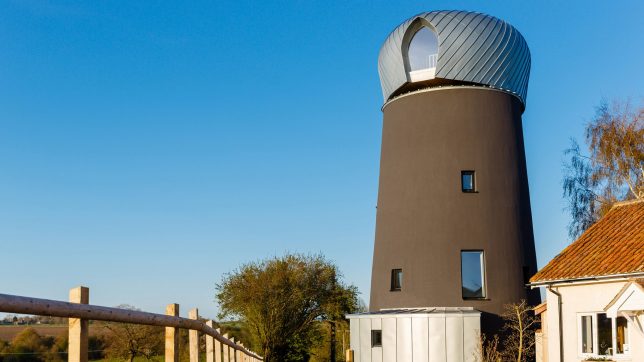
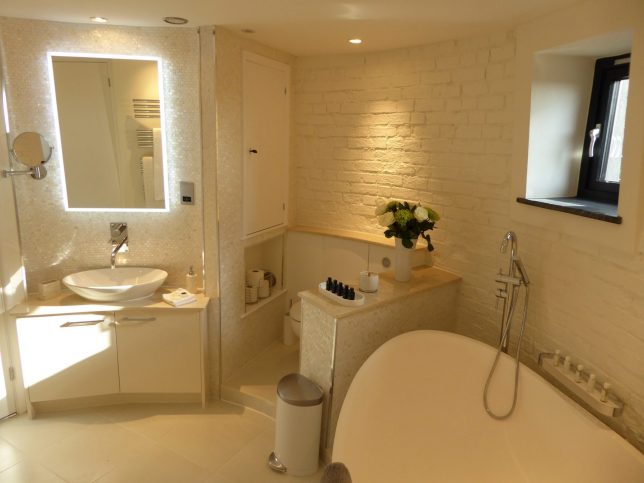
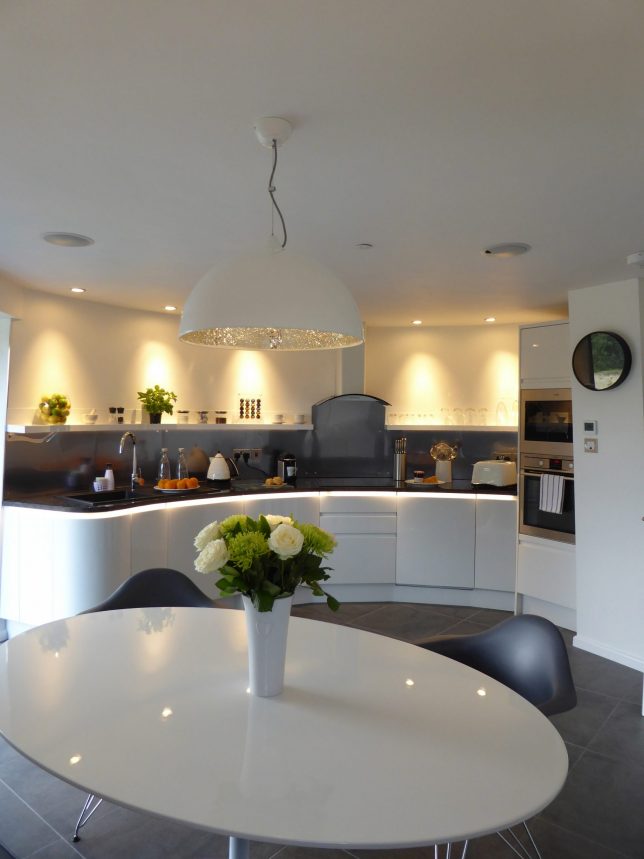
    Beech Architects saw the stump of an old windmill on the site as an opportunity to expand the living space of the main farmhouse nearby. At 60 feet tall, the spacious structure now houses two bedrooms, a dining/kitchen area and bathroom.

    On the top, where the cap and sails were lost decades ago, a new viewing pod was installed to provide panoramic views of the surrounding countryside. Though architects designed the addition, the homeowner acted as the builder and hired subcontractors and suppliers for specific tasks.

    “The design objectives were to reinstate the lost cap structure and restore the redundant and crumbling windmill to its former landmark status via contemporary design interventions,” said the architects.

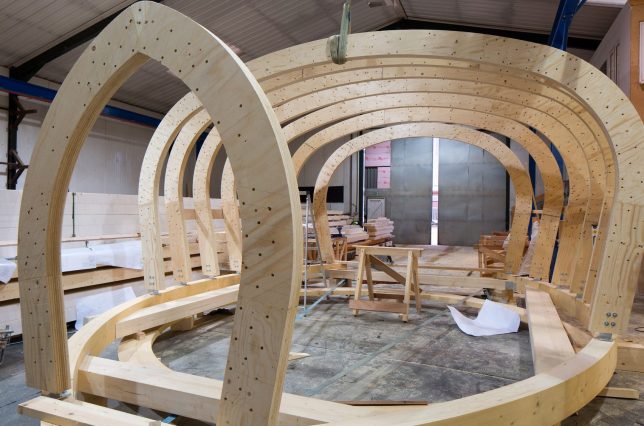
    The cap and entry diverge from the historical aesthetic of the main structure, but also serve to illustrate what parts of the building are original and which have been added. The curved form of the cap uses a special timber rib system that also provides strength and stability, helping it resist wind forces at its exposed and elevated location.

    Everything about the project was complicated by curves. New cladding had to be custom-fit to the exterior. Inside, the lack of straight lines made structural retrofits challenging, and also resulted in a series of rounded furniture and fixtures. A series of staircases spiral up each floor to the final fourth level with the viewing platform.

    The building has won a variety of accolades, including awards from the 2016 National Roofing Awards, Structural Timber Awards and a nomination for an RIBA Regional Awards 2017.

    Share on Facebook


    [ By WebUrbanist in Architecture & Houses & Residential. ]

    [ WebUrbanist | Archives | Galleries | Privacy | TOS ]


    WebUrbanist

  • Sample gallery update: Sony FE 100-400mm F4.5-5.6 GM OSS

    The Sony FE 100-400mm F4.5-5.6 GM OSS is a powerful piece of kit, despite its less-than-fast aperture. More importantly, it is sharp throughout its versatile zoom range.

    We’ve beefed up of our initial sample gallery with some additional photos of bison, bears, prong horned antelope and drift cars. These join our original samples of models, beach scenes and horseback riders. Now how’s that for versatility?

    See our Sony 100-400mm F4.5-5.6 GM OSS sample gallery$ (document).ready(function() { SampleGalleryStripV2({“galleryId”:”4598193995″}) })

    Sample photoSample photoSample photoSample photoSample photo

    Articles: Digital Photography Review (dpreview.com)

  • How to Use Puppet Warp in Photoshop

    One of the most powerful distortion tools in Photoshop is the Puppet Warp command. First Introduced in Photoshop CS5, Puppet Warp is a handy command that allows you to easily bend and shape parts of your image as if it were a puppet. You can use this distortion tool on almost any photo, but in this tutorial, I am going to give you a crash-course on how to make the most out of Puppet Warp command when distorting people in your photos.

    Puppet Warp provides a visual mesh that lets you drastically distort specific image areas while leaving other areas intact. Applications range from subtle adjustments to severe limb distortions. In most cases, you will keep your distortions subtle to keep them realistic.

    How to Use Puppet Warp in Photoshop

    However, in this tutorial, we will push the Puppet Warp Tool to the max and make drastic adjustments to completely reposition the arms and legs of the man in this composite.

    Isolating Your Subject

    The first step to using the Puppet Warp command is to isolate the person (or object) that you would like to distort. This often involves making a selection of the individual and masking-out the background.

    In this example, the man jumping was extracted from his background via a Layer Mask and placed into a Smart Object. Smart Objects allow you to apply filters, commands, and distortions nondestructively; which means that you can always come back and adjust any changes that you’ve made.

    02 isolate - How to Use Puppet Warp in Photoshop

    Puppet Warp works even if you don’t extract the subject from the background, but the tool becomes less efficient and less intuitive.

    Apply The Distortion Pins

    The Puppet Warp command allows you to distort an image by clicking-and-dragging pins which distort the pixels to which they are attached.

    After you isolate the person in your scene, you will need to add the distortion pins so that you can start manipulating the pixel in your image. Start by selecting the layer that contains your foreground element, in this case, the layer of the man jumping, and Go to Edit > Puppet Warp.

    03 mesh How to Use Puppet Warp in Photoshop

    By Default, you will see a mesh around your layer. This mesh can be distracting; I encourage you to disable it by unchecking the “Show Mesh” checkbox from the Options Bar.

    04 disable mesh

    You can now click anywhere on your subject to create the pins that will allow you to move (or pin down) the pixels in the image. When working with people, create the pins near the joints such as the wrist, shoulders, knees, ankles, and in any other area where the body would normally bend. You can also create pins in areas that you want to keep pinned down.

    05 add pins How to Use Puppet Warp in Photoshop

    Adjusting Pins and Distorting the Image

    With your pins in place, click on a single pin to activate it, and drag it to a new location. You will see that the image will be distorted as you drag the pin. The distortions will become more extreme the further you drag it from its original location.

    06 move pins How to Use Puppet Warp in Photoshop

    Rotating Pins

    After making a distortion, you may find that the image does not look realistic because of how the pins bend the surrounding pixels. To help fix this issue, you can use the Rotate control in the Options Bar to rotate a single point and help correct some of the unrealistic distortions.

    07 rotate options

    You can also select a pin and hover over it while holding Option/Alt to reveal a Rotate UI element that you can click-and-drag on to rotate the mesh.

    08 rotate

    This method is much more intuitive, and it allows you to rotate the pin much easier. But for more subtle and precise rotations, the Rotate control in the Options Bar will be the better option.

    Pin Depth

    In this example, you’ll notice that the model’s leg has been placed over his right leg. But if you would like for his right leg to be in front, then you can adjust the Pin Depth.

    Select the pin that controls his right leg, and in the Options Bar, under Pin Depth, Click the Move Forward icon to push that pin forward.

    09 pin depth

    After changing the Pin Depth, the model’s right leg will appear in front of his left leg.

    09 leg behind

    You can do the same with any of the other pins in your image to change the depth of the corresponding body part.

    Options Bar Settings

    The Options bar also give you a few extra options that will determine how the mesh will behave and it will, of course, affect how the pixels are distorted.

    • The Mode option lets you decide how stretchable the mesh should be.
    • Density controls the spacing of the mesh’s points. Adding more points makes your edits a lot more accurate, but the processing time takes longer to complete.
    • Expansion allows you to expand or contract the outer edges of the mesh.

    Conclusion

    If you prefer to watch me do this and follow along by video, see below:

    Remember that when using the Puppet Warp command, or any other distortion tool in Photoshop, you should do so with restraint. Small changes can have a significant impact and go unnoticed. However, extreme adjustments could quickly become unrealistic and distracting to the whole image.

    The post How to Use Puppet Warp in Photoshop by Jesus Ramirez appeared first on Digital Photography School.


    Digital Photography School

  • DJI is now a camera company, and we should probably pay attention

    When most people think of DJI, they think of drones – Phantoms, Mavics, and Sparks. Some may also know DJI for camera stabilization systems and gimbals, but it’s fair to say that most people probably think of DJI as a drone company.

    Starting this week, DJI is also a camera company.

    At an event in Hollywood, the company introduced its new Zenmuse X7 cinema camera, which includes some very impressive features including 6K Raw video. (You can find the full rundown of specs in our news story.) It’s a camera aimed primarily at the high-end motion picture market, but it sheds some light on DJI’s approach to the camera industry.

    Part of what makes this interesting is the astounding rate at which DJI has been innovating over the past few years. I’m not suggesting that other companies haven’t innovated, but let’s be honest – at times the camera market can feel a little bit predictable.

    “Starting this week, DJI is also a camera company.”

    What sets DJI apart is that it seems to consistently push boundaries to create inventive products, which sometimes even surprise us a bit, as well as the rate at which they appear to be doing it. In fact, at the launch event for the X7 I felt a genuine sense of excitement about the new camera, not just from DJI employees but from those in attendance.

    Although the X7 is undeniably aimed at cinematographers, it presents opportunities for photographers as well. It also illustrates that DJI is prepared to make its own imaging products if the company thinks it can build a better mousetrap than what’s currently out there.

    A new system

    DJI has built aerial systems with cameras for years, such as the Phantom series, and more recently, the Inspire series. Those models historically relied on either small sensor cameras with fixed gimbals, or adopted standards not originally developed for aerial use, such as Micro Four Thirds. (The original Phantom even used a GoPro camera.)

    At the very high end of the market, however, photographers and filmmakers have largely been on their own to figure out how to rig pro-level cameras, such as DSLRs or cinema cams, on much larger drones like the S900 or Matrice 600, something that requires long set up times, provides less stability, and results in short flight times.

    The Zenmuse X7 camera was designed specifically for aerial use, with a focus on small size and light weight. The short 16.84mm flange distance of the DL-mount allows lenses to remain small.

    The X7 is primarily designed for this latter group, as well as users of the Inspire 2. By building its own camera, DJI had the freedom to engineer both camera and aircraft as a single, integrated system. The result is a very small Super 35 cinema camera that fits easily on an Inspire 2 drone without compromising the flight characteristics, and which can deliver professional cinema quality output. And, at a price point of $ 2699, it almost feels like a bargain.

    Further, it’s not just a camera that DJI has introduced, but a full system that includes a new lens mount and lenses. The DL-mount has an extremely short 16.84mm flange distance, allowing for impressively small lenses that keep weight to a minimum. The four lenses available at launch are built from lightweight carbon fiber and have no external moving parts for improved durability. It’s a system that DJI can build on for the future.

    In a sense, DJI designed the system because it needed to do so in order to continue innovating in other areas.

    “In a sense, DJI designed the system because it needed to do so in order to continue innovating in other areas.”

    In my brief hands-on time with the X7 and the new lenses I was impressed with the hardware. It’s remarkably small for what it is. The one thing that caught me off guard was the weight of the lenses; they’re so light that they feel like inexpensive kit lenses. But then you remember that they’re built from carbon fiber in order to be as light as possible and it all makes sense. If the camera and lenses can deliver the level of quality that DJI claims (and indications are that it probably can), the company has a real winner of a product. It’s a strong start for a new system.

    The Zenmuse X7 is the first camera in DJI’s new system.

    Why should photographers care?

    Although the X7 is clearly aimed at the motion picture community, there’s reason for photographers to be excited about DJI’s new camera system as well.

    All the press coverage describes the camera as having a Super 35 video sensor, which is a standard in the motion picture industry. That’s true, to a degree. It turns out that the X7’s sensor is actually a full APS-C sensor. When shooting video, the camera uses the full width of the sensor but not the full height, resulting in a cinematic aspect ratio.

    When shooting photos, however, the camera uses the full area of its 24MP sensor, supports Raw capture in DNG format, and can even shoot continuously at 20fps. The result is that the X7 may be one of the most compelling options for aerial photographers available today. It’s a bit pricey once you include an Inspire 2 drone and a lens or two, but no more so than a Nikon D5 and a couple good lenses. If you’re serious about aerial work it’s inexpensive compared to helicopter time, and much easier to use than a homebrew system assembled from scratch.

    The X7’s Super 35 sensor is really an APS-C sized sensor (23.5mm x 15.7mm). When shooting photos the camera captures the sensor’s full 24MP resolution and supports Raw image capture.

    What’s probably more important than the X7 camera, however, is that DJI now has its own camera platform, complete with lens mount, around which it can develop additional imaging products, lenses, and accessories. This could include non-aerial tools, such as gimbal-mounted cameras, and maybe even other products the company has up its sleeve. Additionally, users will be able to buy lenses knowing that they won’t be obsolete when the next camera is introduced, just as with any other system.

    “…the X7 may be one of the most compelling options for aerial photographers available today.”

    I’m not suggesting that DJI is going to radically shift focus and suddenly start making still cameras, but the company has shown an interest in the photography market, as demonstrated by its stake in Hasselblad. It’s not entirely clear where DJI is headed with this, but I suspect it goes beyond hanging a 100MP Hasselblad H6D off a M600 hexacopter with a Ronin gimbal. However, DJI does have the potential to be a disruptor in the imaging market, and now they have a camera platform with which to do it.

    The wrap

    It’s not often that we see the introduction of a completely new camera system, so DJI’s announcement this week is notable. What I find particularly exciting is that DJI has a tendency to introduce and iterate products quickly. It’s also in a unique position of not having a legacy system to support. DJI doesn’t have to worry about ‘the way it’s always been done’, or making sure its lenses work with decades-old products. That won’t be true forever, but for now it gives them the freedom to be very creative in their product design.

    If you’re going to launch a new cinema camera, you might as well do it in Hollywood. The Inspire 2 and Zenmuse X7 camera.

    I don’t imagine DJI is going to shift away from its core strength of aerial imaging, but if the company can keep up its current rate of innovation I believe we’re likely to see some very impressive imaging products coming our way, particularly now that it has committed to a full camera system with room to grow. If DJI can disrupt the market in the process, all the power to them.

    Articles: Digital Photography Review (dpreview.com)

  • iPhone 8 Plus sample gallery

    It’s not exactly a revolutionary device, but the iPhone 8 Plus does promise some evolutionary updates in the camera department. Apple claims that low light image quality is improved, thanks to a new image signal processor, and Portrait Mode gets an interesting update in the addition of a beta Portrait Lighting feature. DPReview contributor Jeff Carlson has been putting the 8 Plus to the test in some everyday shooting situations – take a look at how it fared.

    See our iPhone 8 Plus sample gallery

    $ (document).ready(function() { SampleGalleryStripV2({“galleryId”:”2637450826″}) })

    Sample photoSample photoSample photoSample photoSample photo

    Articles: Digital Photography Review (dpreview.com)

  • Video: DxOMark’s smartphone rating system explained

    Marques Brownlee has one of the most popular photo and video-focused YouTube channels out there—boasting some 5.2 million subscribers—and his most recent video takes on a subject that many in the photo world argue about ad nauseam: DxOMark ratings. The video is currently the #7 trending video on all of YouTube, and it’s definitely worth a look, especially if you don’t fully understand how DxO comes up with its overall ratings, photo ratings, video ratings and beyond.

    The first half of the video breaks down how DxOMark’s testing system actually works, and how scores in individual categories are compiled into an overall Photo and Video score, which is compiled into an overall score for the device. The second half of the video is where it gets really interesting, however.

    Brownlee spends the last 6 minutes or so of the video tackling a few different subjects:

    1. How DxOMark’s role as a consulting firm leads to some speculation about how certain manufacturers might be tuning their devices so they’ll perform better on DxO’s testing system, and whether that always translates
    2. How the scores are NOT based on a maximum score of 100.
    3. How we really ought to expect every new smartphone or camera to be the “best” DxOMark has ever tested, because the tech ought to be getting better every year.
    4. And how the Tech Press at large isn’t very good about explaining DxO scores and often just throws out an overall score for clicks.

    That last part is something we do our best to avoid here at DPReview—diving into individual scores and breaking down some of the more subjective assumptions, like we did with the Pixel 2—but something we’re certainly not immune to either.

    In the end, Brownlee’s video helps to explain how DxOMark scores are arrived at, the questions you should ask when you look at those scores, and the kind of in-depth analysis you should demand from your tech publications when they share those scores. Yep, that includes us.

    Check it out for yourself at the top, and let us know what you think in the comments down below.

    Articles: Digital Photography Review (dpreview.com)

  • Shooting with a used DSLR kit that cost me just $80

    Cameras and lenses are expensive. Really expensive. Even the cheapest entry-level DSLR kit today costs $ 500 and upwards. But what if you would buy the cheapest possible used DSLR? A camera that is over 10 years old? How would it stack up against today’s modern cameras? I was curious about this, and decided to find out for myself.

    After two weeks of watching classified ads closely, and missing a couple of good bargains because I wasn’t fast enough, I finally managed to purchase a Canon 400D(also known as Rebel XTi) with a battery grip and a Canon 50mm f1.8 II lens on it. All this for only $ 80. It seemed like a great deal to me. It even came with a 2GB CF card!

    I took the camera for a long walk the same day I bought it, and to summarize my experience: I was amazed by how good it was!

    The sensor outputs 10 megapixel photos, meaning that they measure roughly 3900×2600 pixels. This is more than enough for posting on social media or viewing photos on a computer screen. And what amazed me even more, was that with a fairly good lens, which the Canon 50mm F1.8 is, these pixels get utilized very well. A 100% crop looks very crisp and sharp in most cases.

    See the video above for image samples and 100% crop examples.

    The only major downside with using an 11-year-old camera is that the dynamic range in the sensor falls far short of my modern Sony A7. If you do not nail the exposure really well when you take the photo, you have far less latitude to correct it later. With my modern cameras I just shoot everything slightly underexposed, and lift the exposure later in Lightroom. That would not be a good idea with the Canon 400D.

    This camera’s weak dynamic range also makes it hard to capture scenes with strong light and deep shadows in the same frame. But other than that, this $ 80 camera kit has already, after a couple of days, given me a lot of photography joy for the money. I will definitely keep this camera—it’s a fun tool to take out once in a while to add some variation to my photo walks.

    This little experiment taught me that if you just want a good camera to take nice looking photos in your everyday life, and you don’t have professional needs (such as 50 megapixel files) $ 80 will take you surprisingly far. And as an added benefit, 10 megapixel files give you such a swift and fast editing experience in Lightroom!


    Micael Widell is a photography enthusiast based in Stockholm, Sweden. He loves photography, and runs a YouTube channel with tutorials, lens reviews and photography inspiration. You can also find him as @mwroll on Instagram and 500px.

    This article was originally published on Micael’s blog, and is being republished in full with express permission.

    Articles: Digital Photography Review (dpreview.com)

  • Trippy Tiles: Optical Illusion Installation Will Mess with Your Brain

    [ By SA Rogers in Design & Fixtures & Interiors. ]

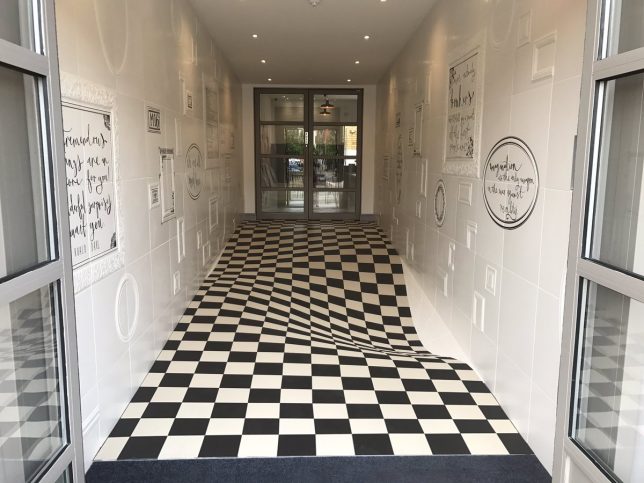
    Looking at this picture, it seems pretty obvious that something is seriously wrong with the floor… right? And yet, as we should all know by now, things aren’t always as they seem, no matter how hard our brains try to reconcile the fact that a flat surface can look so believably sunken on one side. It’s kind of hard to wrap your mind around the fact that the effect is achieved simply by warping the shape of the tiles as they’re applied to the floor.

    The new entrance floor at Casa Ceramica #Manchester now try and process that this floor is actually flat!! #tile #floorporn #decorporn #decor #tileporn #architectureporn #tiles #trippy #tilelove #love #lookbook #lovetiles #largeformat #largeformattiles #decor #design #detail #designer #decorporn #illusion #instagood #interiors #innovation #illusionist #ihavethisthingwithtiles #ihavethisthingwithfloors #roomdecor #roomforinspo #lovetiles #architectureporn #alice #aliceinwonderland

    A post shared by Casa Ceramica Tile Company (@casaceramicatiles) on

    Casa Ceramica Tile Company created the illusion for the entrance to their own showroom in Manchester, UK. People must have had a hard time believing that the tiles are really flat from initial photos posted to Instagram and Twitter, because the company posted subsequent photos and videos of the installation process, saying “Like our entrance floor made from tiles #sorrynotsorry.”

    Apparently, the illusion only works from one direction, and when visitors are exiting the building, it looks like a normal tile walkway.

    Unsurprisingly, the illusion blew up on Twitter and became something of an internet sensation. You might dig through the company’s website or Instagram hoping for more optical illusions, but it looks like most of their work is pretty standard. Maybe this project will get them some fun commissions.

    Share on Facebook


    [ By SA Rogers in Design & Fixtures & Interiors. ]

    [ WebUrbanist | Archives | Galleries | Privacy | TOS ]


    WebUrbanist