Blog

  • Astrophotography Made Simple

    There may not be a more challenging subject matter for photographers than astrophotography. When I first began making photographs, I had an elusive and challenging goal which was to make a photograph of the moon.
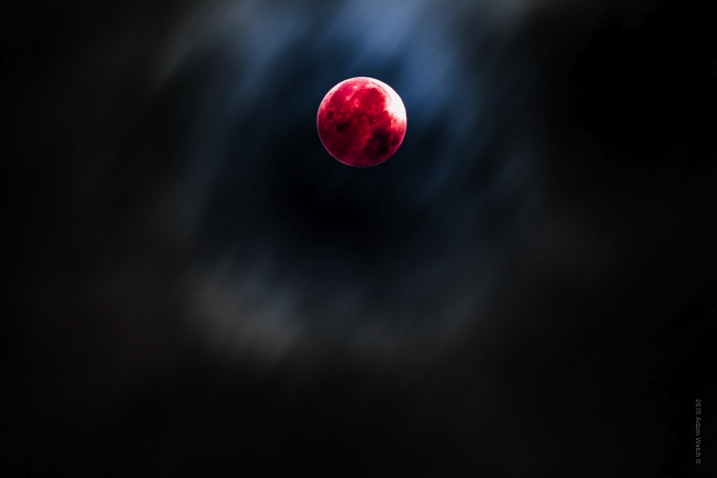
    Moon

    13 years later (has it really been that long?) I think back and smile at how impossible capturing that photograph of the night sky seemed to me at the time. Back then, the idea of making an image that captured the moon or the stars, and even a galaxy, seemed impossible. I assumed the images would require an expensive camera or some kind of magical photo gear. I couldn’t have been more wrong. In reality, you probably have everything you need to get started in astrophotography right now!

    Astrophotography is simply a name for the realm of photography which images astronomical objects and the night sky itself. The moon, stars, constellations, galaxies, and even the sun, are all considered astronomical objects. In this article, you’ll learn just how easy it is to make great single exposure photographs of the wonders to be found in the expanses of the night sky.

    You will only need some basic photographic gear and a small dose of patience. Complicated image stacking software and astronomically priced lenses and professional cameras not required. Now let’s get started!
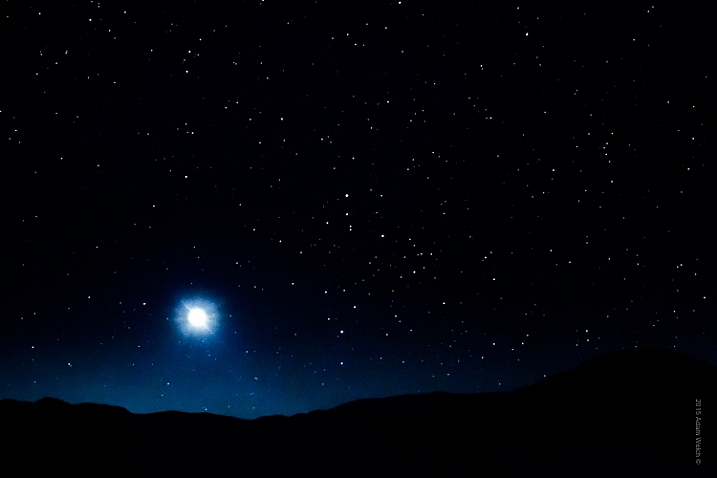
    Cade's Cove Moon

    GEAR

    Let’s talk about some of the bare bones gear that you will need in order to make your astro photos.

    1 – A camera capable of shooting in full manual mode

    You need to be able to control as many variables as possible, so shooting in Manual Mode is essential. Bulb capability is a plus, but not required. Bulb mode means that the exposure begins when you open the shutter and continues until you choose to end it by closing the shutter. Bulb mode is a setting which is now available on even the most budget friendly dSLR’s and mirrorless cameras (even some point and shoots have it).

    2 – The fastest (largest aperture) lens you have in your bag
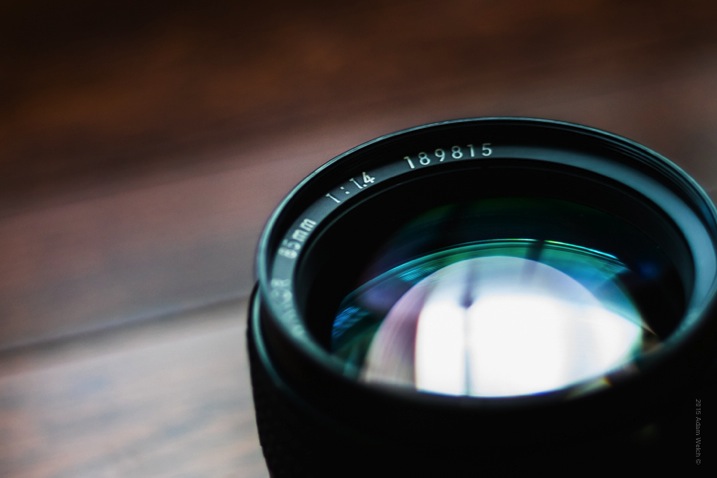
    Fast Lens

    Wide angle lenses are sometimes viewed as the only focal length to use for astrophotography, but that is most definitely not true. The key to solid astrophotography is to use a lens which can let in the most light. These lenses will be rated with a small f-number and are often prime (fixed focal length). While wide angle lenses will give you a sweeping vista of the sky, don’t count out your medium-telephoto lenses.

    3 – A solid tripod
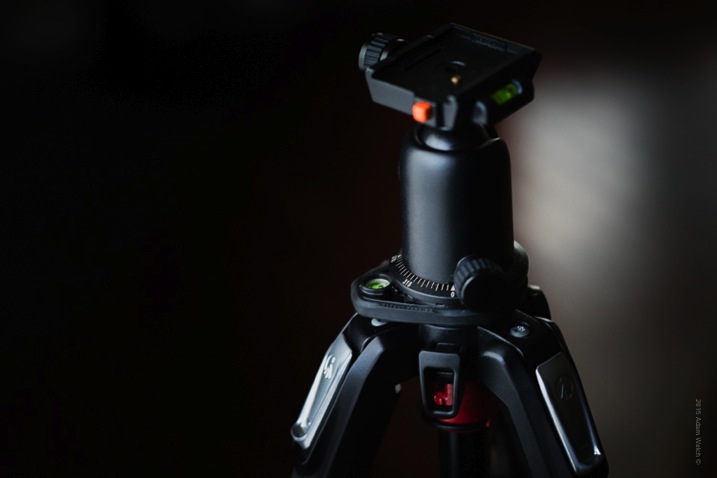
    Tripod

    You simply cannot escape the fact that a reliably sturdy tripod is the foundation on which all strong astrophotographs are built. Unwanted motion is your enemy. You will need a tripod that can support the weight of your camera and keep it completely motionless. Also, the mount on which the camera physically attaches will play a key role in the outcome of your images. Low quality ball-head mounts can sometimes drift under the weight of your camera during long exposures, so keep that in mind as well when choosing your tripod head.

    4 – A microfiber lens cloth
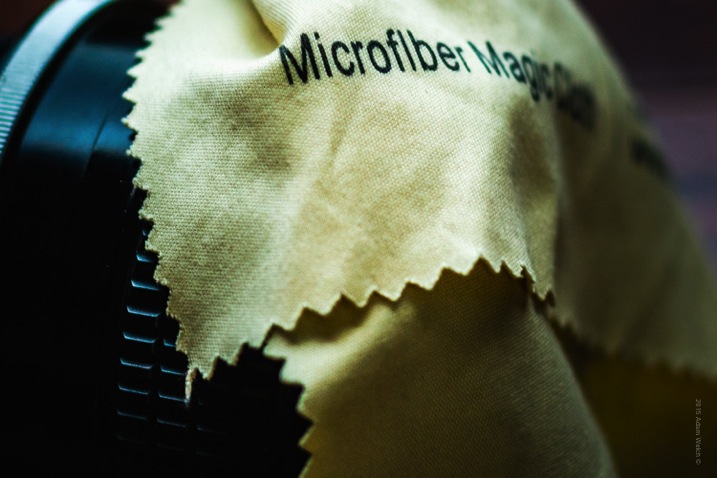
    Cloth

    You will have your lens tilted upward for many of your shots, so settling dew can become a problem, especially in the summer months. Be sure to pack at least one clean micro-fibre lens cloth to wipe off any moisture which can accumulate on your lens’ front element during long exposures. This is a small piece of gear that can make or break your photo outing.

    5 – Optional remote shutter release

    Unless you are shooting in Bulb mode, a remote shutter release in not necessary. However, it makes your shooting a little easier, and helps to ensure less camera shake. When not using a remote, set your shutter release on the 2-second timer so that you will not shake the camera by pressing the shutter button.

    Camera settings

    Now that you know what gear you will need, let’s look at how to go about making your astrophotographs.

    Shutter speed

    Without a doubt, the biggest question about astrophotography is, “How long should I expose my image?” The answer depends on what kind of photograph are you planning to make. The night sky is dynamic. Everything we see is moving, although it may not appear that way to our eyes. I often relate making photos of the night sky to making photos of water. If you want motion blur (star trails) you will need a longer exposure time. If you want to freeze motion (constellations and galaxies) you will need a shorter exposure time.
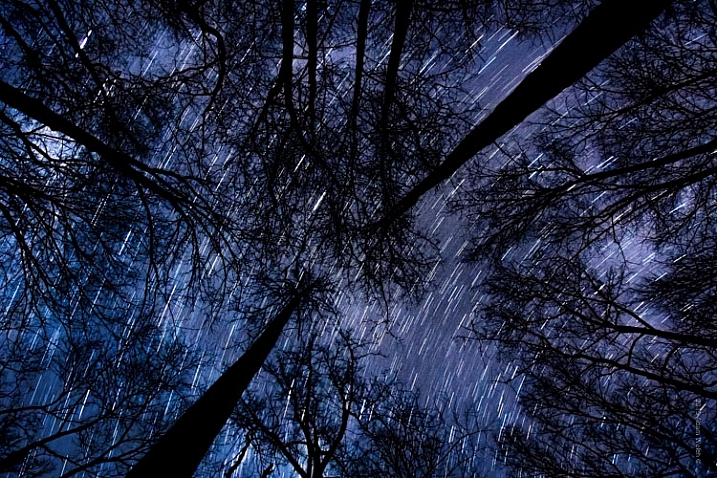
    Startrail Trees

    In my experience, the sweet spot for obtaining workable images of stars and the Milky Way without star trails, is around 15-20 seconds depending on the ISO and aperture (more on that shortly) settings. While there are of course no absolute formulas, a good guideline is called the 600 Rule. It is very similar to the reciprocity rule used for avoiding camera shake during hand-held shooting.

    The 600 Rule states that to reduce celestial motion blur, the exposure time should be no longer than the equivalent of 600 divided by a given focal length. Meaning that the maximum shutter time in order to reduce star streaking for a 50mm lens would be 12 seconds (600 / 50 = 12), for a 14mm focal length it would be 42 seconds (600 / 14 = 42), and for a 24mm focal length it would be 25 seconds (600/24). This rule is based on full-frame digital image sensors and will keep star trailing less than 8 pixels wide. If you’re shooting an APS-C(cropped sensor) camera, try using 400 instead of 600 in order to obtain similar results.

    The important thing to understand about shutter speed as it relates to astrophotography is that, just as in any other type of photography, longer shutter speeds will result with increased motion blur.
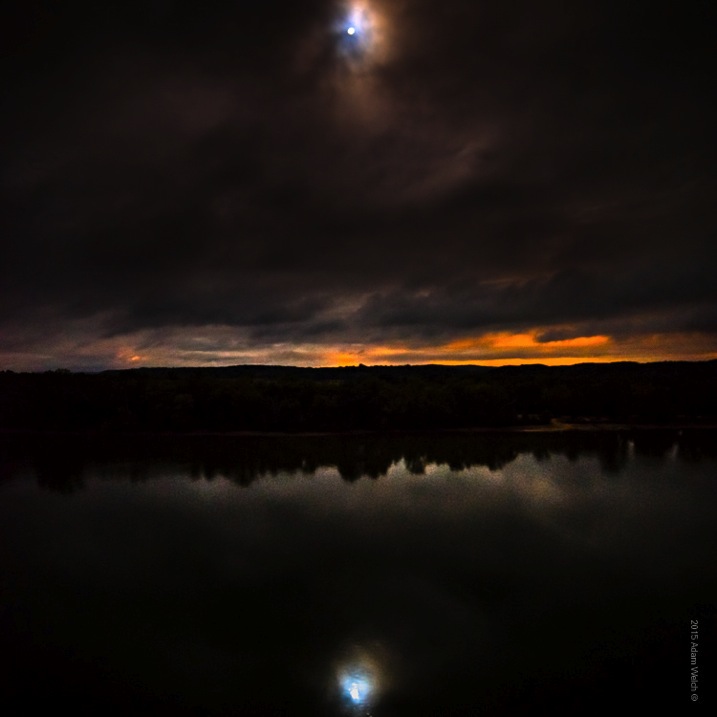
    Reflection

    Aperture

    Aperture controls how much light is allowed to enter your camera, and in astrophotography the more light you have to work with, the better your images will be. Shoot your scene at the widest aperture possible. Keep in mind though, that all lenses have ideal apertures, and opening a lens all the way up (largest aperture) often affects overall sharpness. That being said, using a large aperture is almost always desirable, because it allows in the maximum amount of light, which will make your stars brighter and small celestial details more visible.

    I shoot the majority of my astrophotography from f/1.8 down to f/3.5 and even f/4. Remember too, that with a wider aperture, precise focusing becomes very important due to the decreased depth of field. Manual focusing is very useful. If your camera has a focus magnification option, use it to zoom in on pinpoint stars or the moon, so that you can obtain the sharpest focus possible. Don’t rely on the infinity focus markings on your lens (they are often not accurate).

    ISO settings

    Selecting the ISO for your astrophotography is an exercise in compromise. High ISOs are better for shooting in low light conditions, but will also result in more grain and noise in your final photograph. Finding a comfortable medium can be difficult. Shoot with the highest ISO that you feel gives you the least amount of noise, but still allows you to use your desired shutter and aperture settings.
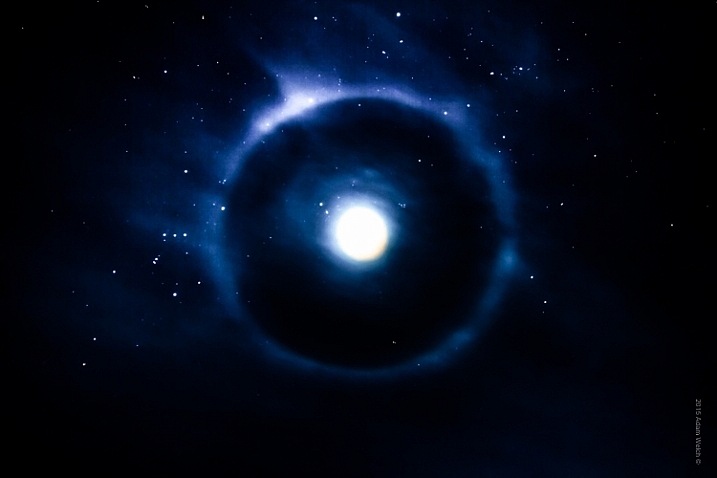
    Mother Moon

    Most cameras now have high ISO noise reduction built into the their on-board software. I find it is almost always helpful to turn this function off – stay with me here. The reason being, is that image post-processing software today almost always does a better job of reducing noise than does in-camera high ISO noise reduction, which can sometimes reduce contrast and image sharpness. I highly recommend that you experiment with your particular camera and find out what you prefer for your own needs.

    Shoot RAW

    You may have heard the benefits of shooting in RAW format. In astrophotography, shooting your images in RAW format becomes extremely helpful. The extra information gathered from these larger files will add a huge amount of dynamic range, which will allow you to process the images to a greater degree. Noise reduction will also work more effectively when coupled with the RAW image format.

    Tips to make your astrophotography stand out

    Incorporate external elements within the scene
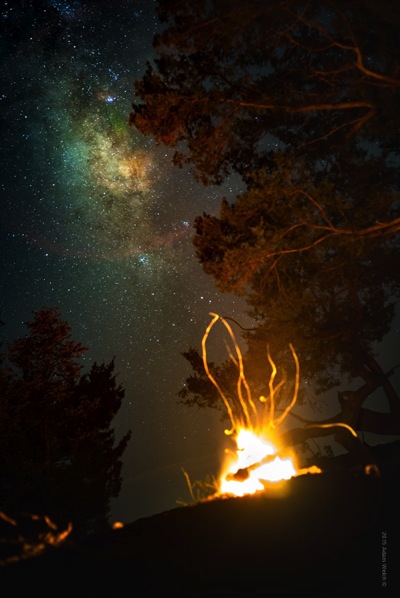
    Milky Way Fire

    While the objects found in the night sky are incredibly beautiful on their own, adding additional points of interest will often make your astrophotography even stronger. Add reference points such as trees or buildings. Look for a elements that bring harmony within the composition, and flow well with your astrological subject.

    Light pollution can be useful
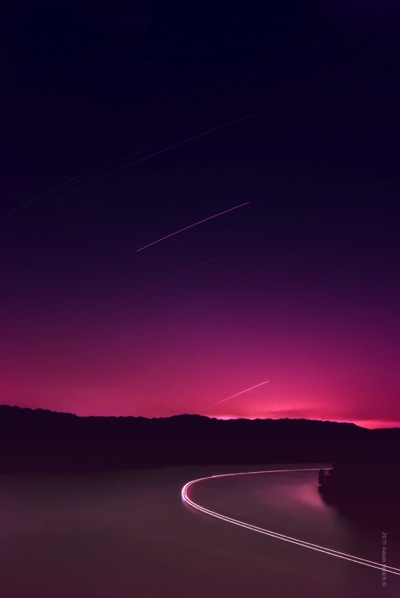
    Boat Trail

    While dark skies are certainly ideal for astrophotography, don’t feel that that all external light sources are a bad thing. Sometimes having city lights, or other luminance, interact with your scene can heighten the impact of your composition and add contrast within the image.

    Experiment with color
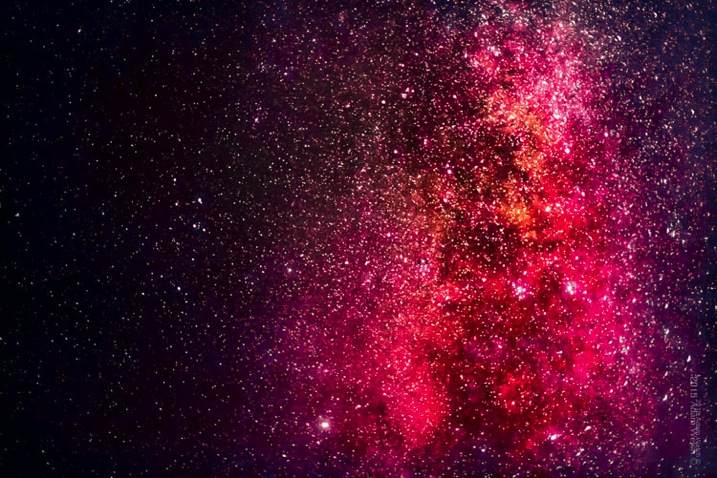
    Red Galaxy

    Astrophotography loves color. Don’t be afraid to increase, and manipulate saturation and hues in your post-processing workflow. Experimenting with colors will make your photograph a piece of personal art, rather than just a representation. Still, it is advisable not to over process your images so much that you lose detail, and/or make the entire image gaudy and unrealistic (which of course is very subjective). As always, less can sometimes be more.

    Astrophotography is challenging, fun, rewarding, and educational. Making images of the heavens is a great way to develop your skills as a photographer, while at the same time producing beautiful images of things that most people may not have noticed before. Today, cameras and imaging software make it easy for us to make great photographs of the night sky. The information you have read here will put you well on the way to producing exciting astrophotos. Shoot for the moon!

    googletag.cmd.push(function() {
    tablet_slots.push( googletag.defineSlot( “/1005424/_dPSv4_tab-all-article-bottom_(300×250)”, [300, 250], “pb-ad-78623” ).addService( googletag.pubads() ) ); } );

    googletag.cmd.push(function() {
    mobile_slots.push( googletag.defineSlot( “/1005424/_dPSv4_mob-all-article-bottom_(300×250)”, [300, 250], “pb-ad-78158” ).addService( googletag.pubads() ) ); } );

    The post Astrophotography Made Simple by Adam Welch appeared first on Digital Photography School.


    Digital Photography School

  • InVisage posts short movie shot with its QuantumFilm HDR smartphone sensor

    For a few years now, InVisage has been working on a new kind of smartphone image sensor that claims to offer higher dynamic range and zero rolling shutter than the chips currently found in mobile devices. It appears the technology is now at a stage where its benefits can be demonstrated, and for this purpose InVisage has commissioned a short movie called Prix  shot entirely on a prototype device using InVisage’s QuantumFilm technology. Read more

    Articles: Digital Photography Review (dpreview.com)

  • PocketWizard Plus IV transceiver gets TTL pass-through hotshoe

    PocketWizard has introduced a new version of its Plus series transceiver that features a top-mounted hotshoe. The new hotshoe allows a flash unit to be fitted while the PocketWizard Plus IV is attached to the camera, as well as when the flash is positioned remotely and being controlled wirelessly. Read more

    Articles: Digital Photography Review (dpreview.com)

  • Out of sight: Astronomers create 46-gigapixel image of the Milky Way

    Researches from German university Ruhr-Universitat Bochum spent half a decade creating the largest astronomical image created to date, a 46-gigapixel image of the Milky Way, which is now available via an interactive online viewer. The image is made up of 46 billion pixels, and the file weighs in at a hefty 194GB. Read more

    Articles: Digital Photography Review (dpreview.com)

  • Get Spooky With a DIY Halloween Photo Booth!

    Halloween DIY

    Photo booths are a must for Halloween parties and we’ve got all the tricks and treats you need to make a screamin’ good one using either your phone or DSLR.

    (…)
    Read the rest of Get Spooky With a DIY Halloween Photo Booth! (0 words)


    © Erin for Photojojo, 2015. |
    Permalink |
    No comment |
    Add to
    del.icio.us

    Post tags:


    Photojojo

  • Concrete Wonders: 13 Brutalist Buildings in the USA & Britain

    [ By Steph in Architecture & Public & Institutional. ]

    brutalism US brunel 2

    While the most theatrical Brutalist buildings remain in the former USSR, there are plenty more of these controversial concrete complexes around the world, and they draw both admiration and ire in Britain and the United States. While Prince Charles of Wales likes to call them ‘monstrous carbuncles,’ and sloppy Brutalist blunders certainly exist, many modernist concrete structures built between the 1950s and ‘80s are striking in their minimalism and solidity.

    Geisel Library, San Diego, California

    brutalist US geisel

    brutalist US geisel 2

    The Geisel Library at the University of California, San Diego (named for the author best known as Dr. Seuss) was made of reinforced concrete to save money, which enabled a more sculptural design. The 8-story structure by William Pereira has two subterranean levels and was “deliberately designed to be subordinated to the strong, geometrical form of the existing library” on the campus.

    Tricorn Center, Portsmouth, England
    brutalist US tricorn

    brutalist US tricorn 2

    brutalism US tricorn 3

    This weird building called the Tricorn Center was a retail, nightclub and parking garage complex completed in the mid-1960s and so named because it resembles a tricorn hat from above. It was voted the third ugliest building in the UK in the ‘80s, and demolished in 2004. Charles, Prince of Wales famously called it “a mildewed lump of elephant droppings.”

    Barbican Estate, London, England

    brutalist US barbican

    brutalism US barbican 2

    brutalism US barbican 3

    This residential complex built in the ‘60s and ’70s stands right in the financial district of London, one of the few examples of British brutalist architecture that’s still mostly intact. There are three tower blocks and 13 terrace blocks positioned around a lake and green squares; the towers are each 404 feet tall.

    Brunel University, London, England

    brutalism US brunel

    brutalism US brunel 2

    Built in the ‘60s and designed by Richard Sheppard, Robson & Partners, the Brunel University Lecture Center was one of two ‘high Brutalist’ structures prominently featured in Stanley Kubrick’s film A Clockwork Orange.

    Brownfield Estate, East London
    brutalist US balfron 1

    Balfron Tower at the Brownfield Estate, an area of social housing in East London, is often considered the sister building of Trellick Tower. Designed by Erno Goldfinger in 1963, it contains 146 residences and features a separate elevator shaft with skybridge connections on every third floor.

    Next Page – Click Below to Read More:
    Concrete Wonders 13 Brutalist Buildings In The Usa Britain

    Share on Facebook


    [ By Steph in Architecture & Public & Institutional. ]

    [ WebUrbanist | Archives | Galleries | Privacy | TOS ]


    WebUrbanist

  • 26. Oktober 2015

    Das Bild des Tages von: Mugelone

    Mugelone

    Im Ausblick: Was aus Kim Puc wurde, der Titanic-Eisberg und schmelzende Gletscher.
    kwerfeldein – Fotografie Magazin | Fotocommunity

  • Video: What’s in the future for Sony’s Alpha system?

    At PIX 2015 we took the opportunity to sit down and talk with industry leaders while they were in our neighborhood. Sony’s Alpha system has made some interesting moves over the last year, and we asked product manager Kenta Honjo all of our burning questions, including what’s in store for the future of the system. Read more

    Articles: Digital Photography Review (dpreview.com)

  • Testbericht: Samyang 135 mm f/2 ED UMC

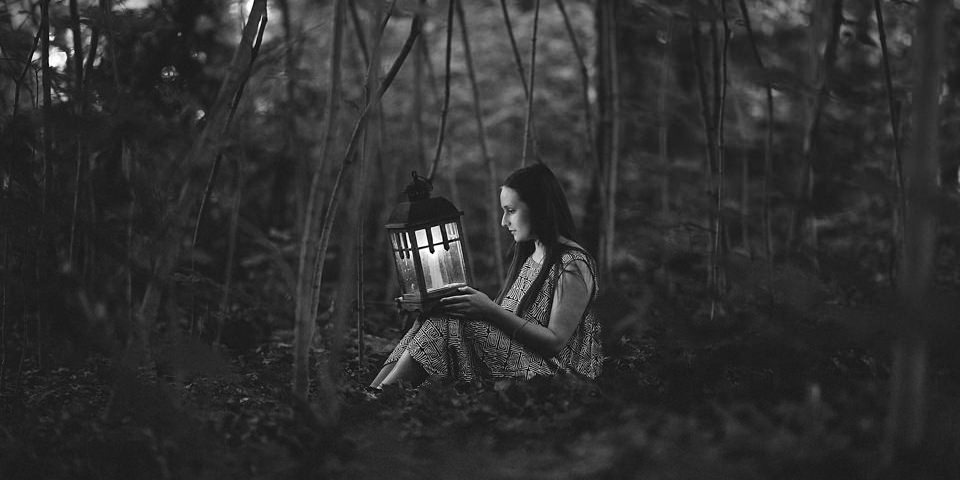
    Eine junge Frau sitzt mit einer Laterne im Wald

    Ein Beitrag von: Paul Weber

    Die manuell zu fokussierenden Objektive aus dem Hause Samyang sind ja durchaus dafür bekannt, gute optische Ergebnisse zu liefern, ohne dabei ihrem zukünftigen Besitzer ein nie mehr zu stopfendes Loch in seinen Geldbeutel zu reißen. Ob das Samyang 135 mm f/2 ED UMC da keine Ausnahme macht, versuchte ich in drei, am Ende dann doch sehr kurzweiligen, Wochen herauszufinden.
    kwerfeldein – Fotografie Magazin | Fotocommunity

  • How to do a Head Swap using Photoshop

    When looking through your pictures, have you ever had that sinking feeling of seeing everyone in a single image perfectly happy and smiling except for one person who was sneezing, sniffling, or looking at a squirrel? I can recall several times when I have returned from photo shoots being all optimistic about the experience, but realized as I combed through my images, that while I had several good shots where most people were perfectly posed, I didn’t have any shots where everyone looked just right.

    It can be intensely frustrating, especially if you know you did everything in your power to get just the right shot. Fortunately Photoshop can help. With a few simple steps, you can learn how to load up a couple of images and perform a face or head-swapping maneuver with surgical precision, that would make Nicolas Cage blush (as in from the movie: Face Off). If it’s done correctly, no one will ever be able to tell that the final image has been altered.

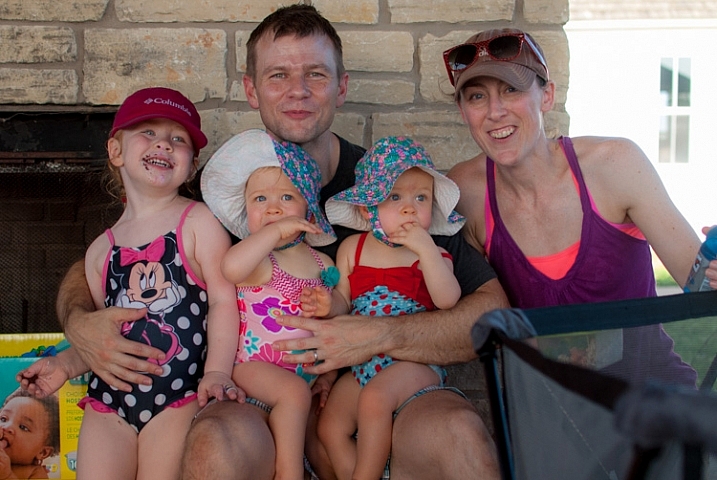
    Face-swapping can be incredibly useful when dealing with squirmy kids. This impromptu photo at a birthday party is actually a composite of three separate pictures.

    Heade-swapping can be incredibly useful when dealing with squirmy kids. This impromptu photo at a birthday party is actually a composite of three separate pictures.

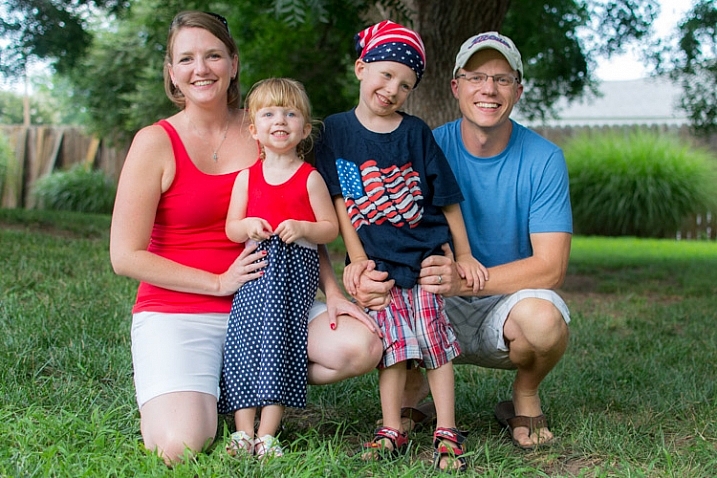
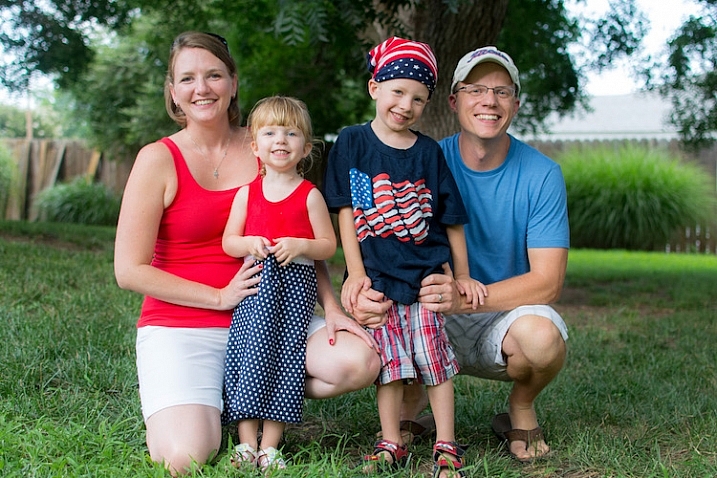
    When going through my pictures, I always start with Lightroom to cull the images down to the best ones, and do initial edits, such as exposure and color adjustments. If I come across a situation where I need to take a face from one photo, and put it in another, I open both pictures in Photoshop (which is a simple matter of right-clicking and choosing: Open as Layers in Photoshop). For example, the following picture turned out fine except for the boy who was distracted by something off to the side.

    This family picture I took on July 4 is fine, but the boy's expression is not the greatest.

    This family picture I took on July 4th is fine, but the boy’s expression is not the greatest.

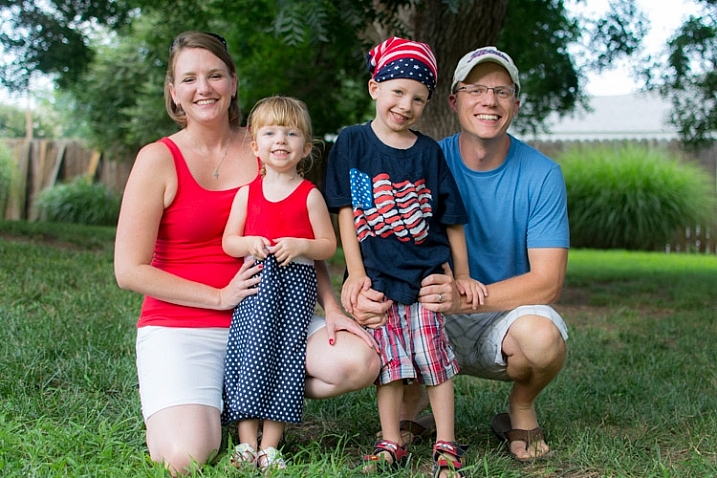
    Fortunately I had another picture that looked great, but in this one the mother was blinking. No worries though – Photoshop was there to save the day!

    He has a much better expression in this photo, but his mother was blinking.

    The little guy has a much better expression in this photo, but his mother was blinking. Photoshop to the rescue!

    When working with edits like this it’s a good idea to use as high-resolution of pictures as possible, so you have the maximum amount of data to work with. Do not export your images from Lightroom as low-res JPG files, and then import them into Photoshop. Instead use full-size originals, though I do like to make sure the exposures are as closely matched in each picture first. Edit your white balance, color adjustments, and other parameters such that both images are as close as possible before going into Photoshop, or your composite will look painfully obvious. (Some photographers take the exact opposite approach and do all the Photoshop work first, and then do color adjustments and cropping in Lightroom. Either way works, but I prefer the former method.)

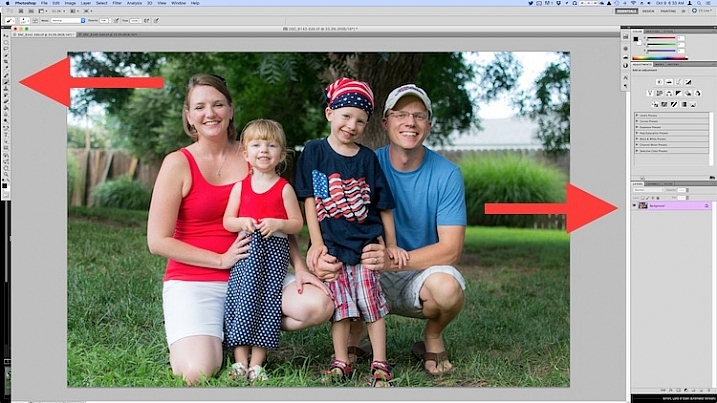
    If you’re unfamiliar with Photoshop, and it seems a bit overwhelming at first, don’t think about all the buttons, menus and options available to you just yet. This face compositing really only requires two sections: the Layers panel in the bottom right corner, and the Brush tool on the left side.

    photoshop-face-swap-workspace

    Open both images as layers in Photoshop

    Select both images in Lightroom and right click, then choose: Open as Layers in Photoshop. Once your images are open in Photoshop, rename one or both so you can tell which is the one to use most people, and which is to copy the new head from.

    photoshop-face-swap-edit-as-layers


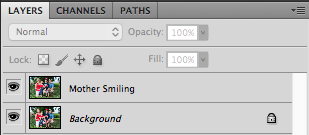
    You now have two layers in one image: the background (in this case, the one where everyone but the mother is smiling) and the layer you just copied over (in this case, the one where only the mother is smiling).

    photoshop-face-swap-multiple-layers

    Make a layer with just the new head to be added

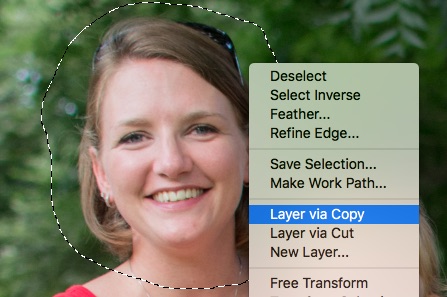
    From here there’s a couple different ways to go about combining them, but when doing a simple head swap the method I prefer is to get rid of everything in the second layer except the face I want to put into the first image. To do this, use the Lasso tool to draw an active selection around the face, and create a new layer which consists of just the face itself. I like to use New Layer via Copy just in case I want to go back to the original for something, but it’s up to you. Make sure to leave plenty of padding around the face so you have enough room to blend it in as you make your adjustments.

    photoshop-face-swap-new-layer-via-copy

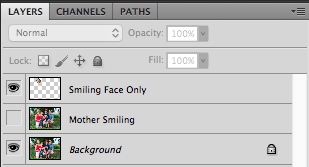
    You now have three layers in the side panel: the original background, the new one you copied over, and the face itself. Since you only need the face, you can click the eye icon just to the left of the layer you copied over, which leaves it intact but invisible (hidden layer).

    photoshop-face-swap-three-layers-hide-one

    Compositing or blending them together

    Now comes the fun part – compositing the face! I like this step because I get to be a little creative, and play around with exactly how I want the final image to look. The first thing you’ll notice is the face you are working with is probably going to be out of place, unless your camera was on a tripod, and everyone was perfectly still.

    photoshop-face-swap-initial-composite

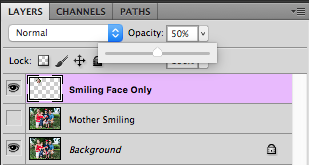
    To get the face into the proper position, select it in the Layers panel and change its opacity to about 50%. That way you can see both faces at the same time, which will help you as you start lining them up. (Note: alternatively you can change the face layer’s blend mode to Difference. That will show it sort of inverted (negative) and it makes it easy to position them or align the layers. Then just change it back to normal when done.)

    photoshop-face-swap-opacity

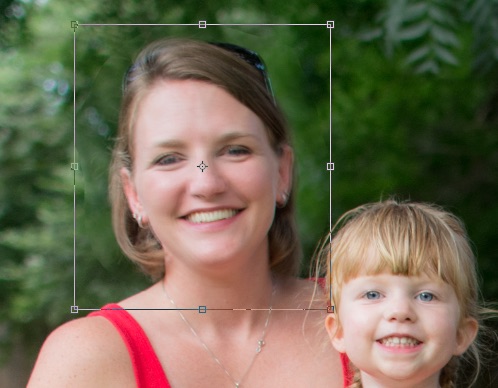
    With the face layer still selected, choose “Transform” from the “Edit” menu, or press command-T on a Mac (control-T on Windows). Use your mouse to drag the face into the proper position, and press the arrow keys on your computer to fine-tune your movements on a per-pixel basis. You can also use the Transform command to rotate the face in case the person has turned his or head slightly. To do this, put your mouse cursor just outside the border near one of the corners, where it will change to a rounded arrow which means you can now click and drag to rotate.

    photoshop-face-swap-line-up-facial-features

    Once you that have the second face lined up properly over the first one, press the [Enter] key to lock it in place, then bring the layer opacity of the face back up to 100%. Don’t worry if you didn’t get things just right: you can always made additional Transformations later by selecting the layer and choosing “Transform” just like before.

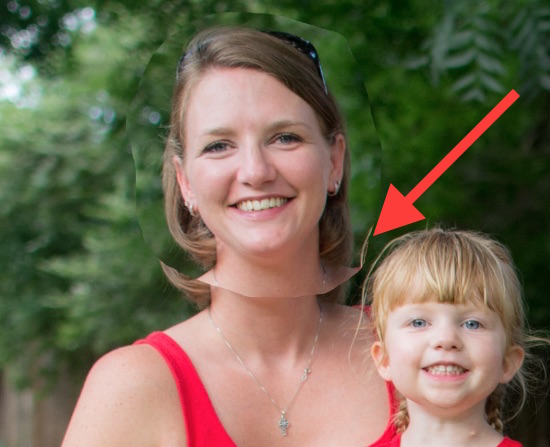
    At this point things are looking pretty good, but right away you will notice a harsh border around the face where your selection box was. This needs to be eliminated so you only have the facial features you want, and not the person’s hair or any background elements that might have changed between the shots.

    photoshop-face-swap-harsh-border

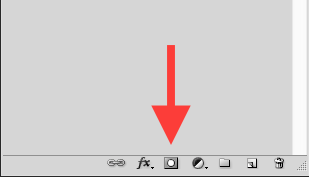
    At this point you might be thinking “No problem! I’ll just use the eraser tool to get rid of the parts I don’t need,” but that’s a rookie mistake you will soon regret. The eraser tool is permanent, so instead we’ll use what’s called a layer mask to get rid of any parts we don’t want. It works similar to the eraser tool, but is fully adjustable and even altogether reversible (it’s called non-destructive editing) so that any edits you make can easily be undone at any point. With the face layer selected, click the “Add Layer Mask” button at the bottom of the Layers panel.

    photoshop-face-swap-new-layer-mask

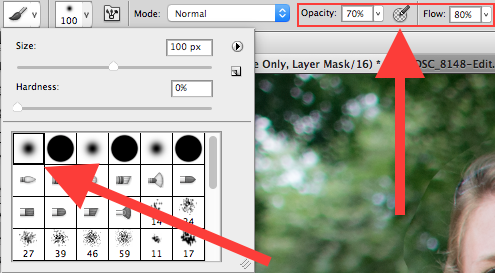
    Now you can use the brush tool to paint out (using black) any areas of the face layer you do not want, or paint them back (paint with white) in if you do decide to keep them. This layer mask method is far more flexible than using the eraser tool, and it allows you to use varying levels of opacity as well. You can partially erase something, while retaining just enough to allow for a smooth transition, instead of a harsh line. Select the brush tool and choose a brush with soft edges. Play around with your flow rate and opacity settings too. I don’t like to go all the way to 100% opacity right away, so I usually start with 50%-70% to leave some wiggle room. Remember, you can always change your adjustments later.

    photoshop-face-swap-brush-selection

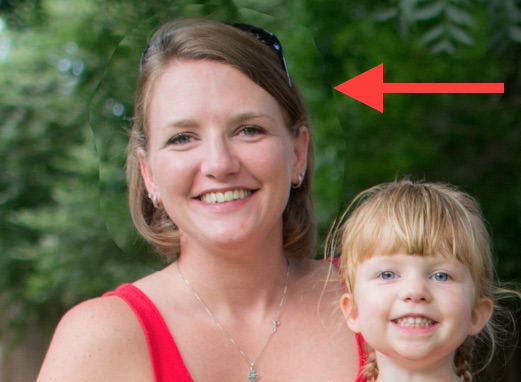
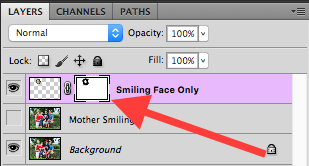
    Now you can start blurring the line between the background photo and the face you are compositing onto it. Use the brush tool to gradually erase around the edges of the face, and if you find yourself wanting to brush anything back in just press the X key to reverse the process (X switches your foreground and background colors, in this case black and white) as you apply the brush. Notice that you’re not actually painting on the image of the face, but on a mask that has been applied to the layer. You are basically telling Photoshop which parts of the face layer you want to see, and which parts you want to erase (hide) or mask out. In the Layers panel you will see this mask show up to the right of the original layer as a mostly white box with some dark spots that indicate where you have painted with the brush.

    photoshop-face-swap-edit-layer-mask

    Using brushes on the layer mask is the most part of this whole process as I get to see my edits in realtime, and get as detailed as I want with brushing in the smiling face.

    photoshop-face-swap-final-image

    The final image

    You can use this technique to composite as much as you want, including background elements, multiple faces, or even individual features such as eyes or teeth. Learning this simple head swapping technique is not only handy for creating the perfect group portrait, but can also be your gateway into a much broader world of Photoshop editing in general.

    What are your favorite tips for doing simple edits in Photoshop? Do you have any other techniques that have worked for you over the years? Leave your thoughts in the comments below.

    googletag.cmd.push(function() {
    tablet_slots.push( googletag.defineSlot( “/1005424/_dPSv4_tab-all-article-bottom_(300×250)”, [300, 250], “pb-ad-78623” ).addService( googletag.pubads() ) ); } );

    googletag.cmd.push(function() {
    mobile_slots.push( googletag.defineSlot( “/1005424/_dPSv4_mob-all-article-bottom_(300×250)”, [300, 250], “pb-ad-78158” ).addService( googletag.pubads() ) ); } );

    The post How to do a Head Swap using Photoshop by Simon Ringsmuth appeared first on Digital Photography School.


    Digital Photography School