Blog

  • Nikon KeyMission 360 price and specs appear on retailer’s website

    The Nikon KeyMission 360 action camera was unveiled at an event in early January, and while Nikon offered some details about the model, it did not reveal the price. Now, nearly a month later, the camera has surfaced on German retailer Cyberport’s website with a list price of €499 and a features list.

    The KeyMission 360 records 4K UHD video, is waterproof to depths of 30m/100ft, shockproof from heights up to 2m/6.6ft, and has electronic image stabilization, according to Nikon. The product listing includes some additional specs, including support for microSDHC/SDXC media cards, WiFi, NFC, Bluetooth, an integrated microphone, non-removable Li-Ion battery and USB 2.0.

    Nikon said during its January event that it is aiming for a Spring 2016 release; it has not confirmed pricing.

    Via: NikonRumors

    Articles: Digital Photography Review (dpreview.com)

  • Veggie Factory: World’s First Vertical Farm Run Entirely By Robots

    [ By WebUrbanist in Architecture & Offices & Commercial. ]

    robofarming

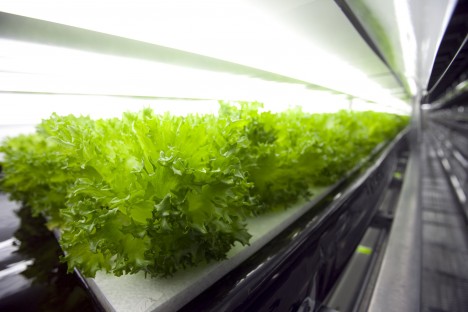
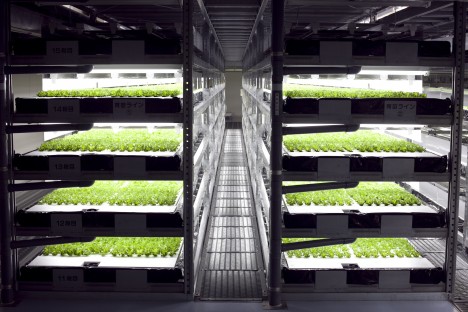
    Taking vertical urban indoor farming efficiency to the next level, a new automated plant coming to Japan will be staffed entirely by robots and produce 30,000 heads of lettuce daily.

    spread indoor farm

    The so-called Vegetable Factory is a project of Spread, a Japanese company already operating vertical farms. Located in Kyoto, its small army of bots will various seed, water, trim and harvest the lettuce.  Spread’s new automation technology will not only produce more lettuce, it will also reduce labor costs by 50%, cut energy use by 30%, and recycle 98% of water needed to grow the crops.

    spread stacked farm

    “The use of machines and technology has been improving agriculture in this way throughout human history,” says J.J. Price of Spread, tells Tech Insider. “With the introduction of plant factories and their controlled environment, we are now able to provide the ideal environment for the crops.”

    spread human farm

    Like other vertical farms, the benefits of this approach are numerous, including: reduced waste, controlled runoff, more efficient use of space and the ability to produce food locally (reducing cost, time and waste associated with rural-to-urban transport). Meanwhile, the fear of automation is becoming a reality, say critics, while advocates point out that this will free up factory workers to potentially engage in more interesting occupations within the same industry (if herding robots is considered interesting, at least).

    Share on Facebook


    [ By WebUrbanist in Architecture & Offices & Commercial. ]

    [ WebUrbanist | Archives | Galleries | Privacy | TOS ]


    WebUrbanist

  • Extreme made easy: GoPro HERO4 Session review

    GoPro HERO4 Session review

    Waterproof, ruggedized, incredibly-small and lightweight, the Session is a no-brainer to toss in your bag or coat pocket before heading out on an adventure. 

    The GoPro HERO4 Session is the company’s latest action camera release. Unlike GoPros before it, the Session is completely waterproof without the need for any housing. It is also the smallest, lightest GoPro to date, 50% smaller than the HERO4 (Black or Silver) and 40% lighter.

    The GoPro HERO4 Session is capable of video capture at the following resolutions and frame rates:

     Video Resolution Frame rate 
    1920 x 1440  30 fps, 25 fps
    1920 x 1080  60 fps, 50 fps, 48 fps (in Ultra Wide mode only), 30 fps, 25 fps
    1280 x 960  60 fps, 50 fps, 30 fps, 25 fps
    1280 x 720  100 fps, 60 fps, 50 fps, 30 fps, 25 fps
    848 x 480  120 fps, 100 fps

    The Session has dual microphones – one on the front and another on the back – for improved audio quality. The camera will automatically choose to prioritize one mic over the over, depending on the scenario. Stills can be captured at a frame rate as fast as 10 fps (limited to 1 sec bursts). Images are captured at 8MP resulting in a 3264 x 2448 still.

    The Session can also capture time-lapses. Available intervals include 0.5, 1, 2, 5, 10, 30 and 60 secs.

    Auto Low Light, a feature that determines video frame-rate based on lighting conditions, gives the promise of better low light video quality, something that action cams are not particularly good at. It’s worth noting that video files will playback at the selected frame-rate and resolution when using Auto Low Light.

    ProTune, an option that allows users to dial in more advanced settings, is available on the HERO4 Session. Selecting ProTune allows users to set their ISO limit (either ISO 400 or ISO 1600), and toggle sharpness on and off. The Session also features a spot meter mode, that, as you may have guessed, determines exposure based on a small point in the center of the frame.

    What’s included

    In addition to the unit itself, the GoPro HERO4 Session ships with just enough to get you started, including: a standard frame, a low-profile frame, one curved adhesive mount, one flat adhesive mount, a ball joint buckle and mounting buckles. A Micro-USB cable is also included for charging and transferring files directly from the GoPro to a computer.

    Compared to Siblings

    The price of the GoPro HERO4 Session recently dropped to $ 200. Here’s how it sizes up against GoPro’s other current offerings:

      HERO4 Session  HERO4 Black  HERO4 Silver  HERO+
    Max Video Resolution

    1440/30p

    4K (UHD) 2160/30p

    4K (UHD) 2160/15p

    1080/60p
    Photo Resolution 3264 x 2448 4000 x 3000 4000 x 3000  3264 x 2448
     Waterproof (without a housing) Yes  No  No No
     Max Still Burst 10 fps 30 fps 10 fps 5 fps
     Weight 74 g 152 g 147 g 123 g
     Street price $ 200 $ 500 $ 400 $ 200

    Design

    The HERO4 unit itself is a tiny 1.5″ cube. The body has only two buttons: the large record button on top, located directly in front of the LCD, and a small Info/Wi-Fi button on the lower portion of the back (see lower image). Press the record button once to turn the camera on and start capture – by default the video will be 1080/30p. Press and hold the record button for two seconds to start a time-lapse. By default it will shoot a photo every half-second. In both cases, hitting the record button again stops capture and powers the device down.

    Users can change video and still capture settings, in addition to turning on Wi-Fi by hitting the Info/Wi-Fi button and poking through the options. However, the two-button ergonomics can make for a pretty confusing user experience. We found it much easier to change settings by using the GoPro app. 

    The LCD on top displays the battery life, recording mode, resolution and clip length (when capturing video), or the number of photos left (if you’re shooting a time-lapse). A small switch on the side of unit, when pressed, reveals the Micro-SD card slot and Micro-USB port (see below).

    The HERO4 Session is impressively tough. The body is coated in a rubber-like material, and the door containing the Micro-USB port and microSD slot appears well-sealed. We’re not entirely sure what kind of glass the front element is made of, but several run-ins with a flying skateboard didn’t even leave a scratch. Seriously, we beat this unit up quite a bit over the course of field testing it, with no damage to speak of. 

    Articles: Digital Photography Review (dpreview.com)

  • How To Find Your Lens’ Sweet Spot: A Beginner’s Guide to Sharper Images

    Are you tired of blurry images?

    It’s time to learn how to capture sharper images by finding your lens’ sweet spot. This will give you more confidence, save time, and help you take better photos.

    In this article you’ll learn:

    • How to find your lens’ sweet spot (for sharper images)
    • Why you should shoot in Aperture Priority mode (and how to use it)
    • How to perform a test to get your sharpest image every time
    • How important is your lens’ sweet spot? Notice the difference

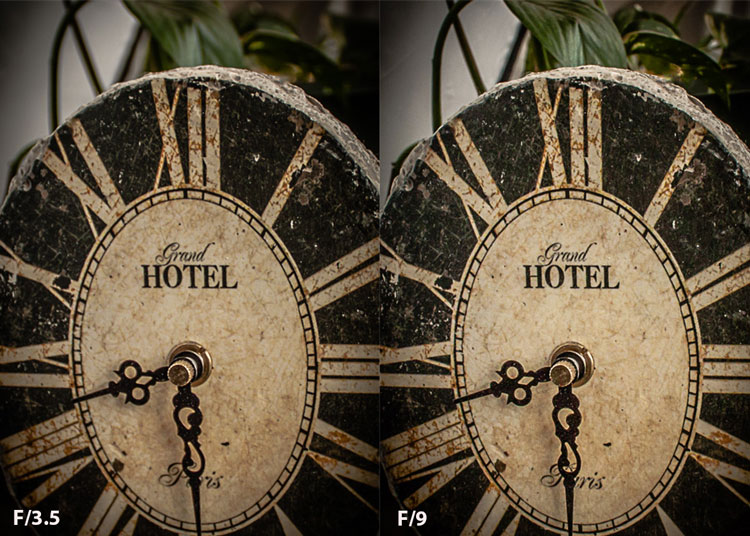
    Mid range aperture sharper than wide open

    In the above images of the clock, the one on the right is sharper. Look closely at the words and at the leaves behind the clock. The f/9 image is sharper throughout because it was shot in my lens’ sweet spot. The f/3.5 one was not.

    First, take a look at your lens

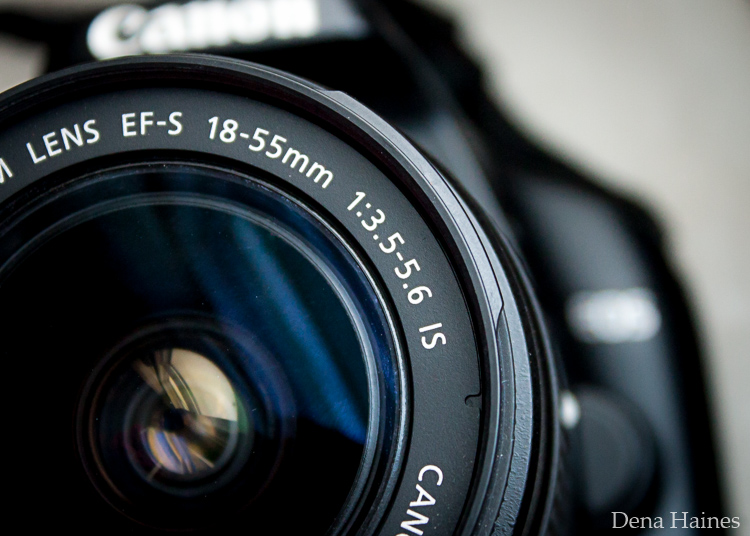
    In this beginner’s guide, we’ll use an entry level zoom lens as our example. Most kit lenses (the basic lens that comes with a DSLR) generally shoot their sharpest at the mid-range aperture settings. To determine the mid-range of your lens, you’ll need to know its widest (or maximum) aperture setting. It is located on the side, or end, of the lens and will look something like this 1:3.5-5.6.

    For example, here it is on my Canon 18-55mm zoom lens.

    Lens aperture range

    This means that when my lens is zoomed all the way out, its widest aperture is f/3.5. When zoomed all the way in, its widest aperture is f/5.6.

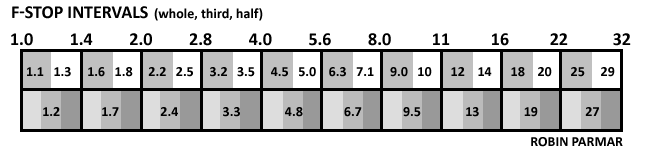
    The rule to finding that mid-range sweet spot, is to count up two full f-stops (aperture settings are called f-stops) from the widest aperture. On my lens, the widest aperture is f/3.5. Two full stops from there would bring me to a sweet spot of around f/7.

    Use this chart to count your f-stops

    Robin Parmar

    By Robin Parmar

    There is some wiggle room in the mid-range, so anything from f/7 to f/10 will capture a sharp image. Once you know the mid-range of your lens, you can do an easy test to get your sharpest image. To perform the test you’ll need to shoot in Aperture Priority mode.

    Take control with Aperture Priority Mode

    Shooting in Aperture Priority allows you to choose the aperture setting you want, which gives you more creative control than Automatic mode. By controlling the aperture setting, it’s much easier to get a sharp image, and because your camera still chooses the ISO (if you are set to Auto ISO) and shutter speed automatically, it’s very easy to use.

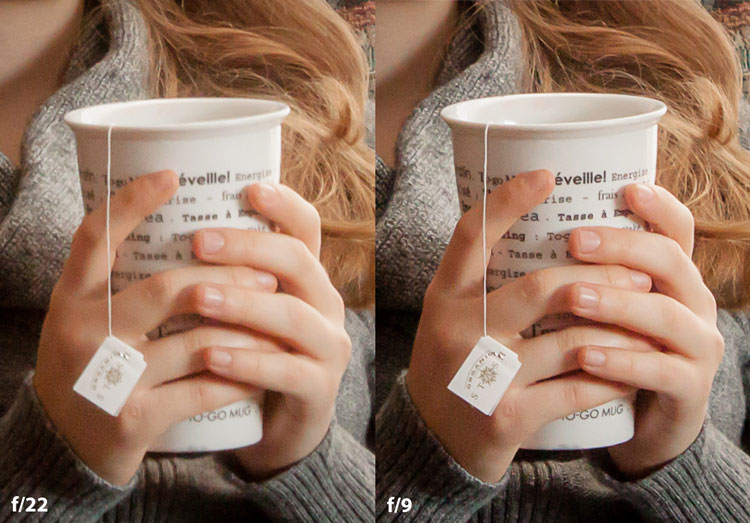
    You’ve probably heard that apertures like f/16 and f/22 are best for keeping everything in focus. While that can be true, focus does not always equal overall sharpness. Choosing a mid-range aperture will give you sharper images throughout. You can improve them even further by reducing camera shake with a tripod and a remote shutter release (or your camera’s self-timer).

    Here’s an example of how shooting in your lens’ sweet spot will give you sharper images.

    Sharp images shot in lens sweet spot

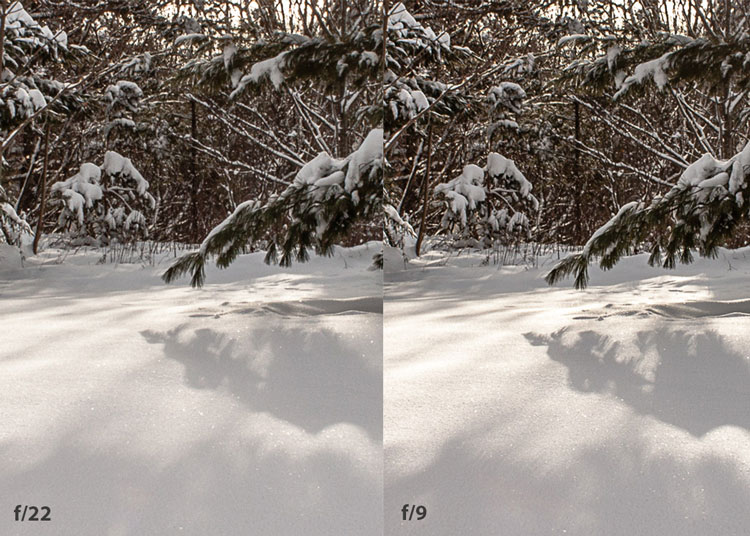
    Mid range f stop sharper than small f stop

    In the above split-image, the f/9 image is sharper than the f/22 one. The needles and shadows are not as soft or blurry as in the f/22 shot (look at the crispness and sparkles in the snow too).

    Switching from Automatic to Aperture Priority Mode

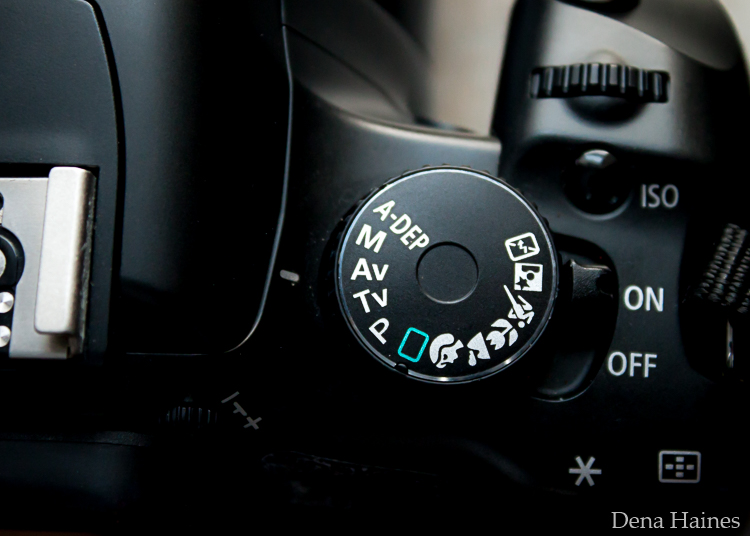
    To take your camera out of Automatic and put it in Aperture Priority, just turn the large Mode Dial to Aperture Priority. This is what that looks like on my Canon (on Nikon and other brans look for the A).

    Aperture priority on canon mode dial

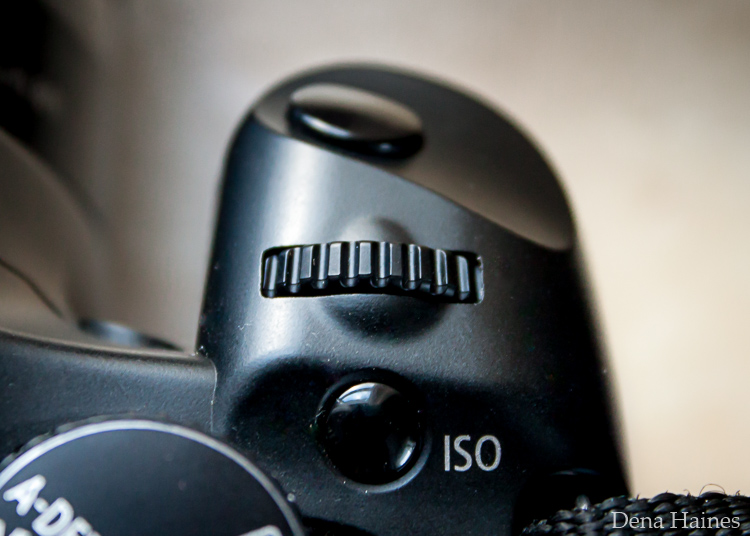
    Automatic mode is the green rectangle; Aperture Priority mode is the Av (or A on a Nikon). Once your camera is in Aperture Priority mode, turn the smaller Main Dial (shown here on the top of my Canon) to choose your f-stop.

    Main dial canon

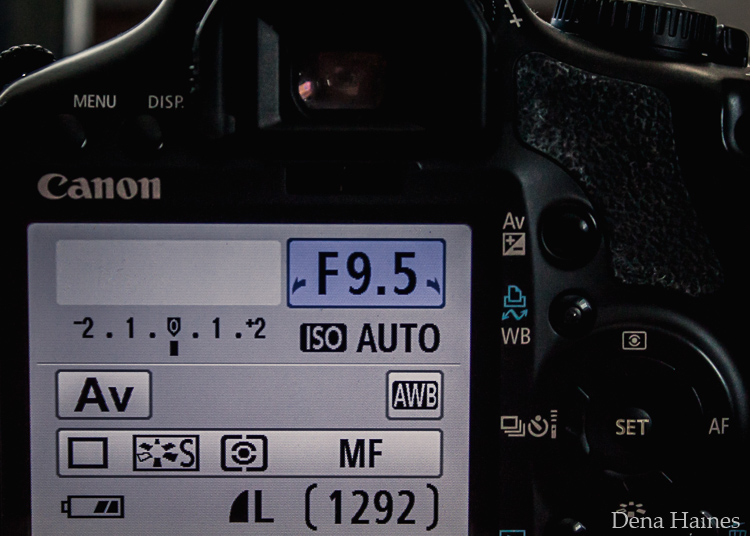
    As you turn that dial, you’ll see the f-number changing on your screen. In the next picture, it’s set to f/9.5.

    Aperture setting on canon LCD screen

    Perform a Lens Sweet Spot Test

    Once you have your camera set up on a tripod, performing a sweet spot test only takes a couple of minutes. To begin, put your camera in Aperture Priority mode, then compose your shot and take a photo at varying apertures. Start out with the widest, then click that main dial a couple of times (to the right) and take another. Keep doing that until you’ve taken seven or eight photos.

    Upload your photos to your computer and zoom in on them. You’ll quickly see which aperture settings gave you the sharpest overall image.

    This next photo of my daughter was shot using natural light. Shooting in my lens’ sweet spot gave me a pretty sharp image, even in this low light setting.

    Mid range aperture sharp image low light

    Find your lens sweet spot for sharper images

    The close up of the mugs shows the advantage of shooting in the lens’ sweet spot. Whenever you want to make sure you get the sharpest capture possible, take a shot at each mid-range setting f/7, f/8, f/9, and f/10.

    Getting Your Sharpest Images

    Now that you know your lens’ sweet spot, it’s time to practice. I hope you’re as pleased with the results as I’ve been!

    Mid range aperture for sharper images

    I love shooting in natural light, and learning how to capture sharper images in low light has made me so much happier with my photos.

    Tips for capturing your sharpest images:

    • Shoot in Aperture Priority mode
    • Choose a mid-range aperture (usually f/7 to f/10)
    • Use a tripod and a remote shutter release (or your camera’s self-timer) to reduce camera shake
    • Take a series of shots at f/7 through f/10 when a sharp capture is especially important

    But don’t stop here. Keep playing with settings in Aperture priority mode. It’s awesome to get images that are sharp throughout, but there’s a lot more to aperture than that.

    Learn more about aperture and depth of field here.

    Do you have any lens sweet spot tips to share? Please do so by commenting below.

    googletag.cmd.push(function() {
    tablet_slots.push( googletag.defineSlot( “/1005424/_dPSv4_tab-all-article-bottom_(300×250)”, [300, 250], “pb-ad-78623” ).addService( googletag.pubads() ) ); } );

    googletag.cmd.push(function() {
    mobile_slots.push( googletag.defineSlot( “/1005424/_dPSv4_mob-all-article-bottom_(300×250)”, [300, 250], “pb-ad-78158” ).addService( googletag.pubads() ) ); } );

    The post How To Find Your Lens’ Sweet Spot: A Beginner’s Guide to Sharper Images by Dena Haines appeared first on Digital Photography School.


    Digital Photography School

  • How to Size Images for Online Sharing

    Whether you’re running a photography business, or sharing your photography on the web with friends, it’s important to know how to properly size your images for various uses. Generally speaking the smallest size you can share, while still retaining enough quality for the viewer to appreciate the photograph, is what you’ll want to aim for, but let’s dive into this with a bit more detail.

    First rule – use the sRGB Color Space for anything going on the web

    Before you even think about sizing an image for the web, you’re going to need to make sure that you’re using the correct color space. The web is standardized on the sRGB color space, which means that if you want your photography to appear accurately across the web, that’s the color space you need to use when you save your image.

    Take a look at this side by side comparison of the same photograph, saved directly from Lightroom, using the sRGB color space versus the AdobeRGB color space.

    sRGB

    sRGB

    AdobeRGB-750

    AdobeRGB

    You’ll notice that the AdobeRGB color space appears slightly more muted in terms of color and it has a slightly more greenish tint when compared to the sRGB image.

    Second rule – Smaller size over image quality

    Even in this world of high resolution monitors, it’s still the best practice to use smaller sizes when sharing images on the web.

    Here at dPS, images in the articles are sized to be 750 pixels on their longest side at an overall size of around 200kb. The reason you want to reduce the size of your images for use on the web is primarily to improve the user experience for your readers. The more data a webpage has to load, the longer it will take for the reader to be able to see content.

    Social media and dedicated portfolio sites, like Smugmug or Zenfolio, are the exception to this rule as they have optimized their backends to handle large image files when necessary, and actually require the full size image for printing purposes.

    How to size your images?

    Knowing why to size your images is only the first piece to the puzzle, now it’s time to learn how to size your images. This article will show you two ways to size images, one with Lightroom and another with Photoshop, as they are the two most commonly used pieces of software among dPS readers.

    How to size an image in Lightroom

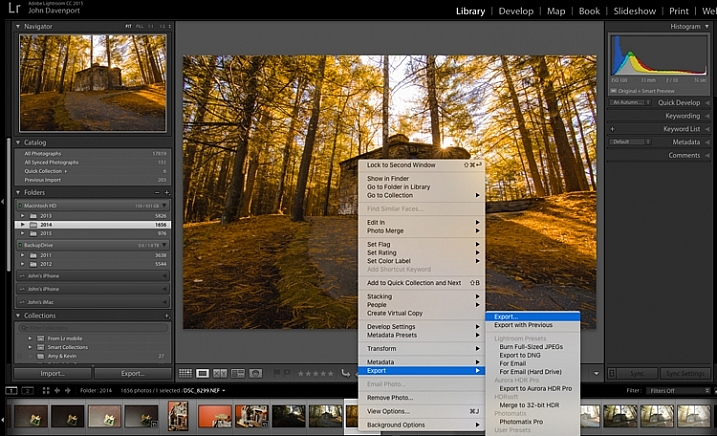
    The best thing to do with Lightroom is to set up an export preset specific for your needs. Once this preset is set up, all you’ll have to do is select it, and everything will be done for you.

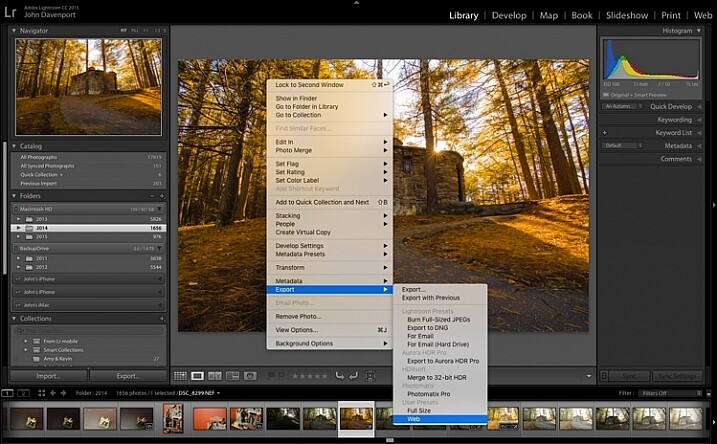
    Step 1: Select any photograph and right click. Navigate to Export and select Export from the fly out menu.

    export-images-lightroom

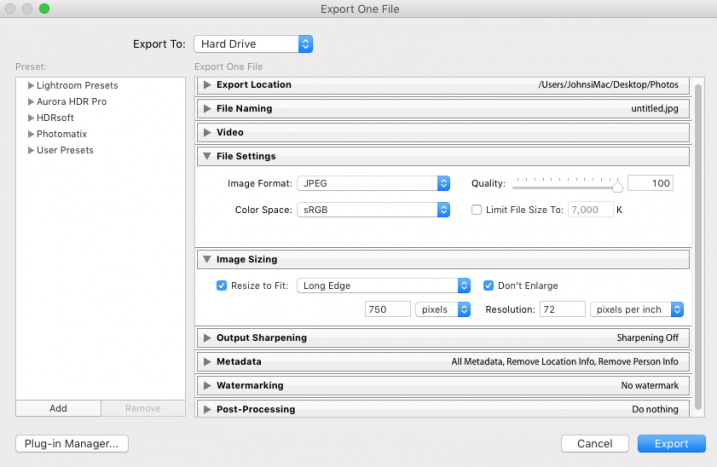
    Step 2: In the box that opens, after selecting your Export Location and File Naming options, you’ll want to navigate to the File Settings and Image Sizing sections.

    In the File Settings Section: Make sure that Image Format is set to JPEG, and that Color Space is sRGB. You can choose to limit the file to a specific siz,e if this matters to you, but know that too much size reduction can result in noticeable quality loss of an image.

    sizing-images-with-lightroom

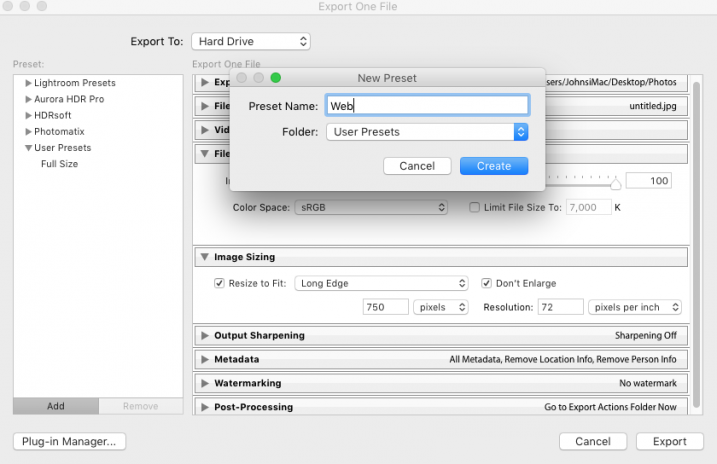
    In the Image Sizing Section: You’ll want to check “Resize to Fit” and make sure that the drop down is set to Long Edge. Check the box “Don’t Enlarge” which will mean that any time you export an image smaller than your “Long Edge” setting, it won’t stretch the to fit that dimension. Finally, you’ll need to pick what size you want your image to be – here it’s set to 750px and 72 pixels per inch which is what we use at dPS.

    To save this as a preset that you can use over and over again, click on the “Add” button in the lower left corner, and name your preset when the dialogue box opens.

    sizing-images-with-lightroom2

    Now, whenever you want to export a photograph to the web, all you have to do is right click on the image you wish to export, and navigate to the preset you’ve just created. Super easy!

    export-images-lr2
    How to size images with Photoshop

    When you want to save your images for the web with Photoshop, the best option is to use Photoshop’s “Save for Web” tool. This will let you choose from various file types (in most cases you’ll want JPEG), and also allow you to convert the image to the all important sRGB color space.

    photoshopsaveforweb

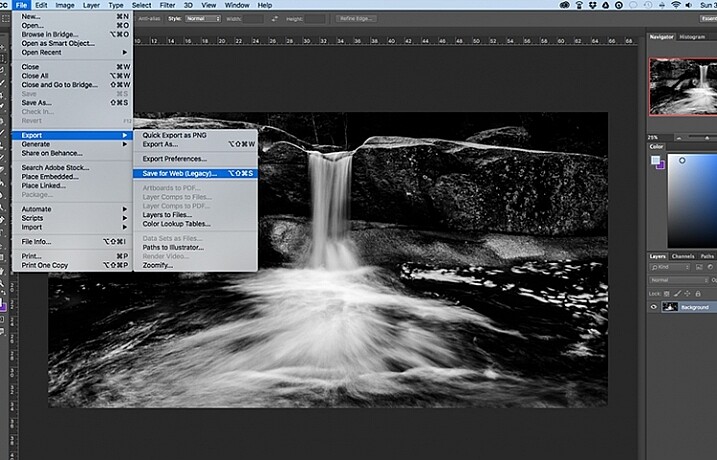
    To find the Save for Web option you’ll want to navigate to File > Export > Save for Web

    Once you select this option a new window will open, providing you with a number of options for exporting your image from Photoshop. Here you’ll want to make sure that “Convert to sRGB” is checked, and that your file format is set to JPEG. Sizing can be done by picking a width or height, and as long as the two are connected with the link symbol, Photoshop will calculate the other’s value based on the one you input and maintain the image proportions accurately.

    The most important part about saving photographs for use on the web is getting the color space correct, and realizing that people browsing photographs on the web are often doing so on smaller screens, with limited time on their hands. Fast load times not only improve your user’s experience, but they also will reflect favorably on Google’s search engine’s algorithm which is used to determine if your content is worthy of being shown to people searching Google for answers.

    How do you size your images for online use? Please share in the comments below.

    googletag.cmd.push(function() {
    tablet_slots.push( googletag.defineSlot( “/1005424/_dPSv4_tab-all-article-bottom_(300×250)”, [300, 250], “pb-ad-78623” ).addService( googletag.pubads() ) ); } );

    googletag.cmd.push(function() {
    mobile_slots.push( googletag.defineSlot( “/1005424/_dPSv4_mob-all-article-bottom_(300×250)”, [300, 250], “pb-ad-78158” ).addService( googletag.pubads() ) ); } );

    The post How to Size Images for Online Sharing by John Davenport appeared first on Digital Photography School.


    Digital Photography School

  • Behind the scenes at Fujifilm’s factory in Sendai, Japan

    Behind the Scenes of Fujifilm’s Factory in Sendai, Japan

    After the official launch of the X-Pro2 recently in Tokyo, Fujifilm invited a select group of press to visit its Taiwa assembly plant near Sendai to see the camera being put together. As well as the X-Pro2, we were also able to see the assembly lines for the X-T1, X100T, and several lenses. Fujifilm has been making optics since the 1940s, and although the construction workers of that time would not recognize much of the technology used in lens construction today, a lot of the assembly is still done fairly traditionally, by hand. 

    The first step when visiting any assembly plant, is to sterilize yourself. No, not like that, but by donning head-to-foot protective clothing and scrubbing your hands with alcohol. It’s a time-consuming, uncomfortable but necessary step in order to prevent contamination of the assembly line. I do very much regret keeping a sweater on underneath the overalls though. 

    Behind the Scenes of Fujifilm’s Factory in Sendai, Japan

    Here, a worker in Fujifilm’s Taiwa plant uses a sonic motorized screwdriver to assemble the company’s 56mm F1.2 prime lens. 

    Behind the Scenes of Fujifilm’s Factory in Sendai, Japan

    Journalists take photographs of the various lens groups that make up the new 100-400mm zoom, laid out on a table at Fujifilm’s Taiwa plant, which is about 20 miles outside of the city of Sendai. 

    The elements themselves are not ground and polished in Sendai, but like other components they are shipped in, ready to be turned into complete lenses. Fujifilm has three additional facilities in Japan that mold and polish glass lens elements and machine various other components.

    Behind the Scenes of Fujifilm’s Factory in Sendai, Japan

    Here, a worker performs the delicate job of attaching the PCB to Fujifilm’s new 100-400mm telezoom. 

    Behind the Scenes of Fujifilm’s Factory in Sendai, Japan

    The 100-400mm zoom takes roughly 4 hours to assemble, in its progress from a box of bits to a finished lens. These lenses are almost complete, and await the final assembly and testing phases of their construction. 

    Behind the Scenes of Fujifilm’s Factory in Sendai, Japan

    Fujifilm’s new 100-400mm telezoom being assembled. As with other factories we’ve visited in Japan, a lot of the assembly is done by hand, and aside from calibration, there’s little automation in the assembly lines of either lenses, or cameras in Fujifilm’s factory. 

    Behind the Scenes of Fujifilm’s Factory in Sendai, Japan

    Here, a 100-400mm zoom undergoes final testing. This process (which involves racking the zoom and focus ring to various points, repeatedly) is partly automated – presumably to avoid the human operators from getting repetitive strain injury.

    Almost all of the other calibration tests and checks are confidential, which means no photos. None taken by humans, anyway.

    Behind the Scenes of Fujifilm’s Factory in Sendai, Japan

    A 100-400mm gets the finishing touches added, prior to being boxed up for shipping. 

    Behind the Scenes of Fujifilm’s Factory in Sendai, Japan

    Several completed 100-400mm zooms are placed in plastic trays before being wrapped and boxed-up for shipping.

    Behind the Scenes of Fujifilm’s Factory in Sendai, Japan

    Here, a worker examines one of the groups destined to become part of Fujifilm’s much smaller 35mm F2 prime lens. 

    Behind the Scenes of Fujifilm’s Factory in Sendai, Japan

    Again, a majority of the steps in the assembly of this lens are manual, with little automation. 

    Behind the Scenes of Fujifilm’s Factory in Sendai, Japan

    We were impressed by just how many of the stages in assembly appear to be visual inspection. A single worker might inspect hundreds of these components in a day.

    Behind the Scenes of Fujifilm’s Factory in Sendai, Japan

    Here, lens groups are arranged in trays ready to be inspected.

    Behind the Scenes of Fujifilm’s Factory in Sendai, Japan

    Ultraviolet light is used to ‘cure’ the cement that holds elements securely in their groups. Gone are the days of screwing elements together using friction and using shims to adjust their precise alignment.  

    Behind the Scenes of Fujifilm’s Factory in Sendai, Japan

    Here, several 35mm F2 primes sit in trays awaiting the final stages of their assembly.  

    Behind the Scenes of Fujifilm’s Factory in Sendai, Japan

    The front bezel of the 35mm F2 is attached with four screws. Once this is done, the screws will be concealed by the nameplate ring. 

    Behind the Scenes of Fujifilm’s Factory in Sendai, Japan

    And here are the finished lenses with their nameplates attached, ready to be boxed and shipped. Much simpler than the 100-400mm zoom, the 35mm prime takes only about 80 minutes to assemble, in total. 

    Behind the Scenes of Fujifilm’s Factory in Sendai, Japan

    The day we toured Fujifilm’s factory was the first ‘official’ day of production for the new X-Pro2. Of course workers have been putting final shipping cameras together now for some time, under a veil of secrecy ahead of the product launch in mid-January.

    Behind the Scenes of Fujifilm’s Factory in Sendai, Japan

    Although outwardly similar to the original X-Pro1, the X-Pro2 is a completely redesigned, considerably more complex camera than the first X-series ILC. It should be – Fujifilm has had four years to gather feedback from users of the original camera. 

    Behind the Scenes of Fujifilm’s Factory in Sendai, Japan

    Like the lenses, the X-Pro2 arrives in Sendai as a collection of partly-finished components ready for final assembly. Here, a worker performs the delicate job of connecting the various wires and ribbon connectors that will bring the camera to life.

    Behind the Scenes of Fujifilm’s Factory in Sendai, Japan

    The X-Pro2’s firmware isn’t ‘hardwired’ but has to be manually uploaded to every camera individually, in one of the final stages of assembly before the cameras are boxed up for shipping. Doing it at this late stage decreases the risk that firmware will need to be loaded more than once if an update is required. 

    Behind the Scenes of Fujifilm’s Factory in Sendai, Japan

    Here, a worker is attaching the small plastic window over the X-Pro2’s focusing lamp before applying the leatherette material that covers much of the outside of the camera’s body.

    Behind the Scenes of Fujifilm’s Factory in Sendai, Japan

    One of the trickiest (and most manual) stages in the construction of the X-Pro2 is applying the leatherette material to the camera body. This is done slowly, carefully, and entirely by hand.

    Behind the Scenes of Fujifilm’s Factory in Sendai, Japan

    The material is carefully pressed into place around the lens throat, and various control points. Bubbles are worked out by scraping the material gently with a plastic ‘spudger’. 

    Behind the Scenes of Fujifilm’s Factory in Sendai, Japan

    The X-Pro2’s grip is attached using a very strong adhesive, and firm adhesion is ensured by placing the camera in a mechanical press that applies firm and even pressure to the join. 

    Behind the Scenes of Fujifilm’s Factory in Sendai, Japan

    Here, finished X-Pro2 bodies await final checks before being boxed up for shipping. 

    Behind the Scenes of Fujifilm’s Factory in Sendai, Japan

    The X-Pro2 isn’t the only camera that is put together in Sendai. Fujifilm also assembles the X-T1 in the same facility. Here, a collection of X-T1 top-plates await assembly.

    Behind the Scenes of Fujifilm’s Factory in Sendai, Japan

    And this is what happens next. The X-T1’s magnesium-alloy top-plates are introduced to the electronic viewfinder assembly, ready to be mated with the main body of the camera, further down the assembly line.  

    Behind the Scenes of Fujifilm’s Factory in Sendai, Japan

    Dials! Thousands of dials! Here, trays and trays of X-T1 ISO dials sit waiting to be introduced to their host cameras. 

    Behind the Scenes of Fujifilm’s Factory in Sendai, Japan

    A well as the X-Pro2 and X-T1, the Sendai plant is also home to the X100T assembly line. We wanted to take this lonely-looking X100T home with us, but apparently that’s not allowed.

    Behind the Scenes of Fujifilm’s Factory in Sendai, Japan

    That’s OK – we like the black ones more anyway. Here, a number of almost-finished X100T bodies sit in trays waiting for their rear control plate and LCD screens to be added. 

    Sendai was badly hit by the earthquake of 2011, and some of the buildings at Fujifilm’s Taiwa plant had to be abandoned due to structural damage. One of those buildings housed the original assembly line for the X100, and after the earthquake, assembly was moved across the street and into the building that we visited.  

    Behind the Scenes of Fujifilm’s Factory in Sendai, Japan

    And here’s where they all end up – X-Pro2s, X-T1s, X100Ts and lenses. These large boxes contain finished products, ready to be shipped to retailers and distributors worldwide. 

    Behind the Scenes of Fujifilm’s Factory in Sendai, Japan

    Well, almost ready. Even once they’re placed in their retail packaging and stacked in the larger shipping boxes, one in 10 of all the cameras and lenses assembled in the factory are removed, unboxed, and checked by hand to ensure that any given batch is free from manufacturing defects. ‘Made in Japan’ really does mean something, even today. 

    Behind the Scenes of Fujifilm’s Factory in Sendai, Japan

    Happy 5th anniversary, Fujifilm X-series!

    Articles: Digital Photography Review (dpreview.com)

  • Canon announces flagship EOS-1D X Mark II full-frame digital SLR

    $ (document).ready(function() { SampleGalleryV2({“containerId”:”embeddedSampleGallery_9233536181″,”galleryId”:”9233536181″,”isEmbeddedWidget”:true,”selectedImageIndex”:0,”startInCommentsView”:false,”isMobile”:false}) });

    Canon has announced its new flagship DSLR, the full-frame EOS-1D X Mark II. It features a new 20.2MP CMOS sensor with Dual Pixel AF, and uses a pair of Dual DIGIC 6+ processors to capture 4K video and shoot continuously at up to 16 fps. The camera has a native ISO of 100-51200, expandable to 409600.

    The new 61-point autofocus system has 41 cross-type sensors and 24% larger frame coverage than its predecessor. Its center point is sensitive to -3EV in OneShot AF. In live view the camera uses the latest iteration of Canon’s Dual Pixel AF technology for high-speed focusing in OneShot mode. The metering system has also been updated to use a 360k-pixel RGB+IR sensor, which the company says improves subject – including face – detection and tracking.

    As with its predecessors, the 1D X is as rugged a camera as you’ll find. It’s magnesium alloy body is fully weather-sealed and has a shutter that will last for approximately 400,000 cycles. In addition to its large optical viewfinder (now with better, adjustable AF point illumination), the Mark II has a 3.2″ Clear View II LCD with 1.62 million dots, up from 1.04 million dots. The screen is touch-enabled, but only for autofocus point selection in Live View. Another new addition is a built-in GPS (with an e-compass), which sits in a ‘hump’ on the top of the viewfinder. Otherwise, the design of the Mark II is very similar to that of its predecessor.

    Performance-wise, the 1D X II can shoot continuously at 14 fps with autofocus, and if you lock the mirror up, you can shoot up to 16 fps with locked focus and exposure. If you’re using the older LP-E4N battery, the top shooting speeds drop to the same frame rates as the 1D X (12/14 fps). If you’re using a CFast card you can take an unlimited number of JPEGs or a whopping 170 Raw images in a single burst, or 12 seconds of shooting at 14 fps. The 1D X II also has a slot for standard CompactFlash cards. When it comes to connecting to a PC you can choose from the camera’s USB 3.0 or Ethernet ports. Wi-Fi requires the use of Canon’s $ 600 WFT-E8 wireless file transmitter.

    One of the most significant additions to the 1D X II is support for 4K (DCI) video capture. It can capture 4K video at 60p using the M-JPEG codec (which allows for easy frame grabs) as well as 1080p at frame rates of up to 120 fps. You’ll need to use a CFast card in order to record more than a few seconds of 4K video though. Dual Pixel AF enables continuous autofocus in video, and touch focus makes the experience a breeze. The camera does not offer focus peaking or zebra patterns natively, but they are visible when using an external recorder. As one would expect given its place in Canon’s lineup, the 1D X Mark II has both headphone and mic jacks.

    The EOS-1D X Mark II will be available in April for $ 5999 (body only), or bundled with a 64GB CFast card and reader for $ 6299.

    Press release:

    Fast, Formidable, and 4K, All-in-One Camera: CANON U.S.A. Introduces the EOS-1D X Mark II Professional Digital Camera 

    Delivering Precise and Reliable Performance with Versatility for Any Photo or Video Professional

    MELVILLE, N.Y., February 1, 2016 – Rising to meet the rigorous and evolving demands of professional photographers and videographers, Canon U.S.A., Inc., a leader in digital imaging, is proud to announce the new EOS-1D X Mark II DSLR camera. With a new 20.2 megapixel 35mm Full Frame Canon CMOS sensor and Dual DIGIC 6+ Image Processors, the EOS-1D X Mark II professional digital camera delivers stunning image quality and speed. Combining the ability to capture high-resolution still images at speeds up to 14 frames per second as well as stunning high-definition video up-to-4K 60P featuring Canon’s proprietary Dual Pixel CMOS Autofocus (AF) technology, the Canon EOS-1D X Mark II camera becomes the ideal camera for any professional image creator. 

    The new flagship Canon EOS-1D X Mark II features several firsts for EOS cameras including:

    • Newly developed 20.2 megapixel 35mm Full Frame Canon CMOS sensor;
    • Continuous shooting speeds of up-to-14 frames per second (fps) with Auto Exposure (AE) and predictive AF for viewfinder shooting and up to 16 fps1 in Live View mode; 
    • Dual DIGIC 6+ Image Processors that transfer image data at extremely high speed for extended bursts during continuous shooting – up-to-170 consecutive RAW images at 14 fps. When shooting JPEG images you’re only limited by memory card capacity2
    • Capable of shooting 4K 60P and Full HD 120P video with Dual Pixel CMOS AF;
    • Enhanced wireless functionality (with the optional accessory Wireless File Transmitter WFT-E8) that supports the new high-speed IEEE 802.11ac standard and the  ability to easily transfer photos and videos to compatible smartphones using Canon’s Camera Connect app*; 
    • Digital Lens Optimizer to help correct aberrations in-camera (a feature that previously required post-processing on an external computer); 
    • Improved 61-point viewfinder AF with expanded coverage and all AF-points selectable and supported to a maximum aperture of f/8; 
    • Improved AI Servo III+ predictive AF algorithm for better accuracy; 
    • Continuous red illumination of all AF points within the camera’s Intelligent Viewfinder II.
    • Compatibility with both CF and CFast memory cards for optimal performance and versatility.

    The Ultimate EOS Camera: Continuing a Legacy of High Speed and Performance

    Building on the success of the Canon EOS-1D X professional digital camera, the Canon EOS-1D X Mark II camera is designed to deliver high-performance, speed, and image quality, with improved comfort for professional photographers. In addition to the new 20.2 megapixel full-frame CMOS sensor and Dual DIGIC 6+ Image Processors, the new EOS-1D X Mark II DSLR camera includes an improved 61-point High-Density Reticular AF II system with all AF points selectable by the user (and up to 41 cross-type points depending on the lens in use). The improved AF system includes expanded coverage that supports AF at maximum apertures up to f/8 with all 61 points for high precision autofocus even when using EF super-telephoto lenses with an EF extender. The camera also boasts excellent dynamic range and reduced color noise compared to its predecessor throughout its standard ISO speed range of 100 – 51,200. Expansion ISO speeds of 50, 102,400, 204,800 and 409,600 are also available.  A first for the Canon EOS-1D series, this camera also features a 360,000-pixel RGB+IR metering sensor with enhanced precision and performance compared to its predecessor, improving facial recognition and tracking, as well as nature scenes. Additionally, the advanced AE system can detect and compensate for flickering light sources such as sodium vapor lamps that are often used in gymnasiums and swimming pools. When enabled, this anti-flicker system automatically adjusts shutter release timing to help reduce disparities in exposure and color especially during continuous burst shooting.

    For filmmakers and photographers looking to do more than still photography alone with a DSLR camera and EF lenses, the EOS-1D X Mark II camera offers high resolution DCI 4K video at frame rates up-to-60p, with smooth movie recording to an in-camera CFast 2.0 memory card. An additional card slot supports standard CF memory cards up to UDMA 7. The built-in headphone jack supports real-time audio monitoring. Two additional EOS ‘firsts’ include 4K Frame Grab and 120p Full HD recording. The camera’s 4K Frame Grab function allows users to isolate a frame from recorded 4K video and create an 8.8 megapixel still JPEG image in-camera. When combined with the EOS-1D X Mark II’s high-sensitivity full-frame CMOS sensor, the new camera’s ability to record Full HD video at frame rates up to 120p will allow videographers to produce high quality slow motion video even in extremely low light. To make video shooting even more intuitive, the Canon EOS-1D X Mark II camera’s touch-screen LCD allows videographers to select the camera’s AF point before and during video recording with Dual Pixel CMOS AF, which provides responsive, accurate and quiet camcorder-like video autofocus to DSLRs.

    “The innovations within Canon’s new EOS-1D X Mark II DSLR camera clearly set a new standard for professional cameras,” said Yuichi Ishizuka, president and COO, Canon U.S.A., Inc. “In developing the EOS-1D X Mark II camera, we looked to incorporate user-requested performance enhancements to bring professional photographers the ultimate EOS camera, a camera that has matured and been developed to meet their evolving needs.” 

    “Having f/8 capability on all 61 AF points is a tremendous benefit to wildlife photographers,” noted nature photographer and Canon Explorer of Light Charles Glatzer. “In order to capture tight shots of animals without disturbing them, I frequently have to use very long lenses—sometimes with an extender attached, which further diminishes the aperture. The improved AF allows me to frame the shot exactly the way I envision it, without having to compromise.”

    “This camera is a huge step forward,” remarked acclaimed photographer and Canon Explorer of Light Damian Strohmeyer. “Shooting sports in a gym at 8,000 ISO, it looked as good as 800 ISO from a generation or two ago. The images are tack-sharp, and the autofocus just doesn’t miss. I’ve been amazed by what I’ve seen so far.”

    “The autofocus was awesome,” agreed Peter Read Miller, sports photographer and Canon Explorer of Light.  “The higher frame rate coupled with the speed of the CFast card was a definite advantage. It just never buffered out, even shooting RAW.”

    The new EOS-1D X Mark II camera also offers a built-in GPS** receiver with compass for precise geo-tagged information of latitude, longitude, elevation and direction. This is especially valuable to wildlife photographers and photojournalists who need to track their locations, as well as providing sports photographers the ability to sync a multiple-camera setup with extreme accuracy and precision. It is also possible to use the camera’s built-in GPS to automatically sync the camera’s time to the atomic clock, an invaluable feature to professionals.  An improved grip also makes the camera easier for photographers to hold and maneuver while shooting. In response to feedback from professional EOS users, the AF points in the EOS-1D X Mark II camera’s Intelligent Viewfinder II can be illuminated in red for improved visibility, especially when shooting in dark locations. AF sensitivity in low light has been doubled from EV -2 to EV -3 at the center AF point when the camera is set to One-Shot AF, enabling the camera to autofocus in extremely dark shooting conditions such as a moonlit nightscape. Viewfinder AF coverage has also been increased for greater compositional flexibility.

    As with all EOS-1D series cameras, the EOS-1D X Mark II’s rugged construction and magnesium alloy body is weather resistant. The camera also features improved controls and more in-camera image quality enhancements than ever before, including a Digital Lens Optimizer function offering high quality aberration correction which can now be achieved without an external computer. This feature makes it easier for professional photographers to deliver finished files to their clients, especially in situations when access to a personal computer is impractical or inconvenient. 

    The estimated retail price for the Canon EOS-1D X Mark II is $ 5999 (MSRP) for the body or $ 6299 for the Premium Kit which includes a 64 GB CFast memory card and card reader. The new camera is scheduled to begin shipping to authorized Canon USA dealers in April 2016***. For more information and the full list of product specifications, visit: usa.canon.com/EOS1DXMarkII 

    * With the download of the free Canon Camera Connect app. This software enables you to upload images to social network services. Before uploading images, please be aware that image files may contain privacy-related information such as people and places. If necessary, please delete such information. Canon does not obtain, collect or use such images or any information included in such images through this software. 
    ** In certain countries and regions, the use of GPS may be restricted. Therefore be sure to use GPS in accordance with the laws and regulations of your country or region. Be particularly careful when traveling outside your home country. As a signal is received from GPS satellites, take sufficient measures when using in locations where the use of electronics is regulated.
    ***Availability, pricing and specifications are subject to change without notice. Actual prices are set by individual dealers and may vary.

    1. Continuous shooting speed may vary depending on the shutter speed, the aperture, the lens being used, the battery charge and various camera settings
    2. Burst rate using CFast card


    EOS-1D X Mark II specifications

    Price
    MSRP $ 5999 (body only)
    Body type
    Body type Large SLR
    Body material Magnesium alloy
    Sensor
    Max resolution 5472 x 3648
    Other resolutions 4368 x 2912, 3648 x 2432, 2736 x 1824
    Image ratio w:h 3:2
    Effective pixels 20 megapixels
    Sensor photo detectors 22 megapixels
    Sensor size Full frame (36 x 24 mm)
    Sensor type CMOS
    Processor Dual DIGIC 6+
    Color space sRGB, Adobe RGB
    Color filter array Primary color filter
    Image
    ISO Auto, 100-51200 (expands to 50-409600)
    Boosted ISO (minimum) 50
    Boosted ISO (maximum) 409600
    White balance presets 6
    Custom white balance Yes (5 slots)
    Image stabilization No
    Uncompressed format RAW
    File format
    • JPEG (Exif v2.3)
    • Raw (Canon CR2, 14-bit)
    Optics & Focus
    Autofocus
    • Contrast Detect (sensor)
    • Phase Detect
    • Multi-area
    • Center
    • Selective single-point
    • Tracking
    • Single
    • Continuous
    • Touch
    • Face Detection
    • Live View
    Manual focus Yes
    Number of focus points 61
    Lens mount Canon EF
    Focal length multiplier 1×
    Screen / viewfinder
    Articulated LCD Fixed
    Screen size 3.2″
    Screen dots 1,620,000
    Touch screen Yes (for AF point selection only)
    Screen type TFT LCD
    Live view Yes
    Viewfinder type Optical (pentaprism)
    Viewfinder coverage 100%
    Viewfinder magnification 0.76×
    Photography features
    Minimum shutter speed 30 sec
    Maximum shutter speed 1/8000 sec
    Exposure modes
    • Program
    • Aperture priority
    • Shutter priority
    • Manual
    Built-in flash No
    External flash Yes (via hot shoe or flash sync)
    Flash X sync speed 1/250 sec
    Continuous drive 16.0 fps
    Self-timer Yes
    Metering modes
    • Multi
    • Center-weighted
    • Spot
    Exposure compensation ±5 (at 1/3 EV, 1/2 EV steps)
    AE Bracketing ±3 (3 frames at 1/3 EV, 1/2 EV steps)
    Videography features
    Resolutions 4096 x 2160 (60p, 30p, 25p, 24p, 23.98p), 1920 x 1080 (120p, 60p, 50p, 25p, 24p, 23.98p)
    Format MPEG-4, H.264, Motion JPEG
    Microphone Mono
    Speaker Mono
    Storage
    Storage included CompactFlash + CFast 2.0
    Connectivity
    USB USB 3.0 (5 GBit/sec)
    HDMI Yes
    Microphone port Yes
    Headphone port Yes
    Wireless Optional
    Wireless notes requires WFT-E8
    Remote control Yes
    Physical
    Environmentally sealed Yes
    Battery Battery Pack
    Battery description LP-E19 lithium-ion battery & charger
    Battery Life (CIPA) 1210
    Weight (inc. batteries) 1530 g (3.37 lb / 53.97 oz)
    Dimensions 158 x 168 x 83 mm (6.22 x 6.61 x 3.27″)
    Other features
    Orientation sensor Yes
    GPS BuiltIn
    GPS notes with e-compass

    Articles: Digital Photography Review (dpreview.com)

  • Good sport: a closer look at Canon’s EOS-1D X Mark II

    Introduction

    The Canon EOS-1D X Mark II is the company’s latest pro-level DSLR, now built around a 20.2MP CMOS sensor with Dual Pixel AF technology. It uses a body that’s the most subtle possible evolution of the classic 1D design, which makes sense, given how many of its long-standing professional users will need to find it familiar the moment they use it. Inside, though, almost every aspect of the camera’s feature set has been overhauled – from the autofocus system to the video capability, the ISO range to the card format it uses. Let us talk you through the biggest changes.

    Autofocus improvements

    The EOS-1D X II features a similar AF module to that found on the previous flagship 1D X, as well as on the 5D Mark III and 5DS/R, but comes with some notable improvements. For a start, the coverage is larger, with the central region expanding vertically by 8% and the 20 points on the left and right flanks extending vertically 24% more than before.

    All 61 points can now focus at F8, which will be very useful when shooting telephoto lenses with 1.4x and 2x teleconverters. 41 of those points are cross-type, having both horizontal and vertical line sensitivity. 5 central points are dual cross-type and have wider baselines that offer high precision focusing for F2.8 and faster lenses. The center point works down to -3EV in One-Shot AF. It’s not available in AI Servo because it requires a longer sampling interval, which would slow down AI Servo.

    Also improved is AF point illumination, based particularly on feedback from wedding and event photographers. Points can now remain lit red when focusing, which helps you keep your AF point over your subject in dim situations. Additionally, two brightness levels are available so you can fine tune brightness based on your preference.

    You can read more specifics about the very similar previous 61-point module in our EOS 5DS coverage here.

    Metering Sensor

    The 1D X Mark II gets a new metering module. It’s now a 360,000 pixel sensor that is used both for metering and to provide scene awareness to Canon’s ‘Intelligent Tracking and Recognition’ (iTR) autofocus system.

    The sensor itself is a two-layer CMOS chip, with red, green and blue information captured by the top layer and infrared detected further down into the silicon.

    Touchscreen LCD

    The LCD screen on the back of the camera has received a significant upgrade. It’s now 1.62 million-dot, up from 1.04 million-dot. This represents a move from 720 x 480 to 900 x 600 pixels and the increase in resolution is noticeable. Images look crisp and clear on the back, thanks especially to Canon’s ‘Clear View’ technology that uses optical coatings to reduce reflections.

    The LCD is also touch-enabled, but you can only use touch to select a focus point in Live View, either for stills shooting, or to refocus on subjects during movie shooting. It cannot be used to operate menus, nor (annoyingly) is it enabled in playback.

    Battery

    The Canon EOS-1D X Mark II ships with a new battery, which allows for 1210 shots on one charge. The nice thing is, the battery compartment remains backwards compatible with the older 1D X battery. However, if you use the older battery, frame rates will drop to 1D X levels (12 fps with AF, 14 fps in live view or with the mirror locked up). Heartbreakingly slow, we think you’ll agree. 

    Dual Pixel AF

    Dual Pixel AF makes its debut on a full-frame sensor with the 1D X II. Every pixel on the sensor is split into two separate photodiodes, one left-looking and one right-looking. Comparing the phase difference between strips of left-looking vs. right-looking pixels essentially allows the camera to determine exactly how much to move the focus element to acquire focus, much as the dedicated phase-detect module in DSLRs do. Approximately 80% of the frame is available for focus using Dual Pixel AF, and the technology is particularly useful not just for this extensive coverage, but for the inherently accurate focus it provides – because focus is performed at the imaging plane, there’s little possibility for mis-focus and the inaccuracy issues dedicate phase-detect sensors in DSLRs display.

    Perplexingly, Dual Pixel AF can only be used in One-Shot AF in Live View, meaning it can’t be used to continuously focus (though it can for movies). We weren’t given any reasons as to this limitation, and given that continuous focus is certainly possible – as it works during movie shooting – it seems an odd omission.

    Read our original coverage of Dual Pixel AF, with an in-depth look at how it works, here.

    Canon embraces CFast (and Compact Flash)

    Canon has decided to adopt the CFast standard while also providing a CompactFlash slot for backwards compatibility. The logic of this move is to ‘futureproof’ the camera. For now, Canon has provided the option for super high-speed data rates without alienating its existing audience, who most likely have a large collection of CF cards.

    Should you own a CFast card, you’ll be able to capture 170 Raw files in a burst: just a fraction below the 180 JPEGs that its predecessor could manage (the Mark II will shoot JPEGs continuously until you run out of card space). CFast is also required for 4K video recording.

    Video capabilities

    On paper, the EOS-1D X Mark II has very impressive video specifications – moving far beyond what its predecessor was capable of and incorporating most of what the more niche EOS-1D C offered. The standout spec is the ability to shoot DCI 4K footage (4096 x 2160 pixels) at up to 60 frames per second. This capability is the same as the 1D C, though the X II doesn’t include that camera’s Log Gamma option.

    To give faster access to video shooting there’s a Video/Live View switch around the live view button just to the right of the viewfinder. In addition, the camera gains a headphone socket for audio monitoring during recording.

    Full HD options

    In terms of 1080 video, the camera can record at up to 120 or 100 frames per second (without audio) or at 60, 50, 30, 25, and 24 frames per second, depending on whether you’ve got the camera set to PAL or NTSC mode. Interestingly there’s also the option to capture true 24p footage, as well as the 23.98p approximation offered in NTSC mode.

    The camera can output a ‘clean’ signal across its HDMI port, for use with an external recorder or monitor (which could be used to provide focus peaking and zebra warnings, if needed), but this stream is 1080 only, not 4K.

    Touch-to-focus video

    The other video-friendly hardware change on the 1D X II is the addition of touch sensitivity to the rear LCD. This is only used for a very limited number of features but one of these is to position and re-position with autofocus point during video recording. Combined with the camera’s Dual Pixel AF sensor design, this should make it easy to adjust focus in video without the risk of the lens over-shooting or adding distracting focus wobble to video clips, as can happen with contrast detection autofocus.

    Touch to focus can also be used for One-Shot AF in stills Live View shooting. 

    Articles: Digital Photography Review (dpreview.com)

  • X-Factor: We examine Canon’s EOS-1D X Mark II

    Introduction

    The Canon EOS-1D X Mark II is the company’s latest flagship camera. Its lineage and price tag make clear that it’s aimed at professionals, but what does that really mean? We’ve had our hands on a prototype, so click through this slideshow for a closer look the all-new Canon EOS-1D X Mark II. 

    Handling

    The first thing to notice is how similar the body layout and design is to previous models. More so than any other part of the market, pro-level cameras need to be consistent with their predecessors. Working professionals need to be able to pick up the new camera and use it perfectly, the first time they take it out. This may not mean using it to its full potential but, at the very least, it needs to perform as well as the camera they’ve been using.

    To give some idea of how familiar pro shooters become with their cameras, our team photojournalist Jordan Stead’s first response upon picking up the camera was: ‘I noticed the AF selection joysticks have changed. They’re larger and less pointy.’ Indeed, the AF selection joysticks are considerably larger, gaining 5D-series-style crenelations around the edges, while maintaining the portcullis-like surface pattern.  

    Handling

    Unfortunately, leaving everything the same isn’t always a good thing, as it can mean the camera’s behavior doesn’t keep pace with its evolving feature set.

    The EOS-1D X II lets you use Auto ISO in manual exposure mode and allows the use of exposure compensation to set the target brightness. However, the +/- exposure compensation button on the top plate doesn’t work in M mode: instead you need to customize a different button to set exposure compensation, or remove your eye from the viewfinder and use the Q menu. This makes little sense when you have a dedicated exposure compensation button.

    A gripe, and a like

    There’s also no quick way to switch between having the camera automatically select a starting AF point vs manually selecting one in continuous AF tracking (AI Servo with iTR). Instead you have to dig through the menus to specify this. We believe some photographers will want to manually choose their subject by selecting an AF point and initiating focus with it, but it would be nice to quickly switch to an auto mode – where the camera selects the nearest target – to respond to a quickly changing scenario.

    While we’re on the subject of quickly switching AF modes, though, it’s worth highlighting one of our favorite custom controls: OneShot<–>AI Servo and AF<–>. Assigning a button to these features allows you to quickly swap between single and continuous AF, and between two AF area modes commonly used (e.g. single point vs. all 61 points). This allows a photographer to quickly adapt to changing scenarios. 

    Making a class-leading AF module better

    By now Canon shooters should be very familiar with the 61-point AF system that debuted in the 1D X, and a version of which can also be found in the 5D Mark III and 5DS/R cameras. This module has been updated for the better in the 1D X II. It offers 24% more vertical coverage, by moving focus points further apart, which also increases the central AF area by 8%. The center AF point is now sensitive down to -3EV in One-Shot AF, which will be a boon for low light – and we think particularly wedding and event – photographers.

    Speaking of wedding and event photographers – one consistent complaint leveled at the 1D X was the lack of continuous AF point illumination. This could make it difficult to, for example, follow a dark subject on a wedding dance floor with your center AF point long enough for it to lock focus. In these situations, we’d often find ourselves activating the AF grid (which lights up all points red) on a 5D Mark III just to get a glimpse of where our selected AF point was in relation to the subject. 

    With the 1D X II, you can choose to have AF points constantly illuminated, with your selected AF point indicated by red-lit square brackets, while every other AF point is indicated by red dots. Two levels of brightness that are user-selectable control how bright red points appear. In AI Servo mode, you can have your selected AF point lit red as long as the subject is in focus, but we’ll withhold judgement on the exact implementation until we’ve been able to use a production camera. 

    Intelligent AF with a 360k-pixel RGB+IR metering sensor

    The metering sensor on the 1D X II has experienced a significant increase in resolution. With 360,000 RGB+IR pixels, it’s the highest resolution metering sensor we’ve ever seen. This should lead to accurate metering, and also enables the camera’s anti-flicker shooting feature, which delays the shutter firing so that it syncs-up with the brightest moments of the fluctuations that occur with some artificial lighting. 

    But the implications of a high resolution metering sensor are most exciting for autofocus. Why? Think of the metering sensor as a low resolution image sensor that can be used to find faces and recognize objects so it can tell the AF system which points to use to follow them (something Canon refers to iTR, and we generally refer to as subject tracking). The main image sensors of DSLRs can’t be used to do this (as they can on mirrorless cameras), because they are blocked by the reflex mirror between exposures. However, the metering sensor, embedded in the viewfinder hump, can see the scene in front of the lens whenever the mirror is down. This has prompted the use of increasingly high resolution sensors to provide the cameras with scene and subject awareness. For example, Nikon announced a 180,000-pixel RGB metering sensor in their recent D5/500 announcements (we analyzed its implications here).

    So how does it work? Our initial impressions are that subject tracking remains a bit erratic and highly dependent on your shooting scenario – in other words, on the face of it, not as versatile as Nikon’s class-leading 3D tracking. While we’d expect it to remain very good at following subjects well-isolated in depth (typically distant subjects shot with telephoto lenses, such as birds), it doesn’t appear to be quite accurate enough to track, say, the eye of a face.

    We were somewhat surprised by this, given the pinpoint precision Nikon 3D tracking is capable of with a far lower resolution 91,000-pixel RGB metering sensor, and given the accuracy with which the 1D X II itself tended to focus on eyes of faces in One-Shot AF (with 61-point Auto AF). Our guess is that when it comes to iTR, Canon continues to rely heavily on distance information to subject track, which may serve it well for birds-in-flight, distant wildlife, and sports photography, but is known to have its limitations.

    In other words, it’s not just about how many pixels your metering sensor has, but how you use them. It should be noted though that these impressions are based on limited use of a pre-production camera, so we’re not drawing any definitive conclusions at this stage.

    Face detection in viewfinder shooting

    Face detection in OVF shooting is nothing new: cameras like the original 1D X, 5DS, 7D Mark II, and most full-frame Nikon cameras also have this ability. But with the 360,000 RGB+IR pixel sensor, the 1D X has the potential to recognize faces better. Does it?

    In our brief time with the EOS-1D X Mark II, face detection indeed appeared to work very well. When the camera is set to iTR (Face Priority), and 61-point mode with Auto selection, in single AF (One-Shot) mode the camera is really good at finding the nearest face and focusing on it – and it even appears from our initial testing to prioritize eyes or the plane of a person’s cheeks. Traditionally, we’ve found face detection in OVF shooting on Canon cameras like the 7D Mark II and 5DS to focus on the nose – possibly due to the low resolution of the metering sensor and the camera ostensibly just telling the PDAF system to focus in the general vicinity of the face (dedicated PDAF systems tend to prioritize the nearest object – like noses). With the spatial resolution of a 360,000-pixel RGB+IR sensor, though, we expect the eyes to be distinguishable features, and we found the majority of shots shot with ‘Auto’ AF area with face priority to be focused on or near the eyes, less so the nose. The system was also good at not getting confused by objects obstructing parts of faces – impressive. 

    That said, results were less impressive in continuous AF mode (AI Servo), where iTR kicks in and can lead to erratic results. In Servo 61-point AF with iTR, we found the camera to start on or near the eye of a detected face, but then wander off to a nose, or the subject’s hair. This is consistent with our previous experiences – we’ve found iTR to be somewhat inaccurate at sticking to your initial subject (e.g. the eye of a face), potentially due to its heavy reliance on distance information over pattern recognition for subject tracking. However, we would’ve expected the 360,000-pixel RGB+IR sensor to significantly increase the accuracy of iTR for subjects such as faces and facial features, and nearer objects in general. Yet our initial impressions are that if it does, it’s not obvious (as yet).

    Please note, though, again, that our initial assessment is based on use of a pre-production EOS-1D X Mark II.

    Backwards compatibility

    As well as offering familiar ergonomics, the camera offers a good degree of backwards compatibility. For example, the Mark II uses a new battery, the LP-E19 but is still able to make use of the LP-E4 batteries used by its predecessor. 

    This means that any professionals who’ve built up a collection of LP-E4 batteries with their previous cameras. However, the difference between the two isn’t simply a matter of capacity: reverting to the older packs will see the maximum continuous shooting rate from from 14 fps (with 16 fps in live view) back to the 12/14 fps rate offered by the original 1D X. The new battery also offers an impressive figure of 1210 shots on one charge, according to CIPA standards.

    CFast / Compact Flash

    This attempt to maintain backwards compatibility risks adding complications, though. For existing users, the camera includes a CompactFlash socket but to cope with greater data throughput, the main slot uses the outwardly similar but physically incompatible CFast format.

    We have concerns about the wisdom of using two such similar cards alongside one another in the high-pressure circumstances the 1D X II will be used in. It’s a concern echoed by pro shooter Jordan Stead:

    ‘I’ll probably stick with [CompactFlash] for now: there don’t seem to be enough advantages to CFast if you’re not shooting 4K,’ he says. ‘Also, I’d worry about whether you can accidentally try to mash the wrong card into the wrong slot, because they’re so similar. If you’re on the sidelines, dealing with runners [running cards back from the camera to a laptop], they’re not going to know the difference – I’d worry about them breaking my card reader or bringing me the wrong card.’

    Speed benefits

    With a CFast card, the camera can shoot nearly as many Raw files in a burst as the original 1D X could manage with JPEGs (170 vs 180), meaning that beyond the increase in storage required, there’s effectively no performance cost to shooting Raw.

    The significance of this may not so much be a question of having such a large buffer, but in the fact that it essentially removes one of the key limitations to shooting Raw.

    ‘For the shooting I do, [a 12 second buffer] is unnecessary,’ says Stead. ‘I can’t remember ever shooting more than 3 or so seconds in a burst, but it’s good to know that you’re never going to hit its limit.’

    What is it?

    And several other upgrades have also been made that reduce any impact of the larger file sizes that Raw brings. The speed of the Ethernet port has been increased from 100Mbps to 330Mbps while the new WFT-E8A Wi-Fi accessory now supports the substantially faster 802.11ac standard. There’s also a USB 3.0 connector, giving plenty of high-speed options for file transfer.

    All of these make it easier to transfer large files off the camera quickly, however you’re delivering your images.

    On the go

    On top of this, the camera’s post-shot in-camera Raw processing has been improved, and it’s now possible to apply all the digital lens corrections previously offered by Canon’s Digital Photo Professional software in the camera as a post-processing option. This allows lens-specific distortion, vignetting, chromatic aberration and color blur to be corrected. The camera’s JPEG engine also gains a diffraction optimizing function that tries to correct for diffraction if you shoot using small apertures.

    The 1D X II also features built-in GPS. ‘GPS is cool, too – it’s another thing that the camera is embedding for you, meaning that you don’t need to stop and add that information yourself,’ highlights Stead.

    Video capabilities

    Looking closely at the EOS-1D X II’s video capabilities tells an interesting story. The camera still lacks the focus peaking and zebra warnings offered on the Cinema EOS cameras the company makes for professional video work. And, for that matter, the Log Gamma option that appeared on the 1D C (so it’s not clear whether this camera eliminates the need for a 1D C II). The camera can also only output 1080 footage over HDMI, which suggests Canon doesn’t expect (or want) it to take the place of one of its more video-focused models.

    Video for non-videographers

    Saying that the 1D X II doesn’t appear to be designed for professional video doesn’t mean it can’t offer video for professionals; it merely depends on which profession. With its touchscreen-operated Dual Pixel AF system, the 1D X II should be one of the easiest cameras to capture footage with if you’re not an experienced videographer. The autofocus should be able to refocus without distracting focus wobble simply by tapping the screen. What’s more, tracking sensitivity and AF speeds can be adjusted for movie recording, allowing videographers to optimize continuous focus for their particular application. 

    We’re a little perplexed, though as to why this Dual Pixel AF isn’t available for continuous AF in stills shooting. Clearly, continuous Dual Pixel AF is possible (Movie Servo AF), yet it’s simply disabled for stills.

    The only thing we’re surprised to see is that it doesn’t appear to be possible to use Auto ISO and exposure compensation when manually exposing in video. Setting the shutter speed and aperture, then leaving the camera to use ISO to maintain a pre-specified brightness is one of the easiest ways to shoot.

    But what about 4K?

    The biggest upgrade in the camera’s video spec is the addition of 4K shooting but, interestingly, this can only be captured using the Motion JPEG format and the wider-than-16:9 DCI 4K aspect ratio (4096 x 2160 pixels). Both of these choices seem odd: the All-I H.264 compression the camera uses for its 1080 footage would be a more efficient choice of codec and the 16:9 UHD flavor of 4K is better suited to certain applications.

    However, along with 4K capture, the 1D X II includes tools to grab 8.8MP frames from its 4K files: at which point the decision to save every frame as an individual JPEG makes slightly more sense. Wedding shooters might even use this feature to document receptions in complete silence: despite the 1D X II gaining a continuous silent drive mode like the 5DS/R, it’s not all that silent. 

    The 1D X II also gains a headphone jack, important for monitoring sound levels during video recording.

    First impressions

    Overall, the EOS-1D X II looks pretty much exactly as we thought it would look. It’s a solid, high-performance DSLR that works in basically the same way as its predecessors. It improves on them in several respects, but does not represent a major paradigm shift in either Canon’s state-of-the-art, or the digital camera market as a whole. This isn’t a criticism – this is what progress looks like at the very top of the market, where letting working professionals get the shot they need matters a lot more than piling on fancy features.

    That said, there are two main ways in which we think the camera may prove particularly significant, once it gets into the hands of pro photographers.

    The first is autofocus performance. Canon has been developing its iTR autofocus tracking for some time and there’s still a chance it’ll shine when put to use in the field (despite our initial impressions). And in the EOS-1D X Mark II, Dual Pixel AF makes its debut in full-frame format. This not only offers fast, precise, and decisive AF in video, but also accurate and quick AF in Live View for stills shooting, albeit of static subjects, without the need for lens-specific calibration, ever.

    The second area in which the EOS-1D X Mark II could raise the bar is workflow. The 1D X II features a series of improvements that could make Raw shooting much easier to incorporate into a high-speed press photography workflow. Equally if it helps stills-focused photojournalists to shoot effective video clips, it could prove to be much more of a breakthrough than it initially seems.

    It’s this second aspect that caught Stead’s eye: ‘Everything seems designed to help get the images out of the camera and onto the wires as quickly as possible, without the need for a computer – whether you’re a JPEG or Raw shooter. It looks like the perfect sports/wire service camera.’

    Articles: Digital Photography Review (dpreview.com)

  • McSki: Lovin’ It at a Ski-Through McDonalds in Sweden

    [ By Steph in Destinations & Sights & Travel. ]

    mcdonalds ski

    You barely have to stop on your way down the slope to grab a burger and fries at the McDonalds ski-through window, located on a popular resort in northwest Sweden. The location has been open since the mid-‘90s and can seat 140 people inside, though most seem to choose the grab-and-go option. Why bother taking off your gear when you can just chow down and then hop right back on the lift?

    mcdonalds ski through 2

    mcdonalds ski-through 3

    mccdonalds ski-through 4

    Meanwhile, in the small Swedish town of Pitea, locals get only four hours of sunlight a day in the winter, with temperatures hovering around minus 60 degrees Fahrenheit. That means most residents use snowmobiles to get around, leading to bizarre scenes like the one pictured below.

    mcdonalds ski-through

    As weird as the McSki McDonalds might be in comparison to the ones in your neighborhood, it doesn’t even break the top 10 most bizarre locations of the fast food chain around the world. In addition to the world’s largest McDonalds, a UFO-shaped location and a brandless, minimalist ‘Quarter Pounder’ experiment in Tokyo, there’s the rotting carcass of a ‘McBarge’ floating in an inlet in Canada.

    Share on Facebook


    [ By Steph in Destinations & Sights & Travel. ]

    [ WebUrbanist | Archives | Galleries | Privacy | TOS ]


    WebUrbanist