Blog

  • Delayed: Nikon Japan pushes D500 to end of April

    Nikon shooters have waited a long time for a D300S replacement, and it appears that they’re going to have to keep waiting a little longer. Nikon Japan has released a statement (in Japanese) pushing the D500’s initial March release back to late April 2016. Nikon cites high demand for the camera as the cause of the delay. It seems that the D500’s battery grip and WT-7A wireless transmitter are also delayed.

    Come April, the D500 will be available for $ 1,999.95 body only or with the 16-80mm F2.8-4E ED VR lens for $ 3,069.95.

    Articles: Digital Photography Review (dpreview.com)

  • Panasonic and Fujifilm reveal joint sensor development, offering global shutter

    Cross-sectional image of conventional Back Side Illumination (BSI) CMOS sensor compared to Panasonic’s Organic Photoconductive Film (OPF) sensor. (Image courtesy of Panasonic.)

    Panasonic has announced that it has developed a new sensor using Organic Photoconductive Film (OPF), developed by Fujifilm, that is capable of recording a much wider range of tones (up to 3 EV greater dynamic range) than current silicon-based sensors, and in which each pixel is read out simultaneously to effect a true global shutter.

    We first heard about this collaboration back in 2013, and it appears that the companies have made progress during that time. Similar to InVisage Quantum Film technology, the OPF sensor employs a thin, light-sensitive film on top of CMOS silicon circuitry. Panasonic says that the separation of the light conversion medium and electronic charge storage removes some design trade-offs that need to be made with conventional CMOS designs. The design allows for a larger active pixel area that makes it 1.2x more sensitive to light than normal photodiodes. Decoupling the photoconversion and storage areas also allows for the ability to store more total charge (higher full well capacity), resulting in 10x, or 3 EV, greater dynamic range. 

    Additionally, the OPF layer is only 0.5 microns thick, or four to six times thinner than silicon photodiodes that are typically 2-3 microns in depth. According to Panasonic this expands the incident angle of light that can be collected to 60 degrees, compared to 30-40 degrees for conventional silicon sensors, which should allow greater flexibility in lens design. It should also help reduce false color and vignetting.

    In addition to better sensitivity and dynamic range, the new technology brings other benefits as well. In particular, the OPF-based sensor will provide global shutter, by allowing all pixels to be exposed essentially at the same time by turning on and off the entire photosensitive area at once. The net effect is that all the lines of the sensor are essentially exposed simultaneously, as opposed to line-by-line as is the case with traditional ‘rolling’ electronic shutters. This helps avoid the dreaded ‘jello effect’ often seen in video, or the distortion of fast moving objects. It also helps avoid flickering and banding with artificial light sources, which with a ‘rolling’ shutter otherwise result in different rows on the sensor being exposed while the pulsating light source is on vs. off.

    When combined with Panasonic’s historical strength in video-oriented products this will likely get the attention of the videography crowd. The potential benefits don’t stop there though. Panasonic has also developed a method of recording sequences of images at slightly different exposure values, that it calls Variable Sensitivity Multiple Exposure Technology. The process can track the direction of motion in the scene by tracing the subject as it moves across the scene becoming gradually darker from one frame to the next. If the camera knows it applied less exposure to the second frame than to the first, it can determine in which direction the subject is moving and at what speed. This could be of great assistance to AF algorithms.

    The company is not absolutely clear about what practical uses it will put this new sensor to, but says ‘We expect this technology to be used widely in motion capture applications and also extend to other applications that have been thought to be difficult to realize unless high saturation global shutter or variable sensitivity multiple exposure.’ Panasonic is also developing a system for using cameras that replace wing mirrors in cars, and this technology will probably see the light of day in that area first, but the lessons learned will be very useful for its regular camera business. 

    Press release:

    Panasonic develops 10times Higher Saturation & Highly Functional Global Shutter Technology by controlling of Organic-Photoconductive-Film on CMOS Image Sensor

    Osaka, Japan – Panasonic Corporation today announced that it has developed a new highly functional global shutter[1] technology for CMOS image sensor using organic photoconductive film (OPF)*1. This technology enables to capture high speed moving object up to 10 times brighter*2 scene in global shutter mode. In OPF CMOS image sensor, charge-storage function and photoelectric-conversion function can be set independently. By utilizing the unique feature of OPF CMOS image sensor, this technology solves the degradation of saturation signal[2] in conventional image sensor with global shutter function. Motion direction can be detected from acquired object’s signal level in one picture by fine control of shutter sensitivity by changing applied voltage to OPF which is hardly realized by conventional CMOS image sensors.

    The newly developed highly functional global shutter technology contributes to high speed image sensing of moving objects without image distortion which appears in conventional shutter operation under very bright scene. We expect this technology to be used widely in motion capture applications and also extend to other applications that have been thought to be difficult to realize unless high saturation global shutter or variable sensitivity multiple exposure.

    The new technology has the following advantages.

    1. Wide incident angle (60 degrees), high sensitivity, high saturation and highly-functional circuits due to a unique feature of OPF, in which an OPF for photoelectric-conversion and a readout circuits are independent.

    2. High saturation signal up to 10 times larger*3 than conventional image sensors with global shutter function due to Photoelectric Conversion Controlled Global Shutter Technology.

    This development is based on the following new technologies.

    1. CMOS Image Sensor Design Technology, in that, an OPF photoelectric-conversion part and a circuit part can be designed independently.

    2. Photoelectric Conversion Controlled Global Shutter Technology that is realized by controlling of organic photoconductive film sensitivity.

    3. Variable Sensitivity Multiple Exposure Technology which can detect the motion and its direction by changing image capturing sensitivity in each frame.

    Panasonic holds 60 Japanese patents and 41 overseas patents (including pending) related to this technology.

    Panasonic will present part of the research at the international conference ISSCC (International Solid-State Circuit Conference) 2016 which is to be held in San Francisco, USA on January 31 to February 4.

    Notes:

    *1: We are using an organic photoconductive film (OPF) that FUJIFILM Corporation has developed.

    *2: Saturation signal per pixel area, compared with conventional silicon based CMOS image sensor with global shutter function.

    More on the Technology

    1. The OPF CMOS Image Sensor Design Technology, in that, photoelectric-conversion part and a circuit part can be designed independently.

    The conventional image sensor consists of a silicon photodiode for capturing light, metal interconnects and an on-chip micro-lens. And, both a photoelectric-conversion function and a signal charge-storage function are executed by a silicon photodiode. On the other hand, in an OPF CMOS image sensor, a photoelectric-conversion function is executed by an OPF, instead of a silicon photodiode, and a signal charge-storage function is executed by circuits beneath the OPF. Both functions are almost independent, so an OPF CMOS image sensor can achieve the following features.

    Expansion of the incident light range to 60 degrees and reproduction of faithful color.

    An OPF with high optical absorption coefficient[3], instead of a silicon photodiode, is adopted, the thickness of an OPF has been reduced to just 0.5 microns, four to six times thinner than silicon photodiodes. Since the conventional silicon photodiode needs at least 2 – 3 microns in depth, the range of incident angles was limited to around 30 – 40 degrees. An OPF, achieved with the OPF CMOS image sensor technology, has enabled the expansion of this range to 60 degrees, efficiently utilizing light entering at an angle for faithful color reproduction with no color mixing. It also gives greater flexibility in lens designs, facilitating the reduction of overall camera size.

    Boost of sensor sensitivity by 1.2 times compared to conventional silicon image sensors to deliver clear images, particularly in dark conditions.

    The transistors and metal interconnects in each pixel, fabricated using Panasonic’s semiconductor device technology, are coated with an OPF. The area of the light receiving section becomes limited in conventional image sensors because of the existence of metal interconnects and the need to form a light shield film to prevent light incidence into areas other than the photodiode in each pixel. However, an OPF CMOS image sensor technology coats the sensor with an OPF, which can harvest all the light received on the sensor. This unique structure and high quantum efficiency of OPF boosts sensor sensitivity by 1.2 times compared to conventional silicon image sensors to deliver clear images, particularly in dark conditions.

    Cross-sectional image of conventional Back Side Illumination (BSI) CMOS image sensor and OPF CMOS image Sensor

    Design of OPF and circuits completely independent and realization of high-performance (high-saturation)

    In the architecture of an OPF CMOS image sensor, the OPF, that converts light into electric signals, and the circuits, that store electric signal charges and readout electric signals, are designed completely independently. Therefore, by selecting an OPF, photoelectric-conversion characteristics, wavelength, sensitivity, etc., can be set with flexibility.

    Moreover, in conventional image sensors, it is necessary to place both a silicon photodiode and circuits (transistors and capacitors) on silicon substrate in each pixel, so an area of circuits is limited. On the other hand, in an OPF CMOS image sensor, it is not necessary to place a silicon photodiode, so high-performance circuits, such as high-speed or wide dynamic range[4], can be formed on a silicon substrate.

    In particular, in an OPF CMOS image sensor, by providing a large capacitor for storing signal charge, a saturation value[2] of electric signal can be significantly increased from conventional image sensors.

    2. Photoelectric Conversion Controlled Global Shutter Technology that is realized by controlling of organic photoconductive film sensitivity.

    Conventional CMOS image sensors with global shutter function require storage located near photoconversion area which makes it difficult to simultaneously shrink the pixel size and enlarge the saturation signal. Developed “Photoelectric conversion controlled global shutter technology” realizes shutter function by controlling of photoelectric conversion efficiency by only modulating applied voltage to OPF, without additional in-pixel circuit and no degradation of saturation signal. And developed “high saturation pixel technology” by pixel gain switching operation can capture under extremely bright scene, up to 10 times or more saturation signal per unit square pixel than conventional CMOS image sensor with global shutter function. This technology will solve imaging problems caused by rolling shutter distortion, flash bands[5] and LED flickers[6] in very bright scene.

    Comparison of Global shutter pixel structure

    3. Variable Sensitivity Multiple Exposure Technology which can detect the motion and its direction by changing image capturing sensitivity in each frame.

    Conventional multiple exposure cannot detect the direction of motion because the capture sensitivity is fixed. Panasonic have developed “variable sensitivity multiple exposure technology” by controlling the voltage applied to OPF with elapse of time, which is hardly realized in conventional silicon based image sensor. We can get several images of different exposure time and different exposure sensitivity in one picture that enables character recognition by choosing optimum exposure time, so direction of motion can be detected by acquired object’s signal level. This technology enables sensing of moving object detection and motion directions.

    Technical Terms:

    [1] Global shutter

    Shutter operation which can capture the image at the same time in all pixels.

    Ordinary CMOS image sensor operates in rolling shutter mode in which exposure and shutter operation is executed row by row.

    [2] Saturation/Saturation signals

    Maximum amount of electric signal that can be handled by image sensors. Receiving a signal greater than this value leads to highlight clipping.

    [3] Optical absorption coefficient

    A constant value that indicates how much light is absorbed into a material, when incident light enter to the material.

    [4] Dynamic range

    Range of brightness that can be captured. (the ratio between highest and lowest signal can be captured by image sensor)

    [5] Flash band

    stripe shaped contrast appears in captured image, because light flashes during image sensor capture the image row by row pixel (rolling shutter operation).

    [6] LED flicker

    Imaging phenomenon resulting in incomplete image capture, caused by a LED’s (traffic, headlights, signs, etc.) frequency and a camera’s imaging speed.

    Captured images of rotating propeller by different shutter mode

    Multiple exposure images by Variable exposure time and sensitivity

    Articles: Digital Photography Review (dpreview.com)

  • ‘We want to make lenses that can be used forever’: Sony engineer discusses G Master lenses

    ‘We want to make lenses that can be used forever,’ says a senior engineer behind Sony’s new G master lenses. At the launch of the ‘G Master’ range of high end lenses, we spoke to Motoyuki Ohtake, Distinguished Engineer in Sony’s Lens Design Department about the process and the philosophy behind the latest lenses.

    The development process series involved re-thinking several parts of the design and manufacturing process, he says.

    Motoyuji Ohtake, Distinguished Engineer, Opto Design Department, Core Technology Division, Digital Imaging Business Group at Sony.

    To understand how the lenses came about, he explained the usual process of lens development. ‘Sometimes we propose a new lens but often it comes from the product planning department [the marketing department that assesses potential requirements and demands]. We then make a series of rough designs, some are big, with high optical performance, others are more compact but maybe not so optically strong. We discuss which design to proceed with, based on what we think is the optimal balance or cost, performance and size to make the perfect product.’

    After deciding which of the initial designs to pursue, there’s a great deal of collaboration between teams, he explains: ‘we work with the mechanical team, the lens motor team, the lens control team, the lens element team and maybe the equipment team who will have to prepare the manufacturing process.’ Each of these team feeds its expertise into the design. ‘Maybe the optical team proposes a new lens design and the motor team tells us which motor is best. Or warn us if the focus will be too slow. They feed back about the mechanical aspects,’ he says.

    The G Master series required many of these teams to re-think their parts of the process, from design to manufacture.

    Re-thinking basic assumptions

    ‘For the G Master lenses we decided we would assess the spatial frequency at 50 lines per mm,’ says Ohtake: ‘Usually lens makers, including ourselves, evaluate lenses at 10 and 30 lpmm (or 10, 20 and 40 for Carl Zeiss-branded optics).’

    ‘At the start of the process we all agreed we should change the spacial frequency [to a more challenging target],’ he says: ’but which is best to get good performance? We could design for 100 lpmm but the lens would become very bulky and long – which might not be a very practical lens. A balance of the size and the optical performance was very important.’

    The target of 50 lpmm wasn’t dictated by the company’s 40MP camera or 4K video, he says. ’All our FE lenses were designed for at least 40MP. Because we have an image sensor team within Sony, we get to see the sensor roadmap, so we’ve been designing for this all along with FE. With the G Master we’d like to make lenses that can be used forever.’

    A focus on bokeh

    But it’s not just the more stringent frequency assessment that was developed for the G Master lenses, Ohtake explains: ‘We had to discuss what good bokeh means. We have some designers from Minolta who understand that the spirit of the ‘G’ lenses was good bokeh in the background but we had no way to evaluate that.

    ‘We looked at what is considered good bokeh and how it affects not just the background rendering but also the transition from perfectly sharp to out-of-focus regions. We developed a way to evaluate bokeh and were able to make a simulation. This meant we didn’t have to build a lens to see how it performed, we could now computer model it before taking a design too far.’

    This is a significant change, Sony says, as it means bokeh can be one of the primary design considerations, rather than being something that can only be adjusted later in the process, once the main aspects of the design have been settled upon.

    Another piece of the puzzle – shape and smoothness

    This analysis of the factors that affect bokeh showed that both the precision of the lens molding and the smoothness of the lens surface could have an effect.

    ‘Traditionally it was very hard to achieve both: current technology gives a roughness on the scale of 20-30nm on the aspheric surface. Improving this usually involved polishing, which can then lead to the lens element being slightly unevenly shaped.’

    ‘We developed a new way of making the lens element and a new molding process, including a new machine. Now we can get roughness down to around 10nm and get a more accurate shape to the aspherical surface.’

    AF technologies

    Ohtake wouldn’t budge when we asked which his favorite lens was, but immediately reached for the 85mm F1.4 when we took this group shot.

    The first three G Master lenses use three different AF motor technologies between them – emphasizing Ohtake’s point that different technologies work better in different contexts.

    The 24-70mm F2.8 uses a Direct Drive SSM system (piezoelectric element). This is very fast, very quiet and very precise. We used a linear motor for the 24-70mm F4 but this lens has a heavier focus element, so direct drive was a better choice.

    The focus element in the 85mm F1.4 was even heavier, however. ‘For the 85mm we use a ring type focus motor. This is very good for heavy lens elements and our lens software team developed a good algorithm so that it works well with contrast-detection autofocus’ (a traditional weakness for ring-type designs).

    Finally, the 70-200mm uses a combination of a linear actuator and a ring-type focus motor. ‘The focus group had become too heavy so we separated the two focusing lenses. One is very heavy, so we used a ring type motor for that one, then used a linear motor for the other. The ring type is used to quickly achieve approximate focus and the linear motor is used for the high precision aspect.’

    Still correct to optically correct

    Discussing the idea that bokeh and sharpness have previously been in conflict, we asked Ohtake about other trade-offs. We’ve been told that the ability to correct lateral chromatic aberration in software makes lens design easier, since you don’t have to correct it optically, which can quickly complicate the lens design and detract from other parameters.

    Not for G Master lenses, he explains. ‘Light doesn’t separate nicely into red, green and blue’ (the color channels that most cameras capture, and which can be adjusted, relative to one another, to correct lateral CA). It’s a continuum with each wavelength being displaced slightly differently. ‘To get the really high contrast we wanted in G Master, we had to suppress it in the lens.’

    The future of APS-C

    We also asked Ohtake about Sony’s APS-C lenses for E-mount. His team likes designing APS-C lenses, he says: ‘The focus elements are light, so it’s easier to design. We have all these focus motor technologies in-house and we’d like to try them in APS-C lenses if that’s what the Product Planning team says is required.’

    Articles: Digital Photography Review (dpreview.com)

  • Leica T firmware version 1.5 update adds Wi-Fi Direct feature

    Leica has released firmware version 1.5 for the Leica T, adding Wi-Fi Direct functionality for transferring images wirelessly. After updating, Leica T owners can set up a mobile hotspot through which images are shuttled between the camera and an iOS mobile device running the Leica T app. In addition, firmware 1.5 speeds up the camera’s wireless reconnection with known networks and improves reconnection reliability.

    The Leica T for iOS app is available from iTunes. The new firmware version 1.5 update is available through the Leica T website.

    Via: Leica Rumors

    Articles: Digital Photography Review (dpreview.com)

  • How to Create Strong Compositions Using Color Contrast

    Color contrast and composition

    When I wrote about making dramatic images using shadow and contrast, a reader rightly pointed out that a couple of my photos were also good examples of color contrast.

    This is interesting because it shows how two photographers can look at the same scene, and see different things. In those examples I saw textures, shadows, and tonal contrast, and instinctively converted them to black and white. But another photographer might place more importance on the strong colors, and make them the centre point of the composition.

    Here’s the first of those images. The color contrast here is between the orange car and the blue sky.

    Color contrast and composition

    If you look at a color wheel, used by artists and graphic designers to show the relationships between colors, you will see that orange and blue are on nearly opposite sides. They are said to be complementary colors (as opposed to analogous colors, which are close to, or next to each other on the wheel).

    Color wheel

    Diagram by Wikipedia contributor Jacobolus

    Using contrasting colors in a composition nearly always results in a strong image. The key is to keep the composition simple, and not to overwhelm it with too many hues.

    Here are a couple more examples. The first shows dramatic red stripes on a lighthouse against a dark blue sky (I used a polarizing filter to intensify the colors). Red and blue are also nearly opposite on the color wheel.

    Color contrast and composition

    The second shows red flowers, against a green background.

    Color contrast and composition

    These three color combinations – orange/blue, red/blue, red/green – occur a lot in both natural and man-made environments.

    Below is the second photo from the earlier article, mentioned above. It uses a different type of color contrast. The green apples are displayed against a grey background. The lack of color in the background makes the green of the apples seem more intense than it is in reality.

    Color contrast and composition

    This technique of placing a colored object against a dark or neutral background is another that you can use over and over. It’s very effective. Here are two more examples.

    The first shows a work created by artist Chris Meek. The grey background emphasises the yellow paintwork, the only strong color in the image.

    Color contrast and composition

    Image used with the permission of the artist

    The second shows a display of pumpkins. The dark grey background emphasizes the intensity of the orange hues.

    Color contrast and composition

    The key here again is to keep the composition simple. Imagine each of the previous examples with a splash of red in the image somewhere. The red would pull your attention away from the dominant colors, and diminish the impact of the composition.

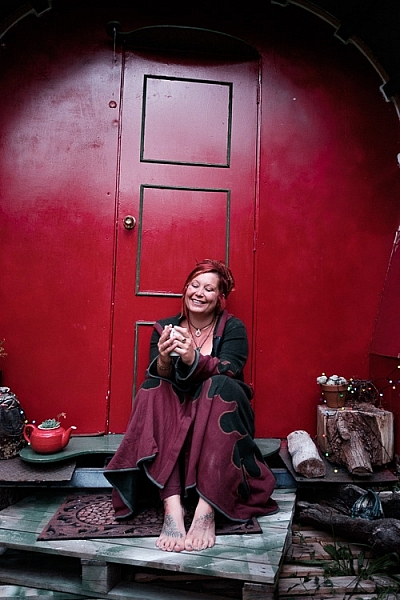
    Another approach to using color contrast is to look for scenes with a limited color palette. Here’s an example – the image below is a portrait of a friend of mine, sitting in front of a gypsy caravan, that she made herself. The image is full of color, but they are mostly shades of two different hues – red and green, which we know are near opposites on the color wheel.

    Color contrast and composition

    Here’s another example. It’s a colorful image, but again there are two dominant hues – blue and red. The incongruity of the plastic sleeves the chef is using to protect his arms, combines with the color contrast to make a strong composition. The colours are more muted than the earlier examples with this color combination, but it still works.

    Color contrast and composition

    The images in this article have several things in common: strong use of color (in different ways), simple composition (simplicity often equals strength in design), and good observational skills.

    It is is one thing to analyze these things in photos, it is another to train yourself to see them. To do so, you really have to think about the scene in front of you. What colors do you see? Does the light suit the subject? How can you simplify the composition to make those colors stronger? If you can figure out the answers to these questions, your images will be stronger.

    Do you have any questions about color contrast, or any photos to show us? Please let us know in the comments below.


    Mastering Composition

    Mastering Composition ebook by Andrew S. GibsonMy ebook Mastering Composition will help you learn to see and compose photos better. It takes you on a journey beyond the rule of thirds, exploring the principles of composition you need to understand in order to make beautiful images. You’ll also learn how to use colour to create photos like the ones in this article. Click the link to learn more or buy.

    googletag.cmd.push(function() {
    tablet_slots.push( googletag.defineSlot( “/1005424/_dPSv4_tab-all-article-bottom_(300×250)”, [300, 250], “pb-ad-78623” ).addService( googletag.pubads() ) ); } );

    googletag.cmd.push(function() {
    mobile_slots.push( googletag.defineSlot( “/1005424/_dPSv4_mob-all-article-bottom_(300×250)”, [300, 250], “pb-ad-78158” ).addService( googletag.pubads() ) ); } );

    The post How to Create Strong Compositions Using Color Contrast by Andrew S. Gibson appeared first on Digital Photography School.


    Digital Photography School

  • Wearable Skylines: Architectural Rings Wrap Up Global Cities

    [ By WebUrbanist in Art & Sculpture & Craft. ]

    architecture wrapping cityscapes

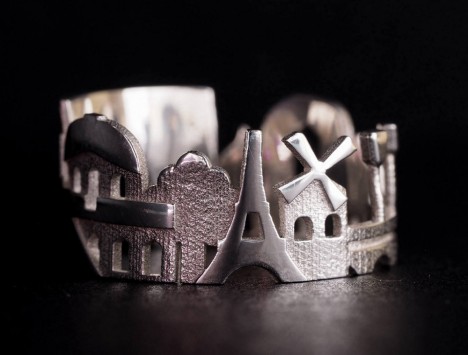
    Jewelry for urbanists has taken a new turn with these silver, gold and platinum cityscapes, each featuring iconic buildings, monuments and landmarks from major metropolitan centers around the world.

    architectural ring collection

    Ola Shekhtman, a goldsmith from North Carolina, has crafted rings around cities including San Francisco, Boston, New York City, Paris, Amsterdam, Stockholm, Berlin and Hong Kong, selling them online via Etsy.

    architecture finger jewelry

    Growing up in Siberia, Ola wanted to travel the world, eventually visiting London and San Francisco before moving to New York.

    architecture silver gold rings

    With the help of 3D-modeling software, she created this series to capture the spirit of places she has been and those she yet wishes to visit. Buyers can likewise decide whether to pick places they live, favorite past points of travel or goal-oriented rings for desired future destinations.

    Share on Facebook


    [ By WebUrbanist in Art & Sculpture & Craft. ]

    [ WebUrbanist | Archives | Galleries | Privacy | TOS ]


    WebUrbanist

  • Game Changers: How to Take Your Photography to the Next Level

    The other day, one of the students I was mentoring asked me a really interesting question, “How do I take my photography to the next level?” The conversation that followed was the inspiration for this article.

    Photograph subjects and experiences that you love, in a way that is unique to you

    Air 39

    “The artist sees what others only catch a glimpse of.” – Leonardo da Vinci

    When you photograph the things you love, you will always be excited and inspired. If you are excited and inspired by something, you are naturally going to want to spend more time doing it. The more time you spend doing something, the better you become at it.

    I spent the first half of my career focusing on fashion photography, because I thought that was what I should be doing. I was okay as a fashion shooter, but to be 100 percent honest, I never really got the whole fashion world, and it didn’t consume me like it does the best fashion photographers in the world. The photographers who excel in this genre live and breathe fashion; some of them are fashion.

    It wasn’t until I started to focus more on portraits, and travel lifestyle photography, that I really fell head over heels in love with photography. I’d finally found my “thing”! I could happily shoot portraits or travel lifestyle images all day long. I felt energized, and on a high after each shoot. I was always exhausted after shooting fashion.

    Are you photographing the things you really love? Is this work making you feel excited and energized, or depleted and flat?

    The way we see and experience life is something that is unique to each of us. If you want to take your photography to the next level, focus on photographing the things that matter to you, in your own world, and in a way that is unique to you. This is the one thing that will set you apart from all the other photographers.

    Passion, not perfection

    Contender final 1

    If passion and perfection had an arm wrestle, passion would win every time. Why? Because the thing that makes photography great, is the way it makes us feel. If there is no passion in an image, and it doesn’t inspire a reaction, then it’s just a snapshot.

    If you want to take your work to the next level, show your passion for your work.

    Given a choice to shoot a photo that was technically brilliant, sharp, correctly exposed, and perfectly composed, yet void of emotion – or an image that was a bit rough around the edges, slightly soft, grainy, with a few blown highlights but captured the feeling – I would choose the latter every time.

    Don’t just focus on what something looks like, focus on how it feels.

    Technique, not gear

    Gear 05

    Michael Schumacher is the best F1 driver in history. If he were to challenge me to a race, and I drove a Ferrari and he drove a 1981 Toyota Corolla, he would still win. Why?

    Schumacher is a master, who has spent years driving. He knows how to drive fast, and take corners at high speed, without rolling the car. He would probably lap me three times before I’d even had a chance to get out of third gear. In the wrong hands, the best gear in the world is useless, if you don’t know how to drive it.

    So many photographers get hung up on the notion that having the right gear will make them better photographers. While it’s true that the right gear will give you a better quality image, it’s not going to guarantee that you will be a better photographer.

    Instead of worrying about the gear, focus on the technique. It’s what you do every day that makes you great; not what you use every day. Dedicating as few as thirty minutes a day to your photography, every day, will do more to improve your skills and develop your style than owning all the high end gear in the world.

    Learn to peel potatoes before you cook a soufflé

    Last supper

    Fat Tony & Co/Nine Network Australia

    During the first few years that I was building my photography business, I had a night job working as a cook in an Italian restaurant. When you train to become a cook, you must master a task before you are allowed to move on to the next one. The first task each apprentice cook must master is peeling potatoes. Then they move on to the salads, entrees, pasta, steaks, and seafood. The last thing I was taught to cook was one of the most technically difficult dishes, the soufflé.

    The photographer who attempts a complicated studio shoot right after buying his or her first camera, is like the apprentice cook who walks into a kitchen and insists on cooking a soufflé on their first day.

    Taking a stepped approach to learning, will take your photography to the next level much faster than trying to learn it all at once. Many photographers will try complicated shooting or lighting styles, then become frustrated because their images are not working out the way they had hoped.

    Master peeling potatoes first. It’s definitely a game changer!

    FOG11FS 166

    Ask for help

    Putting their work out there, is something that many photographers struggle with. Yet, seeking and implementing constructive criticism is one of the fastest ways to take your photography up a few notches.

    The fear of ridicule or criticism prevents some from sharing their work. This is really sad, because many of the fears people may have are imagined. FEAR is an acronym for False Evidence Appearing Real, it’s our mind trying to keep us small. When you create beautiful art, and you don’t share it with the world, you deny so many people the opportunity to experience beauty.

    If you are ever in doubt, take Mother Nature as an example of best practices for artists. Every day she puts her work out there – sunset, sunrise, storms, sunshine, and rainbows. Some are absolutely spectacular. Other times, her art can be mediocre, yet she puts her work out there every day for us to enjoy.

    Other ways you can ask for help:

    • Join a photography group
    • Find a mentor
    • Attend a workshop where your work can be critiqued by an expert whose work you respect

    Confidence

    Ecove Hyde15 2977

    “Whether you think you can, or you think you can’t–you’re right.” Henry Ford

    You can read books, take courses, and listen to podcasts until the cows come home. But if you don’t have self-confidence, it will be very difficult to take your work to the next level.

    Confidence is knowing that you’ve done the hard work and put in the hours, and can now turn up and nail the shot.

    Many photographers and artists really struggle with confidence. It may be due to old programming from a lifetime of being told they weren’t good enough, of having the people they spend the most time with not offering enough support, or a hundred other reasons, all of which undermine a person’s self-esteem.

    Look for ways to improve your self-confidence. Spend more time with people who value and respect what you do. Find ways you can get rid of destructive self-talk.

    The good news is that self-confidence can be trained, just like a muscle in the gym. Gaining self-confidence and self-belief is, by far, a major game changer. It will help take your photography to the next level.

    Do you have a strategy that I might have missed? What techniques have you used to take your work to the next level? I’d love to hear your thoughts.

    All images: Copyright Gina Milicia


    fastflash_bookIf you want to learn more about using flash for creating portraits, pick up Gina’s brand new dPS ebook: Fast Flash for Portrait Perfection. Now on sale for an introductory price for a limited time only.

    googletag.cmd.push(function() {
    tablet_slots.push( googletag.defineSlot( “/1005424/_dPSv4_tab-all-article-bottom_(300×250)”, [300, 250], “pb-ad-78623” ).addService( googletag.pubads() ) ); } );

    googletag.cmd.push(function() {
    mobile_slots.push( googletag.defineSlot( “/1005424/_dPSv4_mob-all-article-bottom_(300×250)”, [300, 250], “pb-ad-78158” ).addService( googletag.pubads() ) ); } );

    The post Game Changers: How to Take Your Photography to the Next Level by Gina Milicia appeared first on Digital Photography School.


    Digital Photography School

  • Portrait time: Sample gallery from Sony’s new 85mm F1.4 GM lens

    After Sony showed off its a6300 and trio of new lenses, our staffers were able to grab an a7R II and start shooting. Above we’ve put together a small selection of images taken with Sony’s new 85mm F1.4 GM portrait lens. 

    $ (document).ready(function() { SampleGalleryV2({“containerId”:”embeddedSampleGallery_2269056192″,”galleryId”:”2269056192″,”isEmbeddedWidget”:true,”selectedImageIndex”:0,”startInCommentsView”:false,”isMobile”:false}) });
    Articles: Digital Photography Review (dpreview.com)

  • 8 Tips to Help Make People Comfortable for Their Portrait Session

    Portrait photography is an incredibly complex subject to master. You have to worry about a variety of technical matters, including your lighting, location, time with subject, color temperatures, and your composition. In many situations you will be moving around an environment quickly and changing your lighting on the fly. It is a lot to pay attention to, and coordinate at the same time.

    Business Portrait Session

    On top of all of this, you must figure out how to make, and keep, your subject comfortable throughout the entire session. No matter how much is going right or wrong, or what is going through your head, your primary attention must always be on your subject.

    Keeping the subject comfortable and natural is an art form in itself. Obviously, it’s not always possible. Some subjects will be impossible to get through to no matter what, but most of them will rise to the occasion if you can foster the right environment. There are many different ways that portrait sessions can vary, but here is how I like to approach photographing my portrait subjects.

    1. Assess the subject’s personality

    Each subject will have a different relationship with the camera. Some will have done this before, and will be all business. Some will be extroverted and will love the attention. Some will be uncomfortable at first, but will open up easily after a little time together.

    Business Portrait Session

    The toughest group are subjects that come in incredibly uncomfortable and stiff, to them you are worse than the dentist. Seriously, there are many people that would much rather go to the dentist than to be photographed by you. These subjects will be the toughest to work with because they, “know I look terrible in front of the camera.” They know this because they know how uncomfortable they get, but they only get uncomfortable because they know they photograph badly. This is a catch 22 that you will have to scratch and claw your way out of, so to speak.

    Is your subject extroverted or introverted? Do they like to joke and talk, or are they more reserved. Are they in the middle of a busy day, or do they seem more relaxed. Do they give you a stiff smile? These are all cues that you can pick up on, to help you figure out the best way to get through to them. The better you can understand your subjects, the better you will be able to get them to enjoy working with you, and to eventually feel comfortable with you and the camera.

    2. Talk with your subject before the session

    Whenever possible, when you first meet your subject, introduce yourself first. Ask them how their day is going to get them talking, then tell them about what you will be doing together. Many subjects will have no idea what to do, or what is about to happen, and will become stiff, nervous, and awkward.

    Business Portrait Session

    Explain how the session will go, and what you would like them to do. Maybe tell them that you are looking for natural images, casual smiles, and comfortable poses. Let them know that you will tell them what to do over the course of the session, but also mention that if they have ideas that they should bring them up. Is there a way that they feel comfortable standing? Tell them to speak up. Do they want to try something? Tell them to speak up. The best shoots are ones that turn into a collaboration between the photographer and the subject.

    3. Help them pose, then change it often

    Tell the subject that you will do some posing but that you also want them to stand in a way that is comfortable for them. You can have your subjects play a part in the posing (a few will be bad at this, but most will be good). Ask them, “How would you naturally stand or lean here?” Give them a couple suggestions of what to do by demonstrating a pose. If necessary, put a few example images on your phone or tablet to show them. Keep them moving. Ask them to slightly change their pose every few shots. This will keep them fluid and comfortable, instead of stiff and standing still.

    The hands are just as important as the body pose, if not more so. If the subject’s hands feel comfortable, there is a good chance the rest of them will fall into place. Some subjects can get very stiff with the hands if you don’t give them direction. Do you want the hands in front of them, in their pockets, or crossed arms? I usually start by giving these suggestions, and asking them to place their hands in a way that they would normally stand. This often yields a very comfortable pose. Then when I have exhausted that, I will ask them to cross their arms to break them into another comfortable pose, then go from there.

    DPS_business_portraiture_2

    Changing the pose at the right times is a very important tool. The second your subject starts to look uncomfortable, get them to do something different. Change their hands or their stance. Move them to another location. Every time you break the stiffness is another chance for them to reset themselves into a comfortable pose.

    4. Tell them what they are doing right

    If your subject is doing something right, tell them! Give them positive reinforcement. Never tell them they look awkward, or they will freeze up even more. I constantly say some variation of, “This looks great” or a more specific compliment. The positivity just keeps things flowing and going in the right direction.

    If you like someone’s smile, let them know that. They will instantly feel good, and it will help them recreate that look when you need it. For a few people, when you say something like that, it will kill their natural smile. Pay attention for these people, and obviously stop saying that to them, but for many this will help them recreate that look constantly as you need it. You can say, “Give me that smile from before.” Then if they have trouble doing it, plead and beg them for it in a funny way so they feel comfortable again.
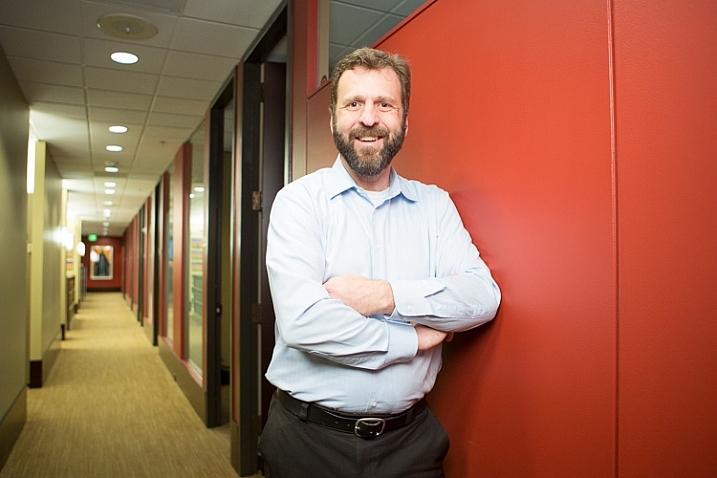
    Business Portrait Session

    You can tell subjects not to do specific things, but be careful with how you do that as it can kill your momentum. Instead of saying, “Your hands don’t look right,” say, “I think your hands might be a little better this way.” Even your constructive comments can be made in a positive way.

    5. Have conversational topics and jokes prepared

    Ask lots of questions of the subjects that do not seem to be in a rush. For the ones that need to run out of there, you can only do so much. Even for these people, I will ask a couple simple questions at the beginning, such as, “Are you from New York” or “How has your day been.” Just these alone will give them a chance to talk, and you can go from there. For most people who are not in a rush, I will go a lot further and try to hone in on a topic that of of interested to them. I find that a good conversation over the course of a session, can make the whole session much more comfortable. The more you get them talking, the more they can break out of their shell. At the very least, they will like you.

    Business Portrait Session

    You do not need to write knock-knock jokes, but think of some funny things ahead of time to talk about, or to use in situations where you are desperate. When a subject begins a session by telling me how much they hate being photographed, I try to say something like, “Well you’re going to hate me then.” A dentist joke will work as well. I then comfortably tell them that they are in good hands, and not to worry. A quick and funny comeback for something like this will make them feel like you are prepared.

    Sometimes when I need a smile, I will tell a subject to give me their most uncomfortable smile. This is only in certain moments though. I will never, ever tell the subject directly that they look uncomfortable. That is a road you do not want to go down, but I will make a joke about a stiff smile before they start trying to smile to make a point, and to make it a little humorous.

    Have them smile with their whole body. Show them the difference between a smile just with their mouth, and then one with their entire face and body. There’s a big difference between the two, and framing it in this way can explain to them what they should be doing. The shutter click is such a finite moment that it helps if they think of the session as one long video where they are moving into their smiles, and not just turning them on suddenly.

    DPS_business_portraiture_3

    Often you will have to make slight tweaks to the way a subject is posing. Having a subject put their chin up slightly can be a very good way of getting rid of a double chin, but it also ruins the spontaneity of the moment. The same thing goes when posing people in a chair. Sometimes, the most flattering way to sit is the most awkward. When I have to do any of this, after I will say something like, “Now look natural.” Just the idea of how stiff they are once you do these poses, mixed with that comment, has the frequent effect of relaxing them and bringing out a smile, even with their chin up.

    Besides that, I will have conversational topics that I try to bring up on the fly when needed, such as current events, sports, or random stories that I can think of.

    6. Use the strengths of your personality to your advantage

    Business Portrait Session

    Are you an extrovert that can charm and joke with anyone? Then you should have an easier time getting your subjects to laugh and open up, but at the same time you will need to be careful not to overdo it. By talking too much, and commanding the attention in the session, you risk stopping the subject from having their own personality show through. All your images can end up looking the same, as they are the expressions of your subjects laughing at your jokes or comments. If this is naturally you, make yourself ask questions, and stop and listen a little bit more. Making them laugh is fantastic, but it is also different from creating an environment where they feel comfortable enough to open up to you.

    Are you an introvert who gets uncomfortable trying to joke and talk with subjects that you have just met for the first time? This can actually be an advantage when you play your cards right, but this is a situation where gaining experience working with people is necessary. In this case, your advantage is your ability to listen and react. Ask your subjects questions, then play off what they say. Pay more attention to their emotions. Get them talking about interesting things that they are passionate about; have them open up that way.

    Business Portrait Session

    Still be confident and explain what you are doing, but play a more reactive role. Watch videos of other portrait photographers, both the talkative and the quieter ones, and pay attention to what they say to help you improve. Work on funny things to say that you will have in your pocket when you need them, as this will be your initial disadvantage. You will need to work more at first to be good at all of this, but after enough experience, the advantages can swing back in your favor due to your adept listening ability.

    7. Don’t show them the images while you are shooting

    Sometimes subjects will insist on seeing the images, and you will have no choice, but I always try to get out of having to show the subject the images until the end. I will often say that we can look at the images after, as a way to put them off. Having the subject look at a photo of themselves, especially if they seem self-conscious, can ruin their ability to feel comfortable later on in the session. In addition, two out of 10 shots are usually good anyway and the other eight will never see the light of day. But if they are looking at the back of that camera they will sure as heck see those eight!

    Business Portrait Session

    For the most uncomfortable subjects, often there is no chance that the photos at the very beginning will be that good. You are just going through the motions as you are trying to make them comfortable over the course of the session. There are not that many situations where the subject seeing the photo is better, unless the subject seems very comfortable from the start.

    8. Know that you can’t win them all

    You will probably lose a few. You can only do the best with what your subject gives you. Portrait photography can be stressful so always keep that in mind. You can only work with what the subject is able to give you. Do your best for all your subjecs and push and spend more time with the ones that are having trouble, but let’s be frank, some subjects are just better that others.


    fastflash_bookStrikingThePose2If you want to learn more about portrait posing and working with people, pick up one of the dPS ebooks by Gina Milicia Portraits: Striking the Pose (left) or her brand new one called: Fast Flash for Portrait Perfection (right).

    googletag.cmd.push(function() {
    tablet_slots.push( googletag.defineSlot( “/1005424/_dPSv4_tab-all-article-bottom_(300×250)”, [300, 250], “pb-ad-78623” ).addService( googletag.pubads() ) ); } );

    googletag.cmd.push(function() {
    mobile_slots.push( googletag.defineSlot( “/1005424/_dPSv4_mob-all-article-bottom_(300×250)”, [300, 250], “pb-ad-78158” ).addService( googletag.pubads() ) ); } );

    The post 8 Tips to Help Make People Comfortable for Their Portrait Session by James Maher appeared first on Digital Photography School.


    Digital Photography School

  • Mystery Oreo Vault in NYC Takes You on a Weird Tasty Trip

    [ By Steph in Design & Guerilla Ads & Marketing. ]

    oreo vault 1

    What’s behind the giant Oreo-shaped vault door mounted to a bright blue garage in midtown Manhattan? Curious passersby who decide to approach and find out for themselves will have the most authentic and rewarding answer to that question, but the rest of us can live vicariously through photos and video of this clever interactive ad installation promoting the cookie brand’s new flavor.

    oreo vault 2

    oreo vault 3

    Once you open that portal-like door, a sign greets you with this message: ‘Welcome to the Oreo Wonder Vault – Pull the lever to begin.’ Follow the directions and a box of free cookies will come sliding down a conveyer belt, delivered directly to you via slide. This time, it’s ‘Filled Cupcake’ flavor.

    oreo vault 4

    oreo vault 6

    Oreo tells Ad Week that as many as 50 prototype flavors and over 100 additional ideas can be in the Wonder Vault at any time, and it can take up to 18 months to perfect each one before it’s ready for release. “The limited edition process never stops; we have lot of flavor ideas just waiting to make their way to the world.”

    oreo vault 5

    The fun installation is located somewhere near 18th street between 7th and 8th Avenues, and appears to have already delivered all the free cookies it had to offer. The new flavor will be in stores on February 8th.

    Share on Facebook


    [ By Steph in Design & Guerilla Ads & Marketing. ]

    [ WebUrbanist | Archives | Galleries | Privacy | TOS ]


    WebUrbanist