Blog

  • End of an era: Fujifilm to discontinue FP-100C instant film

    Fujifilm Japan has announced that it is to stop production of its FP-100C instant film that enthusiasts use in old Polaroid-type cameras. The film has only been available in the 3.25×4.25in size recently, since the 5x4in version was discontinued, but it has been keeping vintage cameras clicking since Polaroid stopped production itself.

    The company says that it will halt production in spring this year, but that stocks will continue to be available for some time after that. Falling demand and sales are cited as the reasons for the ending of the product line, which also spells the end of the working life of Type 100 cameras. The company used to produce a black and white version too, but that was stopped in 2014.

    The Fujifilm FP-100 films are particularly popular with enthusiasts and professionals because they produce very good quality images, but also because a negative can be recovered, cleared and used for making prints. The film comes in a peel-apart format, and the section most people discard contains a negative that is difficult to see because it has a black coating on the outside – to prevent light getting into the pack. This can be removed with domestic bleach, and when thoroughly washed and dried a very serviceable negative can be had.

    There is a Japanese notice on the Fujifilm Global website, and the film’s data sheet is available in PDF format.

    Articles: Digital Photography Review (dpreview.com)

  • Corephotonics launches 5x zoom and low noise smartphone camera modules

    Corephotonics, a provider of computational camera solutions based in Israel has launched a new dual-camera module for smartphones called Hawkeye. Hawkeye combines a standard 13MP camera module with a second 13MP module that uses proprietary folded optics. Read more

    Articles: Digital Photography Review (dpreview.com)

  • Mosaic Murals: Tile Patterns Spray-Painted in Deserted Spaces

    [ By WebUrbanist in Art & Street Art & Graffiti. ]

    tile artwork abandonment

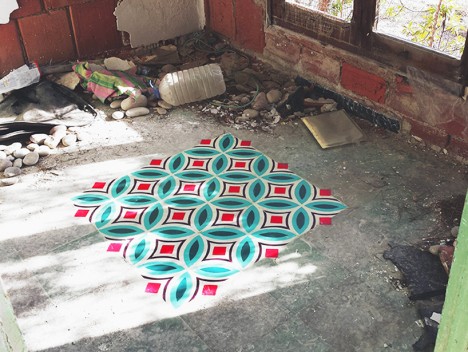
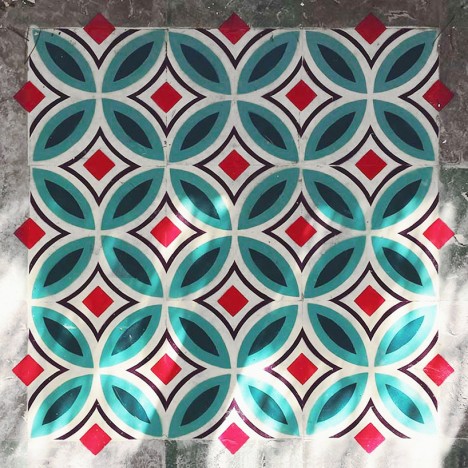
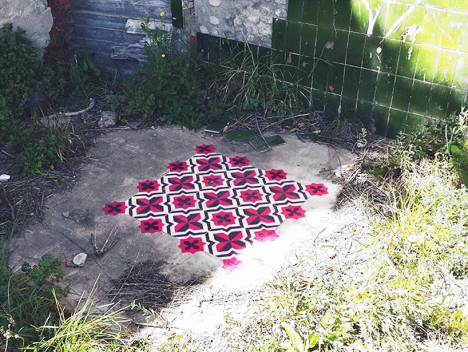
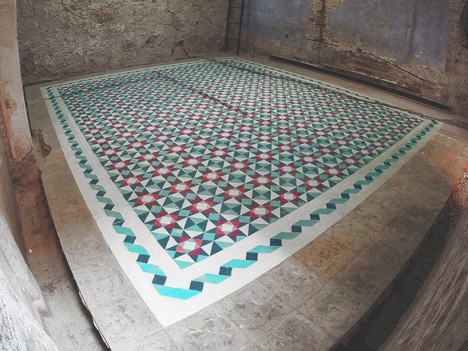
    A puzzle of layers rather than pieces, each of this spray-painted works takes aesthetic cues from historic Barcelona, deploying them in novel contexts using unexpected materials.

    tile floor spraypaint stencil

    tile finished piece

    tile in progress

    tile exposed exterior

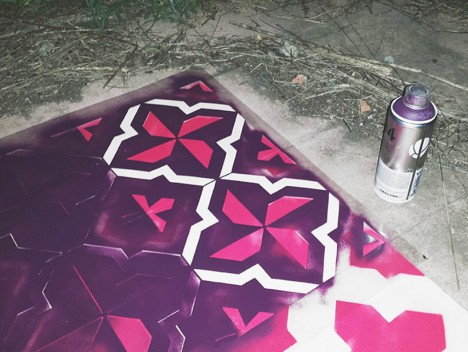
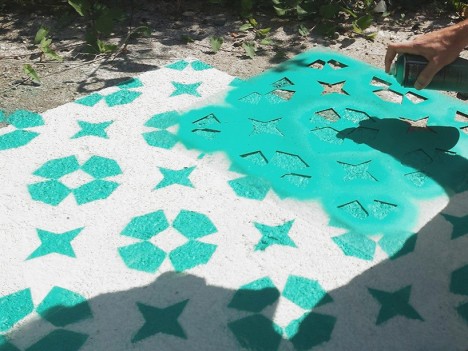
    Catalan artist Javier de Riba creates these vibrant works with stencils, one of the original tools of the street artist, bringing them to life so well they could be confused for glass or ceramic tiles.

    tile wrapping skate park

    tile curved surface stencil

    tile floor mural

    tile floor art spraypainted

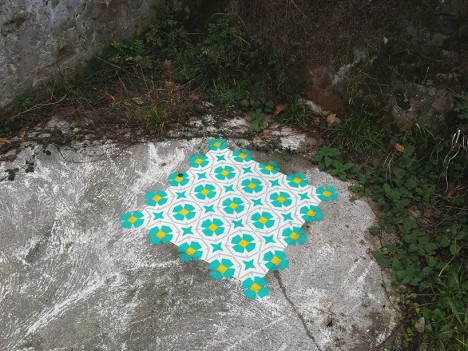
    His target locations vary, but his pieces can sometimes be found on sidewalks or the ramps at skate parks, though the floors of abandoned buildings are a popular pick. Deserted places make it easier to take time with a given work, but also add to the element of surprise when discovered by others.

    tile painting

    tile graffiti stencil outline

    tile work floor ground

    tile demolished house barcelona

    Some are composed in square frames, though many break borders and some even wrap curve surfaces or sweep across entire floors. Currently, some of his work is on display at the Miscelanea gallery in Barcelona, including a large site-specific installation.

    Share on Facebook


    [ By WebUrbanist in Art & Street Art & Graffiti. ]

    [ WebUrbanist | Archives | Galleries | Privacy | TOS ]


    WebUrbanist

  • 3 Secrets to Getting Amazing Toddler and Newborn Photos

    Newborn sibling ct heather kelly photography 001

    You are so excited about an upcoming newborn session. You can’t wait to cuddle the new baby, as you soothe them to sleep and pose them. Then you find out that the parents want to include their toddler, or even worse, toddlers! Now the excitement has changed to anxiety about throwing a toddler into the mix. Toddlers can be unpredictable, difficult to bribe, and sometimes want nothing to do with the new little person in their life.

    Take a deep breath and remain calm. You can do this! Here are my three secrets to getting amazing toddler and newborn photos:

    1. Friend the older sibling

    Newborn sibling ct heather kelly photography 002

    What are their interests?

    Remember that just a couple weeks ago, they were front and center in their parents’ lives. There have been a lot of changes, and most likely a little less attention for them.

    Talk with the parents to find out about big sister. What does she like? Does she have any favorite songs or shows? What is her favorite treat? Talk with mom and dad beforehand, and see if they are okay with a little reward. Make big sister the center of attention when you arrive. Get down on her level, tell her about yourself, and ask her questions. Have her introduce you to her new baby sister. You want big sister to trust and like you.

    Siblings make great helpers

    Toddlers are so curious, and love to help. Show them some of the hats or headbands you brought for their little sibling. Ask them to pick out their favorites. Once they are comfortable with you, it will be a lot easier to get them to listen, when you want to take a picture with their new baby sister.

    After you are done setting up, ask them to help you test out the light. If you can get them to lie down, the battle is half over. Tip: have baby all wrapped up and ready to go, before you have big sister help by being a light tester.

    Newborn sibling ct heather kelly photography 003

    Newborn sibling ct heather kelly photography 004

    newborn-sibling-ct-heather-kelly-photography-005

    2. Let the toddler rule the session

    Choices

    Now that you and big brother are friends, give him some choices. He needs to know that he is in charge. Forcing him to do something he doesn’t want to do, can backfire.

    Some choices could be:

    • Do you want to lay down on this cream rug or this blue rug?
    • Would you like your baby brother on this side or that side?
    • Would you like to kiss your brother or look at the camera?
    • Do you want the red truck or the blue car as your prize?

    Choices make big brother feel in control. If he doesn’t want to cooperate in the beginning, that’s okay. You can try again later.

    Do you want to take the picture now or come back in 5 minutes?

    Let him take a break and then you can try again in a little bit. Use this break to get some images of baby alone. After big brother has had a break, you can give it another try. Sometimes multiple breaks are needed.

    newborn-sibling-ct-heather-kelly-photography-007

    Expectations

    Tell big brother what to expect, and how long it’s going to take. Children have a much easier time if they know what to expect, and that there is an end time. You want to tell them what they’re going to do, how many pictures you’re going to take, and what happens after (the reward!).

    “We are going to take a picture of you and your baby brother for mommy and daddy. It won’t take long. I will take five photos, then we’ll be done and you can pick out your prize! I’m going to start counting. 1 – 2 – 3 …”

    Counting works great as even young toddlers can understand counting to three or five. You can take multiple photos while you draw out one number so you’ll end up with a lot more than five. With squirmy toddlers, multiple images are definitely needed. Once you hit the number, they are done.

    If you don’t think you got a useable image give them a choice of counting again or taking a break. You want it to be short and sweet so big brother is more likely to cooperate.

    newborn-sibling-ct-heather-kelly-photography-008

    3. Praise and Reward

    Praise

    After big sister has done what you have asked, give her a lot of praise. Even if all she did was make a choice to do pictures in five minutes instead of now. You asked her to make a choice, and she did. Great job big sister! It might not seem like a big win, but it will help when you try again.

    Praise and thank big sister for every little thing she does. Kids love being praised, and to know that they are doing a good job. There is no such thing as too much praise when you are trying to get a toddler to cooperate.

    Reward

    Make a toy chest or prize bin. You can add toys that your children don’t play with anymore, or find items at the dollar store. When you first meet big sister and are becoming friends, show her what you brought. Point out a few items in your prize bin, and tell her that after she takes some pictures, she’ll get to pick out any one item to keep.

    While you are praising big sister, remind her of her reward. “You are doing such a great job with your little brother. I can’t wait to see what prize you pick out!”

    You can show the prize bin during breaks. A toddler’s attention span isn’t the greatest, so sometimes they need reminding that they’ll get a prize soon. For a real challenging toddler, you can let them pick out their prize ahead of time, and put it on a shelf or with mom and dad as a reminder.

    newborn-sibling-ct-heather-kelly-photography-009

    newborn-sibling-ct-heather-kelly-photography-010

    newborn-sibling-ct-heather-kelly-photography-011

    Do you have any other tips for working with toddlers and newborns? Let us know if you try these and how you make out. Please share your results in the comments below.

    googletag.cmd.push(function() {
    tablet_slots.push( googletag.defineSlot( “/1005424/_dPSv4_tab-all-article-bottom_(300×250)”, [300, 250], “pb-ad-78623” ).addService( googletag.pubads() ) ); } );

    googletag.cmd.push(function() {
    mobile_slots.push( googletag.defineSlot( “/1005424/_dPSv4_mob-all-article-bottom_(300×250)”, [300, 250], “pb-ad-78158” ).addService( googletag.pubads() ) ); } );

    The post 3 Secrets to Getting Amazing Toddler and Newborn Photos by Heather Symes appeared first on Digital Photography School.


    Digital Photography School

  • 10 Tips for Photographing Great Headshots

    Photographing a headshot can seem like a daunting prospect. To have one person in front of your camera, looking to you for direction and positivity, is an intense environment. People are generally very critical of themselves in photographs, and feel very nervous. However, there are some simple things that you can do to make it a lot easier for everyone.

    Headshot on Black Background 1

    Here are 10 tips to help you photograph headshots:

    1. Have a pre-session consultation

    Before your session make sure you know how the images will be used and what style they would like. This can be on the phone or face to face. Talking to them, will help them relax so much more than email. This will allow you to help them prepare for the session. Make sure they know what to expect, and are as relaxed as possible.

    Headshot on White Background 1

    Find out about what profession your subject is involved in; a corporate lawyer may well opt for a clean white background look (above), while a more relaxed style of business (yoga instructor) may prefer a more colourful, environmental image (below). Find out in the consultation what they want so you are prepared on the day.

    Indoor Headshot

    2. Help them to choose the right clothes

    Generally speaking, solid, neutral colours, work best for headshots, as you want to avoid anything that distracts away from people’s faces. If it is a formal style you are looking to achieve, make sure that everyone gets the message, and remembers to bring formal work clothes with them. Men often forget their jackets, so for a consistent look, try and have a spare one on hand, even if you need to clip it at the back. If you have time with a person, get them to bring a few items of clothing. Remind them to iron their clothes as well.

    Here are some example of good clothing choices:

    What to wear

    What to wear 2

    What to wear 3

    3. Create separation from the background

    Make sure that your subject doesn’t stand too close to the background. If you are using a studio background (or wall in an office) and you stand someone close to it, you may see shadows on the wall, which makes the images look less professional. For environmental headshots outdoors, I still recommend separation from the background. The bokeh creates a nice nondescript background, especially when shot at a wide aperture. Typically I aim for an aperture of f/4 for environmental and natural light sessions, and f/8 for studio style sessions with lights.

    4. Starting the session

    Whether you are photographing headshots for a single person, or a whole team, make sure you have a general chat with each person first, to help them relax. This can be just a 10 second, confident handshake, and a “how are you?”. People generally feel very tense about having their photograph taken, and talking about something in their comfort zone (where they live, if they have children or pets, etc) will really help them appear and be more comfortable.

    5. Silly Faces!

    A great way of helping people to relax in front of the camera, if you don’t have much time with them, is to ask them to pull a funny face for the first frame. Use this as a lighting test for a new person as well. This is great at breaking the ice, and very few refuse to do it. Once they have pulled a daft face, everything else is easy!

    Funny faces

    Headshot Photography London 0997

    6. Lighting and positioning

    For business and actors’ headshots, I tend to light quite evenly. There are a few circumstances when the images are low-key, but for the main part, they are evenly lit. A classic beauty lighting setup works well, with one light above, and a second light, or a reflector filling from below.

    I ensure the subject is turned with their body 45 degrees away from the camera, and towards the main light source (if your lighting allows for this). Their face should be straight towards the camera. You may need to guide people to look straight down the lens. It’s surprising how many people look off camera, at the flash, or somewhere random.

    Headshot setup

    Posing example

    7. Sit people down

    People may be more comfortable sitting down, and by asking them to rest their hands on the tops of their thighs, it gives them something to do with their hands. It also ensures that the subjects all know where they need to be, and they don’t move around too much.

    8. It’s all about the little adjustments

    What separates a great headshot from an average one, are generally very small changes. These little adjustments can make all the difference. The slight tilt to the head, leaning forward, a gentle but intriguing smile. Don’t be afraid to ask someone to make very specific changes to their expression and position, until you get the image you’re looking for.

    Headshot Photography London 1052

    9. Keep talking and be positive

    When you’re in the midst of taking photographs, make sure that you keep talking to your subject. Reassure them that they’re doing it right, and you’re getting great images. Even if you’re not satisfied with the images when someone turns their head in a certain direction, or how the light is falling on them, never express that to your subject. Silence will kill the atmosphere, so no matter what is happening, just keep chatting and being positive.

    10. Shoot tethered

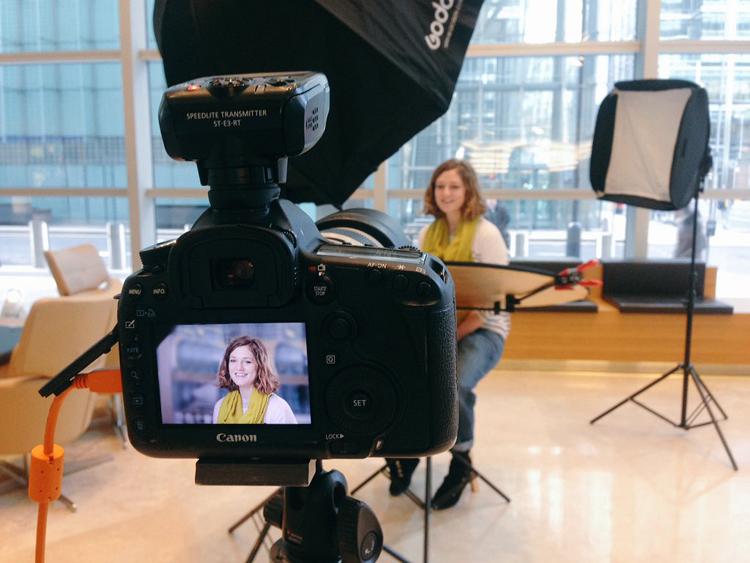
    If you have all the necessary equipment, shooting tethered is a fantastic way the get great headshots. When people see a couple of shots on the screen, they can very quickly get an idea of what needs to be changed. The immediate feedback on the screen will help everyone massively.

    I hope you find these tips for better head shots helpful. Do you have any others we missed? Please share them, and your headshot photos in the comments below.

    googletag.cmd.push(function() {
    tablet_slots.push( googletag.defineSlot( “/1005424/_dPSv4_tab-all-article-bottom_(300×250)”, [300, 250], “pb-ad-78623” ).addService( googletag.pubads() ) ); } );

    googletag.cmd.push(function() {
    mobile_slots.push( googletag.defineSlot( “/1005424/_dPSv4_mob-all-article-bottom_(300×250)”, [300, 250], “pb-ad-78158” ).addService( googletag.pubads() ) ); } );

    The post 10 Tips for Photographing Great Headshots by Sean Gannon appeared first on Digital Photography School.


    Digital Photography School

  • How to Shoot a Pine Cone Time-lapse: A Mini Tutorial

    This week over at our sister site, SnapnDeals, we have a great deal running where you can get 20% off Time-Lapse Photography: A technical and practical time-lapse tutorial guidebook for all skill levels designed to get you out the door and shooting now!

    How to Shoot a Pine Cone Time-lapseIn this lighthearted mini-tutorial we’ll take an 80/20 approach to creating a simple time-lapse of a common pinecone (in this case a Black Pine).

    For a more general introduction to time-lapse photography view: Time-lapse Photography Tutorial: An Overview of Shooting, Processing and Rendering Time-lapse Movies.

    You already know that pine cones are nature’s mysterious seed pyramids, but did you know they have a gender? Yes, there are both female and male pine cones. Did you also know that pine cones are an interesting time-lapse subject? Go get a female pine cone, and give it a shot. Let this whole male/female Nature Notes youtube revelation be your last straw, or should I say pine needle that breaks your procrastination. Here was my result:

    Here’s how to make your own pine cone time-lapse:

    Step 1. Find pine cones

    Collect some good looking pine cones (preferably female: watch the Nature Notes video above). Look for good cones in fresh condition, without rot or discoloration, uniform shape, and bottoms that provide support for upright standing. I’d grab two or three for variety, and a dog chew backup. Here’s an example of an open found pine cone.

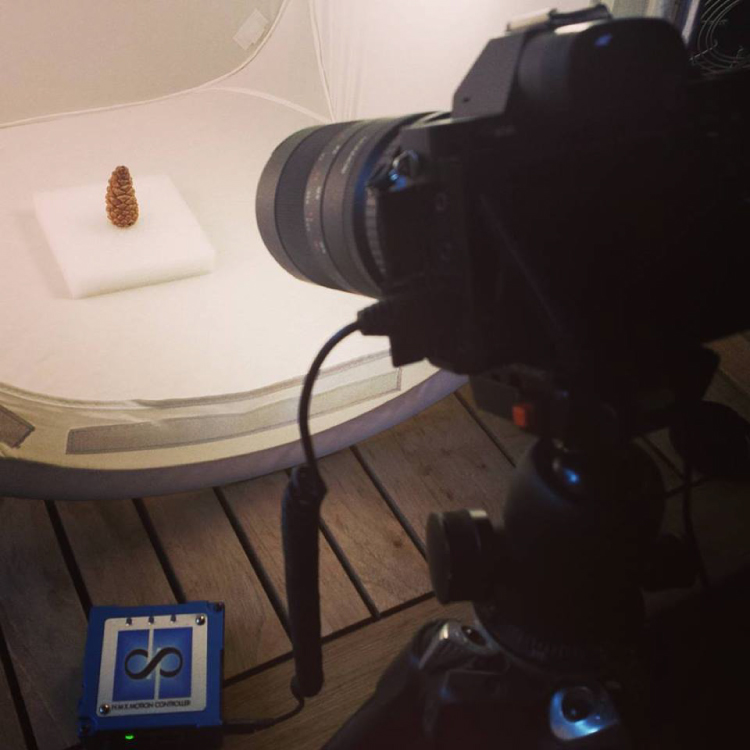
    Pinecone bts1

    Step 2. Make them close

    Pine cone motion is all about moisture, it’s a hydromorphic response. In high moisture environments pine cones close. In low moisture, over time, they open. This video showing both opened, and closed cones, with visible moisture is a perfect learning example.

    To close a cone, simply put it in a cup of water and leave it for an hour or two. That’s it.

    Step 3. Prepare for the opening shot

    Key thoughts: Steady (consistent) lighting, simple background, camera position, power. Let’s take these one by one.

    Steady light: Light fluctuations in a sequence of time-lapse images are bad, as they create unappealing bright and dark frames in the rendered movie, better known as time-lapse flicker (learn much more about that here). Chose a room that you can cordon off for a day or so to prevent disturbances, and block all light from any windows. Move any light sources near the photo white box, to provide a constant uniform brightness, then adjust their positions to eliminate shadows.

    Background: Completely up to you creatively. I chose a minimal white background, using a simple inexpensive white box. By slightly overexposing each shot, you can effectively eliminate almost all appearances of a background.

    Camera position: Choose one or more angles from which to shoot. I chose first, a front downward angle, and a second fully vertical angle from above.

    Power: A pine cone bloom from closed to opened may last anywhere from 8-24 hours, so you’ll need an AC adapter for your camera to make sure it keeps going.

    Step 4: Craft the time-lapse and begin

    We talked a little bit about avoiding stray light sources in the room where you are shooting, as these changes introduce time-lapse flicker into the image sequence. Having your camera in any automatic mode may also introduce flicker. To get the best possible consistent exposure over many frames, shoot in manual mode, set a manual white balance, manual ISO, and manual focus. In the example video above I used a Sony A7s and FE 90mm f/2.8-22 Macro G OSS lens.

    Pine cone bts2

    Exposure: Six seconds at ISO 200, f/22, produced a great image, and just started to wash out the brighter white background. You can push the whites a little further in post-production, and really create a clean image background.

    Time-lapse interval: To be honest I didn’t know how long I would be shooting, or when the action would begin. Times will vary, as no two cones and no two climates, or indoor humidity levels are exactly alike. The side angle pine cone shot took from about 9:00 a.m., to 3:00 a.m. the following morning, approximately 18 hours. I chose a 30 second interval, and set the shot count to infinity, so it would continually shoot until it was manually turned off. When unsure of how quickly to shoot, or how many frames to capture, it’s always good to capture more, rather than less. You can always speed up a time-lapse with too many frames, but if you don’t get enough shots and miss important movement, you are usually stuck.

    Capture

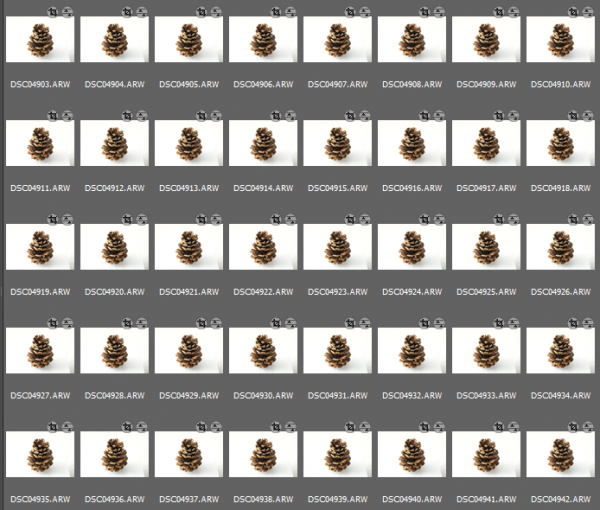
    These 30 second exposures, over 18 hours, resulted in about 3,246 images. That’s a lot of frames. Pine cones are slow. Much slower than I anticipated, and my interval was pretty fast capturing more frames than necessary for smooth movement. For your experiment I’d recommend increasing your interval time to about 50 seconds, or one minute. Having a longer interval time will result in less photos, and with the slow moving nature of the bloom it will not result in a jumpy or less smooth cone opening video.

    Step 5: Adjust the exposures and render the time-lapse

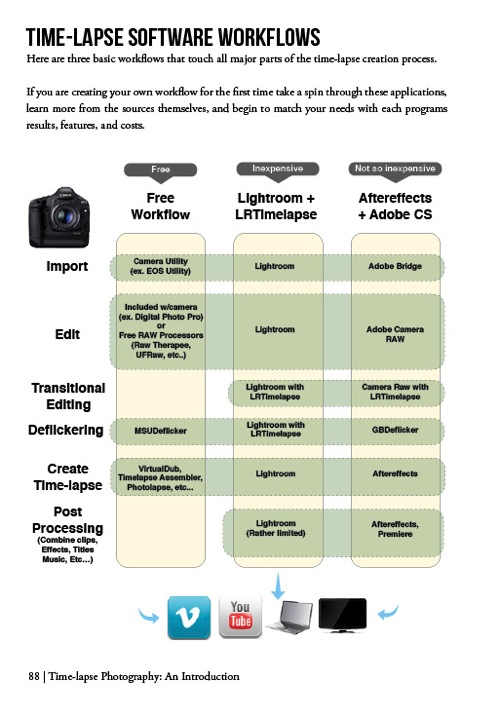
    The beauty of Lightroom, or Adobe Bridge and other applications, is that you can adjust the exposure on a single reference photo, then apply those changes across all your photos. Simple – and so is rendering the basic time-lapse. There are several different applications to choose from, to turn your collection of images into a video – varying from free and inexpensive, to not so inexpensive. Fear not, you can learn much more about time-lapse rendering in previously mentioned article, but the diagram below provides an overview of time-lapse software and applications.

    Timelapse Photography by Ryan Chylinski Book Preview6

    Patience is your most valuable commodity for this project. From pine cones to The Milky Way, I hope this mini peak into the world of creative time-lapse photography has ignited your curiosity to learn more. Time-lapse has a way of slowing the world for the photographer, while at the same time accelerating it for everyone else. I shoot time-lapse because it alters the way I think, it challenges my view of the world, and teaches me things I can bring back and share with everybody else. It’s a real honor and privilege to partner with you on this training journey. I hope is helpful and I would love to hear from you in the comments below.

    This week over at our sister site, SnapnDeals, we have a great deal running where you can get 20% off Time-Lapse Photography: A technical and practical time-lapse tutorial guidebook for all skill levels designed to get you out the door and shooting now!

    googletag.cmd.push(function() {
    tablet_slots.push( googletag.defineSlot( “/1005424/_dPSv4_tab-all-article-bottom_(300×250)”, [300, 250], “pb-ad-78623” ).addService( googletag.pubads() ) ); } );

    googletag.cmd.push(function() {
    mobile_slots.push( googletag.defineSlot( “/1005424/_dPSv4_mob-all-article-bottom_(300×250)”, [300, 250], “pb-ad-78158” ).addService( googletag.pubads() ) ); } );

    The post How to Shoot a Pine Cone Time-lapse: A Mini Tutorial by Ryan Chylinski appeared first on Digital Photography School.


    Digital Photography School

  • Visual appetite: Eric Wolfinger’s food photography

    Eric Wolfinger is a traveling food photographer who spent six years cooking and baking professionally before working behind the lens. An immersive photographer known for weaving practical instruction with powerful storytelling, the cookbooks he shoots go on to become the classics of their category. His first project, ‘Tartine Bread,’ was nominated for a James Beard Award and is now in its ninth printing. Twelve books later he is still hungry and on the move.

    In this presentation from PIX 2015, Eric takes us on a journey that includes baking bread in San Francisco, scuba diving in Korea to photograph fishermen, and details the challenges of photographing an entire book within the confines of a restaurant kitchen in Manhattan. He also reminds us that no job is too small in pursuit of your dreams.

    If you’re feeling hungry and want to see more mouthwatering food photos, visit Eric’s website for a visual feast.

    Articles: Digital Photography Review (dpreview.com)

  • SD card 5.0 protocol supports up to 8K video recording but risks confusion

    The SD Association (SDA) has introduced a Video Speed Class rating, designed to identify cards capable of 8K, 4K, 3D and 360° video capture. The speed class, which guarantees minimum sustained performance, comprises five ratings: V6 (6MB/sec), V10 (10MB/sec), V30 (30MB/sec), V60 (60MB/sec) and V90 (90MB/sec).

    Part of the Secure Digital 5.0 standard, the Video Speed Class ratings not only make use of the latest (and future) NAND technologies but are also closely tied to them. As such, a V30 card is only guaranteed to give sustained 30MB/sec performance when paired with a device that can make use of the relevant data transfer methods. In older devices it may give lower performance.

    The SD Association’s intention is that device makers will specify the Video Speed Class requirements (and hence compatibility) of their devices so that customers know to buy a card of that rating or higher.

    It all looks fairly simple until you realize that a V30 card may only operate at Class 10/U1 speeds if the device can’t make use of its transfer behavior. This explains why the SDA hasn’t just expanded the UHS speed class system, but risks adding further confusion if device makers don’t communicate their devices’ requirements much more prominently.

    Another fine mess?

    Unhelpfully, the latest speed classes will come in addition to the existing need to consider card type (SDHC or SDXC) and interface standard (UHS-I and UHS-II), and will run in parallel with the two current speed rating systems (Class 1-10 and U1/U3), which have confused consumers up until now. And, no doubt, card makers will complicate matters still further by quoting maximum read and write speeds, which do nothing to tell you whether a card will be fit for purpose (or any faster in real-world use).

    To illustrate the current complexity: shooting XAVC S video on the latest Sony cameras requires an SDXC card (which can handle larger individual files), and one that’s rated U3 to capture 4K. So, in this instance, the cards pictured at the top of this story, for all their promises of 240MB/s write speeds, would fail on both counts.

    The Video Speed Class rating system doesn’t appear to simplify this system, since an SDHC card still could not record 4K on current Sony cameras, no matter what V rating is printed on it. The new system appears to do a good job of ensuring SD cards are able to make the best use of the next generations of memory technology, but will require widespread cooperation and communication to avoid even more customer confusion.

    Products supporting the new Video Speed Class are anticipated to arrive on the market ‘soon.’

    Via: SD Association

    Articles: Digital Photography Review (dpreview.com)

  • CP+ 2016: Features you need to know about on the Nikon D5/D500

    CP+ 2016: Features you need to know about on the D5/D500

    Nikon is starting off the year strong with the announcement of the D5 and D500, the KeyMission 360, and the DL compacts announced for CP+ 2016. We got our hands on the D5 and D500 and have been very impressed by our initial, informal testing. AF is much improved, as are ergonomics. We’re working on a video to demonstrate what we consider to be ground-breaking AF performance, but in the meantime we thought we’d also put together a slideshow highlighting some new things we found while digging through the D5 and D500 menus, and give you an idea of the extensive customization options available.

    CP+ 2016: Features you need to know about on the D5/D500

    First off is the autofocus menu, where you’ll note a couple of new features. You can now turn face detection on and off during viewfinder AF-C shooting, with the ‘3D-tracking face-detection’ option. Helpfully, Nikon’s new 180k-pixel RGB metering sensor is more than capable of discerning a face – even the eye of a face.

    3D-tracking gains a ‘3D-tracking watch area’ customization, with options for a ‘Normal’ or ‘Wide’ watch area. We believe this affects how wide of a search region the camera should look over when tracking a subject around the frame. Frankly, the default setting has always worked so remarkably well that we’re not sure what switching it from its default (‘Normal’) will do, but we’re curious to put it to the test soon.

    CP+ 2016: Features you need to know about on the D5/D500

    ‘Focus tracking with lock-on’ gains some new customization. Previously, this option just had a setting of 1 to 5, with higher numbers biasing toward ‘sticking’ to a subject rather than being distracted by a different object that passes in front of it. Nikon has now broken this setting down to allow you to separately customize how long the camera should wait before refocusing to a subject that passes in front of your initially acquired subject, and how erratic the movement of your subject is. 

    It’s unclear if ‘Subject motion’ refers to how erratic an object switches between approaching and receding motion, vs. how erratic the subject is in terms of X-Y movement around the frame. We’ll investigate this once we have one in for testing, but the tailoring should help the user adapt the camera to a wider range of shooting scenarios.

    CP+ 2016: Features you need to know about on the D5/D500

    While this isn’t new, we though it worth pointing out that Nikon tends to offer four different settings for release vs. focus priority in AF-C (continuous).

    Release prioritizes ‘taking the shot’ over focus, while ‘focus’ prioritizes acquiring focus before releasing the shutter. Focus+release prioritizes focus for the 1st shot, prioritizing release for later frames, while release+focus prioritizes firing the shutter for the 1st shot, but requiring focus before release for subsequent shots.

    CP+ 2016: Features you need to know about on the D5/D500

    The D500 can illuminate the focus screen red, but you can turn this off if you so desire. Unfortunately, the camera can only flash the point(s) red when either selecting them, activating an AF point, or when focus is acquired. It cannot keep focus points lit red as you track a subject or fire a burst. That’s reserved for Nikon’s flagship…

    CP+ 2016: Features you need to know about on the D5/D500

    … the D5 (and its recent predecessors). Unlike the D500, the D5 can continuously keep AF points lit red, which helps you see the active point as the camera follows a subject around the frame in, say, 3D-tracking mode.

    You can even adjust the level of bright red they glow, in 4 steps. Seeing one red AF point stick to your subject like glue even as it moves around in your composition is, frankly, somewhat magical. Stay tuned for a video of it in action.

    CP+ 2016: Features you need to know about on the D5/D500

    With all the complex AF modes and customizable buttons on the D5, it’s helpful that Nikon has finally adopted a visual way to assign button function. And the number of customizable functions per button is impressive. The D5 allows you to customize the Pv, Fn1, and Fn2 buttons on the front of the camera where your right hand fingers rest, an additional vertical Fn button right behind the shutter button on the vertical grip, and finally a Fn3 button to the left of the LCD screen.

    The Pv, Fn1, Fn2, and Fn3 buttons are highly customizable in that they can be assigned to any one of 24 or so different functions, or any of a number of functions (6, if we counted correctly) that have different levels of granularity that you can adjust by holding the custom button while turning a dial. The Fn3 button is a bit more limited, and the AF-ON button is reserved for AF and AE functions. We’ll spell out all the assignable options for these buttons in the D500 slides to follow, as they’re largely the same (save for features unique to the D5, like LAN, or 14 fps lockup). One significant difference, though, is that the joystick on the D5 is not customizable, while on the D500 you can assign exactly what pressing this joystick (called the ‘sub-selector’) down does.

    Helpfully, you can change the behavior of these buttons during movie recording by customizing their functions specifically for movie shooting.

    CP+ 2016: Features you need to know about on the D5/D500

    The D500’s custom control assignment is a bit less complex than the D5’s, because it has fewer customizable buttons. On the other hand, unlike the D5, its ‘sub-selector’ AF joystick is customizable (we’ve set it to change image area in conjunction with a dial, as you see highlighted in yellow above), so it’s no slouch when it comes to customizability.

    The Pv and Fn1 buttons are on the front of the camera, for easy access with your right hand as it grips the camera. The Pv button is up top and can generally be activated easily by your middle finger, with the Fn1 button accessible by your ring or pinky finger. Given their ease of access, and ability to be used in conjunction with the rear thumb dial, these two buttons are highly customizable. The new sub-selector retains all customization options of the Pv and Fn1 buttons as well, while adding two more. The Fn2 button, to the left of the LCD screen, is less customizable, likely because it’s less used during shooting. The AF-ON button is reserved for AF/AE functions.

    Before we dive deep into all the customization options available for these buttons, for those prone to accidentally or inadvertently changing settings, you always have the option to assign a button to ‘None’, essentially deactivating it.

    CP+ 2016: Features you need to know about on the D5/D500

    With all this button customization, you’re probably wondering what you can or cannot assign to various buttons. Let’s start off with the AF-ON button, because it has a particular feature that might just be game-changing if you love Nikon’s ‘3D tracking’ as much as we do.

    AF-ON can be assigned to any of the options shown above, as well as ‘AE lock (Hold)’ and ‘AF lock only’ (on the 2nd page of this menu, not shown). But here’s what we’re most excited about: the ability to assign the AF-ON button to ‘AF-area mode’ or ‘AF-area mode + AF-ON’. It’s a quick way to instantaneously switch between your selected AF-area mode (Single, d25, d72, d153, Group-area, Auto-area, 3D) by momentarily holding down the AF-ON button. 

    The option to couple the AF-area switch with AF-ON means the following: a half-depress of the shutter engages AF with your typical AF-area mode, say 3D-tracking. But let’s say you’re now faced with a situation where things are happening so fast that you don’t even have the time to place your selected AF point over your intended subject to start tracking it. Instead, you just want the camera to find, say, the nearest bird or human face by itself and track it. What do you do? Click next…

    CP+ 2016: Features you need to know about on the D5/D500

    Assign the AF-ON button to ‘AF-area mode + AF-ON’ and select ‘Auto-area AF’ within this sub-menu. That way, when you hold down the AF-ON button, the camera will switch to ‘Auto-area’ as long as you have it held down, focusing on the nearest object or detected face and tracking it. This makes for versatile switching between your two most-used AF-area modes.

    I actually found it most useful to assign AF-ON to ‘AF-area mode + AF-ON’ with Single-point AF, highlighted above. That way, I keep 3D-tracking engaged as the default AF mode (in AF-C), always defining my subject by initiating AF on it. The camera then tracks it as it moves or as I recompose, but if I ever want the camera to stop moving AF points automatically to track, and instead just freeze the AF point while still continuously focusing on the subject if it approaches or recedes, I just hold down the AF-ON button (while keeping the shutter button half-depressed). Want the camera to continue tracking the subject exactly where it left off? Just let go of the AF-ON button while keeping the shutter half-depressed, and the camera starts tracking the subject around the frame again. 

    CP+ 2016: Features you need to know about on the D5/D500

    The camera remembers your subject, such as this gentleman’s eye at the Nikon booth at CP+ (please excuse the low, through-the-viewfinder, iPhone video screenshot). The camera tracked his eye until I wanted it to stop moving the AF point – but only momentarily – re-engaging the tracking of his eye when I laid off the AF-ON button.

    Previously, 3D-tracking – though class-leading in terms of subject tracking – was somewhat limited by the following: when I got the composition I wanted, and there was no more subject movement, I’d often want the camera to stop tracking in the X-Y plane, but continue tracking in depth (refocusing if the subject or photographer approaches or recedes). I couldn’t do that – if I wanted the AF point to momentarily stop moving while in 3D tracking, I’d have to engage AF-Lock, which’d mean the camera would stop focusing entirely. Now, though, I can use the AF-ON button to momentarily stop only the X-Y tracking. There isn’t a camera in the world, save for the D5 and D500, that can provide this robust functionality.

    There is still no way to assign a button to instantly switch between AF-S and AF-C, but with the reliability of Nikon’s 3D tracking, I would leave this cameras in AF-C pretty much permanently, assigning one of the customizable buttons to ‘AF lock’ in the rare instances I don’t want the camera to focus (for example, recomposing such that the subject is outside of the AF area).

    CP+ 2016: Features you need to know about on the D5/D500

    You’re probably tired of hearing about AF by now. Let’s look at the other customizations possible with the Fn1, Pv, and sub-selector buttons. This and the next 3 slides show all the available customizations on the D500 for these three buttons, with the sub-selector also assignable to ‘select center focus point’ (a quick way to reset to center) and ‘highlight active focus point’ (red). For reasons that are obvious, Nikon is expecting you to assign the sub-selector to AF point-related functionality.

    Oops, I thought I was going to stop talking about AF… As Barney often says, I’m absolutely irrepressible.

    CP+ 2016: Features you need to know about on the D5/D500

    This is the 2nd page of assignable options to the Fn1, Pv, and sub-selector buttons.

    CP+ 2016: Features you need to know about on the D5/D500

    This is the 3rd page of assignable options to the Fn1, Pv, and sub-selector buttons.

    We think it’s very cool that you can momentarily trip the camera into a different metering mode – though this is nothing new for Nikon. It’s helpful that Nikon’s spot-metering is linked to the selected AF point on nearly every one of their cameras, and highlight-weighted metering allows one to expose for the highlights and recover shadows in post-processing (given the extensive latitude most Nikon cameras have). And on a related note – remember that you can permanently bias any of the metering modes +/- 1 EV, in 1/6 EV increments on most Nikon DSLRs (it’s an option under the metering menu).

    CP+ 2016: Features you need to know about on the D5/D500

    … and the final and fourth page of assignable options to the Fn1, Pv, and sub-selector buttons. Well, not exactly, since the 5th page has a ‘None’ option, and all of these options are a bit shifted for the sub-selector button because it has two additional functions listed on the 1st page. But now I’m just being pedantic.

    A very useful assignment is ‘Access top item in MY MENU’. It’s a quick way to access one of your most used menu items after you assign to the top of MY MENU. Again, available on previous Nikons, but worth reiterating. This is how I, for example, quickly bias the minimum shutter speed the camera will use in Auto ISO mode.

    CP+ 2016: Features you need to know about on the D5/D500

    Here is a list of 6 out of 7 functions you can assign to the Fn1 button if you desire to operate it in conjunction with a dial (the 7th, on the next menu page, being ‘Photo shooting menu bank’. The same list of options is available if you with to operate the Pv button with a dial. Note that if you do this, you can’t assign any of the previous actions in the past 4 slides. You either use the Fn1 and Pv (and sub-selector) buttons as single button press actions, or as actions triggered in combination with a dial. The latter is more limited, for obvious reasons.

    The sub-selector button has three fewer options when used in conjunction with the dial…

    CP+ 2016: Features you need to know about on the D5/D500

    … when using the sub-selector (pressing it downward centrally) in combination with a dial, you don’t get ‘1 step spd/aperture’ (which adjust shutter speed and aperture in 1 EV increments, instead of 1/3 EV) or ‘Active D-Lighting’ or ‘Exposure delay mode’.

    CP+ 2016: Features you need to know about on the D5/D500

    As we’d mentioned earlier, the Fn2 button to the left of the LCD screen is less customizable, probably because it’s less ergonomically useful during shooting. The Fn3 button in a similar position on the D5 has a few more features because of things like LAN connectivity on the D5.

    CP+ 2016: Features you need to know about on the D5/D500

    Now that you have a good idea of the extensive customization available on the D5 and D500, as well as some of the new features that enhance AF ergonomics and functionality, we turn to one last feature that shooters may find useful: an electronic front-curtain shutter (EFCS). This was first introduced on the Nikon D810, and we’re happy to see it continue in Nikon’s lineup.

    EFCS initiates exposure electronically, foregoing the mechanical shutter, which ensures no camera-induced shake during an exposure. The exposure is ended mechanically, ensuring that rolling shutter is not an issue.

    EFCS is limited though: above certain shutter speeds (we’d guess around 1/1000 or 1/2000 or so), EFCS becomes unreliable, if not outright unavailable. Furthermore, Nikon continues to offer this as a mirror-up only mode, which is a shame. It means you have to switch the camera’s drive mode to mirror-up, press the shutter button once to lock up the mirror and shutter, and press the button again to initiate the exposure electronically. That means you can’t really use it in typical shooting scenarios. Especially when you consider that the 2nd button press can induce motion, which means you may wish to introduce an exposure delay…

    CP+ 2016: Features you need to know about on the D5/D500

    … and unfortunately, the same exposure delay options are available as before. We would’ve loved to see the introduction of 1/2s, 1/4s, and 1/8s which, when coupled with EFCS, would automatically trigger the electronic shutter after the pre-specified delay.

    In other words, EFCS should’ve been implemented like this: press the shutter button to lift up the mirror and shutter, then after the pre-specified delay time – say 1/2s – the camera would automatically start the exposure electronically. As it is, just like on the D810, you’ll have to press the shutter button once, then press it again to initiate the delay, after which the exposure is started. With a long lens, your entire composition will have shifted by now. And this method is often required in conjunction with certain VR lenses to ensure no mirror/shutter-induced shake is present in a certain range of shutter speeds (typically 1/60s – 1/125s).

    That said, these roughly ~21MP cameras are unlikely to be as sensitive to mirror induced shake as the higher resolution D810, so users probably don’t have to worry much about these issues at all. Still, best practices are best practices, and we hope Nikon is listening.

    CP+ 2016: Features you need to know about on the D5/D500

    Introduced on the D810, but now with its own menu option, is ‘Monitor color balance’. This allows you to tune the color of the LCD on your camera’s screen. Some pros might find this useful in their workflow, to ensure the screen is a better judge of output color. But as long we’re seeing this sort of tailoring for color – might we expect true ICC color management in future camera displays? We certainly hope so.

    We hope you’ve learned a few things about the new features available on the D5 and D500. The extensive feature-set and customization will prove invaluable for working pros and enthusiasts alike. We weren’t able to get a look at automated AF Fine Tune, unfortunately, but it’ll be the first thing we look at when we get our hands back on these cameras. Suffice it to say we’ve walked away incredibly impressed by these cameras, particularly by what they offer both in terms of AF capability and ergonomics. These cameras are likely to be second to none in their ability to track moving subjects and focus on them, even during 10-12 fps bursts. But don’t take our word for it – we’ve tried it, and will be releasing a video soon showing it in action.

    Stay tuned.

    Articles: Digital Photography Review (dpreview.com)

  • Masterpiece Mashups: Classic Art Gets the GIF Treatment

    [ By Steph in Art & Drawing & Digital. ]

    van gogh gif

    Vincent Van Gogh is having a good pop culture week on the interwebs with multiple humorous GIF treatments and stunning animations of his works exposing classic art to new generations. In this series, artist Kajetan Obarski (known as Kiszkiloszki) mashes up masterpieces by the infamous Dutch painter and others with contemporary life, bringing them firmly into the computer age.

    gif 3

    gif 7

    gif 8

    gif 11

    Leonardo da Vinci gleefully photoshopping a range of different animals into his ‘Lady with an Ermine,’ Michelangelo’s Sistine Chapel God plays pool, a 17th-century lady rocks out with a skeleton and Van Gogh himself receives a very insensitive gift. There’s chocolate flinging, baby throwing and sexting gone awry, not to mention the inevitable conclusion to Magritte’s men falling from the sky.

    output_p1ZRb8

    gif 2

    gif 9

    gif 10

    gif 1

    classic art memes

    Classic art has gotten a big cultural boost lately thanks to projects that appeal to our sense of humor, like the excellent Classical Art Memes. While more conservative art historians may lament that the works aren’t being appreciated in their original context, as the artists meant for them to be, these projects have centuries-old paintings flying around the internet like cat videos, so it’s hard to complain.

    Share on Facebook


    [ By Steph in Art & Drawing & Digital. ]

    [ WebUrbanist | Archives | Galleries | Privacy | TOS ]


    WebUrbanist