Blog

  • Magnum Graduate Photographers Award 2016 winners announced

    Magnum Photos recently announced the ten winners of its Graduate Photographers Award 2016, providing each graduated photographer with a Magnum photographer mentor, portfolio review and a screening of their work at Somerset House in the UK. The awards were announced in association with RBB Economics.

    The Graduate Photographers Award is awarded to photographers who graduated from a ‘lens-based media’ or photography UK degree course some time in the last three years. During the evaluation process, ten experts each nominated ten photographers from which a panel of judges chose the ten finalists. The following photographers were awarded:

    • Nicholas Constant
    • Emma Gruner (NSFW)
    • Tom Heatley
    • Sean Padraic Birnie
    • Sara Sandri 
    • Vincenzo Sassu
    • Charan Singh
    • Erin Solomons
    • Peter Watkins
    • Feiyi Wen

    Via: Magnum Photos

    Articles: Digital Photography Review (dpreview.com)

  • How to Improve Your Night Photos – Add Reflections

    Reflections can be great things to add to your photographs at any time, but they are particularly cool at night. Adding reflections can solve compositional problems you face at night. Further, the steps you have to take to capture photos at night – such as having your camera on a tripod and using a slow shutter speed – actually make it easier to capture reflections.

    How so? I’m glad you asked. Let’s take a look at the use of reflections in night photography.

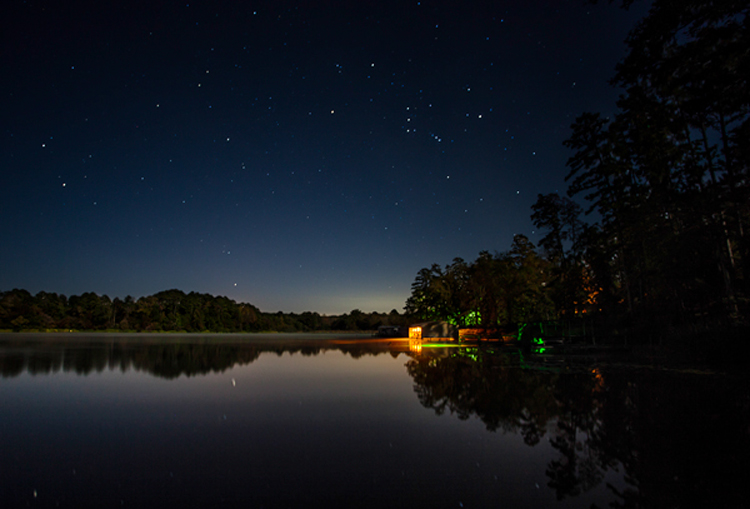
    Lakehouse2

    Why use reflections in your night photography?

    Why would you want to use reflections in your nighttime photos? There are many reasons, but in this article I want to concentrate on two.

    1 – Adding a reflection adds interest to the composition

    First adding a reflection allows you to turn a straight-ahead photo of a single thing, into an interesting composition. For example, common subjects of nighttime photos are things like well-lit buildings, bridges, and fountains. If you take a picture of just a building, it might not be terribly interesting. It’s just a building. The same goes for pictures of bridges and fountains.

    Adding other items to the picture can be a challenge. Everything around the subject is likely to be very dark. Adding more space just results in a sea of blackness around your subject that doesn’t add anything to your photo, it just detracts from your subject. If you add a reflection, however, it adds a compositional element to your picture. Now your picture isn’t just a single thing (like a building, bridge, or fountain). The reflection adds interest to the photo.

    2 – Adding a reflection gives you a good foreground element

    Secondly, adding a reflection to your picture also solves a common problem for all pictures. That problem is what to do with the foreground. Often the subject and background are clear, but the foreground can be difficult to ascertain. However, particularly when you are using water to create the reflection, the reflection will be on the bottom portion of the picture. Therefore it provide you with a ready-made foreground. Problem solved.

    Dallas

    When to use reflections

    You could use reflections in your nighttime photos whenever possible. The limitation on their use is typically not lack of desire, but lack of opportunity. There isn’t always a large shiny surface for you to use to capture a reflection.

    Note: if that is the case, you can always create one in Photoshop!

    So what circumstances create the opportunity to use reflections? Obviously, water works great. It is available for you to use in a lot of different contexts. Here are some of them:

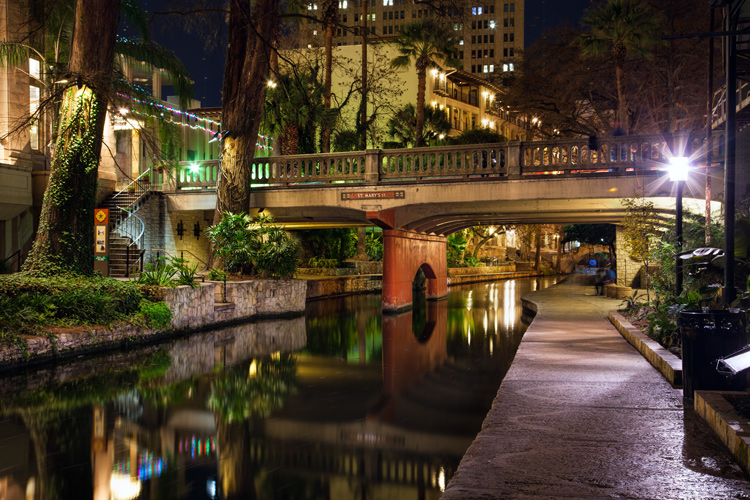
    • Skylines: Most cities are built on a bay or a river that you can use to create a reflection. (By the way, don’t worry about making it a sharp reflection – just a blurry set of lights in the water can provide what you need.)
    • Bridges: A common nighttime photographic subject are bridges, which are almost always over water.
    • Lakes: There are lakes everywhere. You can capture reflections of nearby objects. On clear nights you can also capture the reflections of the stars.
    • Puddles: They provide a great opportunity for using reflections where you might not otherwise expect them. Keep in mind there doesn’t actually need to be a puddle but often a wet surface will reflect light from nearby sources. See Using Rain Puddles to Create Unique Reflection Photos.
    • Fountains: Since fountains are filled with water, they also provide great opportunities for making reflections.

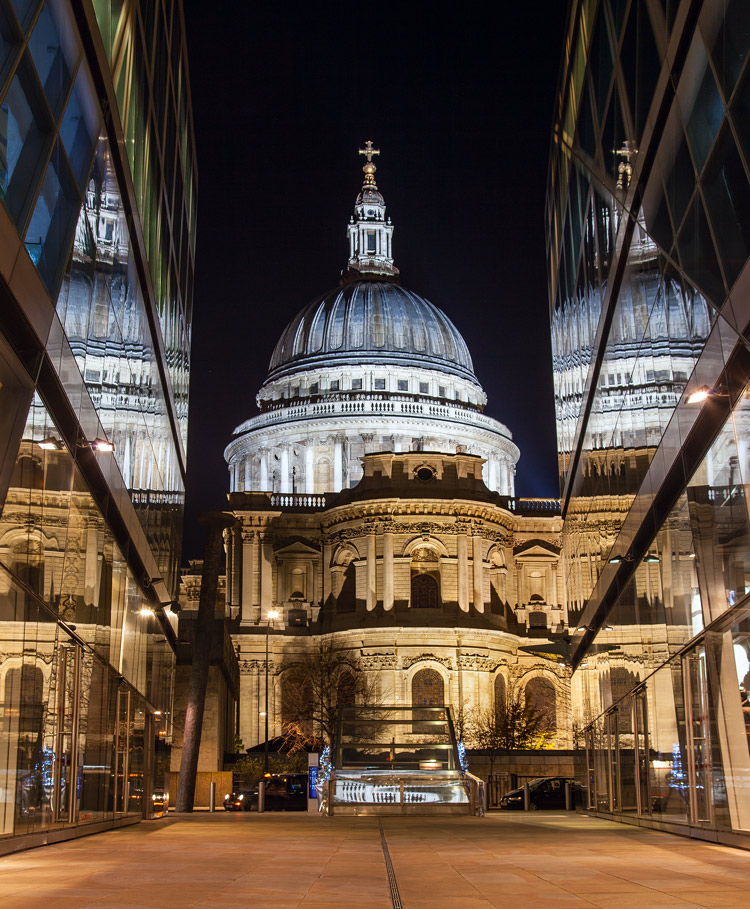
    Besides water, any shiny surface will do. Most cities have many modern office buildings built of steel and glass. While not generally sought out as photographic subjects in and of themselves, they do provide great opportunities for capturing reflections of anything nearby.

    StPaulMirror

    How to capture reflections

    Here is some good news: you probably don’t need to do anything different in terms of exposure to capture reflections in your picture. For reflections of most shiny surfaces, you simply set the exposure as you normally would, and take the picture. While using water to create the reflection does require that you smooth the water out, this is probably already happening because of the inherent challenges of exposure in night photography.

    Night photography requires slow shutter speeds. Because it is dark, your camera needs to hold the shutter open a long time in order to gather sufficient light for the exposure. This is true even if you are using a wide aperture and high ISO. This long shutter speed is what smooths out the water. Therefore, the mere fact that you are taking the photo at night, probably means you are already creating a picture with smooth water. If not, just be sure to slow down your shutter speed.

    Riverwalk

    Enhancing the effect

    The most common problem when using reflections in your nighttime photos, is that the reflection does not show up as much as you would like. The way to fix that is to brighten the reflection. If you apply a global brightening to the picture, however, you risk blowing out the highlights of other parts of your picture. In any case, you will probably end up brightening other parts of the picture more than you want. Therefore, you will need to apply selective brightening to the photo. Here is how to do that, depending on the software you are using:

    • Lightroom: In Lightroom, use the Adjustment Brush (keyboard shortcut K) to apply selective brightening to the reflection. Select the brush, and using the controls that appear, increase either the Exposure or the Whites slider (or both) to make the reflection stand out. At the same time, you will need to maintain contrast in your picture. Do that by decreasing the blacks in the picture (pull the Black slider to the left). Just paint it in and you are all set. You can also adjust the effect after you have painted it in.
    • Photoshop: In Photoshop or Photoshop Elements you can use the same process as described above in the Adobe Camera Raw (ACR) screen that pops up when you open the picture. Once you are in Photoshop, the best way is to use Curves adjustment layers and then mask out the effect everywhere except in the reflection. To do that, just create a Curves adjustment layer, then pull up the line on the right side of the curve (or pull in the white point) to increase the brightness of the reflection. To maintain contrast, pull down the left side of the line (or pull your black point to the right). If you’re not familiar with Curves adjustment layers or masking check out this or this tutorial to get you started with the process.

    Destin2

    The other common problem when using reflections in your night photography, is enhancing the clarity or sharpness of the reflection. Much of the work here is done in the capture phase, and keep in mind that you cannot fix a blurry picture. But you can enhance the effects a bit. Here are some ways to go about that:

    • Lightroom: As with the selective brightening above, use the Adjustment Brush (either in the same step or as a separate step as the brightening). Within the controls of the brush, increase the Clarity slider. Brush in the area of the reflection to add the clarity. You can also increase the Sharpness slider, but beware of doing this too much as it tends to increase digital noise.
    • Photoshop: Within Photoshop or Photoshop Elements, you can use the ACR screens to increase the clarity of the reflection. Once the image is opened in Photoshop though, there is no Clarity slider. The best way to increase clarity is to use the High Pass filter. This article explains how to increase clarity and walks you through the use of the High Pass filter.
    • Plug-Ins: There is also third-party software available that allows you to increase the clarity of your photos. One such program is Topaz Clarity, which works really well. For the best results, apply this effect on a new layer within Photoshop so that you can use masking to apply the effect exactly where and how you want.

    Of course, there will probably be other edits you want to make to the photo in addition to these. You can, and should apply your standard workflow to your pictures. These are just the common issues you will experience when you add reflections to your photos.

    Conclusion

    Reflections can add great compositional interest to your pictures. They also allow you to add context to your nighttime photos, which is not always easy since much of the surrounding area will be dark. They are readily available once you start looking for them. In addition, they are easy to apply. Once you start adding reflections, I think you will find they will help add interest to your night photos, and might even take them to the next level.

    googletag.cmd.push(function() {
    tablet_slots.push( googletag.defineSlot( “/1005424/_dPSv4_tab-all-article-bottom_(300×250)”, [300, 250], “pb-ad-78623” ).addService( googletag.pubads() ) ); } );

    googletag.cmd.push(function() {
    mobile_slots.push( googletag.defineSlot( “/1005424/_dPSv4_mob-all-article-bottom_(300×250)”, [300, 250], “pb-ad-78158” ).addService( googletag.pubads() ) ); } );

    The post How to Improve Your Night Photos – Add Reflections by Jim Hamel appeared first on Digital Photography School.


    Digital Photography School

  • Photo business: the rise and impending fall of social media ‘influencers’

    With so-called ‘influencers’ in the news recently, an anonymous social media executive confesses to Digiday just what contributed to the rise of the phenomenon and the somewhat startling realities of the new ecosystem.

    While it may come as no surprise to the general public that the ‘influencer’ ecosystem is going through some turmoil as of late, it is somewhat surprising that it came about in the first place. According to the interview, it took brands until 2014 to realize what most of us saw much earlier – social media is addictive and engrossing for much of the general public, and it’s here to stay.

    Instead of a handful of TV commercials to make each year, brands and agencies realized that they needed to greatly increase the sheer volume of their content creation in a never-ending quest for ever more ‘impressions’ via their social media channels. So, what easier way to get your product out there than to simply pay someone to post your product in front of their hundreds of thousands of followers? Thus, the influencer was born.

    ‘We have no idea what to pay them.’

    What started as a simple $ 500 investment for someone to ‘show up and take some photos’ has ballooned into paying ‘$ 300,000 for a few photographs because the CEO’s kid liked someone.’ It’s pretty absurd, with the executive going on to admit ‘we have no idea what to pay them.’ Although it appears there’s more of a vetting process being developed at some agencies, you still get influencers whose entire pitch is ‘I want to take a car and pick it up in London and drive it around Europe, so give me $ 100,000.’

    So it’s no surprise that the interview concludes on a bleak note regarding the future for Instagram superstars. The unnamed executive predicts influencers will start to disappear as brands recognize that the value isn’t there. ‘Just because photos look good and have 200,000 followers means nothing.’ While it lasts, it sure seems like a pretty sweet gig.

    Via: digiday.com

    Articles: Digital Photography Review (dpreview.com)

  • Photo bomb: Student project sends Instax camera skyward

    In what must be a one-of-a-kind project, a visual media student at the Rochester Institute of Technology has installed a Fujifilm Instax camera on a DJI drone, making it possible to shoot instant photos from the air.

    Nicholas Kundrat created the drone/instant camera hybrid for a new course called ‘Visual Media Innovation Project.’ Bringing the project to life started with a DJI Flamewheel 450 quadcopter kit as the base with an Instax Mini 25. From Kundrat’s Vimeo page:

    ‘A servo motor was then fitted onto the camera and plugged into the auxiliary port on the receiver to be controlled by the SX6i transmitter. A flip of the aux switch on the transmitter fires the camera and before you know it a picture is ejected from the camera.’

    The drone can fly up to twelve minutes with the camera and motor attached. Kundrat hopes his creation will challenge views of drones as dangerous and harmful by creating a positive connection between observer and drone. If nothing else, it brings a whole new meaning to the term ‘photo bomb.’

    Via: PetaPixel

    Articles: Digital Photography Review (dpreview.com)

  • Holy Art! 13 Spectacular Secular Installations in Sacred Spaces

    [ By SA Rogers in Art & Installation & Sound. ]

    church art mosque 5

    Imbued with a sense of reverence, not to mention all those beautifully vaulted spaces, cathedrals and other sacred spaces can be stunning settings for art installations of all kinds, from ethereal light projections to complex arrangements of string. Abandoned churches get the revival of a lifetime when painted floor-to-cupola with vivid murals, while the ruins of long-lost cathedrals are resurrected in ghostly wire forms.

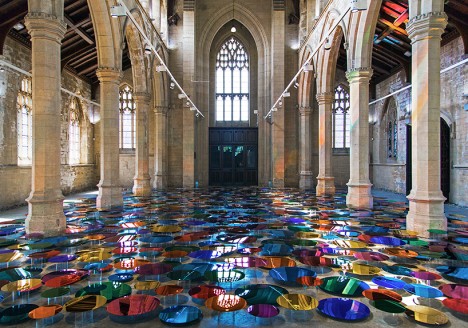
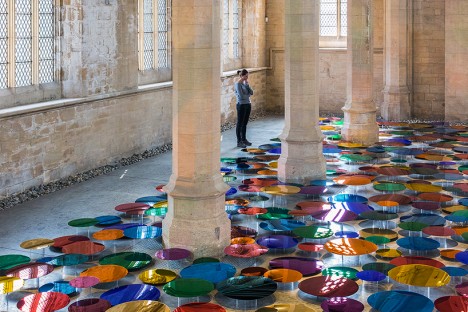
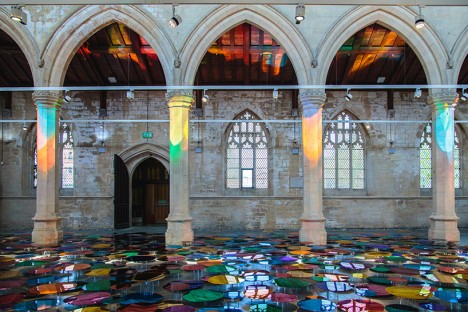
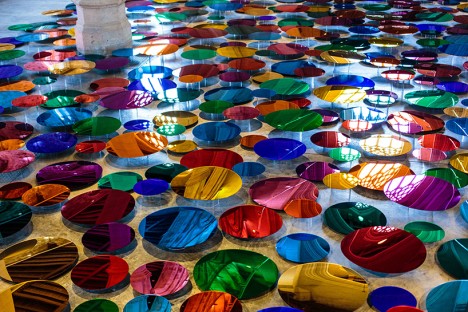
    ‘Our Colour Reflection’ by Liz West, UK

    church art reflection 1

    church art reflection 2

    church art reflection 3

    church ar reflection 4

    church art reflection 5

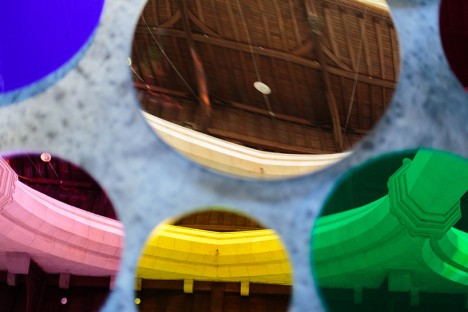
    Hundreds of mirrored discs in a spectrum of colors hover above the floor of England’s former St. John’s Church in Scunthorpe, reflecting rainbow light all over the interior. The installation by Liz West is gorgeous when taking it in as a whole, but step closer and you’ll see that each disc is like a miniature work of art in itself, containing its own tiny composition of architectural elements.

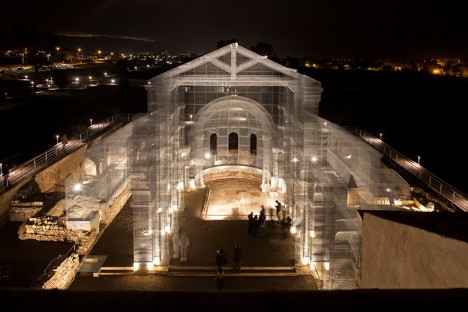
    Ghost Church Made of Wire by Edoardo Tresoldi, Italy

    church art ghost 1

    church art ghost 2

    church art ghost 3

    church art ghost 4

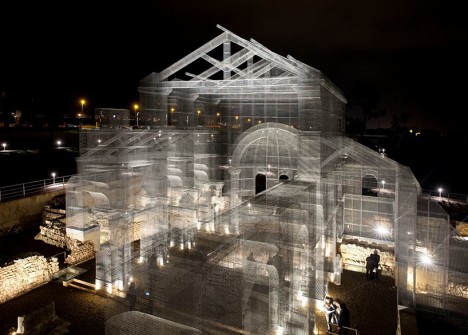
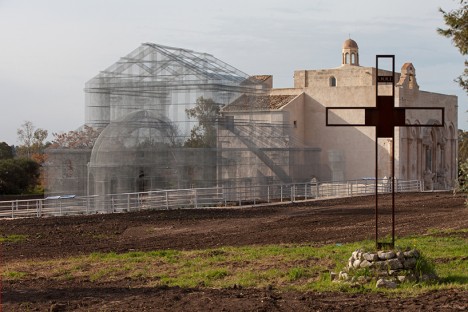
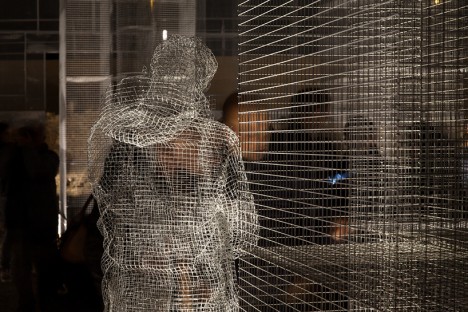
    A long-lost early Christian basilica is resurrected in ghostly form, its contours traced in wire for a translucent effect. Located in the historic park of Siponto in the Southern Italian region of Puglia, this installation by Edoardo Tresoldi lets modern-day visitors explore the church as it is thought to have appeared centuries ago.

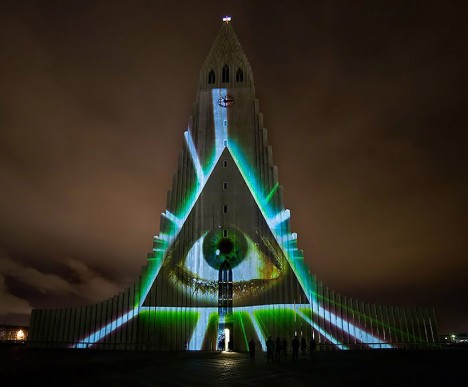
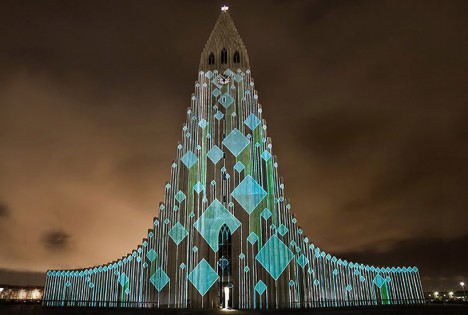
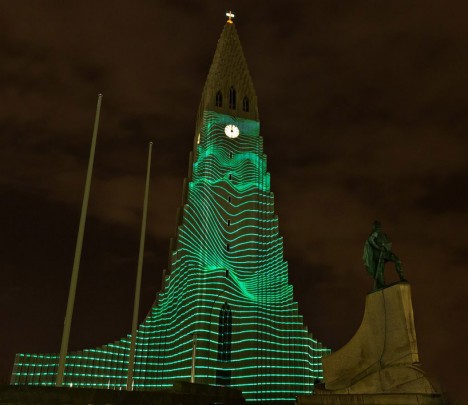
    Video Mapping by Marcos Zotes, Iceland

    chuch art mapping 1

    church art mapping 2

    church art mapping 3

    Artist and architect Marcos Zotes uses the facade of Hallgrímskirkja, Iceland’s largest church, as a canvas for projections of monumental proportions in a show called ‘Rafmognu? Náttúra.’ Moderating the color and movement through a midi controller, the artist created a dynamic visual experience that made the architecture seem to come alive.

    11 Mirages to Freedom by Okuda San Miguel, Morocco

    church art okuda 1

    church art okuda 2

    church art okuda 3

    church art okuda 4

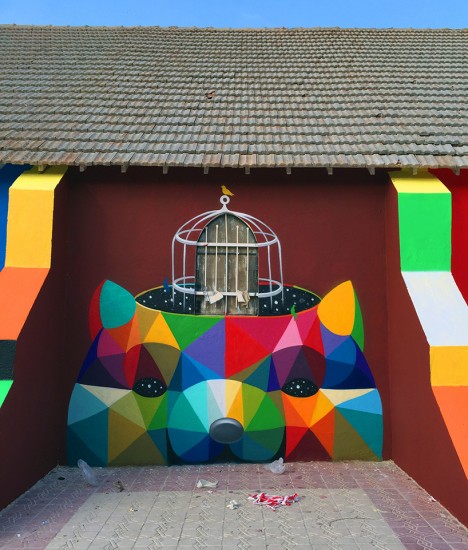
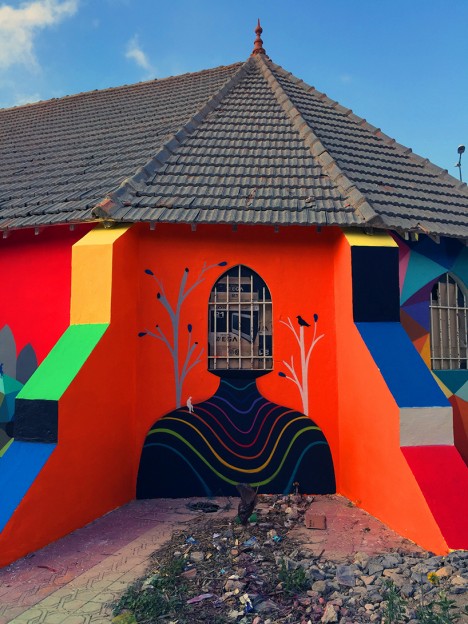
    An abandoned and dilapidated church gets a striking makeover with the addition of a vivid mural covering nearly all of its exterior surfaces. Street artist Okuda San Miguel painted ’11 Mirages to Freedom’ on the outside of this church in Morrocco as an interactive display honoring its past as well as its structural beauty.

    Next Page – Click Below to Read More:
    Holy Art 13 Spectacular Secular Installations In Sacred Spaces

    Share on Facebook


    [ By SA Rogers in Art & Installation & Sound. ]

    [ WebUrbanist | Archives | Galleries | Privacy | TOS ]


    WebUrbanist

  • How to Use the Healing Tool in Photoshop

    We all have those moments in our photographic careers where things just don’t pan out exactly how we imagined them. Our image is almost exactly as we imagined it to be, but perhaps there are some spots, blemishes, marks or distractions that just don’t fit in the frame.

    In most cases, all the elements of the image tend to work together to tell the story, but sometimes we just to clean the image up a tad, to get rid of some of the distracting elements that take away from that story. Luckily, most editing software, including Photoshop, have very easy, yet powerful tools, that you can use to clean up your image and get rid of the distractions.

    Memorable Jaunts Landscape Image cleaned using healing brush tools Artcile for DPS 01

    The Healing Tool in Photoshop

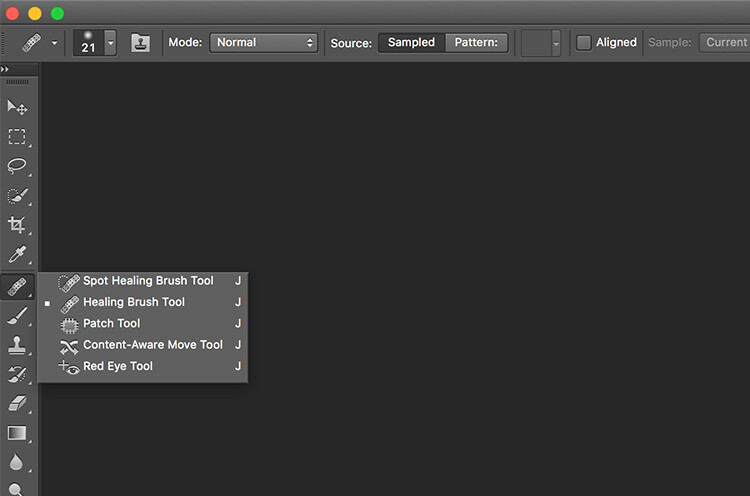
    This article provides a basic explanation of the Healing Tool in Photoshop, that is very effective in removing or cleaning out distracting elements in an image. For the purposes of this article, I am using Photoshop version CS6. The Healing Brush Tool in Photoshop is made of three parts. These are probably the most used tools in the healing tool family, and 90% of the time they get the job done.

    • Spot Healing Brush Tool
    • Healing Brush Tool
    • Patch Tool
    Memorable Jaunts Landscape Image cleaned using healing brush tools Artcile for DPS 07

    The Healing tool in PS has the bandaid icon. When clicked, it opens up this menu. You can also click the J key on your keyboard to access this tool.

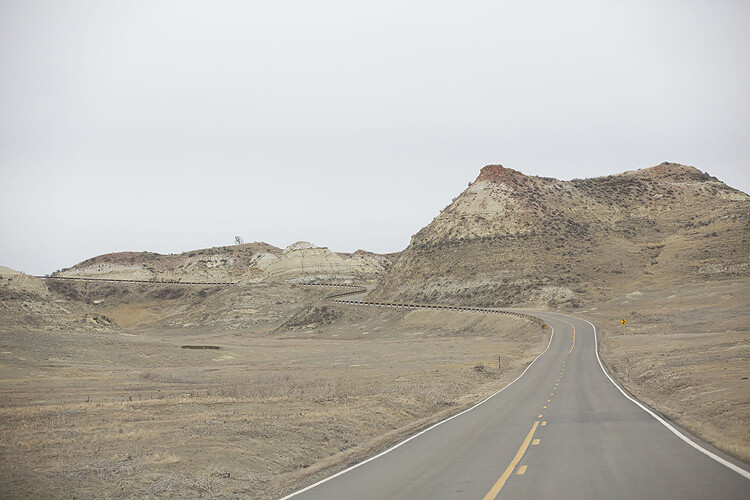
    Here is an example of a simple landscape image that was cleaned up using the Spot Healing Brush Tool, and the Healing Brush Tool.

    Memorable Jaunts Landscape Image cleaned using healing brush tools Artcile for DPS 02

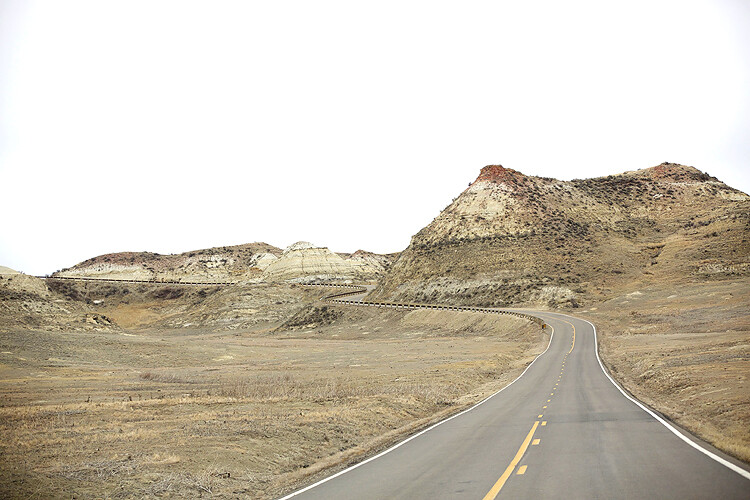
    Original Image – SOOC. I am looking to clean out some of the distracting elements here like the ‘Road curves’ sign on the right, the dead bushes on the left and the little tree on the top of the hill to the left of the image.

    The first step, before any cleanup is done, is to perform any basic edits to the image. I consider adjustments in exposure, contrast and temperature to be basic adjustments. For this image, I increased the exposure and added some contrast, to highlight the browns in the hillside. This image was taken from a stopped car because I really liked the curve in the road along the small hill on the top right side. But I wanted to get rid of the road sign and the dead branches on the sides of the road leading up to the hill.

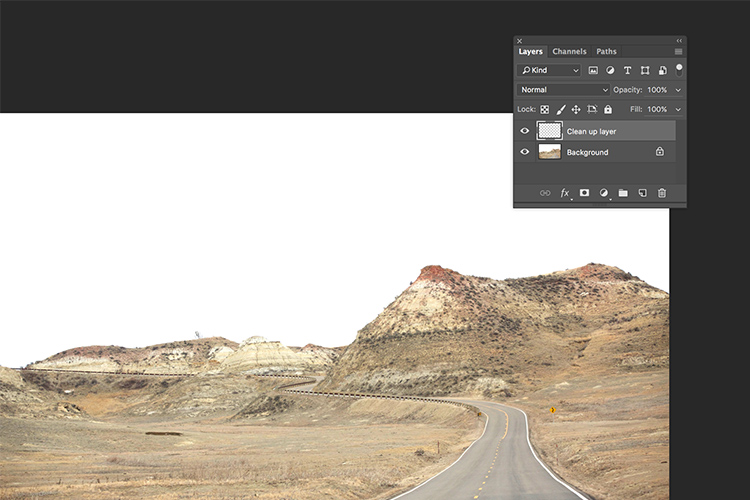
    Once I brightened and adjusted the contrast of the image, I created a new layer in PS to add my cleanup edits. I called it, “Clean up layer” for easy identification. This keeps all the cleanup elements together, so I can toggle between the On and Off to see the affects of the cleanup at any time (toggling a layer On and Off is done by clicking on the eyeball symbol to the left of the layer.)

    Memorable Jaunts Landscape Image cleaned using healing brush tools Artcile for DPS 06

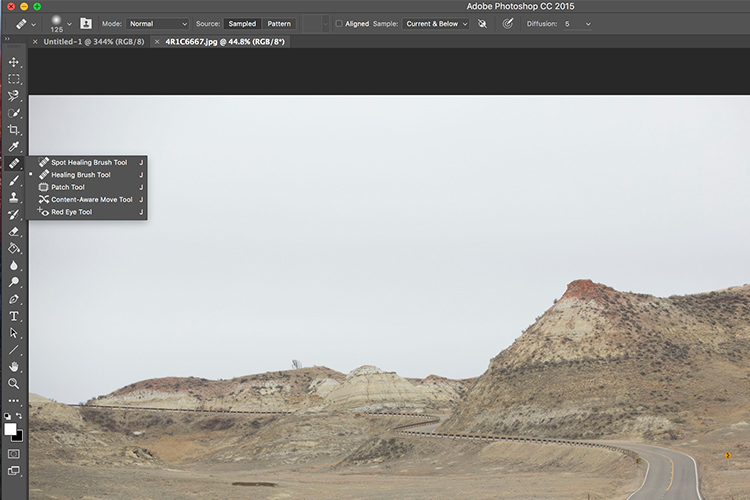
    The Spot Healing Brush Tool is used for quick, easy cleanups. Once you select the it, and adjust the size of the brush (use the left square bracket key [ to decrease size of the brush and right square bracket key ] to increase the size), you simply click on the blemish to remove it. Also set Sample to “Current & Below” or “All Layers” so it will pull pixels from your base layer (otherwise you’re just healing with a blank layer).

    The Spot Healing Brush automatically selects the source area from which to clone. So sometimes it might not be completely accurate, because the software is making the judgement on where is the best source to take a sample. A good tip is to zoom in to the specific area and watch the pixels closely while making the adjustments. The Spot Healing Brush works best on small areas and easy cleanups.

    Memorable Jaunts Landscape Image cleaned using healing brush tools Artcile for DPS 05

    The Healing Brush Tool

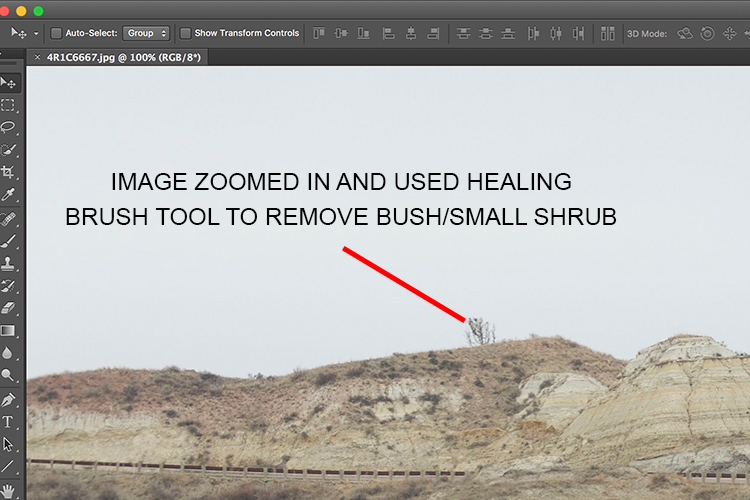
    I use the Healing Brush Tool is for slightly more complex cleanups, especially areas that have sharp edges, curved, or straight lines that separate areas of different textures and color. As you can see here, the top of the hill has a small tree which sticks out against the overcast sky. For more accurate editing, zoom in to the area that needs to be edited, so as to eliminate any errors. It is hard to be completely accurate if you are not zoomed in accurately to the specific area that needs to be edited.

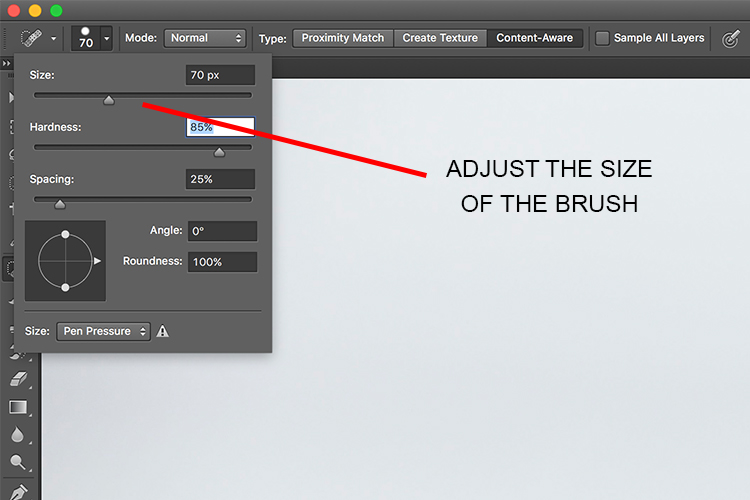
    Once selected, theHealing Brush Tool requires you to set a source point from which to heal the affected area (that is the easiest way to think about the healing action, in my opinion). I set the right size of the brush (use the [ ]  keys to increase or decrease brush size, OR click on the slider as shown in the image below), then I select the edge of the line closest in texture to the source area. Holding my cursor down (holding down the mouse button), I drag the cursor from start to finish over the object to be removed.

    Memorable Jaunts Landscape Image cleaned using healing brush tools Artcile for DPS 04

    After

    After cleanup

    The Patch Tool

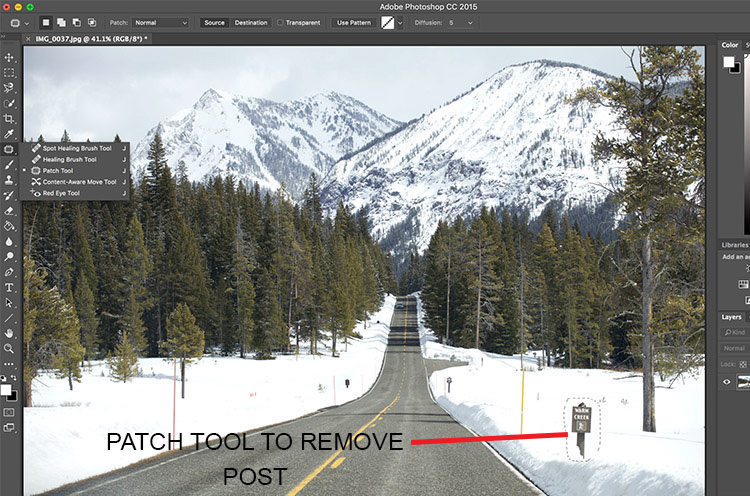
    I use the Patch Tool in Photoshop for any bigger areas that need to be adjusted. For example, in the image below, there are many sign posts along the road that are larger. I could use the healing brush tool but it would be a little bit more time-consuming as I would have to go over the adjustments several times, to clean it out completely. Instead I used the Patch Tool to fix the affected spot, and replace it with another area sampled from the surrounding landscape. Using the Patch Tool, select the area to be cleaned up, then select the area close to it to sample from, to do the patch.

    Notes about the Patch Tool:

    • To do your editing non-destructively use the patch tool on a duplicate layer (it cannot be an empty layer).
    • You must select a Patch type as Normal or Content Aware. For most things Content Aware does a better job, so try that first and resort to Normal if it doesn’t work.
    • If you select Normal you have to choose either Source or Destination. The difference is that when Source is highlighted, the area you select will be Patched with the area you drag it over to. When Destination is highlighted the area you select will be cloned over to the area you move it to.

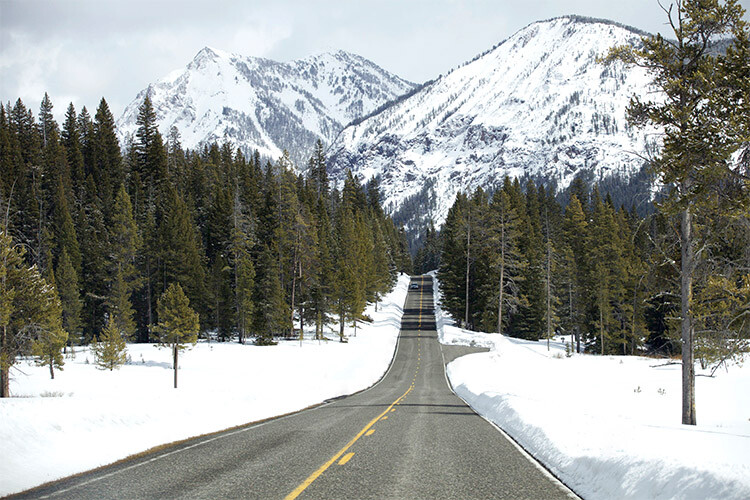
    Final image where all the posts, signs and snow measurement sticks have been removed using a combination of patch tool, spot healing brush and healing brush tool.

    As you can see, the healing tools in Photoshop are quite effective. With such a wide variety of options, any cleanup is easy and effective. One tip that I have learnt from experience is to do all the adjustments while zooming in to the affected area. This ensures that right amount of cleanup is done to all the pixels. If you find that the cleanup effect is too stark and harsh, an easy fix is to adjust the Opacity (i.e. visibility) of the cleanup layer. Especially when cleaning up blemishes on the face, this gives a more natural, blended effect. There is no right opacity percentage, simply choose the value that seems more natural to the eye.

    How do you use the Healing Tools in Photoshop? Please share in the comments below.

    googletag.cmd.push(function() {
    tablet_slots.push( googletag.defineSlot( “/1005424/_dPSv4_tab-all-article-bottom_(300×250)”, [300, 250], “pb-ad-78623” ).addService( googletag.pubads() ) ); } );

    googletag.cmd.push(function() {
    mobile_slots.push( googletag.defineSlot( “/1005424/_dPSv4_mob-all-article-bottom_(300×250)”, [300, 250], “pb-ad-78158” ).addService( googletag.pubads() ) ); } );

    The post How to Use the Healing Tool in Photoshop by Karthika Gupta appeared first on Digital Photography School.


    Digital Photography School

  • Off-Grid & Self-Sufficient: ReGen Villages with Vertical Farms

    [ By WebUrbanist in Architecture & Cities & Urbanism. ]

    vertical farming

    Presented at the 2016 Venice Architecture Bienalle, these new communities are designed to be entirely self-reliant, recycling their own waste, generating their own energy and producing their own food.

    design village

    integrated greenhouse

    Dubbed ReGen by its creators at EFFEKT, this new self-sustaining community typology grew out of a Stanford University Paper and, thanks to the backing of entrepreneurs, the first pilot is set to launch in The Netherlands this summer with others coming to Sweden, Norway, Denmark, Germany and, eventually, China and Africa.

    regen community

    regen model

    Each village features combinations of homes, greenhouses and public buildings, interconnecting vertical farming efforts with everyday living. Like a dome-free version of some science-fiction vision, the idea is that each village unit is effectively self-contained, able to thrive off the grid without polluting or draining resources.

    program

    regent model

    modular architecture

    Integrated solar power systems provide energy for heating, cooling and electric cars. Community participants share responsibility for water and waste management systems. Various housing types are offered, each with modularity designed around seasonal energy savings and human comfort factors.

    green village square

    town at night

    “Our modern lifestyle is utterly unsustainable and this calls for more resilient solutions for the future,” explained EFFEKT partner Sinus Lynge. “The technology already exists, it is just a matter of applying science into the architecture of everyday life. ReGen Villages is engineering and facilitating the development of off-grid, integrated and resilient neighbourhoods that power and feed self-reliant families around the world. The time has come to redefine residential real-estate development for the next three billion people coming to the planet.”

    Share on Facebook


    [ By WebUrbanist in Architecture & Cities & Urbanism. ]

    [ WebUrbanist | Archives | Galleries | Privacy | TOS ]


    WebUrbanist

  • Photo Composition Tips from Bob Holmes – Composition in Travel Photos

    Who better to get photo composition tips from than four-time Travel Photographer of the Year award-winner, Bob Holmes? He shares some techniques you can use to work with composition and take better photos, no matter where your travels may take you.

    Havana 012016 1314 Thumb dPS

    Bob has been all over the world, and his travel photos have appeared in National Geographic, Departures, and 46 books as the sole photographer. Working outdoors on most of his trips, Holmes is an expert at using natural lighting in photos.

    He loves looking for composition that grabs you, and his unique tip is that you need to “get in the zone” and be fully responsible for everything in the frame. The key to learning composition is to practice – you can’t become a great photographer in a week, but you will get there by shooting as much as you can.

    Bob Holmes dPS

    Watch this video interview I did with Bob Holmes, then look below the video for more helpful resources.

    Check out these dPS resources for more info:

    • LIFE IN NATURAL LIGHT- The Ultimate Guide to a photographer’s most powerful tool
    • NATURAL LIGHT – Mastering a Photographer’s Most Powerful Tool
    • TRANSCENDING TRAVEL – A guide to captivating travel photography

    googletag.cmd.push(function() {
    tablet_slots.push( googletag.defineSlot( “/1005424/_dPSv4_tab-all-article-bottom_(300×250)”, [300, 250], “pb-ad-78623” ).addService( googletag.pubads() ) ); } );

    googletag.cmd.push(function() {
    mobile_slots.push( googletag.defineSlot( “/1005424/_dPSv4_mob-all-article-bottom_(300×250)”, [300, 250], “pb-ad-78158” ).addService( googletag.pubads() ) ); } );

    The post Photo Composition Tips from Bob Holmes – Composition in Travel Photos by Marc Silber appeared first on Digital Photography School.


    Digital Photography School

  • Souped Up: 12 Larger Than Life Campbell’s Soup Cans

    [ By Steve in Design & Graphics & Branding. ]

    campbell-soup-can-1dd
    The red & white Campbell’s Soup can has been a huge pop culture (and occasionally pop art) icon for decades. HOW huge, you might ask? THIS huge…

    campbell-soup-can-1f

    campbell-soup-can-1b

    campbell-soup-can-1e

    The classic Campbell’s Soup can has been around a LONG time. Look closely at the gold medallion superimposed onto the divide between red and white: as stated, it was awarded to the company at the 1900 Paris International Exposition. More recently (1962 to be exact), pop artist Andy Warhol immortalized the by-then familiar can in one of his best-known paintings.

    campbell-soup-can-1g

    campbell-soup-can-1c

    In 1981 Warhol visited Colorado State University in Fort Collins, which was holding an exhibition of his work in the art building. The acclaimed artist signed one of three huge replica Campbell’s Soup cans mounted outside the University Center for the Arts. In the summer of 2013, the restored signed can was unveiled at its new location at the UCA.

    Soup Can-tonese

    Giant Campbell's soup can, subway, Admiralty station, Hong Kong.

    Campbell’s Soup cans can look a little different in other parts of the world – take Hong Kong, for instance. The jumbo can above, snapped in the city’s Admiralty subway station, depicts a flavor one wouldn’t expect in such a region.

    Campbell’s Coop

    campbell-soup-can-3a

    campbell-soup-can-3b

    Californians Steve & Chris White employed a little creativity and a lot of red & white paint when designing their one-of-a-kind Campbell’s Chicken Soup Chicken Coop. The pair adapted a hexagonal dog pergola (whatever that is) to suit the needs of their chickens, who thankfully can’t read.

    Bigger in Texas

    campbell-soup-can-4a

    You’ll find this jumbo Campbell’s Soup can storage tank at Johnson’s Ranch in Uncertain, Texas. The oddly-named east Texas town only has about 150 residents, all of whom could presumably be fed for days if the tank really held tomato soup. Speaking of which, “The public restrooms at JOHNSON’S have been updated and improved.” Good to know!

    Next Page – Click Below to Read More:
    Souped Up 12 Larger Than Life Campbells Soup Cans

    Share on Facebook


    [ By Steve in Design & Graphics & Branding. ]

    [ WebUrbanist | Archives | Galleries | Privacy | TOS ]


    WebUrbanist

  • How to Clean Your Photography Gear and Keep it in Good Shape

    A long time ago when I started my first steps into the photography world, a good friend of mine that worked many years as a photojournalist, told me:

    “Treat your camera like a soldier treats his gun, keep it clean and ready to fire!”

    I never forgot that advice from him, and I kept a Pentax K1000, my very first camera, in pristine condition to this day. Nowadays things are a bit different, and electronic digital equipment is not really built to last like in the good old days of mechanical equipment.

    Modern cameras and lenses are built with a lot of sensitive electronic components, and are much more difficult to maintain. Most of the equipment I use is exposed to the elements, and to a lot of abuse during my shooting sessions, and to me it is fundamental to sometimes take a little bit of time off and make sure everything is clean, working properly, and ready to fire.
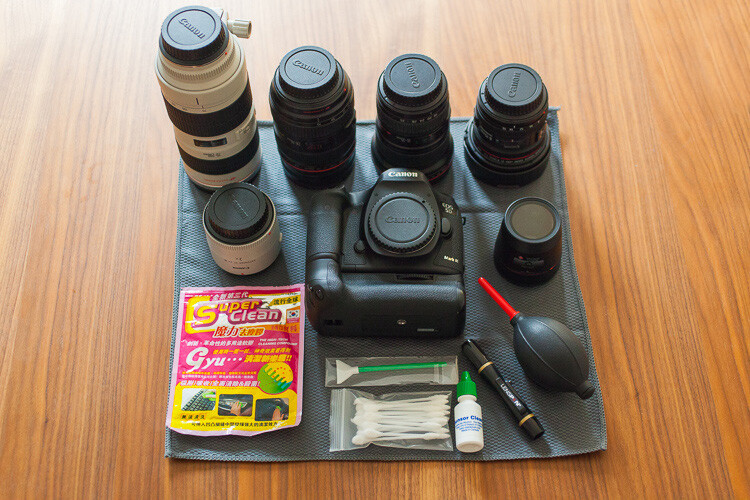
    01

    In this article I will guide you through the steps I usually take cleaning my photo equipment.

    Like everything in life, everyone has their own method of doing things. The way I do this process might not be perfect, but it is the best method I have used so far, with all the tips and tricks I have been collecting along the years.

    To start, I always try to be in a dust free environment, and have an anti-static microfiber cloth under the equipment I am cleaning. This is really important because your equipment is going to grab all the dust that is in the air like a magnet every time you try to clean it.

    The way I do it is always to go from the outside to the inside, meaning I always clean the outer part of the lenses before I clean the glass, and I always clean the outside of the camera body before I clean the sensor. This way I gradually eliminate the dust that is stuck to the equipment.

    Starting with the lenses, I used to just clean the outside of the lens with a microfiber cloth, and use a blower to keep the dust away. But a few years ago I was introduced to a new product from Japan that was the answer to all the germophobes that were really concerned with all the germs computer keyboards collect.

    02

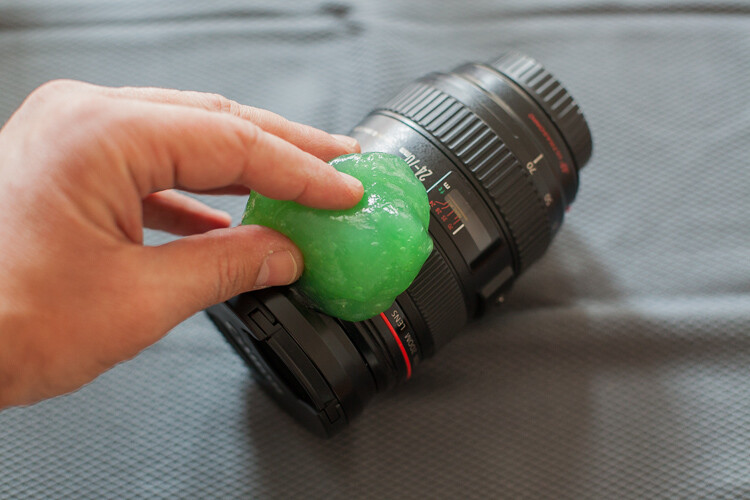
    This cleaning compound is like a sticky jelly, with anti-bacterial properties that can be used on everything you want to keep clean and germ free.

    I use it on the outside of my lenses and camera body, always with the caps on, because it is not supposed to be used on glass.
    03

    This product was expensive, and really hard to find when I first bought it, but nowadays it seems to be much cheaper and available in most stores online.

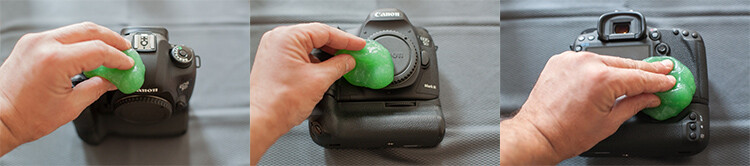
    I find it really useful to clean the camera body in the buttons areas, where it collects a lot of dust that is difficult to clean.
    04

    Next it’s time to concentrate on the glass

    Dust specs are really difficult to keep away from your lenses, and you should never try to wipe the glass off with a cloth like most people do. Wiping off dust might result in scratching your lens. The correct process should always be to blow it off first. You can use a blower or a compressed air can, and this way you remove the dust but don’t touch the glass.
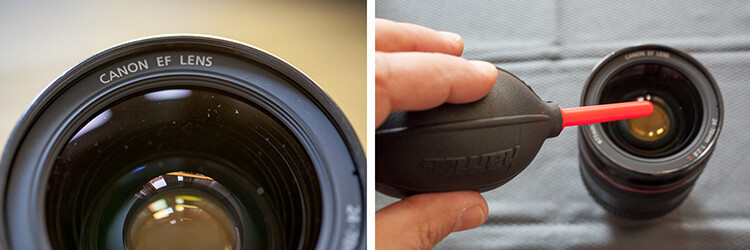
    05

    Now the dust is gone it is time to clean eventual smudges or fingerprints you might have on the glass. My favorite tool for this process is the Lens Pen. It has a tip with a soft compound that is made to safely wipe the glass, without damaging it.

    After cleaning with the soft tip, you may use the anti-static brush on the other side of the pen to get rid of any dust that is still around.

    I usually don’t use any lens cleaning fluid unless it’s really needed. Those kinds of chemicals are never good for your lens coating, but if your lens has grease smudges, then cleaning fluid and a soft cloth might be the only solution.
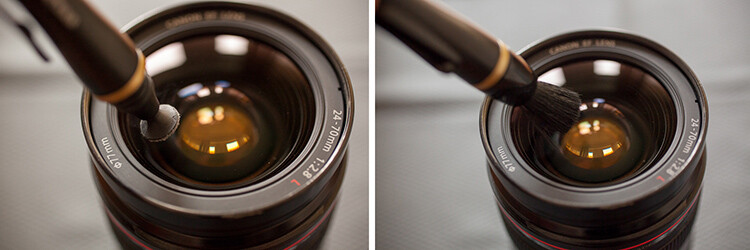
    06

    Repeat that process on the glass on the other side of your lens, and while you’re at it it’s also a good idea to check the electrical contacts of your lens (metal parts on the back). Dirty or oxidized contacts are most often responsible for camera malfunctions or errors, so I always clean them off with a soft cloth.

    In extreme situations I have heard of people cleaning these contacts with a rubber or really fine sand paper, but I’ve never had to do anything like that.
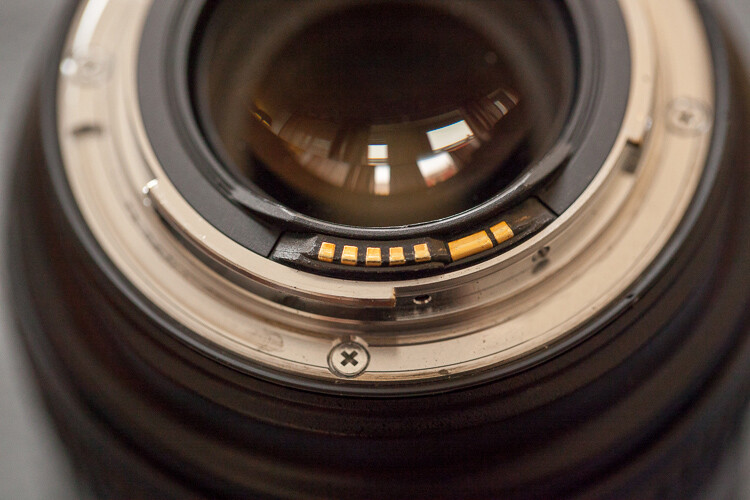
    07

    Dirty lens caps are also something to keep in mind to clean, as they always end up in your pocket or at the bottom of your camera bag while you’re photographing, so they collect a lot of dust. It doesn’t make sense to have your lens all cleaned up, then cover it with a dirty cap, the same applies to the body caps.

    Replacing your caps with new ones from time to time might be a good idea, as they are not that expensive and give your equipment a newer look.
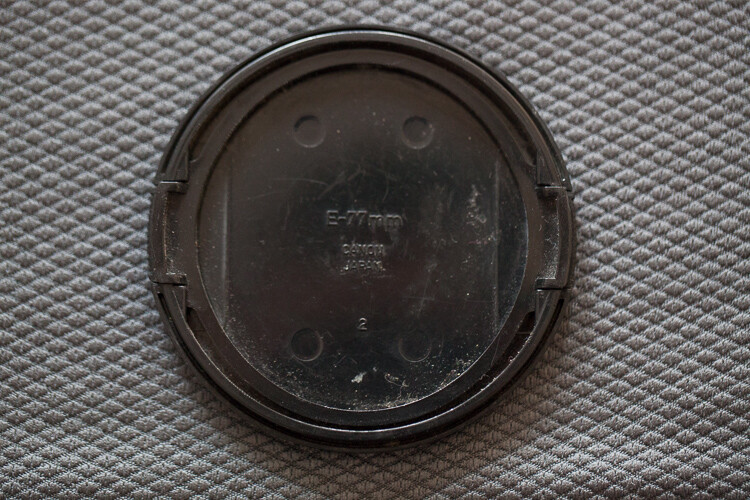
    08

    Now it is time to clean the camera body

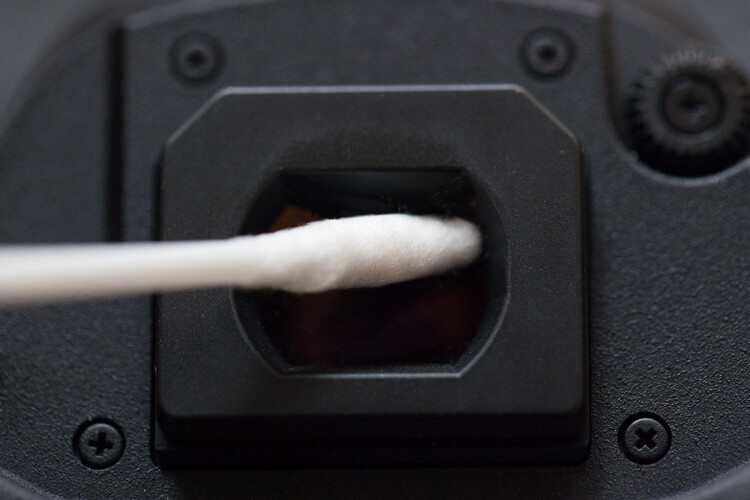
    After cleaning the outside with the anti-bacterial jelly compound, I usually clean the viewfinder. That is a difficult operation as it is a small, deep, and difficult to reach area. My trick for it is Q-Tips, but not the regular ones. I use some special ones made for babies that have a smaller pointy tip, and are made from a softer cotton, which allows a deeper and more efficient cleaning.
    09

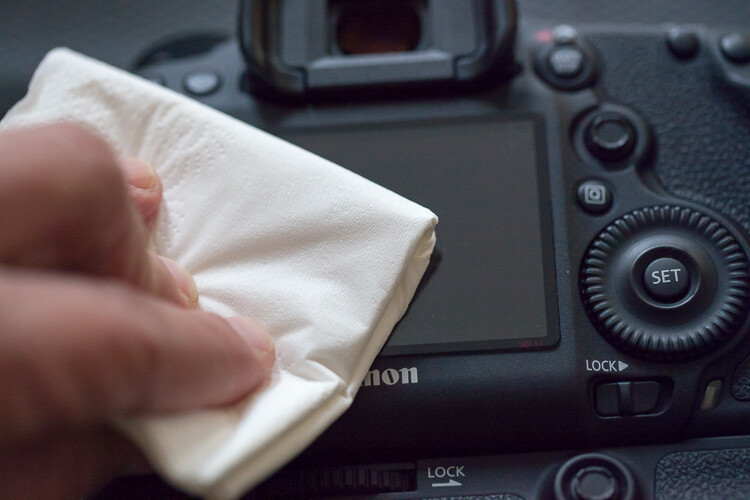
    Next I clean the LCD screen glass with a little drop of glass cleaner and a paper tissue. This removes all the grease that the LCD screen gets from being stuck to my face all the time.
    10

    Cleaning the inside of the camera

    As tempting as it might be I never try to clean the mirror of the camera. It usually seems to do more harm than good, and it usually sends more dust to the inside of the camera chamber, making it land on the sensor sooner or later.

    We finish with the most complicated part of the whole process that is the sensor cleaning.

    Camera makers always advise that this process should only be done in the brand’s technical assistance, by a trained technician, so if you are not comfortable with doing this yourself, please don’t try it.

    I remember I was a bit scared the first time I tried to clean the sensor myself. But, the fact is that I have done it lots of times, with different cameras over the years, and it always worked out fine. You just have to be careful and do things slowly and steadily.

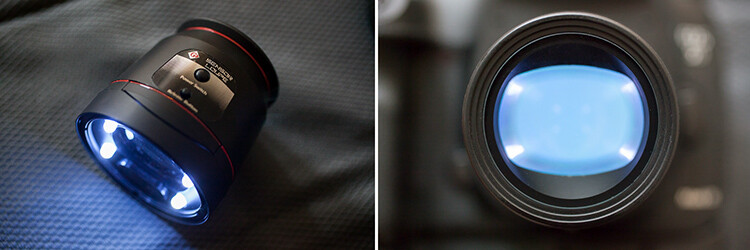
    This is a totally optional step, but I usually use a sensor loupe to check the sensor before I clean it. It is a really nice device that illuminates and magnifies the inside of your camera, making it possible to see with good precision any dust that is on your sensor.
    11

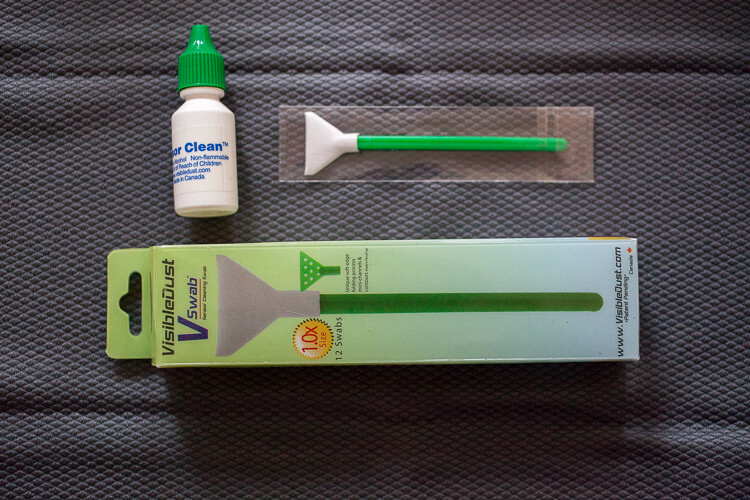
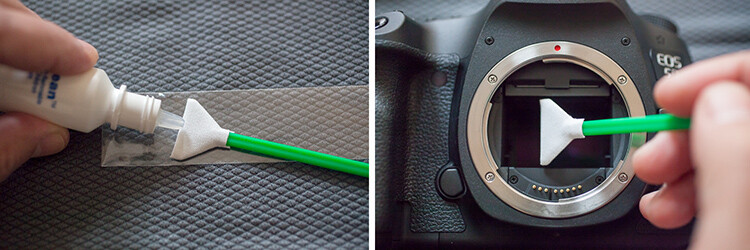
    Now for the cleaning part itself, there are many different systems and brands out there for sensor cleaning. I have tried a few and my favorite is the Vswab by Visible Dust which consists of one time use soft-edge swabs, and a sensor cleaning fluid that you use to clean the sensor from any smudges or dust specs. There are specific swabs for different size sensors, so be sure to buy the correct one for your camera.
    12

    Just get the swab a little wet with the cleaning fluid (a drop or two is all you need) then activate the mirror lockup on your camera (or use the sensor clean setting – check your camera’s user manual if you aren’t sure how to lock it up for cleaning). Wipe your sensor from left to right, just one time, touching it but trying not to apply too much pressure.
    Most of the times it works at first, but I always check it again with the sensor loupe after cleaning, and if needed I swab a second time.

    Note: Keep it mind that these swabs can only be used one time, so if you go for a second clean use a new swab.

    This allows the sensor to be clean all the time, avoiding spots on your images, caused by dust specs the get inside your camera every time you change your lenses.
    13

    These simple maintenance steps gives me confidence that my equipment is in top shape, and that I can be sure that it is going to work fine next time I pick it up.

    Remember, keep it clean and ready to fire!

    googletag.cmd.push(function() {
    tablet_slots.push( googletag.defineSlot( “/1005424/_dPSv4_tab-all-article-bottom_(300×250)”, [300, 250], “pb-ad-78623” ).addService( googletag.pubads() ) ); } );

    googletag.cmd.push(function() {
    mobile_slots.push( googletag.defineSlot( “/1005424/_dPSv4_mob-all-article-bottom_(300×250)”, [300, 250], “pb-ad-78158” ).addService( googletag.pubads() ) ); } );

    The post How to Clean Your Photography Gear and Keep it in Good Shape by Ivo Guimaraes appeared first on Digital Photography School.


    Digital Photography School