Blog

  • Back to the action: Nikon D500 Review

    The Nikon D500 is a 21MP APS-C DSLR capable of shooting at up to 10 frames per second and featuring an autofocus system derived from the one in the D5. In other words, it’s exactly the kind of high-end DX format body that appeared to have become extinct with the D300S.

    The six-and-a-half years that have passed since the D300S’ launch have seen the camera market move on considerably but the D500 does much to reclaim the position as one of the pre-eminent APS-C camera on the market.

    As you might expect, much of the improved capability of the camera centers around sports and high-speed shooting, with significant upgrades to the shooting rate and autofocus system, but there are also major upgrades to the viewfinder, video capabilities and connectivity options which expand its utility beyond one particular niche.

    Key Features

    • 20.7 MP APS-C (DX Format) sensor
    • 153 point AF module with 99 cross-type points
    • 180,000 pixel RGB sensor for metering and subject recognition
    • AF point joystick
    • 10 fps shooting for up to 200 shots (lossless compressed 14-bit Raw to XQD card)
    • 4K (UHD) video from 1.5x crop of sensor
    • 100% coverage viewfinder with 1.0x magnification
    • 2.36m dot tilt up/down touchscreen
    • Wi-Fi and Bluetooth connectivity with NFC for setup
    • Mic and headphone sockets
    • USB 3.0 connector
    • Anti-flicker option for working under artificial lighting

    A good sport

    Much of the D500’s capability is built around the ability to focus and shoot very quickly. Its 153-point AF module offers near full-width coverage and is linked to a 180,000 pixel RGB metering sensor to further improve its AF tracking capabilities. Interestingly, and like the D5, the D500’s AF system now offers two parameters for fine-tuning the autofocus tracking behavior, letting the user specify the type of subject movement and the correct response to another object blocking the targeted subject. Existing Nikons only let you specify duration, suggesting Nikon is trying to expand the range of shooting situations for which the AF system can be optimized.

    Only 55 of the camera’s AF points can be directly selected and the D500 gains both a joystick and a touchscreen to make it as fast as possible to select the point you want to use. Add to this the ability to shoot up to 200 Raw frames before slowing down (if you use an XQD card), and it becomes obvious that the D500 is intended as a high-speed pro/semi-pro camera in a way the D7000 series never was.

    How’s that for coverage? The D500 doesn’t just boast a lot of autofocus points, it also offers them across most of the width of the frame, which is useful whether you’re manually selecting a point or letting the camera track your subject.

    The D500 also gains an anti-flicker option designed to ensure the camera shoots in-sync with the brightest point in the flickering cycle of artificial lights. It’s a feature we first saw on the Canon EOS 7D Mark II and we’d expect it to be particularly valuable for shooting indoor sports such as basketball.

    Another sign that this is a true high-end camera is the inclusion of a larger viewfinder. Like previous DX00 class cameras it has 100% coverage but it also offers 1.0x magnification, which is the largest optical viewfinder we can remember seeing in an APS-C camera (electronic viewfinders are a different matter, since size and brightness isn’t constrained by sensor/mirror size).

    The D500 can also shoot 4K video and includes both an input for using an external mic and a headphone socket for audio monitoring. The camera also offers a flat picture profile to provide more post-processing flexibility, on-screen highlight warnings and power aperture control that allows you to select and change the aperture when in movie mode. There’s no focus peaking option, though, and you can’t zoom-in while you record to confirm or adjust focus as you record.

    Connectivity

    One of the other big features Nikon is touting is its Snapbridge system that uses Bluetooth LE (a low-power variant of Bluetooth also known as Bluetooth Smart), and Wi-Fi to maintain a connection between the camera and a smart device. This includes the ability to auto-transfer images from the camera, as well as initiating the Wi-Fi connection for remote shooting or manual image transfer.

    Context

    To show where the D500 sits in the lineup, here are the major feature differences between it and the less expensive D7200, along with a comparison back to the D300S – not because we expect anyone to be choosing between them, but to show how much of a step forward the camera represents.

       Nikon D500 Nikon D7200 Nikon D300S
    Sensor Resolution 21MP 24MP 12MP
    AF points 153 (99 cross type) 51 (15 cross-type) 51 (15 cross-type)
    Max frame rate 10 fps
    • 6 fps
    • 7 fps in 1.3x crop mode
    • 7 fps
    • 8 fps with battery grip
    Buffer depths 200 lossless compressed 14-bit Raw

    ~17 14-bit Raw
    ~28 12-bit Raw

    30 lossless compressed 14-bit Raw
    Shutter durability rating 200,000  150,000  150,000
    Viewfinder
    • 1.0x magnification
    • 100% coverage
    • 0.94x mag
    • 100% coverage
    • 0.94x mag
    • 100% coverage
    Rear screen
    • 2.36m dots 3.2″
    • Tilting
    • Touch sensitive
    • 1.23m dots 3.2″
    • Fixed
    • 920k dots 3.0″
    • Fixed
    Video Resolution
    • UHD/30p
    • 1080/60p
    • 1080/60p
    •  720/24p
    Mic/Headphone? Yes/Yes Yes/Yes Yes/No
    Wi-Fi? Yes (and Bluetooth) Yes No
    Built-in flash? No Yes Yes
    AF-On Button? Yes No Yes
    Body construction Magnesium Alloy + Carbon fiber composite Magnesium Alloy + Carbon fiber composite Magnesium Alloy
    Battery Life (CIPA) 1240 shots/charge 1100 shots/charge 950 shots/charge
    Weight (Body Only) 760g 675g

    840g

    Review History

    Review History
    26 April 2016 Studio scene and Raw dynamic range published.
    16 May 2016 Introduction, Body and Handling, Operation and Controls, Wi-Fi and Connectivity and Video pages published
    25 May 2016 Autofocus, Loose Ends and Conclusion pages added. Review Finalized

    Articles: Digital Photography Review (dpreview.com)

  • How to do Bulk Resize and Edit in Photoshop

    Have you ever found yourself with a batch of photos that you needed to have edited in the same way? Rather than editing each image one-by-one, Adobe Photoshop offers batch editing processes that can help you save time, while preserving consistent quality among your images.

    This tutorial will show you how to use Photoshop Actions to resize and edit multiple photos, along with a quick tip on how to replicate this process in Lightroom.

    What You Need

    The bulk editing process is pretty easy and straightforward, requiring just a handful of things:

    • A batch of images you want to bulk edit
    • Adobe Bridge
    • Adobe Photoshop
    • Basic Photoshop working knowledge

    Get Started: Record an Action in Photoshop

    The very first step is to determine the process or edit that you wish to have automated, and record it as an Action in Photoshop. In this case, let’s use the example of resizing an image. Then you’ll use Bridge to select your set of images and apply the Action to all of them at once.

    Step 1: Open Photoshop and have a sample image open to perform this action on. Go to the main menu bar and click Window > Actions.

    Photoshop bulk resizing edits


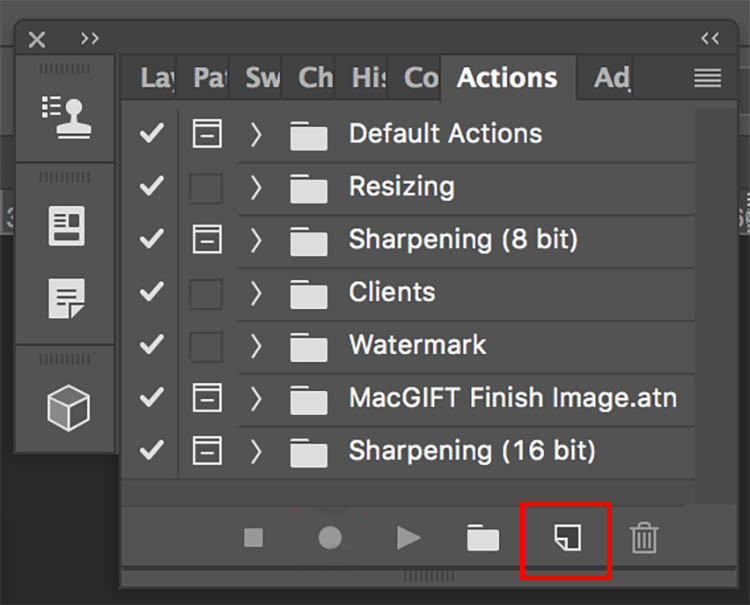
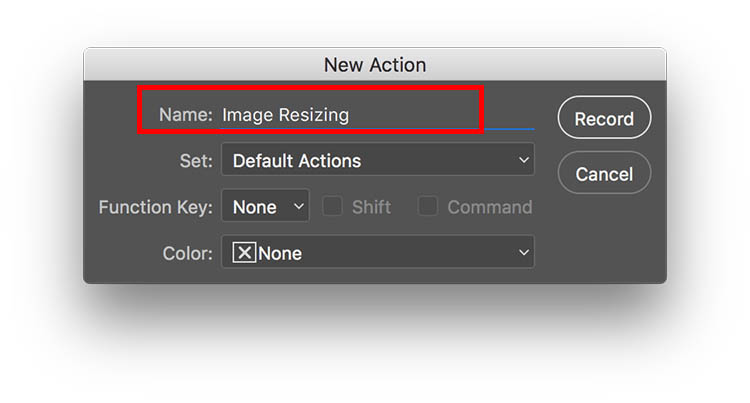
    Step 2: When the Actions panel pops up, click the bottom right button next to the trash can icon that says “Create New Action.” Enter a name for your action, such as “Image Resizing.” Then start recording your new action by clicking the “Record” button.

    Bulk edits new action

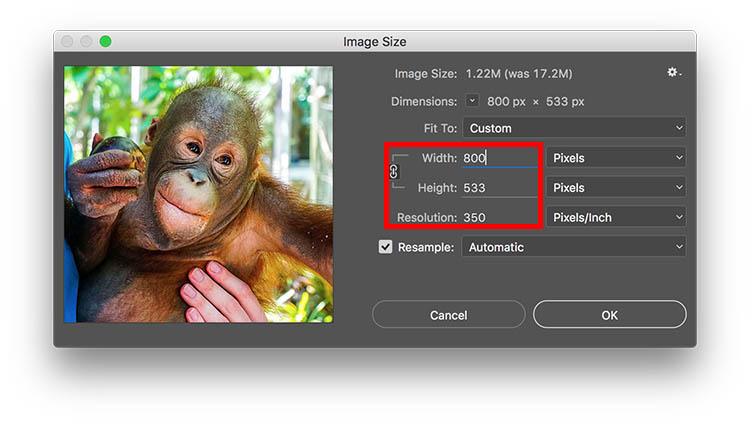
    Step 3: Now begin the series of steps that you want to have recorded. For resizing, head up to the main Photoshop menu bar and go to Image > Image Size. Input your ideal photo size, such as 800 pixels wide.

    Photoshop bulk resizing edits

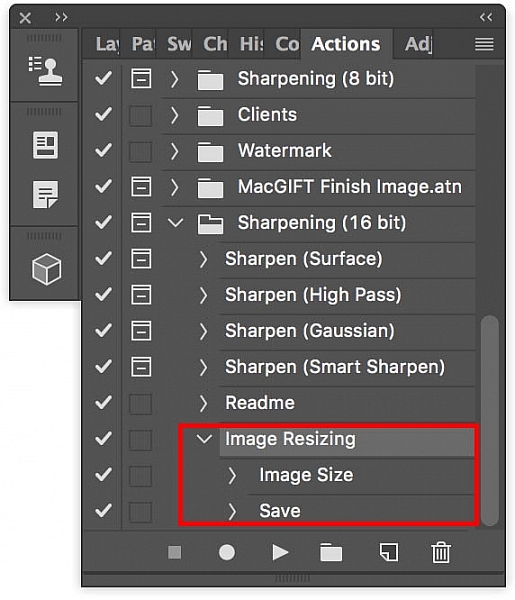
    Step 4: After you’ve completed all of the steps for your action, go back to the Actions panel and click on the Stop button to end recording. You should now see your saved action within the panel.

    Bulk edits image resizing

    Run A Batch of Images Through Photoshop

    After you’ve created your action, it’s time to apply it to your batch of images.

    Step 1: Put all of the photos you want to batch edit into one folder. Open Adobe Bridge and find your folder of images. Click on the folder and select all of the content.

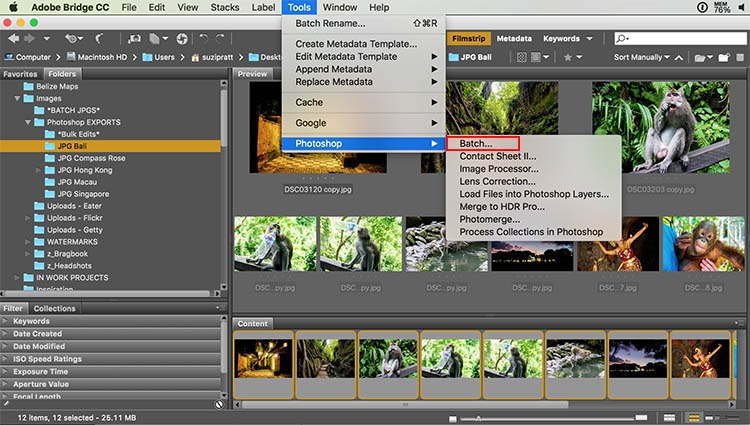
    Step 2: Within Bridge, go to Tools > Photoshop > Batch.

    Photoshop bulk resizing edits

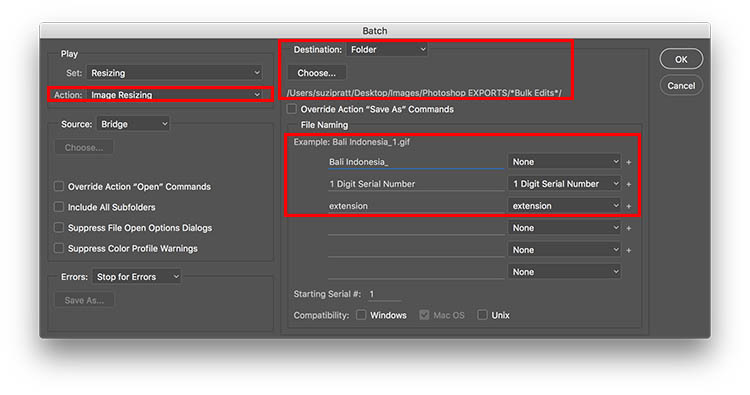
    Step 3: A Batch dialogue box will appear and you’ll want to adjust these settings in particular.

    • In the top left corner, select the action that you want applied to your images (in our case, “Image Resizing.”).
    • In the middle of the dialogue box, specify the folder where your bulk edits should end up. I always have a folder called *Bulk Edits* where I automatically have all of my bulk edited images saved.
    • Finally, you can specify a particular image name that you want to give to your batch of images, as well as assign unique identifiers, such as numeric order. Then click OK to have the action applied to your batch of photos.

    Photoshop bulk resizing edits

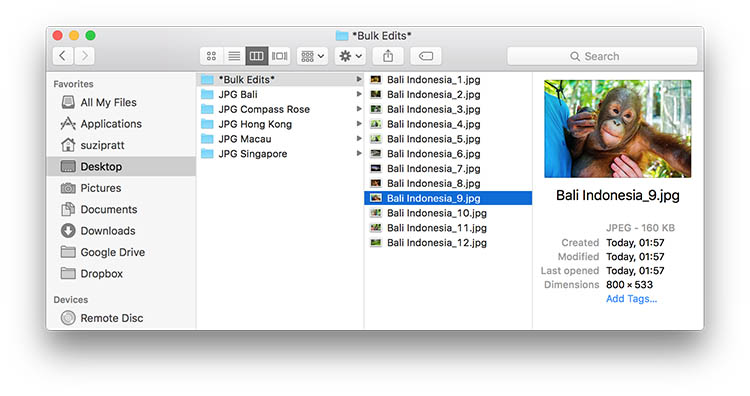
    Step 4: After your batch of images are processed, go to your specified folder to check out the results.

    Photoshop bulk resizing edits

    Making bulk edits in Lightroom

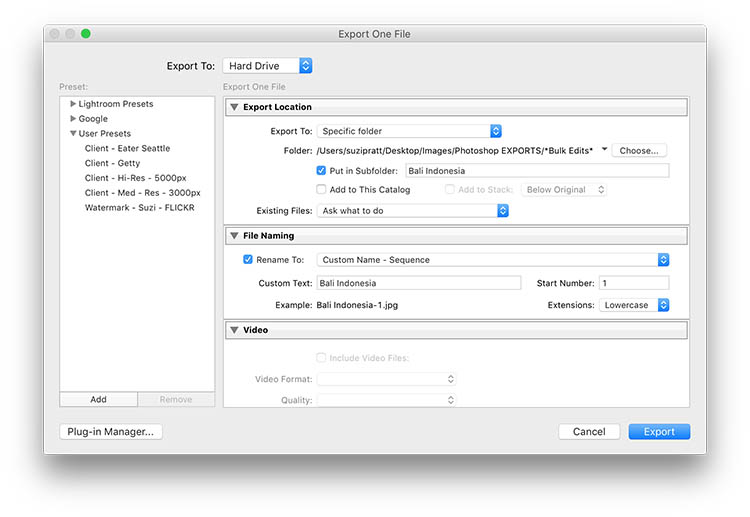
    While doing bulk edits in Photoshop is relatively easy to do, it’s even quicker in Adobe Lightroom. If using Lightroom, import your images and select them all. Then go to File > Export. A pop up dialogue box will then appear with fields where you can specify where to save the images and also rename, resize, and watermark the images (you can also save that as an export preset)

    Lightroom bulk resizing edits

    Over to You

    Do you perform many bulk edits in Photoshop or Lightroom? If so, what are the types of processes you tend to bulk edit? Let me know in the comments below!

    googletag.cmd.push(function() {
    tablet_slots.push( googletag.defineSlot( “/1005424/_dPSv4_tab-all-article-bottom_(300×250)”, [300, 250], “pb-ad-78623” ).addService( googletag.pubads() ) ); } );

    googletag.cmd.push(function() {
    mobile_slots.push( googletag.defineSlot( “/1005424/_dPSv4_mob-all-article-bottom_(300×250)”, [300, 250], “pb-ad-78158” ).addService( googletag.pubads() ) ); } );

    The post How to do Bulk Resize and Edit in Photoshop by Suzi Pratt appeared first on Digital Photography School.


    Digital Photography School

  • Lensbaby Circular 180+ ultra-wide-angle GoPro lens launches on Kickstarter

    Lensbaby has launched a Kickstarter campaign for the Lensbaby Circular 180+, a lens that attaches to a GoPro Hero’s waterproof housing. The Circular 180+ has an ultra-wide 185° field-of-view and features ‘tack sharp edge-to-edge focus,’ according to Lensbaby, as well as ‘intense depth’ and rugged construction.

    The new lens is designed specifically for GoPro’s Hero action cameras, attaching to the waterproof housing with a mount that screws tightly into place. The lens housing is likewise waterproof with an IP68 standard rating, enabling it to handle ‘extended immersion’ to depths down to 3m/9.8ft. The lens is joined by a water-resistant mount, and there’s a waterproof add-on mount as well. Compatibility includes the GoPro Hero, Hero+, Hero+ LCD, and the current standard housing, which supports the Hero4 Silver and Black, Hero3+, and Hero3.

    Lensbaby is seeking $ 30,000 in funding on Kickstarter, where the Circular 180+ lens is offered at various price points as low as $ 69. Backers are expected to receive their orders in August 2016, assuming the funding campaign is successful.

    Via: Kickstarter

    Articles: Digital Photography Review (dpreview.com)

  • 2016 Roundups: Fixed Prime Lens Cameras

    The fixed lens camera market may be a bit niche, but it’s here that you’ll find some of the best cameras you can buy. Sensors ranging from APS-C to full-frame are designed to match their lenses, which cover ranges from 28-75mm equiv., so image quality is top-notch. 

    This segment includes both pocketable models without viewfinders to ‘best worn over your shoulder’ cameras with unique or ultra-high-resolution EVFs. There’s a gigantic spread in pricing, as well. The Fujifilm X70 and Ricoh GR II can be had for under $ 700, while the Leica Q sells for nearly $ 4500.

    For those who want to zoom with their feet,  here are the fixed-lens cameras we think are worth a look:

    • Fujifilm X70
    • Fujifilm X100T
    • Leica Q (Typ 116)
    • Ricoh GR II
    • Sigma dp Quattro series
    • Sony Cyber-shot DSC-RX1R II

    Articles: Digital Photography Review (dpreview.com)

  • Canon EOS 80D Field Test: Barney builds a boat

    The Canon EOS 80D is a 24MP APS-C format enthusiast DSLR, with a strong stills and video feature set. When the opportunity presented itself to build a traditional Greenland-style skin-on-frame kayak with craftsman and friend of DPR Kiliii Yuyan, DPReview editor Barnaby Britton used the EOS 80D to document the process.


    This is sponsored content, created with the support of Canon. What does this mean?

    Articles: Digital Photography Review (dpreview.com)

  • How to Get the Correct Exposure at Night with These Helpful Tips

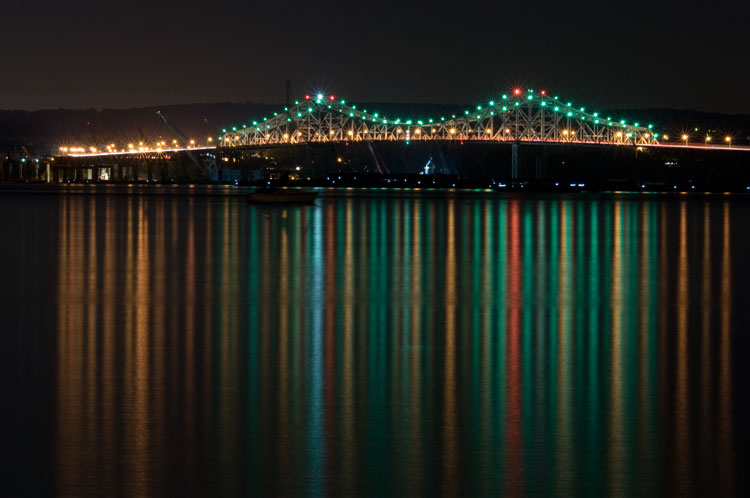
    Tappan zee bridge

    Colorful lights on the Tappan Zee Bridge reflected in the Hudson River at night. Behind the shot: ISO 200, aperture f/8, shutter speed 90 seconds, White Balance tungsten, lens used 80-200mm f/4.5 manual Nikkor zoom.

    Exposing your photos correctly at night can be a bit challenging, and will certainly require some trial and error. In this article, you will learn helpful information to minimize the learning curve. Follow the tips outlined below and you will be taking better night photographs in no time.

    Tappan zee bridge at night

    View of the Tappan Zee Bridge and surrounding landscape at night. Behind the shot: ISO 400, aperture f/8, shutter speed 10 seconds, White Balance auto, lens used 105mm f/2.8 Nikkor.

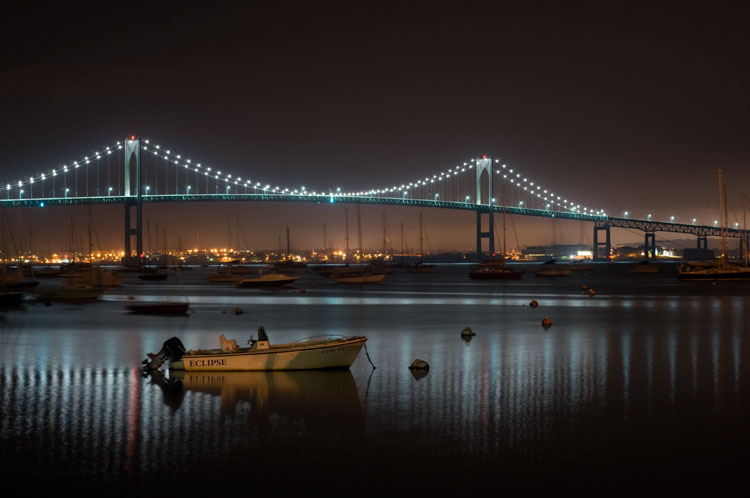
    Claiborne pell newport bridge

    Night-time view of the Claiborne-Pell Newport Bridge and Narragansett Bay, taken in Jamestown, Rhode Island. Behind the shot: ISO 200, aperture f/8, shutter speed 25 seconds, White Balance fluorescent, lens used 50mm f/1.8D Nikkor.

    Things You’ll Need

    A Tripod

    If you’re shooting at night, your exposures are going to be pretty long (anywhere from one to 30 seconds, or more). Since it is impossible to hold your camera perfectly still for that long, you will need a sturdy tripod, so that your camera does not move at all during the exposure. For added stability, you can hang your camera bag (or another somewhat heavy object) from the hook on your tripod’s center column. This is especially handy in windy conditions.

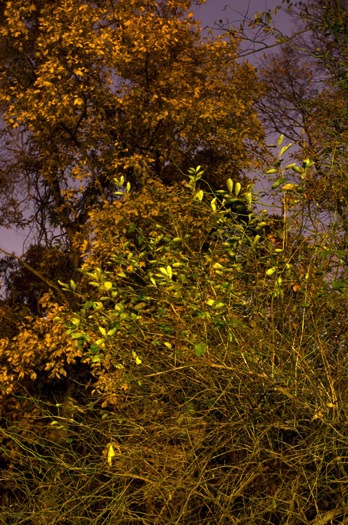
    Plants at night

    Long exposure of plants illuminated by streetlight at night in Nyack, New York. Behind the shot: ISO 400, aperture f/4, shutter speed 30 seconds, White Balance tungsten, lens used 50mm f/1.8D Nikkor.

    Illuminated plant at night

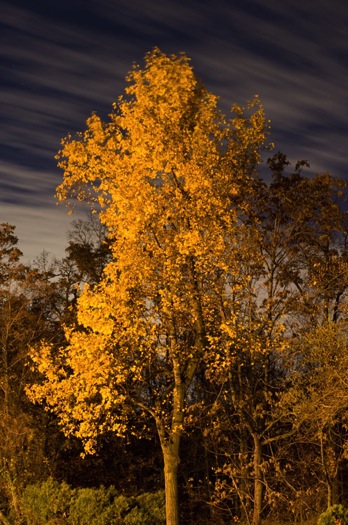
    Golden plant illuminated by streetlight at night in Nyack, New York. Behind the shot: ISO 400, aperture f/4, shutter speed 30 seconds, White Balance tungsten, lens used 50mm f/1.8D Nikkor.

    Remote Shutter Release

    With a long exposure, any camera movement can ruin the shot, making it soft or blurry. To ensure you get a sharp image, use a remote shutter release (remote trigger). The best type of shutter release to use is the kind that functions as a timer remote as well. If you don’t have a remote shutter release, you can use your camera’s self-timer. The only downside to using the self-timer is that you will have to keep your shutter speed at 30 seconds or less. If you don’t have too much light, you can always increase your aperture (decrease the f-stop) or increase your ISO to speed up your shutter speed.

    Colors of night

    Assorted foliage illuminated by streetlights in Nyack, New York. Behind the shot: ISO 200, aperture f/5.6, shutter speed 30 seconds, White Balance fluorescent, lens used 24mm f/2.8D Nikkor.

    Colorful night

    Colorful plants and trees in Nyack, New York. Behind the shot: ISO 200, aperture f/5.6, shutter speed 30 seconds, White Balance fluorescent, lens used 24mm f/2.8D Nikkor.

    Camera Settings

    Shoot RAW

    Keeping image quality in mind, you should always strive to shoot in RAW format. It records more pixel information, and does not compress your images at all. RAW provides you with more post-processing options, including white balance correction. If you happen to under or over expose an image, you can easily adjust the exposure if your image is in RAW format.

    ISO

    When taking photographs with little available light, you are better off using a low ISO (400 and below) and longer exposure times. This is important so you don’t get too much noise (or grain) in your images. Also, make sure you have Long Exposure Noise Reduction turned on in your camera’s settings.

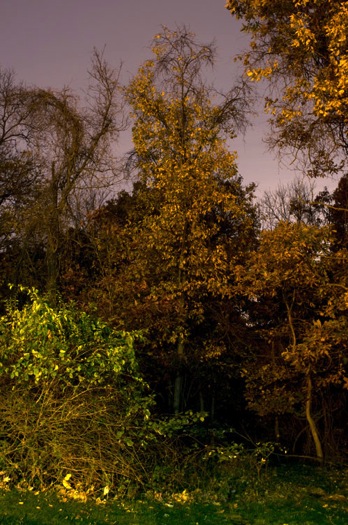
    Yellow leaved tree moving clouds at night

    Yellow-leaved tree and moving clouds at night in Nyack, New York. Behind the shot: ISO 200, aperture f/5.6, shutter speed 30 seconds, White Balance tungsten, lens used 50mm f/1.8D Nikkor.

    Tree in wind

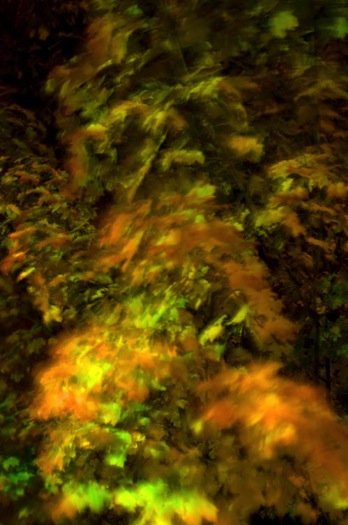
    Tree in wind at night in Valley Cottage, New York. Behind the shot: ISO 400, aperture f/2.8, shutter speed 30 seconds, White Balance tungsten, lens used 50mm f/1.8D Nikkor.

    Use Manual Mode

    While shooting in very low light, your camera’s light meter may not read the scene too well. Your best bet is to use Manual mode, where you control both the aperture and the shutter speed. To find a baseline for the correct exposure, you can use the following trick (which I learned in this blog post):

    1. Set your ISO to 6400
    2. Set the aperture you would like to use
    3. Set your shutter speed at one second

    Take a test shot using these settings to get an idea of what your image will look like. Note, these settings are almost equivalent to a 1-minute exposure at ISO 100, a 30-second exposure at ISO 200 and a 15-second exposure at ISO 400, etc. If your scene is too bright with these settings, you can see what a half second exposure at 6400 looks like. This would equal a 30-second exposure at ISO 100, a 15-second exposure at ISO 200 and a 8-second exposure at ISO 400. This baseline is a great guide, you can easily take test shots to figure out what shutter speed to use.

    Autumn leaves in motion

    Autumn leaves in motion at night in Valley Cottage, New York. Behind the shot: ISO 400, aperture f13, shutter speed 30 seconds, White Balance fluorescent, lens used 24mm f/2.8D Nikkor.

    Tree at night

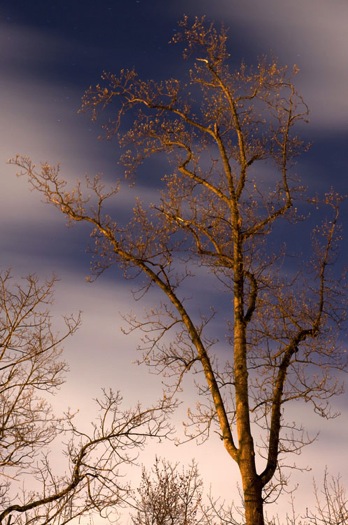
    Tree and clouds in motion at night in Nyack, New York. Behind the shot: ISO 400, aperture f/5.6, shutter speed 30 seconds, White Balance tungsten, lens used 50mm f/1.8 manual Nikkor.

    If you use the above trick, you won’t unnecessarily waste time taking a bunch of long test exposures. As it is, long exposure night photography is rather time-consuming. Make sure you switch your ISO back to 400, or below, before you start taking photos that you intend to keep.

    In scenes where you have a decent amount of available light (e.g. places with numerous streetlights), you may be able to use Aperture Priority mode instead of Manual mode.

    In Conclusion

    Night photography can be rather tricky, and requires a good amount of practice. In time, you will have a feel for the amount of light in various night scenes, and be able to figure out accurate camera settings with relative ease. Hopefully, the information contained in this post will help you capture great long exposure night shots, that don’t need much post-processing.


    googletag.cmd.push(function() {
    tablet_slots.push( googletag.defineSlot( “/1005424/_dPSv4_tab-all-article-bottom_(300×250)”, [300, 250], “pb-ad-78623” ).addService( googletag.pubads() ) ); } );

    googletag.cmd.push(function() {
    mobile_slots.push( googletag.defineSlot( “/1005424/_dPSv4_mob-all-article-bottom_(300×250)”, [300, 250], “pb-ad-78158” ).addService( googletag.pubads() ) ); } );

    The post How to Get the Correct Exposure at Night with These Helpful Tips by Marshall Reyher appeared first on Digital Photography School.


    Digital Photography School

  • Brian May launches smartphone adapter for stereoscopic virtual reality viewer

    Brian May, guitarist with the band Queen and a stereo photography enthusiast, has launched a kit that allows users to view 3D stereo pairs and virtual reality content on a smartphone for just £25 (approx. US $ 37). The OWL VR Smart Phone Kit is an adaptation of a traditional Victorian-style stereo viewer sold by May’s London Stereoscopic Company. Instead of inserting card-mounted stereo pairs, users fix a plate to the viewer’s aperture that holds the smartphone in place. May says that the device provides a much better value alternative to standard VR headsets, and it is more adaptable and of higher quality than low cost models. It’s in much the same vein as Google’s Cardboard VR and other budget-friendly viewers designed for Google’s VR app.

    The OWL has a rigid structure but folds flat for storage, is made from ‘high-grade’ polypropylene and features ‘high quality’ lenses with adjustable focus. The adapter allows access to all the phone’s controls while it is in place, including the headphone socket so audio can be enjoyed during 3D movies and VR experiences.

    Although not in continuous existence, the London Stereoscopic Company was founded in 1854. Over the years it created and sold stereo equipment and cards showing scenes from all around the world. Its fortunes have undulated along with the popularity of stereo photography, and was dissolved a number of times. It was revived in 2008 to promote and preserve the work of the photographer Thomas Richard Williams. Brian May has been one of the directors of the business since 2008.

    The OWL VR Smart Phone kit will be available from June and will ship internationally. For more information visit the London Stereoscopic Company’s website.

    Press release:

    Virtual Reality from Brian May. It’s real.

    Lifelong stereoscopy enthusiast and collector, and, incidentally, world-famous rock guitarist, Brian May this month launches the OWL VR Smart Phone Kit, a Virtual Reality and 3-D stereo image viewer that brings all the excitement of VR within reach of anyone with a smart phone.

    Brian’s London Stereoscopic Company has been supplying his unique original patent OWL Stereo Viewer to 3-D enthusiasts since 2009, enabling a whole new audience to view the company’s reproductions of classic Victorian stereo cards, as well as the originals, plus recently released astronomy and Queen-focused 3-D images. The OWL has been recognised and adopted by 3-D organisations world-wide, as a high quality immersive device.

    The new OWL VR Smart Phone Kit takes the existing OWL Stereo Viewer and, through use of a simple but ingenious adaptor, enables its use with a smart phone not only to view online 3-D images, but also those taken by the user, and commercially available virtual reality content. Manufactured from high-grade polypropylene, and fully collapsible to a thin flat configuration, the OWL is supplied ready for use in seconds. Its carefully positioned high-quality optical lenses, plus fully adjustable focus, present every user with the ideal optical geometry for perfect viewing of side-by-side 3-D images.

    Working with any smart phone, the OWL VR Kit has a significant advantage over most other VR devices, which are usually tied to just one particular make or model of phone. And, in contrast with most of the low cost viewers available, the OWL kit offers full access to the controls on the phone at all times. Access to the headphone socket is also unobstructed. This is particularly useful when using the OWL to watch virtual reality films of concerts, or other content with a soundtrack. It also enables users to connect their smart phone to a home cinema system to generate surround sound to complement the 360° 3-D visuals.

    Commenting on the launch, Brian May said, “Virtual Reality has taken the consumer electronics world by storm over recent months and masses of content is now rapidly becoming available. However, until now, users have had the choice of an expensive VR viewer that puts it out of reach of many people or a very low cost alternative that just doesn’t do the format justice.” He continues, “The OWL Smart Phone Kit changes all that; for a very modest outlay, anyone can now enjoy the VR experience, and also gain access to the fascinating world of Stereoscopy. Plus, with the apps that are available for smart phones, it’s now possible to take your own 3-D images and enjoy them instantly using this simple OWL Kit.”

    The OWL Smart Phone VR Kit will be available from mid June 2016 for £25, direct from
    www.londonstereo.com/lsc_shop.html

    Articles: Digital Photography Review (dpreview.com)

  • Painting in VR: Kingspray Graffiti Simulator & Google Tilt Brush

    [ By WebUrbanist in Art & Drawing & Digital. ]

    graffiti simulator

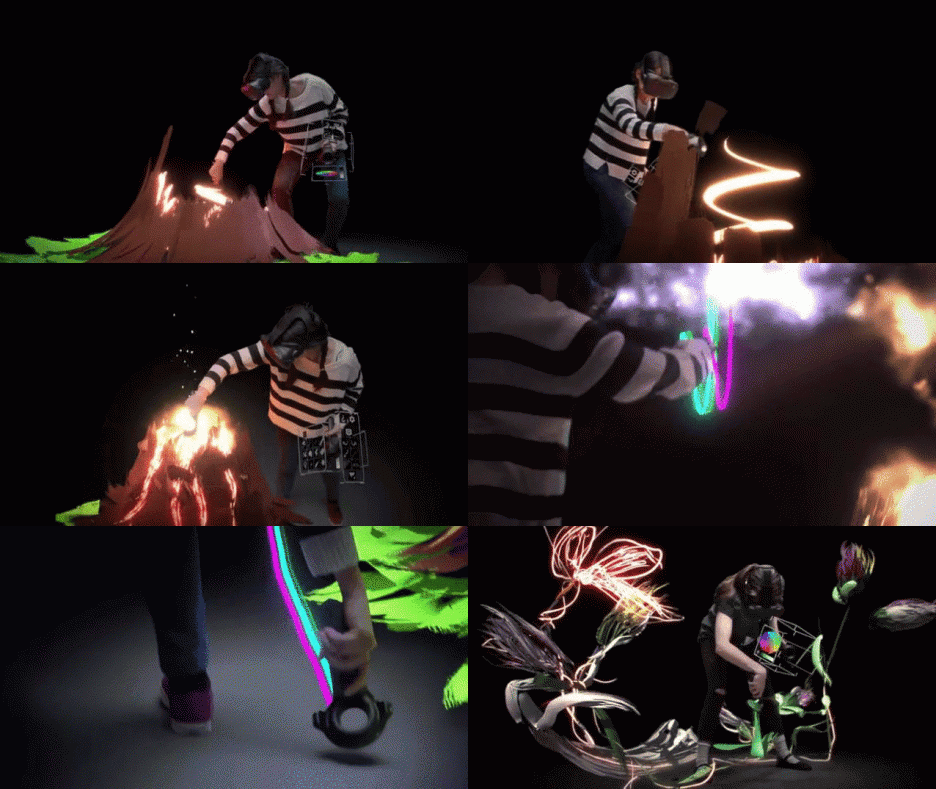
    Virtual reality is not just about interacting with people at distance, or engaging with static worlds designed by others – it can also be a place where users are invited to create their own works of art and design. Games and apps like the two featured here (in videos below) are opening up new digital worlds for creatives to explore and shape.

    graffiti simulator experience

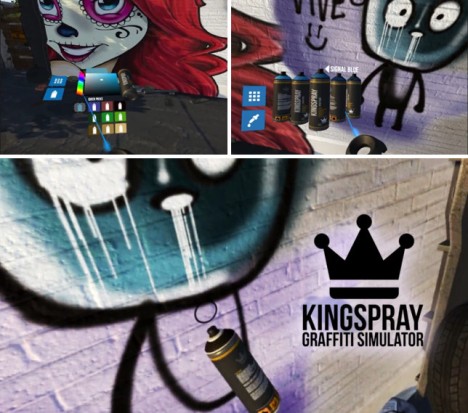
    The Kingspray Graffiti Simulator, currently in development, gives players a palette and can of spray paint, adding realism through trips and spraying effects. Walking around the simulated world, artists can paint over and re-tag, then walk around to view other works and step back to enjoy the view.

    tilt brush artworks

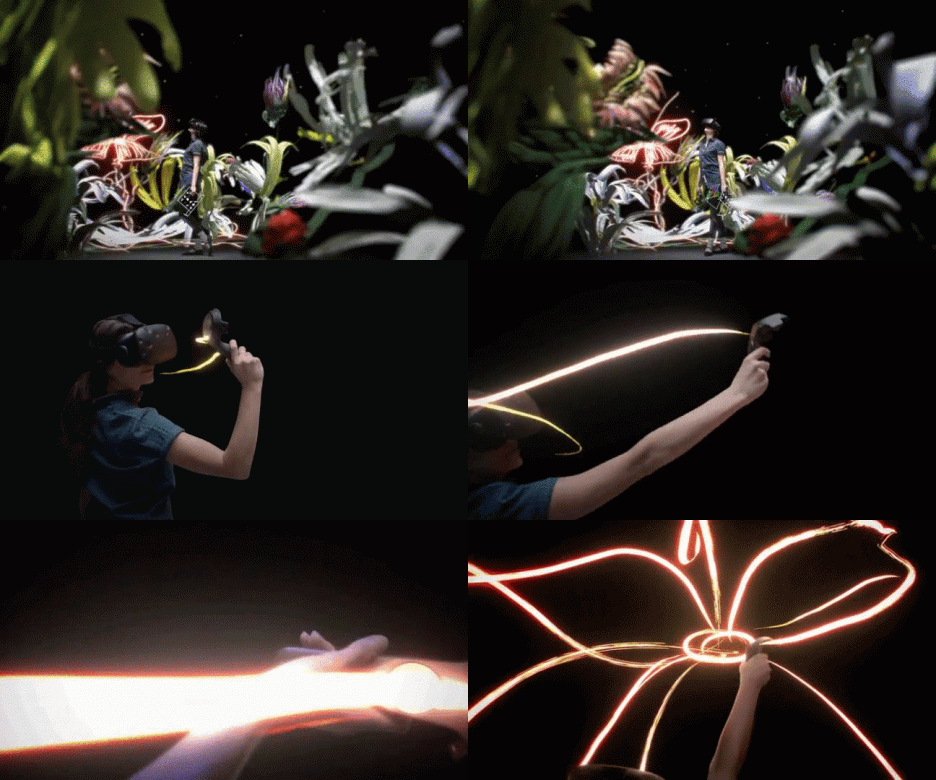
    The Tilt Brush app from Google lets users sketch and draw in three dimensions. While the Graffiti Simulator places you in 3D space painting 2D surfaces, the Tilt brush actually lets you paint in space all around you. In turn, the finished pieces can be experienced from various perspectives by the artist and viewers invited to share the experience.

    3d art

    light painting

    “Tilt Brush, at its core, is a virtual reality painting application. It creates something anyone can use, intuitively, for kids, artists, and absolutely anyone,” say the app’s developers. “Within the first 30 or 45 seconds, anyone can start VR painting and making marks in space all around them… It allows everyone to see how powerful VR is and how transformative it will be.”

    Share on Facebook


    [ By WebUrbanist in Art & Drawing & Digital. ]

    [ WebUrbanist | Archives | Galleries | Privacy | TOS ]


    WebUrbanist

  • Olympus TG-Tracker keeps up with your outdoor adventures

    $ (document).ready(function() { SampleGalleryV2({“containerId”:”embeddedSampleGallery_6448570778″,”galleryId”:”6448570778″,”isEmbeddedWidget”:true,”standalone”:false,”selectedImageIndex”:0,”startInCommentsView”:false,”isMobile”:false}) });

    Olympus has updated its tough camera lineup with the Stylus Tough TG-Tracker, a rugged action-cam that specializes in tracking location, temperature, altitude and more. The TG-Tracker takes 8MP stills with a 1/2.3″ sensor and provides 4K/30p and 1080/60p video recording options. It offers a fixed F2.0 13.9mm equiv. lens and the whole unit is rated to be waterproof to 30m/100ft, shockproof from 2.1m/7ft, freezeproof to -10C/+14F and crushproof to 100kgf/220lbf.

    Also provided are a 1.5″ flip-out (but non-rotating) LCD and a built-in lamp with 30 and 60 lumen settings, the latter of which can be used for a flashlight mode. The tracking features for which the camera is named for include built-in GPS, barometric pressure sensor, temperature sensor, compass and an accelerometer. A pistol-style SG-T01 grip is bundled with the camera to help keep shots steady. The grip itself bends into a few different configurations to enable high or low angle shooting, and of course, selfies.

    The camera syncs with Olympus’ Image Track app via Wi-Fi to display data logs including the user’s route and elevation, and can display detailed summaries of excursions including total elapsed time, distance traveled, average speed and minimum/maximum elevation, among other data points. Images and video (though not 4K clips) can be transferred to the user’s smartphone using the app as well. 

    The Olympus Stylus Tough TG-Tracker is due to hit retailers in June for $ 349.99 in green and black body options.


    Press release:

    TRACK THE EXTRORDINARY: NEW OLYMPUS STYLUS TOUGH TG-TRACKER CAPTURES EVERY DETAIL OF YOUR ADVENTURES

    Ultra HD 4K Video Comes Alive with High-Quality Imaging and Rich Log Data That Tells an Immersive Story

    CENTER VALLEY, PA, May 24, 2016 — Olympus expands the outdoor video experience with the latest member of the Tough product family, the new Olympus Stylus Tough TG-Tracker. The Stylus Tough TG-Tracker is the first rugged experiential camera that combines Olympus’s Tough rugged capabilities with an advanced Field Sensor System,*1 a 204° ultra-wide-angle F2.0 high-speed lens and Ultra HD 4K 30p video capture to record brilliant action video with corresponding activity data. The Stylus Tough TG-Tracker’s built-in Field Sensors include GPS,*2 a barometric-pressure sensor, a temperature sensor, an e.Compass and an accelerometer. Data logs can be displayed simultaneously with recorded images using the Olympus Image Track app, enhancing the excitement of reliving outdoor action with an immersive, data-rich viewing experience.

    Like all other cameras in the Olympus Tough™ series, the Stylus Tough TG-Tracker is optimized for the most extreme shooting environments, with five rugged capabilities: waterproof to depths of 100 feet,*3 dustproof,*4 shockproof from 7 feet,*5 freezeproof to 14°F,*6 and crushproof up to 220 pounds of force,*7 — no protective case required. The Stylus Tough TG-Tracker represents a new category of rugged cameras with its Field Sensor System that’s capable of capturing location, altitude and depth, g-force and air and water temperature while users record videos and still images of their outdoor adventures.

    A high-intensity LED headlight is integrated into the camera body for shooting support in low-light conditions. The bundled SG-T01 Steady Grip helps with stable framing during hand-held shooting. The Olympus Stylus Tough TG-Tracker’s compact body and tilt-out LCD monitor provide for quick and easy video capture, including low- and high-angle shooting.

    *1 Because the GPS and other field sensors are not intended for use as strictly accurate measurement functions, under no circumstances are measured values (such as longitude and latitude, altitude, shooting direction and temperature) guaranteed. Additionally, information may differ from actual circumstances due to the effects of events such as natural disasters. *2 Depending on the country/region of use, different laws and regulations may be applicable regarding the use of the GPS function. Be sure to follow local laws and regulations. Turn off the GPS function in places where its use is forbidden or restricted, such as inside airplanes. Either the A-GPS Utility computer software or the Olympus Image Track app is required to update the Assist GPS data. *3 Waterproof functionality is equivalent to JIS/IEC protection class 8 (IPX8) according to tests performed following our in-house methods. *4 Equivalent to JIS/IEC protection class 6 (IPX6) according to tests performed following our in-house methods. *5 When the LCD monitor is closed, the Lens Protector is attached and the Mount Coupling, grip and Underwater Lens Protector are not attached, according to tests performed following our in-house methods. *6 The number of shots that can be recorded is reduced at very low temperatures. *7 When the LCD monitor is closed, the Lens Protector is attached and the Mount Coupling, grip and Underwater Lens Protector are not attached, according to tests performed following our in-house methods.

    U.S. Pricing and Availability
    The Olympus Stylus Tough TG-Tracker will be available in green and black beginning in June 2016 with an estimated street price of $ 349.99 (U.S.) and $ 479.99 (Canada). For a complete list of specifications, visit the Olympus website: http://www.getolympus.com/us/en/digitalcameras/tough/tg-tracker.html

    Main Features

    Field Sensor System for capturing all the action of outdoor adventures

    The wearable-device market has expanded in recent years, offering ways to automatically record location information, steps walked, calories burned and other life-logging data. In the same spirit, the new Olympus Stylus Tough TG-Tracker is equipped with the Field Sensor System, which includes GPS, a barometric-pressure sensor, a temperature sensor, an e.Compass and an accelerometer. Users can select from three different display options on the LCD monitor, including a compass display, level display, and log display, to show the data captured via these sensors. Log Mode records data without video for extended time periods.

    1. GPS
      The camera uses GPS (with GLONASS and QZSS functionality) to precisely calculate the user’s latitude and longitude from satellite signals. Additionally, Assist GPS can significantly increase the speed of the system’s positioning calculations by downloading satellite information ahead of time using the Olympus A-GPS Utility computer app or the Olympus Image Track smart-device app.
    2. Barometric-pressure sensor
      Altitude and water depth are calculated based on air- and water-pressure information. When the camera is submerged below a depth of half a meter, the Underwater Detector will automatically switch the camera to the optimal mode for shooting underwater so you can focus on getting the best shot without worrying about complicated controls. The monitor log display will also automatically switch from altitude to water-depth information.
    3. Temperature sensor
      This sensor records ambient temperature with a high degree of precision. The Stylus Tough TG-Tracker captures water temperature in both Video and Log Mode, and air temperature in Log Mode only.
    4. e.Compass
      This sensor tracks the direction in which the camera lens is being pointed. It provides an easy way to confirm direction when shooting outdoors.
    5. Accelerometer
      This sensor measures acceleration (g-force) on three axes to record the photographer’s movements. When a preset acceleration level is detected while a video is being recorded, the Chapter Function*1 automatically identifies and bookmarks the moment. This feature supports editing and playback of exciting scenes, like when jumping and landing in intense sports such as snowboarding and motocross. Users may choose from two levels of acceleration or may turn this feature off.

    Rugged capabilities: waterproof, dustproof, shockproof, freezeproof and crushproof

    With its sealed construction, the Stylus Tough TG-Tracker is waterproof to depths of 100 feet (30 meters). The waterproof seal also makes the camera dustproof, so users don’t have to worry when operating the Stylus Tough TG-Tracker in dusty areas. The dual-layer chassis makes for superb shockproof performance, allowing the camera to clear drop tests from heights of up to 7 feet (2.1 meters). Operation is guaranteed in temperatures as low as 14°F (-10°C), so you can shoot in cold-weather environments where other digital devices fear to tread. The Stylus Tough TG-Tracker also boasts a rigid construction that can withstand loads of up to 220 pounds of force (100 kilograms of force).

    High-quality images captured with an ultra-wide-angle lens

    1. 204° ultra-wide-angle F2.0 high-speed lens
      The Stylus Tough TG-Tracker’s ultra-wide-angle lens was developed using advanced optical technology. Its 204° angle of view is wider than that which can be captured by the human eye, allowing it to record action videos with a dramatic perspective, especially useful for ultra-wide views of outdoor sports scenes.
    2. TruePicTM VII for 4K Image Processor and backlit CMOS sensor
      The Stylus Tough TG-Tracker is equipped with the TruePicTM VII for 4K Image Processor, the latest iteration of the TruePicTM image processors used in the Olympus OM-D and PEN compact system cameras, now with 4K video capability.*2 It quickly processes data from the high-sensitivity, low-noise backlit CMOS sensor to produce high-quality images.

    Versatile shooting style and superb controls

    The compact body provides for quick and easy video capture no matter your shooting style, allowing low- and high-angle camerawork. An SG-T01 Steady Grip is bundled with the camera to help with stable framing during hand-held shooting.*3 The MC-T01 Mount Coupling comes with a small mirror on the front to assist in capturing wide-angle group selfies.*4 The high-intensity LED Headlight is built into the camera body for shooting support in low-light conditions.*5 Its quick-action operation lets you swiftly illuminate subjects for high-quality imaging. Even when the camera is turned off, users can press and hold the Info button to activate the headlight for standalone use.

    Compatibility with the Olympus Image Track smart-device app

    The Stylus Tough TG-Tracker is equipped with built-in Wi-Fi.*6 Using the exclusive Olympus Image Track app, users can easily transfer videos recorded on the camera, along with field data, to a smart device. Users can also display the log data and view images simultaneously, enjoying the experience of the shooting environment during playback. Within the app, the data display can be switched between geographical information and altitude/depth information to best match the scene, and data is saved so that users can conveniently check the information at any time.

    Other Features

    • Time Lapse Movie mode*7 for fixed-point observation of movement such as crowds of people, clouds crossing the sky or flowers opening.
    • Loop Recording function for easier video-data handling.
    • Bundled with the UP-T01 Underwater Lens Protector for underwater shooting.*8 
    • Graphical user interface (GUI) for intuitive control.
    • Electronic 5-Axis Image Stabilization*9 for compensation of every kind of camera motion.
    • 4K Video playback via HDMI connection.
    • Remote control and image transfer with the Olympus Image Share app.

    *1 A “chapter” is a bookmark designating a scene transition in a movie. This feature lets you quickly find the exact spot you want during movie playback. Chapters can be manually inserted by pressing the OK button on the top of the camera, but manually inserted chapters cannot be transferred to the Olympus Image Track smartphone app. *2 4K videos cannot be transferred to a smartphone. They should be viewed on a large TV that supports 4K playback. *3 Because the Stylus Tough TG-Tracker’s angle of view is a diagonal 204°, part of the tripod will appear on the monitor when it is connected directly to the camera. This can be prevented by using the tripod baseplate on the bottom of the Steady Grip. *4 The Mount Coupling attaches to the top of the Steady Grip for mounting on the camera. *5 The LED Headlight can be used only for a limited duration. *6 “Wi-Fi” is a registered trademark of the Wi-Fi Alliance. *7 Users can select from 1080p, 720p or VGA and can record at up to 30 FPS in full HD. *8 The bundled UP-T01 Underwater Lens Protector is required to shoot underwater. Without it, the camera will not be able to focus underwater. The angle of view becomes narrower underwater; users must change the camera’s angle-of-view setting to Underwater. *9 When the Electronic 5-Axis IS is activated, the angle of view becomes narrower.

    Optional Accessories CSCH-125 TG-Tracker Case

    This case can be attached to a backpack or belt, and data logs can be recorded while on the go with the camera inside. The camera can be stored in the case on its own or with the Steady Grip attached. The case is equipped with a carabiner and spiral safety cord so users never have to worry about losing the camera. This accessory can even be used in the rain or in saltwater, so it’s perfect for use during outdoor sports or in harsh environments.

    Articles: Digital Photography Review (dpreview.com)

  • Minimal Luxury: Monumental Concrete Hotel by Tadao Ando

    [ By SA Rogers in Boutique & Art Hotels & Travel. ]

    setouchi aonagi 6

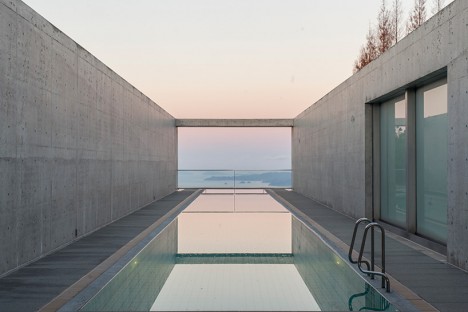
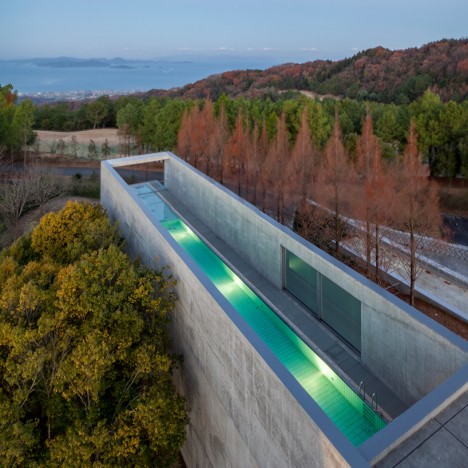
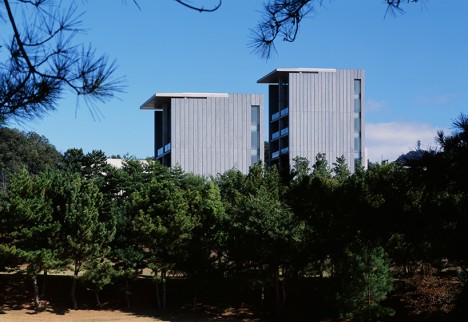
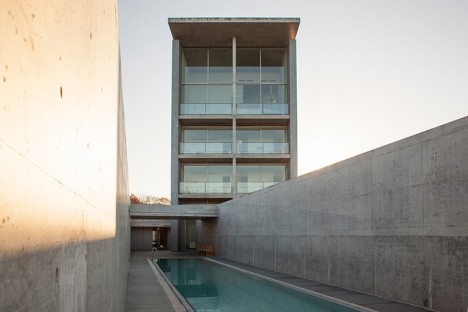
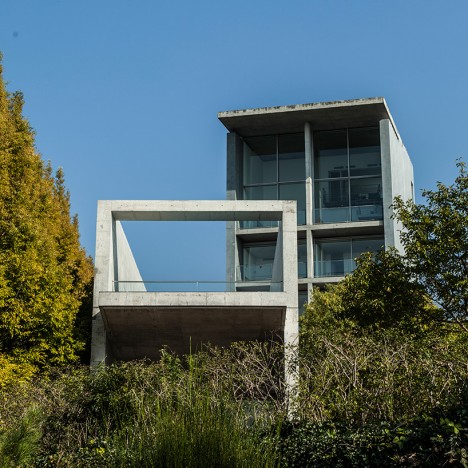
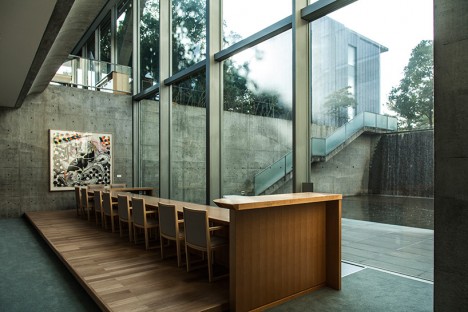
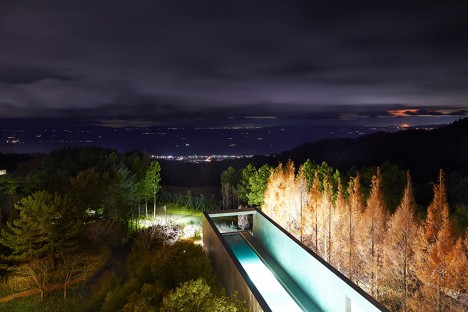
    Master of minimalist architecture Tadao Ando has remodeled a small boutique hotel on Japan’s Shikoku island in a refreshingly spare yet luxurious aesthetic, with few distractions to break up his trademark expanses of concrete and glass. The seven-room Setouchi Aonagi perches on a mountain overlook gazing out onto the glassy surface of the Seto Inland Sea, its narrow rooftop swimming pool extending in the opposite direction like a telescope to focus on the distant skyline.

    setouchi aonagi 1 setouchi aonagi 2

    setouchi aonagi 4

    setouchi aonagi 13

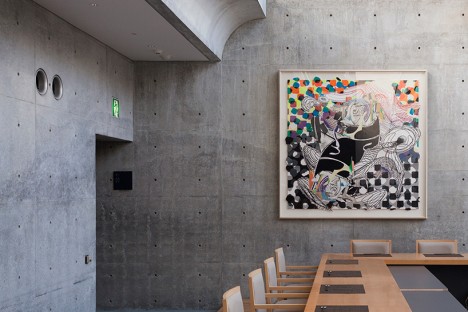
    In recent years, the Setouchi International Art Festival has brought tourists and press from around the world into this quiet corner of Japan, with the central venues all shining examples of Ando’s work, so it was only natural for the Setouchi Aonagi to ‘join the lineup’ as another architectural masterpiece. The building previously functioned as an art museum and private residence, and was outfitted with interior furnishings the architect deemed unnecessary. His transformation strips away all distractions, giving each spacious suite its own subtle theme.

    setouchi aonagi 3

    setouchi aonagi 5

    setouchi aonagi 7

    setouchi aonagi 8

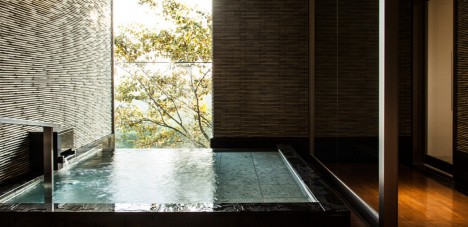
    In addition to the cinematic rooftop pool, there’s an indoor pool dubbed ‘The Cave’ that can be reserved for private use. The hotel notes that the ‘luminous light’ that pours into the building, as well as the view of the sea, are art in and of themselves – but that a selection of minimal contemporary art is also on hand, sparingly displayed to keep the focus on the architecture and surroundings. One example is a mossy garden installation by Yutaka Ono, mimicking the look of the islands when seen from afar.

    setouchi aonagi 12

    setouchi aonagi 11

    setouchi aonagi 10

    setouchi aonagi 9

    The rooms range from about $ 820 per night for the Garden Suite on the bottom floor to $ 1450 for the Aonagi Suite, which might sound a bit steep until you consider the general cost of travel in Japan and the fact that each room sleeps 3 to 5 guests.  Plus, staying in a Tadao Ando creation is a once-in-a-lifetime kind of experience, after all.

    Share on Facebook


    [ By SA Rogers in Boutique & Art Hotels & Travel. ]

    [ WebUrbanist | Archives | Galleries | Privacy | TOS ]


    WebUrbanist