Our team at DPReview TV spent the week shooting with the new Sony a7C. Check out the photos from their review of the camera, including many taken with the new 28-60mm F4-5.6 kit lens.
The post 4 Ways to Shoot Portraits in the Middle of the Day appeared first on Digital Photography School. It was authored by John McIntire.
One of the first things you learn when starting out in portrait photography is that the midday sun does not provide great lighting conditions.
As with all things in photography, there are plenty of exceptions. But, for the most part, this is sound advice. Because of the harsh, contrasty light, and the deep shadows that such light produces, shooting portraits in the middle of the day can be a real challenge.
Creating portraits on location in the middle of the day can prove a real challenge, thanks to unflattering light from the high sun. Fortunately, there are loads of ways to get around this and take back all those wasted shooting hours.
Canon 5D Mark III | Canon EF 50mm f/2.5 Macro | 50mm | 1/800 sec | f/5.6 | ISO 200
Of course, you can always go and find a bit of open shade for more flattering light, but what do you do when isn’t an option? And what do you do when you have a location that you love, but the light isn’t perfect at the moment?
You could always wait. But with portraits, you can’t necessarily count on another person’s enthusiasm for waiting around for the right light. Fortunately, there are a lot of tools that will help you modify the midday sun so that the light is more flattering for portraiture.
By far, the easiest way to shoot in the middle of the day is to do so on an overcast day with heavy cloud cover. Of course, just like waiting around for the golden hour, you can’t always wait around for clouds.
Canon 5D Mark III | Canon EF 85mm f/1.8 | 85mm | 1/2000 sec | f/2.8 | ISO 200
This article will give you an overview, along with the basics, of four techniques for manipulating, or completely altering, the light from the midday sun to help you get better portraits.
1) Reflector as key
The first of these techniques only requires a reflector. Either white or silver will do, but if you opt for a 5-in-1 reflector, you will have both at your beck and call.
In strong sunlight, the white reflector should work most of the time. If the light is a bit dimmer, you may need to opt for the silver reflector.
In direct sunlight, the shadows are heavy and unflattering. An easy and cheap method of countering this is through the use of a silver reflector.
Canon 5D Mark III | Canon EF 85mm f/1.8 | 85mm | 1/1600 sec | f/4.5 | ISO 400
To get started with using a reflector as your key light, place your subject so that the sun is behind (or at least to the side of) them.
Now, raise the reflector up and point it back towards your subject. It should be placed opposite the sun. You should be able to see and watch what the light bouncing off the reflector is doing. Adjust the reflector’s position until you are getting the effect that you are after.
When using a reflector like this, make sure it’s above and pointed at your subject. You will be able to watch what the light is doing.
While using a reflector in this way, there are a few things to keep in mind. Because the reflector is your main light source (or key light), it is usually best to make sure that it is above your subject. Lighting from above in this way will help to ensure more natural and flattering results. Lighting from below will result in unnatural-looking shadows that won’t be flattering to your subject.
The silver reflector has killed most of the shadows from the sun and brought up the exposure of the subject’s eyes for a much more flattering light.
Canon 5D Mark III | Canon EF 85mm f/1.8 | 85mm | 1/800 sec | f/4.5 | ISO 400
Another thing to keep an eye on is your exposure. Because you are working with natural light, you will be able to rely on your camera’s meter. Where you might find a problem is when the light reflecting off of the reflector isn’t as strong as any sunlight in the scene.
Do watch what the light is doing very carefully. Here, the reflector has come down too low and the light is hitting the subject’s arm and the lower side of her face first. This is not flattering.
To ensure a good exposure on your subject, meter from their skin. An easy way to do this is to use your camera’s spot metering mode and meter a place on your subject’s skin that is being lit by the reflector.
Just remember that your camera’s meter is measuring for 18% grey and a lot of skin tones do not fall anywhere near that range. Subjects with lighter skin may require a bit of overexposure, while subjects with darker skin will need you to compensate with underexposure. In most cases, 1/3 to 2/3 of a stop will be good enough.
2) Diffusion
You might not be surprised to see that direct overhead sunlight doesn’t make for a very good portrait.
Canon 5D Mark III | Canon EF 50mm f/2.5 Macro | 50mm | 1/3200 sec | f/5.6 | ISO 400
A diffusion panel is a great option for manipulating the harsh midday sun and achieving better portraits in the middle of the day.
Diffusion panels are sheets of material that you place between the light source and the subject. The material spreads out the light, making it softer and more suitable to portraiture. If you have a 5-in-1 reflector, you probably already have one of these.
Alternatively, there are a lot of options on the market, including massive diffusion panels that cover a large area.
Using a diffuser (or a diffusion panel) is a great and affordable way to soften the light from the sun.
Canon 5D Mark III | Canon EF 50mm f/2.5 Macro | 50mm | 1/500 sec | f/5.6 | ISO 400
To use a diffusion panel for these purposes, simply place it between the sun and your subject. Because we are talking about the middle of the day, depending on where you are in the world, the sun should be pretty close to straight above your subject. In this case, the diffusion panel would go above your subject. This will have the effect of softening the light; once you’ve done this, you should be able to meter and start taking images.
All that you have to do is place the diffusion panel between your subject and the sun. Because this diffuser cuts out two stops of light, you can clearly see how much darker the area in shade is compared to the rest of the scene.
There are a few things to watch out for while using a diffuser. A lot of diffusion panels are made to reduce the exposure of the light in your scene by a certain number of stops. This is important to take into account because the diffuser will only be altering the exposure of the light falling within its area of effect. If your subject is a fair distance from the background, the background will appear two stops brighter than it did in any shots you may have taken without the diffuser.
Here, you can clearly see the effect the diffuser has on the subject and the ground that it covers. You can also see how much brighter the background becomes when you expose for the subject.
This may result in overexposed backgrounds. To minimise this, you can make sure that the diffuser is covering everything in your frame by choosing a background closer to your subject, or by using a background that’s very dark in the first place.
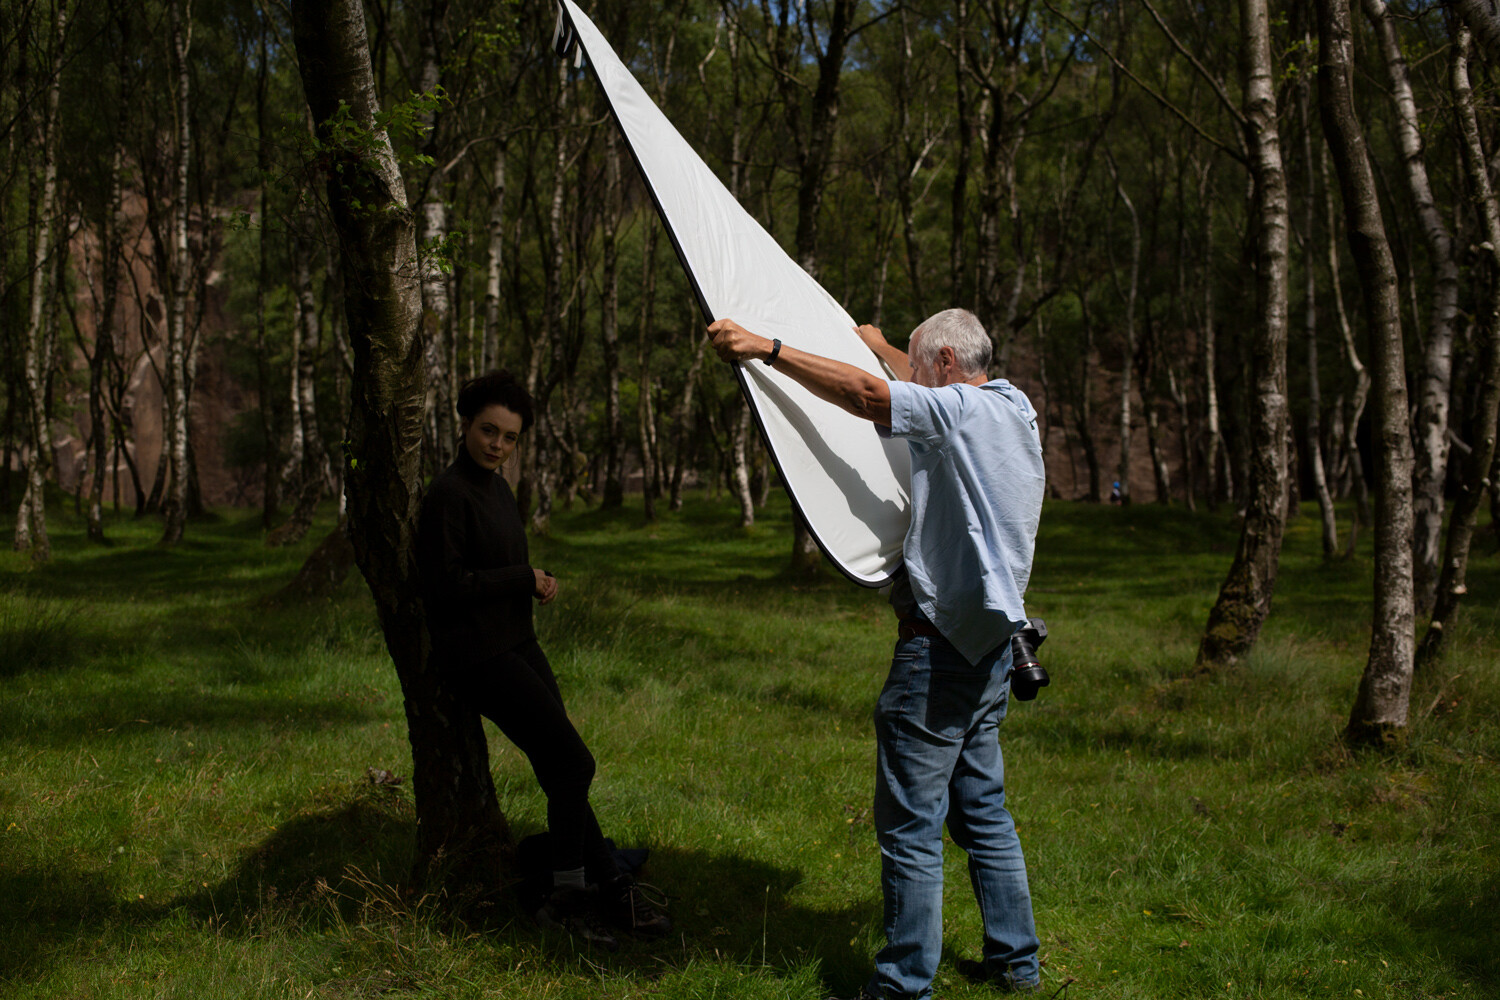
This diffusion panel catches even the slightest breeze very easily. Without a dedicated stand, it required two people to hold it in place and, even then, it had its moments.
Also, large diffusion panels like the one I have used in this example are very light. If there’s even a slight breeze, they pretty much act like a sail. You may need a dedicated stand or extra bodies to hold them in place.
3) Flash as fill
More direct sunlight, more unflattering light. Using flash to fill in the shadows is another useful technique for portraits in the middle of the day.
Canon 5D Mark III | Canon EF 50mm f/2.5 Macro | 50mm | 1/1600 sec | f/5.6 | ISO 400
If you have the equipment, using off-camera flash as fill light to the sun’s key light is a great way to help you take portraits in the middle of the day. The job of the fill light is to bring up the exposure of the shadows created by your key light (the sun, in this case). This will reduce the contrast in your scene and even out the exposure.
Here, you can see that the shadows from the sun still exist, but they are much brighter. This reduction in contrast makes for a much more suitable portrait.
Canon 5D Mark III | Canon EF 85mm f/1.8 | 85mm | 1/640 sec | f/4 | ISO 100
There are a lot of ways to do this, but I’ll go over a basic method that requires the least amount of extra equipment.
It doesn’t matter if you are using a speedlight or a full-powered strobe; the principles remain the same.
The first thing you need to do is obtain an exposure for the ambient light. Do this by using your camera’s meter and taking a test shot as if you weren’t going to be using flash at all. The one exception here is that you need to ensure that your final shutter speed is slower than the max sync speed on your camera. This is often around 1/250 seconds, but do check your manual just in case. Once you’ve ensured that all of the highlight tones are present in your frame and not overexposed, you should have your working settings.
Note: If the sunlight is very bright and you cannot get the shutter speed to go slower than your max sync speed, you may want to consider using High-Speed Sync.
Now, turn on (and connect) your flash. While you are getting started with fill, I suggest placing your flash in an on-axis position. This means the flash is on the same line as the lens of the camera from the subject’s position. Although if you are using a speedlight on top of the camera, I recommend getting it off for more flattering results.
Getting the flash off-camera will always provide a more flattering light. (Please forgive my visitor. He just wanted to see what was going on.)
You can use Manual mode of E-TTL mode on your flash. Either will work fine, but E-TTL might help to get you closer to the desired exposure in less time.
Once your flash is set up, take a test shot. Look at the shadows in your image. Are they too bright? Turn down the power on your flash and take another test shot. Repeat this until the shadows appear how you want them. Do your shadows seem unchanged, or are they still too dark? In the latter case, turn up the power.
One thing that I suggest you take into account immediately is modifiers. For fill lighting, you will generally want as soft a light source as possible. The light from a bare speedlight will never be soft. A modifier like a translucent umbrella is dirt cheap and as portable as an actual umbrella, and they work well with both small and large flashes.
Use as big of a modifier as you can for softer light. Portable softboxes like this one work well. So do translucent umbrellas if you want a cheaper, even more portable option.
Another thing to look out for with fill lighting is how much you are filling in the shadows. Remember, the goal in using a fill light is to bring up the shadows so that they aren’t as dark in high contrast situations. You want to avoid having the exposure of your fill light as bright as the exposure from your key light. Try to aim for at least one stop between the exposure for your key and fill, but don’t be afraid to extend it more. Oftentimes two, three or even four stops of difference is the right choice.
4) Flash as key
Yet more unflattering light, this time with a more extreme solution. Here you will learn how to overpower the sun and use your own light.
Canon 5D Mark III | Canon EF 50mm f/2.5 Macro | 50mm | 1/800 sec | f/5.6 | ISO 200
Another way to use flash for portraits in the middle of the day is to use your flash as the key light. This will require a fairly powerful flash, as you will need it to appear brighter than the sun in your exposure, as you will now effectively be using the sun as a fill light. There are two main ways to go about this. These are using your flash in Manual mode and using your flash in E-TTL mode with High-Speed Sync (HSS).
Because it is fairly easy to get started with your flash in E-TTL mode with HSS (provided that you have the right equipment), that is what this article will discuss.
Using High-Speed Sync on a high-powered strobe allows you to overpower the sun and light the scene with your flash. The sunlight will still be present, but it will be a few stops darker than your key light.
Canon 5D Mark III | Canon EF 50mm f/2.5 Macro | 50mm | 1/800 sec | f/5.6 | ISO 200
High-Speed Sync allows you to use flash at shutter speeds far faster than your maximum sync speed. Since shutter speed is what governs the exposure of ambient light while using flash, this means that you can use a shutter speed that underexposes the light from the sun.
Adding the flash as key at this point will shape the main light on your subject with whatever modifier you are using, while the shadow areas will be filled in by the ambient light. This is a great technique that works in a huge variety of situations, but it does require a bit of specialist equipment.
Most speedlights have HSS functionality and more and more full-sized strobes are coming to market that have it, as well.
To get started using this technique for portraits in the middle of the day, select the aperture that you want to work with. Using the meter in your camera, meter the scene and underexpose it by the desired amount. You can evaluate the histogram to decide whether it is dark enough, or too dark.
Underexposing the ambient light by three stops was too much in this case. Evaluate based on taste and your desired output, then adjust as required.
Canon 5D Mark III | Canon EF 50mm f/2.5 Macro | 50mm | 1/2500 sec | f/5.6 | ISO 200
Now, set up your flash with your chosen modifier for the lighting pattern of your choice. Rembrandt and Butterfly are two basic patterns that work great most of the time. Now, connect your flash to the camera and turn it on, making sure that it is set to both E-TTL mode and HSS mode.
Take a test shot.
Adjust the exposure compensation of your flash as required to get a good exposure of your subject. Referring to the histogram will help you figure out how much exposure compensation you need to use at a glance. If your image is too bright, dial in -1/3 to -2/3 of a stop at a time until you have the desired effect. The same applies for too dark images. Just dial in +1/3 to +2/3 of a stop instead.
The test shot in this instance was way too overexposed. Simply dial in exposure compensation on your flash unit or trigger and keep evaluating until it is right.
Canon 5D Mark III | Canon EF 50mm f/2.5 Macro | 50mm | 1/800 sec | f/5.6 | ISO 200
Once you have a decent exposure, you should find that you have a nicely-lit portrait with all of the shadow and highlight details present in your image.
This is a very basic overview of High-Speed Sync and doesn’t even come close to covering what’s possible with the technique, but it should get you started with the basics.
Outro
Learning how to use just one of these techniques can open up hours worth of time that you would normally avoid shooting portraits in.
Canon 5D Mark III | Canon EF 50mm f/2.5 Macro | 50mm | 1/640 sec | f/4 | ISO 100
While there are plenty more methods for shooting portraits in the middle of the day, the ones listed here should go a long way to get you started.
There is no reason that you should feel limited by the time of day (and the lighting it brings) when you are photographing people.
Even with a few basic tools and techniques, you can stop being at the mercy of the light and, instead, take control of it and manipulate it to your needs. If nothing else, doing so will open up countless hours in the day that you can use for your portrait photography that you would normally be advised to avoid.
The post 4 Ways to Shoot Portraits in the Middle of the Day appeared first on Digital Photography School. It was authored by John McIntire.
San Francisco-based Breakthrough Filters has announced an all-new EF to RF filter adapter. This is the first EF to RF drop-in filter adapter released not made by Canon.
Breakthrough’s EF to RF Drop-In Filter Adapter is loaded with a variety of hardware improvements. The adapter has an all-metal aluminum alloy construction and includes dust and water resistance. The weather-sealed adapter has rubber gaskets around both the filter and rear mounts. The adapter includes a detachable tripod food and accepts mounting plates for ballheads, arca plates and more. Further, the interior has been blacked out to reduce specular reflections.
In terms of compatibility, Breakthrough states that you can mount your EF lenses to RF mounts on cameras such as the Canon EOS R, R5 and R6 cameras and the RED Komodo. The adapter supports autofocus, image stabilization and EXIF data recording.
The Breakthrough EF to RF Drop-In Filter Adapter includes numerous features, such as an all-metal construction, weather sealing and more. Click to enlarge. Image credit: Breakthrough
You can use either Canon’s own drop-in filters or filters from Breakthrough. Breakthrough Photography announced many drop-in filters in August, you can learn more about them by reading our coverage.
The Breakthrough EF to RF Drop-In Filter Adapter is available for preorder for $ 199 USD. The first 500 orders will also ship with a free Breakthrough XF Clear drop-in filter. Shipping is expected to begin on November 16.
Breakthrough offers many drop-in filters for their new filter adapter and for the existing Canon EF-EOS R drop-in filter adapter. Image credit: Breakthrough
This is a sizable discount when compared to Canon’s own EF-EOS R Drop-In Filter Mount Adapter. The version that comes with a circular polarizing filter costs $ 300 and the version that includes a drop-in variable ND filter is $ 400. If you already own a Canon Adapter and want to purchase Breakthrough’s new EF to RF drop-in filter adapter, Breakthrough is offering a buyback program.
After your new filter arrives, you can use an included pre-paid return label to ship your Canon unit back for a refund on your transaction with Breakthrough. Sending a regular Canon EF to RF adapter nets you a $ 69 refund and Canon’s Drop-In Filter Adapter is worth $ 149.
Breakthrough is offering a Canon Adapter Buyback program for purchasers of the new Breakthrough filter adapter. Click to enlarge. Image credit: Breakthrough
To learn more about the new Breakthrough EF to RF Drop-In Filter Adapter, head to Breakthrough’s website.
Low light photography is one of those types of photography that when done well can produce amazing photos but when not done well can leave you feeling a bit disappointed. It’s a type of photography that at first can seem quite complicated as if you need a PhD to master. Yet all you actually need is a few simple pieces Continue Reading
The post The Ultimate Guide To Low Light Photography: Tips, Settings, Cameras, Lenses appeared first on Photodoto.
Aaron ended up picking up a Minolta Maxxum 5 and 28-80mm kit lens for under $ 20.
Read: The $ 20 film camera challenge part 1: the hunt
A quick recap: In part one (see link above), I proposed a $ 20 film camera challenge, the goal being to find a working film camera for less than twenty bucks, shipping included. The search was fascinating: I found lots of point-and-shoot compacts, several intriguing vintage cameras and a surprising number of autofocus SLRs. I had been trolling the waters of low-end Minoltas and was just about to make an offer on a Maxxum 3xi and a zoom lens, when I saw… the camera.
Too good to be true?
It was a Minolta Maxxum 5, a camera that, quite frankly, I had never heard of. It came with what I assume was its kit lens, a Minolta AF 28-80 F3.5-5.6 painted in matching silver. The lens hood was present but the lens cap was missing. The seller was here in the Los Angeles area, so shipping was only six dollars.
Asking price: $ 12 or best offer.
The description didn’t indicate if it was working, just the standard Ebay ‘Used’ boilerplate, which does include the phrase ‘…is fully operational and functions as intended.’ I figured that was my out if the camera turned out to be broken.
The asking and shipping price were already within my $ 20 budget, but I am the son of a used car salesman, so I had to try to do a little better. I sent the seller a $ 10 offer, and it was accepted!
A high-feature camera for a super low price
While waiting for my new cheap camera to arrive, I fired up Google to figure out exactly what I’d just bought. I learned that the Minolta Maxxum 5 came out in late 2001 (well after I’d tuned out the 35mm SLR market, which explains why I’d never heard of it). The Maxxum 5 was part of that market’s last gasp. It sat in the middle of Minolta’s lineup, but the features sure made it look like a high-end camera to me. It was as if Minolta was shoveling every feature they could into their 35mm SLRs as film was on its way out the door. Retail price for the body was $ 403, which is $ 587 in today’s dollars. I wasn’t able to find any contemporary ads, but I imagine at the time, you could get it with the 28-80mm for just a bit more dough.
The Maxxum 5 was part of the 35mm SLR market’s last gasp. It sat in the middle of Minolta’s lineup, but the features sure made it look like high-end
I’ll spare you a laundry list of the Maxxum 5’s features, because it’ll waste too many words and no one will care, but the highlights include 14-segment exposure metering, off-the-film flash metering, 7-point switchable autofocus, and a shutter speed range of 30 sec to 1/4000 sec. It has a depth-of-field preview (yay!), 3-exposure auto-bracketing, and – especially important to me – automatic and manual ISO settings. (I bulk-roll my film, so if the camera has no DX override, I’m stuck.) And the film advances at the lighting-fast rate of three frames per second.
I stopped paying attention to the 35mm SLR market in the late 90s (after all, how could I need anything better than my Canon EOS Rebel 2000?), and frankly I was amazed at the Maxxum 5’s features and configuration options. Cripes, I thought to myself as I skimmed the 127-page manual, who needs a Nikon F100 when you can get one of these?
A sample from the Maxxum 5, shot on Ilford HP5+.
The realities of my sub-$ 20 camera
Two days later, my camera showed up, and it looked brand new. The lens cap was missing, but there was a UV filter installed, and the glass underneath was spotless. It still had batteries and they had just enough juice to turn on the camera on and fire the shutter. Everything seemed to work – but would it take decent pictures?
I loaded up a new pair of CR2 batteries and some film. I started with a roll of deep-discount Ultrafine Xtreme 100, then splurged on a roll of Kodak Ektar, and followed up with my old favorite, Ilford HP5+. It’s worth noting that these three rolls of film together cost more than I paid for the camera.
It’s worth noting that three rolls of film together cost more than I paid for the camera
Shooting with the Maxxum 5 is good fun. The body and lens barrel are made of plastic, as were many SLRs of the era, and the upside is a light weight. With a strap, cap, and no film, it weighs 612g (21.6 oz), a little heavier than my Sony a6000 and quite a bit lighter than my Pentax ME Super. The autofocus is quick and accurate and there’s minimal shutter lag. Aside from the clicks and whirrs of the autofocus and winding motors, the experience wasn’t entirely unlike shooting with my a6000 – no surprise, I suppose, since the Minolta is, technically, the Sony’s not-too-distant ancestor.
When I developed my B&W and picked up the color film from the lab, I was rather pleased with the results. I shot primarily in aperture-priority or program mode, and the Minolta’s built-in meter nailed the exposure on pretty much every shot. As for image quality, well, it’s what you would expect from a kit lens: reasonably sharp, but I’ve seen better. Actually, I’ve seen better from other Minolta AF lenses, which are ridiculously cheap – you can get some damn fine Minolta lenses in the $ 10 to $ 40 price range. (I was tempted to fit them to my new Maxxum 5, but that would go against the spirit of the challenge.)
The more I shot with the Maxxum 5, and the deeper I delved into its features, the more I realized that it is, by far, the most comprehensive, feature-rich film camera I own
The more I shot with the Maxxum 5, and the deeper I delved into its features, the more I realized that it is, by far, the most comprehensive, feature-rich film camera I own. Not bad for something that cost me sixteen bucks!
Yes, you can get a great camera for $ 20 – or less
I set out on this little experiment to see if it was possible to find a decent camera for less than $ 20. I was pretty sure the answer would be yes, but I never expected to find such an advanced camera in such good shape. Did I just get lucky? At $ 16, maybe a little. But it only took me a few days of shopping to unearth this gem, and as I speak there are a bunch more Maxxum 5s on eBayfor $ 30 or less. And I have no doubt there are even better bargains to be found.
Who’s going to take the $ 20 Film Camera Challenge next?
The post Weekly Photography Challenge – Details appeared first on Digital Photography School. It was authored by Sime.
This week we want you to focus on ‘details’
Last week we went with self-portraits and there were many of you that submitted really great images, thanks! This week, we want to see ‘detail’ and that could be a detail of yourself if you wanted to continue the theme “here’s my eyeball” seems to be a thing
I’ve decided to photograph the end of a fallen tree at the local park, the cracks, the rings and the ants! #dPSDetail
There’s detail in everything, while not necessarily being a macro photograph, though you can if you want, the detail is a selection of the larger image. An example might be that the photograph above is a detail shot of the scene below. Detail photographs are used in a story to help tell that story. Tag your photos #dPSDetail and we look forward to seeing what you come up with!
From last week’s photographs, this was a stand-out from Belgium based photographer, Katrien Stuyck, thanks and congratulations, Katrien!
Great! Where do I upload my photos?
Simply upload your shot into the comments field (look for the little camera icon in the Disqus comments section) and they’ll get embedded for us all to see. Or, if you’d prefer, upload them to your favourite photo-sharing site and leave the link to them.
Share in the dPS Facebook Group
You can also share your images in the dPS Facebook group as the challenge is posted there each week as well.
If you tag your photos on Flickr, Instagram, Twitter or other sites – tag them as #DPSDetail to help others find them. Linking back to this page might also help others know what you’re doing so that they can share in the fun.
Follow us on Instagram?
The post Weekly Photography Challenge – Details appeared first on Digital Photography School. It was authored by Sime.
Sony has announced plans to end its camera manufacturing and sales operations in Brazil by the middle of next year. Per Gizmodo Brazil, Sony will continue to sell its consumer electronics, including cameras, in Brazil until mid-2021. However, next March, its production plant in Manaus, Brazil will shut down. The plant has been in business for nearly 50 years.
In a statement to Brazilian employees, partners, retailers and suppliers, Sony said that its exit from Brazil is due to changing market conditions and expected business trends. Clóvis Letie, Sony senior operations manager in Brazil, has stated that operations in Brazil will continue to provide technical support and warranty service for products already sold. You can view an image of the statement in Portuguese by clicking here. Sony issued a follow up statement to Gizmodo as well, which can be seen here.
A screenshot from Sony Brazil’s website shows that the new Sony A7C, recent A7S III and A9 II cameras are featured in the interchangeable lens category. These cameras and the rest of Sony’s photographic offerings will no longer be on sale in Brazil starting in mid-2021.
In its analysis, Gizmodo Brazil states that the most surprising aspect of Sony’s announcement is that the Japanese company is closing multiple divisions at once. It is also worth considering the influence of currency exchange rates and, of course, the ongoing pandemic. Gizmodo notes that Sony’s strategy in Brazil has been to slash costs to any sector not generating significant profit, which after the middle of 2021 will result in the last vestige of Sony in Brazil being the PlayStation division.
While market conditions are surely challenging for Sony and other electronics companies, Brazil is a large market to exit. The large South American nation has one of the highest GDP in the world, both by nominal and purchasing power parity measures. Granted, on a per capita basis, the nation of over 200 million ranks much lower. Income is also not evenly distributed, perhaps making it challenging to generate a profit while producing and selling what are essentially luxury items.
The closure of the factory in Manaus will hurt locals. The closure will result in the loss of about 220 jobs, per PetaPixel. In addition to the loss of employment for over 200 people, Sony’s exodus from Brazil will certainly hurt photographers as well. This comes only a few short years after Nikon left Brazil.
Another screenshot from Sony Brazil.
A PetaPixel reader writes, ‘Personally, I receive this notice like a stab on my back. I invested a lot of money in Sony cameras and lenses, a lot of people too. Sony is already the standard for many professionals, live event, marriages, and advertising small producers…With Nikon already gone a few years, I made the move to Sony. Looks like a bad choice. Now, I will have to sell and buy everything new from Canon.’
This sentiment is likely echoed by many photographers in Brazil. Cameras and lenses are expensive photography is an expensive hobby for many and a way of life for others. Changing brands is not simple nor inexpensive. In the meantime, existing Sony owners can likely depend on ongoing product and warranty support, even after Sony stops making and selling most of its consumer electronics in Brazil.
The post KUVRD Launches Lens Hood That Fits 99% of Lenses appeared first on Digital Photography School. It was authored by Jaymes Dempsey.
Lens hoods cause photographers a lot of frustration.
On the one hand, they’re necessary. They reduce unwanted flare while protecting the front element from damage.
On the other hand, they’re big, unwieldy pieces of plastic that take up space in your camera bag. And you generally need a different lens hood for every one of your lenses.
Which is why KUVRD, the company behind a universal lens cap, has just launched a new Kickstarter campaign:
For the Universal Lens Hood.
As KUVRD explains on its Kickstarter page, the Universal Lens Hood is carefully designed to fit 99% of lenses, by way of a clever stretch-and-fold system that allows you to expand the hood around your lens, then resize the hood depending on the lens you’re using.
The Universal Lens Hood also offers other innovative features, such as compactness (it can be folded up into a small ring that fits in your pocket) and filter compatibility (you can nestle any circular filter inside the lens hood, regardless of size).
Plus, the Universal Lens Hood promises to eliminate reflections from surfaces. If you’re shooting the skyline through a hotel window, for example, simply press the front of the hood up against the glass and watch as the reflections disappear.
And did I mention that it only costs $ 30 USD?
Now, there are a few drawbacks to the Universal Lens Hood worth highlighting:
First, it actually comes in two sizes, one designed for lenses with a 54mm to 76mm filter size, and the other designed for lenses with a 72mm to 112mm filter size. This isn’t a huge deal, but it does seem to undermine the idea of a single universal lens hood; if you have lenses of different sizes, you’ll need two of the hoods, not one.
Second, I do wonder about adjusting focus rings and zoom rings under the Universal Lens Hood. While KUVRD claims that it’s easy to fold the lens hood back and gain access to these controls, this seems inconvenient at best, especially if you’re trying to zoom and focus manually in a single shoot (and could potentially cost you images while you’re fiddling around).
While the Universal Lens Hood is technically still in the funding stage, it has already shot far beyond its $ 5000 USD Kickstarter goal, which means that orders will be shipped (likely in December). So if you’re looking for a lens hood that is ultra-compact, fits all your lenses, and includes some additional useful features, then the Universal Lens Hood is worth a look.
You can become a Kickstarter backer here, where you can grab a single copy of the Universal Lens Hood for $ 30 USD or two copies of the Universal Lens Hood for $ 50 USD.
Now over to you:
What do you think of the Universal Lens Hood? Is it something you’d be interested in? Do you get frustrated with your current lens hoods? Share your thoughts in the comments!
The post KUVRD Launches Lens Hood That Fits 99% of Lenses appeared first on Digital Photography School. It was authored by Jaymes Dempsey.
Venus Optics has announced the release of its latest lens, the Laowa 14mm F4 FF RL ‘Zero-D’ lens for full-frame mirrorless camera systems.
The compact ultra-wide-angle lens is constructed of 13 elements in 9 groups, including two aspherical elements and three extra-low dispersion elements. The lens features a 114º angle of view on a full-frame sensor while maintaining near-zero distortion as the ‘Zero-D’ moniker alludes to.
The lens features an aperture range of F4-F22, uses a five-blade aperture diaphragm, has a minimum focusing distance of 27cm (10.6″) and uses a 52mm front filter thread. It measures in at 58mm in diameter, 59mm long and weighs just 228g (8oz).
Below is a gallery of sample images provided by Venus Optics:
The Loawa 14mm F4 ‘Zero-D’ lens is available in Leica M, Leica L, Sony FE, Nikon Z, and Canon RF mounts on Venus Optics’ website. All versions retail for $ 549, with the exception of the Leica M mount, which retails for $ 649. Shipping will start in late September for all but the Leica M and Canon RF mount versions, which will see the first shipments go out in late October.
100 best lockdown portraits revealed from Duchess of Cambridge’s Hold Still project
Kate Middleton, the Duchess of Cambridge, and the UK’s National Portrait Gallery have put together a digital exhibition of the 100 best portraits taken during the lockdown and submitted to the Hold Still photographic contest. The images, centered around the themes of Helpers and Heroes, Your New Normal and Acts of Kindness, will become a print exhibition later in the year and will tour the UK.
Set up to document aspects of life in England, Scotland, Wales and Northern Ireland during the global coronavirus pandemic, the Hold Still project was launched by the Duchess, a keen photographer herself, in May and was open for entries for six weeks.
Organizers say they received 31,598 entries which were judged by the Duchess alongside the Director of the National Portrait Gallery, a poet, a photographer and the Chief Nursing Officer for England. The judges said they selected the winning images based on the ‘emotions and experiences they convey rather than on their photographic quality or technical expertise’.
We’ve rounded up ten of the 100 images in the following gallery, but for more information and to see all 100 portraits visit the National Portrait Gallery website.
THE DUCHESS OF CAMBRIDGE AND NATIONAL PORTRAIT GALLERY LAUNCH HOLD STILL DIGITAL EXHIBITION
Final 100 images unveiled in landmark community project to create a photographic portrait of the nation
The Duchess of Cambridge and the National Portrait Gallery have today unveiled the Hold Still digital exhibition, featuring one hundred portraits selected from 31,598 submissions during the project’s six-week entry period. Focussed on three core themes – Helpers and Heroes, Your New Normal and Acts of Kindness – the images present a unique record of our shared and individual experiences during this extraordinary period of history, conveying humour and grief, creativity and kindness, tragedy and hope.
Launched by The Duchess of Cambridge and the Gallery in May, Hold Still invited people of all ages, from across the UK to submit a photographic portrait which they had taken during lockdown. The project aimed to capture and document the spirit, the mood, the hopes, the fears and the feelings of the nation as we continued to deal with the coronavirus outbreak.
The Hold Still judging panel included: The Duchess of Cambridge; Nicholas Cullinan, Director of the National Portrait Gallery; Lemn Sissay MBE, writer and poet; Ruth May, Chief Nursing Officer for England and Maryam Wahid, photographer
The panel assessed the images on the emotions and experiences they convey rather than on their photographic quality or technical expertise. The final 100 present a unique and highly personal record of this extraordinary period in our history. From virtual birthday parties, handmade rainbows and community clapping to brave NHS staff, resilient keyworkers and people dealing with illness, isolation and loss. The images convey humour and grief, creativity and kindness, tragedy and hope – expressing and exploring both our shared and individual experiences.
A selection of the photographs featured in the digital exhibition will also be shown in towns and cities across the UK later in the year.
International law firm Taylor Wessing are supporting the Hold Still project in partnership with the National Portrait Gallery. They are long-term supporters of the Gallery and have sponsored the Taylor Wessing Photographic Portrait Prize for the past 12 years.
{/pressrelease}
Making bread
Photographer: James Webb Location: Colne, Cambridgeshire
This is me and my son Jake making bread together. Baking was something that I enjoyed but didn’t get to do very often. Lockdown gave me the opportunity to bake and enjoy this passion with my children. During this time we started off making flatbreads, cupcakes, muffins and the like, and then moved on to bread. Baking became a daily pleasure we were all able to enjoy together. We’ve continued to bake as a family and my children have enjoyed learning how to knead dough and the process of proving before baking. Making bread has become the new normal in our house and is a hobby now enjoyed by the whole family.
Glass kisses
Photographer: Steph James Location: Cowfold, West Sussex
My 1-year-old little boy and his 88-year-old great grandma, who miss each other so much at the moment. I captured this beautiful moment between them whilst dropping off groceries. Kisses through glass.
This is what broken looks like
Photographer: Ceri Hayles Location: Bridgend
This is what broken looks like. This is operating for 3 hours in full PPE. This is dehydration. This is masks that make your ears bleed because the straps have slipped and you daren’t touch them. This is fighting an invisible enemy that becomes more visible each day. This is a face I never thought I’d show the world, but one which I wear more and more. I took this photo to have as a reminder of how far I’d been capable of pushing myself when I needed to. I sent it to my family to tell them what a hard day it had been and they were all so shocked by it. The person they know as being so well put together, always wearing a smile, was not the person they saw that day. Looking back on it now, I feel immensely proud of the commitment shown by myself and my colleagues to provide safe care for patients, even in the depths of a pandemic. We still wear full PPE for all of our cases, and you never get used to it, but I know we’ll keep doing it for as long as it is needed.
Last precious moments
Photographer: Kris Tanyag and Sue Hicks Location: Chicester, West Sussex
This portrait was taken by Kris, the clinical lead in the care home where Phil lived. Kris took the photograph for Phil’s daughter, Sue who submitted the work. Sue said: ‘As I approached the window my father’s smile lit up the world. Probably belying the fact that he couldn’t really comprehend why, after normally frequent visits and companionship in his twilight years, his daughter hadn’t been allowed to visit for the last three weeks. Easter Saturday 2020 and these precious, intensely emotional moments, will stay with me forever. One week later our wonderful dad, grandad and great grandad passed away peacefully. I can never fully express my gratitude to the carers who, sensing the situation and having looked after my father with love, care and compassion for seven years (as well as my mother for 3 of those years), made those moments possible.’
Kris explains: ‘We devised a plan for Phil to see his daughter Sue via a glass wall and communicate using mobile phones. Hearing our plan gave Phil a burst of energy to go in his wheelchair, hold a muffled conversation, reaching over to put his hand on the glass wall, convinced that he was touching Sue. Struggling to speak but hearing Sue made him so very happy. Their expression of emotion through tearful, smiling eyes and touching hands; the entire conversation was just one amazing moment!’
Funeral heartbreak
Photographer: Bonnie Sapsford and Fiona Grant-MacDonald Location: Cockermouth, Cumbria
My brother, Barry, lives in the Lake District and could not travel to be with his family when our beloved Gran died of Covid-19 on 3 May 2020. Her cremation took place on 13 May in Edinburgh with only 8 people in attendance – and Barry had to watch it live online – but we were so proud he suitably dressed for the occasion. His wonderful partner, Bonnie took this powerful picture and sent it on to us. The family all missed him greatly and our hearts were shattered at the realisation that our grandmother’s first grandchild could not be with her on her final resting day.
At the end of a shift
Photographer: Neil Palmer Location: Reading, Berkshire
This is a studio portrait of Tendai, a recovery and anaesthetics nurse, who was born in Zimbabwe, and now lives in my local town – Reading, Berkshire. I wanted to portray her caring side as well as a look of concern and uncertainty that many of us have experienced during this pandemic. It’s why I chose a lower than normal angle and asked her to look off camera, placing her half way down in the frame.
Justin, from the outside in
Photographer: Sara Lincoln Location: London
Justin didn’t know about my project when I turned up at his window with a camera. I just so happened to be across the road, capturing his daughter Safi and her family, who had volunteered to be a part of my ‘Outside In’ project, which documents my community living life in lockdown, through the window. Safi asked if I wouldn’t mind popping over to capture a frame or two of her father and I am very grateful that I did. It was wonderful meeting this brilliant man albeit through the window. We spoke about this project, his art collection and how he manages to keep his plants so well. We talked about how surreal everything is right now, how the weeks have been for him isolating alone and his plans to jet off to France as soon as this madness is over. He finished up by telling me he had a spot of hay fever… A session that wasn’t meant to happen, happens to be one of my favourites.
We’re really lucky to have a garden
Photographer: Robert Coyle Location: Sale, Manchester
The weekend is here, lockdown continues and Bernadette and Francis enjoy the garden. One Friday, as I finished emailing at the kitchen table, my wife had taken a chair and a drink outside to enjoy the evening sun. We were doing our best, like the rest of the country, with work, childcare and news of daily death tolls. Our son, had taken to relieving himself on the plants, much to our initial amusement and then slight frustration.
Everyday hero
Photographer: Arnhel de Serra Location: London
When I drove past Richard I had to do a double-take, as I couldn’t believe he was out on his postman’s round in fancy dress. I asked if I could photograph him, and over a few days we got to know each other. Given the doomsday scenario that the media were portraying in the early days of the COVID-19 pandemic, I felt very strongly that here was a man who had something deeply personal and positive to offer his community. Is it an earth shattering news story? Probably not. As a human interest story however, I feel that his generosity of spirit should be celebrated, and I am delighted that he will be part of this very important project.
Never without her grandma
Photographer: Melanie Lowis Location: Teddington, London
Millie (5 years old) made a cut out of her much loved grandma (73 years old). Millie sees Grandma almost daily and lockdown prevented the pair from seeing each other. As a retired teacher, Grandma would have made the perfect partner to help Millie with home schooling. The bond between this grandma and granddaughter is truly a special one and when lockdown ends, and the real grandma can return, it will be a very happy and emotional reunion.