Blog

  • Urban Human Habitats: 13 Compact Concepts for Growing Cities

    [ By SA Rogers in Architecture & Cities & Urbanism. ]

    compact cities coastal cliffs 1


    How will various cities around the world adapt to rapid population growth while maintaining quality of life and responding to their unique environments and cultural context? In some cases, new ideas for maximizing urban density require building new cities from the ground up, while others reclaim industrial areas and depressed suburbs or simply keep building higher and higher into the sky. These proposals – some fanciful, others currently under construction or completed – represent a diverse variety of urban growth solutions, each with its own pros and cons.

    Lush Pedestrian-Oriented Vision for Singapore

    PARKROYALonPickering_Ext-ViewofSkyTerraceFromClubLounge02_(c)PatrickBingham-Hall

    ParkRoyal_Dwg-GardenDown_(c)WOHA


    PARKROYALonPickering_Ext-DistanceStreetViewFromAcrossUrbanPark_(c)PatrickBingham-Hall

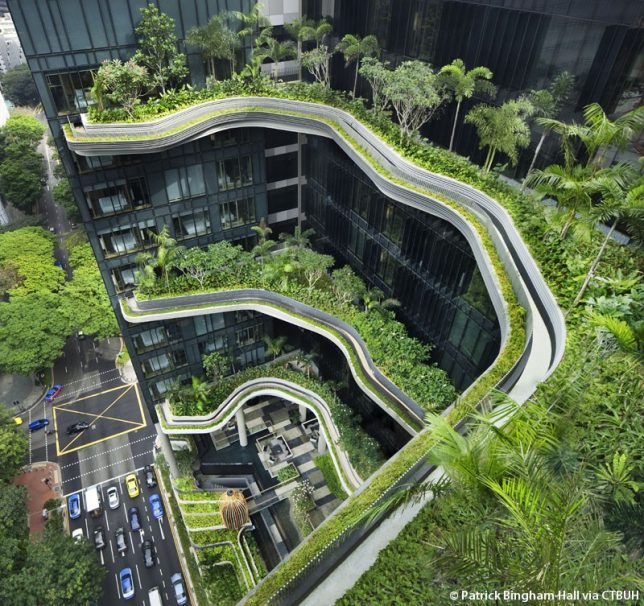
    The ‘PARKROYAL on Pickering’ is a pedestrian-oriented elevated neighborhood for Singapore with lush greenery planted on nearly every level and a porous layout encouraging daylight, cross-breezes and free circulation between the various elements of the structure. The 2015 winner of the Urban Habitat Award by the Council on Tall Buildings and Urban Habitat (CTBUH), the Parkroyal was praised for being “intelligently influenced by both its environmental and cultural context.” A contoured podium draws inspiration from terraced landscapes like rice paddies, and a series of columns resembling trees makes the entire building seem to hover above the street, establishing a shaded pedestrian thoroughfare on the ground level. By stretching upward, the building design with all of its integrated greenery adds 215% new green space to the plot area, proving that increasing density in cities doesn’t have to mean losing parks and gardens.

    Cities Carved Into Coastal Cliffs

    compact cities coastal cliffs 1

    compact cities coastal cliffs 2

    copact cities coastal cliffs 3

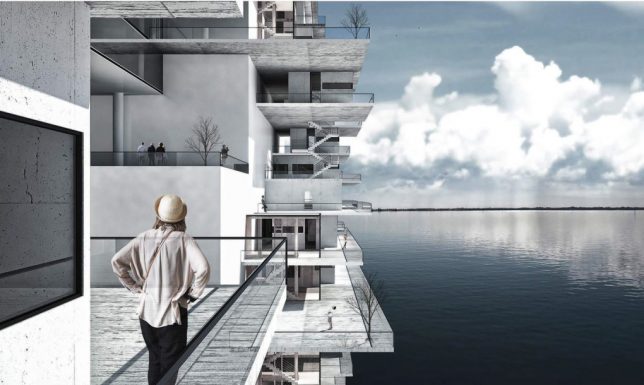
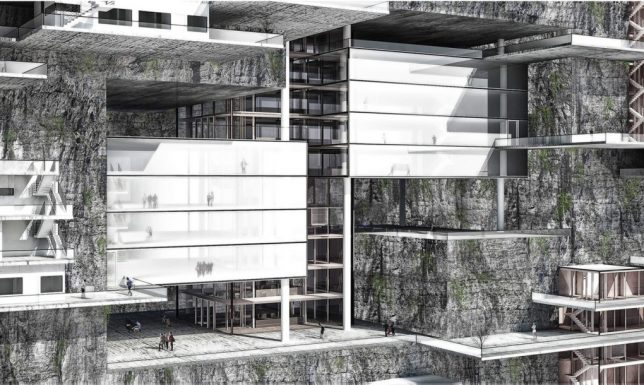
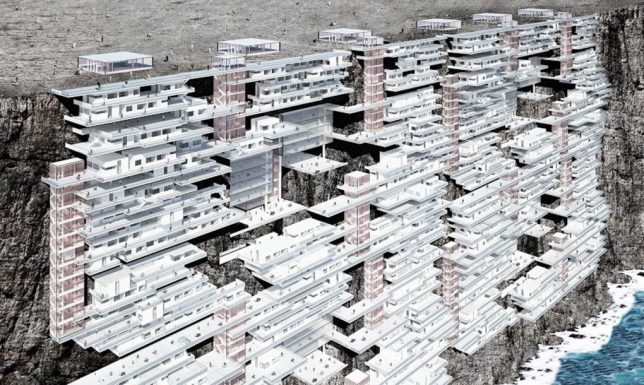
    The ‘Living on the Edge’ project imagines building new cities right into coastal cliffs around the world, forming new urban environments. While it would seem like expanding human developments into areas that are currently in their natural state isn’t exactly desirable (not to mention the threat of rising seas), the designers contend that making use of these spaces high above the water level would be better than allowing currently-existing cities to keep sprawling outside their urban boundaries into surrounding forests and agricultural land.

    Shop-Top Neighborhood in Beverly Hills

    compact cities MAD 1

    compact cities MAD 2

    compact cities MAD 3

    As multiple functions compete for space in crowded cities, the answer is often to build tall structures full of apartments that sacrifice the classic suburban neighborhood feel for density and walkability. But what if we could have both? 8600 Wilshire by MAD Architects places a relatively traditional neighborhood complete with green spaces and trees right on top of a retail block in Beverly Hills. The clustered white glass villas offer 18 residential units in the form of a ‘hillside village,’ with the houses appearing opaque from the street but facing the inner courtyard with transparent facades.

    High-Density Urban Development Inspired by Chinese Mountains

    compact cities shanshui 1

    compact cities shanshui 2

    compact cities shanshui 3

    Another MAD project “treats architecture as a landscape,” integrating waterfalls, trees and gardens into a high-density urban development with curvaceous structures mimicking traditional Chinese paintings of mountain ranges. ‘Shan-shui City’ is a concept that can be applied to all sorts of building projects, and MAD aims to make use of it in both all-new construction projects in China and as supplements to existing cities. They will apply it to a mixed-use urban development that’s half a million square meters in size, and new plaza development in Beijing’s central business district.

    Next Page – Click Below to Read More:
    Urban Human Habitats 13 Compact Concepts For Growing Cities

    Share on Facebook


    [ By SA Rogers in Architecture & Cities & Urbanism. ]

    [ WebUrbanist | Archives | Galleries | Privacy | TOS ]


    WebUrbanist

  • Festival Friendly: The Canon G7 X Mark II at Sasquatch! 2016

    Canon G7 X Mark II at Sasquatch! Music Festival

    The Sasquatch! Music Festival, which takes place at the Gorge Amphitheater in the town of George in eastern Washington State, is loud, expensive, crowded, beautiful and dirty. Leaving behind the ‘expensive’ part, that about sums up why this is the fourth year I’ve attended, and why I’ve brought a camera (or three) with me each time.

    The first year I went, I attended chiefly for the music (i.e., for fun). But having seen friends cover it for college publications ‘back in the day,’ I decided I had to bring a camera just to document the absolute spectacle of it all. So for that year, I had a friend with a real press pass smuggle my D700 in for me along with a couple of lenses. Ever since, I’ve been hooked, though with less smuggling – the following two years were all X100 classic all the time (100% kosher with the official rules), though that eventually resulted in some big pieces of dirt stuck in my hybrid viewfinder.

    Going bananas – I was excited to see the G7 X Mark II has a screen that now tilts downward as well as upward, for easier shooting above the crowd. Of course, constant jostling from the crowd meant I still had some cropping to do to get the composition I wanted. Good thing there’s 20MP on tap. Processed and cropped to taste from Raw. F2.5 | 1/100 sec | ISO 1000 | 40mm equiv. Photo by Carey Rose.

    This year, I was hoping to bring the Nikon D5 to further supplement our recent review, but the festival has gotten stricter with its ‘big camera’ policy (DPR was, shockingly, denied a press pass). And since this was a personal trip more than anything else, I didn’t want my expensive festival wristband cut off for breaking some rules. Luckily, the Canon G7 X Mark II had just arrived the day before my departure – with a capable 1″ CMOS sensor, a fast zoom lens with a useful range and sturdy metal build, what better festival camera could I have brought?

    Taking the good with the bad – the G7 X Mark II’s lens can produce some nice sun stars, but at F11, you’re running into sharpness-ruining diffraction territory. With such a good amount of dynamic range available from the Raw file, I’d still take this image over a cellphone JPEG any day. Processed and cropped to taste from Raw. F11 | 1/200 sec | ISO 125 | 24mm equiv. Photo by Carey Rose.

    Getting to know the Mark II

    Despite my shooting full-frame Nikons for personal work, I’ve always had a soft spot for Canon compacts (my first digital camera ever was a PowerShot A75). Having extensively used the G5 X (which is, beneath its skin, very similar to the original G7 X), it’s clear that the G7 X Mark II is more refining than revolutionizing in a lot of ways. That’s not necessarily a criticism.

    Sure, the sensor and lens are essentially unchanged from the Mark I to the Mark II; the sub-par continuous autofocus performance still encourages ‘Single-AF and recompose’ behavior, and the rear controls are still a little fiddly. But even so, Canon has managed to take what was already an engaging compact camera and make it appreciably better.

    The view from Terrace Camping at The Gorge with the G7 X Mark II at maximum zoom. Processed and cropped to taste from Raw. F4 | 1/1250 sec | ISO 125 | 100mm equiv. Photo by Carey Rose

    The ‘cons’ list of the original G7 X review contains a number of not-insignificant criticisms we had with Canon’s first foray into the 1″-sensor compact market. But when I looked at them, and then compared them to the Mark II model, I was pretty surprised.

    Specifically, this new model features increased battery life, 8 fps continuous shooting even in Raw, an option for 24p video, smoother menu operation, re-damped front and exposure compensation dials (and the front dial can even be de-clicked, if you like) and in-camera Raw processing. Plus, the more standard Canon GUI has been refined. In all, more than half the previous ‘cons’ list has been taken care of (with many thanks to the DIGIC 7 processor). That’s not too shabby.

    Festival-friendly features

    The new, more-robust screen mechanism on the G7 X Mark II tilts both upward and downward to make working at odd angles a breeze, with responsive touch-to-focus functionality to boot. Processed to taste from Raw. F1.8 | 1/320 sec | ISO 200 | 24mm equiv. Photo by Carey Rose.

    What isn’t all that eye-catching from a spec sheet or press release point-of-view – yet makes a very real difference in the real world – is the new grip on the front of the Mark II. It adds very little bulk, but does absolute wonders as far as how this camera feels in the hand. I had a thin neck strap on it, but if I just wanted to grab the camera for a quick snap, the grip inspired some confidence.

    Perhaps most crucially for this sort of trip was the appreciably increased battery life on the Mark II, plus the new USB charging option. In the past, I’ve not always been a fan of USB-only charging, but when camping and using communal USB power banks, it made perfect sense and meant that I rarely needed to swap in the second battery I carried with me.

    The G7 X Mark II won’t let you turn backgrounds into butter at moderate distances, but for more casual documentary and portrait work, some context can be useful. Also, I promise this isn’t just an informercial for cheap beer. Processed to taste from Raw. F2.2 | 1/320 sec | ISO 250 | 38mm equiv. Photo by Carey Rose.

    As stated earlier, the 20MP sensor in the G7 X Mark II is the same as its predecessor, which is to say, it’s a peach. The Raw files are very malleable, and they respond well to pushes and pulls (though you might need a touch of noise reduction).

    Speaking of noise reduction, the default JPEG noise-reduction on the Mark II is a little heavy-handed, though as is typical of Canon cameras (even compacts), the colors are great. As a matter of personal preference, I still like processing out Raws (even when shooting for fun – I’m a nerd), but wirelessly transmitting the above-average JPEGs from the G7 X Mark II to my phone for posting to social media was quick and easy.

    Even at high ISO values, the G7 X Mark II’s Raw files retain a fair amount of flexibility. F2.8 | 1/200 sec | ISO 4000 | 100mm equiv. Photo by Carey Rose.

    Lastly, the video mode on this camera might not be 4K, but the image stabilization is incredibly effective, making casual shooting look far nicer than it has any right to.

    Not-so-festival friendly

    So while the G7 X Mark II ended up being a near-ideal companion for most of the long weekend, there were still a couple of things I had to keep in mind.

    Press pass – Sasquatch! style. Straight-out-of-camera JPEG – click through to the full-size to see the noise reduction robbing detail on his palm, even at base ISO. F2.8 | 1/400 | ISO 125 | 28mm equiv. Photo by Carey Rose.

    The build quality of the Mark II is very, very good – but there are no claims of weather-sealing. Remember how I said Sasquatch! was dirty? Between high-speed gusts of dusty wind and large quantities of people carrying large quantities of beer, I ended up treating the Mark II pretty carefully. I didn’t actually experience any issues with dust (or liquid) intrusion, but like I said – I was being careful.

    Straight-out-of-camera JPEG with some spectacularly rich red tones. F2.8 | 1/400 sec | ISO 125 | 24mm equiv. Photo by Carey Rose.

    And while the tilting touchscreen is very good and very responsive, it can be hard to see in bright sun – especially when it’s covered in sunscreen-y fingerprints and dust. At least that new grip means it’s easier to hold the camera with one hand and shield the screen with the other.

    Lastly, Canon’s ‘auto lighting enhancer’ works a little less effectively than competing models in high-contrast scenes, giving an awful lot of weight to preserving highlight detail at the expense of overall underexposure of your scene – and in JPEGs, that means a potential loss of shadow detail that you can’t get back.

    In the G7 X Mark II’s dust-filled natural habitat, at least for that weekend.

    The wrap

    The updates Canon has brought to the PowerShot G7 X Mark II cement it, for me, as an impressively engaging photographers’ compact. The improvements to overall responsiveness finally make the camera feel as premium in general operation as it feels in your hand. The autofocus performance still doesn’t quite match up to the improved burst speed (and the autofocus modes are still a little confusing), but being able to shoot at 8fps will help you catch moments that you might have missed with its predecessors’ 1.1fps burst speed in Raw.

    The real story for me is that I still brought two other cameras along ‘just in case’ – a Ricoh GR and my trusty D700 – and I used the G7 X Mark II for over 90% of the photographs I took, with no regrets.

    Until next year. Processed to taste from Raw. F1.8 | 1/60 sec | ISO 4000 | 24mm equiv. Photo by Carey Rose.

    More real-world G7 X Mark II samples from Sasquatch! 2016

    $ (document).ready(function() { SampleGalleryGridV2({“galleryId”:”8985678033″,”isMobile”:false}) })

    Canon G7 X Mark II Real-world Samples Gallery

    69 images • Posted on Jun 3, 2016 • View album
    Sample photoSample photoSample photoSample photoSample photoSample photoSample photoSample photoSample photoSample photoSample photoSample photoSample photoSample photoSample photoSample photoSample photoSample photoSample photoSample photoSample photoSample photoSample photoSample photoSample photoSample photoSample photoSample photoSample photoSample photoSample photoSample photoSample photoSample photoSample photoSample photoSample photoSample photoSample photoSample photoSample photoSample photoSample photoSample photoSample photoSample photoSample photoSample photoSample photo

    Articles: Digital Photography Review (dpreview.com)

  • Leica releases audio and S-lens adapters for SL mirrorless

    $ (document).ready(function() { SampleGalleryV2({“containerId”:”embeddedSampleGallery_2220794024″,”galleryId”:”2220794024″,”isEmbeddedWidget”:true,”standalone”:false,”selectedImageIndex”:0,”startInCommentsView”:false,”isMobile”:false}) });

    Leica has announced the availability of a pair of adapters for its SL full frame mirrorless camera that will allow users to fit lenses from the S medium format system and to use microphones and headphones when shooting video. The Leica S-Adapter L opens the camera to 16 lenses from the S system including the company’s collection of leaf-shutter lens. While this doesn’t add any focal lengths that aren’t available via the existing SL zooms it will allow access to wider apertures for some and will also save existing S users having to buy extra lenses.

    The new audio adapter uses the camera’s USB port and provides a pair of 3.5mm jack sockets for connecting a microphone and audio monitors for those shooting video with the SL.

    The Leica S-Adapter L is available now and will be priced at £950, while the audio adapter AA-SCL4 will be on sale at the end of the month for £120. US pricing has yet to be announced.

    For more information visit the Leica website.

    Press release

    Leica announces availability of Leica S-Adapter L and forthcoming release of Audio Adapter for the Leica SL

    – Leica S-Adapter L enables S-lenses to be used with the Leica SL
    – Leica AA-SCL4 Audio Adapter available end of June

    Leica Camera has today announced that the Leica S-Adapter L for the Leica SL mirrorless camera system is now available. This adapter further extends the range of lenses that can be used with the Leica SL to include those of the Leica S medium format camera system.

    The S-Adapter L allows the use of 16 Leica S-Lenses with focal lengths from 24 to 180mm (including six central shutter lenses), in addition to the system’s own lenses, the Vario-Elmarit–SL 24-90mm f/2.8-4 ASPH. and the Leica APO-Vario-Elmarit-SL 90-280mm f/2.8-4. The exceptionally fast S-Lenses are the result of more than 100 years of experience and expertise in optical design and precision engineering. Combining traditional Leica quality with cutting edge technology, they achieve uncompromising imaging quality in virtually all photographic situations, in the studio and on location.

    Furthermore, the outstanding compatibility of the Leica SL-System grants photographers access to almost every Leica lens ever made. For example, Leica T lenses can be mounted on the Leica SL without an adapter, the M-Adapter T (already available) enables the use of almost all Leica M-Lenses with the Leica SL, while the R-Adapter L (available Q3/2016) will provide access to an entire range of Leica R-System lenses.

    Leica AA-SCL4 Audio Adapter

    Another new addition to the range of accessories and equipment for the Leica SL camera system is the AA-SCL4 Audio Adapter, which is scheduled to be available at the end of June 2016.

    Pricing and availability

    The Leica S-Adapter L is available now from Leica stores and authorised Leica dealers in the UK at a suggested retail price of £950 including VAT. The AA-SCL4 Audio Adapter, available at the end of June 2016, will have an SRP of £120 including VAT.

    Additional information can be found at uk.leica-camera.com

    Articles: Digital Photography Review (dpreview.com)

  • Samsung announces ruggedized Galaxy S7 Active

    Samsung has announced a ruggedized “Active” version of the standard Galaxy S7.  The Active comes with the same IP68 rating for water resistance as the standard device, but adds the MIL STD-810G standard and a shatterproof display to the mix, making the S7 Active resistant to the occasional drop. 

    The beefy 4000 mAh battery is another notable change compared to the standard S7’s 3000 mAh variant but most other internal components remain unchanged. Like on the Galaxy S7 the Android OS is powered by a Qualcomm Snapdragon 820 chipset and 4GB of RAM. Versions with 32 or 64GB of internal storage are available and a microSD-card can add up to another 256GB. For added security a fingerprint reader is on board and, important for mobile photographers, there are no are no changes in the camera department either.

    Images are captured on a 1/2.6″ 12MP sensor with 1.4 µm pixel size and on-sensor phase detection. The aperture is a very fast F1.7 and the focal length 26mm equivalent. The camera is capable of recording 4K video and at the front a 5MP/F1.7 module should be capable of capturing decent self-portraits.

    At least for now the Galaxy S7 is exclusive to AT&T in the US. It will be available from June 10 and cost you $ 26.50 or $ 33.31 a month, depending on your plan. The Galaxy S7 Active looks like a good options for those who like shooting with their phone during outdoor activities and the like, let’s hope Samsung will make it available through additional channels sometime in the nearer future.

    Articles: Digital Photography Review (dpreview.com)

  • How to Straighten Crooked Images Fast Using Lightroom

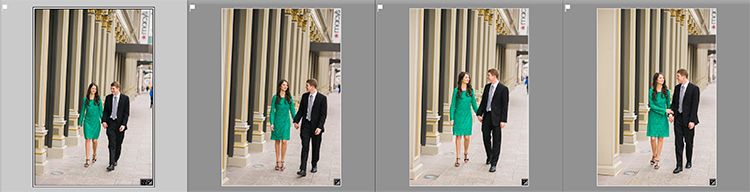
    If you’re like me, it’s so easy to get focused on trying to take great shots that you forgot to make sure your images are straight, and not crooked. Not some crazy tilt, mind you – just a slight tilt. So slight that when you notice it in your images, it just looks weird. A more dramatic tilt and we’ll just call it art. But this slight tilt is just enough to drive you crazy and cost us a lot of extra time editing your images.

    Well I am here to report that I have found a quick and easy way to fix this tilt fast using Lightroom. So easy, that you can even automate it so that Lightroom fixes it for you.

    So if this tip interests you, keep reading to find out how:

    Image01

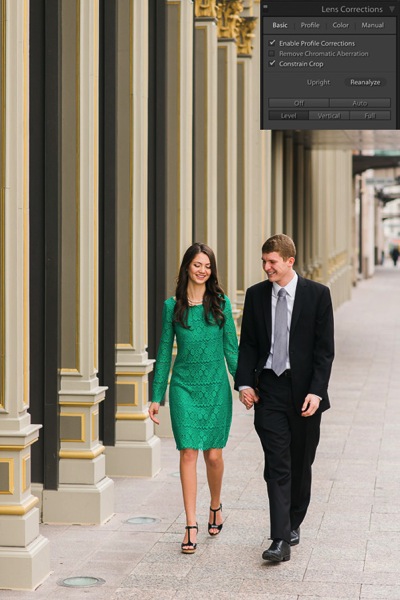
    Take a look at the image above. Good shot, right? Photographically I think I did well with the image, but it’s crooked! I can’t give this image to my client like this, it needs to be straightened first.

    Lens Corrections Panel

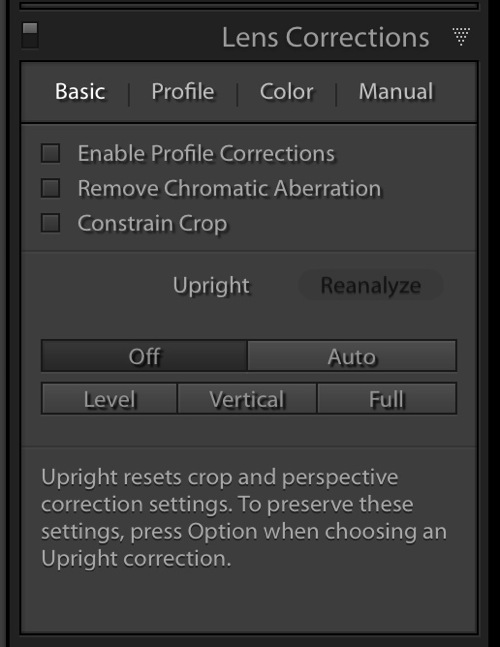
    Beginning with Lightroom version 5 the Basic tab was introduced inside of the Lens Corrections panel. This tab gives you the easy to use Upright Mode buttons, which are powerful tools used to fix perspective issues with your images. The perspective issue that I always seem to be dealing with is crooked images.

    Image02

    There are several Upright Mode buttons, but the one I want to show you in this article is the Level button. When clicked, this button works to straighten your images based on the lines present inside them. Obviously if there are no strong vertical or horizontal lines in the image, this button won’t work. But if there aren’t strong lines, who’s to say it’s crooked in the first place, right?

    Images appear crooked to our eyes because of the strong lines within an image, therefore the Level button works great at straightening those images quickly, without much difficulty. Instead of going into the crop tool and manually rotating the image slightly to straighten it, I can go to the Lens Corrections Panel instead and click the level button to straighten this image very quickly.

    I also like to have the Enable Profile Corrections check box checked as well as the Constrain Crop check box. These make sure Lightroom is straightening with as much information as possible.

    Image03

    Automating Your Upright Adjustments

    Now here is the trick. When done properly, you can create a Lightroom preset, or sync your Level adjustment across any number of images, and have Lightroom analyze and adjust each image independently based on each image’s needs and requirements.

    What this means is you can have Lightroom straighten all of your crooked images with the click of a couple of buttons!

    Syncing

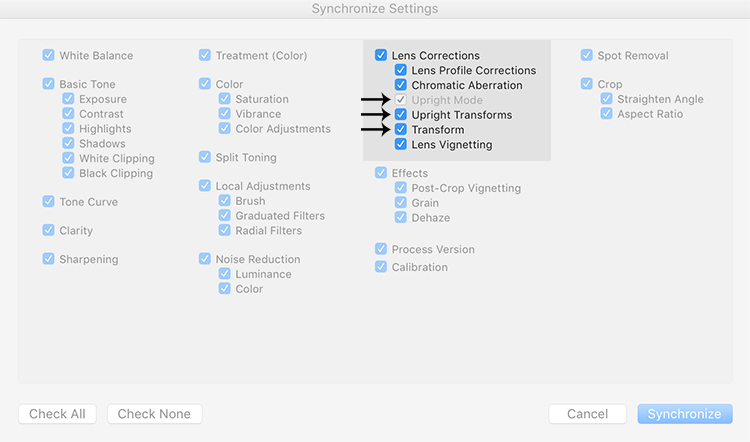
    In the Sync dialog box under Lens Corrections check box, there are three check boxes you want to be concerned with: Upright Mode, Upright Transforms and Transform.

    Image04

    These three boxes determine how Lightroom is going to handle your straightening – whether to analyze each image independently or simply copy the same settings from one image to the next.

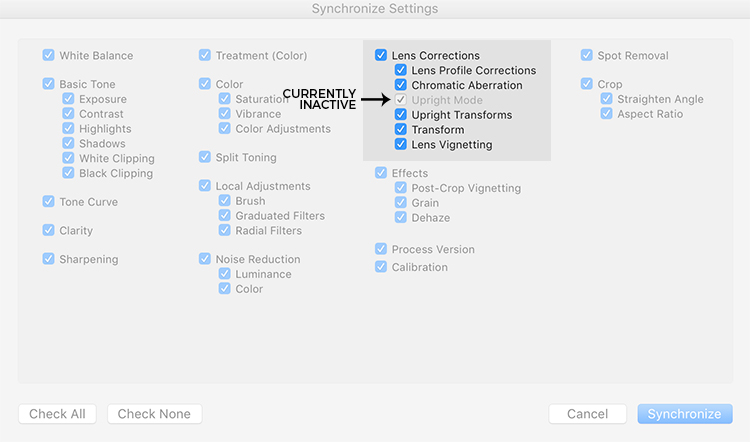
    If all three are checked, Lightroom will simply apply the same setting to all of the images, something you do not want because each image requires specific straightening based on its own lines. You’ll notice that Upright Mode is grayed out, telling you that it isn’t active.

    Image05

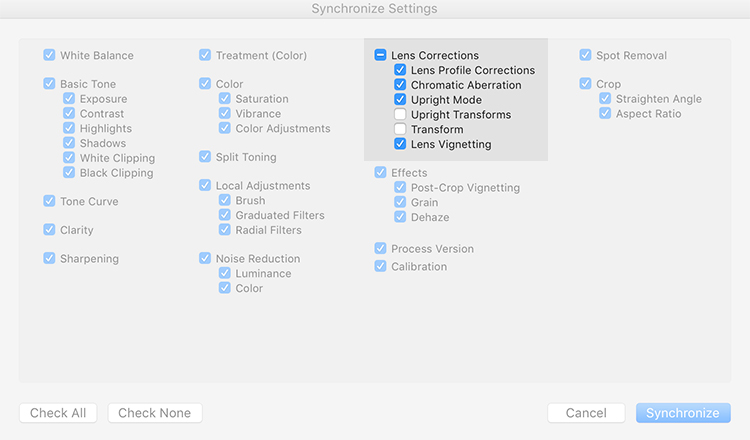
    To do what you want, which is to have Lightroom analyze each image independently and straighten it based in its own needs, you want to ONLY have a check mark in the Upright Mode box. The other two are left blank (see below).

    Image06

    By doing it this way, Lightroom will fix your crooked images, according to the amount of straightening that each image specifically needs.

    How cool is that?

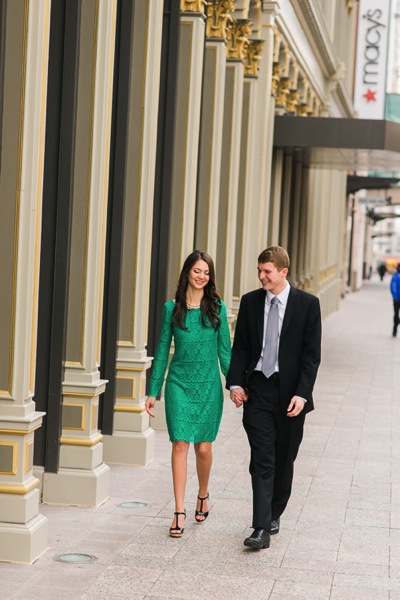
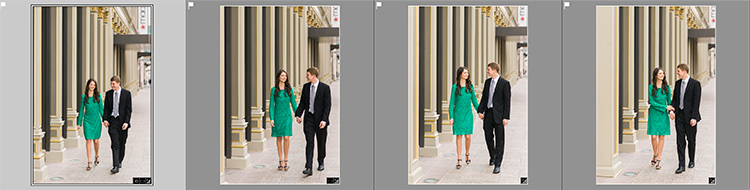
    Take a look at the images below. I took many shots in a sequence of the couple walking, and I want to straighten each one individually. Before learning this technique, I had to straighten each image individually – but not anymore.

    Image07

    Once I fix the first image using the Level button in the Lens Corrections panel, I can then sync the Upright Mode across all of the other crooked images, and each will be analyzed and fixed according to what it needs (even if they are all different amounts).

    Image08

    Look at that. All of my images were fixed with a few clicks. I don’t want to belabor the point here, but I constantly shoot crooked and this little trick saves me hours of tedious straightening over the course of a year.

    Making a LR Preset

    You can also automate this process by creating preset. You do this by first straightening an image with the Level button found in the Lens Corrections panel of the Develop Module.

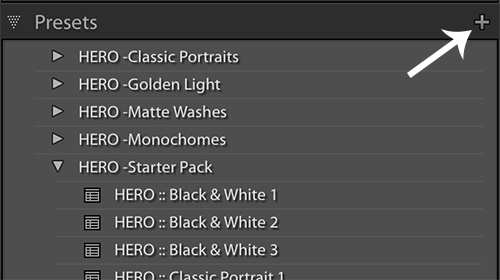
    Then, at the top of Presets panel clicking the (+) plus button to create a new LR preset.

    Image09

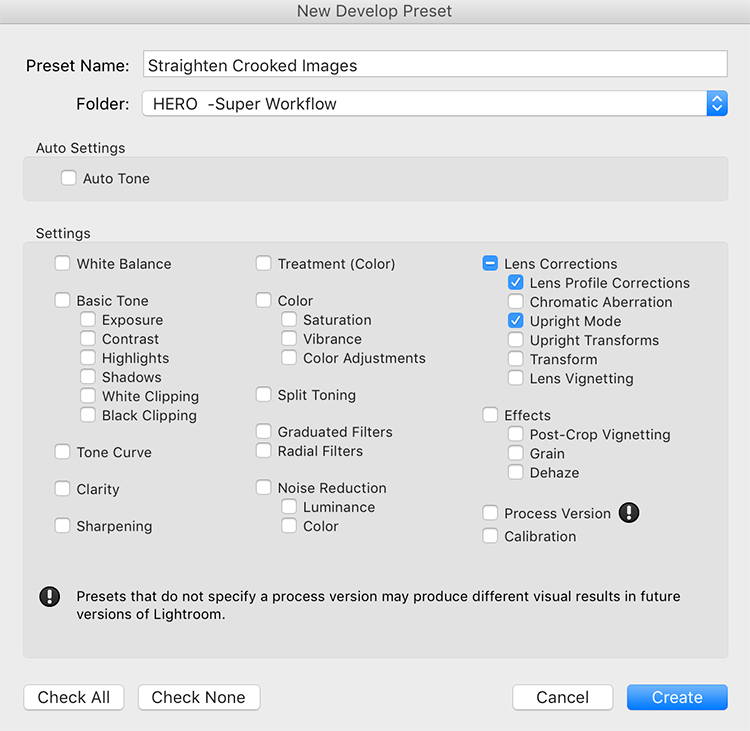
    This will bring up the New Develop Preset dialog box where you choose which settings you want in your preset, the folder you want to store it in, and what name you want to give it. Name your preset something that you will remember, put checkmarks in the Upright Mode checkbox and the Lens Profile Corrections checkbox and hit Create.

    Image10

    Now, when you have crooked images you can hit this preset and almost magically, your images will be straightened compared to the strong lines in the image.

    Image11

    Give it a shot, I think you will find yourself using this technique quite often to straighten your images quickly.

    Image012

    Image013

    googletag.cmd.push(function() {
    tablet_slots.push( googletag.defineSlot( “/1005424/_dPSv4_tab-all-article-bottom_(300×250)”, [300, 250], “pb-ad-78623” ).addService( googletag.pubads() ) ); } );

    googletag.cmd.push(function() {
    mobile_slots.push( googletag.defineSlot( “/1005424/_dPSv4_mob-all-article-bottom_(300×250)”, [300, 250], “pb-ad-78158” ).addService( googletag.pubads() ) ); } );

    The post How to Straighten Crooked Images Fast Using Lightroom by Kelly David Sansom appeared first on Digital Photography School.


    Digital Photography School

  • Natural Light Versus Artificial Light: Which is Better?

    Light is the backbone of photography. Without light, there are no photos. After all, the word photo means light. However, which type of lighting is best: natural or artificial? There are a lot of proponents for either camp, but this article will try and dissect the argument from both perspectives, and give you a chance to add your opinion at the end.

    Natural Light

    natural-light-versus-artificial-light-2689

    The arguments in favor of natural light are many, which means it’s not difficult to see why it is attractive to many photographers.

    The pros of natural light

    Cost

    Natural light costs nothing to make use of; there are plenty of gadgets and accessories available, such as reflectors and diffusers, that do help to maximize results, but even without them, it is easy enough to get beautiful results using natural light, without spending any money. This apparent lack of a financial entry barrier makes it much easier for most photographers to immediately assume a preference for natural lighting.

    Learning Curve
    natural-light-versus-artificial-light-0729

    Learning how to see, manipulate and utilize light, whether natural or artificial, is the most critical skill set for a photographer to learn. Fortunately, these break down into many individual skills that can be learned one at a time. In terms of natural light, a lot of these skills are easy to learn and put into practice. For example, you can read a tutorial on using an area open shade to diffuse and soften the light, then put it into immediate practice ten minutes later.

    Another thing to keep in mind here is that cameras are designed for use in natural light first. So, a new photographer working their way through the technical basics of their camera, such as metering, aperture and shutter speed, is almost certainly learning with natural light, thereby improving both their camera and lighting skills simultaneously.

    Semantics

    This point may seem a bit strange, but I have seen it crop up in various conversations, and it does affect some people’s perceptions. We live in a world that is currently obsessed with the word natural. It seems difficult to go more than five minutes without seeing words like organic, all-natural and free from. Of course, most of this applies to food and health products, but the mindset and lifestyle that go with it have become so expansive, that it has seeped into all manner of other aspects in our lives. Whether or not you buy into that sort of thing, try to ask yourself what sounds better and more appealing: natural or artificial? This may not seem rational in terms of photography (an inorganic, mechanical medium), but the appeal is more of an emotional one, and more often than not, emotion trumps rationale.

    The biggest concern here is one of marketing. A photographer who refers to themselves as a natural light photographer may very well simply be attempting to appeal to the quite large demographic that holds value over that kind of thing.

    The cons of natural light

    natural-light-versus-artificial-light-0962While natural light has its advantages, it is not without its own set of shortcomings.

    Unpredictability

    While the sun is a near constant during daylight hours, the availability of light is only one factor that needs to be taken into account. Clouds and other weather conditions are just a couple examples of things that will alter specific qualities of the light you are trying to work with. Softness, intensity, and color can all change in a split second at the whim of mother nature. If you are attempting to work towards a specific goal, these changes can be a nightmare.

    Night

    After sunset, what do you do if you’re in a situation where you still want (or need) to take photographs. If you’re relying solely on natural light, the answer is: not a whole lot. Many photographers have no problem with this limitation; however, try to imagine what you can achieve with just another hour or two a day working towards your photography.

    Environment

    natural-light-versus-artificial-light-2691

    Aside from its effect on light, shooting outdoors means you are at the constant mercy of the weather. Cold temperatures, rain, snow, and wind can all make for some uncomfortable experiences for both you and your subjects or clients.

    If you’re photographing in areas open to the public, you may be subject to the whims of passers-by. This can lead to an unwelcome audience, or even worse, hecklers. Believe me when I relate, that nothing kills the general mood of a session for both the subject and the photographer faster than excessive and undue attention from strangers.

    These environmental problems can often be solved by finding an indoor location and using window light. While the effects of weather and other people are gone, this solution is not without its own limitations. Window light, while often beautiful for photography, can be quite dim and may require slower shutter speeds than you might like for portrait photography. A lack of space is also a common problem when shooting indoors.

    Artificial light

    natural-light-versus-artificial-light-3213

    Like natural light, artificial light, whether strobes, flashguns or continuous lighting, has its own set of advantages and shortcomings.

    The pros of artificial light

    Convenience

    By owning an artificial lighting solution, you have the means to take photographs at any time day or night, indoors or out, and the weather has no effect on you. If for some reason you want to do food photography at midnight, by all means, go for it.

    If you own a set of flashguns (speedlights), they are not only convenient, but portable as well, and can be taken just about anywhere and set up with ease.

    Versatility

    With studio strobes and the like, the sheer number of ways that they can be used for a vast array of creative results is their strongest selling point. These range from simple one light setups that mimic natural light, to complicated setups with seven or more lights.

    Control

    Another great strength of studio lighting is the control it offers you over your final photograph. By controlling every bit of light in your scene, artificial lighting negates the unpredictability that you get with natural light. If you want a particular look or mood, all that you have to do is set up the lights, and take photos until you have your results. There’s no worry that a cloud will move in and block your light.

    Reliability

    natural-light-versus-artificial-light-4689

    Apart from removing the environmental issues associated with natural light, studio strobes and flashguns are quite reliable. Most models in the moderate price range, and above, are very well made. This means that the power output, as well as color output, is consistent every time it fires. This a huge advantage over the fast changing conditions of natural light.

    The cons of artificial light

    Cost

    natural-light-versus-artificial-light-4563Probably the most off-putting aspect of studio lighting is cost. It doesn’t matter whether you choose studio strobes, flashguns (speedlights), or continuous lighting; decent quality lighting equipment does not come cheap and a good set, along with modifiers, can easily cost over $ 1000. With natural light being a free and capable resource, it’s easy to understand why so many photographers steer clear of artificial lighting.

    Learning Curve

    Another initial disadvantage of studio lighting is the amount of knowledge you have to gain, in order to start using it. It’s very possible to accidentally take a beautifully lit photo in natural light. With artificial light, that’s next to impossible.

    A lot of photographers, me included, would probably gladly tell you how atrocious their first attempts with studio lighting were. To get good results, you have to spend an enormous amount of time reading and practicing. This involves things like new aspects of aperture and shutter speed in relation to flash, qualities of light, effects of modifiers and the dreaded inverse square law.

    So, which is better?

    In my opinion? Neither and both are better.

    It depends on the job at hand. Both are just tools to be used at each photographer’s discretion. After all, nobody walks into a newly built house and waxes lyrical about the type of hammers that were used. Good photography is good photography, no matter how it was made. If something screams out to be lit with natural light, then natural light is better. Likewise with artificial light.

    Each method is capable of stunning results and I would rather have a full toolkit to use for every opportunity, than miss out on something because I restricted myself from using the right tool for the job.


    Editor’s Note: This is one of a series of articles this week that are Open for Discussion. We want to get the conversation going, hear your voice and opinions, and talk about some possibly controversial topics in photography.

    Give us your thoughts below on the article above on natural versus artificial, and watch for more discussion topics this week.

    See all the recent discussion topics here:

    • 7 Commonly Accepted Photography Beliefs Debunked
    • Is HDR dead? Some dPS Writer’s Thoughts on this Controversial Topic
    • How to Find your Personal Photographic Style
    • Why You May be Failing to Reach Your Potential as a Photographer
    • To Process or Not To Process? Let’s Discuss
    • How much do you process your images? – a dPS POLL
    • Does the Camera Matter? SLR versus Mirrorless versus Smartphone

    googletag.cmd.push(function() {
    tablet_slots.push( googletag.defineSlot( “/1005424/_dPSv4_tab-all-article-bottom_(300×250)”, [300, 250], “pb-ad-78623” ).addService( googletag.pubads() ) ); } );

    googletag.cmd.push(function() {
    mobile_slots.push( googletag.defineSlot( “/1005424/_dPSv4_mob-all-article-bottom_(300×250)”, [300, 250], “pb-ad-78158” ).addService( googletag.pubads() ) ); } );

    The post Natural Light Versus Artificial Light: Which is Better? by John McIntire appeared first on Digital Photography School.


    Digital Photography School
  • World’s Biggest Indoor Vertical Farm Near NYC to Use 95% Less Water

    [ By WebUrbanist in Architecture & Offices & Commercial. ]

    aerfarms rows

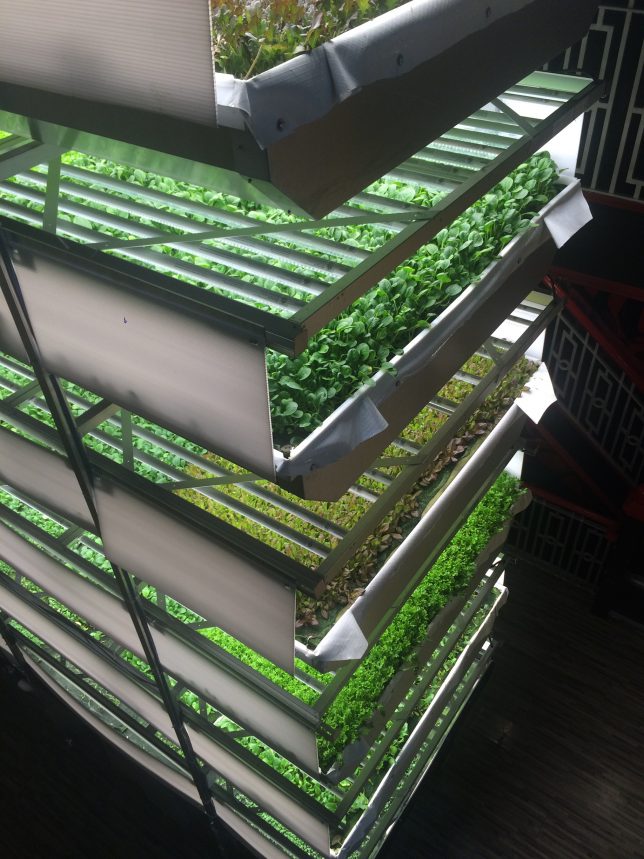
    AeroFarms is on track to produce 2 million pounds of food per year in its 70,000-square-foot facility in Newark, under construction about an hour outside Manhattan. Their efficient operation, based on previous experience at similar but smaller facilities, can accomplish this astonishing output “while using 95% less water than field farmed-food and with yields 75 times higher per square foot annually.”

    aerofarms facade

    This new facility is comparable in efficiency to what is currently the world’s largest vertical farm in Japan, but nearly three times the size. Staggering its crops is part of the success behind AeroFarm’s strategy at their new and existing locations – at a given facility they are able to switch between 22 crops per year. Their all-season growth works with specialized LED lights and climate controls all without the need for sunlight or soil.

    aerofarms diagram

    “We use aeroponics to mist the roots of our greens with nutrients, water, and oxygen.,” explains AeroFarms. “Our aeroponic system is a closed loop system, using 95% less water than field farming, 40% less than hydroponics, and zero pesticides.” Smart pest management and highly-detailed data feedback loops help keep the system operating at peak efficiency and provide opportunities for iterative improvement, respectively.

    aerofarms shelves

    “Our passion is great tasting food and sharing our harvest with the world. In Newark, New Jersey, we are growing and selling into the New York Metro area. There has been tremendous demand for our locally grown, delicious, produce, and we have farms in development in multiple US states and on four continents. There has never been a greater need for safe, dependable, nutritious food, and we are scaling quickly to transform agriculture around the world.”

    aerofarms students

    First Lady Michelle Obama recently visited the Garden State and toured a nearby school, planting seeds in a rooftop garden and sharing healthy snacks with students involved in a youth program as young AeroFarmers.

    Share on Facebook


    [ By WebUrbanist in Architecture & Offices & Commercial. ]

    [ WebUrbanist | Archives | Galleries | Privacy | TOS ]


    WebUrbanist

  • Cows Of A Different Color: The Moooving Art Project

    [ By Steve in Art & Installation & Sound. ]

    moooving-art-1a
    The Moooving Art project in Shepparton, Australia, promotes the region’s dairy industry via dozens of fiberglass cows creatively painted by local artists.

    moooving-art-1e

    moooving-art-2b

    moooving-art-2a

    The Moooving Art Project was established in 2002, inspired in part by the very successful “Merry Moos” campaign featured at the Shepparton agricultural show. So what’s the deal with Shepparton and cows, you might ask?

    moooving-art-1d

    moooving-art-1b

    In a nutshell, Shepparton is the largest town in the Goulburn River valley, located just over 100 miles (175 km) north-northeast of Melbourne in Victoria, Australia. The region is Australia’s largest producer of dairy products and the aim of the project is to celebrate the positive impact the cow-driven industry has made on the local economy. Flickr user rotheche snapped some of these “outstanding in their field” designs in April of 2009.

    moooving-art-10a

    Though most of the models sport the standard bovine pose, a few feature out-of-the-ordinary modifications. Fancy some relaxing on the above “Cowch” whilst enjoying a sunny summer’s day down under?

    Next Page – Click Below to Read More:
    Cows Of A Different Color The Moooving Art Project

    Share on Facebook


    [ By Steve in Art & Installation & Sound. ]

    [ WebUrbanist | Archives | Galleries | Privacy | TOS ]


    WebUrbanist

  • Does the Camera Matter? SLR versus Mirrorless versus Smartphone

    Camera comparisons

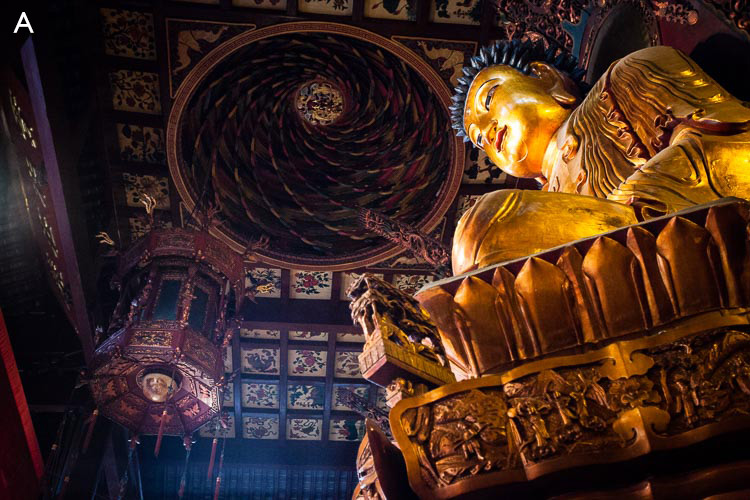
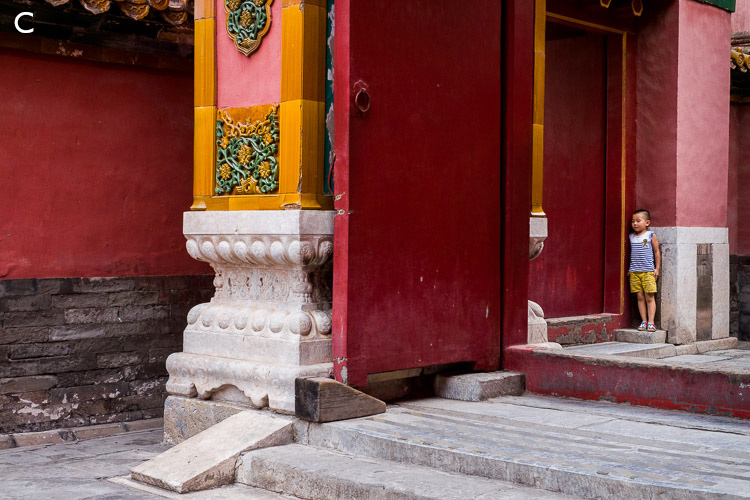
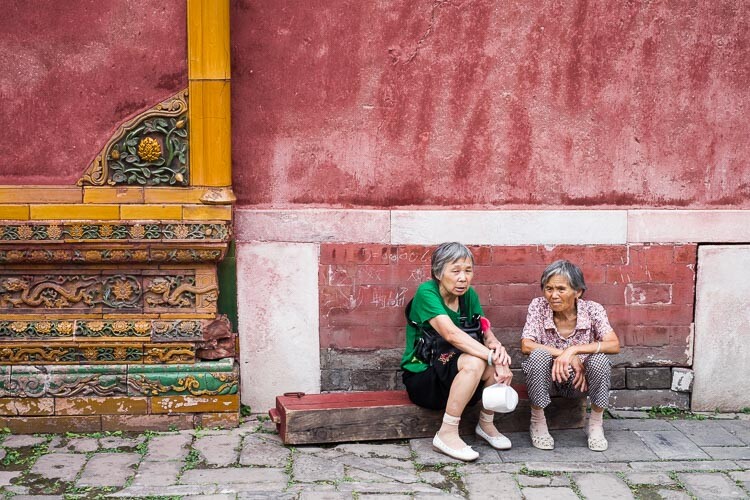
    When our wonderful editor Darlene asked me to write an article comparing camera types my first thought was to show you a series of photos just like the following, and ask you to guess which ones were taken, with which cameras. It’s a fun idea, so let’s do it.

    This is the list of cameras.

    1. Olympus D345 (5 megapixel compact, purchased 2006)
    2. EOS Digital Rebel XT (8 megapixels APS-C dSLR, purchased 2006)
    3. EOS 40D (10 megapixel APS-C dSLR, purchased 2007)
    4. EOS 5D Mark II (21 megapixel full-frame dSLR, purchased 2010)
    5. iPhone 5
    6. Fujifilm X-T1 (16 megapixel APS-C mirrorless, purchased 2014)

    Here are the photos:

    camera-comparisons-2

    camera-comparisons-3

    camera-comparisons-4

    camera-comparisons-5

    camera-comparisons-6

    Camera comparisons

    How did you do? Here are the answers.

    A. EOS 5D Mark II
    B. Olympus D345
    C. Fujifilm X-T1
    D. EOS 40D
    E. EOS Digital Rebel XT
    F. iPhone 5

    Now, this isn’t a fair comparison, for several reasons. One is that these photos are reproduced here at 750 pixels wide. You really need to see them uncropped to appreciate the difference in quality and size (for example, the photo taken with the 5D Mark II is four times the size of the one taken with the Olympus D345).

    Also, these photos don’t tell you much about the dynamic range capability of each camera, or how well they perform at high ISO settings. The Olympus D345 doesn’t even have a high ISO setting – all photos are taken at a fixed ISO of 50 (something I didn’t realize until after I bought it).

    Then there’s the variable of lens choice, which also affects image quality, plus post-processing (clarity and sharpness adjustments in particular can make a big difference to the apparent sharpness of an image).

    All this exercise does, is tell you that if all you want to do is post photos online, then just about any camera will suffice. John Lennon is quoted (probably apocryphally) as saying:

    “When I went to school, they asked me what I wanted to be when I grew up. I wrote down ‘happy’. They told me I didn’t understand the assignment, and I told them they didn’t understand life.”

    To paraphrase, anybody who asks what camera you took a photo with probably doesn’t understand photography. Okay, that’s a bit harsh, but it’s a question that misses the point. Nobody who matters cares what camera you you used to take the photo.

    If you submit a photo to a magazine, a photography competition, or a gallery, unless there’s a specific reason they need to know (good luck sending a photo taken with a Canon camera to Nikon Photo magazine) they don’t care.

    All that matters is the strength of the photo – did you capture an interesting subject? Is the composition strong? Is the lighting beautiful? Does your photo move people, inspire emotion? None of this has anything to do with the camera, and everything to do with the photographer.

    So, why do we have this endless discussion about cameras? Well, for most of us photography is a hobby and discussing gear and lenses is all part of the fun.

    But sometimes the discussion is more purposeful. Cameras are tools, and good photographers learn to either adapt to the tool at hand, or choose the best one for the job. The question is not what camera is best, but which camera is best for you, and the purpose you have in mind. Discussions about what cameras are best for what subject can go on a long time!

    So, bearing in mind I’ve been asked to write about SLRs vs mirrorless cameras vs smartphone cameras, let’s take a look at which each of these tools does.

    The Digital SLR

    SLR cameras replaced rangefinders sometime in the 1960’s, as the camera style of choice for most photographers. The main advantages of SLRs is that, unlike rangefinders, the viewfinder shows you exactly what the lens sees (or 95% or so, of it anyway).

    Until about six years ago the digital SLR was the undisputed king of 35mm and crop sensor camera designs. You get an optical viewfinder that shows you what the lens sees, no matter which lens you use on the camera, and fast and reasonably accurate autofocus in an ergonomic body. Sizes range from small (such as the EOS 100D/Rebel SL1) to massive (the Nikon D5) and the specifications range from entry level, to high-performance professional.

    Where digital SLRs excel (high-end ones at least) is with autofocus tracking of moving objects. That, plus the wide range of available super-telephoto lenses, makes them the camera of choice for most professional sport and nature photographers.

    Camera comparisons

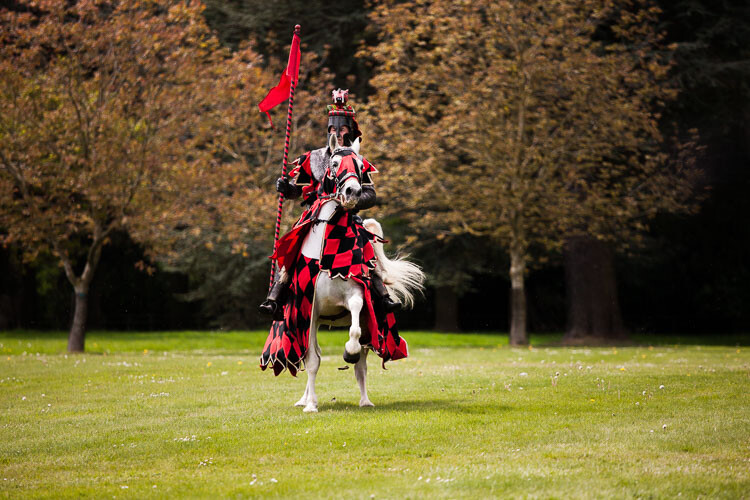
    Digital SLRs are good for capturing photos of fast moving subjects like this knight on horseback.

    The Smartphone

    Apple more or less invented the modern smartphone with its first iPhone back in 2007. Since then smartphones and their cameras have improved immensely. The appeal of the smartphone camera is fairly obvious – most people carry their phone just about everywhere.

    An antidote to the large, heavy SLR, smartphones bring a degree of freedom that photographers hadn’t experienced before. When I asked a friend once how she was going with her EOS 40D (she bought one about the same time as me) she replied that she was “sick of lugging that thing about” and just used her iPhone now.

    Throw in apps like Instagram and Snapseed, and the ability to share photos instantly, and you can see why smartphone cameras are popular. If you’ve seen Apple’s iPhone posters you’ll also know they are capable of creating insanely good images in the right hands.

    The Mirrorless Camera

    The mirrorless camera fills the gap between smartphone and digital SLR that was previously occupied by high end compacts. The best mirrorless cameras have the lens choice, image quality, and functionality of professional digital SLRs in a lighter, cheaper, and smaller body. The biggest difference between the two, in terms of performance, is accurate autofocus tracking of moving subjects, and the gap is getting smaller (whether it will ever be reduced to zero is something we will see in the future).

    Mirrorless cameras appeal to photographers who want high performance cameras in a small body. They are great for street and travel photographers.

    Camera comparisons

    Mirrorless cameras are great for street and travel photography, helping you take photos like this.

    So, here’s my answer to the question “Does the camera matter?” No it doesn’t. Most people don’t care what camera you took a photo with. You may be curious – for example, if you see someone creating beautiful landscape photos, it’s natural to wonder if buying the same camera and lens will help you do so as well (the answer is that it may help, but it probably won’t – you’d be better off asking how they mastered their craft and how hard they work to get their images). But ultimately, nobody cares. They only care about the photo.

    Should you care what camera you use? Yes, you should, because it is your job as photographer to make sure your tools are up to the job at hand. You need a camera that suits you and your way of working, that fits into your budget, and has all the features you need for the types of photography you do.

    Agree? Disagree? Let us know in the comments!

    If you’d like to learn more about the basics of photography, then please check out my ebook Mastering Photography: A Beginner’s Guide to Using Digital Cameras.


    Editor’s Note: This is one of a series of articles this week that are Open for Discussion. We want to get the conversation going, hear your voice and opinions, and talk about some possibly controversial topics in photography.

    Give us your thoughts below, and watch for more discussion topics each day this week.

    See all the recent discussion topics here:

    • 7 Commonly Accepted Photography Beliefs Debunked
    • Is HDR dead? Some dPS Writer’s Thoughts on this Controversial Topic
    • How to Find your Personal Photographic Style
    • Why You May be Failing to Reach Your Potential as a Photographer
    • To Process or Not To Process? Let’s Discuss
    • How much do you process your images? – a dPS POLL

    googletag.cmd.push(function() {
    tablet_slots.push( googletag.defineSlot( “/1005424/_dPSv4_tab-all-article-bottom_(300×250)”, [300, 250], “pb-ad-78623” ).addService( googletag.pubads() ) ); } );

    googletag.cmd.push(function() {
    mobile_slots.push( googletag.defineSlot( “/1005424/_dPSv4_mob-all-article-bottom_(300×250)”, [300, 250], “pb-ad-78158” ).addService( googletag.pubads() ) ); } );

    The post Does the Camera Matter? SLR versus Mirrorless versus Smartphone by Andrew S. Gibson appeared first on Digital Photography School.


    Digital Photography School
  • Nikon D5: A pro sports photographer gives us his opinion

    Nikon D5: a pro photographer’s opinion

    A Bahaman athlete, shot through the flame and heat haze in the Olympics Stadium in the 4 x 100m Mens Relay – London Olympics 2012.

    Nikon D4, Nikon 300mm F2.8, 1/500 sec F4 ISO 800. Photograph by Mark Pain


    The Nikon D5 has impressed us with its speed and reliability, and earned a gold award when we reviewed it recently. But we don’t pretend to represent the camera’s core market of sports professionals and photojournalists. That’s why we turned to Mark Pain, a UK-based sports photographer and Nikon shooter, to get his opinion on the D5. Click through this article to learn how Mark got started, what makes a good camera for his needs, and how the D5 is measuring up.

    Nikon D5: a pro photographer’s opinion

    Zara Tindall (Phillips) jumps the lake At Badminton, on her horse High Kingdom.

    Nikon D5, Nikon 400mm F2.8, 1/3200 sec F3.5. ISO 320. Shot using AF-C in D25 area AF mode. Photograph by Mark Pain


    Mark Pain:

    The first thing you notice when you use a D5 is the blisteringly fast and accurate autofocus. Many cameras feel quick and responsive the first time you pick them up, but very few continue to fill you with more and more confidence every time you use them. But the D5 does just that. It takes everything the D4s did well and improves on it. But most importantly Nikon seemed to have listened to photographers’ feedback on what wasn’t so good about the D4s and transformed those areas of performance with a total redesign.

    The new AF system is nothing short of sensational. If you set the camera up properly the D5 doesn’t miss a beat. User error is far more likely to be the reason for a missed shot than the camera letting you down, even for the best of photographers.

    Nikon D5: a pro photographer’s opinion

    David Weir celebrates winning his third gold medal in the 1500m – London Paralympics 2012.

    Nikon D4, Nikon 300mm F2.8, 1/1250 sec at F2.8. ISO 2000. Photograph by Mark Pain


    I’ve been shooting sport professionally for over 25 years now, since I was 22. But I got the bug for photography and especially for photographing movement just after I was given my first SLR for my 13th birthday. I loved my fully manual Fujica STX-1 when I was asked to shoot some pictures of my school Sportsday for the school magazine, I was hooked.

    The Fujica STX-1 was a superb camera for a young photographer to learn with, fully Manual and extremely well built. It made me concentrate on and master all the fundamentals of photography, fundamentals that remain the backbone of my photography today.

    Nikon D5: a pro photographer’s opinion

    Mark’s kit-bag. Nikon D5, Nikon D4s, Nikon 70-200mm F2.8, Nikon 24-70mm F2.8, Nikon 14-24mm F2.8, Nikon TC14 1.4x converter MkIII, Nikon 16mm F2.8, Nikon SB-800 Flashgun inside a Think Tank Airport International rolling case.


    There have been two huge developments in photography since I started out; the coming of autofocus and the move from film to digital. As a professional there have been times when these changes have caused major headaches. AF systems take time to get right and professional sports photographers tend to be on the receiving end of their failings or quirks. Often the technical ability of the cameras in the field (even the top end Pro SLRs/DSLRs ) has lagged behind what the manufacturers claim to have achieved on paper. Especially when it comes to autofocus.

    Nikon D5: a pro photographer’s opinion

    The British Mens Team Pursuit team on their way to breaking the world record at the Beijing Olympics 2008.

    Nikon D3, Nikon 70-200mm F2.8, 1/15th sec at F8, ISO 200. Photograph by Mark Pain


    A camera’s success is dependent on three crucial aspects of its design and spec coming together in harmony; sensor performance, the processor used in the camera and the firmware. For me, the first digital camera that married all these important factors together was the Nikon D3. The D3 changed my world and I switched from Canon to Nikon in the January of 2008 because of it, and I took the D3 to the Beijing Olympics later that year. To my mind the D3 was the best balanced professional sports camera. Until the D5.

    Nikon D5: a pro photographer’s opinion

    Zara Tindall (Phillips) jumps the lake At Badminton, on her horse High Kingdom.

    Nikon D5, Nikon 400mm F2.8, 1/3200 sec F3.5. ISO 320. Shot using AF-C in D25 area AF mode. Photograph by Mark Pain


    The D5 seems to have that same balance, ease of performance and feeling of class that the D3 had. It’s the camera the D4 and D4s so nearly were. Of course it’s early days and I’ve only been shooting with it for a month or so. A camera’s abilities can only be fairly judged over a much longer period of time in a far wider variety of conditions than I have used the D5 in so far. How the camera performs at a rain soaked night match at a dark non-league football ground in the early rounds of FA Cup at 8000 ISO is just as important as how it performs at 200 ISO in bright sunshine at the Final at Wembley.

    But the Olympics is the ultimate test of any camera claiming to have a sports pedigree and I’m seriously excited to be heading to Rio in a couple of months time with a couple of D5s at my side. The huge variety of sports both indoors and outdoors and the technical challenges they present will push the camera to its limits.

    Nikon D5: a pro photographer’s opinion

    Jesse Lingard celebrating his winning goal in the FA Cup Final.

    Nikon D5, Nikon 70-200mm F2.8, 1/2000th sec at F2.8, ISO 2000, Shot using AF-C in D25 area AF mode. Photograph by Mark Pain


    The sequence of 28 consecutive Raw frames I recently took of Manchester United’s Jesse Lingard celebrating his winning goal at the FA Cup Final confirmed the true AF performance of the D5. Every frame was sharp and in focus. Every frame. Camera manufacturers show sequences of sprinters running towards the camera in their brochures to try and sell the AF tracking performance of their new equipment. But that kind of movement has been easy for cameras to track for a long time.

    Nikon D5: a pro photographer’s opinion

    The next day’s papers!


    In the real world of top professional and dynamic team sport with lots of random movement, AF systems inherently struggle. But the D5 has proved to be extremely capable and with a Nikon 70-200mm F2.8 the Lingard celebration was technically faultless.

    Nikon D5: a pro photographer’s opinion

    Saracens v Harlequins at Wembley Stadium in the Aviva Premiership Championship.

    Nikon D5, Nikon 400mm F2.8, 1/2000 sec F2.8 ISO 1100. Shot using AF-C in D25 area AF mode. Photograph by Mark Pain


    Even at ISO 2000 the files look sharp with a complete lack of noise or signs of in camera over-processing. Now that the D5 has 20.8 megapixels a shutter speed of at least 1/2000th is needed to freeze most fast moving sport. What many people don’t realise is that the more megapixels you have the faster shutter speeds necessary to freeze the same action. In real camera terms, six years ago I would have been shooting the whole of this year’s FA Cup Final on a D3s on a shutter speed of 1/800th sec. This year I was shooting the match at 1/2000th sec on a D5 – to freeze the very same type of images.

    Mark Pain is a multi-award winning UK-based sports photographer who covers major events worldwide from the Olympic Games to the Ryder Cup. Mark was the Chief Sports Photographer for The Mail On Sunday for more than 20 years, and was named Sports Photographer of the Year in 2005 and 2011 at the British Press Awards. Mark launched the first ever Sports Photography School in 2011, and was named the British Airways Olympic Photographer Of The Year 2012 at the prestigious UK Guild Of Picture Editors Awards.

    Articles: Digital Photography Review (dpreview.com)