Blog

  • It was only a matter of time… new app turns your Instagram into virtual art gallery

    Have you ever wanted to see your photographs on the wall of an art gallery? Come on – be honest. Your cat pictures deserve a wider audience, and the makers of new app ‘Instamuseum’ agree. 

    Instamuseum converts any Instagram account into a 3D virtual reality experience, placing images (up to 90) from the feed on the walls of a computer-generated gallery space. There are four templates available (including ‘Louvre’) and the rendered space can be explored using VR goggles or using a more conventional pan / zoom interface in a desktop browser.

    Instamuseum for @dpreview by barney.britton on Sketchfab

    Coming in the same week as the actual Louvre gallery in Paris (into which we’ve placed DPReview’s Instagram feed, above) was evacuated due to historic flooding, we can’t help wondering if this is just another sign of the end times. Let us know what you think in the comments. 

    Articles: Digital Photography Review (dpreview.com)

  • Eye-Plug camera dongle enables Android phones to record 3D video

    At Computex in Taipei recently, Chinese company Weeview Inc. showcased a USB-C dongle that adds another camera to an Android phone, enabling it to record stereoscopic 3D videos. Called Eye-Plug, this camera dongle records content simultaneously with either the rear or front-facing camera integrated in the handset; because it uses USB-C, the dongle can be inserted in either direction. 

    A prototype version of Eye-Plug was demonstrated at Computex, and the company will, according to Engadget, begin production on a commercial version later on this year. Weeview plans to sell Eye-Plug for $ 35 and to eventually produce an iPhone version; it isn’t clear whether a mini USB model will also be produced or if it will remain limited to USB-C devices (which is a pretty small group of phones at this point.)

    No information on the dongle camera’s resolution has been provided, though the product video below shows notable differences in quality and white balance between Eye-Plug’s footage and footage recorded with the handset’s own camera. It isn’t clear whether the company’s app will adjust the footage in post-processing to correct this issue. The video below suggests the app offers still image editing tools for selective adjustments made possible by layering two images taken simultaneously.

    Availability for Eye-Plug was not provided by the company.

    Articles: Digital Photography Review (dpreview.com)

  • New glassless ‘metalens’ is 100,000X thinner than conventional optics

    A team at Harvard University has designed a ‘metalens’, around 100,000 times thinner than an equivalent glass lens. Constructed from titanium dioxide ‘nanofins’, the lens is a mere 600 nanometers thick, and can focus features smaller than the wavelength of the light it is imaging, thanks to its very high numerical aperture that allows it to focus light into a spot smaller than the wavelength of light being imaged. Senior author Federico Capasso and his fellow researchers successfully imaged structures 400nm in size, which is on the order of the bluest light in the visible spectrum. That suggests the tech is essentially diffraction-limited: resolving small structures as well as one ever theoretically could using visible light.

    An electron microscopic view of the titanium dioxide metamaterial lens, created by engineers at Harvard University. These TiO2 towers are only 600nm in length, yet can image features traditional microscopes require lenses 6cm in length – 100,000 longer – to image. And apparently do so 30% better.

    John A. Paulson School of Engineering and Applied Sciences/Harvard University

    This is the first planar lens that works in the visible spectrum. The nanofins (shown above) are constructed using similar lithographic processes used to fabricate computer chips, and mounted on a thin layer of transparent quartz. The fins are made of titanium dioxide because it is clear, and interacts strongly with visible light. Each fin is angled and positioned so that the ensemble effectively bends light just as the curved surface of a lens would. Different focus can be achieved simply by changing the size, spacing and orientation of the pillars – it’s just a matter of doing the computer simulations and calculations to dial in the proper design. Different materials can be used to target different wavelengths of light: previously, the team has used silicon to focus infrared light, for example.

    The practical potential of lenses made from these so-called ‘metamaterials’ are almost infinite, considering the drastic reductions in size and weight that the technology makes possible. A planar surface saves considerable space and volume compared to the typical curved surfaces traditional lenses necessitate. Furthermore, the non-reliance on a perfectly curved spherical or aspherical surface means images can be relatively aberration-free. And the nanostructures themselves can be manufactured with incredible precision, and in a cost-effective way as well, due to the compatibility with traditional microprocessor chip foundries.

    Currently, these lenses can’t handle full-color imaging because of the very narrow band of wavelengths that can currently be imaged with any particular TiO2 arrangement. However, the team hopes to broaden the wavelengths over which the technology works in the future. This might allow for small yet very high numerical aperture, aberration-free imaging in cameras and cell phones.

    But even without spectral broadening advances, the potential applications are very exciting. Obvious applications include microscopy and medical instruments, where structures larger than the wavelength of light are more the exception than the rule. But another potentially huge application is display technology – particularly virtual/augmented reality and wearable optics in general, where the size and weight of today’s headsets is a major obstacle to mass adoption. Display technology actually utilizes narrow wavelength R, G, and B primaries, mixing them in just the right ratios to trick your eye/brain into perceiving the intended color. Small, flat lenses that can focus these primary colors with very high precision, aberration-free, might just open up a world of high-resolution and practical VR devices.

    Source: phys.org

    Articles: Digital Photography Review (dpreview.com)

  • Brand Name Versus Third-Party Photography Gear: Which is better?

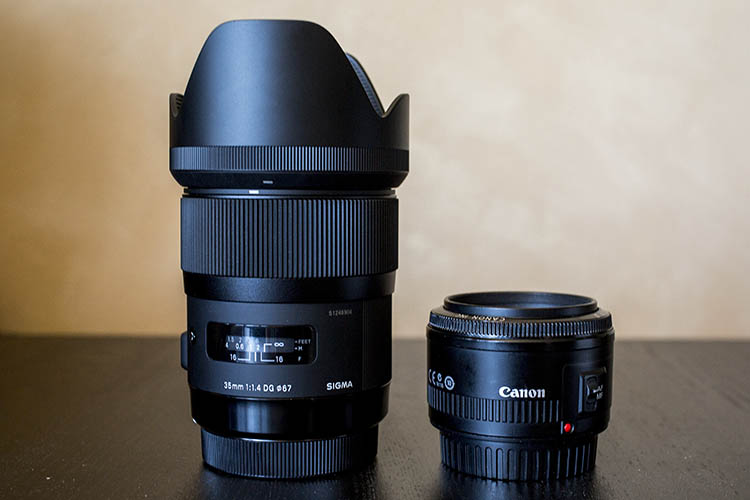
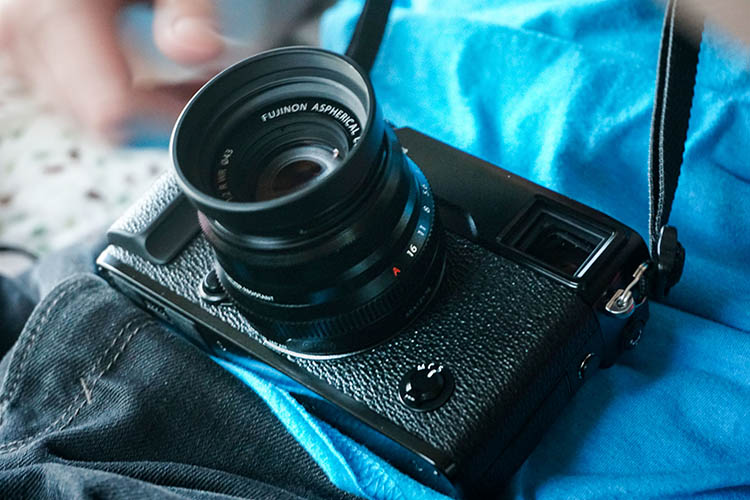
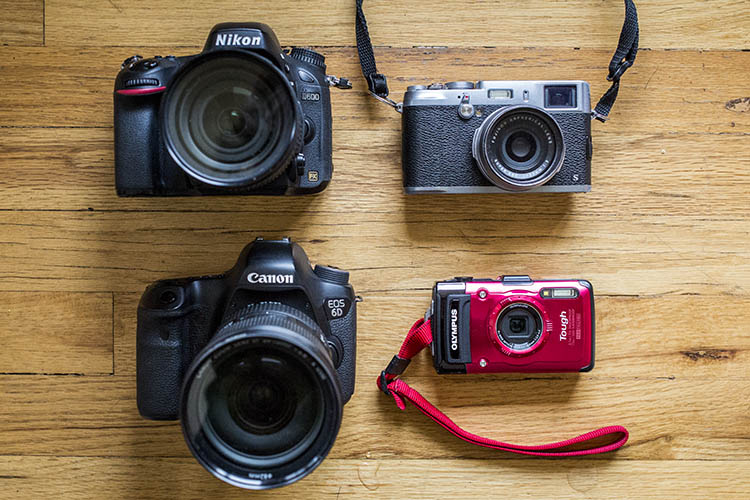
    Not long ago, there were two types of camera accessories to buy: brand items designed by known manufacturers such as Canon and Nikon, OR third-party items of questionable quality that you’d likely buy only if you were on a tight budget. Today, this situation has changed, with third-party manufacturers such as Sigma and Tamron stepping up their game and producing alternatives that even serious professionals have begun using.

    Still, the question remains: does the brand name truly matter when it comes to camera accessories?

    Let’s explore some of the pros and cons of each side. Keep in mind that this is a highly debatable topic, and this is just a short list of general pros and cons for using brand name and third-party items. If you have any other points to add, please mention them in the comments below.

    third party camera lenses

    Why brand names matter

    Brand name items are almost always going to be more expensive than third-party ones, but as most photographers say, “you get what you pay for.” Some reasons for the premium pricing on brand name items include:

    Better build quality and dependability

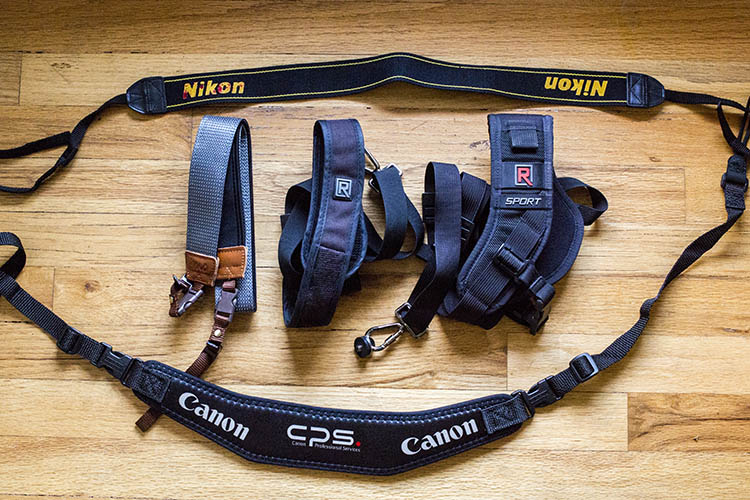
    This can be extremely important if you belong to any professional organizations such as Canon or Nikon Pro Services, as cleaning and repair of brand name gear is generally included in your membership. While most third-party manufacturers have begun adding their own repair services, they’re not known to be as fast and consistent as name brands, and guaranteed compatibility with your brand name camera of choice.

    third party camera lenses

    Guaranteed compatibility

    Third-party vendors thrive on the ability to produce accessories and items that are compatible with many major brand name cameras. If you buy say a Sigma 35mm f/1.4 lens, there will be both a Nikon and Canon mount option. This means you have to be ultra diligent to make sure a third-party item will work with your camera model. However, if you buy a 35mm f/1.4 lens from Nikon (for example), you know for sure that lens will work your Nikon camera.

    Respect from other photographers

    When you shoot with a brand name accessory, you’re more likely to get nods of respect from other photographers who recognize the value of that authentic, name brand lens (the coveted red ringed lenses from Canon and gold ring on Nikon lenses). This is becoming more of a debatable point lately with the rise of high-quality third-party gear options, but there’s still something to be said about acknowledging the real deal over a third-party brand.

    Why third-party brands are coming up

    Unique innovations

    third party camera lenses

    As mentioned earlier, the scene for third-party brands has shifted to the point where Sigma and Tamron are no longer necessarily viewed as compromises, just for the budget-minded photographer. Instead, these brands are focusing not only on improving old designs perfected by established name-brands, but they’re innovating alternatives that even Canon and Nikon haven’t come up with. Consider the Sigma 120-300 f/2.8, which is already in its third incarnation, or the Sigma 18-35mm f/1.8 lens, the first zoom lens for DSLRs that holds a consistent f/1.8 aperture throughout its entire zoom range. These are lenses with features that even Canon and Nikon have yet to offer. Quality and consistency of these Sigma lenses might be questionable depending on your photography standards, but the fact that a third-party brand is innovating and selling unique lenses speaks to how third-party brands are shifting in the overall industry. (Read this to see why one dPS writer uses the Sigma 150-600mm for wildlife photography.)

    The price is right

    Every photographer knows that camera gear isn’t cheap, and while brand name items may be ideal, sometimes they just aren’t realistic price points for what is affordable. This is where third-party items can help beginners, or photographers on a budget, can get their hands on some quality equipment. If the gear is kept in good shape, resale value should still be pretty decent, if and when they decide to upgrade to a brand name alternative down the road.

    third party camera lenses

    One item you probably shouldn’t buy third-party

    When it comes to third-party accessories, there’s one in particular that you may want to make sure is brand name authentic: your camera batteries. Personally, I’ve had mixed experiences using third-party batteries on both my DSLR and mirrorless cameras. Most of the time they work, but every once and a while, there’s a battery that just won’t hold a charge, or fails for some mysterious reason. That battery is always from a third-party brand. A simple way to work around this would be to stock your camera battery arsenal with some brand name batteries, and some third-party ones to make sure you’re covered. There’s nothing worse than having a battery fail when you need it the most.

    Over to you

    What has been your experience using brand names and third-party brands? Are you partial to one over the other? Do you go for brand name camera bodies and lenses, and opt for third-party accessories like filters, tripods, and batteries?

    What has your experience been, let us know in the comments below.


    Editor’s Note: This is one of a series of articles this week that are Open for Discussion. We want to get the conversation going, hear your voice and opinions, and talk about some possibly controversial topics in photography.

    Give us your thoughts below on the article above and watch for more discussion topics.

    See all the recent discussion topics here:

    • 7 Commonly Accepted Photography Beliefs Debunked
    • Is HDR dead? Some dPS Writer’s Thoughts on this Controversial Topic
    • How to Find your Personal Photographic Style
    • Why You May be Failing to Reach Your Potential as a Photographer
    • To Process or Not To Process? Let’s Discuss
    • How much do you process your images? – a dPS POLL
    • Does the Camera Matter? SLR versus Mirrorless versus Smartphone
    • Natural Light Versus Artificial Light: Which is Better?
    • How Limitations Can Help You Grow as a Photographer

    googletag.cmd.push(function() {
    tablet_slots.push( googletag.defineSlot( “/1005424/_dPSv4_tab-all-article-bottom_(300×250)”, [300, 250], “pb-ad-78623” ).addService( googletag.pubads() ) ); } );

    googletag.cmd.push(function() {
    mobile_slots.push( googletag.defineSlot( “/1005424/_dPSv4_mob-all-article-bottom_(300×250)”, [300, 250], “pb-ad-78158” ).addService( googletag.pubads() ) ); } );

    The post Brand Name Versus Third-Party Photography Gear: Which is better? by Suzi Pratt appeared first on Digital Photography School.


    Digital Photography School

  • Mosh Pits and Sunsets: Shooting with the Panasonic GX85

    Panasonic Lumix DMC-GX85 Real World Experience 

    An evening of challenge light, both in terms of temperature and brightness, couldn’t stop the Panasonic GX85. Edited to taste in ACR. ISO 3200, 1/500 sec at F2.8. Shot at 50mm (equiv. ) using the Panasonic Lumix G 25mm F1.7 lens.SO 3200

    I’ve been working on our forthcoming review of the Panasonic Lumix DMC-GX85 for two weeks now and as I put the finishing touches on the technical portion of the write-up, I wanted to share some highlights of my shooting experience with the camera, specially in two very different shooting environments.

    While I’ve been using the GX85 to shoot street photos and portraits of friends, this past Saturday I brought it along to a music festival in Seattle’s industrial SoDo neighborhood called Big BLDG Bash. I shoot a lot of live music for my blog, mostly with a Nikon D750, 50mm F1.8, 20mm F1.8 and flash. But after using the GX85 for a couple of weeks, I felt relatively confident in the Panasonic’s ability to keep up.

    The GX85 handled challenging AF scenarios all night long. Out of camera JPEG.  ISO 6400, 1/500 sec at F4.5. Shot at 50mm (equiv. ) using the Lumix G Panasonic 25mm F1.7 lens. 

    Seven stages, both indoor and outdoor, gave me a chance to test out the GX85’s autofocus and overall performance in a variety of scenarios. And the non-stop music meant that this would be a good test of the battery life, too. 

    Of course after a night of rocking out I figured the GX85 needed some peace and quiet, so I also brought it shooting around one of my favorite places in Seattle: Golden Gardens, a beach along the city’s Northwest coast. There I put the GX85’s articulating touchscreen and near-silent electronic shutter to good use as I photographed both strangers and other wildlife enjoying the beautiful day and later, the sunset.

    I love articulating LCDs, especially ones with touch interfaces. The GX85 makes it so simple to get creative with your framing. Edited to taste in ACR. ISO 640, 1/640 sec at F2.8. Shot at 48mm (equiv. ) using the Panasonic Lumix G X Vario 12-35mm F2.8. 

    Rock and roll

    But let’s start with some rock and roll. I arrived at the venue around 9:00pm, with plans to shoot as many acts as possible, using mostly available light, until everything wrapped up around 2am. 

    Since starting work on the GX85, I’ve found myself very attached to the Panasonic Lumix G 25mm F1.7. Maybe because it reminds me so much of using my own Nikon 50mm F1.8. Both are lightweight, affordable lenses that offer excellent results. I also brought along the Lumix G Vario 7-14mm F4 lens. 

    Panasonic’s Depth from Defocus technology is really impressive. Having already run the GX85 through our AF test (more on that in the forthcoming review) I knew it was more than capable of maintaining focus on a moving subject while shooting at 6 fps. But that testing had been done in bright daylight, and I was eager to see if those results would hold up in low light.

    Great Spiders is one of Seattle’s best rock and roll bands. This image in particular was shot one-handed as a cold one graced my other hand during the set — a crucial part of real world testing. Edited to taste in ACR. ISO 6400, 1/320 sec at F1.8. Shot at 50mm (equiv. ) using the Panasonic Lumix G 25mm F1.7 lens.

    Looking back through my images shot in continuous drive at 6 fps I am impressed. The hit rate isn’t quite what I enjoy with my full frame DSLR (nor did I expect it to be), but it’s still very high.

    The majority of the show was shot using a single point in continuous AF mode. One of my absolute favorite features is touch-pad AF. With one’s eye to the finder, simply touch the screen with your thumb to drag your AF point around. The GX85 is remarkably responsive in this regard; and shooting with touch-pad AF is ridiculously simple. 

    I did also try using both face detect and subject tracking, two AF modes I’ve had success using in good light, but had poor results in this environment, which is not all that surprising given the challenging shooting conditions.

    Edited to taste in ACR. ISO 6400, 1/500 sec at F4.5. Shot at 14mm (equiv. ) using the Panasonic Lumix G Vario 7-14mm F4 lens.

    Overall, I was very happy with the GX85’s performance at Big BLDG Bash. Sure I got some funny looks from dual-DSLR-toting hot-shots, but after field testing cameras like the Sigma Quattro, I’m use to that. One of the best feature of the GX85 is how light it is, especially with lenses like the 25 F1.7, 7-14 F4 and even the 12-35mm F2.8. All of those, with the exception of the 25mm are image stabilized lenses, meaning they can take advantage of the GX85’s Dual I.S. system which combines sensor and lens based image stabilization.

    Of course, IS doesn’t do a whole lot for me if I’m shooting stills of bands thrashing around stage, but for hand-held video, it is a true blessing.

    Shot at ISO 6400 1/50 sec F4 in 4k/24p. Shot at 50mm (equiv.) using the Panasonic Lumix G 25mm F1.7 lens.

    Though my experience with the GX85 at Big BLDG Bash was largely positive, I did have some frustrations: Many times I found myself attempting to flip the camera on in a hurry in an effort to capture a fleeting moment of rock and roll glory, only to accidentally switch the camera to video mode and initiate video capture.

    This unfortunate occurrence is due to the illogical placement of the mode dial in relation to the on/off switch. The mode dial sits directly above the on/off switch, and because Manual Video mode is directly to the left of Manual mode on the mode dial, it’s easy to bump the dial to this position while turning the camera on in a hurry. 

    Also, Panasonic is one of the few companies that does not offer a minimum shutter speed setting in Auto ISO, something that would have been hugely helpful for me shooting fast subjects in low light.

    Donormaal performing at the Hangar 1 stage. Edited to taste in ACR. ISO 6400, 1/400 sec at F1.7. Shot at 50mm (equiv. ) using the Panasonic Lumix G 25mm F1.7 lens.

    By 11pm my first battery died. By 1am my second battery died. Around 1000 images and 20 videos into the show and the GX85 was dead. Good thing I packed my Nikon just in case!

    Beach day

    The next day I made my way out to Golden Gardens which is about a 10 mile bike ride from my apartment. A backpack packed to the brim with picnic supplies left little room for camera gear, fortunately the GX85 with 12-35mm F2.8 was just small enough to make the cut. 

    Once I got to Golden Gardens and started shooting, one of the GX85’s biggest pitfalls became more apparent, specifically, in regard to its field sequential 16:9 electronic viewfinder. While in low light, color tearing and the rather small image view (due to displaying a 3:4 image in a 16:9 aspect ratio) is less noticeable, it is VERY noticeable in bright light. For these reasons I stuck to shooting using the LCD only while at Golden Gardens. This of course put me in flare’s way, fortunately the GX85 can be operated with one hand, freeing your other hand to shade the sun’s rays from the LCD. 

    I don’t shoot birds in flight, I prefer birds at rest. Out of camera JPEG shot in the Scenery JPEG style . ISO 200, 1/1600 sec at F3.5.  Shot at 70mm (equiv. ) using the Panasonic Lumix G X Vario 12-35mm F2.8 lens.

    In fact, I spent the majority of the day using the touchscreen with the camera set to it electronic shutter mode. This allowed to discreetly take images, whether of folks walking through the frame, or waterfowl. Speaking of the E-shutter, I am happy to report that at no time was I forced to use it to avoid shutter shock. The GX85 features a newly designed shutter that appears immune from the issues we’ve experienced with previous M43 cameras.

    The scenic views also gave me a chance to try out some of the GX85’s JPEG picture styles. The above scene was taken using using the ‘Scenery’ style, while the below was taken using the new ‘L.monochrome’ style. 

    Out of camera JPEG shot in the L.monochrome style. ISO 200 at 1/320, F9. Shot at 70mm (equiv. ) using the Panasonic Lumix G X Vario 12-35mm F2.8 lens. 

    The GX85 offers four customizable buttons, one of which I assigned to ‘Photo Style,’ for easy access. The new L.moncohrome picture style is pretty cool in certain shooting scenarios . And it’s nice to see Panasonic jumping into the fun of releasing a moody analog b/w mode. I really hope this trend of trying to capture specific film ‘looks’ in JPEG profiles continues. I much prefer it to the trend of tacky creative filters.

    Back to custom buttons, I left the Quick menu assigned to its default and assigned another button to toggle the touchscreen on/off. I set the final button to ‘Focus area set,’ so that I could still move my AF point while using the LCD with the touchscreen off.  

    While I mostly shot using the touch functionality, I occasionally found that when shooting vertically, my nose would move the AF point. Which is both hilarious and frustrating.

    The Takeaway

    The GX85 is an excellent choice for street photographers, though I wish it was weather-sealed. Out of camera JPEG. ISO 200, 1/80 sec at F2.8 Shot at 52mm using the Panasonic Lumix G X Vario 12-35mm F2.8 lens. 

    The GX85 is arguably Panasonic’s most compelling camera to date. Sure, it doesn’t use the new 20MP Four Thirds chip from the GX8, but it makes good use of its 16MP sensor by removing the AA filter for better detail retention. Moreover, its new shutter mechanism means that shutter shock is a non-issue. And its 5-axis in camera IS makes it the steadiest Panasonic M43 camera to date, not to mention its offers outstanding 4K video. But most importantly, its a really fun and practical camera to shoot with, regardless of whether you’re shooting a concert in the dark, or a lazy day at the beach. 

    Now, should someone buy this over (say) a Sony a6000? Before I answer that, let me make it clear that the reason I compare the GX85 to the a6000 is because despite its age, the latter is probably the camera I end up recommending most to friends and family, due to its excellent all-round performance and price point. 

    Another low angle shot brought to you thanks to the GX85’s articulating touchscreen. And yes, the seaweed was very smelly. Thankfully, I did not have to lay in it.  Out of camera JPEG. ISO 200, 1/500 sec at F14. Shot at 52mm (equiv.) using the Panasonic Lumix G X Vario 12-35mm F2.8 lens. 

    In short, reasons to purchase the GX85 over an a6000: Better/more affordable lens selection, excellent sensor-based IS (plus Dual I.S.), an outstanding touchscreen with class-leading interface and excellent 4K video. On the other hand, with the Sony, you get a better EVF, better overall image quality and a hybrid AF system. Though the GX85 handles itself quite well in the last two regards.  

    At the end of the day, the GX85 is a great camera, with a couple of things, like its EVF and fumbly controls holding it back. But as a complete package, it has a lot going for it. Enough so that I would not hesitate to recommend it to anyone looking for a lightweight, capable interchangeable lens camera.

    Out of camera JPEG. ISO 200, 1/400 sec at F5. Shot at 70mm (equiv.) using thePanasonic Lumix G X Vario 12-35mm F2.8 lens.

    $ (document).ready(function() { SampleGalleryGridV2({“galleryId”:”5699693136″,”isMobile”:false}) })

    Panasonic Lumix DMC-GX85 Real World Samples

    65 images • Posted on May 26, 2016 • View album
    Sample photoSample photoSample photoSample photoSample photoSample photoSample photoSample photoSample photoSample photoSample photoSample photoSample photoSample photoSample photoSample photoSample photoSample photoSample photoSample photoSample photoSample photoSample photoSample photoSample photoSample photoSample photoSample photoSample photoSample photoSample photoSample photoSample photoSample photoSample photoSample photoSample photoSample photoSample photoSample photoSample photoSample photoSample photoSample photoSample photoSample photoSample photoSample photoSample photo

    Articles: Digital Photography Review (dpreview.com)

  • The Secret to Getting Tack Sharp Images for the Web

    Do your images end up looking soft when you resize them and export them for the web? When you resize an image, it loses some sharpness. With a 24 MP image measuring 6000 px you need to resize quite a lot to downsize it for optimal web use which is often around 800 px wide. That is why a set-once-and-forget Continue Reading

    The post The Secret to Getting Tack Sharp Images for the Web appeared first on Photodoto.


    Photodoto

  • Mobile Museums: French Train Cars Filled with Impressionist Art

    [ By SA Rogers in Art & Installation & Sound. ]

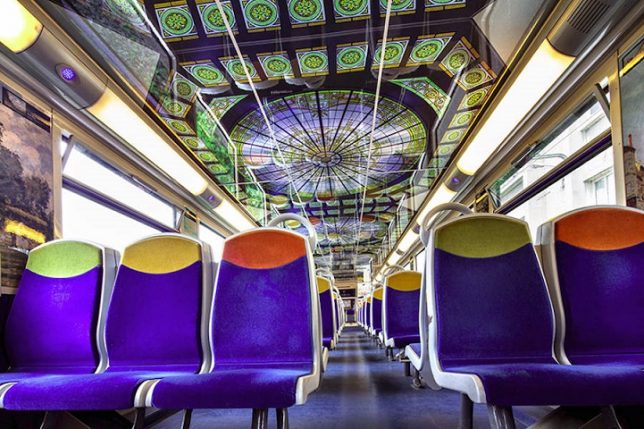
    french train car musems 1

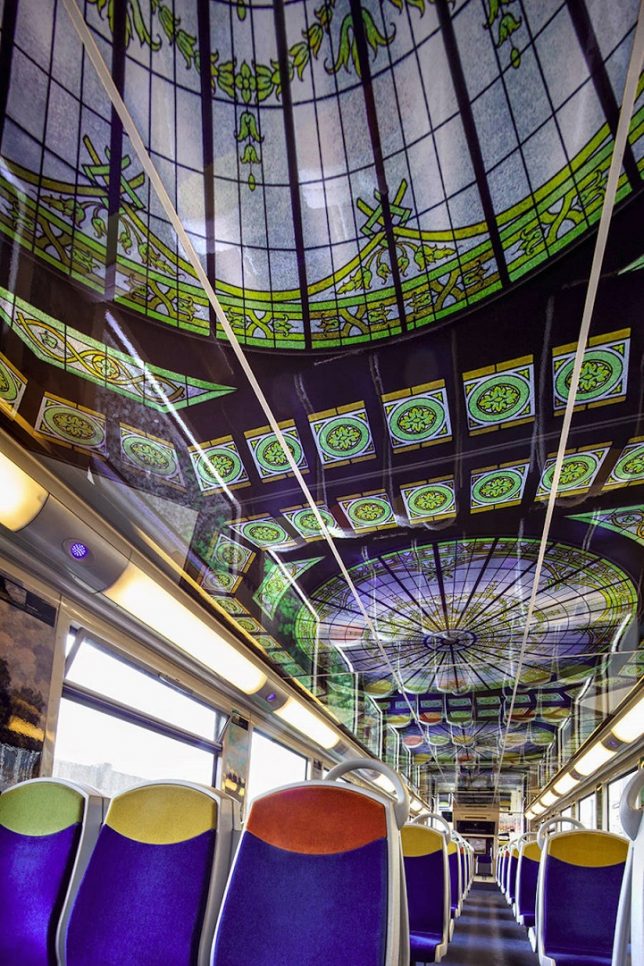
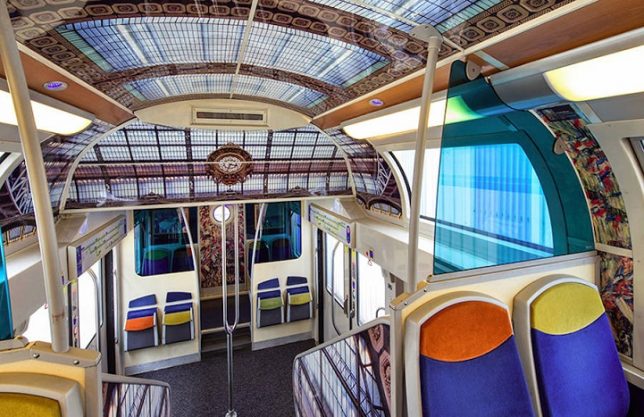
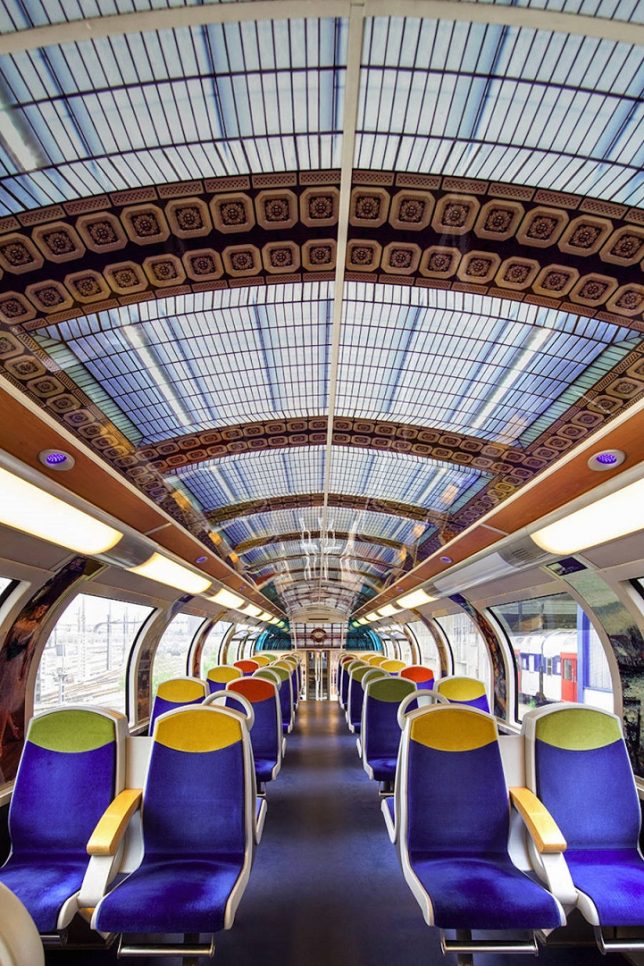
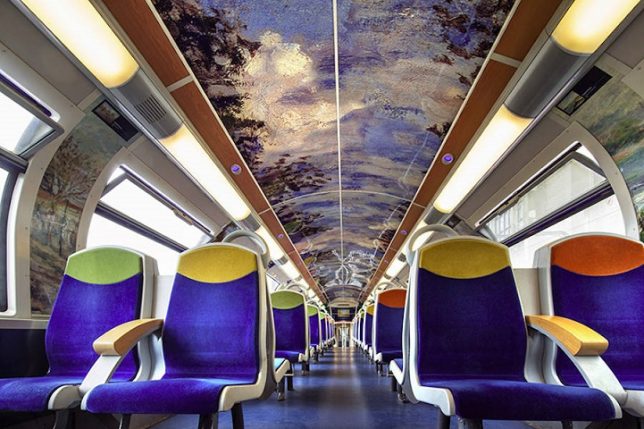
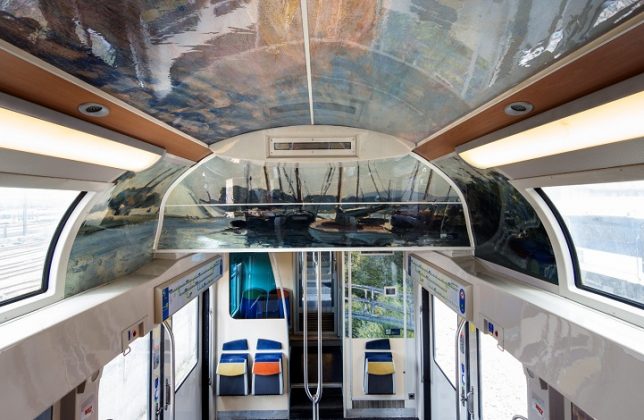
    Commuters traveling from Gare Saint-Lazare to Vernon-Giverny in France get to gaze up at a selection of impressionist art from the Musée d’Orsay applied right onto the walls and ceilings of their train cars. The SNCF (French National Railway Company) collaborated with the adhesive experts at 3M for a summer-long installation that will make rail travel a lot more beautiful and relaxing. Three double-height cars on the RER line have been altered for the project, photographed by Christophe Recoura so the rest of the world can catch a glimpse, too.

    french train car museums 2

    An adhesive graphic film printed with impressionist scenes was carefully applied to immerse train travelers in these serene compositions starring the vague painterly brush strokes the movement is known for. Each car has its own theme: gardens and water, local landscapes or Paris industrialization.

    french train car museums 3

    french train car museums 4

    french train car museums 5

    This particular line serves visitors heading to Normandy, the birthplace of Impressionism and home of the annual Impressionist Festival. Sight-seers can gaze up at works by painters like Claude Monet as they travel to his former home in Giverny or to the André Malraux Museum (MuMa), which hosts the second-largest collection of Impressionist works in the world after the Musée d’Orsay in Paris.

    french train car museums 6

    french train car museums 7

    15 juin 2013.Le "Train de l'impessionnisme-Musée d'Orsay/STIF/SNCF".

    In fact, a long-serving steam train line direct from Paris to Normandy is credited with encouraging artists to travel to that lush, peaceful corner of France in the first place as Normandy became home to a new school of open-air painting. The trains carried the artists, their families and their aristocratic clientele back and forth between the two cities, delivering them from the modern metropolis to a countryside full of cliffs, meadows and Gothic cathedrals.

    Share on Facebook


    [ By SA Rogers in Art & Installation & Sound. ]

    [ WebUrbanist | Archives | Galleries | Privacy | TOS ]


    WebUrbanist

  • Instagram begins rolling out reordered feeds to all users

    In March, Instagram announced plans to reorder user feeds using an algorithm, eliminating the chronological arrangement and replacing it with a personalized order that prioritizes content based on a user’s behavior. In a recent blog post, Instagram announced that it is now rolling out these reordered feeds to all of its users.

    The initial feed change announcement was not well received; many users worried it would result in decreased usability, and a Change.org petition attempting to halt the plan garnered about 160k signatures. Still, Instagram went ahead and introduced the reordered feeds to small groups of users over the past couple months, expanding that rollout to all of its users over the course of June.

    According to Instagram, users on the service don’t see approximately 70% of the content in their feeds. Reordering the feeds based on an algorithm will, in theory, ensure users see the content they’re most interested in while pushing the less desirable photos and videos to the fringes. In the past, Facebook enacted a similar feed change that replaced chronological posts with algorithm-based arrangements, but many users complained they no longer saw posts from people they were interested in.

    The Instagram feed change hasn’t been wildly popular with some users who have already seen the update, judging from comments on Twitter using the hashtag #InstagramUpdate. They cite trouble finding newer posts, less posts surfaced from accounts they enjoy and difficulty seeing what others are up to in real-time.

    Via: Instagram

    Articles: Digital Photography Review (dpreview.com)

  • Sandisk launches 128GB capacity memory stick with USB-C and A connections

    Memory manufacturer SanDisk has announced a new series of portable flash drives that feature a retractable, reversible connector that allows users to pair the stick with both USB Type-C and Type-A devices. The company suggests the dual compatibility of the Ultra Dual Drive USB Type-C will make it easier for smartphone users to transfer images and data from the phone to a computer, as well as offering a solution for expanding the storage memory of the device.

    SanDisk claims the USB sticks have a maximum read speed of 150MB per second but says that the write speed is dependent on the device it is connected to. Android users can download the SanDisk Memory Zone app that features a convenient interface for transferring files between the phone and the external storage areas. The flash drives come in capacities from 16GB to 128GB and have a five year warrantee.

    • 16GB $ 19.99/£10
    • 32GB $ 29.99/£13
    • 64GB $ 39.99/£21
    • 128GB $ 69.99/£39

    For more information see the SanDisk website.


    Press release:

    SanDisk Mobile Storage Portfolio Expanded with Faster, Higher Capacity USB Type-C Flash Drive

    New SanDisk Ultra® Dual Drive USB Type-C™ offers hassle-free transfer between smartphones and next-generation USB-C™ devices

    Western Digital® Corporation (NASDAQ: WDC), a global storage technology and solutions leader, today expanded its line of SanDisk-branded mobile storage solutions with the new SanDisk Ultra Dual Drive USB Type-C flash drive. The newest generation drive features a new retractable design, faster speeds and higher capacity, giving consumers the ability to quickly and easily free up space and transfer content between their smartphones and today’s USB-C devices1.

    “With its reversible connector, impressive speeds, and multi-purpose potential, USB Type-C is a game-changer,” said Dinesh Bahal, vice president of SanDisk product marketing, Western Digital. “More Type-C devices are entering the market and through our Type-C mobile drives, we can offer consumers a complete line of mobile storage solutions. The new SanDisk Ultra Dual Drive USB Type-C flash drive now provides more than twice the capacity and offers the flexibility to quickly and conveniently move photos, videos and files between devices, as well as the freedom to expand device capacity.”

    Now available in up to 128GB*, the sleek, new SanDisk Ultra Dual Drive USB Type-C includes one reversible USB Type-C connector and one standard USB (Type-A) connector, enabling users to easily free up space on a smartphone or tablet, or transfer files between smartphones, tablets and computers and next-generation devices. The drive also now delivers high-speed USB 3.1 performance of up to 150MB/s2 – offering users phenomenal speeds when moving their photos, videos and files to a computer.

    “By 2020 we expect that 44 percent of all mobile phones sold worldwide will include a USB-C connector, that’s about 800% growth over the next four years,” said Ken Hyers, director, Wireless Device Strategies, Strategy Analytics. “At this rate of anticipated growth, we expect to see more and more solutions like the SanDisk Ultra Dual Drive USB Type-C flash drive that offer consumers a way to move and access their content between devices with varying connectors.”

    The SanDisk Ultra Dual Drive USB Type-C flash drive also works with the SanDisk® Memory Zone app for Android™, giving users an easy way to manage and back up content on their device. The app, which is available for free through the Google Play™ Store3, auto-launches upon insertion of the drive into a compatible device, allowing immediate access to the user’s content.

    The SanDisk Ultra Dual Drive USB Type-C flash drive complements the company’s suite of SanDisk brand USB Type-C flash memory solutions which range from USB drives to portable SSDs.

    Pricing and Availability
    The SanDisk Ultra Dual USB Type-C Flash Drive features a five-year warranty4, and is now available worldwide at Amazon and other leading retailers. The new offering comes in capacities of 16GB, 32GB, 64GB and 128GB with U.S. MSRPs of $ 19.99, $ 29.99, $ 39.99 and $ 69.99, respectively.

    Articles: Digital Photography Review (dpreview.com)

  • How Limitations Can Help You Grow as a Photographer

    142

    Have you ever said to yourself, “If only I had that lens, or this camera I’d be an amazing photographer”? Or maybe you’ve thought that if only you had more time or money, your dreams of being the photographer you want to be, would finally be realized. Many times as photographers we will have limitations put on us. Sometimes we may set those limits on ourselves, and sometimes they are limits that can’t be helped. Either way, we can use those limitations to our advantage and become better photographers because of them.

    Set aside those “if only” thoughts. Push away those feelings of inadequacy. Don’t let those limitations hinder your progress as a photographer. Once we have gone through some of those limitations that can help you grow, you might even decide to limit yourself on purpose sometimes, just for the challenge.

    185

    I don’t have an expensive camera

    Do expensive cameras make a difference? Of course they do. There’s a reason some cameras cost more than others. However, the person behind the camera matters a whole lot more. If you’re looking at your favorite photographer’s work and thinking that their camera is amazing, you may be right. Their camera is possibly amazing, but the reason you love their photos isn’t because of their camera, it’s because of what they do with that camera.

    If you constantly think that you can’t do what you want to because your camera isn’t fancy enough, then you’re probably right. With that kind of thinking, you’ll always be waiting for the next purchase before you even try to get better. If you can convince yourself that your camera is good enough, smart enough, and doggone it, people like it, then your photos will change with your perspective. Find out what your camera CAN do, instead of lamenting about what it can’t do. Pull out your camera’s user manual, and practice until you’ve truly worn out your camera. You might decide to get the next big thing then, or you might have fallen in love with your camera so much that you wouldn’t dream of trading it in for a newer model.

    143

    I don’t have the right lens

    Want to know a secret? For a long time I used my kit lens, and a 50mm f/1.8 on my first camera body. That’s it. I made those lenses work for me, and I learned how to get the most out of them. Want to know another secret? Now I use a 50mm f/1.4 and 85mm f/1.4, and that’s it. Nothing else, ever. I’ve looked at other lenses, and thought about them a lot, but when it comes down to it, I really feel like I don’t want any other lenses.

    I’ll often go through an entire session with only one lens on my camera body. I feel more free to concentrate on what’s going on in front of me, and capturing what I want. I’m completely comfortable and familiar with my lenses, and I know exactly what they can do. I don’t waste time switching to another lens, and risk getting dirt on my sensor. Your lens of choice may be different from mine, and that’s okay. If you are photographing other things besides portraits, you may very well need a different lens from what I have.

    However, you don’t need EVERY lens. Figure out how to make the lens (es) you have work for you. Challenge yourself to work with the constraints of a 50mm prime, or even a kit lens. You might realize that you don’t need that expensive new lens after all.

    1202

    I don’t have ALL the equipment

    It’s exciting to dream about all the photography equipment you could buy. All the different flashes, reflectors, tripods, timers, camera bags, diffusers, and straps are calling to your wallet, begging you to buy them all. Money is a real issue for me, and likely for many of you, too. If it’s not something that you are going to use on a regular basis, see if there are ways that you can work without it.

    There are many DIY ideas that will stretch your creativity. You might find that you can make beautiful photos, even without all the extra equipment. Sometimes having a limit to what you are able to purchase can make your creativity grow, because creativity is free. You can use it abundantly without hurting your budget one bit. Cameras don’t care if they’re stored in a bag you’ve had for years, that is worn on the corners (at least that’s what my camera tells me).

    194

    I don’t have any pretty locations available nearby

    Wouldn’t it be great if we always had beautiful waterfalls and trees and majestic mountains right there to photograph? Unfortunately life doesn’t work that way. I live in a place that is actually truly spectacular, but when I first moved here, I was quite underwhelmed. It’s one of those places that takes time to appreciate, and sometimes certain camera angles to hide the parts that aren’t so photogenic. Look at your surroundings with new eyes, and you might find that you actually have a lot of gorgeous views. You’ll not only be able to make some beautiful photos, but you’ll be happier with your life and surroundings.

    Sometimes you might be at a location that you must shoot then and there, and there’s not much to choose from. A back deck at high noon can work in a pinch. This is where your creativity and resourcefulness can come in handy. Hone those skills, and you will find that you are never at a loss for great locations.

    169

    I don’t have enough training or knowledge

    Every photographer has had to say this at some point, we all have to start somewhere. If you are turning down opportunities to take photos, or scared to try something new because you’re afraid you don’t know enough, you’re selling yourself short. The worst that could happen is that you could learn what not to do.

    Find every opportunity to practice and learn. Don’t let a lack of knowledge stop you from trying, instead, let it motivate you to learn more. While you are in the process of learning, remember the saying, “Fake it until you make it”. If you pretend that you know what you are doing, that fake confidence can pull you through, and you’ll gain more real confidence for the future.

    ***However, I must insert a warning here. Don’t agree to be the sole photographer for a very important once in a lifetime event, like a wedding, if you aren’t knowledgeable and prepared enough. You’re welcome.

    293

    I don’t have good weather today

    Suck it up and get out there. That may sound harsh, but unless the weather is going to ruin your camera, give it a try. Some of my favorite sessions have been in the wind, in light rain or snow, or in freezing temperatures. If you always seek out comfortable conditions, you won’t stretch yourself to find new ways to deal with things. You’ll miss out on some very compelling shots, because you won’t be forced to make something less than ideal work to your advantage. You might get dirty, cold, wet, hot, or sunburned. Don’t limit yourself when conditions aren’t perfect.

    158

    I don’t have time

    Quality over quantity will help you here. Instead of thinking you have to take 1000 frames at a time, challenge yourself to capture something great in 10 frames. Instead of spending two hours on one session, see if you can get a handful of truly great images in fifteen minutes. Sometimes when we have more time, we don’t end up with more great photos, we just end up with a whole lot of mediocre photos. Use your time constraints to help you focus on capturing exactly what you want, and not wasting time with thoughtless clicking. Use the little time you have to your advantage, and make every click count. Read: 6 Tips on How to Make More Time for Photography

    Summary – let’s hear from you

    What limits do you think are holding you back? Could you find a way to make those limits benefit you and make you a stronger photographer? Change your perspective on your limits, and see if you can make your photography growth limitless.

    How have you found limitations have helped, rather than hindered your own growth as a photographer? Have you tried any limitation exercises on purpose? If so please share your actions and results in the comments below.


    Editor’s Note: This is one of a series of articles this week that are Open for Discussion. We want to get the conversation going, hear your voice and opinions, and talk about some possibly controversial topics in photography.

    Give us your thoughts below on the article above on limitations and watch for more discussion topics this week.

    See all the recent discussion topics here:

    • 7 Commonly Accepted Photography Beliefs Debunked
    • Is HDR dead? Some dPS Writer’s Thoughts on this Controversial Topic
    • How to Find your Personal Photographic Style
    • Why You May be Failing to Reach Your Potential as a Photographer
    • To Process or Not To Process? Let’s Discuss
    • How much do you process your images? – a dPS POLL
    • Does the Camera Matter? SLR versus Mirrorless versus Smartphone
    • Natural Light Versus Artificial Light: Which is Better?

    googletag.cmd.push(function() {
    tablet_slots.push( googletag.defineSlot( “/1005424/_dPSv4_tab-all-article-bottom_(300×250)”, [300, 250], “pb-ad-78623” ).addService( googletag.pubads() ) ); } );

    googletag.cmd.push(function() {
    mobile_slots.push( googletag.defineSlot( “/1005424/_dPSv4_mob-all-article-bottom_(300×250)”, [300, 250], “pb-ad-78158” ).addService( googletag.pubads() ) ); } );

    The post How Limitations Can Help You Grow as a Photographer by Melinda Smith appeared first on Digital Photography School.


    Digital Photography School