Blog

  • Enter to Win one of 10 Copies of Corel’s AfterShot Pro 3 Photo Editor

    Win one of 10 Copies of AfterShot™ Pro 3 Photo Editor from Corel!

    Enter the After Photography Contest Today!

    After dark, after thought, after noon, after work, after school, after life, after all…

    You pick your after theme and have fun with it.
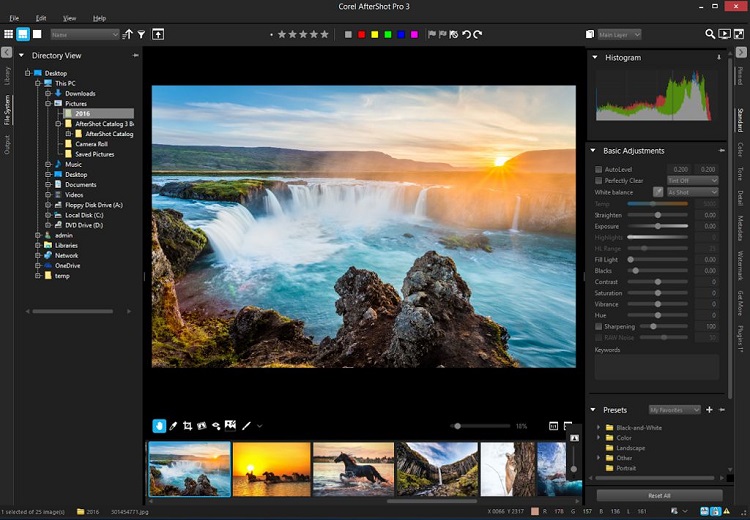
    ASP 3 workspace

    Over the last few years here at dPS, we’ve run very some very popular contests with our partners, to give away some of their great photographic products to lucky dPS readers. We are lucky enough to be able to do it again now.

    For this competition, Corel is giving away TEN copies of AfterShot™ Pro 3 Photo Editor!

    These prizes are designed to help every level of photographer create BETTER pictures. Since 1989, with the introduction of CorelDRAW, Corel boasts a range of award-winning products that includes graphics, painting, photo, video, and office software with a community of over 100 million strong. Each copy of AfterShot Pro 3 will be won by a different dPS reader.
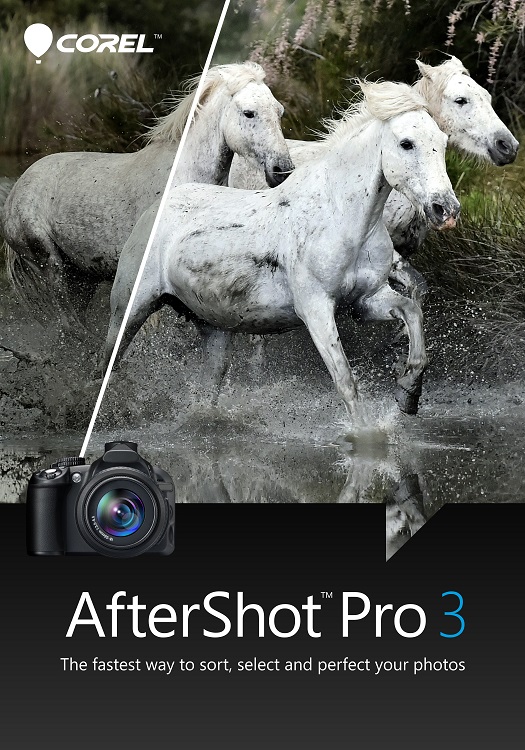
    ASP3 box front

    Our 10 prize winners will receive the full version of Corel’s leading RAW Photo Editor – A $ 79.99 Value

    Corel® AfterShot™ Pro 3 is up to four times faster than Adobe® Lightroom (claim based on a batch export workflow, using Lightroom CC 2015.5.). It’s the photo editor that helps you reveal your true creative potential. With AfterShot™ Pro 3 there are no subscriptions, and no longer a need to spend hours editing at your computer. You can import, process, output faster, and get back to taking photographs. Take a look at a few of the new, improved and classic features:

    • Faster workflow
    • Simple photo management
    • New comprehensive watermarking
    • Enhanced highlight recovery
    • New blemish remover tools
    • New image preset library
    • Powerful batch processing

    Adobe®, Lightroom® and Photoshop® are either registered trademarks or trademarks of Adobe Systems Incorporated in the United States and/or other countries.
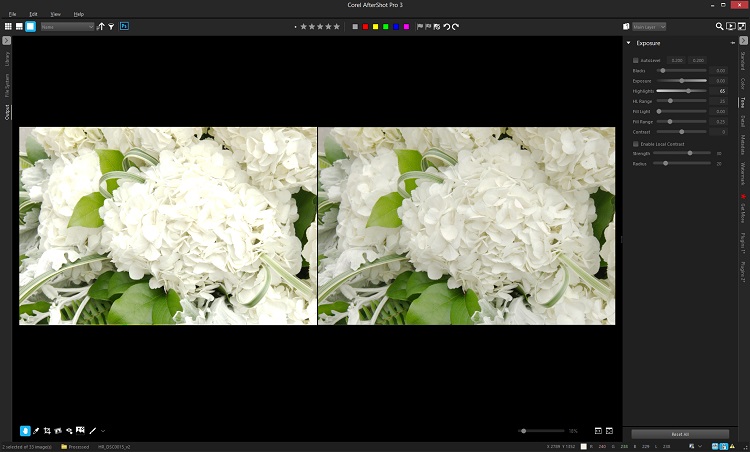
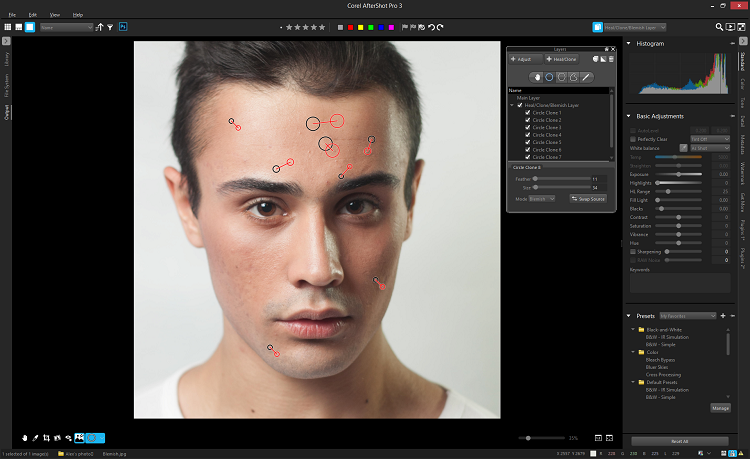
    ASP 3 Highlight Recovery

    New Blemish Remover

    Learn a little more about AfterShot Pro 3 HERE:

    ASP3 Logo

    How to win

    To win this contest you’ll need to:

    • Edit your favorite ‘After’ photo. To make it even better, download a free trial of AfterShot Pro 3 HERE
    • Post your After photo, along with a few words on how you feel AfterShot Pro 3 would help your photography in the comments section below, and of course, your After themed image. It’s as easy as that!
    • Do this in the next 21 days and on August 5, 2016, the team at Corel will choose the 10 best photos and comments, and we will announce the winners in the following days.
    • Deadline Is July 19, 2016, at 11:59pm PDT. Photos and comments left after deadline will not be considered.

    By best – we’re looking for people who have an understanding of photography post-processing, and how AfterShot Pro 3 may best suit your needs. So you’ll need to check out the product page to put yourself in the best position to win. Don’t forget to grab a free trial download.

    There’s no need to write essay length comments to win – but we’re looking to hear what you like about the software, and how it would help your development as a photographer. Don’t forget to include your favorite After themed photo. We encourage you to have fun and be creative!

    This competition is open to everyone, no matter where you live – but there is only one entry per person. To enter – simply leave your photo and comment below.

    ASP3 Logo

    Disclaimer: Corel is a paid partner of dPS.

    By entering the After photo contest, the Entrant is providing permission to Corel to publish their photo, if it is chosen as a winner, to be utilized within media post(s) by Corel announcing the winners and promoting. Entrants will be provided a full photo credit if photo is used, and will retain their copyright – Please click HERE or full contest rules, terms and conditions.

    googletag.cmd.push(function() {
    tablet_slots.push( googletag.defineSlot( “/1005424/_dPSv4_tab-all-article-bottom_(300×250)”, [300, 250], “pb-ad-78623” ).addService( googletag.pubads() ) ); } );

    googletag.cmd.push(function() {
    mobile_slots.push( googletag.defineSlot( “/1005424/_dPSv4_mob-all-article-bottom_(300×250)”, [300, 250], “pb-ad-78158” ).addService( googletag.pubads() ) ); } );

    The post Enter to Win one of 10 Copies of Corel’s AfterShot Pro 3 Photo Editor by Darlene Hildebrandt appeared first on Digital Photography School.
    Digital Photography School

  • 10 Quick Photoshop Tips to Improve Your Workflow

    Whether you are a Photoshop newbie or a guru, there is always something new to learn or discover in this extensive image editing software. One of the joys of using it,  is that there are many ways to do the same thing in Photoshop. Here are a few tips that are useful to improve your workflow, either by speeding it up or adding a few tweaks to your process.

    1. Copyright Metadata Tip

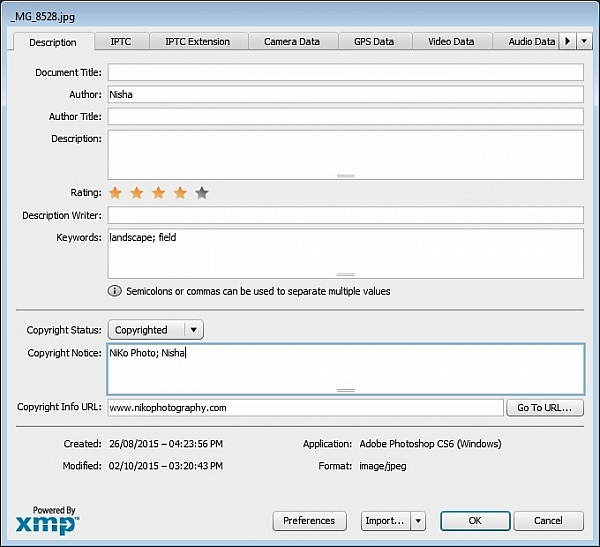
    Many people use the terms watermarking and copyrighting interchangeably, but these are two different things. While arguments continue for and against watermarking images, in this digital age copyrighting your photos is still highly recommended. One of the best ways of doing this, is to embedding the copyright information right into the metadata of your image.

    Follow these steps:

    1. Click Ctrl + Alt + Shift + I (Mac: Command + Option + Shift + I), or go to File > File Info to bring up the Metadata panel
    2. Click on the Description tab (left one) and enter your copyright information in the relevant fields

    Copyright

    2. Color Correcting with Curves Tip

    As you may know, there are many way to correct color in Photoshop, and you may have even experimented with using a Curves Adjustment layer to achieve this. Sometimes, while working on this layer to color correct an image, you may inadvertently make the image lighter (or darker).

    An easy fix that allows you to apply your color correction, without affecting the tonal values of the image, is to set the Curves Adjustment layer’s Blending Mode to Color.

    3. Double Windows Tip

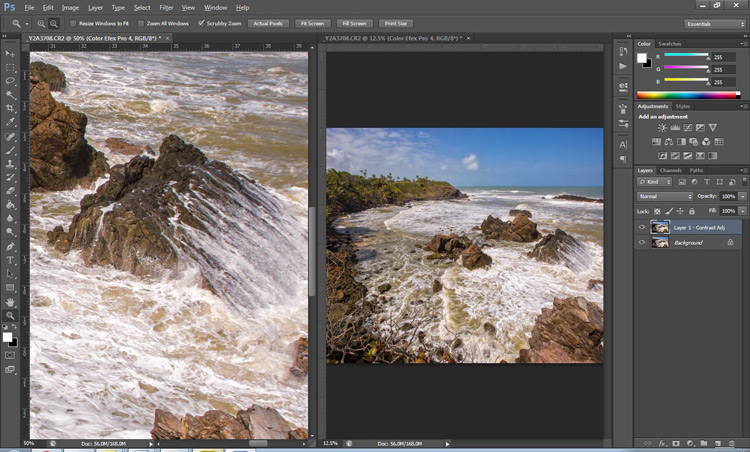
    ComparativeForEdit

    Zooming into your images can be helpful when editing details, but it can feel like a chore if you constantly have to zoom in and out to see how your changes affect the overall image. A simple solution to your problem is to open the same image in two windows. Now you will be able to put them side by side, at different zoom levels for your comparative purpose.

    1. With your image open, go to Window > Arrange > New Window for [file name of your image].  This this will open up a second window for the original image.
    2. Then, go to Window > Arrange > 2-Up Vertical and this will put your windows adjacent to each other. Now you have one zoomed out for an overall picture, and you can zoom in to edit the other.

    The coolest part is that all the adjustments you make to one window, will be reflected in the other.

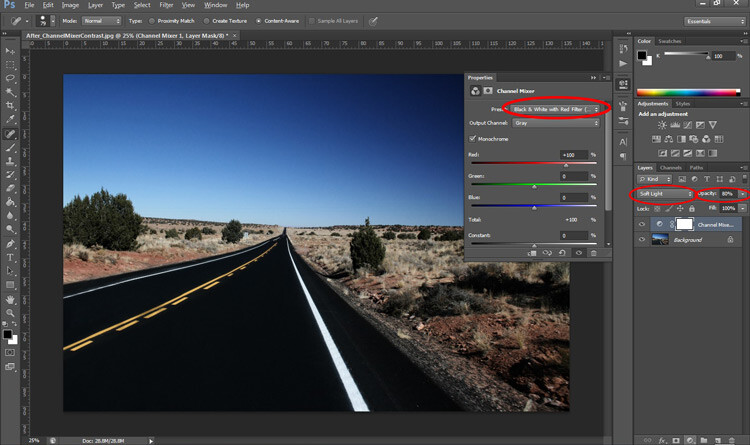
    4. Contrast with Channel Mixer Tip

    The Channel Mixer is an easy way to add great contrast to an image.

    1. Create a new Channel Mixer adjustment layer.
    2. Choose Black and White With Red Filter from the preset drop-down (in the Properties Panel).
    3. Change your blending mode for the adjustment layer to Soft Light.
    4. Play around with the opacity of the layer until you get the desired level of contrast.
    Before_ChannelMixerContrast

    Original Image

    After_ChannelMixerContrast

    Image Contrast changed using Channel Mixer

    5. Content Awareness Tip

    Several tools use Content-Aware, which is Photoshop’s method of examining your image, and calculating which pixels are needed to repair the selected area. At times though, even awesome tools such as the Healing tool or the Content Aware fill, do not return the best results when applied

    If you are not happy with what the tool has returned, simply apply the adjustment again. Yes you read that correctly, you can apply content aware a few times and get a more desirable result the second or third time around.

    6. Better Black & White Image Tip

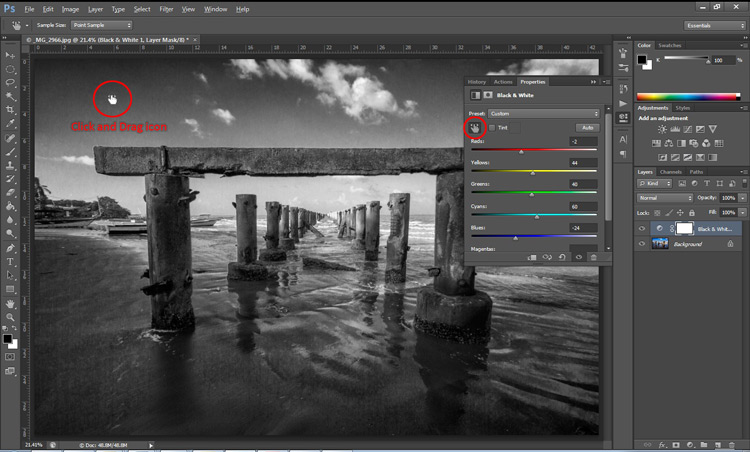
    Making a black and white photo can be as easy (and boring) as desaturating your images (using Image > adjustment > desaturate). If you want to take it up a notch, try using a Black and White adjustment layer (from the Layers panel), where you can use up to six color sliders to control the main colors in your imag,e and adjust the relative brightness of each color.

    While you’re there, check out the very useful click and drag (targeted adjustment tool) icon. Click it, then click and drag (hold the button in while you drag) on any area of the image that you wish to make darker or lighter— to the left for darker, right to make it lighter

    BWAdjLayer

    7. Getting Historical Tip

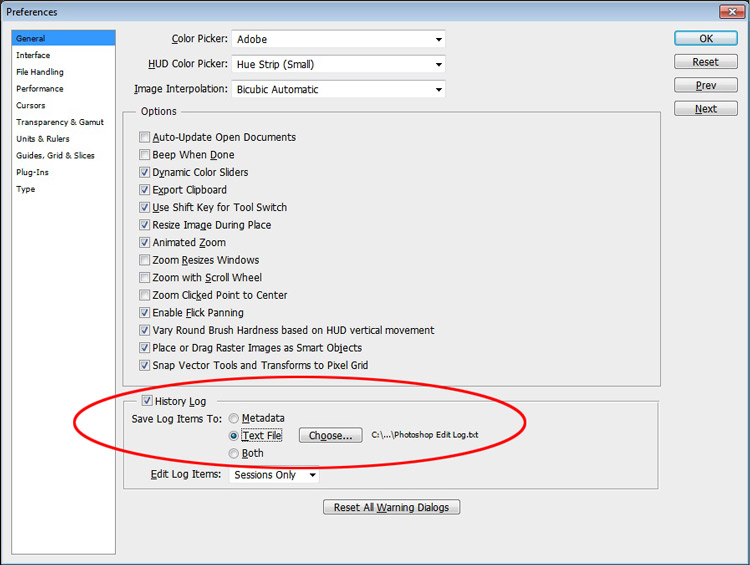
    Have you ever wanted to repeat your timely editing on another image and found your memory unreliable? Photoshop’s History Log is a great feature to turn on if you want to keep a text record of every single step you have done to your image.

    • Click Ctrl + K (Mac: Command + K) to bring up the Preferences panel.
    • In the General tab check the History Log and the Text File box, and choose a location to save the file (name it for easy reference later on).

    Now when you work on your image, and Photoshop will record every step you take. If you ever want apply the same steps to another image, just locate the text file and review.

    HistoryLog

    8. Check Spelling With Photoshop Tip

    Spell check is not something that would come to mind when you think of Photoshop, but yes it can do that too. All you have to do is click on Edit > Check Spelling and your visible text layers will benefit from more accuracy.

    9. Revealing Hidden Detail Tip

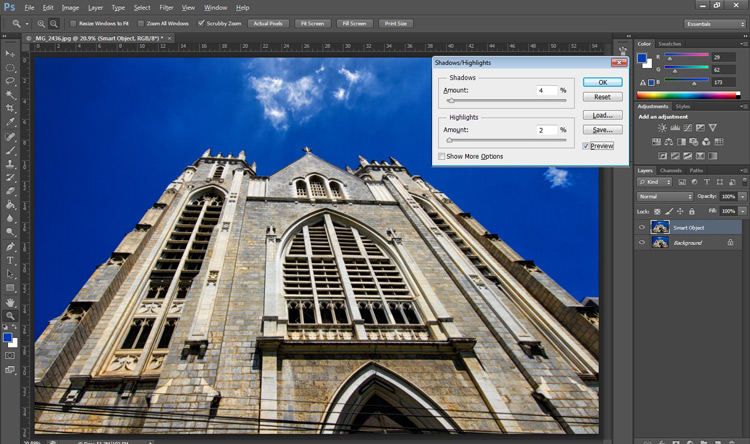
    To bring out hidden detail in the shadows and highlights of your image, one of the best tools is the (you guessed it) Shadow/Highlight Adjustment. Sadly though, it is not available for application via an Adjustment Layer, so for non-destructive use, first convert your layer to a Smart Object.

    Then go to Image > Adjustments > Shadows/Highlights and apply to recover those details.

    HighlightsShadows

    10.  Close Everything Tip

    Did you know you can close all your open images at once? Simply hold down the Shift key and click the close icon on any of your image windows.

    Conclusion

    While there are several ways to accomplish a task in Photoshop, hopefully there was something new hidden in these quick tips. Were any of these new to you or did you discover a new way to execute an old favorite? Maybe you can share some other must-know, or time saving tip,s that you use to be more efficient at post-processing in Photoshop.

    googletag.cmd.push(function() {
    tablet_slots.push( googletag.defineSlot( “/1005424/_dPSv4_tab-all-article-bottom_(300×250)”, [300, 250], “pb-ad-78623” ).addService( googletag.pubads() ) ); } );

    googletag.cmd.push(function() {
    mobile_slots.push( googletag.defineSlot( “/1005424/_dPSv4_mob-all-article-bottom_(300×250)”, [300, 250], “pb-ad-78158” ).addService( googletag.pubads() ) ); } );

    The post 10 Quick Photoshop Tips to Improve Your Workflow by Nisha Ramroop appeared first on Digital Photography School.

    Digital Photography School

  • Mirrorless is ‘probably’ the future: an interview with Hasselblad Product Manager Ove Bengtson

    It is quite extraordinary for Hasselblad to produce a mirrorless camera like the X1D for a number of reasons. Firstly is the obvious: it has predominantly produced cameras with very large mirrors since its first consumer camera in 1948 – the 1600F. Second, mirrorless cameras with touch screens and electronic view finders are very modern, and we may not all think of Hasselblad as a manufacturer of entirely up-to-date electronic products.

    In the X1D we are looking at a medium-format sensor in a body that can hide behind a standard high-enthusiast 35mm-style DSLR. Okay, so plenty of people will point out that it isn’t ‘full frame’ 645 (the smallest of the 120 film formats), but it’s very similar to 127 film which was considered medium format by the ISO organization. More to the point, it’s much bigger than the ‘full frame’ 35mm format and is essentially the same size as the sensors used in Leica’s S series, the Pentax 645Z, Phase One IQ3 50MP and Hasselblad’s own H6D-50c.

    I guess this kind of breakthrough is one we’d expect to come from what we might consider a high-tech company, not a business that has traditionally created a relatively low volume of very high-priced and principally mechanical professional tools.

    Of course Hasselblad marked a technological turn around when it introduced the H6D with its new electronic platform, but this new X series camera takes what the H6D did a few steps further. Shortly after the announcement of the X1D in Gothenburg I got some time with Hasselblad product manager Ove Bengtson to discuss some of the technical challenges that had to be overcome to create the X1D and to find out some more detail about how the product will work when it comes to market.

    ‘…designing a mirrorless system is relatively easy compared to our usual H cameras’

    ‘The X1D took only between 18 and 20 months to develop from the final concept to where we are today,’ says Ove Bengtson. ‘As it uses the same 50-million-pixel Sony IMX161 sensor, the same electronic platform and same processor as the H6D-50c most of the work was already done – designing a mirrorless system is relatively easy compared to our usual H cameras as there are no moving parts. We started discussing the idea in November 2013 but were still talking about it a year later before we decided to go ahead. The work that we had already done in the development of the H6D saved us a lot of time in research for the X1D.’

    As mirrorless cameras are so much easier to make and offer so much more flexibility I wonder if mirrorless is the future for Hasselblad. ‘Yes, it probably is, but not for a while. Mirrorless systems can be smaller and lighter, and because they have no internal movement they are more durable and they create less vibration so there is less to disturb image quality. Electronic viewfinders will need to get better though and the AF systems will need to improve to catch up with phase detection systems.’ 

    ‘We really do want phase detection but we’ll have to wait for the sensor manufacturer.’

    ‘It is a great benefit to be able to have AF points all over the screen, as in our H system we are really restricted to the centre of the frame, but phase detection wasn’t even an option for the X1D. We discussed having phase detection AF points built into the sensor, but Sony was already too far down the road with the sensor development at that stage. We really do want phase detection but we’ll have to wait for the sensor manufacturer.

    So, while mirrorless has many advantages over mirrored systems there are still just as many reasons to use the H system. The H system has better AF in low light, and a lot of photographers prefer an optical viewfinder. The H system is also modular so you can change the backs and use a waistlevel viewfinder – not to mention a choice of 12 lenses including technical lenses – so it is still a very different experience.’

    To allow X1D users access to the existing range of H system lenses Hasselblad will introduce what it describes as a ‘simple adapter’, but in the announcement there wasn’t much more detail than that. ‘Yes, this adapter will allow autofocus to operate with most of the H lenses, but they weren’t designed to work with contrast detection systems. Consequently users will need to update the firmware in their lenses to allow them to work properly. Not all lenses have firmware that can be upgraded as early H lenses in 2002 were fixed, but all more recent lenses will be able to be used.’

    ‘It is still early days for this camera but when it comes to market it will have touch AF…’

    The cameras on display at the announcement event had touch screen controls for working the menus and for making feature selections, but they didn’t allow touch AF controls. ‘It is still early days for this camera but when it comes to market it will have touch AF and the AF points will be spread across the screen. You will press the AF/MF button and an AF point display will appear on the screen and then you can select the point you want to use.’

    The X1D’s touch-driven interface. The menu screens and displays are controlled via a series of swiping motions, much as we are used to in smartphones.

    Ove said that the company hadn’t directly considered allowing the rear screen to be used as a touch pad while the EVF is in use, but that it would probably be a question of firmware and that they would consider it. ‘The touch experience for the user has been a major consideration for us, and we want the touch sensitivity to be the best there is. Users will all have smart phones and we couldn’t allow the screen of the X1D to present an experience that isn’t as good as people will be used to.’

    We also talked about the company’s integration of the Nikon flash system and what the reasons were for not developing a system of their own. ‘We don’t want to have to develop our own flash system, as we’d prefer to concentrate our resources on making cameras and lenses. Any system needs a range of flash units as customers want a choice, so it makes much more sense to work with an existing system that already has that range and choice. When we only had the V system we partnered with Sunpak, and in more recent years we worked with Metz, but Metz discontinued the gun as they didn’t sell enough. Nikon agreed to work with us and we are very happy that they offer excellent flash units that will work well with our X1D.’

    ‘We have to produce the best that we can and allowing reduced quality just isn’t an option’

    The XCD lenses that Hasselblad has developed to go with the X1D use leaf shutters and offer a top shutter speed of 1/2000sec. Leaf shutter systems allow much faster flash synchronization than focal plane shutter systems and, as is the case with the H6D, the X1D can work with full power flash at that shortest shutter opening. ‘In this camera and in the H6D we use a dual shutter system to achieve the top 1/2000sec flash sync speed,’ explains Ove.

    ‘The new XCD lenses are designed and built to the same specification standards that we use for the H series lenses. We have to produce the best that we can and allowing reduced quality just isn’t an option. In fact these have a short back focus which makes it easier to design them to really excellent standards. The lenses are designed by us and manufactured by Nittoh who have made many great lenses in the past, including the lenses for the X-Pan. These XCD lenses have no crosstalk and the angle of the light as it approaches the sensor is well within the limits. You’ll notice that the exit pupil of the wide angle particularly is set well inside the barrel.’

    ‘Right now… we have no zooms on the roadmap’

    ‘To start with we will concentrate on fixed focal length lenses as we can make these small in line with the compact concept of the camera. I expect there will be some demand for zooms but we will wait and see what that demand is and then respond to it. Right now though, we have no zooms on the roadmap. Personally I think they will have to be too big, and I want us to concentrate on the best performance and the highest resolution possible.’

    Speaking to Ove and other technicians at the event it is obvious that Hasselblad has built this system around the specific physical dimensions of the 43.8×32.9mm sensor. If there will be a 100MP version of the X camera it will not be one using the current Sony offering that measures 53.4x40mm. ‘The camera isn’t designed to take a larger sensor,’ I was told, ‘and the XCD lenses don’t have the covering circle to work with it. We designed the camera to be small and portable, and a part of that equation is the size of the sensor. If we work with a larger sensor it means we need a bigger body and bigger lenses, and that would defeat the principles of what the X1D is about.’

    No one would be drawn on how many lenses the company expects to have in the XDC range in five years’ time, but it is clear there will be more and that they will start coming shortly. The 30mm will be formally announced at Photokina and I think it reasonable to assume there will be hints of other focal lengths at the time, even if the announcements aren’t formal.

    The X1D really does mark quite a departure for Hasselblad and a step towards a larger market (though still some way from the mass market) that will allow the company to broaden its user base. The step too though is as much about demonstrating it is a modern company now that can make modern products. It has also drawn an unmistakable line under that period of its life when it rebadged and allowed other brands to have too much of a hand in its manufacturing.

    Things are looking up; Hasselblad seems to be back on track, innovating once more and in many ways getting ahead of the game. The X1D is certainly the coolest, most flexible, portable and accessible digital medium format almost on the market.

    Articles: Digital Photography Review (dpreview.com)

  • Pencil + Sharpener: Redesign Solves 3 Classic Drawing Tool Problems

    [ By WebUrbanist in Design & Products & Packaging. ]

    pencil plus sharpener

    Pencils require sharpening, run out of eraser and turn into unusable stubs as they near the end of their lifespan, but this clever gadget aims to change all of that, solving all three issues at once.

    demo

    Even in today’s digital world, artists, designers, writers and musicians still fall back on this traditional tool. The Pencil+ helps on multiple fronts, but functions first as a pencil holder, enabling the user to tuck various lengths of pencil into a central void.

    eraserhead

    What keeps the pencil from slipping too far in? An adjustable eraser serves as a backstop, letting you move the pencil portion backward to fit and forward as the pencil gets shorter. Meanwhile, the back of the holder (normally where one would find an eraser) doubles as a sharpener, keeping it always on hand for reworking broken or worn tips.

    remove and sharpen

    “Worry no more because with pencil+,” say its creators, “you can now have a sharpener, extender, eraser holder and transporter for your favorite tool” which is available in Teak, Ebony, Wild Olive, African Padauk and Indonesian Redwood”

    pencil sharpener combo

    A few potential critiques come to mind: first, someone employing this device will have to deal with an additional step to access an eraser. Second, the holder is necessarily wider than a pencil, so it will require some getting used to in terms of grip and function. Third, the eraser length is a function of pencil length, so storing a lot of extra eraser could be an issue (though easily longer than a normal one). Still, one can be sure, at least, never to lose track of one’s sharpener, and also that a single pencil will last a lot longer.

    Share on Facebook


    [ By WebUrbanist in Design & Products & Packaging. ]

    [ WebUrbanist | Archives | Galleries | Privacy | TOS ]


    WebUrbanist

  • The Secret to Finding the Hero Angle in Food Photography

    Have you ever stared at a photo of a food dish, and instantly thought that something looked a little odd? Like the shot wasn’t quite bang on, but you can’t quite put your finger on what it is? Chances are the dish hasn’t been shot using its hero angle.

    Rachel Korinek Food Photographer DPS Hero Angle 12

    You can have the freshest ingredients, the maddest styling skills, and be able to tame ever changing natural light, but if your angle isn’t complimentary to the food you’re shooting – you’re missing out on the full potential of creating a powerful food image.

    Never fear though, the secret to finding the hero angle in food photography is simple. Just approach the shoot with two things in mind; the height of the dish and/or the props, and the layers contained in them.

    The Height of Your Dish and Props

    The height of food basically falls into two categories; tall or flat.

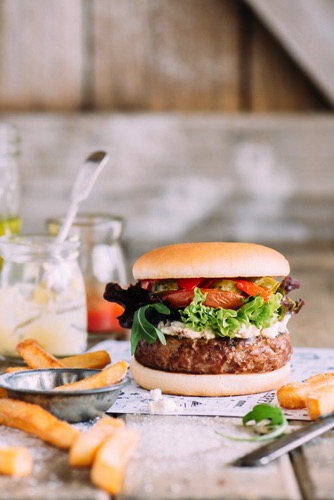
    Tall subjects are simply anything with height – like a bundt cake, an ice cream cone, or a burger with the lot. For tall subject you will usually default to shooting somewhere between a 45 degree angle to straight on. Going beyond 45 degrees can sometimes limit being able to see the full dish and layering.

    Flat subjects are simply anything whose width is inherently larger than its height – like a tart, a cookie, or a pancake. For these types of subjects, default to shooting somewhere between straight above and a 75 degree angle. Going too close to 45 degrees will also accentuate their flat qualities.

    Rachel Korinek Food Photographer DPS Hero Angle 8 Rachel Korinek Food Photographer DPS Hero Angle 5

    But what about everything else? What about soup, salad, or how about liquids? I am so glad you asked, because this is where the fun starts.

    There are quite a few foods that are dependant on serve-ware. A burger or cake can hold their own, but liquids, soups, salads, and puddings cannot. Which category these guys fall into is dependent on the food styling prop in which they are presented.

    Take soup for instance, is it being served in a bowl, or is it a fancy cold soup served in a tall shot glass? The salad, is it served on a plate or a large glass bowl? What sort of holder is the liquid in; tall, short, opaque? Is it in a flat tray because you’re about to freeze it and turn into granita?

    Oh the possibilities are endless! But remember, they all fall into two categories, so you’ve got a 50/50 shot of getting it right. I’m pretty sure you’ve got this.

    The Layers in Your Dish and on Set

    There are two things to consider when thinking about layers in food photography. The layers present in your food dish and the layers present on set.

    Layers in a dish are the number of visual components in a recipe. The classic example is a burger with seven layers, bun, meat patty, cheese, sauce, slice of tomato, lettuce, bun. Or a layer cake with seven layers, cake, jam, cream, cake, jam, cream, cake. So to get the best food photography shots, you’ll want to choose an angle that exposes these layers in their best light.

    Rachel Korinek Food Photographer DPS Hero Angle 6 Rachel Korinek Food Photographer DPS Hero Angle 7

    Layers on set are the number of elements or props that you have on your set (props) on top of one another. For example, napkin, plate, and garnish would be three layers and would appear on top of one another. I don’t count the food/recipe as a layer as it is the subject and will always be present. If the prop layers are an important part of telling the food story, you’ll want to make sure your angle captures those elements too.

    Putting it all Together

    Now that you’ve thought about the height of your dish and the layers, you can marry those two, in order to figure out your hero angle. Let’s look at some examples.

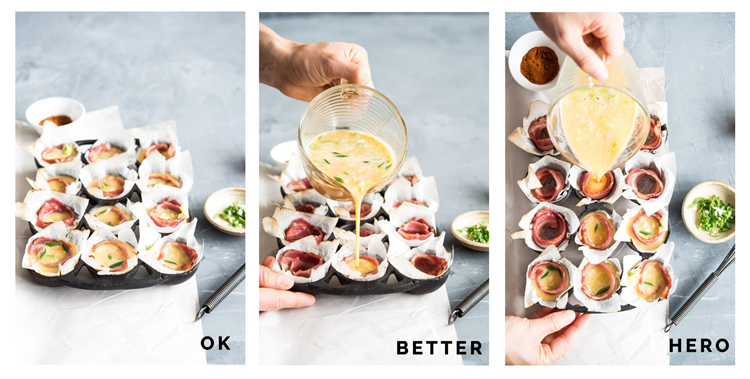
    This is a little game I like to play called; Okay, Better, Hero. There is nothing wrong with any of these shots I’m about to show you per say, but there can only be one hero, right? That’s what we’re aiming for, so let’s dive right in.

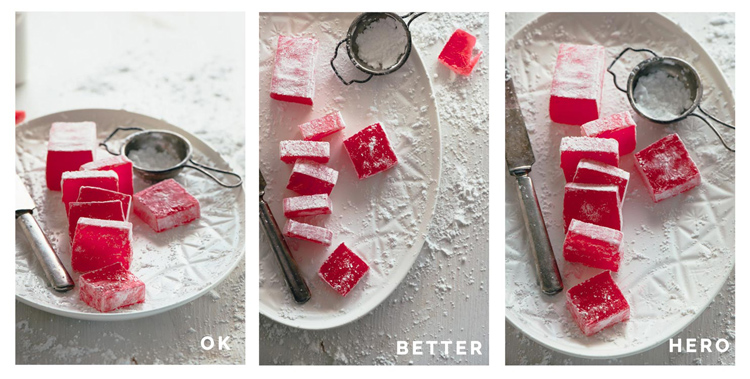
    Turkish Delight (a flat dish without layers)

    Rachel Korinek Food Photographer DPS Hero Angle 1

    I shot this Turkish delight with a 105mm micro (macro) lens, at a 25 degree angle, overhead, and 75 degree angle respectively.

    Because this is such a flat dish, you may expect that the overhead angle would be the most flattering. But really the 75 degree shot is hero angle, here is why. It is so close to overhead, yet allows you to capture the gorgeous light coming through the Turkish delight which adds to the richness of its colour.

    25 degrees also captures the colours, but accentuates the flatness of the dish, and detracts from the overall feel.

    Rachel Korinek Food Photographer DPS Hero Angle 11
    Horizontal variation, shot at the same angle.

    The Burger (tall dish with layers)

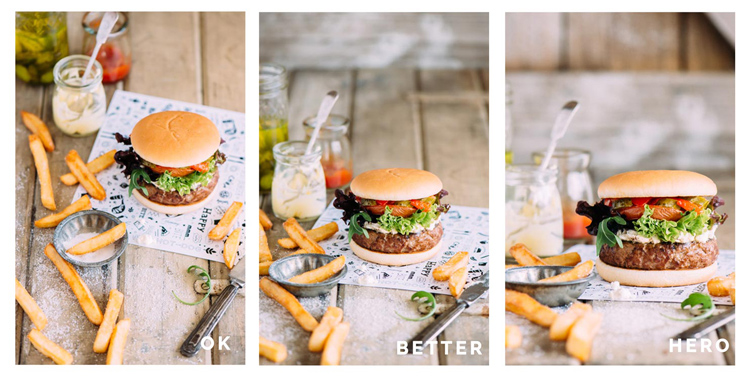
    I shot this burger with a 105mm micro (macro) lens, at a 45 degree angle, 25 degree angle, and straight on respectively.

    Rachel Korinek Food Photographer DPS Hero Angle 4

    The hero angle is the one shot straight on, because it allows the viewer to focus on all the delicious layers, and elongates the height of the burger which you naturally expect to be a tall food. Your mind thinks, the taller the burger, the more ingredients, and the more bang for your buck you get.

    The 45 degree angle doesn’t give you enough context of the layers, and the 25 degree angle makes the top burger bun look too flat.

    Kale Pesto (tall dish without layers)

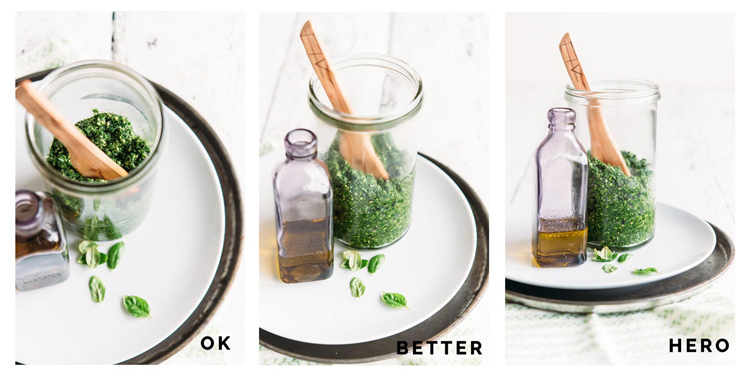
    I shot this with a 60mm micro (macro) lens, at a 85 degree angle, 45 degree angle, and straight on.

    Rachel Korinek Food Photographer DPS Hero Angle 3

    Pesto, being a sauce or condiment, is dependant on the serve-ware in which it is presented. As you want to show that there is enough of the pesto to coat an entire family size dish of pasta, it was shot in a tall glass. This also complimented the tall spoon, and bottle of oil in the shot as props.

    The 45 degree angle is workable, but straight on one is the hero angle here. It allows for an overall sense of how the dish is being served and stored, while still allowing the viewer to comprehend its texture.

    If you want to get into the nitty gritty, the 45 degree angle allows for reflection of the plate to show up in the glass, hindering the ability to see the texture of the pesto.

    Egg and Bacon Muffins (flat with layers)

    I shot this with a 60mm lens, at a 45 degree angle, 30 degree angle, and from directly overhead.

    Rachel Korinek Food Photographer DPS Hero Angle 2

    Here the 45 degree angle accentuates the flatness of the dish, but does show the layers. The 30 degree angle is better, but it doesn’t show the full layers of the dish as much as the overhead shot does. That’s why the overhead shot is the hero angle in this case. It allows you to see right into the dish, while still getting the action of the egg filling being poured into each compartment.

    Putting Finding That Hero Angle Into Practice – 5 Take Aways

    Next time you’re doing a food photography shoot, put the following into practice:

    1. Thinking about whether your dish falls into the tall or flat category.
    2. Are there layers in your dish, or through your use of props on set?
    3. For tall foods, especially those with layers, explore angles between straight on and 45 degrees.
    4. For flat foods, explore angles between overhead and 75 degrees.
    5. Take a few shots with different angles outside the recommended ones above, and look for the OK, better, hero shots.

    Do you have a favourite angle for food photography that you can always rely on? Please share in the comments below, as well as your food shots.

    googletag.cmd.push(function() {
    tablet_slots.push( googletag.defineSlot( “/1005424/_dPSv4_tab-all-article-bottom_(300×250)”, [300, 250], “pb-ad-78623” ).addService( googletag.pubads() ) ); } );

    googletag.cmd.push(function() {
    mobile_slots.push( googletag.defineSlot( “/1005424/_dPSv4_mob-all-article-bottom_(300×250)”, [300, 250], “pb-ad-78158” ).addService( googletag.pubads() ) ); } );

    The post The Secret to Finding the Hero Angle in Food Photography by Rachel Korinek appeared first on Digital Photography School.

    Digital Photography School

  • Silence Of The Lamps: 10 Abandoned Light Bulb Factories

    [ By Steve in Abandoned Places & Architecture. ]

    abandoned_lightbulb_factory_1a
    Things may look dim for these abandoned light bulb factories but hopefully the last worker out the door remembered to flip the switch on their way out.

    abandoned_lightbulb_factory_1b

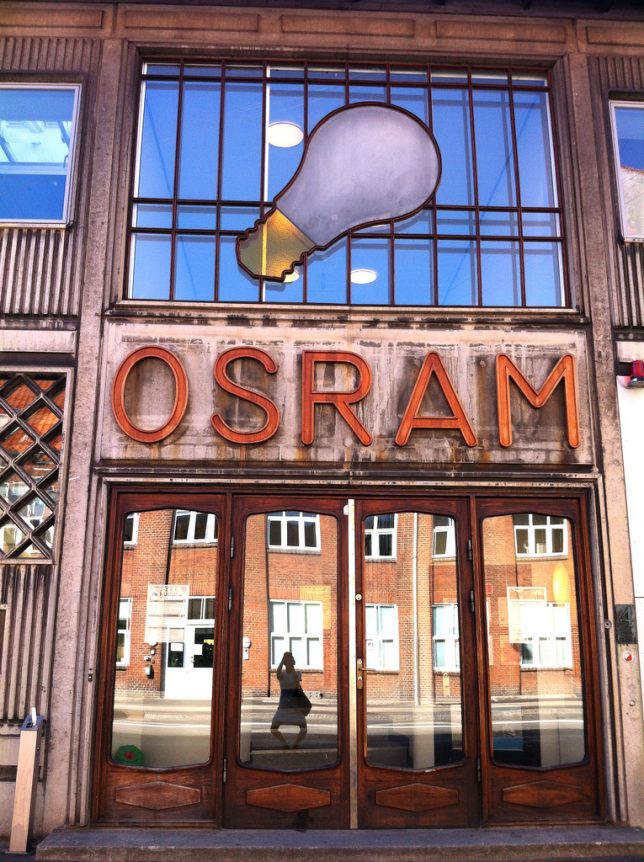
    What’s the deal with the above OSRAM light bulb factory facade in Copenhagen, Denmark? Flickr user Stine Linnemann (stine_maskine) snapped the first photo on August 30th of 2009 while Flickr user maya weeks (mayaweeks) snapped the same – yet magically de-aged – facade almost three years later.

    Back In The GDR

    abandoned_lightbulb_factory_2b

    abandoned_lightbulb_factory_2c

    abandoned_lightbulb_factory_2d

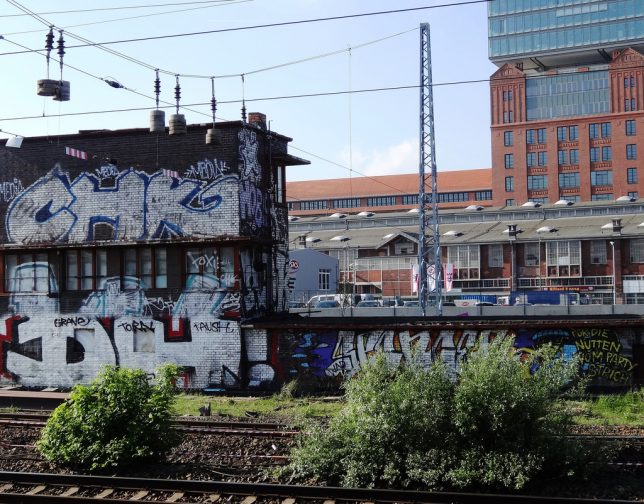
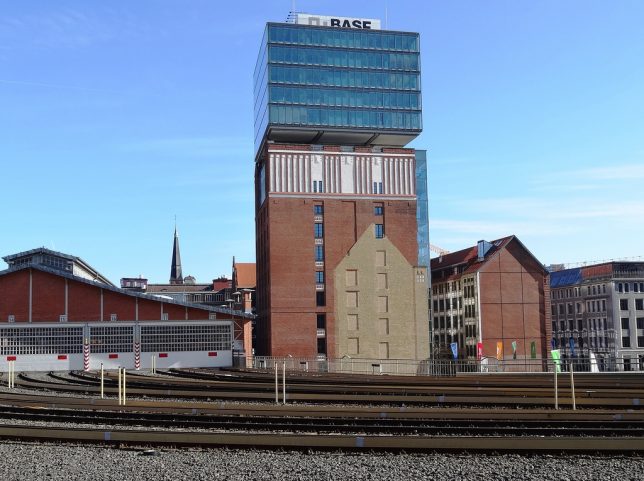
    Twenty-five years after the Berlin Wall tumbled, grungy relics of the GDR (German Democratic Republic, aka “East Germany”) linger on like a bad case of heartburn after too much currywurst. Take the distinctive building above, centerpiece of the former VEB Kombinat Narva Berliner Glühlampenwerk which was the main manufacturer of incandescent light bulbs in the GDR. Flickr user Mondrian Graf Lüttichau (Mondrian-Berlin) captured the semi-restored and partially re-purposed main building in 2014 and 2015.

    Alien: Resurgence

    abandoned_lightbulb_factory_3a

    abandoned_lightbulb_factory_3c

    Stay outta there, Ripley!! This unnamed abandoned light bulb factory would make an ideal location shoot for some future Alien movie sequel, would it not? Kudos to Flickr user Andrea Pesce (Opissse) for not disclosing the site’s details – vandals would stomp those scattered light bulbs like so much bubble wrap.

    Next Page – Click Below to Read More:
    Silence Of The Lamps 10 Abandoned Light Bulb Factories

    Share on Facebook


    [ By Steve in Abandoned Places & Architecture. ]

    [ WebUrbanist | Archives | Galleries | Privacy | TOS ]


    WebUrbanist

  • Photographing surfers on Russia’s Kamchatka Peninsula

    $ (document).ready(function() { SampleGalleryV2({“containerId”:”embeddedSampleGallery_1062980856″,”galleryId”:”1062980856″,”isEmbeddedWidget”:true,”standalone”:false,”selectedImageIndex”:0,”startInCommentsView”:false,”isMobile”:false}) });

    The Kamchatka Peninsula, located in the far eastern portion of Russia, is home to a passionate surfing community. You read that right – Russian surf community. The peninsula boasts excellent conditions for surfing, and its towering volcanic peaks make for a fantastic backdrop.

    Surf photographer Tania Elisarieva is well familiar with what she describes as the ‘cold and harsh landscapes’ of Kamchatka, having grown up in the far north of Russia. Her photos capture the striking beauty of the place, from its snow-covered peaks to icy volcanic craters, and show the world another side of Russia. Read her story and see more of her work on Resource Travel.

    Articles: Digital Photography Review (dpreview.com)

  • How to Use a Reflector and Diffuser to Enhance Flower Photographs

    Photograph Flowers 2016-05-11at15-41-06

    cover-fill-card

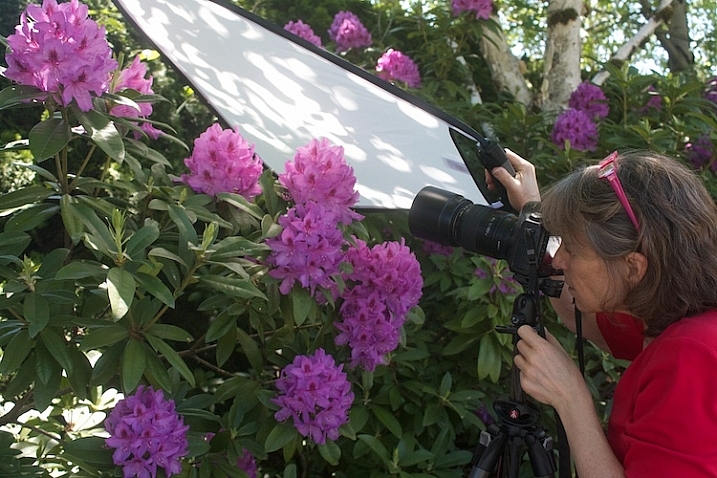
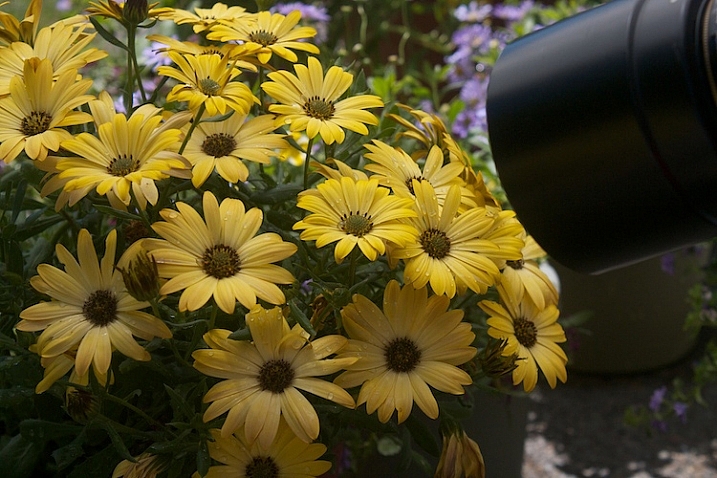
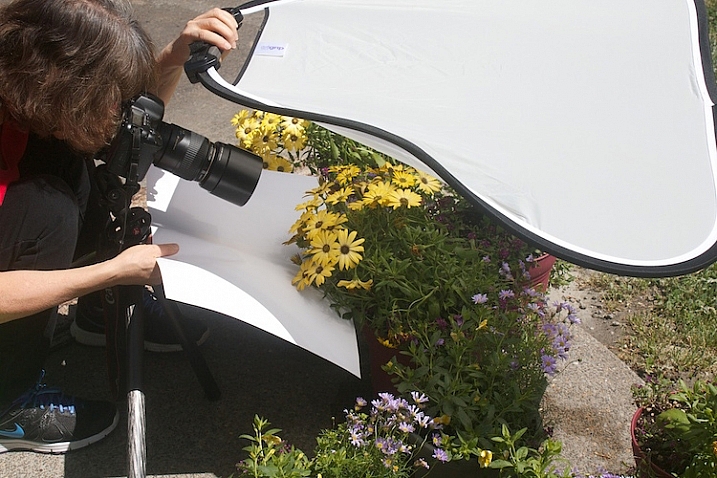
    Learning to see and use light is one of the most important steps to creating great photographs. As you become more aware of what nice light really looks like, you can start to manipulate even the harshest conditions with some simple tools. The photo above was shot in bright sunshine using both a diffuser and a reflector.

    full-sun-overview

    Practice

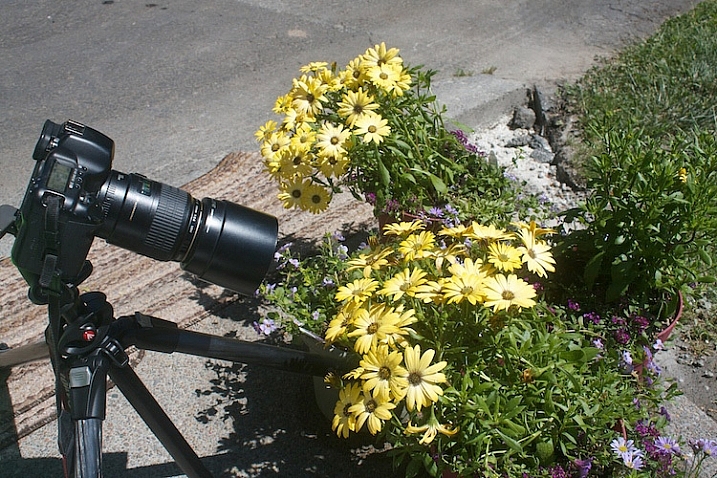
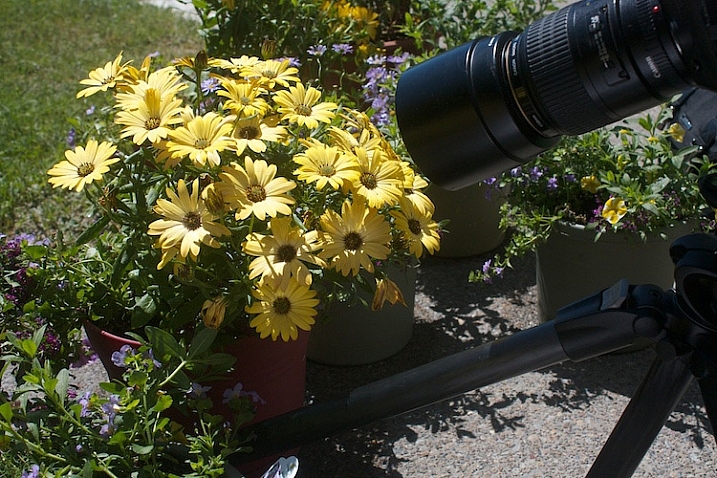
    To practice this exercise, find some flowers in bright sun. You can photograph flowers that are planted in your garden, or in pots.

    Photograph-Flowers-in-sun-3

    Photograph-Flowers-in-sun-2

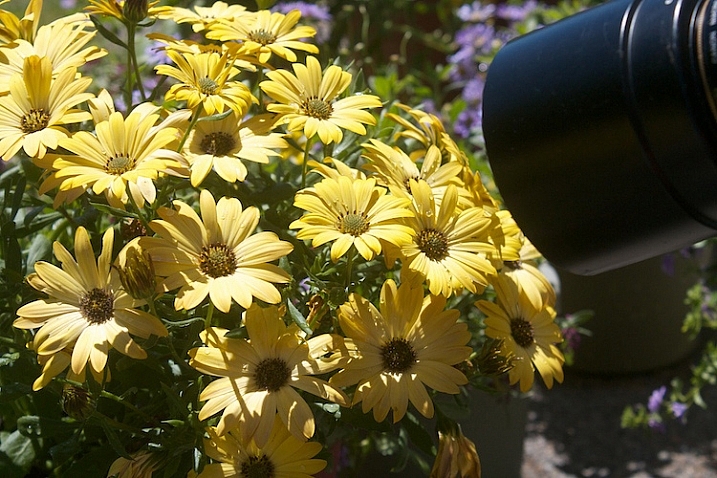
    Notice the quality of light on the flowers. In bright sun, there are strong highlights and deep shadows. There is lot of contrast, which comes through in the image.

    Photograph-Flowers-2016-05-11at15-34-44

    Notice how you lose detail in the highlights. The bright spots caused by the sun don’t add anything to the photograph, in fact, they are very distracting. Our eyes tend to go toward the brightest spots in a photograph and in this situation, the highlights are drawing our eyes away from the center of interest – the flower.

    Photograph-Flowers-2016-05-11at15-09-23

    Add a reflector

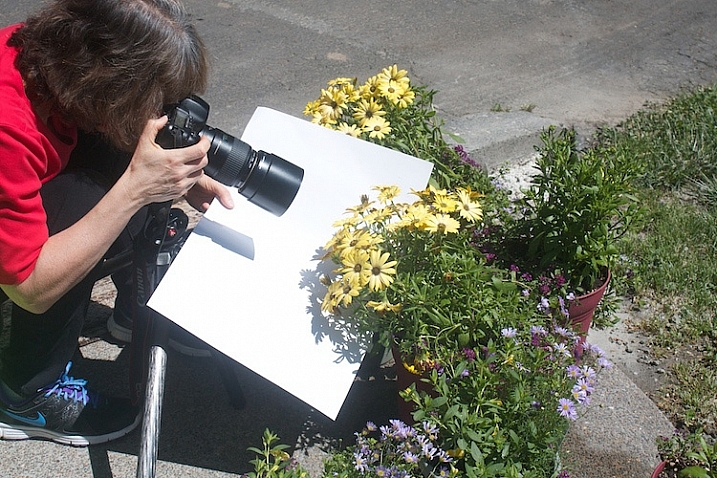
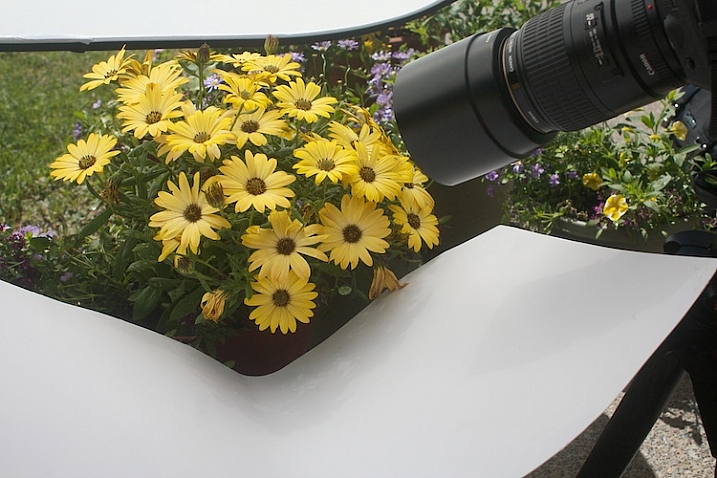
    Now, try using a reflector. Light bounces just like a billiard ball. By placing a light colored, reflective surface opposite the light source, you can bounce light back into the subject. In this instance, our light source is the sun, so I placed the reflector under the leaves to bounce the light back into the shadows. You can use almost anything as a reflector. In this example, I’m using a piece of white poster board.

    Read DIY How to Build and Use a Reflector to Take Better Portraits and 10 Ways to Use a 5-in-1 Reflector for more help on using reflectors.

    Just-below-full-sun-using-fill-cards

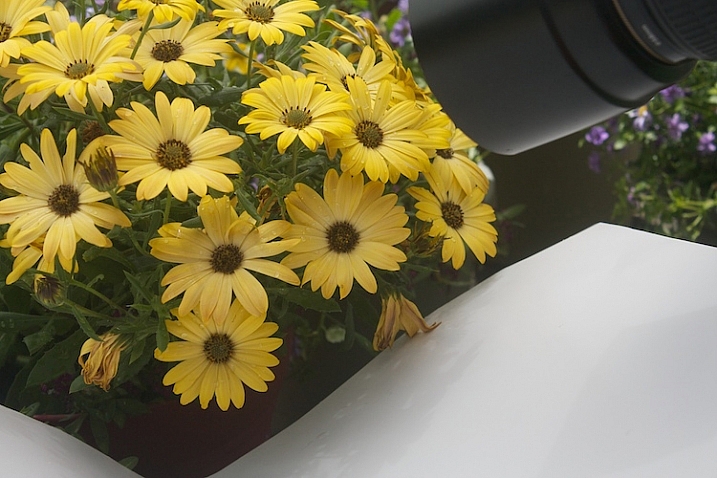
    Notice the difference in the image above, compared to the one without the reflector. Can you see how bouncing the light back in brightens up the flower? The exposure settings haven’t changed. The only difference is the reflector (also called a fill card) in the second shot.

    Photograph-Flowers-2016-05-11at15-08-06

    Diffuse the light

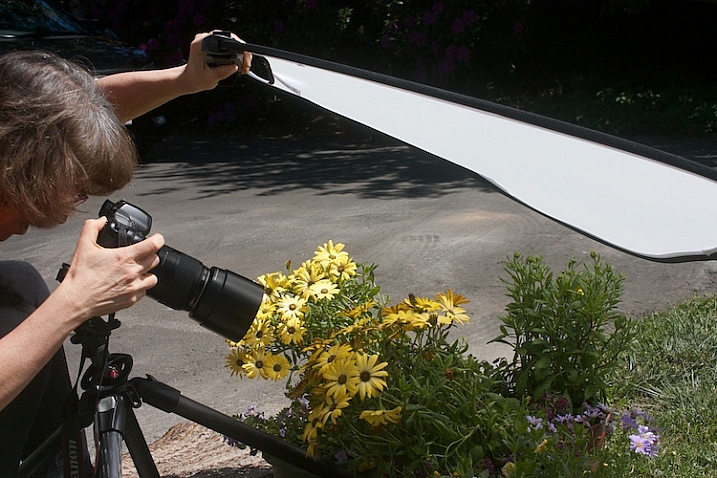
    Now, we are going to use a diffuser to soften the light.

    Photograph-Flowers-reflector-above-better2

    Here we are starting to see some really beautiful, soft light. Notice how even the light is and how much softer the flowers feel. The highlights and shadows are not as severe and harsh, and more detail is retained in both areas.

    Photograph-Flowers-reflector-above

    Use a reflector and diffuser

    Take it a step further.

    Photograph-Flowers-2016-05-11at15-09-41

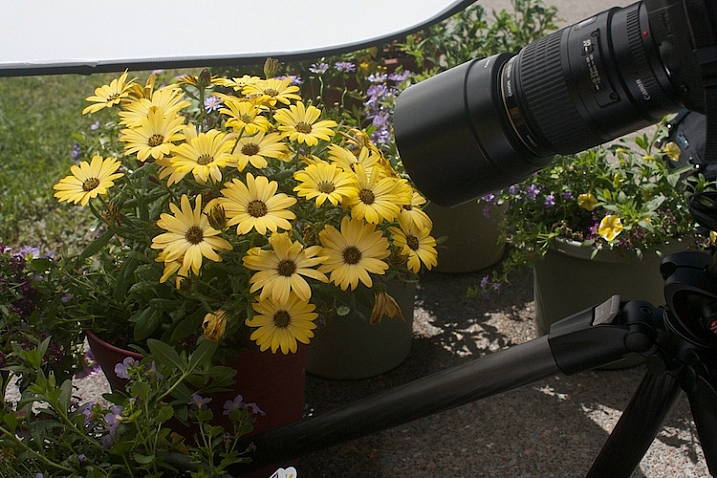
    Let’s use a diffuser with a reflector, and see how that looks. Here’s a tip for you: If you can’t prop up your reflectors and diffuser and press the shutter button, you can use the 2-second self-timer on your camera to free up an extra hand.

    Photograph-Flowers-reflector-above-and-below

    With the diffuser above and a reflector below, the flowers start to take on a magical feel.

    Photograph-Flowers-2016-05-11at15-12-20

    fill-card-reflector-top-and-bottom

    cover-fill-card

    Now you can see how using a reflector and diffuser can drastically improve your flower photographs. I also want to add that none of these photographs were manipulated in Lightroom or Photoshop in any way, other than a little sharpening. The dramatic difference in the photographs was created entirely by manipulating light.

    Please share you comments and questions below, then try this exercise at home and post your photos in the comments below. I’d love to see them!

    googletag.cmd.push(function() {
    tablet_slots.push( googletag.defineSlot( “/1005424/_dPSv4_tab-all-article-bottom_(300×250)”, [300, 250], “pb-ad-78623” ).addService( googletag.pubads() ) ); } );

    googletag.cmd.push(function() {
    mobile_slots.push( googletag.defineSlot( “/1005424/_dPSv4_mob-all-article-bottom_(300×250)”, [300, 250], “pb-ad-78158” ).addService( googletag.pubads() ) ); } );

    The post How to Use a Reflector and Diffuser to Enhance Flower Photographs by Vickie Lewis appeared first on Digital Photography School.

    Digital Photography School

  • Diagonal Crosswalk: Walk Any Way in LA’s Safe Scramble Intersection

    [ By WebUrbanist in Architecture & Cities & Urbanism. ]

    scramble intersection

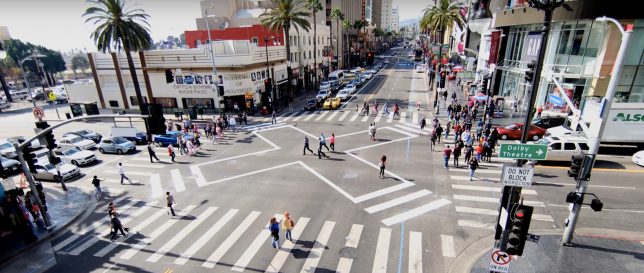
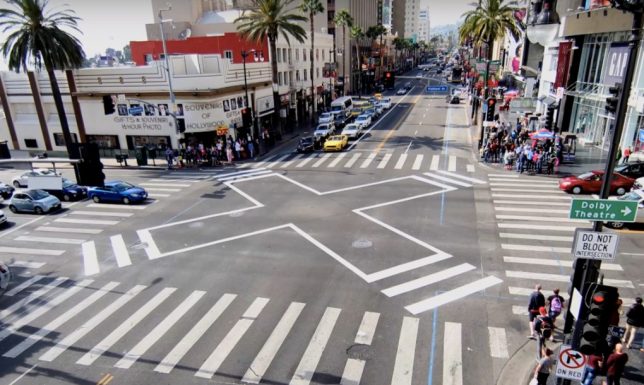
    When visitors approach the intersection in front of Seattle’s famous Pike Place Market in the heart of downtown, the surprise is palpable when they realize that a ‘go’ for pedestrians lets people walk any way they want. Los Angeles recently followed suit, introducing its own omnidirectional ‘scramble intersection’ at a notoriously dangerous crossroads, making it much safer.

    At Hollywood and Highland, designers have taken things a step further, adding an X-shaped layer of walking indicators (zebra stripes and white-framed boxes) to make it clear how people are permitted (and encouraged) to cross the streets diagonally through the center.

    scramble diagnoal crosswalks

    Popularized in the 1950s by Henry Barnes, the concept is quite simple: when pedestrians get their green light, anyone can cross anywhere during the limited window, then the lanes are given back over to cars and the process repeats. In the months since this latest scrambler was introduced, there has been only a single accident.

    Scramble intersections can be found around the world, but are still limited in quantity, focused in areas where the safety gains are greatest. In dense cities like Tokyo, Japan, they can be marvelously busy at times (as shown above). In Seattle, meanwhile, the success of the Pike Street and First Avenue scrambler has led to others being introduced around the city; perhaps LA will continue to follow its lead.

    Share on Facebook


    [ By WebUrbanist in Architecture & Cities & Urbanism. ]

    [ WebUrbanist | Archives | Galleries | Privacy | TOS ]


    WebUrbanist

  • 23 Quick Tips for Street Photography or Your Next Photo Walk

    The guys over at the Cooperative for Photography (COOPH) have some good quick tips from Thomas Leuthard for you. If you are planning on doing some street photography this summer, joining a photo walk, or even doing travel photography – apply this tips to those genres and have some fun. Let’s see the tips:

    My faves are:

    • #2 control your camera remotely: I never even thought of that but will work great with my Fuji X-T1
    • #10 get down low: another thing cameras like the Fuji X-T1 do well with a tilting screen.
    • #13 shoot water as a slow shutter speed: this is starting to sound like an ad for the Fuji X-T1, but I love the fact my camera is weather resistant (WR) and I’ve stood in the rain, and taken a direct hit from an ocean wave and it withstands it and keeps going! Read more on this camera here.
    • #17 shadows make great photos: see How to Use Shadow and Contrast to Create Dramatic Images for more on that

    Thomas Leuthard, “Street photography is like fishing, catching the fish is more exciting than eating it.”

    Which of those quick tips did you like best?

    googletag.cmd.push(function() {
    tablet_slots.push( googletag.defineSlot( “/1005424/_dPSv4_tab-all-article-bottom_(300×250)”, [300, 250], “pb-ad-78623” ).addService( googletag.pubads() ) ); } );

    googletag.cmd.push(function() {
    mobile_slots.push( googletag.defineSlot( “/1005424/_dPSv4_mob-all-article-bottom_(300×250)”, [300, 250], “pb-ad-78158” ).addService( googletag.pubads() ) ); } );

    The post 23 Quick Tips for Street Photography or Your Next Photo Walk by Darlene Hildebrandt appeared first on Digital Photography School.

    Digital Photography School