Blog

  • Bottomless Anti-Chair: Crafty Bentwood Form Frames Other Seats

    [ By WebUrbanist in Design & Furniture & Decor. ]

    chairless chair

    As it stands, you can do just about anything with this Arm Chair except actually sit in it, at least until you add your own chair, stool or other form of seating to the mix.

    bent chair stool casters

    bent chair with office

    Part artist statement, part conceptual and part physical framework, this absurdist anti-chair by Clark Bardsley is also a cunning and well-crafted exercise in traditional wood bending and shaping techniques.

    no seat back chairs

    bent chair in public

    The steam bent, brush back sanded and oiled American Oak object represents an impressive execution of a notoriously difficult process made all the more complex within a seat and back to tie the piece together.

    bent chair jig making

    bent brushed sanded wood

    The Auckland-based designer focused on materials and methods in this work, but while he may have failed to include that essential ingredient, which most would associate with chair-ness, the void he left also lets users fill empty space with other sorts of seats.

    Office chairs on casters, plastic bucket chairs, metal stools … pretty much anything can be slotted into place as desired. At the same time, the wood frame gives the piece a recognizable outline and sense of comfortable familiarity.

    bent chair front view

    bent chair back view

    As the artist puts it, “we structured our research around creating a beautifully finished object that pays heed to a classic bentwood chair, without posing it as a commercial product. Why shouldn’t research have a sense of humor?”

    bent chair backward bucket

    bent chair in nature

    In a world where it seems like every type of chair possible has been designed (if not built), perhaps it is indeed time to make one simply with the goal of getting a good laugh.

    Share on Facebook


    [ By WebUrbanist in Design & Furniture & Decor. ]

    [ WebUrbanist | Archives | Galleries | Privacy | TOS ]


    WebUrbanist

  • Fly-by: Learn how to shoot the Milky Way from an airplane

    Photographing the Milky Way from the ground can be challenging in itself, but photographer Ian Norman has taken the challenge to new heights. In a new video tutorial, he explains how he and his partner Diana Southern photographed the Milky Way from an airplane. 

    Together, the couple make up the team behind Lonely Speck, a blog dedicated to astrophotography. They were on a flight to Budapest when they began to wonder if they could capture the Milky Way from the plane. Sure enough, after some trial and error outlined in the video above, they found it was possible. Ian explains in the tutorial how he layered multiple exposures in post-processing to reduce noise in his final images.

    The results are pretty amazing. We know what we’ll be doing next time we get bored on an overnight flight. 

    Articles: Digital Photography Review (dpreview.com)

  • How to Create a Strong Composition by Centring the Subject

    Central composition

    I’m a strong believer that there are no rules when it comes to composition in photography, only guidelines. The rule of thirds is misnamed (but guideline of thirds is not nearly so catchy), and while it is helpful for newcomers to photography realize that you can often improve composition by placing the subject off-centre, it is not a rule.

    The rule of thirds, and other similar guidelines that you may read about (golden section, golden triangle, Fibonacci sequence, etc.) are really about placement. The question you are looking to get answered is, where in the frame should the main subject be placed? Secondary questions are how large should the subject be in the frame, and how does it relate to other elements that may be included?

    In simplistic terms: sometimes the best place for the subject is in the centre of the frame, and sometimes it is not. In this article we’re going to look at some examples where the subject is centred, and talk about how that central placement actually makes the image stronger, not weaker.

    Central composition

    In the photo above I placed the girl in the centre of the frame (horizontally) because that was the best way to include the metal statue she was sitting on. If I moved the camera to the left (to place her on a third) then the statue’s head would be cut off. If I moved the camera right then there would be an empty space to the right of the statue’s head.

    Here, the question of whether or not to place the subject (the girl) on a third, is the wrong question to ask. A better question is – What’s the best way to include everything that needs to be in the frame, and nothing more? Different question, and a different thought process.

    The image also shows a strong use of tonal and color contrast. The girl’s white clothing contrasts against the surrounding dark tones, pulling the viewer’s eye to her. The eye also moves between the girl and the pink umbrella lying on the ground. The pink tones (umbrella, shoes, wristband, hair ribbon) stand out because the rest of the scene is fairly monochromatic.
    Central composition

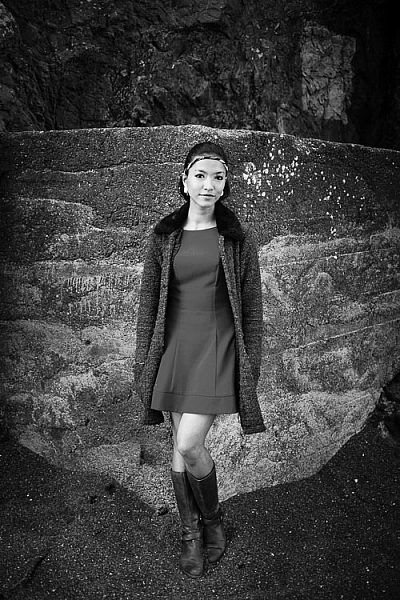
    The photo above is interesting because it utilizes symmetry. I asked the model to stand at the corner of concrete structure, built into the base of the cliff. The sides of the walls, the textured pattern on them, even the way the pebbles lie against the base of the walls all mirror each other. She is placed in the centre of the frame (horizontally) so she doesn’t break the symmetry of the background. The model, however, is not symmetrical. I asked her to put her weight on one foot, creating an S-curve with her body, to break the symmetry created by the background.

    Consider also the size of the subject within the frame. If I had placed her on a third by moving the camera to the right or the left, I would have both broken the symmetry and been left with a large area of empty space. This can work when there is something interesting in that space, but it doesn’t always, and should be considered when deciding where to place the subject.

    Central composition

    In this portrait you can see that the model’s sharp eye, is right in the centre of the frame. There’s a good reason for that – I took the photo with an EOS 5D Mark II, which has just one cross-type autofocus (AF) point in the centre of the frame. When you are using wide apertures, as I was in this case (f/2.5), it’s essential to use a cross-type autofocus point, as it’s the most accurate. One of the weaknesses of this camera is that it forced me to base my composition of portraits around its central AF point.

    That’s the practical reason for using a central composition, but the portrait works. I moved in close so there wasn’t much empty space in the photo, The central composition takes the viewer’s eye to her face, eyes and hair, which are the important parts of the image. If I had moved back a little and placed her face on a third, then there would be a lot more empty space around her, and less emphasis on her features.

    Central composition

    This close-up photo of a flower (above) is another example of using a central composition for impact. I focused on the flower’s stamen and let the petals go out of focus. Visually, you can divide the photo into three. At the centre there’s the stamen, which is the sharp part of the image. Around that is the petal of the flower, and around that the green leaves. If I moved the camera further away and placed the flower on a third, rather than the centre, then it would lose impact and be a completely different photo.

    Central composition

    The final example uses the square format. You’ll see central compositions in the square format, far more than you will with a rectangular aspect ratio, because the square format lends itself to strong, graphic compositions that utilize shape.

    In this example the domes of the Venetian church (centered horizontally) are the strongest shapes, and the focal point of the image. It helps that the lines formed by moving boats from the bottom right of the frame pull the eye towards the church in the distance.

    What do you think? Are there times when you use central composition or do you prefer to place the subject off-centre? Let us know in the comments below.


    Mastering Composition

    If you’d like to learn more about composition then please check out my ebook Mastering Composition: A Photographer’s Guide to Seeing.

    googletag.cmd.push(function() {
    tablet_slots.push( googletag.defineSlot( “/1005424/_dPSv4_tab-all-article-bottom_(300×250)”, [300, 250], “pb-ad-78623” ).addService( googletag.pubads() ) ); } );

    googletag.cmd.push(function() {
    mobile_slots.push( googletag.defineSlot( “/1005424/_dPSv4_mob-all-article-bottom_(300×250)”, [300, 250], “pb-ad-78158” ).addService( googletag.pubads() ) ); } );

    The post How to Create a Strong Composition by Centring the Subject by Andrew S. Gibson appeared first on Digital Photography School.


    Digital Photography School

  • Metabones unlocks native Sony focus modes for Canon-mount adapters

    Updated firmware allows Sony users to use all their AF modes when shooting Canon EF-mount lenses with Metabones adapters. It does so by emulating a native Sony lens, much like the recent Sigma MC-11 adapter. This update to the Metabones line of Smart Adapters and Speed Boosters enables the use of modes such as continuous Eye-AF and Direct Manual Focus. Updated firmware also brings smoother aperture control to most of Metabones’ adapters. And though the company doesn’t make any claims as to video focusing, if the adapters do truly emulate native E-mount lenses, we’d expect full phase-detect AF functionality during video.

    The Metabones is only the second E-mount adapter to offer ‘native’ lens functionality with adapted lenses, with the Sigma being the first.* However, in practice the Sigma MC-11 has had many issues, too often reverting to contrast-detect AF off-center, and constantly hunting back and forth in minute increments in AF-C.

    It’s not surprising, then, that Metabones lists a series of caveats and exceptions, most of which reflect the range and diversity of EF lenses that people might use. There are also warnings of increased battery usage and of poor continuous AF performance from lenses that aren’t designed to be driven in the pattern required for fast contrast-detection AF. Finally, Metabones mentions potential problems when shooting stopped down, undoubtedly a result of Sony’s ‘stop-down focusing’ that cripples the AF system if you shoot at smaller apertures by depriving the AF system of light, and literally shutting off phase-detection altogether at apertures smaller than F8.

    Firmware for the latest adapters can be downloaded from the Metabones website. Owners of Mark I, II or III Smart Adapters and original Speed Boosters will need to return their adapters to the factory, where they will be updated free-of-charge. We’ll keep you apprised of actual performance once we’ve had an opportunity to try out the new firmware with a variety of lenses.


    Press Release:

    Metabones® Adds “Native” AF and Smooth Iris to EF Mount Speed Boosters® and Smart Adapters by Firmware Upgrade

    Vancouver, Canada, June 23, 2016: Metabones® releases Metabones App 2.3, a major firmware update with the following additional features.

    • Eye-AF (A6300/A7series).
    • Fast contrast detect AF for all E-Mount cameras.
    • DMF (direct manual focus) for E-Mount cameras, where the camera switches to MF as soon as AF completes. This is useful for checking AF accuracy when used with focus peaking.
    • Smooth iris for Sony E-Mount and FZ-Mount cameras and Blackmagic, JVC and Panasonic Micro Four Thirds Mount cameras.

    Metabones® has already added fast EF lens autofocus to its Micro Four Thirds Mount Speed Boosters® and Smart Adapters™ last year. With this speedy advantage now extended to E-Mount, EF-Mount lenses are now capable of focusing quickly across the widest variety of mirrorless cameras with trusted Metabones precision and reliability.

    The smooth iris feature slows down the movement of the electromagnetic aperture diaphragm so that video footage transitions smoothly when the aperture changes, with reduced tick noise from the lens. The latest Canon and Tamron SP lenses have special support for this feature and Metabones® makes use of it if the lens supports it.

    Limitations:

    • E-Mount “native” autofocus features may not work with all lenses.
    • “Native” autofocus may be lesser in performance and/or accuracy compared to the original “Green” mode phase-detect autofocus for A6300, A7 Mark II and A7R Mark II.
    • AF-C and video autofocus may have unsatisfactory AF performance and/or accuracy. This is a limitation inherent in DSLR lenses, which lack the low latency required for making many fine movements in rapid succession during AF-C and video focusing.
    • Excessive hunting may occur if a small aperture is used with AF-C, video or “Liveview Display Setting Effect” turned on.
    • The first few autofocus attempts may result in false positives where the camera gives focus confirmation but the subject is not in focus. This issue goes away on its own after a few trials with most lenses.
    • No support for in-camera correction such as peripheral shading, CA and distortion.
    • Power consumption may increase compared to the original “Green” mode autofocus. We recommend turning off the “Pre-AF” option to conserve battery power. On A7 series cameras and A6300 the option is on page 3 under the “gear” tab.
    • Actuations of the electromagnetic aperture diaphragm and/or the focus motor of the lens result in noises which may be picked up by the camera’s internal microphone during video recording. Use of an appropriately placed external microphone is required for video work.
    • The aperture moves in 1/3 stop steps with most Panasonic cameras and 1/8 stop steps with other cameras, which may be noticeable in video recordings. Programmed exposure mode and shutter priority exposure mode should not be used for video. Lenses supporting “smooth iris” smooth out the transition but do not increase iris resolution.

    The following lenses have been tested for “native” AF. Refer to Metabones’ web site for the most up-to-date list. Lenses equipped with smooth iris support are marked with asterisks. APS-C lenses are not compatible with Speed Booster®.

    • Canon EF 8-15mm f/4L USM Fisheye*
    • Canon EF-S 17-55mm f/2.8 IS USM
    • Canon EF-S 18-55mm f/3.5-5.6 IS II*
    • Canon EF 24-105mm f/4L IS USM
    • Canon EF 28-80mm f/3.5-5.6 II
    • Canon EF 40mm f/2.8 STM*
    • Canon EF 50mm f/1.2L USM
    • Canon EF 50mm f/1.4 USM
    • Canon EF 70-200mm f/2.8L IS II USM*
    • Canon EF 70-200mm f/4L USM (non-IS)
    • Canon EF 70-300mm f/4-5.6L IS USM*
    • Canon EF 85mm f/1.2L II USM
    • Canon EF 100mm f/2.8L IS USM Macro*
    • Canon EF 100-400mm f/4.5-5.6L IS USM (I)
    • Canon EF 100-400mm f/4.5-5.6L IS II USM*
    • Canon EF 200mm f/2.8L II USM
    • Canon EF 300mm f/4L IS USM
    • Sigma 18-35mm f/1.8 DC HSM Art 013
    • Sigma 24-105mm f/4 DG OS HSM Art 013
    • Sigma 50mm f/1.4 EX DG HSM
    • Tamron SP 24-70mm f/2.8 Di VC USD A007
    • Tamron SP 45mm f/1.8 Di VC USD F013*
    • Tamron SP 70-200mm f/2.8 Di VC USD A009*

    Incompatible lenses: (“Green” mode PDAF is still supported on A6300, A7 Mark II and A7R Mark II.)

    • Canon EF 50mm f/1.8 II
    • Canon EF 100mm f/2.8 USM Macro
    • Canon EF 135mm f/2L USM
    • Contax N lenses modified to EF mount by Conurus Canada
    • Sigma 18-125mm DC OS HSM
    • Tamron SP 17-50mm f/2.8 Di II VC B005
    • Tamron 28-300mm f/3.5-6.3 (IF) Macro A20

    OSX and Windows versions of the firmware updater are available for download from Metabones’ web site. The same download updates Speed Booster® ULTRA, Smart Adapter™ Mark IV, EF to FZ Mount Smart Adapter and all EF Mount to Micro Four Third mount products. Updates to earlier Smart Adapters™ (I, II and III) and the original Speed Booster® are by factory only and are free of charge except for shipping.


    * A TechArt adapter was technically the first to offer native lens functionality, but it was so highly unreliable that we never considered it a viable option.

    Articles: Digital Photography Review (dpreview.com)

  • How To Capture Action Shots of Waves

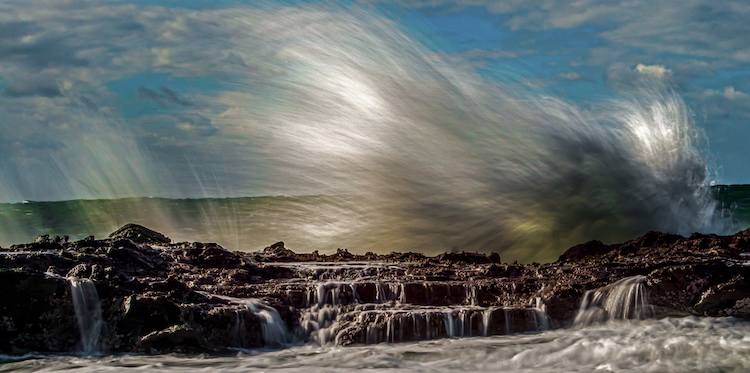
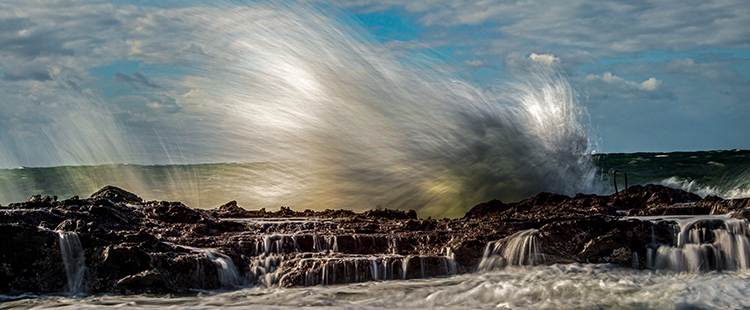
    If you enjoy photographing mother nature and waterscapes, one particularly fun exercise is to capture the beautiful characteristics of the ocean shore. If you are in the right place at the right time, you can create images displaying the delicate balance between the awesome force of a powerful wave crashing into the shoreline, juxtaposed with the calming ebb and flow of the water cascading over the rocks.

    Follow these tip to help you capture great action shots of waves:

    Image001

    EQUIPMENT:

    Use of a tripod is important due to the relatively slow shutter speeds you’ll be working with. Generally speaking, a one-third to one-half second shutter speed range does the job. Perhaps there are lenses and cameras with image stabilization which can help you shoot photographs in this shutter speed range handheld, but I always prefer to keep my setup as motionless as possible to achieve sharp images so I use a tripod.

    I also always use a remote shutter release, because pressing directly on the camera’s shutter button can introduce slight vibration into the setup during exposure.

    Ideally you will be shooting a relatively rough surf (more on that later), so choosing a long lens that keeps you and your setup out of harm’s way is important. I typically choose a medium telephoto, such as a 70-200mm zoom, but sometimes a slightly shorter length is necessary to capture a wide enough composition.

    You may also want to bring a circular polarizer which helps mitigate any glare in the water, and should slightly slow down the shutter speed. You may also want to bring a variable neutral density filter in case it is too bright out to get the correct shutter speeds.

    Image002

    PLANNING THE SHOT:

    If you want to shoot large, powerful waves, pick a location that has incessantly high wind. The higher the winds, the larger and stronger the waves will be. You will also want to shoot during the golden hour, either just after sunrise, or just before sunset. These times of day offer a warm, diffused natural light cast over the beach, and create a nicely saturated background sky.

    Get to the location early. Give yourself plenty of time to scout it out, and pick an area where you can ideally compose a combination of high waves crashing into the surf, with a foreground of water flowing to and from the beach. If possible, pick a beach with rocks and boulders scattered amongst the surf. Rocks give the waves an extra punch when they land, and further add the element of unpredictable force and power to the photograph. Also, water gently flowing over rocks in the foreground adds an interesting element to the image.

    When your composition is set (more on that in a minute), put your camera in aperture priority, set your aperture to f/8 or f/11, and fasten the polarizer to the lens. Rotate the filter until you see the sheen or reflection on the water dissipate to its minimum, then stop. Adjust the ISO to reach a desired shutter speed of around 1/3 to 1/2 of a second. Remember, raising ISO one stop speeds up the shutter by one stop, and lowering ISO one stop reduces shutter speed by one stop, (assuming the aperture stays constant). Depending on how bright it is out, you may need a neutral density filter to slow down your camera’s shutter. Many filter manufacturers make one single filter that has both a polarizer and a variable ND filter combined.

    Image003

    Quick Tip: Whenever I use a neutral density filter, I always manually focus before adding the filter. The ND filter will cause your viewfinder to become relatively dark, which makes focusing difficult – sort of like trying to read with sunglasses on in a dimly lighted room.

    Set your camera so that it shoots continuous photos as quickly as possible, in RAW mode, and fire away!

    COMPOSITION AND POST-PROCESSING:

    When you compose the scene, leave plenty of extra space around the intended target. Since your setup will be locked in place on a tripod, you won’t be able to adjust your composition once you’re set. Thus, you’re basically taking an educated guess as to where the wave will eventually land. Once you’re set, wait for a wave that’s inside your composition, and let it loose.

    Image007

    Shooting wider than necessary greatly increases your chances at nailing some good action shots of waves. Once you’re back at the computer, it’s a piece of cake to crop out the edges and tighten in on the action if necessary.

    With respect to post-processing, aside from cropping, the only adjustment you might want to consider is a mild boost in contrast. Added contrast will enhance the water’s punch and power, as seen by the viewer.

    Image004

    Do you have any other tips for photography the awesome power of nature and ocean waves? Please share in the comments below, as well as your wave images.

    googletag.cmd.push(function() {
    tablet_slots.push( googletag.defineSlot( “/1005424/_dPSv4_tab-all-article-bottom_(300×250)”, [300, 250], “pb-ad-78623” ).addService( googletag.pubads() ) ); } );

    googletag.cmd.push(function() {
    mobile_slots.push( googletag.defineSlot( “/1005424/_dPSv4_mob-all-article-bottom_(300×250)”, [300, 250], “pb-ad-78158” ).addService( googletag.pubads() ) ); } );

    The post How To Capture Action Shots of Waves by Jeb Buchman appeared first on Digital Photography School.


    Digital Photography School

  • Nikon releases new firmware for D5: Improves video and adds flicker reduction

    Nikon has released new firmware for its flagship D5 DSLR. There are four main improvements included in firmware v1.10, which address some of the frustrations that we had with the D5 in our full review.  

    Video Recording Upgrades:

    1. Movie maximum recording time extended to 29 minute 59 seconds, including for 4K UHD video
    2. Electronic VR for more stable hand-held Full-HD*1/HD video recording added

    Still Photography Upgrades:

    1. Flicker reduction function for still photography added, minimizing exposure variations
    2. 9-point dynamic-area AF added, offering more selective focus on a moving subject 

    Press release:

    Further advance of Nikon D5 digital SLR camera performance through expanded functions

    Tokyo – Nikon Corporation has released new firmware, C: Ver. 1.10, that expands the functions of its flagship Nikon FX-format digital SLR camera, the D5.

    The D5 has been extremely well received on all fronts, winning such globally prestigious photo and imaging awards as the TIPA Awards 2016, and the Camera GP (Grand Prix) 2016 Readers Award (sponsored by Japan’s Camera Journal Press Club), which is selected through voting by users.

    Nikon has released new firmware for the D5, C: Ver. 1.10, that enhances D5 performance even further. The new firmware offers a major upgrade to the camera’s shooting capabilities, delivering four key improvements. First, the maximum recording time of movies, including for 4K UHD movies, is extended, and three functions — Flicker reduction for still images, 9-point dynamic-area AF AF-area mode, and Electronic VR for movies — are added. In addition to these four major changes, some additional updates* have been applied to the new firmware.

    • *Details regarding “additional updates” are provided on the firmware’s free download page (Nikon Download Center).

    Release overview

    The new firmware is available for download from June 23, 2016. It can be downloaded free of charge from the following URL.

    • *The camera’s current firmware version can be checked using the Firmware version option in the setup menu.

    Four major improvements

    1. Maximum movie recording time, including for 4K UHD movies, extended to 29 min. 59 s

    Movies up to 29 minutes 59 seconds in length can now be recorded at all Movie quality and Frame size/frame rate settings. The new firmware increases the maximum recording time of even 4K UHD (3840×2160) movies from 3 minutes to 29 minutes 59 seconds. In addition, movies are recorded to up to eight separate files, each of which has a file size of up to 4 GB. Separate movie files can be combined to create a single movie using ViewNX-Movie Editor.

    • The maximum recording time for 4K UHD time-lapse movies is 3 minutes.

    2. Flicker reduction for still images added for more stable exposure under lighting that flickers

    When shooting under fluorescent and some other types of artificial lighting, flickering may cause uneven exposure in parts of images and/or variations in exposure and color reproduction characteristics between individual images captured continuously or in quick succession. We have equipped the new firmware with a Flicker reduction function for still images*1 that reduces these effects. When Flicker reduction is enabled, the camera detects peak brightness as light flickers and automatically times shutter release with these peaks in brightness for stable exposure and color reproduction characteristics. This function is effective when continuous shooting is used for indoor sporting events or similar situations captured at fast shutter speeds*2.

    • *1Still images captured during viewfinder photography (not available with mirror up mode).
    • *2The continuous shooting rate may decrease.

    3. 9-point dynamic-area AF AF-area mode added for focusing on a limited portion of a moving subject

    With dynamic-area AF, the camera focuses based on information from surrounding focus points* if the subject briefly leaves the focus point selected by the photographer. The D5 originally supported 25-point, 72-point and 153-point dynamic-area AF. A 9-point dynamic-area AF option has been added with the new firmware. This new option is effective for focusing on a more specific portion of a moving subject.

    • *In dynamic-area AF with 9, 25 or 72 points, the number of focus points actually used may be fewer than 9, 25 or 72, depending on the selected primary focus point.

    4. Electronic vibration reduction function, effective with hand-held recording, added (for HD and full-HD*1 movie recording)

    The new firmware has been equipped with an Electronic VR function that reduces the effects of camera shake with hand-held recording of movies in the FX- or DX-based movie formats (image areas)*2. The effects of camera shake in three directions — vertical (up and down), horizontal (left and right), and rotational (around the center of the lens) — are reduced. This function is effective when recording movies in places or situations in which use of a tripod is prohibited or inconvenient, or when there simply isn’t time to set one up. In addition, electronic VR can be used in combination with the optical vibration reduction (VR) built into a NIKKOR lens for more effective reduction of the effects of camera shake.

    • *1Not available with 1920 x 1080 crop settings.
    • *2The angle of view will be reduced slightly.
    • The effects of electronic VR are also reflected when photos are captured during movie recording (Live frame grab).
    • When Electronic VR is enabled, the maximum sensitivity allowed is ISO 102400, even if ISO sensitivity is set to Hi 0.3 or higher.

    Articles: Digital Photography Review (dpreview.com)

  • Capture One Phase One 9.2 extends support to Pentax K-1 and Nikon D500

    Phase One has updated its Capture One Pro software. Version 9.2 brings support for two notable new DSLRs: the Pentax K-1 and Nikon D500. The update also adds support for premium compacts in Canon’s PowerShot G series as well as minor workflow enhancements. The update is offered at no cost for Capture One Pro 9 customers. Capture One Pro 7 and 8 customers can get the latest version for $ 99/€99.


    Press release:

    Phase One Releases Capture One Pro 9.2

    Unprecedented Power, Precision and Quality

    COPENHAGEN, June 23, 2016 — Phase One, creator of the world’s finest open-platform high-end camera systems and professional imaging software, today released Capture One Pro 9.2. Known for its outstanding tethered capture capability, high-quality raw conversion, and precision image editing tools, Capture One Pro is already considered by many to be the only image capture application for the serious professional photographer. The release of version 9.2 aims at a better culling workflow from selections and metadata sources to accelerate editing workflow to new levels.

    New camera support includes:

    • Pentax K-1
    • Nikon D500
    • Canon EOS M10
    • Canon G5x
    • Canon G7x MkII
    • Canon G9x

    Powerful new workflow features include:

    — Access assets quickly and precisely: Select from file list, select by variant position and create album from selection form a large group of improvements under targeted selections;

    — New rate and cull workflow using “Select Set”: Select a number of images for viewer preview, then advance through the browser by the same number. Navigating within the selection to rate and cull makes editing and comparing fast and efficient;

    — Capture One 9.2’s new color management module for Tiffs gives users more accurate preview returned from retouching/round trip applications – making Tiff handling in Capture One better than ever before;

    — Phase One XF camera users can turbocharge focus stacking workflow with a multi-image round trip to the Helicon Focus application. Shoot, organize, group, process and stack — all in a few clicks;

    — New Shortcut Engine: More functions can be shortcut than ever before! All cursors can now be shortcut, users can navigate the library collections (even when hidden) and shortcut support for the new 9.2 selection methods all help to make the workflow sing.

    “Pro photographers deserve a strong ally to vanquish workflow issues and give them the most reliable, efficient workflow and performance,” said James Johnson, Software Product manager, “Capture One Pro 9.2 is about workflow, not work!”

    For more details on all the new and improved features in Capture One Pro 9.2, including new cameras and lenses supported, please go to: www.phaseone.com/ninetwo

    Availability and Pricing

    Capture One Pro 9 is available now for the Mac and Windows operating systems online at www.phaseone.com/store and from Phase One authorized partners worldwide. www.phaseone.com/partners.

    New customers can purchase Capture One Pro 9 for 299 USD / 279 EUR. Owners of versions Capture One Pro 7 or 8 may upgrade for 99 USD / 99 EUR.

    Capture One Pro is also available by subscription. Existing subscribers can simply download the new Capture One Pro 9 release, as subscriptions are good for all new and previous versions of Capture One Pro. A single-user subscription is 15 USD / 12 EUR per month for a 12-month plan. Please see all subscription options at www.phaseone.com/store

    Articles: Digital Photography Review (dpreview.com)

  • Remembering Fan Ho: 1937-2016

    There are few photographers who have documented Hong Kong’s past in the way that Fan Ho did back in the late 40s and early 50s. Dubbed ‘the Henri Cartier-Bresson of the East’, Ho observed the then British Colony through his Roleiflex, producing iconic images that played with shape and form and captured people going about their daily lives.

    Ho was born in Shanghai in 1931 and moved to Hong Kong at the age of 17 As such, while Hong Kong was always the city he called home, he was able to view it as an outsider. His work was predominantly black & white, but while Ho preferred to shoot with Kodak Tri-X and Plus-X, he was by no means a traditionalist. Ho considered film an equally important medium to stills photography, directing 27 films himself, and was always willing to experiment. “I hate to repeat myself. I’m still finding some new ways of seeing. A new approach, a new kind of experimentation,” he said.

     Approaching Shadow 1954. 

    Between 1958 and 1965 he was named one of the top ten photographers of the world by the Photographic Society of America and received over 280 awards over his career.

    I was lucky enough to speak to Fan Ho for an interview for Time Out Hong Kong back in 2014. He had produced a new book and exhibition of his work, images from his archive that had never been printed, digitally overlaid to produce multiple exposures, with sometimes serious and sometimes humorous results. Over an often poor quality internet call to his house in San Francisco, the 83-year-old spoke slowly but clearly in exceptionally good English. He was funny and self-deprecating; “I’m a simple-minded man,” he said. He admitted he had little knowledge of Photoshop and worked rather more as a director to produce his latest work but he clearly still maintained his passion.

    ‘I’m still finding some new ways of seeing. A new approach, a new kind of experimentation’

    In November 2014, Ho made a trip back to Hong Kong to open his new exhibition in the city and I had the opportunity to meet him in person. Though clearly tired by the busy schedule, he was still the sharp and entertaining man I had spoken to a few months earlier. He seemed truly grateful for all the coverage his work had received without an ounce of pomposity.

    It will be his classic images of Hong Kong streets and fisherman for which Fan Ho will be remembered, but his career was full and varied. He was simultaneously a perfectionist and a rule breaker; a passionate photographer and a gentleman.


    Mat Gallagher is the former managing editor of Time Out Hong Kong and deputy editor of Amateur Photographer magazine. He has worked for a range of consumer titles in the UK, China and Hong Kong. He now writes about technology and travel. For more of his work visit www.matgallagher.com

    Articles: Digital Photography Review (dpreview.com)

  • Brain Food: Vending Machines Offer Books Instead of Snacks

    [ By SA Rogers in Design & Products & Packaging. ]

    book vending machine 1

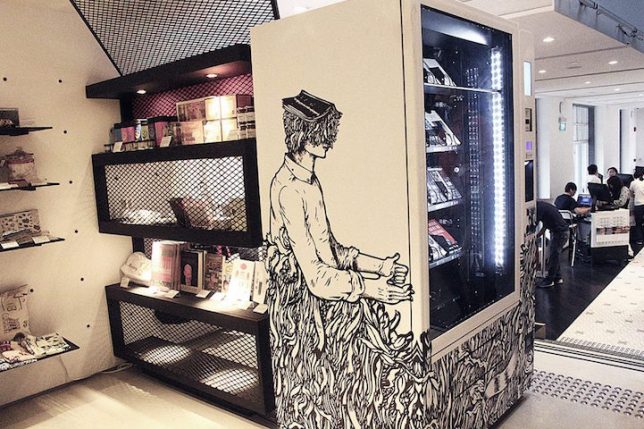
    You can buy all kinds of weird things from vending machines these days – from live crabs to blue jeans to gold bars – but this new iteration is more entertaining than most, and it’ll certainly keep you busy longer than a bag of Skittles. Peruse the covers of a curated selection of books through the glass of these BooksActually vending machines in Singapore for a new distraction on demand. If only this idea caught on everywhere, maybe we’d spend a bit less time standing around staring at our phones.

    book vending machine 6

    Two of the machines are now ready for reading enthusiasts in high-traffic areas, including the National Museum of Singapore and the Singapore Visitor Center. Fittingly for these locations, the selections appear to be Singapore-centric, including books by local authors as well as helpful guides for tourists. Each machine contains about 150 books with up to 22 titles, and the outsides of the machines are painted by local artists to indicate what’s inside.

    book vending machine 3

    “The whole idea is about accessibility and eyeballs,” says Kenny Leck, owner of BooksActually. “There are not enough bookstores in Singapore… these vending machines could be a visual touchpoint. You may not buy [a book] but we’ll let you know these exist. And from there, there could be more possibilities. We start with visual awareness: books where you see a local author’s name. The ultimate place we want to put them are at train stations.”

    book vending machine 5

    Of course, book vending machines aren’t entirely new, though they’re far more popular in Asia than they are stateside. The first book-dispensing machine, called the Penguincubator, was installed in London way back in 1937. An Irish company called ‘A Novel Idea’ installed a machine at London’s Heathrow airport, but went out of business. It’s kind of hard to pick out a book when you can’t even read the back cover, but the concept could work with highly recognizable beach-read-type titles that are about the equivalent of junk food for your brain, anyway.


    Share on Facebook


    [ By SA Rogers in Design & Products & Packaging. ]

    [ WebUrbanist | Archives | Galleries | Privacy | TOS ]


    WebUrbanist

  • Rare Nikon 1200mm F11 pops up on eBay

    A seller on eBay is offering up a Nikon 1200mm F11 super telephoto lens, dating back to the 1970s. A separate AU-1 focusing unit attaches to the lens and drives focus, and is included for the seller’s asking price of $ 5,750. Naturally, the lens features a revolving tripod socket, since your chances of getting sharp images while handholding it would be slim-to-none. 

    If $ 5,750 is a little steep but you’re itching to add a super telephoto prime to your vintage lens collection, the seller is currently accepting offers and claims the lens is in ‘nearly mint’ condition. If you do buy it, could you send us some sample photos for fun? 

    Articles: Digital Photography Review (dpreview.com)