Blog

  • DxOMark confirms Canon EOS 1D X II sensor advances

    This is how the EOS-1D X Mark II’s sensor compares. Its performance sees it rank joint 21st with the Nikon D3X, putting it just ahead of its closest rival, the Nikon D5.

    DxOMark has rated the Canon 1D X II’s sensor, and it looks very competitive for its class. Strong low-ISO dynamic range and impressive high ISO performance earn it a score of 88 – tying with the Nikon D5 despite having an edge in both these areas.

    These results echo our own findings, which showed the latest generation Canon chip offering greater low-ISO DR than previous designs: enough to out-perform the Nikon D5 (whose own performance isn’t particularly good by modern standards).

    However, while it performs well for its class, these numbers are only enough rank it 21st in DxO’s overall sensor score chart, which sees the high-resolution chips in the Nikon D810 and Sony a7R II significantly out-perform it in terms of low light performance, dynamic range and the ability to distinguish between colors. Of course, what these other sensors can’t do is shoot continuously at 16 frames per second, but it’s interesting to see the image quality hit that you currently have to pay to get that high-speed performance.

    Articles: Digital Photography Review (dpreview.com)

  • Google Earth and Maps updated with higher quality satellite imagery

    $ (document).ready(function() { SampleGalleryV2({“containerId”:”embeddedSampleGallery_8496580915″,”galleryId”:”8496580915″,”isEmbeddedWidget”:true,”standalone”:false,”selectedImageIndex”:0,”startInCommentsView”:false,”isMobile”:false}) });

    Google has updated both Google Earth and Google Maps with higher-quality satellite imagery using images mostly taken by NASA and the USGS’s Landsat 8. According to the company, the refreshed imagery provides truer colors and greater detail in comparison to the previous content captured by Landsat 7, helping provide what Google calls its ‘freshest global mosaic to date.’

    The company pored over more than 700 trillion pixels’ worth of Landsat images to choose the clearest photos. Before this imagery refresh, Google’s mapping products included satellite imagery captured, in same cases, nearly two decades ago. Google has rolled out the new images to all of its mapping products; the content can be viewed on both the ‘satellite’ layer on Google Maps and on Google Earth.

    Via: Google Lat Long Blog

    Articles: Digital Photography Review (dpreview.com)

  • Beast of a Bicycle! Mechanical Modification With a Spider-Like Walk

    [ By SA Rogers in Art & Sculpture & Craft. ]

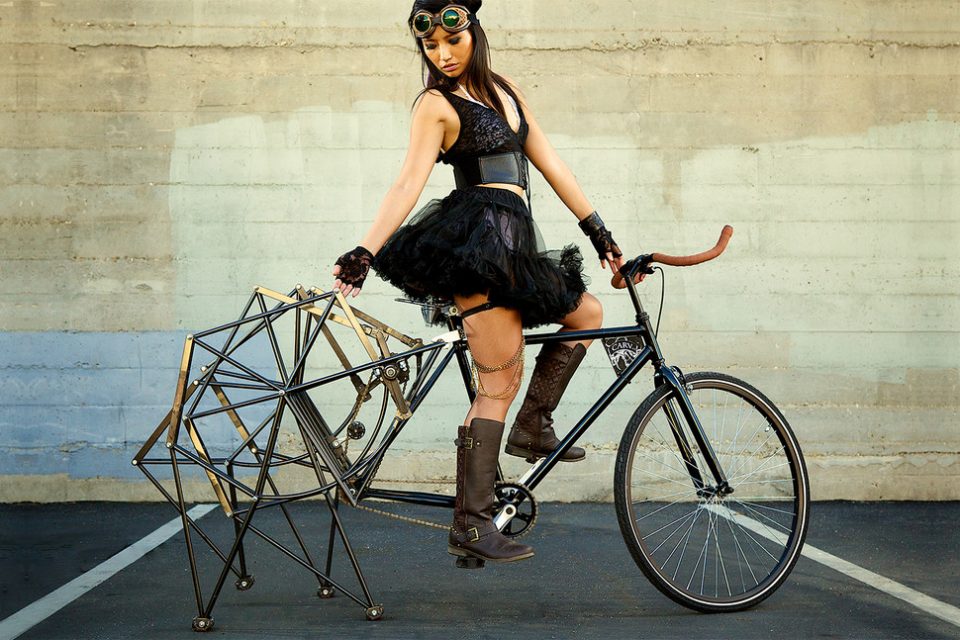
    strandbeest bike 1

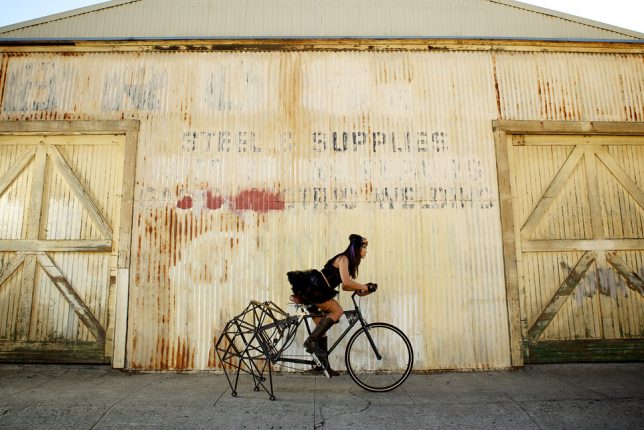
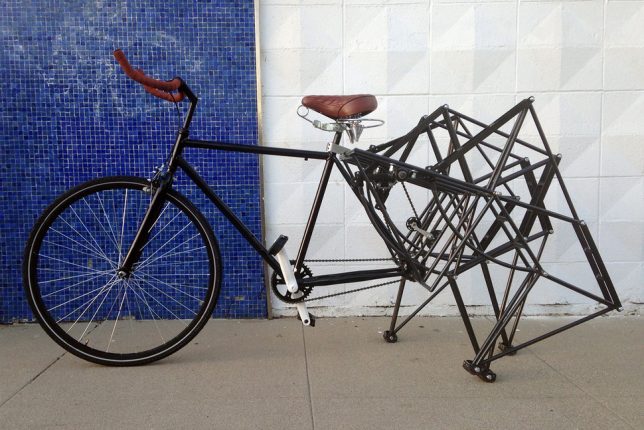
    This bizarre new take on the Strandbeest bicycle isn’t going to get you from point A to point B much faster than a casual stroll, but it’s fun to watch, with the rear mechanical mechanism ‘walking’ in spider-like motions. Borrowing from the wind-powered kinetic sculptures pioneered by Dutch artist and engineer Theo Jansen, this new creation by Californian collective Carv is half bike, half beast with a front wheel, three functional legs and over 450 handmade components. The designers started with a simple blueprint of Theo Jansen’s rod-linking technique, which he describes as “skeletons which are able to walk on the wind.”

    strandbeest bike 2

    strandbeest bike 4

    It took Carv a whole seven months to develop and build the bike, with the assembly of the rods alone taking three days. Whereas Jansen’s walking sculptures use sails and wind to generate movement, the bike uses pedal power. The designers used a single-speed bike from Walmart as the base and added the rear linkage. Get the technical details here.

    An earlier version of the ‘walking bicycle’ by Hanno Smits also uses pedal power, but takes out both wheels, opting for a full walking mechanism that seems to navigate a little more smoothly. The Panterragaffe, a third version, is a two-person pedal-powered walking machine conceived as a public performance piece.

    strandbeest opt

    It’s hard to deny that Jansen’s original sculptures are just plain cooler and more interesting, though, no matter how many hybrid knock-offs people try to make. Still tempted to try it, or just want to know more about how they work? Jansen sells a few books as well as DVDs and miniature ‘beasts’ on the Strandbeest website.

    Share on Facebook


    [ By SA Rogers in Art & Sculpture & Craft. ]

    [ WebUrbanist | Archives | Galleries | Privacy | TOS ]


    WebUrbanist

  • ZTE nubia 11 features optical image stabilization and plenty of storage

    Chinese manufacturer ZTE has launched its latest flagship-level device, the nubia Z11. Looking at its specifications the new model has the potential to be a serious alternative for mobile photographers for several reasons. On paper, the camera module looks very similar to the one on the recently unveiled OnePlus 3 and comes with a 16MP Sony IMX298 1/2.8″ sensor that offers on-chip phase detection and a pixel size of 1.12 micron. The lens is protected by a sapphire glass element and  comes with a fast F2.0 aperture and an optical image stabilization system. The front camera captures 8MP images on a sensor with a 1.4 micron pixel size. The lens on the front module covers a wide angle view of 80 degrees and features a F2.4 aperture.

    Photographers and frequent video shooters will also like the generous on-board memory. The Z11 comes in two versions, either with 4GB of RAM and 64GB of storage, or 6GB of RAM and 128GB of storage. On both models storage can be further expanded via a microSD-slot.

    Photos can be viewed and edited on a 5.5-inch Full-HD display that is protected by Gorilla Glass 3, and inside the Android 6.0 OS is powered by Qualcomm’s current top-end chipset Snapdragon 820. A fingerprint reader increases security and the 3,000 mAh battery supports Qualcomm’s Quick Charge 3.0 standard. The high-end components are built into an elegant looking all-metal case with extremely thin display bezels. In China the nubia Z11 will be available from July 6 at approximately $ 375 for the model with 4GB RAM and $ 525 for the higher-end version. No information on availability in other markets is available yet.

    Articles: Digital Photography Review (dpreview.com)

  • Sony delays 70-200mm GM lens until September

    Sony has said that the FE 70-200mm F2.8 GM OSS lens for its E-mount cameras is to be delayed until September. When the lens was announced in February this year the company expected to be delivering the tele-zoom to stores this month. No reason is given for the delay, but the statement thanks users for their patronage and apologies for the inconvenience.

    Along with the zoom the company will also push back the release of the two tele-converters that are supposed to go with it – the SEL14TC 1.4x converter and the SEL20TC 2x converter.

    The FE 70-200mm F2.8 GM OSS is part of a new G Master range of lenses designed with the company’s full frame a7 series of cameras in mind – though they are also compatible with the APS-C models. Other GM lenses announced along with the 70-200mm F2.8 are the FE 24-70mm F2.8 GM and the FE 85mm F1.4 GM.

    For more information see the Sony website.

    Articles: Digital Photography Review (dpreview.com)

  • How to Create a Dramatic Cinematic Style Portrait Using Photoshop Color Grading

    Cinematic style portraits are personally one of my favourites. What I like the most about them are the desaturated colours and the dramatic ambience.

    Before we start the tutorial on colour grading, I will give you some of my best tips to achieve this cinematic look:

    • Use a large aperture, something between f/1.4 and f/2.0. If you have a long lens then you can also use that. The idea is to have a nice background bokeh (when things in the background are blurred). You also want to have nice separation between the model and the background.
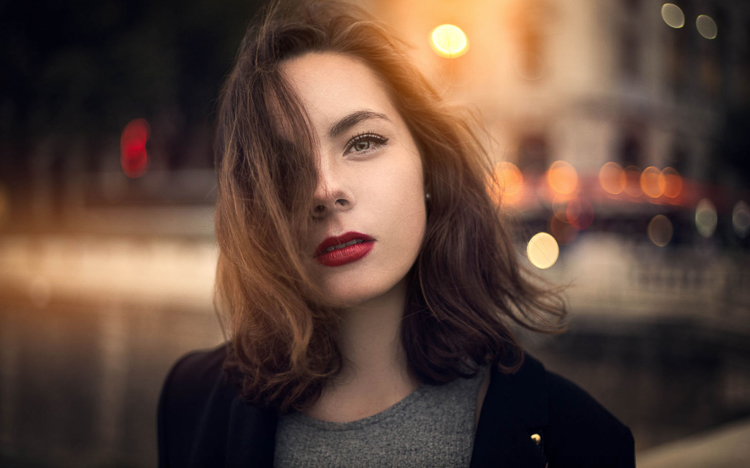
    IMAGE 1

    • If you’re shooting indoors with strobes, then try to add ambience by adding shadows to the model’s face. You do not want flat lighting, it is boring.
    • If somehow you can’t get the dramatic lighting, don’t hesitate to enhance the contrast with some dodging and burning in Photoshop.
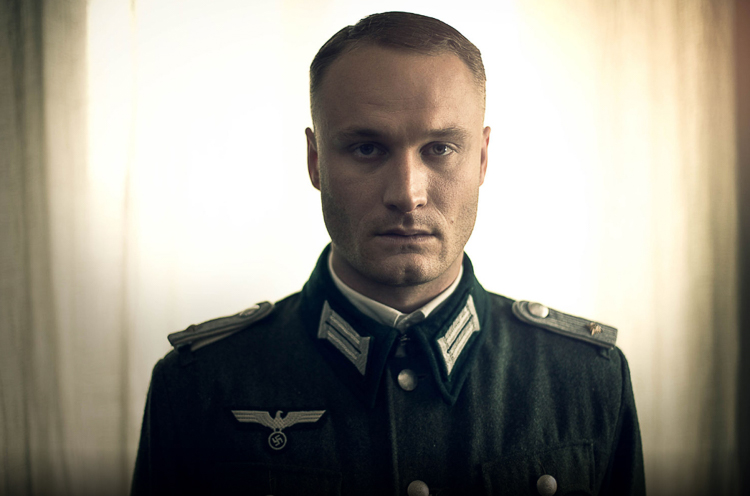
    IMAGE 2

    • If you’re shooting outside, the I recommend shooting right after sunset. You will get nice soft light on the model’s face, and you will also have city lights behind them, to really get a cinematic feel. This only works with a large aperture, and it adds another point of interest.
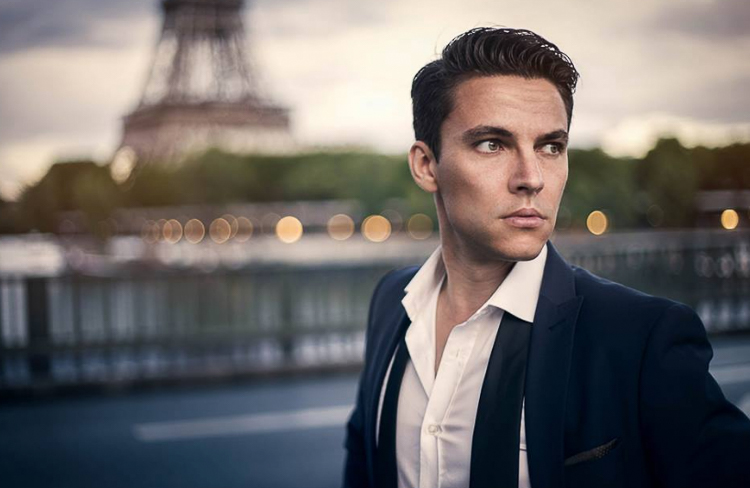
    IMAGE 3

    • Your model should have a strong expression on their face, especially if it’s a male. Cute smiling images do not really work that well with this style.
    • Leave some space in the frame. You do not want your model to take up the whole frame, so leave some space around them, to add context to your image. You can get better results if the viewer is able to locate the spatiotemporal context of your image.
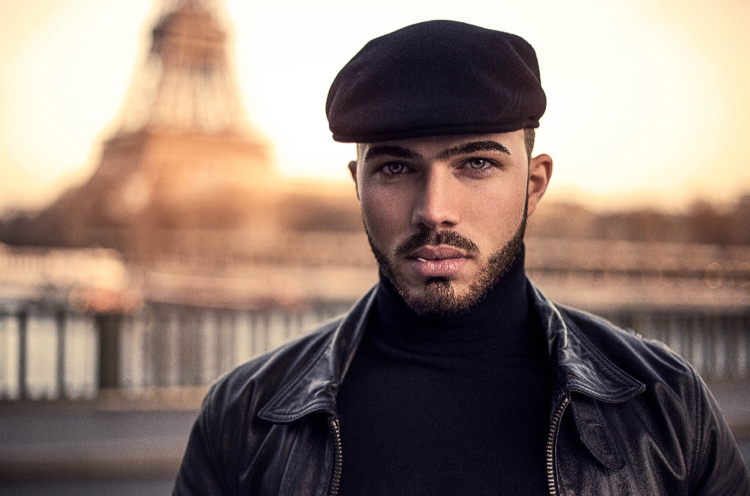
    IMAGE 4

    • Your model should not wear something too flashy (something like pink or yellow), limit their clothes to sombre, subdued colours.
    • Try to use complementary colours as much as possible, it creates nice depth to your images. Usually in movies, the actor is either in blue and the background in yellow/orange, or vice versa. Try to keep your actor in a range of cold colours and your background in warm colours, it works the best. The opposite also gives you good results.
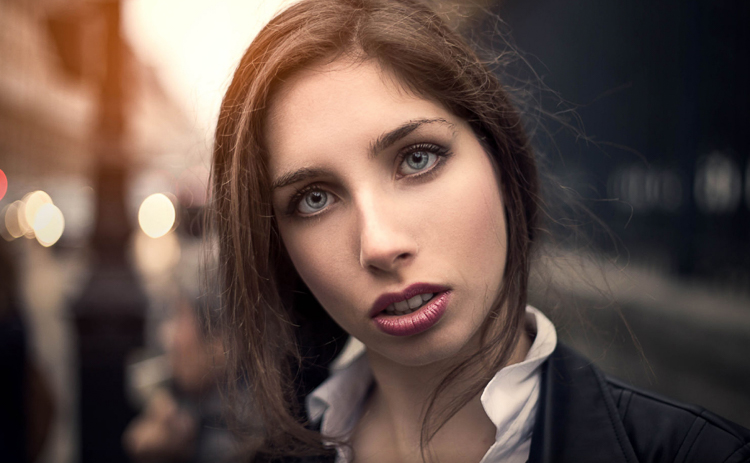
    IMAGE 5

    • The most important thing is that your model should look like a character. Try to add accessories, clothes, or poses that make the character look credible. You can discuss with the model or stylist before the session, the look you want to give to your images, and have a look together at the wardrobe.
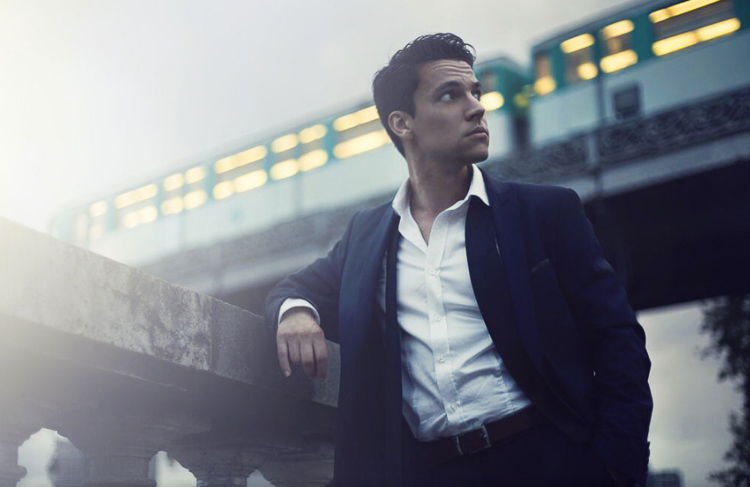
      IMAGE 6

    Color Grading in Photoshop

    For the colour grading tutorial I am going to work on this image:
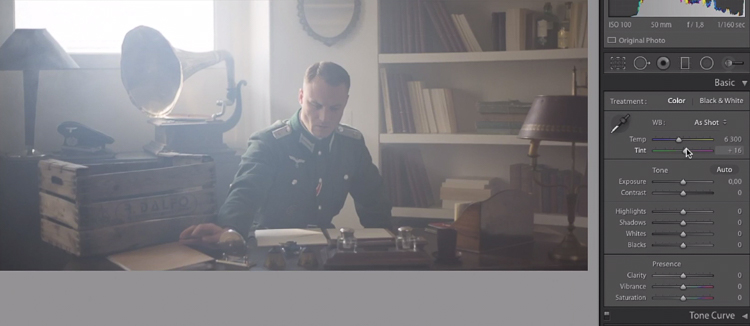
    IMAGE 7

    This image was taken on a Canon 6D, with an aperture of f/1.8, on a 50mm lens. This was taken during a short film where I was the photographer. There was a lighting behind the window aiming at the model, we added some fog to create this 1945 look.

    What we’re going to do with this image is bring it back to life, by enhancing the contrast between the yellows in the highlights, and the greens in the shadows. We’re going to have a colour scheme based on analogous colours, going from green to yellow.

    Let’s start with some basic exposure correction on Lightroom, this will depend on your image, so adjust accordingly.
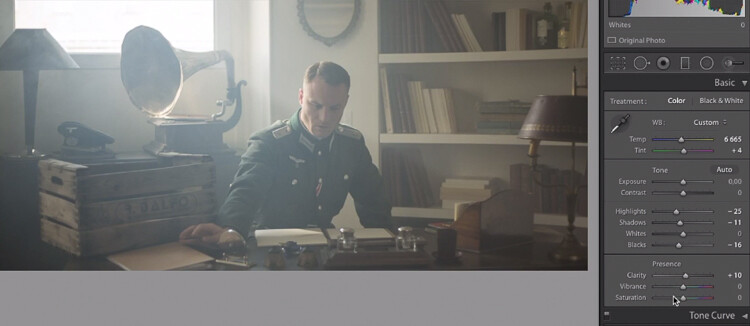
    IMAGE 8

    Do basic adjustments in Lightroom, or your program of choice, first.

    After the basics are done let’s move the image over to Photoshop to start our colour grading. If you are using Lightroom just right click and choose Edit in Photoshop.

    First, duplicate the layer in Photoshop so that you won’t do any destructive editing. You can always go back to the original layer if you don’t like the results.
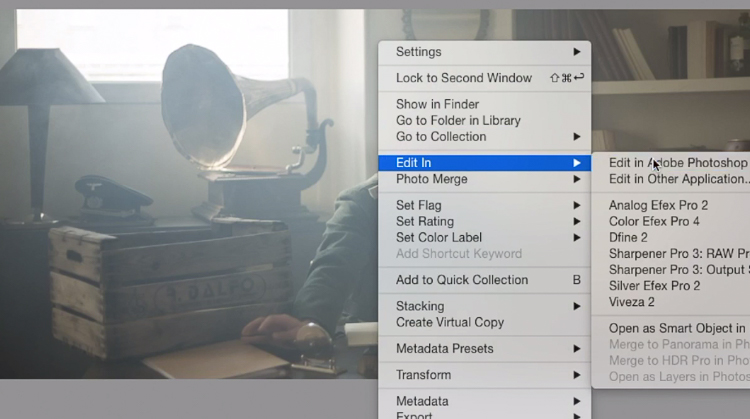
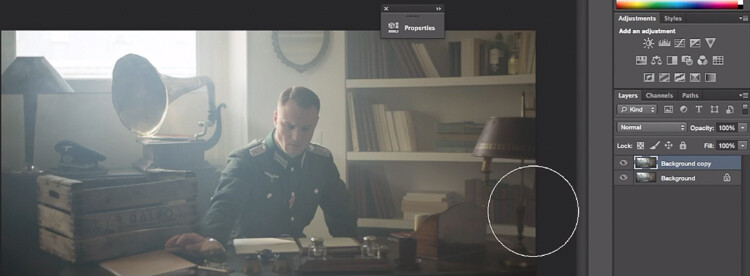
    IMAGE 9

    IMAGE 10

    Make a duplicate layer.

    The first thing we’re going to do is to create a new layer adjustment, go to: Layer > New Adjustment Layer > Color Lookup…
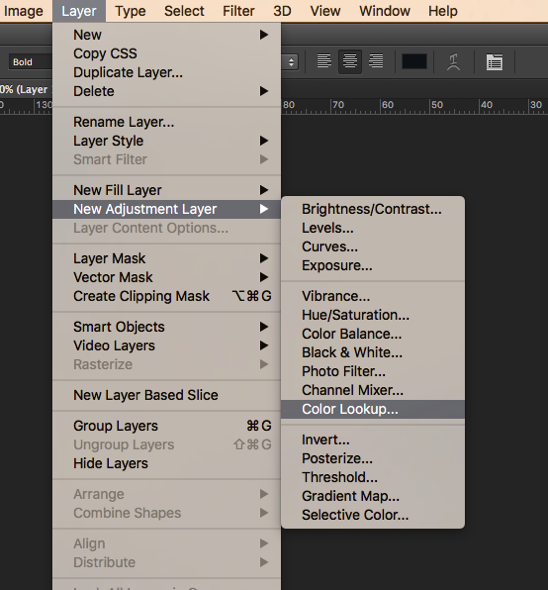
    Screen Shot 2016 06 23 at 2 08 13 PM

    Pick filmstock_50.3dl and reduce the opacity of the layer to around 20%. You need to reduce the opacity otherwise the effect is going to be too strong.
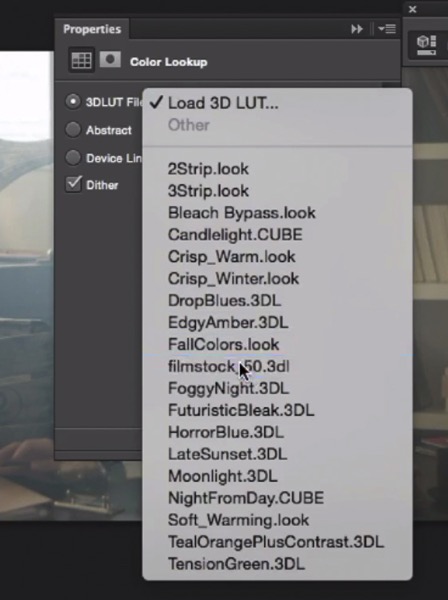
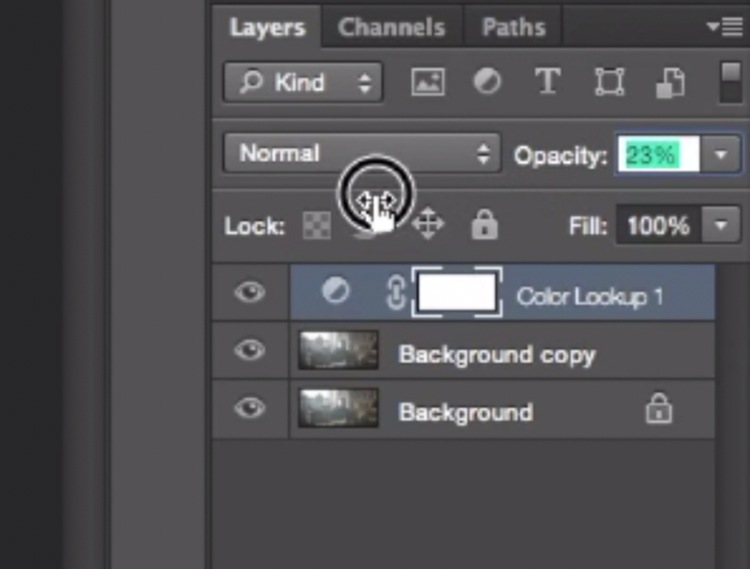
    IMAGE 12

    IMAGE 13

    Next thing we’re going to do is create a curves layer and redo the contrast. This will really depend on your image, so adjust according to your taste.
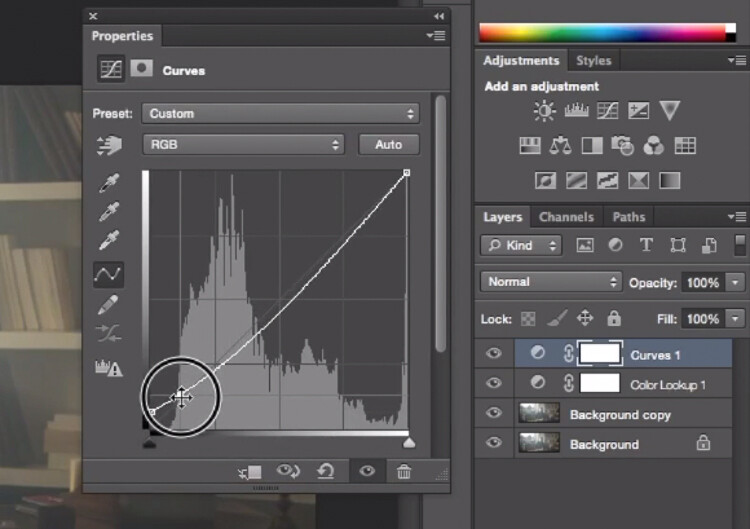
    IMAGE 14

    Adjustment layer Curves to add contrast.

    Then create another curves layer, go to the blue curve and lower the top right extreme of the layer. This will add yellow to your shadows.
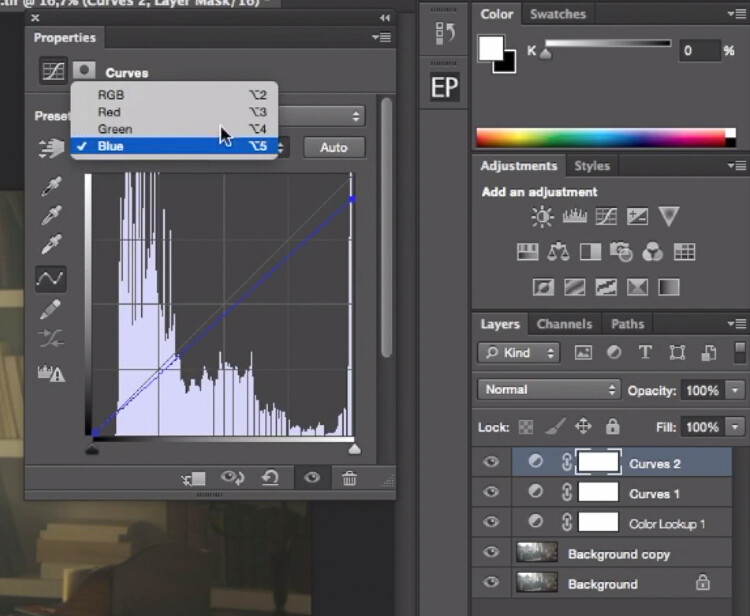
    IMAGE 15

    Add yellow to the shadow areas using this curve adjustment

    Next step is to play around with the colour balance (make another new adjustment layer) to enhance to greens in the midtones and the yellows in the highlights. Once again just the sliders to add green and yellow to both the highlights and the midtowns.
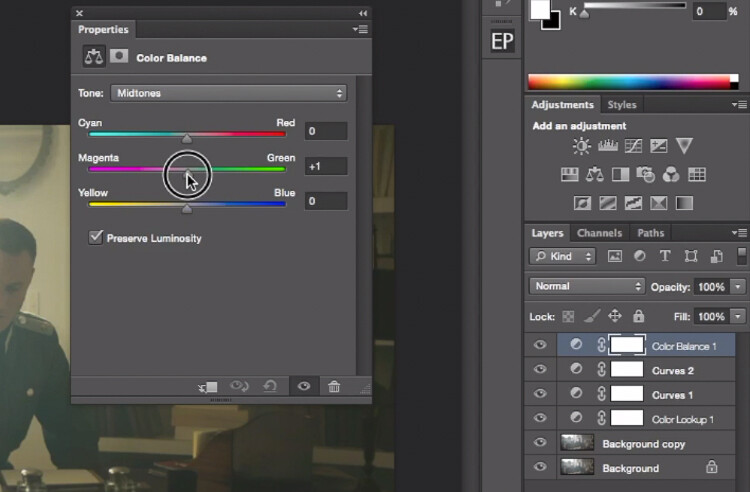
    IMAGE 16

    Select Midtones from the pull-down menu and add green and yellow.
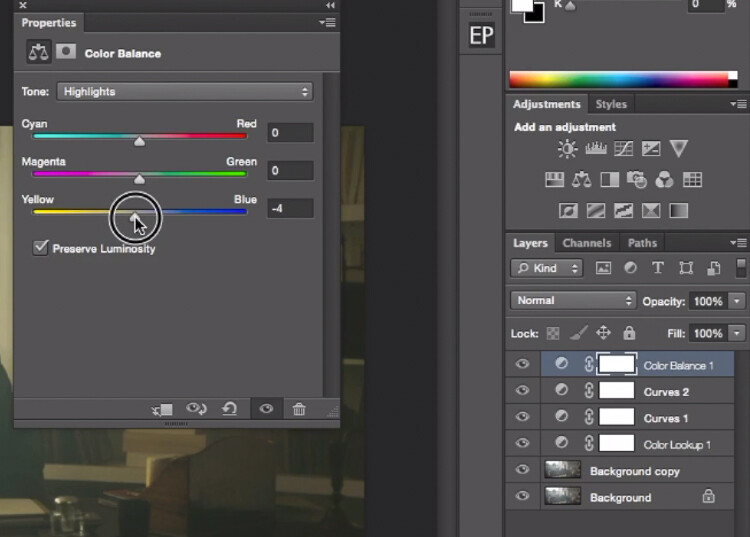
    IMAGE 17

    Select Highlights from the pull-down menu and add green and yellow.

    Right now, we are basically done with colour grading. Lastly is to quickly dodge and burn, to enhance the light coming from the window, and to darken the image and the background. We are basically doing a manual vignette.

    To lighten up the image, create a curves layer, make it brighter, and add a black layer mask (CMD/CNTRL+I to invert the layer mask). Call the layer Dodge, and paint with a white brush (because the mask is black) in the spots where you want to brighten up the image. Pick a brush with an opacity around 40% with and edge hardest of 0%

    To create a dark layer, we will basically do the same thing but darken up the curves layer and paint over the spots in the image we want darker.
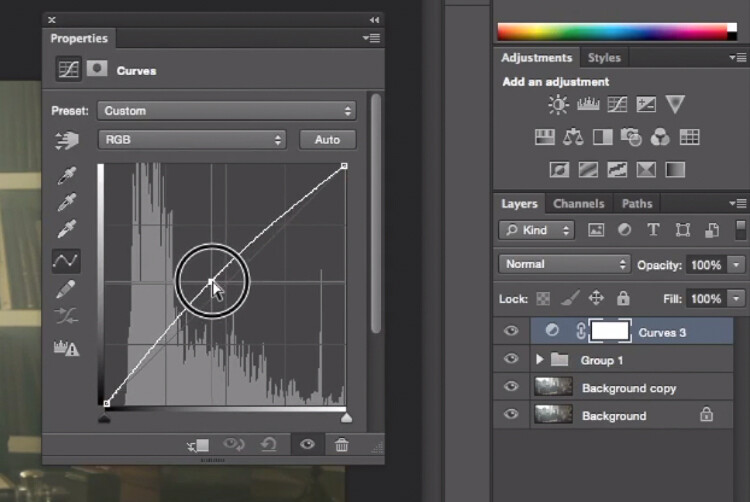
    IMAGE 18

    This Curves adjustment layer is for dodging or lightening areas of the image.
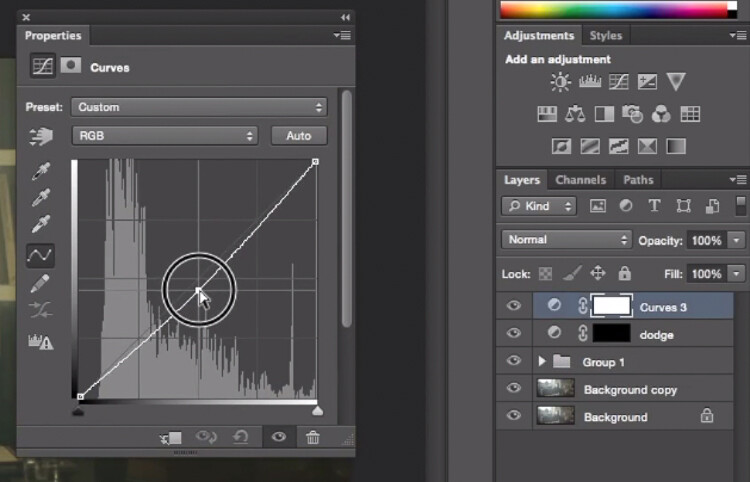
    IMAGE 19

    This Curves adjustment layer is for burning or darkening areas of the image.
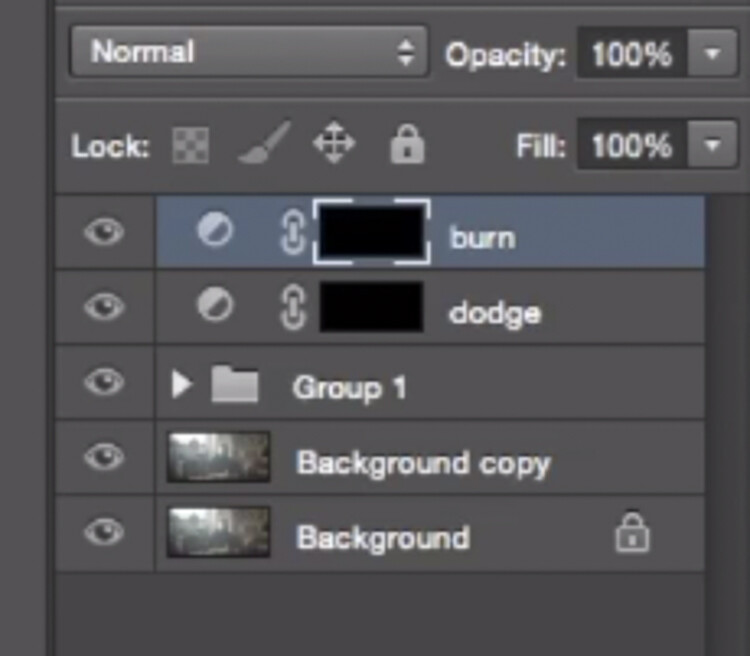
    IMAGE 20

    Rename your layers to identify them easier.
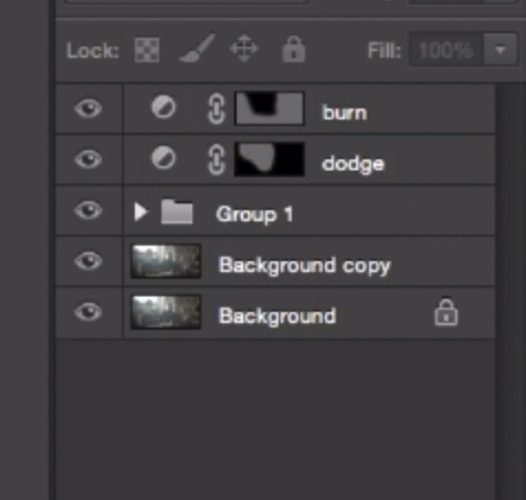
    IMAGE 22

    This is the final result:

    IMAGE 23

    Conclusion

    Cinematic portraits rely heavily on great colour grading – but the lighting, model, camera settings and ambience should not be neglected. It all starts with a great image and ends with Photoshop to enhance your vision.

    Enjoy the art !

    googletag.cmd.push(function() {
    tablet_slots.push( googletag.defineSlot( “/1005424/_dPSv4_tab-all-article-bottom_(300×250)”, [300, 250], “pb-ad-78623” ).addService( googletag.pubads() ) ); } );

    googletag.cmd.push(function() {
    mobile_slots.push( googletag.defineSlot( “/1005424/_dPSv4_mob-all-article-bottom_(300×250)”, [300, 250], “pb-ad-78158” ).addService( googletag.pubads() ) ); } );

    The post How to Create a Dramatic Cinematic Style Portrait Using Photoshop Color Grading by Yacine Bessekhouad appeared first on Digital Photography School.


    Digital Photography School

  • Peruse Your Illusions: 21 Mind-Bending Urban Works of Art

    [ By SA Rogers in Art & Street Art & Graffiti. ]

    illusions main

    Optical illusion art brings a bit of magic to the streets, using paint, paste-ups or photographic tiles to transform urban surfaces into massive sinkholes, bizarre portals and mysterious doors offering entrance to places unknown. Three-dimensional objects seem to float in midair, people walk across vertical surfaces and entire buildings seem to be melting beneath the sun in these fun works of large-scale urban art.

    Graphic Wormhole Mural by Astro

    mural astro 1

    mural astro 2

    astro 2

    astro 3

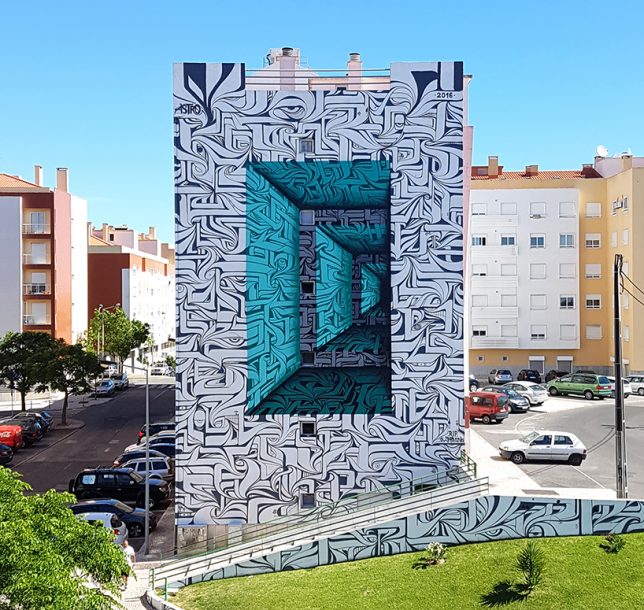
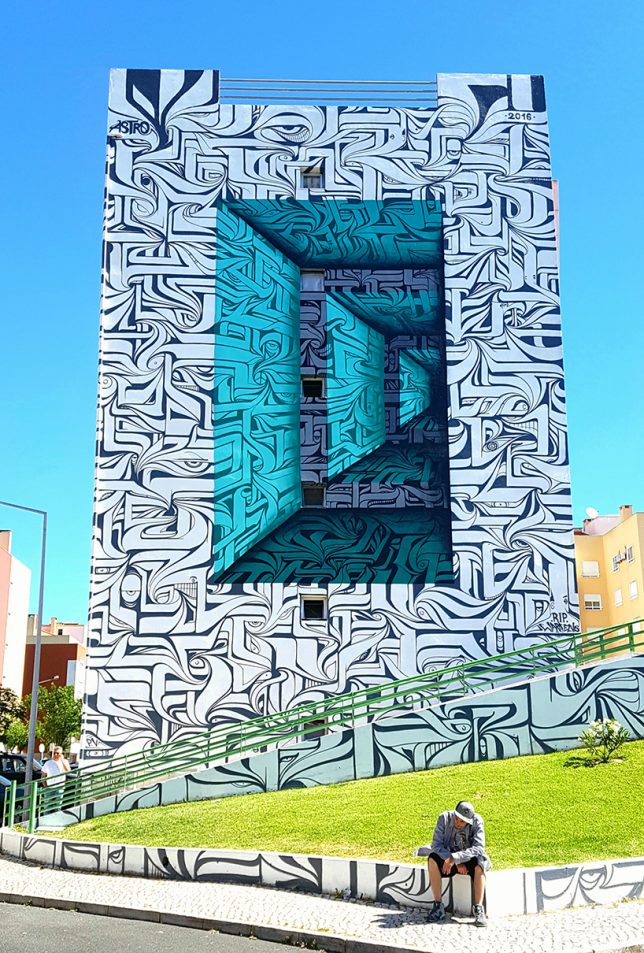
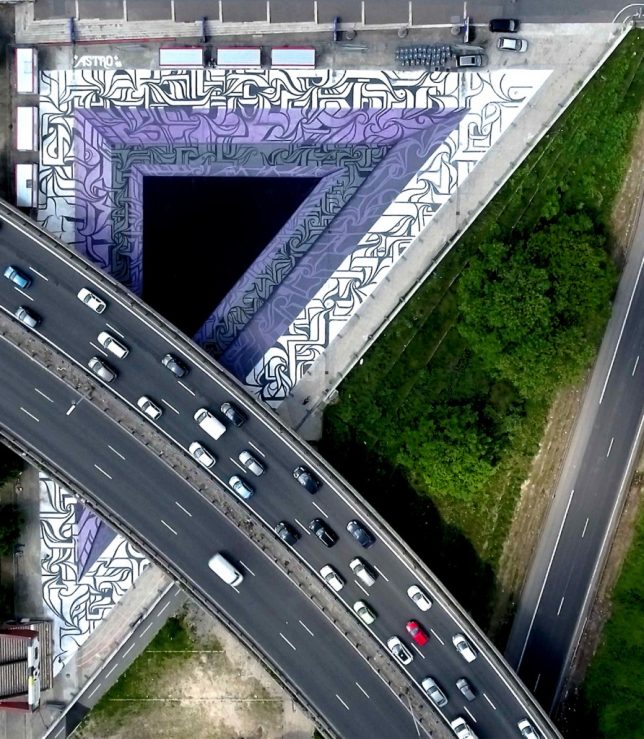
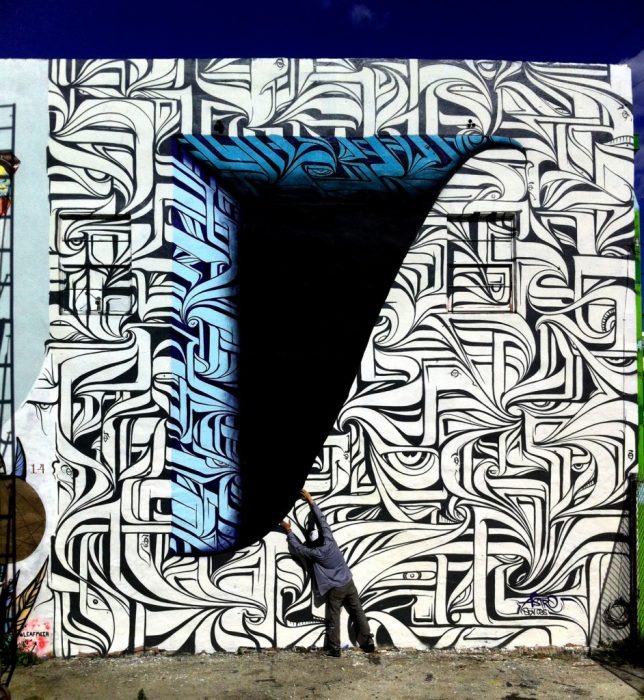
    A huge, boring side wall of an apartment building in Loures, Portugal just got a lot more fun to look at with the addition of a massive optical illusion mural by the street artist ‘Astro,’ who made it seem like a blue abyss. The artist has completed similar illusions in other spots, like a patch of concrete beneath an overpass.

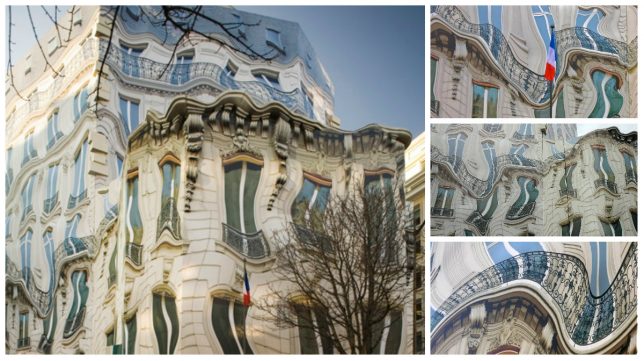
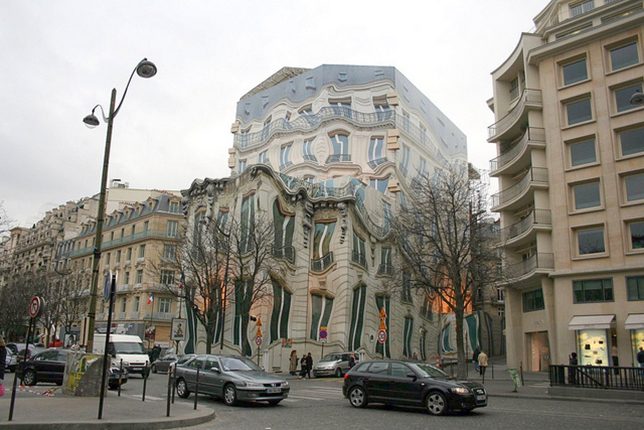
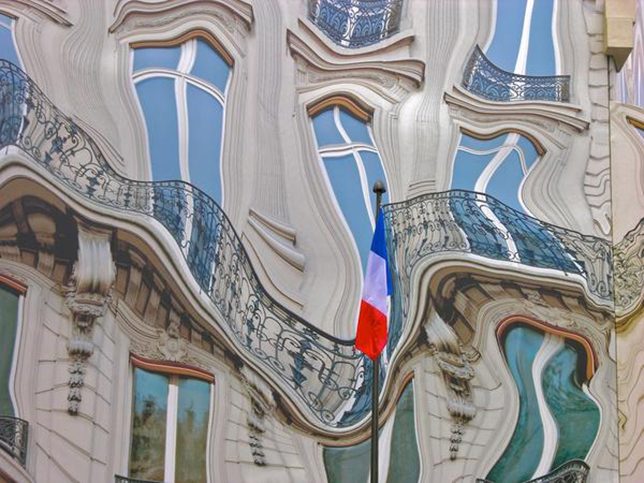
    Melting Facade in Paris

    mural illusion facade

    mural illusion facade 2

    mural illusion facade 3

    A mural added to the entire exterior of a building in France makes it look as if the structure is melting like a Dali clock. Imagine walking down an alley while under the influence and then looking up to see this. It’s disconcerting enough as it is.

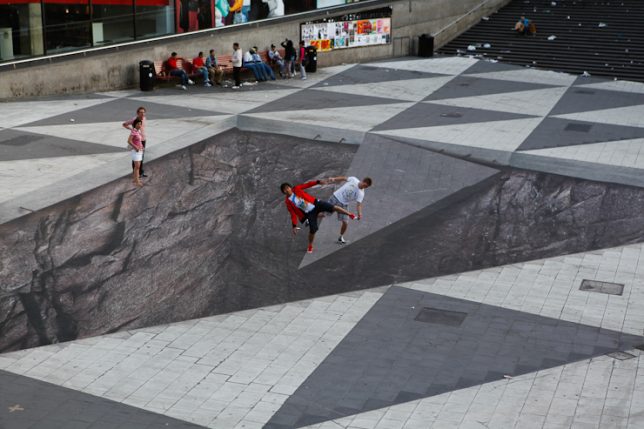
    Mind Your Step by Erik Johansson

    mural mind your step 1

    mural mind your step 2

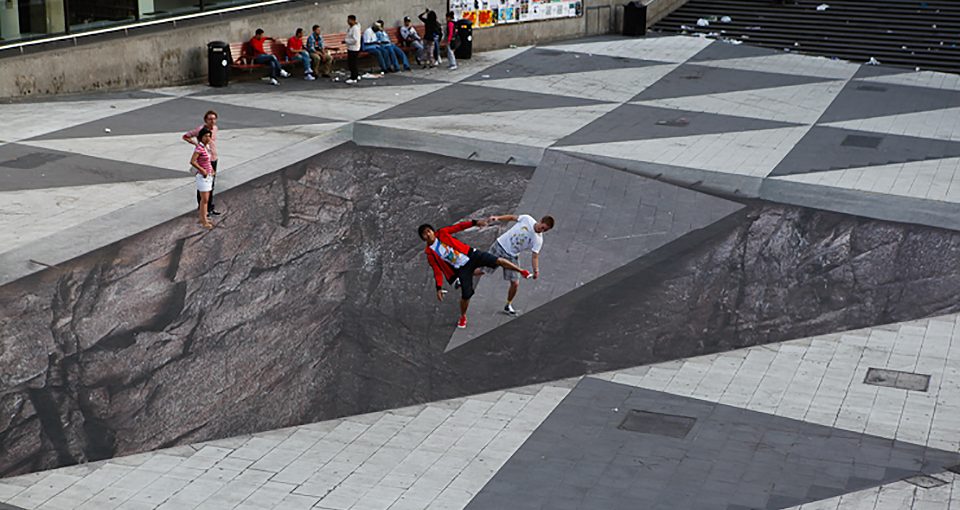
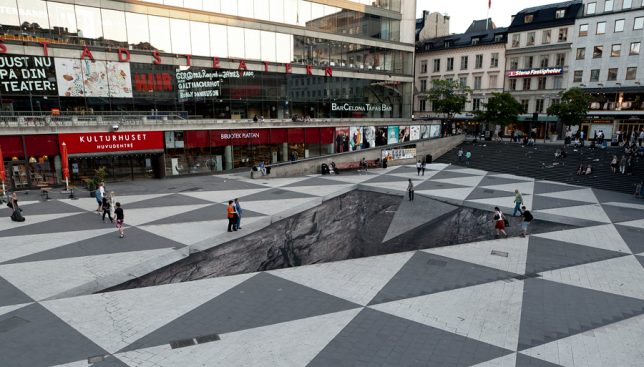
    Pedestrians crossing Stockholm’s Sergels torg square either dangle dangerously close to a giant sinkhole or appear to miraculously walk right over it while interacting with an amazing street art illusion by artist Erik Johansson. ‘Mind Your Step’ was created off-site and assembled using large printed sheets, with a yellow platform indicating where passersby should stand to make the illusion come together.

    Skrapan Illusion by Erik Johansson

    mural skrapan

    mural skrapan 2

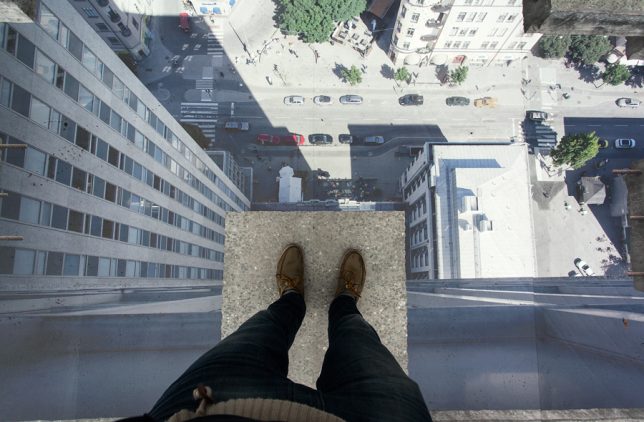
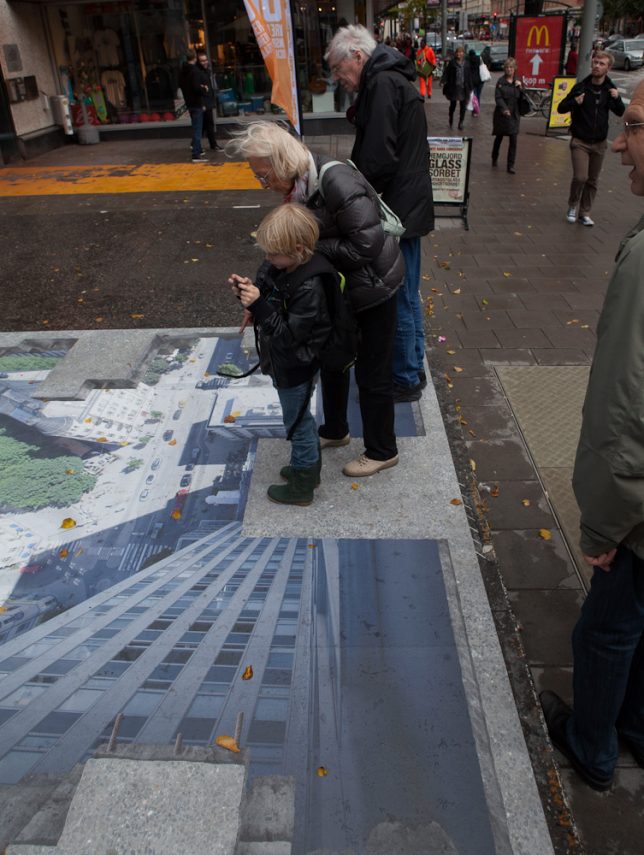
    Equally fun is Johansson’s ‘Skrapan Illusion,’ commissioned in the summer of 2012 for a Stockholm shopping center. The artist’s rendering of a city as seen from a perilously high vantage point is so realistic, you could get a bit of vertigo standing on the ‘edge.’

    3D Portals by 1010

    murals 1010 1

    murals 1010 2

    murals 1010 3

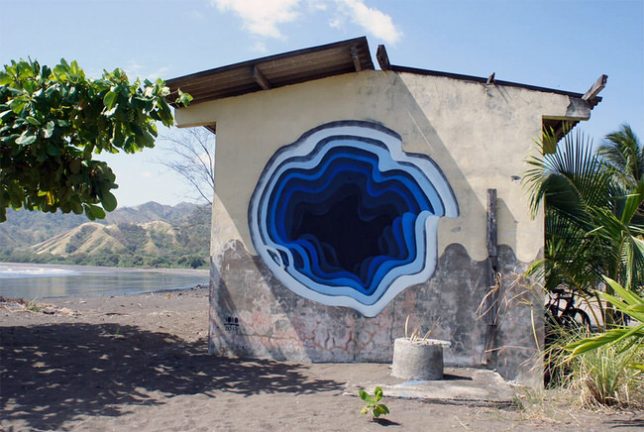
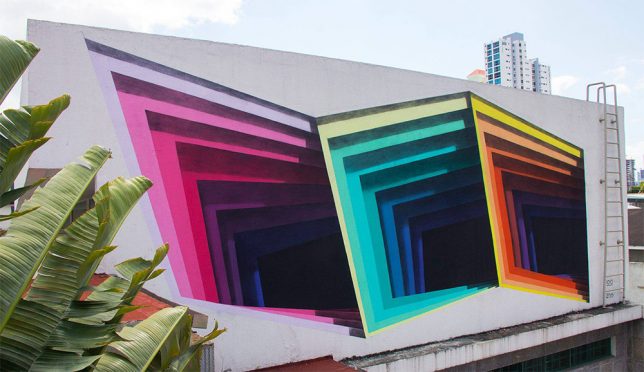
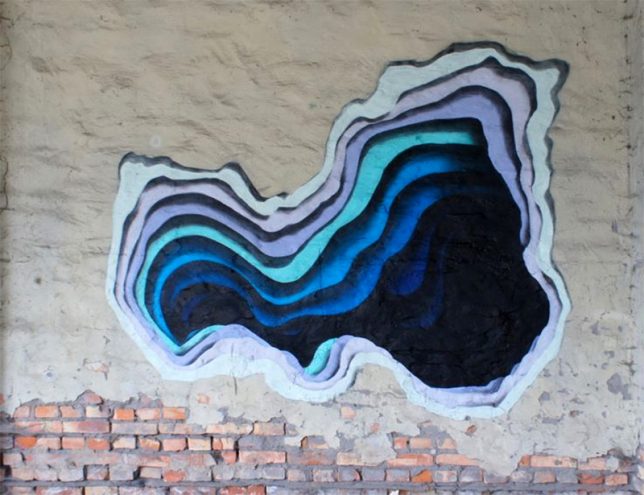
    Surprisingly colorful inner layers of exterior walls seem to have been peeled away to reveal the pitch blackness inside, making it seem as if each building contains some kind of intriguing mystery. Germany-based street artist 1010 started with small framed paper cuts and then realized he could achieve the same effect with paint on a large scale. “I call them holes, abyss, passage or portals, names that leave enough space for interpretation and projection for the viewer.”

    Next Page – Click Below to Read More:
    Peruse Your Illusions 21 Mind Bending Urban Works Of Art

    Share on Facebook


    [ By SA Rogers in Art & Street Art & Graffiti. ]

    [ WebUrbanist | Archives | Galleries | Privacy | TOS ]


    WebUrbanist

  • Macro Maven: An Interview with Ithalu Dominguez

    Whenever we scroll up on an Instagram from @itha_mar, we *marvel* at her amazing knack for snapping super close-up macros, of Mother Nature’s handy work.

    She’s no professional with a fancy bunch of gear, and specially trained bugs that stay extra still.

    Ithalu shoots mostly with her phone. A phone! Just like that one you’ve got right there.

    So, we caught up with her to find out all her secrets (in hopes of mastering bug-ography ourselves).

    (…)
    Read the rest of Macro Maven: An Interview with Ithalu Dominguez (745 words)


    © laurel for Photojojo, 2016. |
    Permalink |
    No comment |
    Add to
    del.icio.us

    Post tags:


    Photojojo

  • The price is right: Canon EOS Rebel T6 / 1300D Review

    Key Features

    • 18MP APS-C CMOS sensor
    • 9-point autofocus system
    • 1080/30p video capture
    • Fixed 3″ 920k-dot LCD
    • ISO 100-6400, expandable to 12800
    • 3 fps burst shooting
    • Wi-Fi with NFC

    The Canon EOS Rebel T6 / 1300D is an entry-level DSLR targeted toward first-time ILC users and smartphone upgraders. Built around an 18MP APS-C sensor, the T6 offers Wi-Fi with NFC for easy photo sharing when you’re out-and-about, and adds a faster processor compared to its predecessor, the Rebel T5.

    Its closest competitor in the category is the Nikon D3300, which was announced in January 2014 and is getting a little long in the tooth at this point.

    As per Rebel tradition, the T6 packages up some tech borrowed from previous-generation higher end models, and that’s no bad thing. It offers a 9-point AF module, 1080/30p video and built-in Wi-Fi with NFC. Battery life is a very respectable 500 shots per charge, putting it near the top of its class in that respect. But one of the T6’s headline features isn’t on the inside of the camera at all, it’s written on the outside of the box: that sweet $ 500 price tag with lens.

    The T6 is better tuned to a beginner’s needs and hits an aggressively low price point

    Offering tech handed down from previous generations at a very reasonable price is what the Rebel line has traditionally done best. The original Digital Rebel is just about 13 years old, and was essentially a single-dial 10D in a plastic body, priced at $ 1000 with kit lens – a breakthrough price-point for DSLRs at the time. As well as being cheaper still, the T6 is a vastly more capable camera than that pioneering Rebel, and better tuned to a beginner’s needs. 

    In short, with the T6, Canon has gathered up various components it had lying around on the shelf from Rebels past and put them together in an aggressively priced bundle. Smart business move for Canon, but is it the best way to spend your $ 500? Read on. 

    Articles: Digital Photography Review (dpreview.com)

  • Sony Alpha SLT-A68 real-world samples

    The Alpha SLT-A68 is Sony’s entry-level Translucent Mirror camera and the follow-up to the a58. Despite its position in the entry-level class, it borrows many components from its big brother, the Sony SLT- A77 II. This includes a 79 point AF system with 15 cross-type points, Bionz X processor and a stabilized sensor. It all adds up to quite a lot of camera.

    The weather is just starting to really warm up here in Seattle and the long days offer plenty of sun-filled hours for shooting. We’ve been out and about with the a68; click the link below to get a sense of its real-world image quality.

    Articles: Digital Photography Review (dpreview.com)