Blog

  • Fighting the elements: Landscape photography in Antarctica

    $ (document).ready(function() { SampleGalleryV2({“containerId”:”embeddedSampleGallery_0745152892″,”galleryId”:”0745152892″,”isEmbeddedWidget”:true,”standalone”:false,”selectedImageIndex”:0,”startInCommentsView”:false,”isMobile”:false}) });

    When most photographers want a new accessory or piece of gear to help them get a shot, they can usually pick it up at a local store or online. But when you’re a photographer living in Antarctica, you have to be a little more resourceful.

    Josh Swanson has spent 16 seasons working in Antarctica and photographing its landscapes. Starting with a disposable film camera and now shooting with a Nikon DSLR, Swanson has learned the ins and outs of shooting panoramas in one of the most unforgiving environments on earth.

    For example, when he began running into issues with elements in his panoramas not aligning correctly, he discovered that a specialized bracket would help sort things out. He tells Resource Travel, ‘…being on the ice I was not able to get one (planes don’t regularly arrive during the winter which means no mail service). I ended up just building one. It worked for the season, although I later replaced it with a manufactured one for that had degree increments etc. for faster more accurate pans.’

    As you’d expect, he’s also had trouble with LCDs freezing and battery life plummeting in the cold weather. He tells Kira Morris, a fellow photographer and former Antarctic resident, all about it over at Resource Travel. 

    Articles: Digital Photography Review (dpreview.com)

  • 6 Ways of Using Reflector to Take Better Portraits

    I’ve been making my living as a photographer for over 20 years, and have accumulated thousands of dollars of gear over time. I have the latest Canon SLRs, a full complement of lenses, strobes, light stands, gels, filters, soft boxes, tripods, and even some video and audio gear. But the one thing that often makes the biggest difference in the quality of my portraits is a simple $ 20 reflector. I never leave home without it and neither should you.

    When shooting outdoor portraits, the first thing many photographers think about is the background, but the pros consider the quality of the light first and foremost. They know, for example, that a portrait with nasty overhead lighting is not going to work, no matter how cool the background.
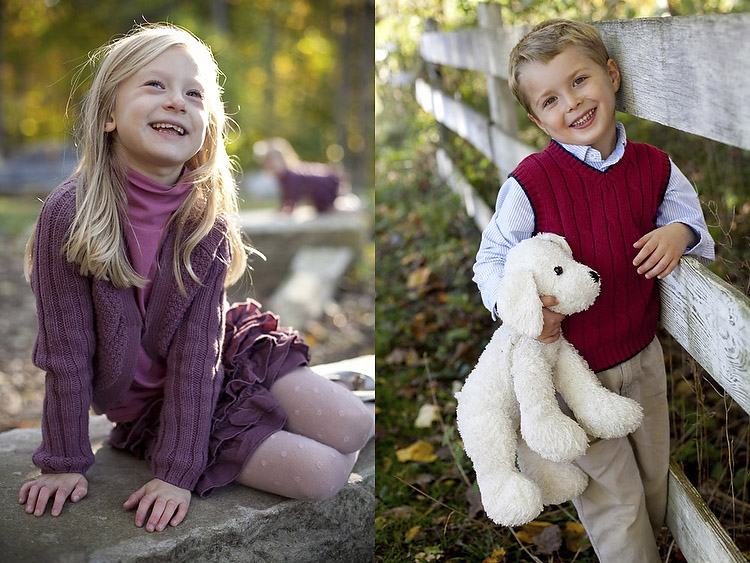
    Photo12

    A reflector can help you salvage bad light, and turn okay light into something magical. You can use your reflector from below to fill in shadows, or from above to block distracting light. You can bounce the sun from the silver reflector to create a main light, or you can use a reflector with a black side to create deeper shadows. You can even sit on your reflector to keep your pants clean when shooting outside, or pop it open dramatically to dazzle young children.

    Most of the photos in this article were shot with a 5-in-1 reflector you can buy for less than $ 20. 5-in-1 refers to the fact that the reflector and cover can combine to give you five different options: white, silver, gold, and black sides, as well as a diffuser.

    Here are 6 tips to help you use this versatile tool, a reflector, to transform your photos.

    1. Using a Reflector for Fill Light

    The most traditional use of the reflector is to simply reflect light into the shadows. I took my wife Karen out into our local park to demonstrate this.

    Photo1

    In the photo on the left (above), she is photographed in nice soft light, but there are still pretty deep shadows under her eyes and chin. In the photo on the right, she is holding a reflector at her waist. The shadows on her face are noticeably lighter and there is a subtle catch-light (reflection of the reflector) in her eyes. If she were an older person with more textured skin, the contrast would be even more dramatic.

    Photo2

    Of course, you may not always want to fill in the shadows in this way, but if you are trying to flatter someone it almost always helps. You don’t even need an official photo reflector. Anything that reflects light will work. In a pinch I’ve used everything from old newspapers to a nearby person wearing a white shirt.

    2. Using a Reflector as the Main Light Source

    This is one of my go-to reflector moves, and an easy way to wow your friends and family. You place your subject with the light hitting them from behind, then use a reflector to bounce the light back into their face. You will get nice soft light on their face, with a dramatic rim light on the back of the subject’s head. The only trick is positioning yourself so the light doesn’t go straight into your lens and create lens flare (unless you like that look, of course).

    Photo3

    In the photo above the is sun hitting the left side of her face and arm. The light from a reflector is bouncing back some of the sun to light up her face.

    You may also notice the shallow depth of field in this photo. If you are lighting with a reflector, you can jack up your shutter speed as much as you like to allow for a wide aperture (this photo was shot at 1/1250th of a second at f/2.0, with a 50mm lens). If you were using flash to create this same effect, you would have to lower your shutter speed (to 1/250th or whatever matches your camera’s maximum) to sync with the flash, requiring a larger aperture and greater depth of field (killing the whole look).

    Yes, yes, some of you are no doubt thinking, “What about high speed sync?!” Well, yes, that could give you the same effect if you had the right equipment (and know how to do that). Or, you know, you could just use an old newspaper.

    Photo4

    In the next example above, we positioned Karen against a tree and had her cousin Claudia reflect a spot of sunlight on her from about 10 feet away. At this distance, the light from the reflector looks more like it is coming from a grid spot or snoot (hard light) – in other words, it’s a focused and dramatic beam (notice the fall-off of light on her legs). It’s a cool look that you can recreate with a reflector, a few feet of aluminum foil, or your bathroom mirror. Your friends will be wowed, and ask what fancy gear you used for the shot (and your family will ask what happened to the bathroom mirror).

    Using a slight variation of this technique, we moved the reflector slightly behind the subject (relative to the camera) to created a dramatic rim light on the face in a profile shot (see below).
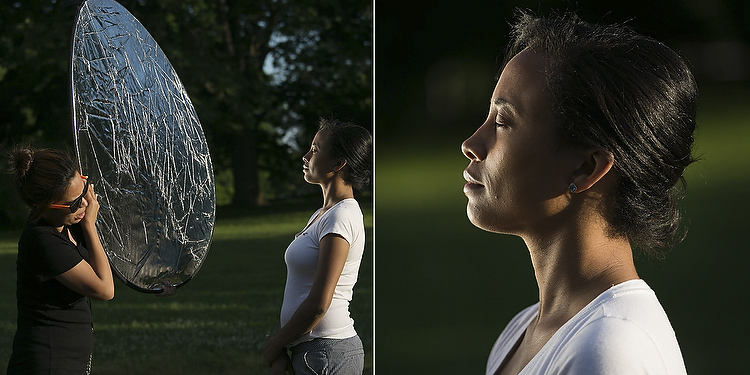
    Photo4a

    3. Using a Reflector to Block Light

    Sometimes you’ll find yourself in some beautiful shady light under a tree, except for that pesky sunbeam that finds its way through the leaves to light up your subject’s left ear. When this happens, turn your reflector into a light blocker (sometimes called a flag or gobo).

    A few years ago, I was doing a maternity portrait in a local park, when a newspaper photographer snapped my picture using just this technique. If you look at the reflector, you can see the bright spots of sunlight that it’s blocking (imagine how those spots would have ruined the final image if we didn’t block them).
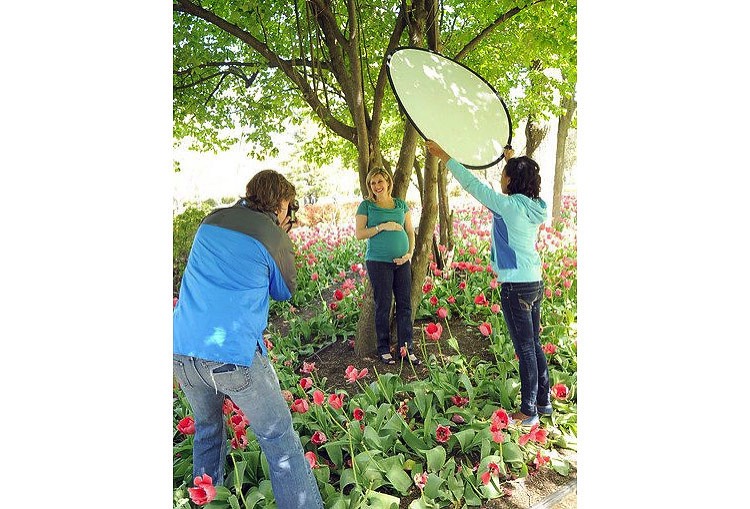

    Photo5

    Photo6

    4. Using a Black Reflector to Create More Dramatic Shadows

    Sometimes you actually want to deepen the shadows. I use this technique all the time in my headshot studio. Below is a photo of me with a white background. In one shot, I have a silver reflector opposite the main light, sending light back towards my left cheek. In the other, the reflector has a black cover on it, gobbling up reflected light, leaving a dark shadow on the cheek.
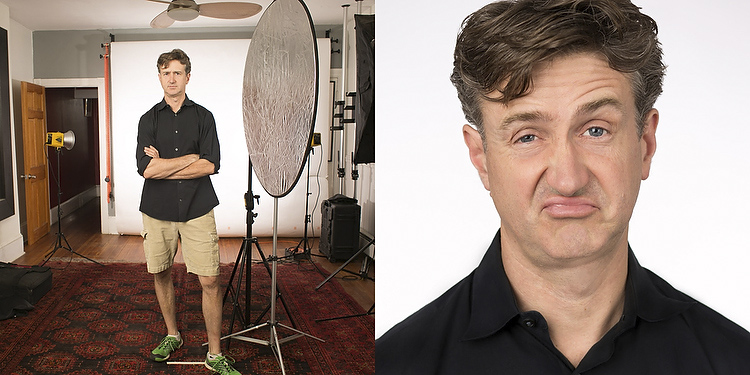
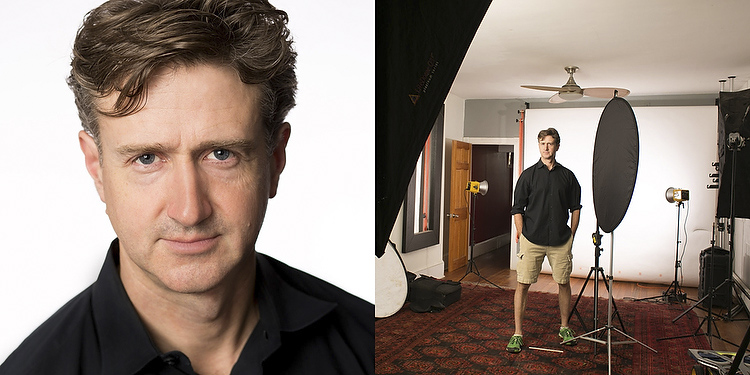
    Photo7

    Photo8

    Except for the small change of literally flipping the reflector from one side to the other, the lighting setup is identical, but as you can see the difference is pretty dramatic. (For you studio lighting enthusiasts out there, my key light here is a large soft box, and there are two bare heads pointing at the background to make sure it is nice and bright white).

    This is the same technique used in the famous Steve Jobs portrait where he has his hand on his chin. In addition to creating a little drama, you can also use this technique to give someone a photographic face-lift by trimming pounds from the dark side of their face and under their chin.

    5. Who Holds the Reflector?

    You may be saying to yourself, “But, I don’t have an assistant! Who’s going to hold the reflector for me?”. I usually don’t have an assistant either, but there is usually someone nearby who is more than happy to help, be it a family member, passerby, intern, wedding guest, etc. Sometimes you can even have the subject of the photo hold the reflector themselves (as in the photo of my wife holding the reflector at her waist in the photo above). Of course if you’re in the studio, or outside on a day without too much wind, you can just pop your reflector onto a light stand (like in the studio shots of me above).

    In the photo below, I was shooting wedding portraits on a beach in the Florida Keys. My reflector assistant that day was one of the bridesmaids, who truly enjoyed helping her friends out with their portraits.

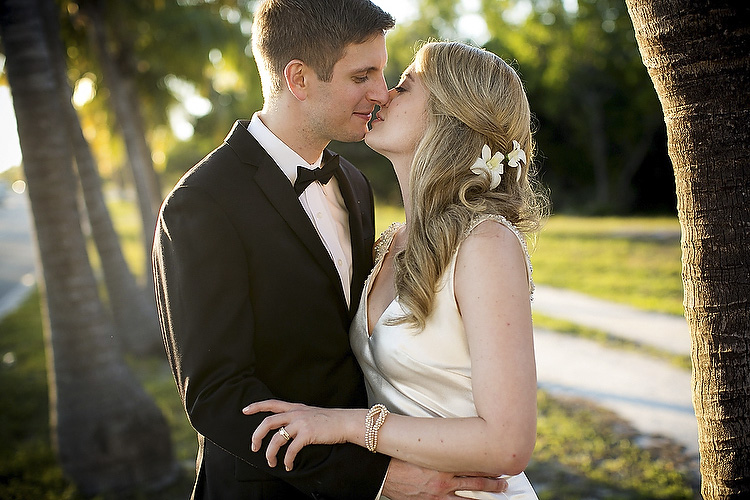
    Photo9

    Photo10

    6. Reflectors in the Environment

    Once you get the hang of reflectors, you’ll probably start noticing reflected light everywhere. Ever see a white building getting blasted by the sun? Well that’s nothing but a giant reflector! Depending on what’s around it, you may have found yourself a giant studio, with no rental fee.

    Mind you, anything that reflects enough light can work as a reflector. A brick building, large truck, flock of seagulls flying by at just the right moment…

    Final Notes

    Although they may not be as sexy as strobe kits, reflectors can often yield similar, or superior results for your portraits, and are cheaper and easier to use. I will leave you with a few more assignment photos, shot using nothing more than a reflector.

    In the child portraits below, note that there is light behind the kids in both cases, but there is still beautiful light on their faces. Same goes for the athlete portraits.
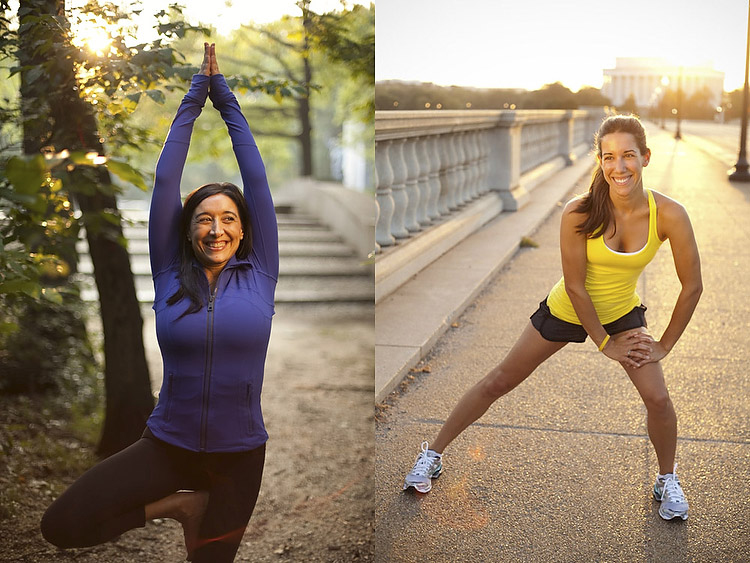
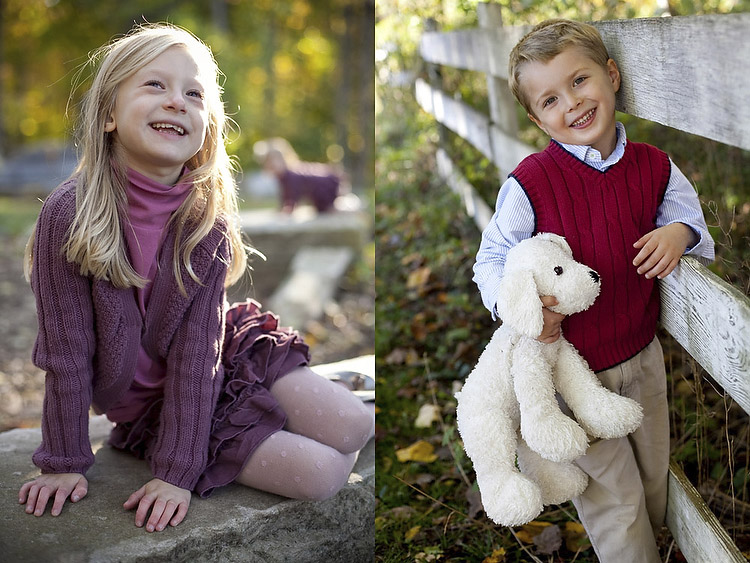
    Photo11

    Photo12

    As a final image, I leave you with a group of wedding guests who were so enamoured of my reflector that they wanted a picture with it. Hopefully you will soon have similar feelings towards your own reflector!
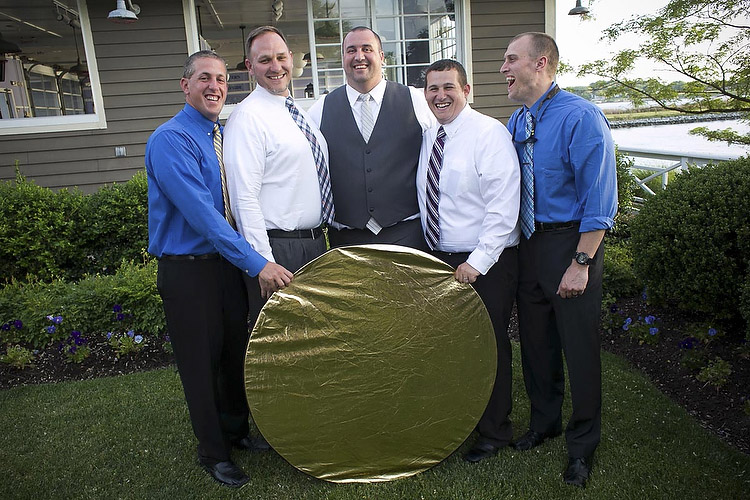
    Photo13

    Do you have any additional reflector tips to add? Please do so in the comments below.

    googletag.cmd.push(function() {
    tablet_slots.push( googletag.defineSlot( “/1005424/_dPSv4_tab-all-article-bottom_(300×250)”, [300, 250], “pb-ad-78623” ).addService( googletag.pubads() ) ); } );

    googletag.cmd.push(function() {
    mobile_slots.push( googletag.defineSlot( “/1005424/_dPSv4_mob-all-article-bottom_(300×250)”, [300, 250], “pb-ad-78158” ).addService( googletag.pubads() ) ); } );

    The post 6 Ways of Using Reflector to Take Better Portraits by Dennis Drenner appeared first on Digital Photography School.


    Digital Photography School
  • How to Understand the Mysteries of ISO for Beginners

    Josh Cripps has many really helpful videos on his YouTube channel. In this one he will help you get a handle on one of the elements of the exposure triangle that is often confusing and perplexing to many beginners – ISO.

    Watch as his gives real world examples, learn what ISO is, when to change it, when you should raise it or lower it and why. Ultimately having a better grasp of ISO will help you take better photos, and get the results you want.

    He also mentions his teacup video where he explains the relationship of aperture and shutter speed. You can see that one below for your reference as well:

    I hope these videos have given you a good idea about ISO and how to use it in your photography.

    googletag.cmd.push(function() {
    tablet_slots.push( googletag.defineSlot( “/1005424/_dPSv4_tab-all-article-bottom_(300×250)”, [300, 250], “pb-ad-78623” ).addService( googletag.pubads() ) ); } );

    googletag.cmd.push(function() {
    mobile_slots.push( googletag.defineSlot( “/1005424/_dPSv4_mob-all-article-bottom_(300×250)”, [300, 250], “pb-ad-78158” ).addService( googletag.pubads() ) ); } );

    The post How to Understand the Mysteries of ISO for Beginners by Darlene Hildebrandt appeared first on Digital Photography School.


    Digital Photography School
  • Tips for File Renaming Success in Lightroom

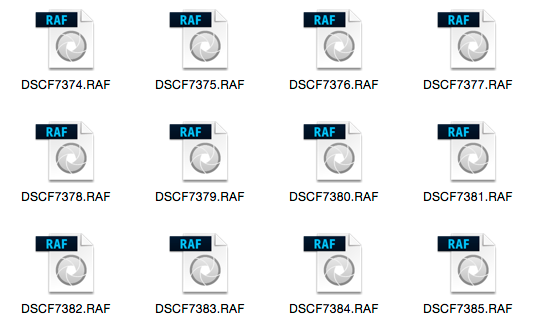
    This article is about how to build a useable file renaming strategy, and how to implement it in Lightroom. Your standard camera names are generally pretty boring. IMG this or DSC that, or even P0235425653. If you’re not using continuous naming you might even end up with hundreds of IMG_0001 files. Don’t laugh, I was there once upon a time after reading some terrible advice on camera settings.

    If you’re using Lightroom, renaming is really straightforward and accessible from quite a few places in the application.

    File naming in lightroom 1

    Before we talk about how to rename your files, let’s talk about what you should name them. First and foremost, each photo should have a unique name. There are two number sets that can pretty much ensure this. The first is the date the photo was taken, and the second is the sequence number the camera creates (assuming you do use a continuous camera naming system). Mixed together these give each file a unique name. You’d need to shoot 10,000 images in a day to get two identical names with this structure. You could just use this method and nothing else, but a series of numbers, while great for sorting, is generally meaningless to most people.

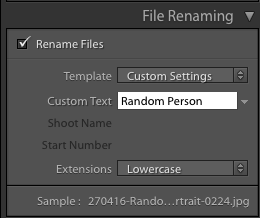
    File naming in lightroom 2Some photographers use those number sets and their initials to get the filename. It’s enough to create that unique pattern. A string of numbers doesn’t tell you what’s in the file though, even with some initials. For this reason, I use a custom text field that I change with each shoot that I import. In Custom Text field I put a little description of the shoot. That way even outside Lightroom I can tell the contents of the file just from the name. It also gives me additional search terms I can use when looking for a file. Let’s look at how to set this up.

    File naming template in Import

    Renaming in Lightroom uses a mix of tokens and direct text in the box. The Dialog for creating File Naming Templates can be called up from a variety of places in Lightroom. The first place you see it is in the Import Dialog box when using one of the following settings: Move, Copy or Copy as DNG. It’s on the right hand side in the appropriately named File Renaming panel. As well as the type of File Naming, you can choose Custom Text/Shoot Name, a Start Number, and whether the file extension is upper or lower case.

    File naming in lightroom 3

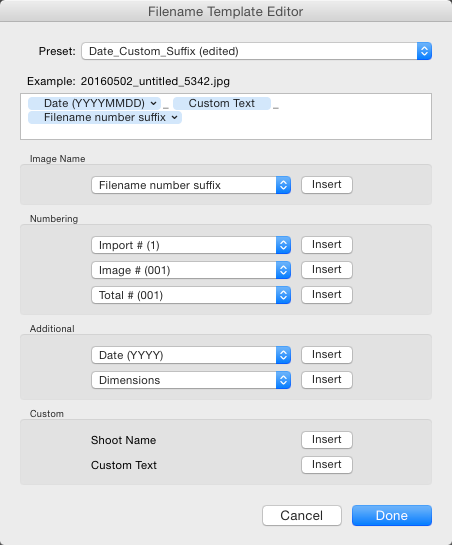
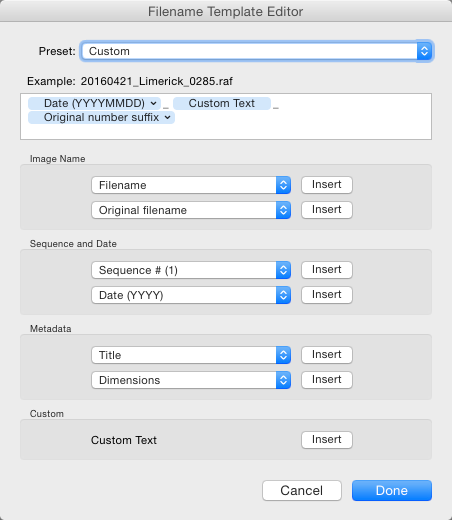
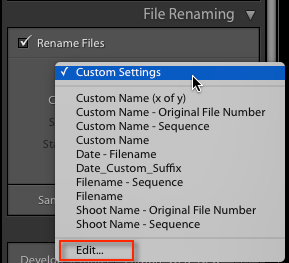
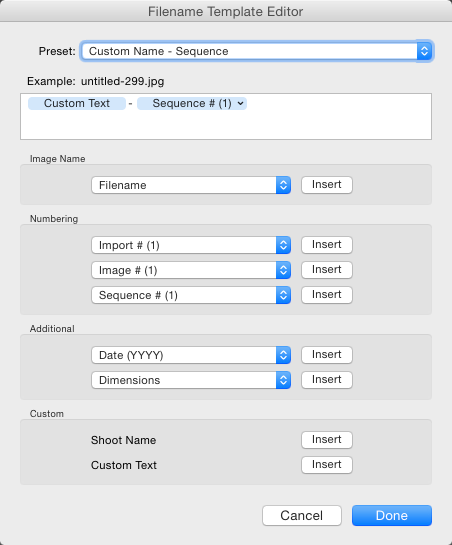
    File naming in Lightroom depends on Templates, so click on the Template list and choose Edit from the bottom of the list (shown above). This opens the Filename Template Editor (below). At the top we see the current Template, or in a typically Lightroom fashion, it’s called a Preset here, versus being called a Template in Import. The contents of this list matches the one you saw in Import from the Template dropdown. Note that the Filename Template Editor is not exactly the same in each location you can use it in Lightroom. You’d think it would be, but nope, it’s not.

    File naming in lightroom 4

    Note this is the box you will see in the Import dialog popup. If you access rename files from the Library module it looks slightly different.

    Next is the text box where the template is built. Any item you click from the list below will be added to the box, in the order you click them. You can also type directly into the box. Remember that text typed directly into the box will be added to all filenames, so use it sparingly (above there is only a hyphen added between tokens Custom Text and Sequence # to separate them).

    File naming in lightroom 5

    Below this are the tokens, split into sections of similar information. Image name has two options, Filename and Filename number suffix. The latter refers to the string of numbers at the end of the current filename (not necessarily the original file numbers). Note: When you use Edit in the Library version of renaming, you also get Folder Name as an option.

    File naming in lightroom 6

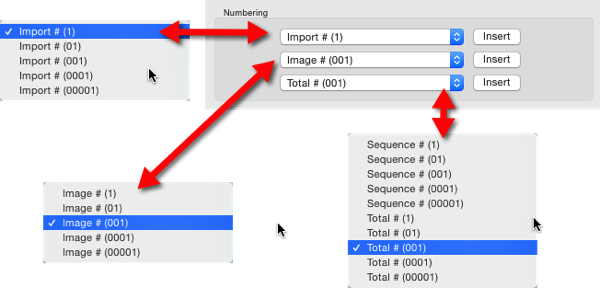
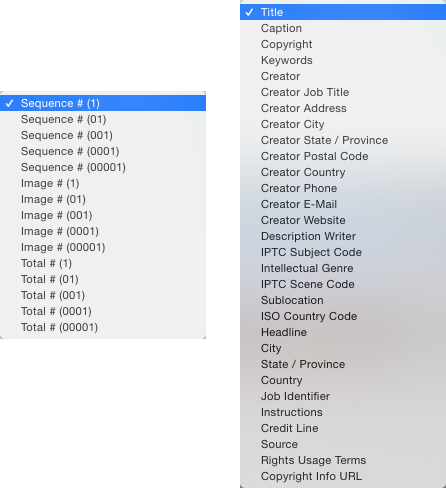
    Numbering has far more options. In each case you can choose an option with leading zeros. It’s good practice to include enough of these so your sorting looks okay. For example, Image1 is followed by Image10, then Image2 if you have no leading zero in the file name. For most things three leading zeros is enough.

    File naming in lightroom 7

    Import refers to the number of imports and can be set in the Catalog Settings dialog (under the Edit menu on PC, Lightroom menu on Mac), as can Image. Image itself refers to the number of images imported into Lightroom. Sequence creates a new sequence each time, with the start number set in the renaming panel (except on Export). Total refers to the number of images that are being imported at that time.

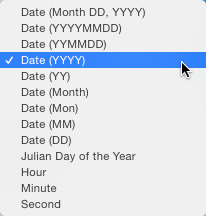
    File naming in lightroom 8Next is the Additional Section. For the Date, you can opt for any combination of year, month, day, hour, minute or second. Personally I go for the YYYYMMDD version, though you could choose Year YY, Month MM and Date DD as as shorter year set. Using this at the start of the name puts all the photos in a dated chronological order when when sorting by name.


    File naming in lightroom 9

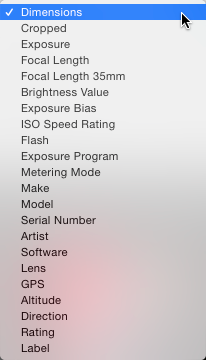
    The 2nd part of Additional is a metadata list (above). It contains things like the camera serial number and file dimensions.

    Custom lets you add text that can change between imports. Shoot Name is available only in the Import menu. Shoot related naming is not available using Auto Import.

    File naming in lightroom 10

    When you’ve entered the tokens you can either click Done, to have the settings apply as Custom Settings or you can go back to the Presets menu, where you now have additional options. If you started off by editing an existing Preset (e.g. Filename) you can Save you settings as a new Preset, Update the Current Preset, or restore the default presets.

    File naming in lightroom 11

    If you select a Preset and don’t edit it, you get the options to Delete or Rename the preset (below) instead of the Update option. That covers the mechanics of creating a File Naming Template.

    File naming in lightroom 12

    My method:

    My preferred renaming method is: {YYYYMMDD}_{Custom Text}_{Original Filename Suffix}. The items in {} are the tokens from the Date, Custom Text and Filename menus (see right). The underscores are written directly into the textbook between the tokens. You may prefer to use a dash instead. I use underscores, because the Web module changes dashes into underscores.

    File naming in lightroom 13

    This keeps files in order by set based on the Date and Custom text, the Suffix then keeps the sequence. You can use any naming system you like, of course. The important thing is that you use the same naming consistently. When I first started using this kind of renaming system, I had the Custom Text first, but it turned out to be a pain for sorting. Generally when I look through a shoot now, I visually ignore the date part of the name and look at the custom text if I’m just browsing. I don’t need to see it generally, but it helps the sort.

    File naming in lightroom 15

    This is how my file naming looks

    Renaming inside the Library Module

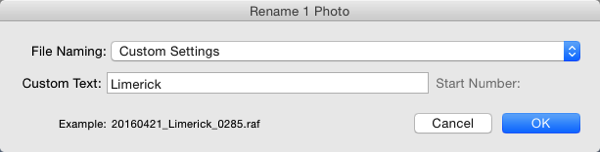
    As well as renaming on Import, you can batch rename inside Library by pressing the F2 key. This brings up a really basic dialog where you can select or edit a preset, change the Custom Text, or the Start Number if you’ve chosen a sequence. When you select Edit from the Preset list, the Filename Template Editor has a slightly different set of options to that of the editor inside of Import.

    File naming in lightroom 14

    We’ve looked at Image Name. The other main differences are the Sequence menu now has Date as well and the Additional section is now called Metadata with a 2nd set of Metadata, in this case IPTC metadata. Other than that, it works identically to in Import.

    File naming in lightroom 16

    Renaming on Export

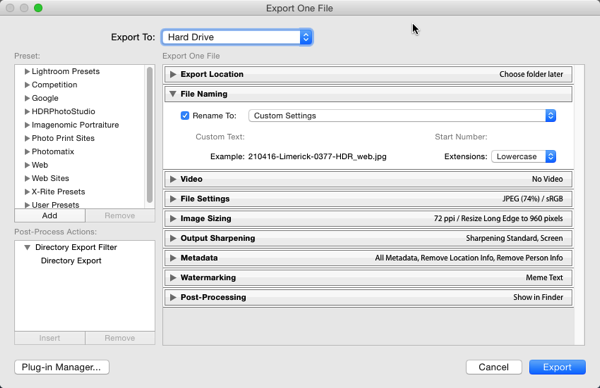
    You can also rename when Exporting. In the Export Dialog, File Naming is usually the second option. It’s similar to the other instances where you can select or edit a file naming preset, add Custom Text or choose a Start Number. In this case the Filename Template Editor is the same as the one available in the Library module.

    File naming in lightroom 17

    So that’s a look at how to choose a suitable naming system in Lightroom, and how to create a filename template to match it. How do you do your file names? What structure do you find works best for sorting and finding images later? Please share your thoughts in the comments below.

    googletag.cmd.push(function() {
    tablet_slots.push( googletag.defineSlot( “/1005424/_dPSv4_tab-all-article-bottom_(300×250)”, [300, 250], “pb-ad-78623” ).addService( googletag.pubads() ) ); } );

    googletag.cmd.push(function() {
    mobile_slots.push( googletag.defineSlot( “/1005424/_dPSv4_mob-all-article-bottom_(300×250)”, [300, 250], “pb-ad-78158” ).addService( googletag.pubads() ) ); } );

    The post Tips for File Renaming Success in Lightroom by Sean McCormack appeared first on Digital Photography School.


    Digital Photography School

  • Fotodiox releases new LED studio-in-a-box

    $ (document).ready(function() { SampleGalleryV2({“containerId”:”embeddedSampleGallery_5352485227″,”galleryId”:”5352485227″,”isEmbeddedWidget”:true,”standalone”:false,”selectedImageIndex”:0,”startInCommentsView”:false,”isMobile”:false}) });

    Fotodiox has announced a new LED Studio-in-a-Box, designed to make it easy to create simple macro and product images on a tabletop. Aimed at Etsy and Ebay sellers just as much as macro and still life enthusiasts, the Studio-in-a-box comes in four sizes, from 16×16″ ($ 69.99) all the way up to 28″x28″ ($ 119.99). Each model comes with an integrated ring of LED lights, and four plastic, wrinkle-free ‘cyclorama’ backdrops.

    Features:

    • Comes with Integrated Daylight LED Lights (~85 CRI) & Diffusion Panel
    • Folds up into supplied carrying case
    • Four sizes available: 16×16″, 20×20″, 24×24″ And 28×28″
    • Comes with four choices of backdrops: blue, gray, white and black
    • 24 Months Manufacturer Warranty

    Press Release:

    WAUKEGAN, IL JUNE 29, 2016

    Fotodiox Pro Announces Lightweight, Portable LED Studio-in-a-Box for Tabletop Photography

    Fotodiox Pro, creator and distributor of several lines of specialty solutions for videography, cinematography and photography, has announced the LED Studio-in-a-Box: a lightweight, fold-out kit that provides tabletop photographers with a fully-contained environment for shooting clean, professional images.

    Ideal for small business owners, artists, retailers and independent Etsy and eBay sellers, the LED Studio-in-a-Box comes equipped with built-in LED lights and a removable diffusion panel for maximum control and ease of use. Available in four different sizes, the LED Studio-in-a-Box can be purchased now on FotodioxPro.com.

    The LED Studio-in-a-Box can be set up by photographers of any skill level in well under five minutes, with no need for tools, and folds down flat after use. The kit includes four plastic, wrinkle-free “cyclorama” backgrounds in black, white, gray and blue, as well as a removable diffusion panel and an integrated ring of top-mounted LED lights for a powerful, even glow. Perfect for macro photographers, professional tabletop photographers and artisans, the LED Studio-in-a-Box saves an enormous amount of time and space, and allows any user to shoot dynamic, expertly lit images with any type of camera, including smartphones.

    To learn more about the Studio-in-a-Box and Fotodiox Pro’s additional photography and filmmaking accessories, please visit FotodioxPro.com. View unboxing videos and product demonstrations via youtube.com/user/FotodioxInc.

    About Fotodiox

    Serving the photo and video markets since 2004, Fotodiox Pro is a leading manufacturer and distributor of high-quality, professional and affordable photography and filmmaking accessories. Known for such products as the WonderPana wide-angle filter system, the Vizelex ND Throttle adapter series, the ever-expanding line of award-winning GoTough accessories for GoPro cameras, and the groundbreaking FlapJack LED Edgelights, Fotodiox Pro is also responsible for bringing the CamDolly Cinema System – the industry’s first truly portable, modular dolly system for professional videography gear – to filmmakers in the United States.

    For more information about Fotodiox Pro, please explore online at http://www.fotodioxpro.com, http://www.youtube.com/user/FotodioxInc, http://www.facebook.com/Fotodiox and http://www.twitter.com/Fotodiox.

    Articles: Digital Photography Review (dpreview.com)

  • White House photographer Pete Souza reveals what’s in his bag

     ‘The Situation Room’, photo by Pete Souza. President Barack Obama and Vice President Joe Biden, along with members of the national security team, receive an update on the mission against Osama bin Laden in the Situation Room of the White House, May 1, 2011. 

    There’s no photographer in the world with a job quite like Pete Souza’s. As Official White House photographer, Souza has to be ready to move at a moment’s notice. Familiarity with and trust in his gear is essential. So what’s in his photo bag? Surprisingly little, which actually makes a lot of sense.

    Souza uses two Canon EOS 5D Mark III bodies. Introduced in 2012, it’s a full-frame 22MP DSLR that earned a gold award for its excellent image quality and versatility when we reviewed it.

    Popular Science recently got a look at Souza’s kit and found two Canon 5D Mark III bodies and a trio of L-series lenses: a 135mm F2, 35mm F1.4 and a 24-70mm F2.8 II. Souza also keeps it simple when he isn’t shooting visiting dignitaries and state dinners: he uses a Fujifilm X100S in his downtime. 

    You can keep up with Souza and the POTUS on Flickr and Instagram. 

    Articles: Digital Photography Review (dpreview.com)

  • Pentax K-1 real-world sample gallery

    We’ve been shooting a lot with the Pentax K-1 and have seen what that manufacturer’s first full-frame DSLR is capable of. Its 36MP sensor has shown impressive results in dynamic range tests, especially when coupled with the camera’s Pixel Shift mode. Its sensor-shift image stabilization, extensive weather sealing and attractive price make it very appealing to outdoorsy types and landscape photographers.

    Fortunately, we have several of those kinds of people on staff. They’ve been out shooting the K-1, from the highest mountain peaks to the dimmest concert venues. Our full review is almost wrapped up, but for now we’ve put together a gallery of real-world samples to show you where the K-1 has been so far.

    Articles: Digital Photography Review (dpreview.com)

  • Collector’s item: Nikon’s 87th F SLR camera up for auction on eBay

    $ (document).ready(function() { SampleGalleryV2({“containerId”:”embeddedSampleGallery_4189097372″,”galleryId”:”4189097372″,”isEmbeddedWidget”:true,”standalone”:false,”selectedImageIndex”:0,”startInCommentsView”:false,”isMobile”:false}) });

    A rare Nikon F SLR camera with the original cloth-type shutter and a Nippon Kogaku Tokyo Japan 1:1.4 F = 50mm lens has surfaced in an eBay auction. Per the listing and product photos, this camera was the 87th unit to come off the production line; it was originally owned by the seller’s deceased grandfather who is said to have collected hundreds of cameras during his lifetime.

    The Nikon F SLR was developed by Nippon Kogaku in the late 1950s and launched in 1959. The very first models off the production line used the same cloth shutter curtains as the Nikon SP. Nikon switched to using much more durable titanium shutter curtains in all subsequent F bodies, and it is estimated that Nikon produced only around 100 Nikon F SLR units with a cloth shutter before switching to titanium.

    The seller started the auction at 99 cents without a ‘reserve’ price, and it currently sits with a bid of $ 4,050. The auction ends this upcoming Sunday.

    Articles: Digital Photography Review (dpreview.com)

  • Sigma updates 150-600mm firmware to solve overexposure with Nikon D500

    Sigma has announced new firmware for one of its super tele zooms that has a problem with exposure when used with the Nikon D500 and Sigma’s 1.4x tele convertor. Both Sports and Contemporary versions of the 150-600mm F5-6.3 DG OS HSM will need the new firmware if owners want to use the lenses with the company’s TC-1401 1.4x teleconverter on the Nikon D500. The company says it has discovered that when the three items are combined there is an issue with overexposure, and that the new firmware will fix it.

    The TC-1401 can be used with the 150-600mm F5-6.3 lens because both it and the Nikon D500 can support autofocus at apertures up to F8.

    Users who own the Sigma USB lens dock can update their firmware themselves, while those who don’t can receive the update free of charge from a Sigma service center.

    For more information see the Sigma website.

    Lens firmware Update for SIGMA 150-600mm F5-6.3 DG OS HSM |Sports / Contemporary in Nikon mount

    Thank you for purchasing and using our products.

    We would like to announce the availability of a new firmware update for the SIGMA 150-600mm F5-6.3 DG OS HSM | Sports in Nikon mount and the SIGMA 150-600mm F5-6.3 DG OS HSM | Contemporary in Nikon mount.

    This firmware update can be installed using SIGMA Optimization Pro.

    The lens firmware update corrects the phenomenon of overexposure when the lens is attached to the SIGMA TELE CONVERTER TC-1401 on Nikon Digital SLR camera “D500”, released by NIKON CORPORATION.

    For customers who own the following applicable products and also SIGMA USB DOCK, please update the lens firmware using SIGMA Optimization Pro.

    For customers who do not own SIGMA USB DOCK, the lens firmware update will be provided free of charge. Please contact your nearest authorized subsidiary/distributor of SIGMA.

    Applicable products

    • SIGMA 150-600mm F5-6.3 DG OS HSM | Sports – Nikon mount
    • SIGMA 150-600mm F5-6.3 DG OS HSM | Contemporary – Nikon mount

    Benefit of this firmware update
    It has corrected the phenomenon that it shows some overexposure when it is attached with
    SIGMA TELE CONVERTER TC-1401 on Nikon D500.

    *For customers who are using SIGMA Optimization Pro Ver1.1 or earlier, please ensure to update it to Ver1.3 from the following Download page before updating the lens firmware.

    Download page: http://www.sigma-global.com/download/

    We appreciate your continued support for our company and products.

    Articles: Digital Photography Review (dpreview.com)

  • Weekly Photography Challenge – Stars

    Night photography is something that goes beyond the average snapshot, something many beginners shy away from because it seems difficult. But the results of learning how to do night photography, especially of stars is well worth the time and effort required.

    Olli Henze

    By Olli Henze

    Weekly Photography Challenge – Stars

    If you need some help with night and astral photography here are some dPS articles to get you started:

    • Two Methods for Shooting Star Trails Made Easy
    • How to Shoot a Star Trails Selfie
    • Single Image Star Trails – a Powerful Technique to Create Star Trails in Minutes Using Photoshop
    • Photographing Stars Using a Kit Lens
    • How to do Milky Way Photography: A Comprehensive Tutorial
    • How to Photograph the Full Band of the Milky Way
    • Down and Dirty Guide to Milky Way Photography
    • How to Photograph the Stars
    Howard Ignatius

    By Howard Ignatius

    DAVID MELCHOR DIAZ

    By DAVID MELCHOR DIAZ

    Jeff Krause

    By Jeff Krause

    Share your images below:

    Simply upload your shot into the comment field (look for the little camera icon in the Disqus comments section) and they’ll get embedded for us all to see or if you’d prefer upload them to your favourite photo sharing site and leave the link to them. Show me your best images in this week’s challenge. Sometimes it takes a while for an image to appear so be patient and try not to post the same image twice.

    Wayne Stadler

    By Wayne Stadler

    Alistair Nicol

    By Alistair Nicol

    googletag.cmd.push(function() {
    tablet_slots.push( googletag.defineSlot( “/1005424/_dPSv4_tab-all-article-bottom_(300×250)”, [300, 250], “pb-ad-78623” ).addService( googletag.pubads() ) ); } );

    googletag.cmd.push(function() {
    mobile_slots.push( googletag.defineSlot( “/1005424/_dPSv4_mob-all-article-bottom_(300×250)”, [300, 250], “pb-ad-78158” ).addService( googletag.pubads() ) ); } );

    The post Weekly Photography Challenge – Stars by Darlene Hildebrandt appeared first on Digital Photography School.


    Digital Photography School