Blog

  • A photographer’s intro to the world of video

    It took me a long time to recognize the appeal of video shooting. Even in a job where I have to use a camera’s video features, it was only fairly recently that I moved beyond just taking short clips (essentially stills with a little bit of movement in them) and started to think in terms of using video and editing to tell stories.

    Given that most modern cameras offer at least rudimentary video tools, I wanted to share my experiences and perhaps encourage others to start thinking about shooting at 24 or more frames per second.

    The good news is that a lot of the things you learn as a photographer are immediately useful as you take your first steps in video shooting. But, as I discovered, at almost every stage I encountered differences and additional factors to consider. Many of which I wished someone had told me when I started…

    Stop shaking the camera, you’re making me feel sick

    The first thing that became apparent when shooting video for the first time was the need to keep the camera steady. I remember my Dad teaching me how to keep my camera steady and be aware of my breathing when shooting relatively long exposures, but no amount of good breathing technique or bracing the camera against a pillar is enough to give steady video.

    Even if your camera is hand-holdable, don’t expect that to mean you’ll shoot it hand-held.

    This makes sense, of course: most stills shooting only requires you to hold your camera steady for fractions of a second whereas video lets the viewer see how steady you’ve been for seconds or minutes at a time.

    What I’ve learned is that in-camera stabilization can be enough to stop your footage looking unwatchably juddery, but unless you’re aiming for a ‘run-and-gun’ aesthetic, you’ll need to use a tripod or some sort of stabilization rig.

    Exposing some limitations

    Exposure is another area where the lessons I’d learned from stills photography are useful but incomplete. You still get to control the same variables, but the range of control you have is somewhat restricted. It’s still a question of managing light, but with a greater risk of finding yourself with too much of the stuff.

    For me it’s a question of shutter speed, which has a more obvious impact on the appearance of your footage than is usually the case in stills shooting. A fast shutter speed in stills photography will freeze motion, a slow one will allow the subject to blur but there’s often a large range in between these two extremes. In video, there’s a narrower range before the viewer starts to notice the difference.

    The 180 degree shutter ‘rule,’ where you use a shutter speed that’s half the duration of each frame (so 1/48th seconds for 24 fps shooting) isn’t an inviolable law, but the further you stray from it, the more jarring or muddled your footage will look. This can be a creative choice, of course, but only counts as such if you’ve consciously made it.

    This made me think back to when I was first experimenting with stills photography, and getting a feel for the boundaries set by the longest shutter speed I could hand-hold, the widest aperture I had available and the highest ISO setting I found acceptable. Once I was familiar with these, one of the first purchases I made was a faster lens (that’s right: a 50mm F1.8) to get more light to extend these capabilities.

    With stills shooting, one of the first things you buy is a bright lens to get more light, with video it’s an ND filter, to get rid of it.

    With video and the further restriction over the fastest shutter speed I’m willing to use, it’s a decent ND filter I need to buy, to reduce the light level to fit your boundaries.

    A neutral density (ND) filter allows you to use use wide apertures and the relatively slow shutter speeds that a lot of videographers favor. An adjustable ND filter provides even more flexibility.

    A return to JPEGs

    Added to these exposure limitations has been another throw-back to my first days as a photographer: having to revert to an 8-bit, compressed shooting format. Having spent some time learning the distinctions between video file formats, the main lesson has been that none of the ones I’m likely to encounter are anything like Raw.

    Once you’ve been spoiled by the seemingly endless dynamic range that can fit in a 14-bit Raw file and the ability to set and adjust the white balance at the ending stage, it’s a shock to go back to having to get exposure and white balance perfect when you shoot.

    Flat tone curves and Log profiles provide a means of squeezing a bit more useable DR into those 8-bit files, but this can make it even harder to judge correct exposure. I’d highly recommend shooting some test footage and trying to grade it back into something useful, before committing yourself to the flattest tone curve you can find.

    Articles: Digital Photography Review (dpreview.com)

  • Parachut is a subscription service for borrowing expensive camera gear

    If you’re really keen to shoot with a particular camera or lens, but you can’t afford to buy it, you don’t have many options. Renting gear for long periods of time can get very expensive, very quickly.

    Parachut is a new subscription-based service that allows you to borrow from a wide variety of equipment – old and new – for $ 149 per month. Pitched as a service geared around ‘exploration’, Parachut allows subscribers to lease equipment based on their personal interests. You can add specific items to a wish list, but the precise contents of your first delivery – called a ‘Chut Drop’ – will be tailored to your picture-taking preferences, and skill level, and may include ‘surprises’. 

    Parachut is a subscription-based service for long-term leasing of photographic equipment, both old and new.

    Once you take delivery of a piece of equipment, provided that you maintain your subscription, you can keep it for as long as you like. An additional $ 49 per month covers accidental loss or damage.

    Parachut is currently in beta, and only available to US-based subscribers. Expansion to other countries is planned, and an official launch for ‘founding members’ is scheduled for later this year. Right now, $ 149 will get you on the founding members list, ready for the first Chut Drop in autumn. 

    For more information, watch the (slightly cringeworthy) video, above, and check out Parachut’s website. What do you think? For what amounts to almost $ 2000 a year, would you make use of a service like Parachut? Let us know in the comments. 

    Articles: Digital Photography Review (dpreview.com)

  • Vorticity: Time-lapse captures the drama of storm chasing

    Mike Olbinski recently spent 18 days and drove some 20,000 miles to capture one of nature’s most powerful forces on camera, and in doing so has created one of the most compelling time-lapse videos we’ve seen in a long time. He shot some 60,000 time-lapse frames between April 15th and June 15th, 2016 and compiled them into a six minute long epic that concludes with the holy grail of storm chasing: capturing a tornado on camera. Definitely view this one in full screen mode and enjoy!

    Articles: Digital Photography Review (dpreview.com)

  • DEAL: $5000 worth of Post Production Tools for Just $79

    It’s the 7th and final day of our 2016 Summer Sale… and we’ve saved the biggest deal until last!

    The good people over at Photographypla have made their Ultimate Photography Bundle, worth a whopping US$ 5,000+, available to dPS subscribers for just US$ 79.

    NewImage

    Yes, $ 5,000+, worth of resources for Lightroom and Photoshop for $ 79.

    In it you’ll get:

    • 1,000+ Lightroom presets
    • 1,000+ Photoshop actions
    • 500+ actions for Photoshop Elements to apply a huge variety of different effects to your photos in no time.
    • 1,000+ photo overlays for weddings, engagements, graduations and more
    • 130+ print templates with announcements for births, graduation, weddings and more
    • 120+ digital frames
    • Collection of business and marketing resources (including contract templates)

    Why buy presets or actions in small packs when you can get this MASSIVE bundle at an amazing price? Get it while it lasts!

    googletag.cmd.push(function() {
    tablet_slots.push( googletag.defineSlot( “/1005424/_dPSv4_tab-all-article-bottom_(300×250)”, [300, 250], “pb-ad-78623” ).addService( googletag.pubads() ) ); } );

    googletag.cmd.push(function() {
    mobile_slots.push( googletag.defineSlot( “/1005424/_dPSv4_mob-all-article-bottom_(300×250)”, [300, 250], “pb-ad-78158” ).addService( googletag.pubads() ) ); } );

    The post DEAL: $ 5000 worth of Post Production Tools for Just $ 79 by Darren Rowse appeared first on Digital Photography School.


    Digital Photography School

  • Take a look around: traditional stills versus VR in Iceland

    Introduction

    Time to relax – does VR capture lower the barrier for creating memorable vacation content? Let’s take a look. Nikon D810 + Nikon AF-S 35mm F1.4G @ F2 | 1/8000 sec | ISO 200. Photo by Carey Rose

    Back in April, two friends and I took a trip to Iceland, spending eight days circumnavigating the island via its famous ring road. Happily, around that time we were looking for some updated content for our review of the Nikon D810, so I took one along and wrote up a shooting experience.

    In general, though, I enjoy documenting my travels even when I’m just traveling for fun. I find it to be a nice creative recharge, simply photographing for myself, in my style, with my choice of equipment. Of course, the D810 I borrowed wasn’t my personal equipment, but it was near-ideal for the sorts of situations I found myself in (plus, handling-wise, it isn’t quite so different from the D700 I was originally planning on bringing).

    But now we’ve got VR technology beginning to make waves in the consumer electronics industry. What’s more, capture devices are getting more accessible: the Ricoh Theta S retails for just $ 349, making it a cheaper proposition than most DSLRs, as well as my secondhand X100 and Ricoh GR, which are my usual go-to cameras for casual photography.

    The Ricoh Theta S carries an MSRP of $ 349, and offers full 360 stills and video capture as well as smartphone integration.

    At its core, the act of taking a photograph requires some translation of the 360-degree setting in which the photographer stands into a two-dimensional window, for viewing on the web or in print. But 360-degree VR capture changes that. When you’re literally just capturing the entirety of a scene around you, is there value in it for other viewers? When you’ve removed one of the most basic creative tenets of capturing a photograph, what are you left with?

    During our time in Iceland, my friends and I were lucky enough to have the opportunity to borrow a Ricoh Theta S as well. Without any prior experience, we tried to use it as we did our DSLRs – to see if and how it could offer value to us above and beyond our traditional camera kits.

    Click-and-drag on a desktop or laptop to view the 360 footage. All ‘traditional’ photographs by Carey Rose, and all Theta S 360 images by Jordan Stead.

    360-degree viewing methods

    Spoiler alert – when viewing the Theta S footage on a 2D viewing device, such as a laptop or smartphone, I find the results somewhat underwhelming. And throughout this article, you will, of course, notice that the files from the Ricoh are a little low-res, and lack some ‘pop’ that you can see in files from the D810. This shouldn’t really be a surprise given the dramatic differences in hardware, so I’ll be focusing on the viewing experience concerning the 360-stills rather than outright image quality.

    Here’s a collection of stills captured on a D810 from a black sand beach outside Vik, in southern Iceland.

    The top two images are shot with a 35mm prime, and the bottom two with an 80-200mm F2.8 zoom. Now, as I alluded to in my shooting experience, these may not be your standard picture-perfect postcard images from this setting. But that’s okay, because that’s not generally how I shoot when I’m shooting for myself. I like to use several different photos to focus on several different aspects of a scene, as opposed to shooting wider-angle ‘overall’ photos that get more of a sense of place in a single image. Something approaching the latter is what you get when you use the Theta S. 

    I find viewing the 360 as you see it above in a web browser or on a mobile phone to be somewhat ‘distant.’ The distortion is strong, and therefore distorts the sense of place, even though you can see everything in the scene. Everything also feels very far away, which ties in with an overall sense of detachment I feel looking at it, even though I know that I’m just a little ways down the beach in the image. You can zoom into the 360 image to reduce the distortion somewhat, but then the experience becomes even less immersive.

    The overall feeling I get is of a person quickly taking an eye-level wide-angle photograph of something in front of them (not a criticism of my friend Jordan who was shooting with the Theta – the 360’s I took on this trip also had the same feel). Also, if you happen to view it on a phone, by default you ‘look’ around the scene by reorienting your phone in 3D space, which makes you look very silly if you are looking at it in public.

    But then I looked at it through a Galaxy Gear VR headset, and everything changed.

    Articles: Digital Photography Review (dpreview.com)

  • Nikon D500 firmware update adds workaround for SD card errors

    Nikon has released a firmware update for the D500, correcting the card error issue we discussed in our D500 review. The error — which happened once in our office and has been reported by many camera owners — manifests when some UHS-II SD cards are used (Lexar cards seem to be particularly affected). According to Nikon, these card errors are resulting from the cards themselves, not the camera.

    The update takes the D500’s firmware from version 1.01 to 1.02, and only corrects the card error. Per Nikon’s changelog, the new firmware does the following:

    Articles: Digital Photography Review (dpreview.com)

  • Wireless tethering on a budget: control your camera from your phone or tablet for $40

    Wireless tethering is nothing new, but it’s not exactly a cheap proposition. Well, that’s changed, as Seattle-based photographer Alan Lawrence shows on his blog. For around $ 40, you can wirelessly control and transfer images from your camera to your phone or tablet.

    In short, this DIY wireless tethering requires a TP-Link MR3040 Battery Powered 3G Wireless Router, some software, a USB cable, and some time. Lawrence says the router is similar-looking to the CamRanger, a device that offers tethering functionality out-of-the-box, but the router retails for under $ 30 compared to the CamRanger’s $ 299 MSRP.

    Once you’ve got your hands on the router (and he does say you need a specific version, which is the one linked above), you’ll need a $ 9 app called DSLR Dashboard for Android, or QDSLR Dashboard for iOS. The last thing you’ll need is a compatible USB cable, and you’re almost in business.

    The DSLR Dashboard website has a link to download new firmware for the router, and once you’ve updated that, all you have to do is connect to the wireless network you’ve set up and launch the app. You can control your camera from your device and download files instantly after you’ve taken them.

    You can read all the nitty gritty details over on Alan Lawrence’s blog.

    Articles: Digital Photography Review (dpreview.com)

  • DIY: $10 Custom Wooden Backdrop Mount

    Do you have painted canvas backdrop, or other textile, that you use for portraits?

    Why clamp it up to a crossbar (and crop the top) every time you use it, when for about $ 10 you can build a permanent wooden mounting bar that begs to be included in the frame?

    Such was this morning's project.Read more »
    Strobist

  • Hasselblad and DJI announce 50MP medium-format drone kit

    The first product of the collaboration between Chinese drone maker DJI and Swedish medium-format camera manufacturer Hasselblad will be a long range drone fitted with the same 50MP CMOS sensor that is used in a number of current medium-format cameras, including the new X1D mirrorless camera.

    What the companies are calling a ‘fully integrated aerial photography platform’ will combine DJI’s industrial Matrice 600 drone with Hasselblad’s recent A5D aerial camera. The camera, which has no moving parts of its own, will come with an adapted HC 50mm F3.5 lens that has its focus set to infinity. When used with the 50c sensor the lens offers a view similar to that which we would expect from a 42mm lens on a 35mm system camera.

    DJI’s M600 can carry a maximum of 6kg/13.2lb which the company says means it can carry the Hasselblad A5D and a Ronin-MX gimbal ‘with ease’ – together the camera, lens and gimbal will weigh just over 4kg/8.95lb.

    As both products are already on sale the bundle deal is available now priced $ 25,999/€24,400/¥189,999 (Chinese yuan) – all before tax. The UK price has yet to be announced. For more information see the Hasselblad and the DJI websites – below are a couple of official samples from Hasselblad.

    ISO 100, F6.3, 1/500sec
    ISO 100, F4.5, 1/800sec

    Press release:

    DJI and Hasselblad introduce first joint aerial photography package

    First fully integrated aerial photography platform combines DJI’s M600 with Hasselblad’s A5D.

    DJI and Hasselblad today announced a fully integrated high-end aerial camera-platform bundle made up of Hasselblad’s aerial medium format camera A5D and DJI’s professional flying platform M600.

    The A5D-M600 bundle is the first joint product following DJI’s recent investment in Hasselblad. The combination of the M600 and the A5D provides users with today’s most advanced aerial optics and sensors integrated with one of the world’s most reliable aerial platforms. In addition, the two companies are looking at additional joint products for the future.

    ‘Combining best-in-class aerial optics with the world’s most powerful aerial platform is a natural development for DJI and Hasselblad. We are delighted to provide this unique bundle to professional photographers, surveyors and mappers’, said Perry Oosting, CEO of Hasselblad.’

    DJI’s M600 is designed for maximum performance and smart flight safety. The M600 is fully compatible with DJI’s advanced gimbal system the Ronin-MX. It comes fully equipped with 6 intelligent batteries, A3 flight controller, Lightbridge 2 Professional HD transmission system, a dust-proof propulsion system and powerful app control.

    Hasselblad’s A5D camera combines the world’s best optics and sensors with a modern, compact design. The sensors are almost twice the size of those used in today’s best 35 mm DSLR cameras and the A5D lens comes in 50 mm.

    Hasselblad’s Natural Colour Solution (HNCS) comes standard and helps optimize difficult color gradations straight out of the box. The A5D has a strong seal on the camera body and sensor unit preventing dust in the optical system.

    Articles: Digital Photography Review (dpreview.com)

  • Largest Mural in Paris: 15,000 Origami Birds Adorn Condemned Building

    [ By WebUrbanist in Art & Street Art & Graffiti. ]

    lunar building

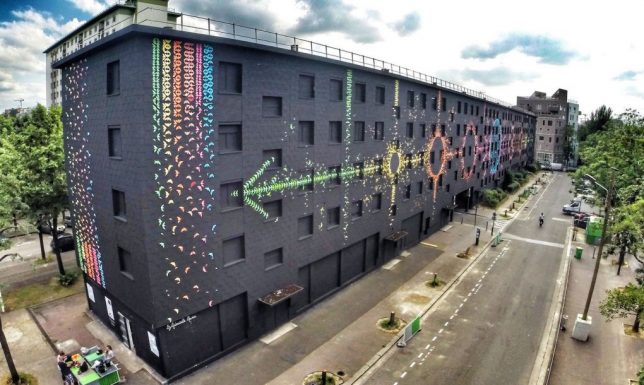
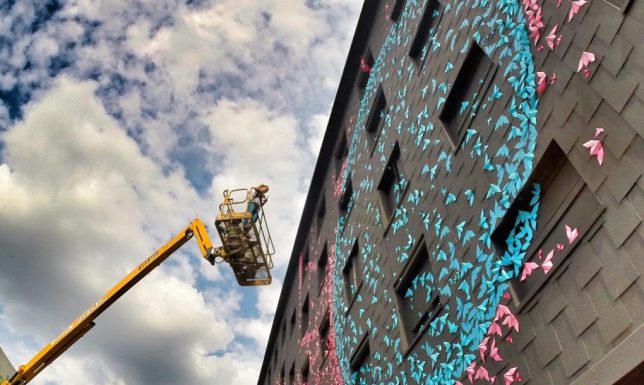
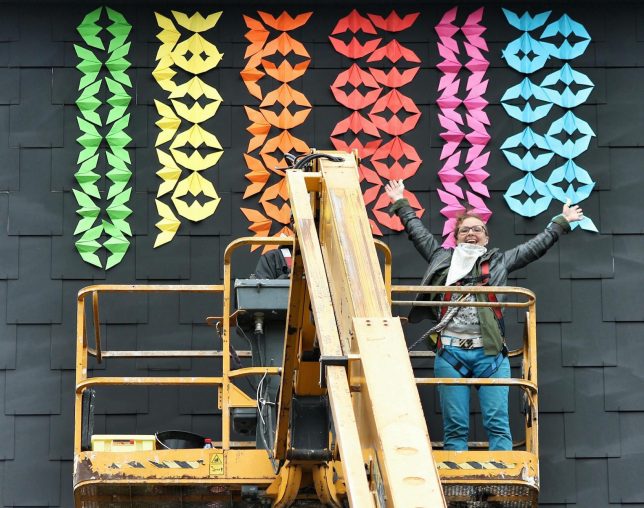
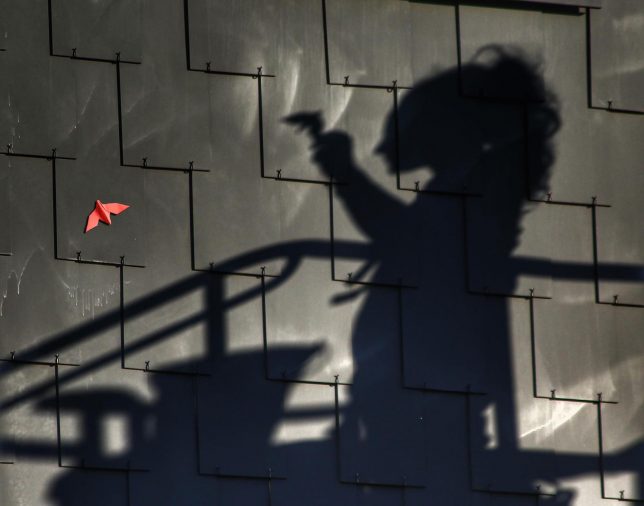
    Lunar Cycles is a massive site-specific installation featuring 15,000 paper-crafted birds in the 13th arrondissement of France’s capital city, requiring (non-paper) cranes to hang the elaborate avian collage.

    bird art crane

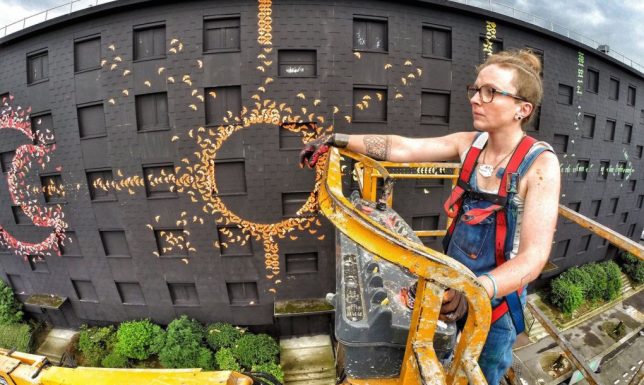
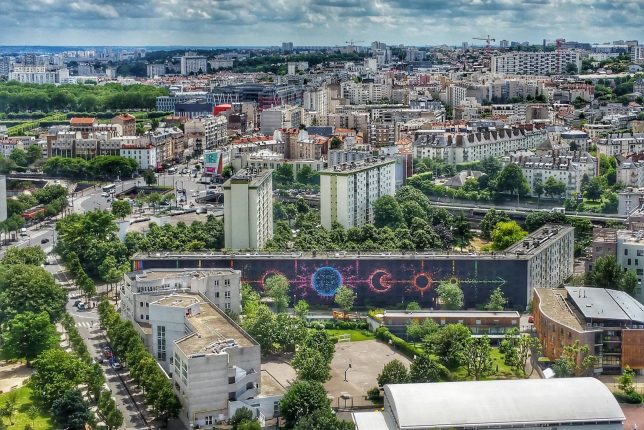
    Created by French street artist Mademoiselle Maurice in collaboration with Mathgoth Gallery, the work represents the biggest mural Paris has ever seen, a massive flight of birds landing on a 20,000-square-foot wall.

    lunar art bird origami

    birds on cranes

    The artwork was installed on a condemned building, allowing the artist to first apply a layer of black paint as a backdrop for the colorful array of geometric paper birds added to the wall. She also painted on a series of two-dimensional origamic patterns to bridge between the physical papers and flat surface.

    painted bird art

    bird crane aerial view

    The artist notes that the neighborhood contributed to the design, including those most impacted but the upcoming demolition of this long-standing structural pillar of the community. Previous projects from Maurice have featured similar themes in other settings, from birds and other geometric origami shapes gracing the walls of city streets and ancient castles alike. This work will be up through August.

    Share on Facebook


    [ By WebUrbanist in Art & Street Art & Graffiti. ]

    [ WebUrbanist | Archives | Galleries | Privacy | TOS ]


    WebUrbanist