Blog

  • How to Create Beautiful Light Painting Images With an Illuminated Hoop

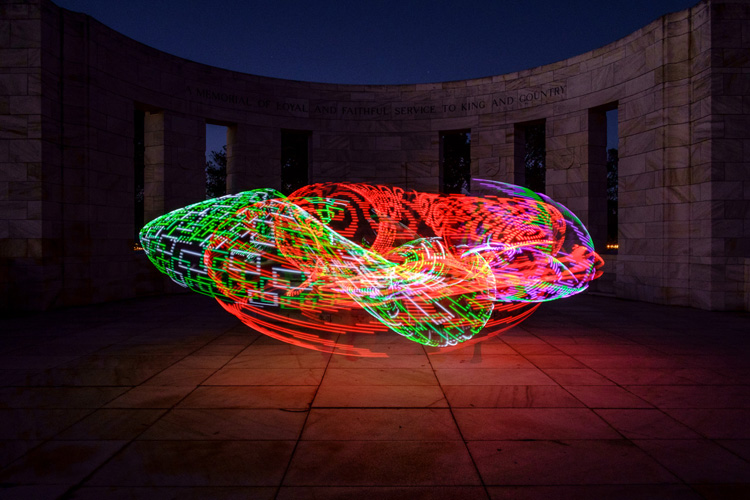
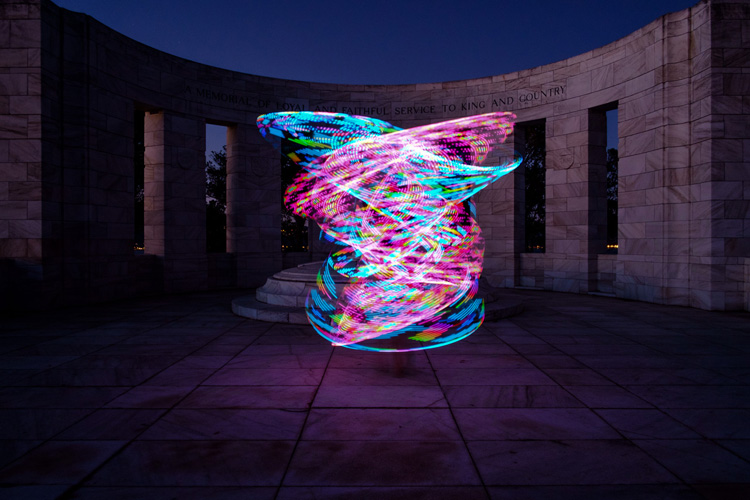
    Early last year I collaborated with a friend who is a professional circus performer and hula hooper to create the unique images that you see in this article.

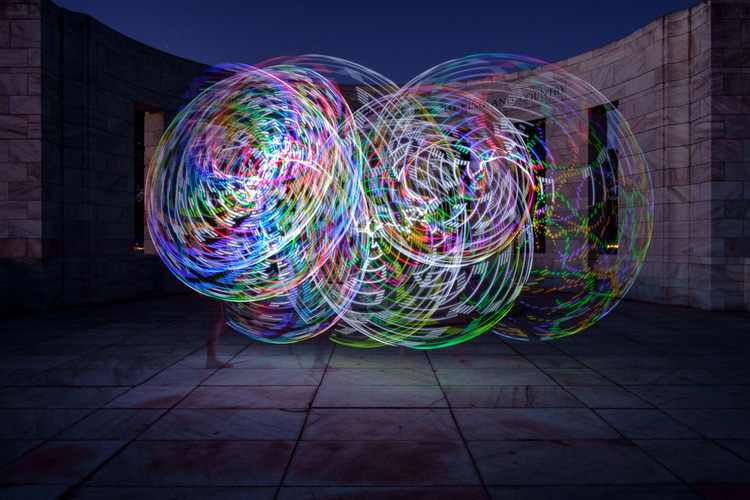
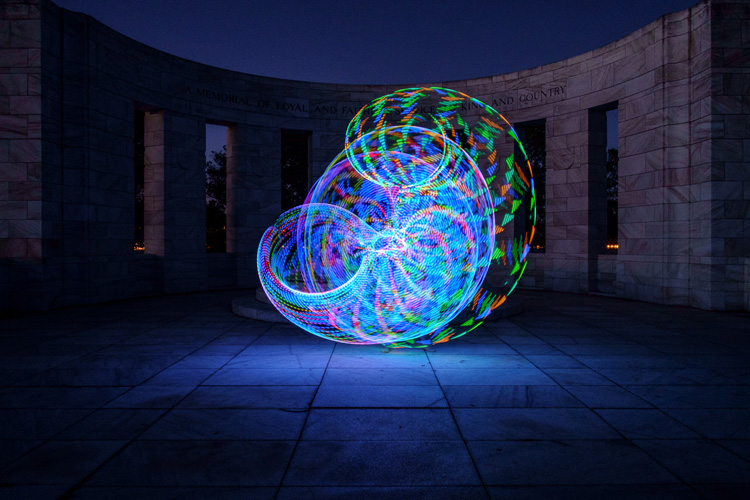
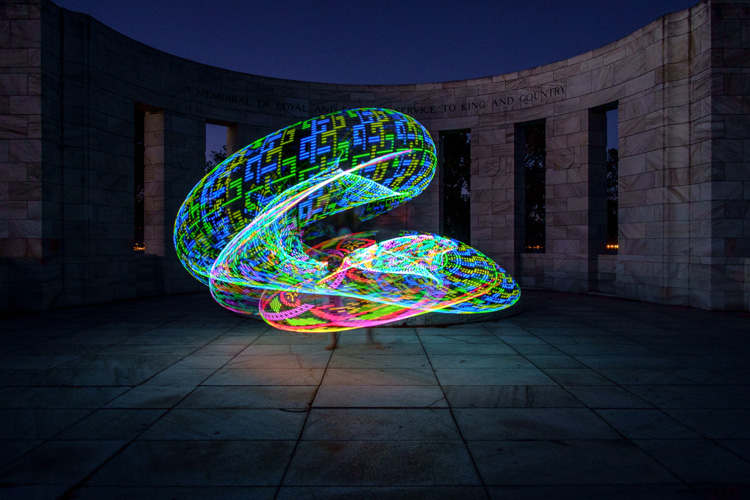
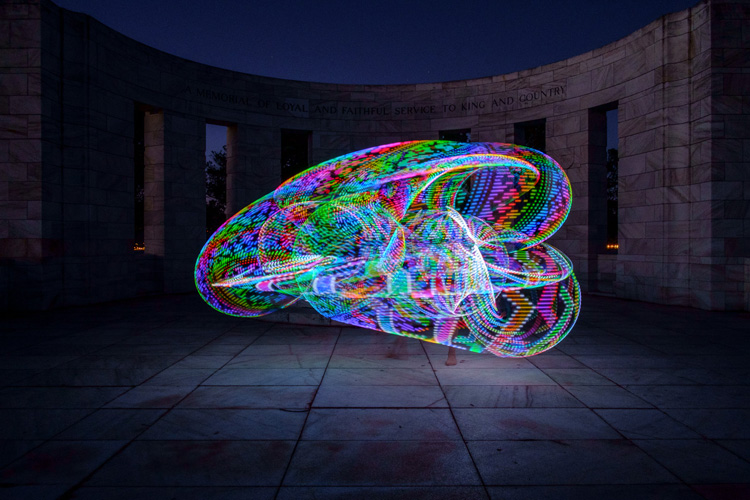
    There are lots of good light painting photos around, but the factor that sets these ones apart is that my friend Tess used something called a FutureHoop – a transparent hula hoop that has built-in lights that can be programmed to flash in different colors and patterns. It helps that Tess is a trained dancer and hooper, so she was able to create some beautiful patterns with the FutureHoop.
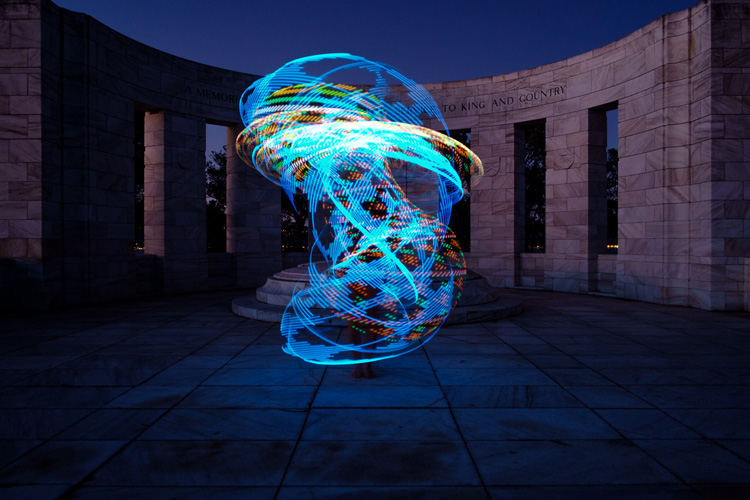
    painting with light

    You can try this technique yourself – if not with a FutureHoop then with any number of colored light tubes or similar devices that are available (or make your own). Do a search on Amazon to see what you can find, and use your imagination to reveal their potential.

    Whatever you end up using for your painting with light experiments, there are a number of things you need to consider to get the best results. Take care of these and you should be able to create some strong images.

    Choose a Location
    painting-with-light-7

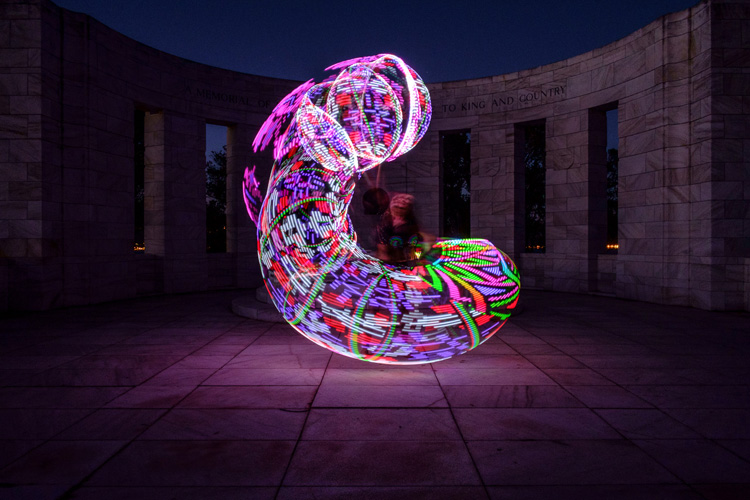
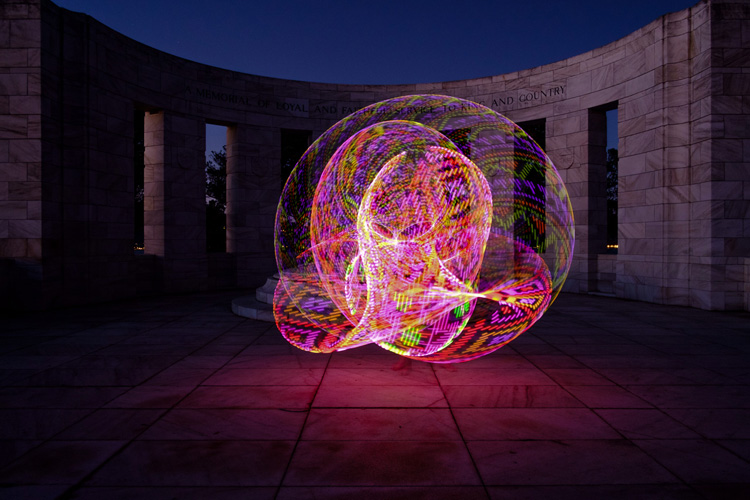
    Pick a good location. You need a dramatic background that complements the painting with light technique you choose to use. For these photos we went to Massey Memorial, built in remembrance of a past New Zealand Prime Minister on a hill in Wellington. I knew it would be a great place to take the photos because the marble pillars form a dramatic background. There was also plenty of room for Tess to move and dance with the FutureHoop.

    Take the practicalities into consideration when choosing a background. For example, beaches often make good locations for painting with light photos, but you need to make sure your model can walk around safely in the near dark without tripping over rocks (or falling into the sea). Incidentally, isolated beaches are also a great place to try steel wool spinning, another form of painting with light.
    painting with light

    Pick a model

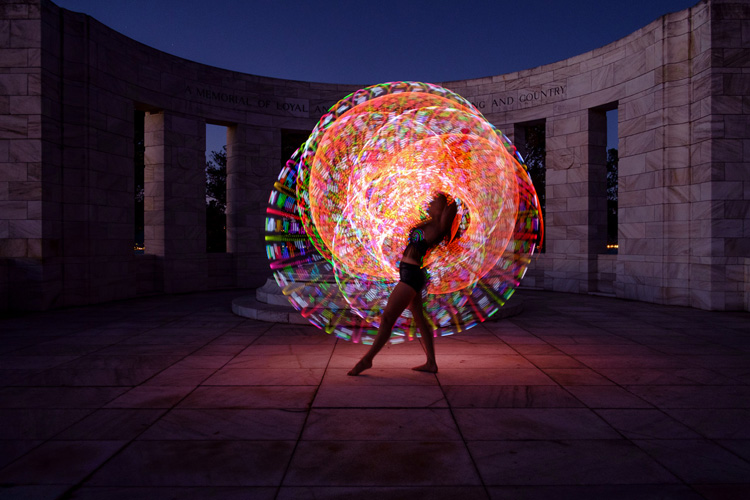
    Pick the right model. Tess is a professional performer and I couldn’t have created these photos without her. She had the appropriate costume, including an illuminated bra that can also be programmed to give different color displays.

    Her training also meant that she could strike professional poses. The following photo demonstrates this perfectly. Look at the arch of her back, the way her feet are positioned, and how the toes on her left foot are pointed. You can even see the flashing bra.
    painting with light

    The other thing that helped is that Tess thought about the patterns she would use on FutureHoop, and how she would move the hoop before the shoot. That helped us nail the shoot the first time.

    Ask your model to practice, and be prepared to reshoot if necessary. It is possible that you won’t create your best images during the first attempt. During the shoot, look at the photos on the camera’s LCD screen and see what works and what doesn’t. Then you can suggest things that your model can try, or ask her to do something again if you didn’t quite time the photo correctly. Use feedback to refine the images and work towards something beautiful.
    painting-with-light-15

    Time of Day

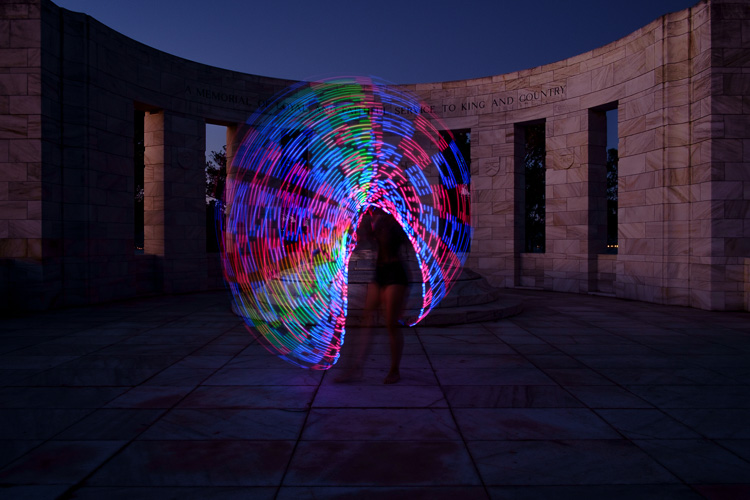
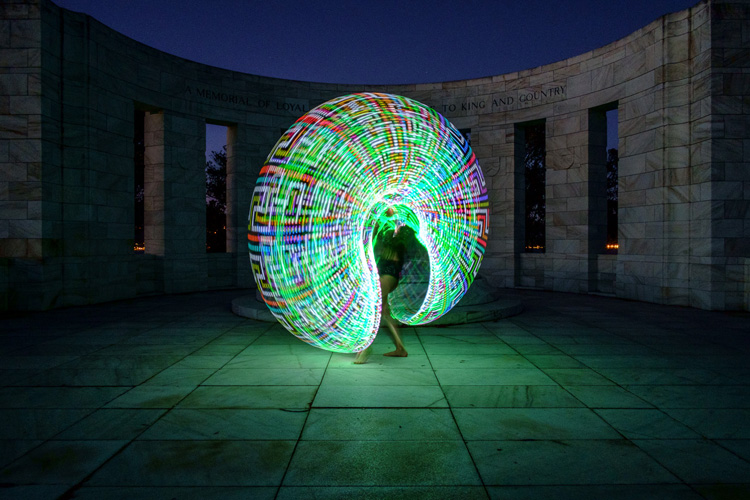
    Choose the right time of day. The best time for painting with light is twilight, as it is dark enough for the lights to show, but there is still enough ambient light to subtly illuminate the background, and maintain some color in the sky.

    The only difficulty with twilight is that the light fades rapidly, so you have to keep up by changing the exposure settings as you go along. The photos you take earlier on in the shoot, will be different from the ones you take later, as the light is fading. The ratio between the light from the FutureHoop (or whatever devices you are using), which stays constant, and the ambient light, which is fading, changes.
    painting with light

    painting with light

    The two photos above show the difference. The first was taken early in the evening, the second one when it was nearly dark. The pillars in the background in the first are lit by the light of the setting sun. The FutureHoop seems much brighter in the second because the ambient light levels are lower. Note that I darkened the background of the first image in Lightroom to match that of the second one.

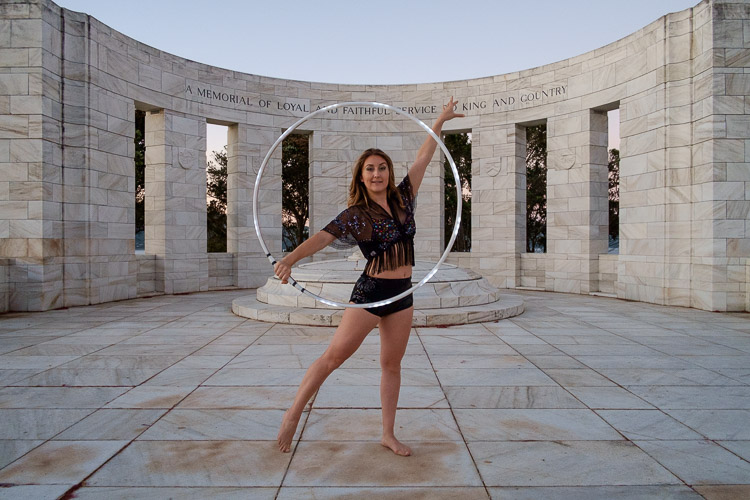
    This photo shows Tess warming up at the start of the shoot. It was still too bright as this stage for the painting with light photos – you can barely see the light of the FutureHoop.
    painting with light

    If you shoot at night the exposure should remain constant, but the sky will lack color. On the other hand, the light from the device your model is using could light up the background beautifully if it is close enough. So there may be advantages to working at night, rather than twilight, but in most cases the light during twilight will be better.

    Technique and Camera Settings

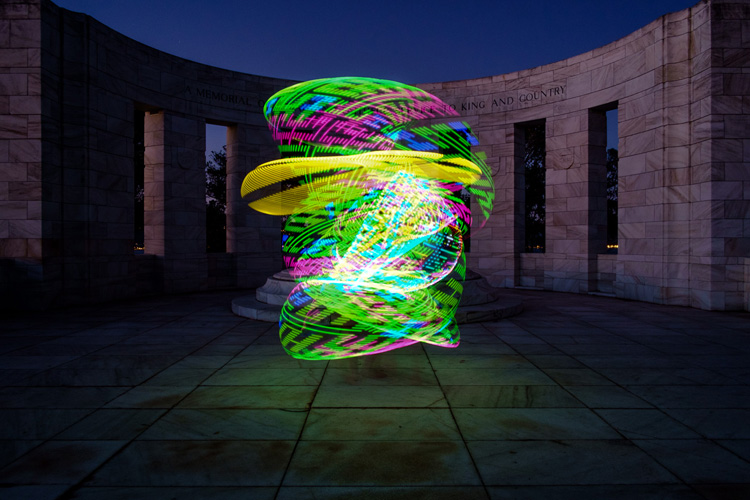
    Get your technique right. You need slow shutter speeds to take this type of photo, so a good tripod to support the camera and a cable release are necessities. I used shutter speeds between two and four seconds for these photos – you may need longer exposures depending on how long it takes your model to move the device you are using through the air. Tess moved quite fast, so the shorter shutter speeds we used worked better.
    painting-with-light-16

    Set your camera to Manual mode so that the exposure remains constant throughout the series (the moving lights will confuse your camera’s light meter in an automatic exposure mode). It is easy enough to open the aperture, or raise the ISO, if you need to as the light fades.

    Use the Raw format to give you maximum leeway in post-processing. Shooting Raw simplifies the shoot greatly as you don’t have to worry about settings such as color profile until you sit down to process the photos.

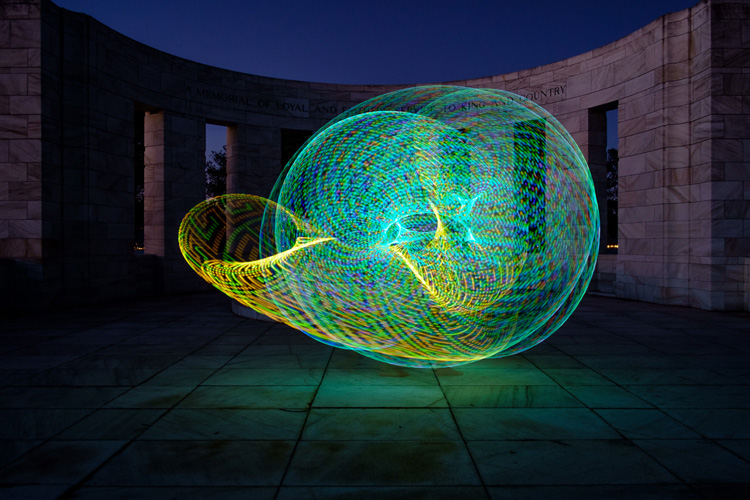
    In this shoot, once the camera was set up, I kept the aperture at f/8 or f/11 and raised the ISO as the light faded. I set the White Balance to Daylight so I could see the natural colors of the FutureHoop and the ambient light. Using auto White Balance may result in some strange color casts as the camera tries to compensate for the colored lights.
    painting-with-light-14

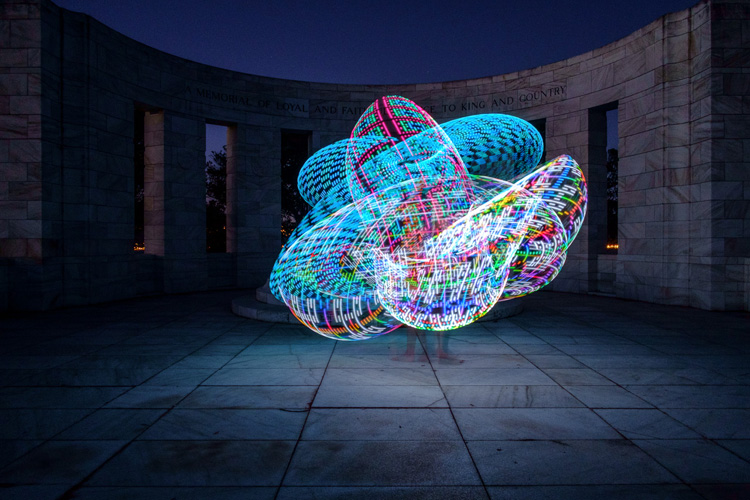
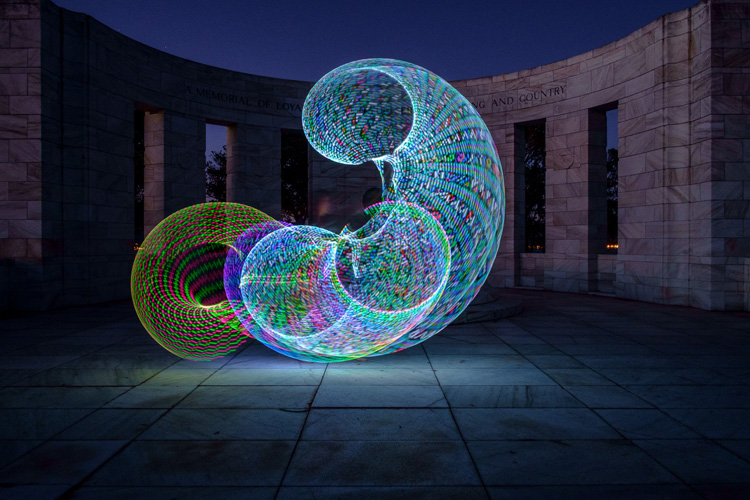
    Above all, have fun. If you both enjoy the process you create better images. If your model enjoys it she will want to collaborate with you on future ideas. Below are a few more images from our shoot – enjoy and hopefully they give you some ideas.
    painting-with-light-6

    painting-with-light-13

    painting-with-light-12

    painting-with-light-11

    painting-with-light-10

    painting-with-light-9

    painting-with-light-8

    Any questions? Let us know in the comments and I’ll do my best to answer.

    And if you’d like to learn more about the basics of photography, then please check out my ebook Mastering Photography: A Beginner’s Guide to Using Digital Cameras.

    googletag.cmd.push(function() {
    tablet_slots.push( googletag.defineSlot( “/1005424/_dPSv4_tab-all-article-bottom_(300×250)”, [300, 250], “pb-ad-78623” ).addService( googletag.pubads() ) ); } );

    googletag.cmd.push(function() {
    mobile_slots.push( googletag.defineSlot( “/1005424/_dPSv4_mob-all-article-bottom_(300×250)”, [300, 250], “pb-ad-78158” ).addService( googletag.pubads() ) ); } );

    The post How to Create Beautiful Light Painting Images With an Illuminated Hoop by Andrew S. Gibson appeared first on Digital Photography School.

    Digital Photography School

  • Software Review: AfterShot Pro 3 by Corel

    ASP3-box_front.jpgI remember seeing a poster on the wall of my fourth grade elementary school class that said, “What’s right isn’t always popular, and what’s popular isn’t always right.” The quote is attributed to Albert Einstein, and while he was most likely speaking with regard to issues of ethics, justice, and social equality, he might as well have been referencing the current state of image editing software.
    The king of the hill when it comes to photo editing programs is Adobe, with their extensive suite of applications designed for creative professionals and hobbyists. But just because their software is widely used, does not mean it is the best. Corel, a software company based in Canada, has been making its own image and video editing programs for years, and is a stalwart in the ever-changing software industry with roots that go back to the early days of the personal computer revolution in the mid-1980’s.

    The most recent version of their photo-editing software, AfterShot Pro 3 by Corel, may not have the sheer quantity of features offered by Lightroom or Photoshop, but it has a few tricks up its sleeve that make it a very attractive alternative to those looking for a solid solution outside of Adobe’s offerings.

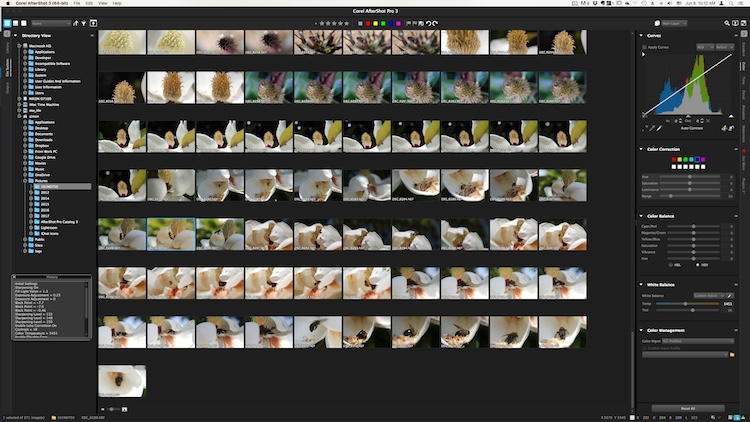
    The user interface is instantly familiar to anyone who has used Lightroom or other image editing programs.

    The user interface is instantly familiar to anyone who has used Lightroom or other image editing programs.

    Overview

    At its core, AfterShot Pro 3 is an end-to-end workflow solution that is designed to suit the needs of demanding photographers as well as casual hobbyists. It allows you to sort your images, edit them, and export them for print, sharing, or use in other programs. Its core features are centered on a robust set of tools that allow you to have a great deal of control over several parameters of your images, and adjust fairly basic elements like white balance, exposure, saturation, and contrast, while also giving you fine-grained control over settings like individual RGB color balance, hue/saturation/luminance, and tone curves.

    Pixel peepers and image tweakers will find little to complain about here, though some of the tools are a bit lacking compared to those offered by Lightroom. Sharpening and noise removal work quite well, but don’t allow the same degree of control as in Adobe’s software, but there are some automatic “Perfectly Clear” options for noise removal and color adjustments that I have found to be quite useful.

    You can of course edit metadata, use presets, and even insert watermarks or access a growing library of plugins, but a proper evaluation of this program isn’t necessarily about comparing features tit-for-tat to see how it stacks up to the competition. Anyone who is looking at sheer numbers of options and adjustment sliders, will likely find everything here that they could ask for. Rather, deciding if this is the right program for you will likely come down to whether it is suited to your own particular way of actually using the features it has.

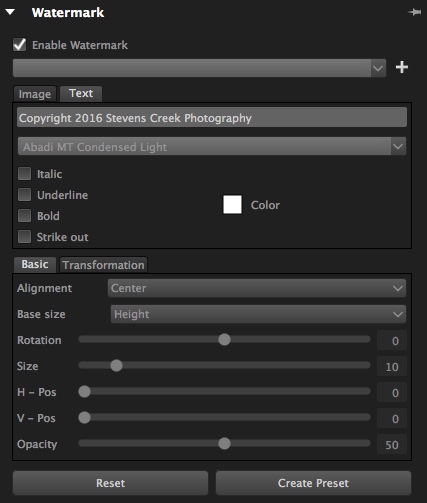
    The built-in watermarking tool can accommodate text or allow you to insert a logo or other graphic.

    The built-in watermarking tool can accommodate text or allow you to insert a logo or other graphic.

    Workflow

    AfterShot Pro 3 has its own unique workflow, which does bear some resemblance to how Lightroom and other programs function. But, in order to make full use of the program’s capabilities you might need to learn how to do things in a way that seems strange at first, but will feel like second nature over time.

    One of the most notable differences is that AfterShot Pro 3 does not import your pictures into a database, and does not store changes to files in one single master catalog like Lightroom. Instead, it works by leaving your pictures exactly where they are and does not copy them, even from a camera memory card. You must first save your images where you want them, and then as you make edits, a record of all the changes you have made to your image get stored in a unique XMP file.

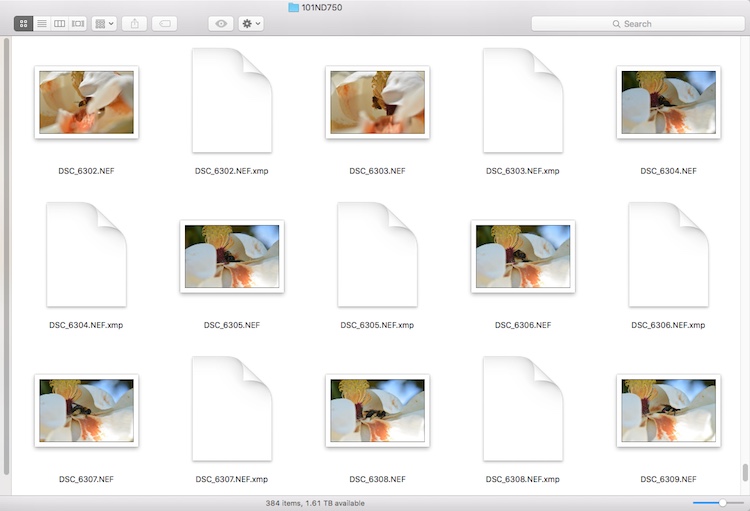
    Instead of keeping a master catalog file with all your edits, a single data file is created for every photo that you have changed. To let someone else edit a photo you have already started, give them the original and the XMP file.

    Instead of keeping a master catalog file with all your edits, a single data file is created for every photo that you have changed. To let someone else edit a photo you have already started, give them the original and the XMP file.

    This approach may seem counterproductive at first, because you end up with thousands of XMP files instead of one single all-encompassing catalog. However, it makes your editing much more portable and flexible, since you can transfer your photos and their editing instructions across devices, and share them with other users in a way that Lightroom simply does not offer. If I edit an image on my computer and want to hand it off to another team member to tweak even further, all I have to do is send her the original RAW or JPG file, along with the very small related XMP file. She can now open the image on her machine, make changes to any of my edits, and add alterations of her own. I can even edit an image right on my camera’s memory card without ever copying it to a hard drive, and then physically hand that card to someone else who can make further edits or go back and revise any changes I have made.

    From this standpoint, AfterShot Pro 3 could be a boon to those who work in a collaborative or fast-paced environment, as well as casual or hobbyist photographers who want a little more flexibility.

    Work space

    AfterShot Pro 3 also operates in a single combined environment, as opposed to the discrete modular-based approach taken by Lightroom, where you use the Library module to organize and sort your images, the Develop module to make edits, the Print module when making prints, etc. In AfterShot Pro 3 everything happens from within a single module, from organizing your images, to editing them, to adding watermarks, and finally printing or sharing. Neither one is necessarily good or bad, and neither approach can be said to be objectively better than the other, but personally I have found the interface in AfterShot Pro 3 to be a refreshing change from Lightroom, where I am forced to switch between Library and Develop to do simple things, and even the function of quick keys changes depending on which module I am in at the time. Your mileage may vary, but it’s an important distinction to know if you are considering changing over to Corel’s program, or even just trying it out.

    Use of Layers and Flexibility

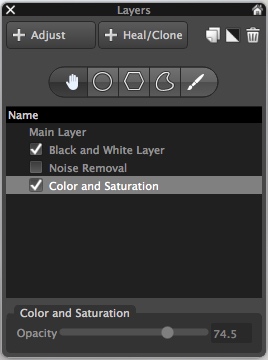
    Layers contain a set of edits and can be made more or less opaque, and enabled or disabled at will.

    Layers contain a set of edits and can be made more or less opaque, and enabled or disabled at will.

    One hugely useful aspect in AfterShot Pro 3, that really stands out from much of the competition, is its intuitive use of layers. You can apply any number of edits in terms of tint, hue, curves, etc., then stash them all into a single layer, which can then be set to anywhere between 100% and 0% opacity. This is an incredibly helpful way of stacking various types of edits on top of one another, and I’m surprised it is not available in Lightroom. For instance, you could easily create a layer wherein you convert your image to black and white, but then set that overall layer opacity to 25%, which would lend a subtle desaturated look to the actual image. You can use multiple layers of edits on a single picture, and even use layers specifically for cloning and healing adjustments as well. It’s a clever, and highly useful way of editing your images, and once you get used to it, you may not ever want to be without it again.

    Is the software right for your needs

    New in version 3 of the program, is a highlight recovery tool that allows you to coax a bit more out of your RAW files than before, along with other tweaks and improvements compared to earlier iterations. However, as I mentioned in the opening paragraph it’s not really a productive exercise to simply compare a list of features when deciding if an image editor is right for you, since nearly all of them have extensive options that will likely suit your needs.

    What matters is whether the program suits your needs and your workflow, and in the case of AfterShot Pro 3 it is certainly worth considering if you are a casual user who wants something with much more power and flexibility, or are simply seeking a worthy (and far cheaper) alternative to one of the more popular editors like Lightroom.

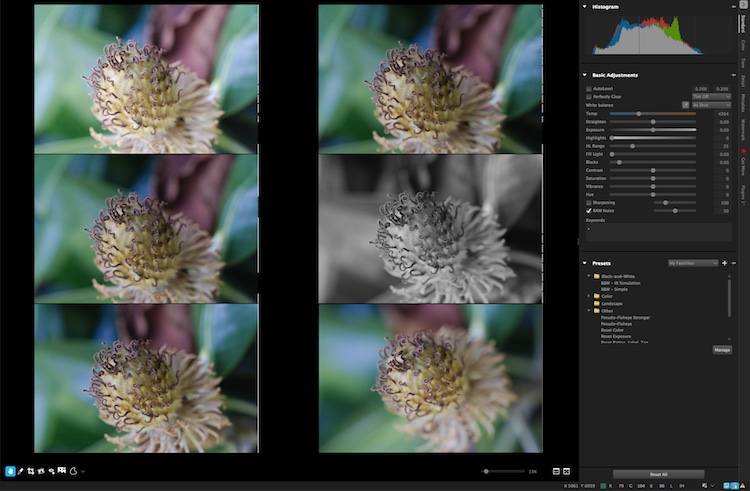
    One of my favorite parts of AfterShot Pro 3 is its speed, which honestly could be a make-or-break decision if you are comparing programs. Photos load almost instantly and switching between RAW files is as smooth as butter, which is a far cry from some other programs where you might as well go make some coffee while you wait for a picture to load.

    You can view up to six images at once and apply edits to individual photos while in multi-image view.

    You can view up to six images at once and apply edits to individual photos while in multi-image view.

    In the end, I found Corel’s latest entry into the image-editing fray a worthy competitor that can certainly hold its own against the competition. I especially like that it’s priced well under $ 100, which is a one-time purchase, as opposed to a monthly subscription.

    I did find a few things to quibble over, like like its lack of a clarity slider (which can be mitigated by using a combination of other sliders) and a black and white conversion function, that is in my opinion, far behind Lightroom’s use of color filters to take fine-tune control over monochrome conversions. However it is a speedy and full-featured image editing program that is certainly worth checking out.

    ASP3-Logo.png

    Editor’s note: if you want to check it out Corel has a free trial and you can enter to win a copy right here on dPS. 

    googletag.cmd.push(function() {
    tablet_slots.push( googletag.defineSlot( “/1005424/_dPSv4_tab-all-article-bottom_(300×250)”, [300, 250], “pb-ad-78623” ).addService( googletag.pubads() ) ); } );

    googletag.cmd.push(function() {
    mobile_slots.push( googletag.defineSlot( “/1005424/_dPSv4_mob-all-article-bottom_(300×250)”, [300, 250], “pb-ad-78158” ).addService( googletag.pubads() ) ); } );

    The post Software Review: AfterShot Pro 3 by Corel by Simon Ringsmuth appeared first on Digital Photography School.


    Digital Photography School

  • Sony announces FE 50mm F1.4 ZA prime lens

    $ (document).ready(function() { SampleGalleryV2({“containerId”:”embeddedSampleGallery_0676890121″,”galleryId”:”0676890121″,”isEmbeddedWidget”:true,”standalone”:false,”selectedImageIndex”:0,”startInCommentsView”:false,”isMobile”:false}) });

    Sony has announced its new Planar T* FE 50mm F1.4 ZA lens. This full-frame fast prime features an 11-blade aperture for circular out-of-focus highlights even as you stop down, ‘Advanced Aspheric’ and ED lens elements and Zeiss’ T* coating. Sony says that the lens’ Planar design minimizes distortion. 

    The lens is similar in construction to the FE 35mm F1.4. It’s weather-sealed and uses Sony’s Super Sonic Wave Motor for quick and quiet autofocus. A clicked aperture ring can be de-clicked if desired for smooth aperture control in video.

    At a recent shooting event in San Diego, we had a chance to go hands with this fast prime (view our gallery here). Despite being a bit heavy, the lens handles beautifully. We were very impressed by sharpness: subjects placed far off-center remained sharp even wide open, despite the 42MP Sony a7R II sensor resolution. Indeed, MTF curves indicate an impressive 60% response is maintained across the frame wide open even at 40 line pairs / mm. Our initial shots also indicate that axial chromatic aberration (green and purple fringing) are very well controlled, and bokeh appears very smooth, both of which add to this lens’ appeal over options like the Sony FE 55mm F1.8 ZA.

    The FE 50mm F1.4 ZA lens will be available this month at a price of $ 1500.

    Sony Planar T* FE 50mm F1.4 ZA specifications

    Principal specifications
    Lens type Prime lens
    Max Format size 35mm FF
    Image stabilisation No
    Lens mount Sony FE
    Aperture
    Aperture ring Yes
    Number of diaphragm blades 11
    Optics
    Elements 12
    Groups 9
    Special elements / coatings 2 aspherical + 1 ED element + Zeiss T* coating
    Focus
    Minimum focus 0.45 m (17.72)
    Maximum magnification 0.15×
    Autofocus Yes
    Motor type Ring-type ultrasonic
    Full time manual Yes
    Focus method Internal
    Distance scale No
    DoF scale No
    Physical
    Weight 778 g (1.72 lb)
    Diameter 84 mm (3.29)
    Length 108 mm (4.25)
    Sealing Yes
    Colour Black
    Filter thread 72.0 mm
    Hood supplied Yes
    Hood product code ALC-SH143

    Press Release:

    Sony Releases Full-Frame FE 50mm F1.4 ZA Prime Lens

    A quintessential wide-aperture 50mm “normal” lens, the new ZEISS® Planar F1.4 offers high resolution, high-contrast and overall exceptional performance

    SAN DIEGO, July 11, 2016 – Sony Electronics, a worldwide leader in digital imaging and the world’s largest image sensor manufacturer, has today introduced a new full-frame lens for their E-mount camera system, the Planar T* FE 50mm F1.4 ZA (model SEL50F14Z).

    This 50mm prime lens features a large F1.4 maximum aperture that offers impressive contrast and outstanding resolution that are hallmarks of the ZEISS® brand. It produces these consistently strong qualities throughout the entirety of the frame – from center to corner – and at all aperture settings, even while shooting wide open at F1.4. The cutting edge optical structure includes high-precision AA (Advanced Aspherical) and ED (Extra-low Dispersion) glass elements that reduce spherical and chromatic aberration, as well as a ZEISS® T* Coating that minimizes flare and ghosting creating the classic ZEISS® clarity. Additionally, its Planar design ensures minimal distortion.

    The large F1.4 maximum aperture of the FE 50mm F1.4ZA lens provides a level of brightness and speed that are advantageous for dimly lit indoor shots, night scenes, and portraits, while its 11-bladed circular aperture allows for stunning “bokeh”, or background defocus, in images. The lens also features an aperture ring with an adjustable ON/OFF switch, an AF/MF focus mode switch, and a dust and moisture resistant design¹, further increasing its functionality.

    The new lens is also equipped with a ring drive SSM (Super Sonic wave Motor) system, which allows it to efficiently lock focus with speed, precision and in near silence, making it particularly useful for shooting movies.

    Pricing and Availability – FE 50mm F1.4 ZA Lens

    The new FE 50mm F1.4 ZA lens will ship this July for a retail price of $ 1,500 US and $ 1,950 CA. The new FE interchangeable lens will be sold at a variety of Sony authorized dealers throughout North America.

    Articles: Digital Photography Review (dpreview.com)

  • Hands-on with Sony’s wireless flash system, arriving in August

    $ (document).ready(function() { SampleGalleryV2({“containerId”:”embeddedSampleGallery_7699465702″,”galleryId”:”7699465702″,”isEmbeddedWidget”:true,”standalone”:false,”selectedImageIndex”:0,”startInCommentsView”:false,”isMobile”:false}) });

    Sony’s wireless radio flash trigger system, introduced back in March, is headed to retailers this August. The system is comprised of a ‘commander’ (FA-WRC1M) and a receiver (FA-WRR1). There can be up to 5 groups, each of which can contain 15 flashes. A standard sync port on the receiver allows for control of studio strobes with ease, though of course you’ll lose TTL capabilities. High Speed Sync (HSS) is also supported. The system has a maximum range of 30m/98ft, and the commander unit sports a large LCD with an intuitive user interface.

    What we like

    At a recent shooting event in San Diego, CA, I got some brief hands-on time with the new transmitters and receivers, and was pleased with how intuitive the user interface was (not something you can always take for granted with flash systems). For the shot below, I used E-TTL with three flashes (groups) – one (A) at camera right for some harsh side-lighting, one (B) front left of model Eliza as the key, and one (C) directly in front of her for a tiny bit of balance to the overall light. I dialed in my exposure manually to ensure ambient was drowned out, then varied the ratios of groups A, B, and C on the transmitter’s LCD with ease until I got the lighting just as I wanted it. Essentially, it all worked just as I’d expect it to. Adjust flash ratios, groups, Manual power, Flash Exposure Compensation are all very intuitive and direct. Furthermore, the option of triggering studio probes was very handy. Studio shooters: rejoice.

    What we’re less pleased with

    If you’re an event shooter, I was less pleased with the lack of an AF assist beam on the transmitter. This speaks to a larger problem with Sony mirrorless: no Sony E-mount camera will trigger any off-camera AF assist beam. Red/IR AF assist beams are a boon to any event photographer; for example, I rely on it for fast AF at dim wedding receptions, where all my flashes are off-camera for dramatic lighting. In such scenarios, AF assist beams on transmitters allow the camera’s AF system to focus in near-darkness, obviating the need for a heavy flash on-camera. Sony’s continued lack of any support of off-camera assist beams on transmitters or flashes is unfortunate, given Sony’s desire for acceptance by pros, and considering that in our own lab tests, Sony’s a7R II and a6300 focus incredibly well with red/IR assist beams triggered by Canon/Nikon systems (contrary to the belief of many that on-sensor phase-detect AF systems can’t ‘see’ these beams).

    While one can fault both Canon and Nikon for similar oversights in their latest radio triggered flash systems, we find the omission increasingly unforgivable given that 3rd party options like Phottix and Yongnuo do offer AF assist beams on their radio triggers. Yet while these 3rd party options do at least work on Canon and Nikon DSLRs, they fail entirely to trigger AF beams on Sony FE cameras, due to Sony’s continued lack of support of AF assist beams (save for the largely useless one built into the camera).

    We’re hopeful that this is something Sony will address in the future. It’s by no means a deal-breaker though for what appears to be a very capable radio trigger system that should find a way into your kit if you shoot with Sony flashes.
    Both the commander and receiver will be available in August at $ 350 and $ 200, respectively.

    Pricing and Availability – New FE 70-200mm f/2.8 GM OSS G Master lens. Teleconverters and Wireless Lighting Control System

    Today, Sony has also released pricing and ship timing for the FE 70-200mm f/2.8 GM OSS G Master lens, 1.4x and 2.0x teleconverters plus their new wireless lighting control system. All products were introduced earlier this year.

    One of the most eagerly anticipated lenses of the year, the Sony FE 70-200mm f/2.8 GM OSS G Master lens takes its place as the flagship telephoto zoom in the Sony lens lineup. Featuring built in Optical Stead Shot (OSS) and a fast f/2.8 maximum aperture across the zoom range, the lens will be an ideal fit for nature, sports, travel, fashion, beauty and wedding photographers. This lens will ship this July for a retail price of $ 2,500 US and $ 3,300 CA.

    Designed exclusively to fit the 70-200mm F2.8 G Master lens, the new 1.4x and 2.0x teleconverters (models SEL14TC and SEL20TC) will both be sold for the same retail price of about $ 550 US and $ 700 CA, and will ship this July.

    The versatile new wireless flash and control system – comprised of the FA-WRC1M wireless radio commander and the FA-WRR1 wireless radio receiver – was designed to meet the growing demands of professional Sony photographers. With a maximum range of 30m (approx. 98 feet) and the ability to control a maximum of 15 separate flash units in 5 different groups, it offers a flexible wireless flash shooting experience with exceptional performance.

    The FA-WRC1M commander will be sold for about $ 350 US and $ 480 CA. The FA-WRR1 receiver will be sold for about $ 200 US and $ 280 CA. Both products will ship this August.

    The new lenses, teleconverters and wireless lighting system will be sold at a variety of Sony authorized dealers throughout North America.

    Articles: Digital Photography Review (dpreview.com)

  • Sony Planar T* FE 50mm F1.4 ZA Sample Gallery

    Sony has just announced its Planar T* FE 50mm F1.4 ZA lens, a high quality normal for its E-mount Alpha line of cameras. At a shooting event in San Diego, we had a chance to go hands-on. It’s a formidable lens, smaller than the 85mm GM with its 72mm filter thread, but significantly larger than the FE 55mm F1.8 ZA already available for the system.

    So what does that extra heft and glass get you besides top notch build quality and ergonomics? Have a look at our gallery where we’ve posted a smattering of real-world portraits at fast apertures shot using Eye AF on the 42MP Alpha 7R II, some shallow focus shots at various apertures to get an idea of axial CA, as well as some infinity horizons at various apertures for the assessment of sharpness (day scene) and coma (night scene).

    We’re duly impressed by the lens’ sharpness across the field wide open, lack of axial CA (green/purple fringing just outside the focal plane), and pleasing bokeh, but to keep things objective, we’ll be following up soon with a brief comparison of these attributes against the already stellar FE 55/1.8 ZA. Look for updates to this gallery as well in the coming days.

    Articles: Digital Photography Review (dpreview.com)

  • DEAL: How to Get Your Camera Out of Auto Mode

    It is Day 5 of our 7 day Summer Sale.

    Today only, you can buy our two popular Photo Nuts courses together for just $ 35.

    Pnbvideo

    Normally you’d pay $ 118 to get them both. But today you’ll save 70% when you purchase them in a bundle.

    Grab them here.

    In these two courses, Neil Creek goes through all the basics of photography and explains tech concepts in a way anyone can understand.

    This 2 course bundle includes:

    1. Photo Nuts and Bolts – Over 2 hours of practical online video lessons that teaches you all about your camera and gets you out of “auto” mode.
    2. Photo Nuts and Shots – 2.5 hours of online video lessons, that teach you the craft of photography – so you can take photos that truly connect with people and reflect your creative vision.

    Only want the one course? Then pick up either for just $ 19 for today only. Usually $ 59, you’ll save 68%.

    Remember, these deals only last for 24hrs so grab this offer while you can.

    Note: As with all dPS products these come with a 60 day money back guarantee so there’s no risk. If you don’t find them useful simply let our team know and we’ll arrange a refund.

    googletag.cmd.push(function() {
    tablet_slots.push( googletag.defineSlot( “/1005424/_dPSv4_tab-all-article-bottom_(300×250)”, [300, 250], “pb-ad-78623” ).addService( googletag.pubads() ) ); } );

    googletag.cmd.push(function() {
    mobile_slots.push( googletag.defineSlot( “/1005424/_dPSv4_mob-all-article-bottom_(300×250)”, [300, 250], “pb-ad-78158” ).addService( googletag.pubads() ) ); } );

    The post DEAL: How to Get Your Camera Out of Auto Mode by Darren Rowse appeared first on Digital Photography School.


    Digital Photography School

  • How to Use Portrait Angles More Creatively: A Visual Guide

    When it comes to creating a successful portrait, there are a lot of moving parts! We talk often about finding the light, composition, and camera gear when it comes to portraits. While all three of those things are important in creating your final image, they aren’t the only variables at play.

    Another important aspect in capturing portraits is angles. Understanding and making good use of angles in portrait photography, allows you to capture images of your subjects in the most flattering way, unique to each person you’re photographing.

    portrait-angles1

    Under the umbrella of “angles” are two different aspects – facial view, and camera angle. Facial view simply refers to how much of a person’s face is visible in the photograph. Whether or not you recognize the term facial view, you probably understand that there’s a visual difference between a photograph of someone looking directly into the camera, and a photograph of them in profile. These are examples of both ends of the facial view spectrum. In addition to facial view, you’ll also want to learn to utilize camera angle in portraiture. Camera angle refers to whether you’re holding the camera at eye level, or above or below the eye level of your subject.

    The concepts themselves are pretty simple, right? However, the difficult part is learning how each of these variables interact with each other, and your subject. Let’s walk through some visual examples of different facial views and camera angles using the same gear, subject, location, and same time of day, while observing how different angles change the look and the feel of each image.

    Camera Angles

    portrait-angles2

    Eye Level

    One of the most common camera angles for portraits is to place the camera at the subject’s eye level. This camera angle results in a final image that is balanced, and proportionate between head and body. It also allows for the subject to look directly into the lens, which tends to create the feeling of connection in a portrait. This is a flattering camera angle for most people.

    portrait-angles3

    High Camera Angle – Above Eye Level

    Shooting from a high camera angle (with the camera above the subject’s eye level) is another great option to try in your portrait photography. With this angle, the focus is on the face rather than the body and can be a very slimming angle for adults. I’m not at all concerned with making children seem slimmer than they really are, but find that I use this angle a lot when photographing children because I like the way that it emphasizes the childlike qualities of kiddos. I find that parents tend to really enjoy photographs of their children taken from a high camera angle, and I believe that’s because parents see their children from this angle quite often in their day-to-day life, so it feels very natural and candid.

    As a bonus, shooting from a high angle makes it really easy to achieve good catch lights in their eyes, and can also help to camouflage a less than desirable background. On the other hand, this camera angle may not be to your advantage in some situations; if your subject is very thin, shooting from above can sometimes make your subject look like a bobble-head, which is very rarely flattering.

    portrait-angles4

    Low Camera Angle – Below Eye Level

    Shooting from a low camera angle (with the camera placed below the subject’s eyes and tilted up) can make people seem tall and authoritative, but can also tend to make people (their body in particular) look larger than they really are, which is not very flattering for most people.

    This is particularly important to keep in mind if you’re photographing someone who is taller than you. If you’re 5’2″, and the person you’re photographing is 6’4″, you may need to be creative to make sure that you’re not photographing the whole session from a low camera angle. Have your subject sit, crouch, or find something that you can climb on to create a more even plane, for at least some of the photos – it really will make a difference.

    I’ve used this camera angle a handful of times with newly walking babies, and could envision using it with a wider angle lens (to capture more of the body) if I were photographing a politician, a football player, or someone who wished to appear particularly powerful. Overall though, this is usually not the most flattering angle for portraits.

    portrait-angles7

    Don’t be afraid to experiment. Try capturing the same image from two different camera angles. The image above demonstrates how the same subject and pose appears from eye level, as well as from a high camera angle. If you did a poll, I bet you’d find that some people prefer the eye level shot, and some prefer the high camera angle. This is largely a matter of taste and preferred aesthetic, so I frequently make a point to include both sorts of angles in my portrait sessions.

    Facial Views

    portrait-angles6

    Photographing a subject full-face means that their face is pointing directly towards the camera lens – you can see both ears, and both sides of the face in equal amounts. Full-face portraits often convey a sense of confidence and assertiveness, especially when the person being photographed is looking directly into the camera with their eyes also.

    portrait-angles8

    Other facial views include 3/4 view, 2/3 view, and profile view. With 3/4 view, the subject has turned just enough so that one of their ears is no longer visible to the camera. With 2/3 view, the subject has continued to turn so that their nose is just about to break the plane of their back cheek. For a true profile portrait, the subject’s face is turned 90 degrees, and is perpendicular to the camera.

    Shooting with the subject’s face turned to 2/3 view or 3/4 view tends to convey a more casual, and less assertive portrait. Images shot with a 3/4 facial view, and the subject looking just off camera, are often the most successful candid images, because the facial expressions are still easily visible to the viewer. Similarly, shooting in profile allows for portraits that feel unposed, while also being graceful and demure (particularly when shot in silhouette).

    portrait-angles5

    The best way to begin to learn, and really understand angles, is to grab a friend and go experiment. Take photos from every camera angle you can think of, including non-traditional angles like a bird’s eye or worm’s eye view. Then, take a photo with every facial view – full face, 3/4 view, 2/3 and profile. If you’re really feeling ambitious, try combining facial views and camera angles – does the feel of the portrait change if you shoot full-face from eye-level versus from a high camera angle?

    Chime in below, do you find that you gravitate towards images with a particular facial view and/or camera angle? What tends to be your preference and why?

    googletag.cmd.push(function() {
    tablet_slots.push( googletag.defineSlot( “/1005424/_dPSv4_tab-all-article-bottom_(300×250)”, [300, 250], “pb-ad-78623” ).addService( googletag.pubads() ) ); } );

    googletag.cmd.push(function() {
    mobile_slots.push( googletag.defineSlot( “/1005424/_dPSv4_mob-all-article-bottom_(300×250)”, [300, 250], “pb-ad-78158” ).addService( googletag.pubads() ) ); } );

    The post How to Use Portrait Angles More Creatively: A Visual Guide by Meredith Clark appeared first on Digital Photography School.


    Digital Photography School

  • Noah’s Ark: Creationist Theme Park Opens Amidst Regional Flooding

    [ By WebUrbanist in Destinations & Sights & Travel. ]

    great ark

    A biblical theme park contained within a huge ark (the largest timber-framed structure in the world) has opened in Kentucky, just as the region was hit hard by heavy rains and flash floods. Expecting an initial rush of visitors, the ark will have extended hours of operation for 40 days and 40 nights, coinciding with duration of the biblical fable of the great flood.

    ark opening

    Built by Amish carpenters to dimensions described in the Bible, the main Ark Encounter structure is close to 500 feet long, 100 feet wide and a 50 feet tall. It was created by Answers in Genesis, a fundamentalist Christian organization, close to their existing Creation Museum. The megastructure is meant to serve as an education center as well as adventure playground.

    ark interior

    ark base

    The original ark, as the story goes, was designed to save Noah, his family and pairs of animals from a great flood that swept the world clean of sinners. “In a world that is becoming increasingly secularised and biased, it’s time for Christians to do something of this size and this magnitude,” said Answers in Genesis chief executive Ken Ham. The new version employs somewhat more contemporary materials and construction techniques, connecting large timber logs with steel braces.

    ark dinosaurs

    The modern-day complex is designed to be accessible to all Americans, located less than a day’s drive from most of the country. In addition to scenes of dinosaurs living on the ark alongside humans, it features zip lines, petting zoos and camel rides.

    arkitecture

    ark grounds

    Controversially, the $ 100,000,000 project was made possible in part through sales tax incentives, a fact that does not sit well with all residents of the state. Alas, anyone seeking to survive the next great global purge will find that the ark itself does not float, though it may provide some high ground in a storm.

    Share on Facebook


    [ By WebUrbanist in Destinations & Sights & Travel. ]

    [ WebUrbanist | Archives | Galleries | Privacy | TOS ]


    WebUrbanist

  • Interview: “The best image as fast as possible” – Motorola’s approach to smartphone imaging

    Modern smartphones are essentially pocket-sized mini-computers, capable of dealing with many tasks that not very long ago would have been processed on desktop or laptop computers. The camera module is just one component of many, but more and more consumers are carefully considering camera performance in their buying decision.

    Manufacturers have been well aware for quite some time and are investing heavily to make sure the cameras on their devices can compete with the best. The device division of mobile communication pioneer Motorola for example, which was taken over by Chinese PC makers Lenovo in 2014, first assembled a dedicated camera and imaging team in 2013 when it was still part of Google.

    Since then the brand has launched a number of new devices in its Moto range with a clear focus on imaging performance and features. Most recently the Moto G Plus and the Moto Z and Moto Z Force were the first new models to be officially launched under the Lenovo name. In our first impressions review we were pleasantly surprised by the image output of the mid-range Moto G Plus. Both high-end models, the Moto Z and its sister model Moto Z Force, come with advanced smartphone camera features such as optical image stabilization, on-sensor phase detection autofocus and manual control.

    Val Marchevsky and Kathy Mahoney in the Motorola image testing lab Peter Matsimanis

    We had a chance to speak to some key members of the Motorola imaging team – Kathy Mahoney, Senior Director of Imaging Experiences at Motorola, Val Marchevsky, Senior Director of Engineering – Head of Camera Team, and Peter Matsimanis, Senior Development Manager Imaging – to find out more about the company’s approach to imaging and camera development. Read on to find out what they had to tell us.


    How would you describe Motorola’s strengths and weaknesses in the area of smartphone imaging?

    One of our core strengths is our dedicated camera and imaging team. Motorola has rapidly enhanced our imaging expertise over the past few years thanks to our internal team which has grown to include software and hardware engineers with diverse backgrounds (color science, optics, computer vision and beyond), in addition to external camera/imaging veterans. This team has reimagined the company’s approach and attitude toward camera technologies, ultimately delivering some of Motorola’s best imaging solutions to date, including our very own intellectual property, like Temporal Frame Stacking and PDAF (phase detect autofocus), which continues to drive major improvements and stands out within the industry.

    As for a weakness, I’d say not forming this non-traditional team sooner! Since building our team in 2013, we’ve re-emerged as an industry leader and key player. A lot has changed – for the better – and we look forward to continuing to create industry leading technology that delivers on consumers’ demands for more affordable, thinner smartphones and faster, higher quality cameras. 

    Is there any knowledge exchange happening between the imaging team at Lenovo/Motorola and the manufacturers of “traditional” cameras?

    In recent years, we’ve added top imaging talent to our team from traditional camera manufacturers like Kodak and HP. We also work closely with suppliers that have great knowledge of traditional cameras, as well as being ODMs for those traditional camera manufacturers. We have also been able to transfer a significant number of top engineering talent from within Motorola to our imaging team, in order to capitalize on their system integration expertise and to also provide cutting edge solutions to enhance the user experience.

    Leveraging 80+ years of embedded systems development, we’ve designed cameras that are truly best-in-class. Our plan for the future is to create common imaging experiences across all our products that will universally delight consumers around the world.

    What are consumers most looking for in terms of image quality and how is Motorola currently meeting these needs and/or innovating behind them for the future?

    Consumers are looking for great image quality in all conditions – low light, bright light, landscapes, selfies, sporting events and more. At Motorola, we’re constantly evaluating imaging solutions to identify those that will deliver under all of these conditions and ultimately provide consumers with a higher quality experience that enhances the memories captured with their smartphone cameras. This includes improving image detail, color accuracy and white balance for all of our devices.

    What camera and imaging features are most important to consumers? And how is Motorola working to improve these features in future devices?

    We feel what consumers are looking for and what’s important to them go hand-in-hand. Ultimately, what most people really want – and deserve – is a camera that automatically delivers amazing photos and videos that capture the full essence of their experience. We’re focused on continuing to develop enhanced hardware and intelligent algorithms that deliver unbelievable quality and simplicity, but also enable creative freedom.

    In which areas can we expect smartphone cameras to make the biggest improvements in the short and long term?

    In the short term, we’ll see strides towards improved performance to deliver bright, detail-rich, noise-free photos and videos in low light environments. Many smartphones on the market take low light pictures that are bright, but lack detail due to over-cleaning. We know that to achieve high-quality low light performance, you need to capture more light with bigger pixels and faster apertures. We see this trend continuing. We also expect to see this capability across all price tiers, and we feel Moto G Plus is paving the way.

    In the longer term, at Motorola, we continue to address areas of concern for hardware with lasers, better lenses and lower megapixels with large pixels to enhance low light image quality. We also continue to hone in on smart camera experiences, utilizing computer vision and artificial intelligence to provide users the best image, as fast as possible.

    Intelligent software not only maximizes the capabilities of hardware, but also leverages the depth of information available from the device. By using device sensors to detect the environment (light, motion, location, etc.), the software is able to deliver better quality images and richer experiences. It turns your camera into an access point for instant information that can help quickly analyze and identify your surroundings.

    The Moto 4G offers impressive camera specs for a mid-range device, including a 1/2.4″ sensor and an AF system that uses both on-chip phase detection and a laser to measure subject distance.

    The Moto G Plus is, in most respects, a mid-range device, but comes with a high-end camera specification. What was the decision process behind this design and specification?

    Consumers depend on great imaging performance each and every day for all of their communication needs, and it was a priority for us when designing Moto G Plus to offer excellent camera systems. Moto G Plus has a 16MP camera, fast apertures, laser and PDAF focus technologies and a wide-angle front camera lens, rivaling some of the best premium smartphone cameras on the market. Putting this technology in the hands of a diverse global consumer audience is a unique opportunity, and we find it particularly rewarding to help them capture life’s most important moments.

    The Moto G Plus comes with three focus methods: contrast detect, phase detection and laser. How difficult is it to combine those and what are the benefits of this combination? 

    Moto G Plus has an extremely responsive focus system that delivers crystal-clear photography under all conditions; low light to bright light, subjects close-by and distant landscapes. To do this effectively requires multiple focus technologies and the real-time intelligence to know which is best for current conditions. Picking just one or two is simply not good enough. Our philosophy is to maximize output from each focus system and use modern computational methods to calculate the ideal lens position.

    Phase Detect Autofocus does a great job quickly finding focus in bright light settings and when the object of interest is farther away, like in landscapes and at sporting events. Laser focus, sometimes referred to as “time-of-flight,” picks up in low light environments and when subjects are close-by, like restaurants and nightclubs. Contrast focus augments each of these technologies to ensure precise focus across a range of light and subjects.

    Getting all three to work synergistically is not an easy task, which is why most competitors pick either PDAF or laser (not both), and then augment with contrast. We believe every picture can and should be the best it can, which is why we’ve included all three technologies in Moto G Plus. We’ve also invested in a tremendous amount of simulation tools, deep learning and advanced statistic engines to ensure Moto G Plus covers the endless range of photos and videos consumers want to capture. We will continue to drive advancements in these multi-focus technologies to advance the speed and accuracy of Moto smartphone cameras going forward.

    Are manual camera controls, like the Professional mode on Moto G Plus, a niche feature or something that more users will be expecting in a device in the future?

    Consumer needs are extremely diverse, especially on a global scale. Most people simply want a great camera – just point and shoot in any condition, but there are others who are more avid photographers and want more out of their mobile imaging experience. We’ve heard from this particular group of photographic aficionados through blogs, the Google Play store, and even directly, that they want features like the professional mode on Moto G Plus that provides greater control and options to create a specific look without a point-and-shoot or DSLR. We’re making great progress towards addressing even more of these needs, and are providing a wider variety of options for more amateur photographers as well to capture every moment exactly how they want to capture it.

    The latest generation of Moto devices, including the Moto Z pictured above and the Moto G Plus, all feature manual control over essential shooting parameters, such as shutter speed, ISO and white balance.

    Kathy, you have many years of experience at digital imaging pioneers Kodak. How have you leveraged your past experience in your current role at Motorola?

    Kathy: I was fortunate enough to be a part of the start of digital imaging with Kodak, working alongside many talented and intelligent imaging engineers. That experience gave me a solid foundation of understanding around what it takes to deliver truly high-quality imaging systems.

    Fundamentally, delivering great imaging is so much more than ‘counting megapixels.’ Cameras are complex and require many technologies to deliver great photography. For example, strong low-light performance demands systems that can capture more light, including big pixels and fast apertures, while attaining fast accurate focus requires multiple focus technologies and the smarts to know which one to use under the current conditions.

    My past experiences also helped me realize how important photography really is to consumers’ daily lives, as well as the impact (and consequences) of poor quality. Imaging is how we communicate, relive and memorize our life experiences. I am passionate about ensuring Motorola’s camera technology continues to deliver amazing experiences that consumers can count on to be there when they need it.

    What lessons have you learned throughout your career in imaging and photography? What words of wisdom would you give to someone just starting in the field?

    Kathy: Throughout my career I have learned how important it is to follow your dreams and choose opportunities that you are passionate about. With passion, you’ll always achieve incredible results. Having worked on some of the first commercial digital cameras, the first photo kiosk, digital minilabs, thermal printers, retail printing systems and online photo services, I have spent my career helping people capture, share and relive their lives.

    Articles: Digital Photography Review (dpreview.com)

  • Quacked Up: Cleveland’s Legendary “Duck Factory”

    [ By Steve in Abandoned Places & Architecture. ]

    duck-factory-0a

    The “Duck Factory”, a century-old abandoned warehouse in Cleveland’s Little Italy home to hundreds of toy rubber ducks, has finally kicked the bucket.

    duck-factory-0

    duck-factory-1a

    Urbex explorers – not to mention Sesame Street’s Ernie – have suffered a grievous blow with the sudden loss of the former Woodhill Supply, Inc. warehouse in Cleveland’s University Circle neighborhood. Not that the east-side eyesore was on an irresistible descent into decay and deterioration, mind you: real estate developer Visconsi Companies, Ltd. had already received approval to tear down the old warehouse and replace it with 200 luxury apartments.

    Unchained Mallardy

    duck-factory-2a

    duck-factory-2b

    A devastating fire early on Sunday, September 27th of 2015 put the first part of that plan on the fast track – the smoldering remains of the brick building located at the corner of East 120th Street and Coltman Avenue were demolished later on that very afternoon. The origin of the blaze is yet to be determined but authorities suspect (ahem) fowl play.

    Ducks Redux

    duck-factory-3b

    duck-factory-3a

    Though it may be gone, Cleveland’s “Duck Factory” lives on thanks to the relative permanence of physical and virtual media; not to mention the efforts of uncounted urbex explorers who have documented the otherwise unremarkable icon for many years.

    duck-factory-11b

    duck-factory-11a

    duck-factory-11c

    By “otherwise unremarkable”, we mean that without those signature rubber ducks this abandoned factory would be forgotten as easily as any number of other rotting relics of the American rust belt.

    Next Page – Click Below to Read More:
    Quacked Up Clevelands Legendary Duck Factory

    Share on Facebook


    [ By Steve in Abandoned Places & Architecture. ]

    [ WebUrbanist | Archives | Galleries | Privacy | TOS ]


    WebUrbanist