Blog

  • Weekly Photography Challenge – Laughter

    Real, natural emotions captured with a camera can be challenging like getting photos of real laughter.

    How to approach people photography is up to you. There are two basic approaches:

    1. The sneak attack with a long lens where the subject is unaware of being photographed
    2. The direct approach where the subject is engaged with you and the camera
    Meena Kadri

    By Meena Kadri

    Dennis Brekke

    By Dennis Brekke

    Weekly Photography Challenge – Laughter

    How you decide to approach it is up to you. Do you prefer to be inconspicuous and wait for the right moment, observing people from afar. Or do you like to be part of the action, maybe even take part in or help cause the laughter.

    Do you find, like I do, that children are quicker to laugh than adults? Perhaps because they have less inhibitions? Or maybe they’re just sillier?

    Either way – go take some photos of people laughing, and have some fun yourself!

    Pauleon Tan

    By Pauleon Tan

    Thomas Hawk

    By Thomas Hawk

    Atli Harðarson

    By Atli Harðarson

    Becca.peterson26

    By becca.peterson26

    Elizabeth Pfaff

    By elizabeth pfaff

    BMiz

    By BMiz

    Share your images below:

    Simply upload your shot into the comment field (look for the little camera icon in the Disqus comments section) and they’ll get embedded for us all to see or if you’d prefer upload them to your favourite photo sharing site and leave the link to them. Show me your best images in this week’s challenge. Sometimes it takes a while for an image to appear so be patient and try not to post the same image twice.

    googletag.cmd.push(function() {
    tablet_slots.push( googletag.defineSlot( “/1005424/_dPSv4_tab-all-article-bottom_(300×250)”, [300, 250], “pb-ad-78623” ).addService( googletag.pubads() ) ); } );

    googletag.cmd.push(function() {
    mobile_slots.push( googletag.defineSlot( “/1005424/_dPSv4_mob-all-article-bottom_(300×250)”, [300, 250], “pb-ad-78158” ).addService( googletag.pubads() ) ); } );

    The post Weekly Photography Challenge – Laughter by Darlene Hildebrandt appeared first on Digital Photography School.


    Digital Photography School

  • 3rd annual International Drone Photography Contest winners announced

    $ (document).ready(function() { SampleGalleryV2({“containerId”:”embeddedSampleGallery_9559387122″,”galleryId”:”9559387122″,”isEmbeddedWidget”:true,”standalone”:false,”selectedImageIndex”:0,”startInCommentsView”:false,”isMobile”:false}) });

    Dronestagram has announced the winners of its third annual International Drone Photography Contest. Three winners were selected in each of the following categories: ‘Travel,’ ‘Sports Adventure,’ and ‘Nature Wildlife.’ According to National Geographic, which was one of the contest’s sponsors, Dronestagram received 5900 entries from photographers across 28 countries.

    The Dronestagram contest seeks out the best photographs taken with a drone, and deliberately looks for images that couldn’t have been taken any other way. According to Dronestagram marketing and development head Guillaume Jarret who spoke with Nat Geo, ‘A great drone picture is a picture that you immediately identify as a drone photo. It is taken at a low altitude, near the target of the picture.’

    The winners are:

    Travel category: 

    • 1st place: Francesco Cattuto’s “Basilica of Saint Francis of Assisi in Umbria, Italy”
    • 2nd place: Todd Kennedy’s “Cable Beach”
    • 3rd place: Karolis Janulis’ “Summer camp of Gran Canaria”

    Sports Adventure category:

    • 1st place: maxseigal’s “Moab Rock Climbing”
    • 2nd place: losmanesdeldrone’s “Complejo Acuático Norte de Santander”
    • 3rd place: High Angle Shot’s “Chugach Mountain Range, Alaska”

    Nature Wildlife category:

    • 1st place: mbernholdt’s “Kalbyris forest Denmark”
    • 2nd place: Szabolcs Ignacz’s “Swarm of sheep”
    • 3rd place: Jonathan Payet’s “Piton de la fournaise, Volcano”

    Via: Dronestagram

    Articles: Digital Photography Review (dpreview.com)

  • Samsung launches first removable UFS memory cards

    Samsung has announced that it intends to produce the first removable versions of a new format of memory cards designed, it says, to replace the microSD card in portable electronic devices such as cameras, drones and phones.

    The Universal Flash Storage cards are as small as microSD cards but boast enhanced read/write speeds, with the company claiming that 5GB can be read in just 10 seconds at a rate of 530MB/s. The write speeds a less impressive however, with a quoted maximum of 170MB/s, but Samsung says that is still almost twice the speed of a top end microSD card. The company says its cards will write at 170MB/s, which compares well to the 100MB/s rate quoted by SanDisk for its Extreme Pro UHS-II cards. The same SanDisk card reads at 275MB/s.

    Although the format was announced in a white paper (pdf) in 2013, and Samsung announced its plans in February, this is the first time the cards appeared to become a reality with compliance with the Joint Electron Device Engineering Council (JEDEC) standards.

    The company expects to introduce capacities of 32, 64,128 and 256GB, but hasn’t said when or whether there will be devices to take them.

    Press release:

    Samsung Introduces World’s First Universal Flash Storage (UFS) Removable Memory Card Line-up, Offering up to 256-Gigabyte (GB) Capacity

    Samsung Electronics, the world leader in advanced memory technology, today unveiled the industry’s first removable memory cards based on the JEDEC Universal Flash Storage (UFS) 1.0 Card Extension Standard*, for use in high-resolution mobile shooting devices such as DSLRs, 3D VR cameras, action cams and drones. Coming in a wide range of storage capacities including 256, 128, 64 and 32 gigabyte (GB), Samsung’s UFS cards are expected to bring a significant performance boost to the external memory storage market, allowing much more satisfying multimedia experiences.

    “Our new 256GB UFS card will provide an ideal user experience for digitally-minded consumers and lead the industry in establishing the most competitive memory card solution,” said Jung-bae Lee, senior vice president, Memory Product Planning & Application Engineering, Samsung Electronics “By launching our new high-capacity, high-performance UFS card line-up, we are changing the growth paradigm of the memory card market to prioritize performance and user convenience above all.”

    Samsung’s new 256GB UFS removable memory card ? simply referred to as the UFS card will provide greatly improved user experiences, especially in high-resolution 3D gaming and high-resolution movie playback. It provides more than five times faster sequential read performance compared to that of a typical microSD card, reading sequentially at 530 megabytes per second (MB/s) which is similar to the sequential read speed of the most widely used SATA SSDs. With this UFS card, consumers have the ability to read a 5GB, Full-HD movie in approximately 10 seconds, compared to a typical UHS-1 microSD card, which would take over 50 seconds with 95MB/s of sequential reading speed. Also, at a random read rate of 40,000 IOPS, the 256GB card delivers more than 20 times higher random read performance compared to a typical microSD, which offers approximately 1,800 IOPS.

    When it comes to writing, the new 256GB UFS card processes 35,000 random IOPS, which is 350 times higher than the 100 IOPs of a typical microSD card, and attains a 170MB/s sequential write speed, almost doubling the top-end microSD card speed. With these substantial performance improvements, the new 256GB UFS card significantly reduces multimedia data downloading time, photo thumbnail loading time and buffer clearing time in burst shooting mode, which, collectively, can be particularly beneficial to DSLR camera users. To shoot 24 large/extra fine JPEG photographs (1,120 megabyte (MB)-equivalent) continuously with a high-end DSLR camera, the 256GB UFS card takes less than seven seconds, compared to a UHS-1 microSD card which typically takes about 32 seconds, at 35MB/s.

    To achieve the highest performance and most power-efficient data transport, the UFS card supports multiple commands with command queuing features and enables simultaneous reading and writing through the use of separately dedicated paths, doubling throughput.

    As the leading memory storage provider, Samsung has been aggressive in preparing UFS solutions for the marketplace, while contributing to JEDEC standardization of the Universal Flash Storage 2.0 specification in September 2013 and the Universal Flash Storage (UFS) 1.0 Card Extension standard in March 2016. Following its introduction of the industry-first 128GB embedded UFS chip in January 2015, the company successfully launched a 256GB embedded UFS memory for high-end mobile devices in February of this year. As of earlier this month, Samsung also completed the Universal Flash Storage Association** (UFSA)’s certification program that evaluates electrical and functional specifications for compatibility of a UFS card, and Samsung’s new UFS card products were approved as UFSA-certified UFS cards with the right to use the official UFS logo for the first time in the industry.

    Articles: Digital Photography Review (dpreview.com)

  • Phottix launches Spartan multi-purpose beauty dish/softbox

    Lighting and accessories manufacturer Phottix has launched a new light modifier for studio heads and hotshoe guns that can be used as a beauty dish as well as an octa softbox. The Spartan is collapsible, uses flexible rods for its assembly and comes in 20″ and 28″ sizes. The central metal diffuser of the beauty dish configuration can be removed and users just have to attach the front diffuser panel to switch it to a softbox. A set of clasps along the rod housings allow a second diffuser to be attached directly in front of the light source, to create an extra diffused effect.

    To make the light from the softbox more directional Phottix supplies its standard egg-crate grid that attaches to the inner circumference of the dish just in front of the forward diffuser.

    The Spartan comes with a Bowens S-Type mount which fits the Phottix Indra heads, but speed rings are available for most other studio heads. The company’s Cerberus hotshoe flash mount is also compatible with the Spartan, so standard hotshoe speedlights can be mounted to the back of the modifier.

    The Phottix Spartan is available now and costs $ 120 for the 20in model and $ 145 for the 28in model. For more information visit the Phottix website.


    Manufacturer information:

    Meet the Phottix Spartan Beauty Dish

    Introducing the Phottix Spartan Beauty Dish. The perfect on-location light modifier, the Phottix Spartan assembles easily using flexible rods, a huge benefit over the time-consuming setup of traditional octa softboxes.

    The Phottix Spartan collapsible beauty dish is made from high-grade materials. The white interior produces softer, more even light. Included in the kit are a metal beauty dish “disk”, baffle, front diffuser and fabric grid.

    The Phottix Spartan is more than just a beauty dish—it quickly transforms into a traditional octa softbox by replacing the metal diffuser with the internal baffle. Add the outer diffuser for even more softness and the grid to make the light directional. All with the speed and ease that will make Phottix Spartan your first choice in light modifiers.

    The Phottix Spartan comes in two popular sizes – 50cm / 20 inches and 70cm / 28 inches – perfect for single subjects and couples. Use with the award-winning Phottix Indra series of studio lights or mount to the Phottix Cerberus Hot Shoe Flash Mount.

    Articles: Digital Photography Review (dpreview.com)

  • DEAL: Save 72% off Lightroom Editing System for Travel Photography

    Travel lightroom presetsIt’s day 2 of our Summer Sale and today we have a special Adobe Lightroom Presets Travel pack* for you with a 72% Saving.

    This “system” normally sells for $ 176, but it’s being offered to dPS readers for the special price of $ 49 USD – a massive 72% saving.

    One of the best parts about travelling is documenting your trip with pictures. But what’s not so great is pending hours weeding out the stinkers from the keepers. And editing them to look as awesome as possible.

    What if you could systemize and cut the editing process in half?

    And reduce the struggle, endless fiddling and overwhelm with all the features and options of Lightroom editing tools?

    Well, now you can thanks to the Lightroom Rapid Editing System for Travel Photography.

    Pro travel photographer Viktor Elizarov got tired of drowning in digital images. And spending more time processing pictures than taking them.

    So he searched for a better way. And after a year testing different approaches and systems with lots of trial and error – the Rapid Editing System was born.

    And he wants to share it with you.

    Learn how to automate 80% of your editing process so you save time on repetitive tasks. And have more free time to spend on fun tasks (like taking pictures).

    Viktor’s system features a large collection of Lightroom Presets specifically for travel photography. And will help take your photos from good to great – fast.

    Viktor normally sells his system for $ 176, but he’s offering it to dPS subscribers for the special price of $ 49 – a 72% saving.

    Here’s everything you get:

    • 90+ page eBook with step by step tutorial on how to use Lightroom Rapid Editing System
    • 20 1-Click LANDSCAPE Style presets
    • 20 1-Click CITYSCAPE Style presets
    • 20 1-Click PEOPLE Style presets
    • 10 1-Click Fall Colors Style presets
    • 10 1-Click Winter Colors Style presets
    • 10 1-Click Spring Colors Style presets
    • 10 1-Click Summer Colors Style presets
    • 41 TOOLKIT adjustment presets
    • “Reset All” preset that reverts your image to its original state
    • Documentation and Installation Instructions
    • Source RAW and JPEG photos used in the tutorials

    If you love travel photography – or just want to speed up your post processing – don’t miss out.

    But hurry! This valuable offer for the Lightroom Rapid Editing System for Travel Photography only lasts 24 hours – secure it for yourself and save 72% today only.

    *Note: You’ll need a copy of Adobe Lightroom installed to use these presets.

    googletag.cmd.push(function() {
    tablet_slots.push( googletag.defineSlot( “/1005424/_dPSv4_tab-all-article-bottom_(300×250)”, [300, 250], “pb-ad-78623” ).addService( googletag.pubads() ) ); } );

    googletag.cmd.push(function() {
    mobile_slots.push( googletag.defineSlot( “/1005424/_dPSv4_mob-all-article-bottom_(300×250)”, [300, 250], “pb-ad-78158” ).addService( googletag.pubads() ) ); } );

    The post DEAL: Save 72% off Lightroom Editing System for Travel Photography by Darren Rowse appeared first on Digital Photography School.


    Digital Photography School

  • DEAL: Save 71% on our Complete Portraits Pack of eBooks

    July is here, and do you know what that means?

    It’s time for our dPS Summer Sale where for the next 7 days we’re going to be sharing 7 amazing deals on training resources for photographers!

    While it may not be summer for all of us right now, we can guarantee the 7 deals we have lined up for you over the next 7 days are HOT.

    Deal #1: 71% Off The Complete Portraits Pack

    Photography deal portraits pack

    If you want to transform your dull and lifeless portraits into works of art… whether you’re a beginner, enthusiast, or pro – this deals for you.

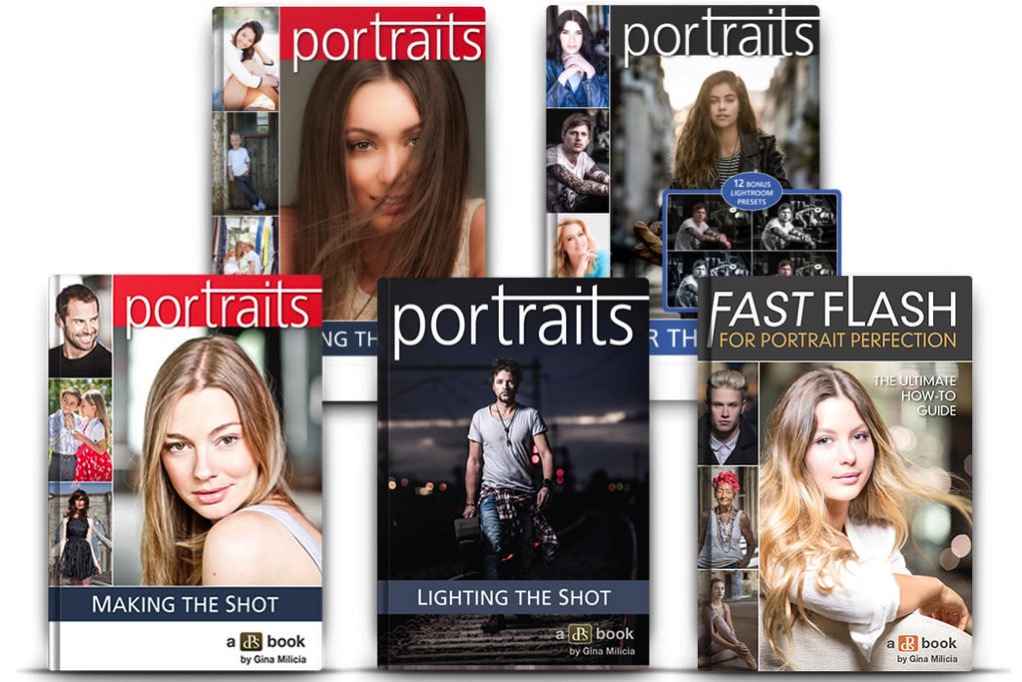
    dSP favourite and world class photographer, Gina Milicia shares everything and more about portrait photography in 5 in-depth ebooks.

    Get this ultra comprehensive Portraits pack for $ 29.

    For just $ 29 (a staggering 71% off the regular price) you’ll learn how to take portraits with soul.

    Here’s what you’ll get from one of the best in the biz with these exclusive dSP guides:

    • Portraits: Making the Shot – 84 pages of practical tips for bringing your portraits to life
    • Portraits: Lighting the Shot – 130 pages of the secrets to beautiful portrait lighting
    • Portraits: Striking the Pose – 119 pages and your go-to guide of natural posing positions
    • Portraits: After the Shot – 139 pages on master portrait post production and workflow
    • Fast FLASH For Portrait Perfection – 125 pages of Flash techniques & lighting set ups

    These ebooks regularly sell for $ 19.99 each (dPS readers rave about them!) but when you buy today you’ll only pay $ 7 per ebook!

    But here’s the deal – The Complete Portraits Pack only lasts for 24 hours.

    So if you’ve ever been disappointed that your portraits didn’t capture the true spirit of your subject… or lacks the WOW factor… don’t miss out on this incredible deal.

    Get your 5 ebooks today – they’re crammed with practical, easy to follow, step-by-step instructions, tips and tricks of portrait photography.

    Not only is Gina Milicia one of the best photographers in the business – she’s one of the best teachers!

    Subscribe to Get All 7 Deals the Moment they are Released

    If you’re looking for more photography training deals you can subscribe over on our Summer Sale page here to get notified the moment all of the next 6 days of deals go live. There are some great ones still to come!

    googletag.cmd.push(function() {
    tablet_slots.push( googletag.defineSlot( “/1005424/_dPSv4_tab-all-article-bottom_(300×250)”, [300, 250], “pb-ad-78623” ).addService( googletag.pubads() ) ); } );

    googletag.cmd.push(function() {
    mobile_slots.push( googletag.defineSlot( “/1005424/_dPSv4_mob-all-article-bottom_(300×250)”, [300, 250], “pb-ad-78158” ).addService( googletag.pubads() ) ); } );

    The post DEAL: Save 71% on our Complete Portraits Pack of eBooks by Darren Rowse appeared first on Digital Photography School.


    Digital Photography School

  • 3 Quick Photoshop Edits You Need to Know

    For many photographers, spending time behind a computer editing images, can be annoying. I personally enjoy the editing process, but I often hear photographers saying that they wish they didn’t have to spend time editing images. Of course, the image editing process has become the photographer’s responsibility since the advent of digital photography. In the past, the editing process was the domain of the lab that developed and printed your roll of film.

    If you are one of the photographers that does not like the idea of spending hours editing your images, then this article might help you get out of the editing blues.
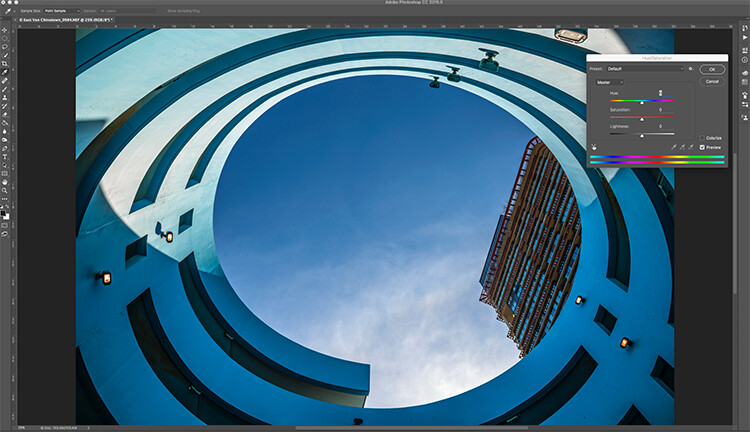
    Image open in Photoshop with the Hue and Saturation tool open

    Image open in Photoshop with the Hue and Saturation tool open

    Of course, you will always need to spend some time editing, but you don’t want to be spend hours trying to make an image  look good. There is a quick way to get some good results from your images in Photoshop. But, before we talk about that, first there are some things that you need to do in-camera, which will save you time in post-production.

    1. Make sure your lenses are clean, you don’t want to spend time cleaning up dust spots on your images.
    2. Make sure your sensor is clean, get your sensor cleaned when you start to notice sensor spots on your images.
    3. Use a tripod, straightening images in Photoshop or Lightroom wastes your time.
    4. Make sure your image is in focus and sharp. Zoom in on your LCD screen to be sure, if not, retake the shot.

    From there, you can be sure that your images are coming out of your camera in an edit-ready state. You don’t want to spend your time fixing photography mistakes made in-camera. The main goal with image editing is to take your good images, and make them look spectacular. So, here are some very quick edits you can do to your images (assuming the image is in good shape) in Photoshop, and in turn, spend more time behind the camera.

    Quick Edit #1 – Levels or Curves?

    This is something of an ongoing debate among photographers. Some have a preference for one or the other, the reality is that they are very different tools, and you can (and should) use both.
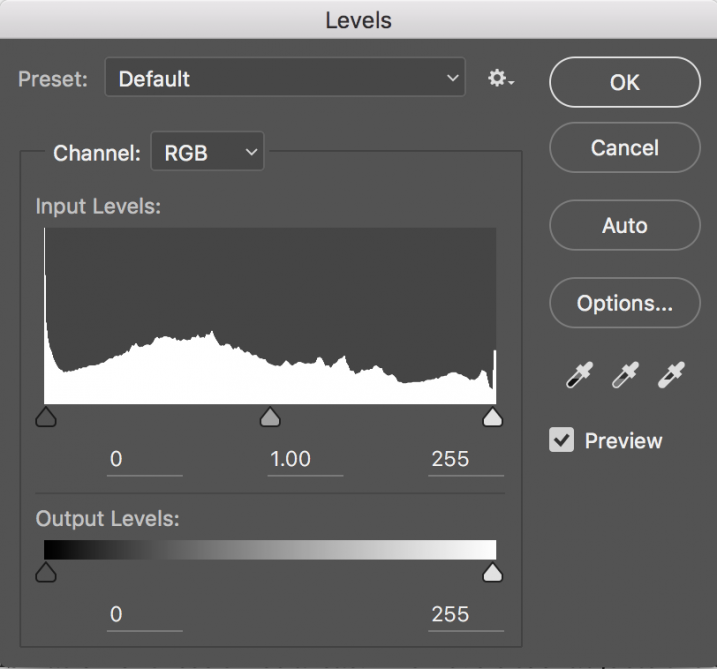
    Screen Shot 2016-06-30 at 3.52.50 PMLevels is a great tool to quickly make exposure adjustments to your image. Curves gives you the same ability, but in much more detail. It also has some very powerful abilities in terms of specific adjustments. For a quick edit though, Levels is your tool of choice: IMAGE > ADJUSTMENTS > LEVELS, the keyboard shortcut is CMD>L on a Mac and CTRL>L on a PC, OR add it as an adjustment layer for non-destructive editing.

    Levels can really make a difference to your image. Take a look at this article to help you with levels: 5 Photoshop Tools to Take Your Images from Good to Great, as well as some of the other tools available. The levels tool looks deceptively simple, but it has some really powerful functionality. It is best to adjust your image using Levels first, as this tool affects exposure on three areas of your image: the highlights, shadows and midtones.

    All images are made up of a combination of these three areas. The Levels tool adjusts the exposure in each of them separately. The reason why this is important, is because exposure affects colour. For example, if you make your exposure in a scene darker, your colours will become more saturated, if you brighten the exposure, your colours will desaturate. So, making levels adjustments first, will also help your image’s colour.
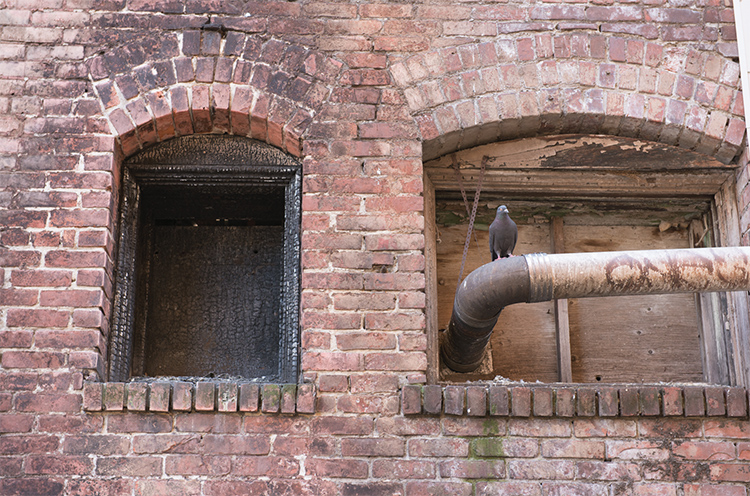
    Image straight out of camera, no adjustments

    Image straight out of camera, no adjustments.
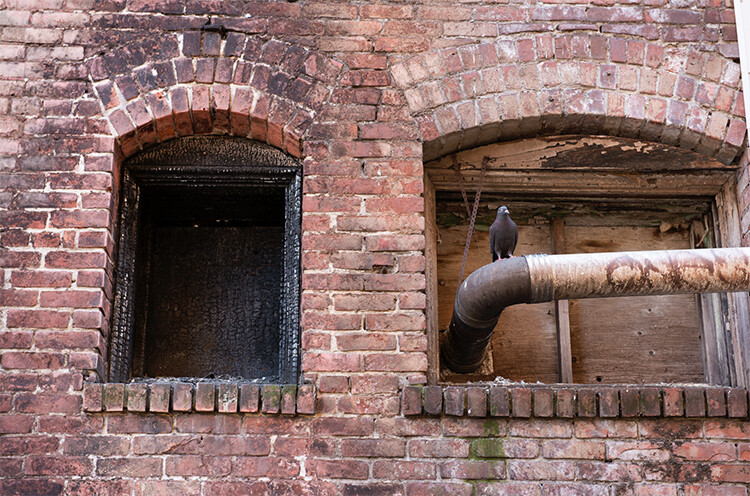
    The same image after adjustments in Levels

    The same image after Levels adjustments

    Quick Edit #2 – Hue and Saturation
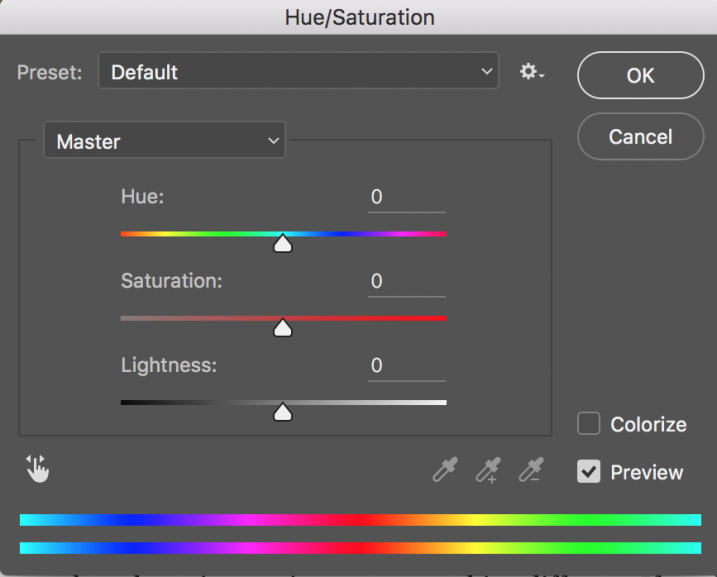
    Screen Shot 2016-06-30 at 3.54.30 PMThis tool is the next one in order. Start off with Levels and then move onto Hue and Saturation  (IMAGE > ADJUSTMENTS > HUE AND SATURATION or the keyboard shortcut is CMD>U on a Mac or CTRL>U ON A pc). This also looks like a simple tool on the surface, but there is a lot more depth to it.

    First of all, you will see three sliders, the top one is Hue, the middle one is Saturation, and the bottom one Lightness. You will also notice a pull-down box above the three sliders, it is set to Master as the default.
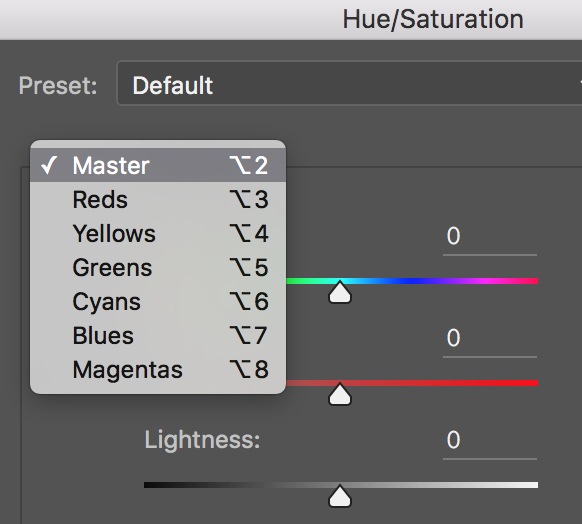
    Screen Shot 2016-06-30 at 4.02.56 PMThe Hue slider is used if you want to change the colours in your image to something different. If you leave the box at the top on Master and adjust the Hue slider, all the colours in the image will change, making your image look a little funky and weird, but this could be fun too! The real power of the Hue slide comes into play when you select a colour channel from the drop down box. If you click on the arrow next to Master, all the colour channels will drop down (see screenshot left). This is really useful if you want all the reds to look a little more orange in your scene. Bear in mind, this is a universal adjustment, it will select all the reds in your image and make an adjustment to them all.
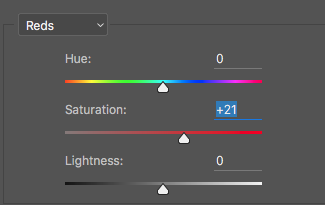
    Screen Shot 2016-06-30 at 4.06.31 PMThe second slider is Saturation which affects how rich your colours are in your image. If the reds in your image seem to be light or weak, you can select Reds from the list, and simply move the Saturation slider up (see screenshot right). Also, if some of your colours seem too bold, you can select the appropriate colour channel and move the Saturation slider to the left. You can select each colour individually and make the necessary adjustments.

    The last slider is Lightness. I have almost never used this one. If you have done a good job on your levels adjustment, there is really no reason to use the Lightness slider, so I would recommend not using it.
    Image after Hue and Saturation adjustments have been made

    Image after Hue and Saturation adjustments have been made

    Quick Edit #3 – Brightness and Contrast

    Once you have made your colour adjustments using Hue and Saturation, you might need to boost the brightness a little. The Brightness and Contrast tool (IMAGE > ADJUSTMENTS > BRIGHTNESS AND CONTRAST, there is no keyboard shortcut to this one) should be used sparingly, do not make big adjustments using it.

    You can simply nudge the Brightness slider to the right and give some pop to the image, then do the same for the Contrast slider. If you don’t feel that you need to use this tool, then don’t, it is only necessary if your image looks a little dark after your colour adjustments.

    Note: if you’ve done each of these as an adjustment layer you can go back and tweak your levels again, after doing the others.
    Final quick edits made in Brightness and Contrast

    Final quick edits made in Brightness and Contrast

    That’s it, you are done, in a manner of speaking. These quick edits may be good enough for you to get your image to a satisfactory point. If you are happy with your image, then great – you have not spent too much time editing it.

    You can do these three quick Photoshop edits on images that you think might be printed. Then if you see that the edits give them the boost you want, you can then spend more time on each image. This cannot replace a good workflow and a good understanding of what is possible in Photoshop, but these three tools will give you the ability to quickly edit your images and get them into a print-ready state really quickly.

    If you need to do some further edits, then take a look at this article about more detailed post production techniques or check out all the articles dPS has on image editing in Photoshop. 

    googletag.cmd.push(function() {
    tablet_slots.push( googletag.defineSlot( “/1005424/_dPSv4_tab-all-article-bottom_(300×250)”, [300, 250], “pb-ad-78623” ).addService( googletag.pubads() ) ); } );

    googletag.cmd.push(function() {
    mobile_slots.push( googletag.defineSlot( “/1005424/_dPSv4_mob-all-article-bottom_(300×250)”, [300, 250], “pb-ad-78158” ).addService( googletag.pubads() ) ); } );

    The post 3 Quick Photoshop Edits You Need to Know by Barry J Brady appeared first on Digital Photography School.


    Digital Photography School

  • Under pressure: Canon vs. Nikon in a hydraulic press

    It’s a question photographers have been asking since time immemorial – or since the 1970s, at any rate: which is best? Canon or Nikon? The brave souls over at the Hydraulic Press Channel are committed to finding out. And they’re going to do so in the only way they know how – by using a hydraulic press. In the yellow corner: a Nikon FA. In the red corner: a Canon AE-1. 

    We don’t want to ruin the outcome of this unconventional two-way test before you’ve watched the video (apart from anything else, we’re far from clear on the criteria of the contest) but we dare you to only watch it once.

    Articles: Digital Photography Review (dpreview.com)

  • Tips for How to Make the Most of Rainy Days

    It isn’t always possible to get great weather when are out photographing. If you’re on a once in a lifetime vacation and you encounter rainy weather, then you have a couple of choices. You can pack away your camera and forget about shooting until the weather improves, or you can find a creative approach to make the most of the inclement weather. I suggest you attempt the latter, and when you encounter wet weather, look for opportunities to create great photos notwithstanding the rain.

    In fact, if you compare a day with dull gray skies to one where there is plenty of rain, you might actually find that the rainy day is preferable, as there are more things of interest happening.

    Melbourne Australia in the rain

    There are, however, some things to consider when shooting in the rain. You will want to protect your gear from getting too wet, and you will want to know a bit about using your camera so that you can take great shots. Here are some tips for shooting on rainy days.

    Preparing for rain

    Invariably, at some time you will encounter rainy weather when you are out photographing. If you have a set of “go to” creative options that you have practiced, and you are familiar with, you can swing immediately into the mindset of taking advantage of the wet weather and capture some great shots. I’ll give you some ideas about what you can shoot.

    You’ll also need to prepare yourself and your camera so you can stay as dry as possible. Wet weather shooting should still be fun, and staying dry is an important part of that.

    What to shoot

    When you encounter rainy weather you can try to minimize the appearance of the rain or capture it. If you try to avoid the rain you’ll often capture dull and uninteresting images. Whereas if you capture the rain in your photographs, you’ll likely achieve more creative and interesting images.

    Shoot through windows

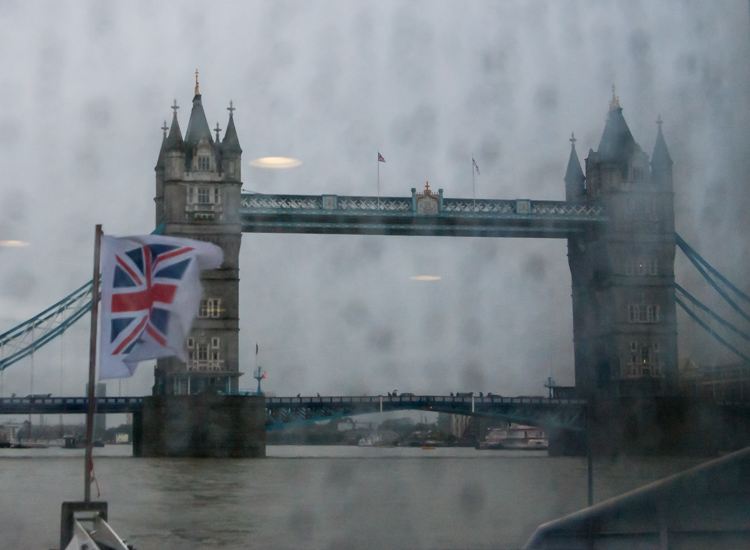
    Here are two shots of Tower Bridge in London shot from a ferry on the Thames. For the first image I shot through a rain-splattered window and focused on the Tower Bridge. The result is, quite frankly, embarrassingly awful.

    Tower Bridge London in the rain

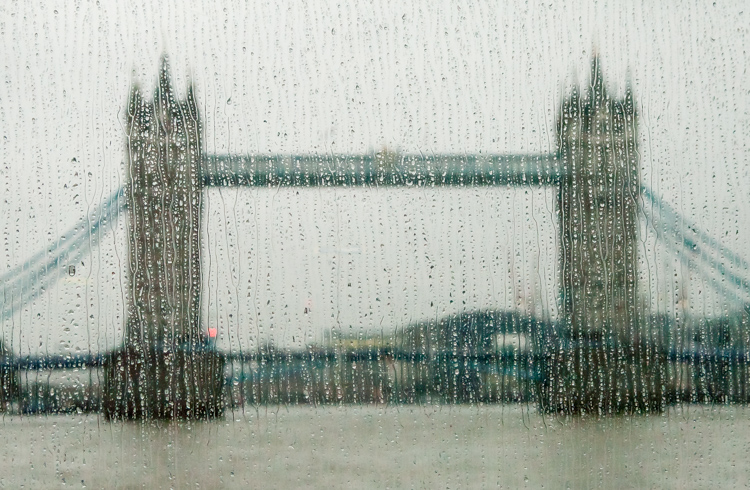
    This second image is shot from the same ferry, through the same window, but this time I focused on the raindrops instead of the bridge. The Tower Bridge is still recognizable, and the overall image is much more creative and pleasing. When you next get a chance, try focusing on the raindrops on a window, and not what you see through it.

    Tower Bridge London in the rain

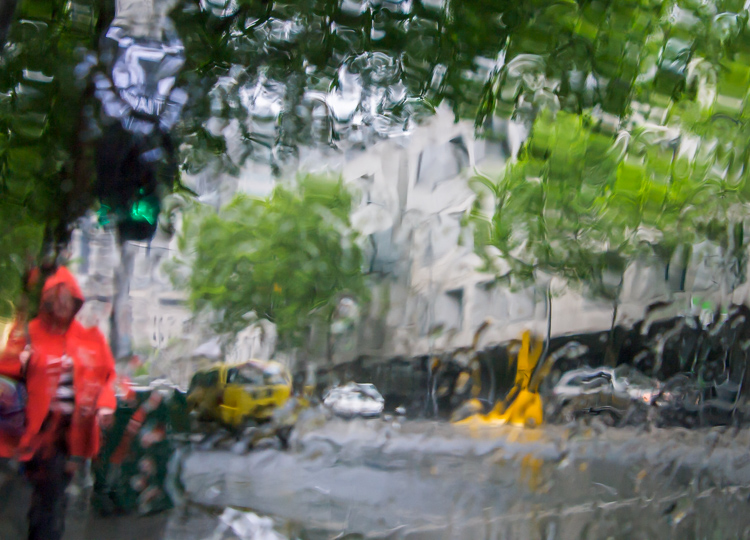
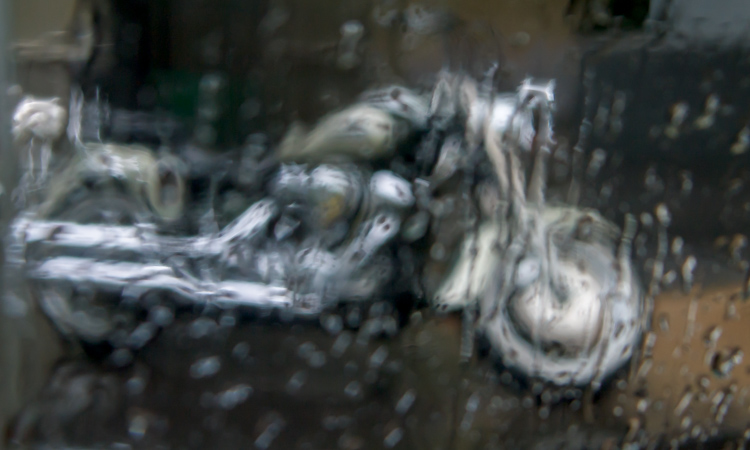
    In this shot below , captured through a taxi window as it sped through Melbourne in a sudden downpour, the focus has landed somewhere between the window and the bike, and the result is a painterly image.

    Tower Bridge London in the rain

    Shoot puddles

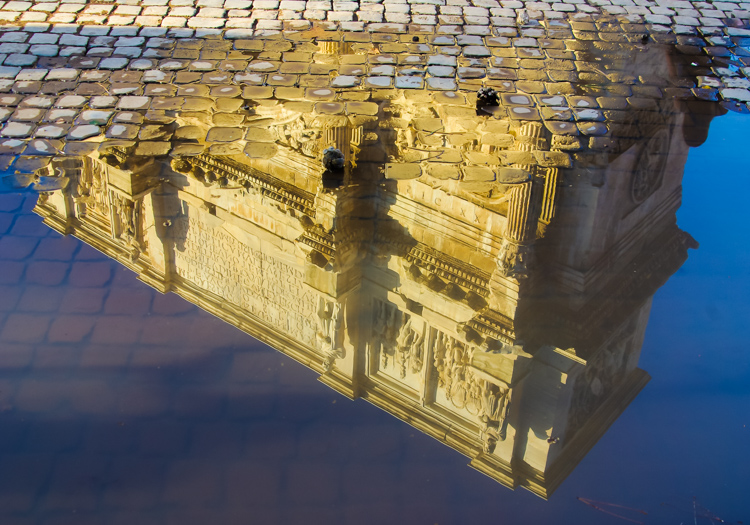
    Where there is rain, there are generally puddles. These puddles will reflect anything (and everything) from car taillights to buildings, and from people to trees. Look out for interesting objects reflected in puddles.

    Rome - reflection of building in a puddle

    Shoot water droplets

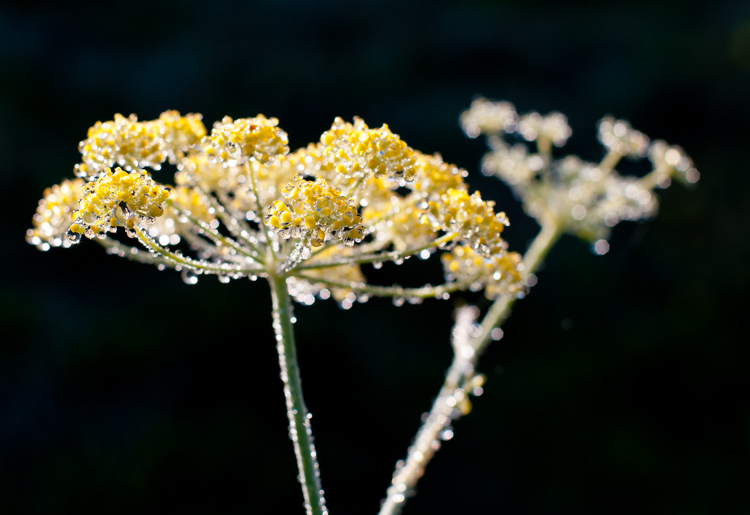
    For a time after it has rained, raindrops will still cling to plants and other surfaces. Look for interesting objects dotted with raindrops.

    raindrops on yellow flowers

    Shoot the clouds

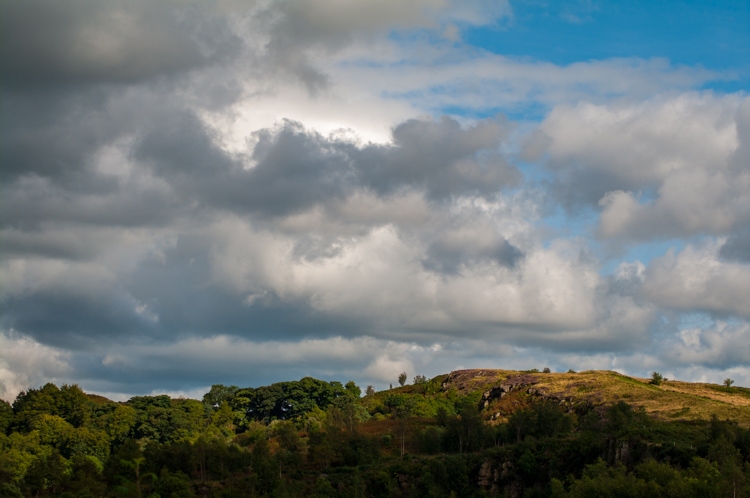
    Before it rains you will typically see interesting formations of rain clouds. Sometimes they will enhance an otherwise spectacular landscape, and sometimes they are the subject a photo in and of themselves.

    thunderous clouds

    When there are gaps between rain clouds, you will often see shafts of sunlight piercing the clouds and highlighting small areas of a landscape or cityscape. This light is truly magical and it will give a sense of drama a scene. Keep an eye out for this light and shoot it quickly when you see it – because the clouds are moving, light that is there one minute, will be gone the next.

    St Paul’s lit by shard of light

    Camera settings

    Some creative photography will require skills beyond using the automatic settings on your camera. For example when you opt to capture the raindrops on a window rather than what you see through the window you will need to experiment to find the best distance to stand from the window. Moving one or two steps closer or further from the window can totally change the image.

    You will also probably need to manually focus your camera so you need to know how to set it to Manual focus mode. The reason for this is that most cameras in autofocus mode will try to focus on the distant building, and won’t focus on the raindrops on the window. Using manual focus will allow you to determine exactly what is in focus in your shot.

    To capture raindrops on plants and other surfaces, you can use Aperture Priority mode and vary the aperture to achieve different results. A very large aperture (f/ 2.0 – f/5.6) will give you a shallow depth of field with only a small part of the scene in focus. A small aperture (f/8- f/13) will result in a much deeper depth of field, where more of the scene is in focus. It is up to you to decide how much of the image you want to be in focus – just be sure you know how to set your camera in Aperture Priority mode, what range of apertures are available for the lens you are using, and how to change the aperture setting.

    Caring for you and your camera

    When shooting in the rain you’ll want to keep your camera and yourself as dry as possible. I find it preferable to wear a raincoat with a hood because I find it impossible to juggle an umbrella and a camera at the same time. Whatever you choose, carry only what you need to have with you, so you have a better chance of keeping everything dry. It’s best to avoid changing lenses in wet weather, so stick with just one lens. Take care when moving from a cold, rainy situation into a warmer building. The heat combined with the damp will increase the humidity and you run the risk of condensation forming inside your camera lens.

    Even if your camera has good weather seals, take care to protect it as best you can. There are plenty of good rain covers that you can purchase for your camera, or in a pinch, cover the camera and lens with a plastic bag, and cut a small opening for the lens. Duct tape or elastic bands will hold the bag securely on the camera.

    Make sure to pack some clean, dry towels that you can use to wipe off your camera, but don’t use them on your lens – only use a lens cleaning cloth on the lens glass.

    If your camera gets wet, dry it off as carefully as you can, and leave the lens open at full zoom until it’s thoroughly dry. A camera will dry best in a cool dry place, and you can use silica gel (an absorbent material sold in packets) in your camera bag to help avoid condensation forming.

    Conclusion

    Giving some thought as to creative options for capturing great photos in the rain, with some advanced preparation so that you and your camera stay dry, may turn the prospect of shooting on a rainy day from a sorry disappointment, into an exciting challenge.

    googletag.cmd.push(function() {
    tablet_slots.push( googletag.defineSlot( “/1005424/_dPSv4_tab-all-article-bottom_(300×250)”, [300, 250], “pb-ad-78623” ).addService( googletag.pubads() ) ); } );

    googletag.cmd.push(function() {
    mobile_slots.push( googletag.defineSlot( “/1005424/_dPSv4_mob-all-article-bottom_(300×250)”, [300, 250], “pb-ad-78158” ).addService( googletag.pubads() ) ); } );

    The post Tips for How to Make the Most of Rainy Days by Helen Bradley appeared first on Digital Photography School.


    Digital Photography School

  • FLM CP-Travel tripod aims for ultimate in portability and versatility

    $ (document).ready(function() { SampleGalleryV2({“containerId”:”embeddedSampleGallery_4816728746″,”galleryId”:”4816728746″,”isEmbeddedWidget”:true,”standalone”:false,”selectedImageIndex”:0,”startInCommentsView”:false,”isMobile”:false}) });

    German photo accessory manufacturer FLM is launching a new travel tripod on indiegogo. The CP-Travel will be made of ten layers of carbon fiber and will be able to support up to 10kg/22lb of gear. When fully collapsed, the tripod will fit in a carry-on suitcase, with a maximum height of 142cm/55.9in when completely extended.

    The CP-Travel offers interchangeable rubber and spiked feet, using a revamped changing system that the company calls more secure and better able to dampen vibrations. Seeking funding to send the CP-Travel tripod into production, FLM is offering early bird discounts to its first backers. The company anticipates a final $ 635 MSRP when it becomes available in October.

    Articles: Digital Photography Review (dpreview.com)