Blog

  • How to Use a Limited Color Palette to Compose Strong Images

    There are lots of ways to use color in photography. One is to look for strong, complementary colors – those on opposing sides of the color wheel – and include them in the same frame. The opposite is to use a very limited color palette.

    Here’s an example of the first approach. There’s a green background, purple petals, and yellow stamen. Three strong colors, working together to create an image that has good impact, because of color contrast.

    Limited color palette

    Limited color palette approach

    But the approach is the opposite. Instead of including several strong, contrasting colors the idea is to use a much more limited color palette. You can do this with strong colors, as in this example below, where the dominant color is red.
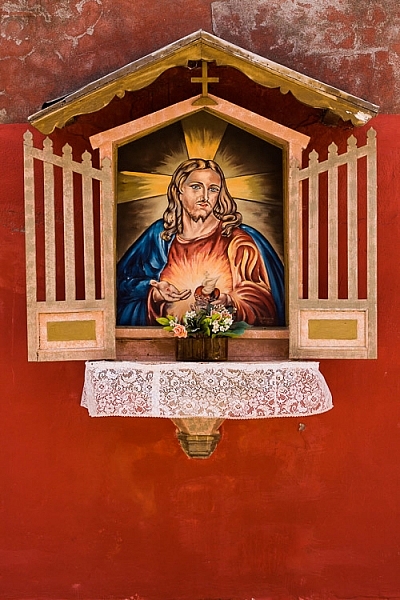
    Limited color palette

    Or you can do it with much more subtle colors, as in this photo.
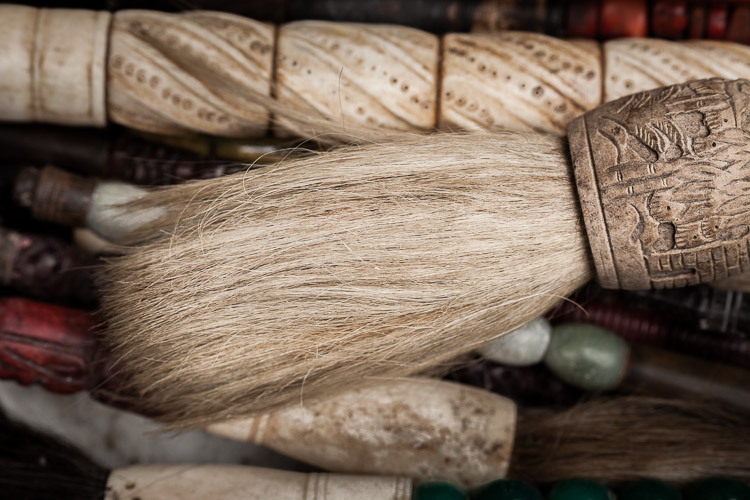
    Limited color palette

    Either way, the result is a strong image with an intelligent use of color.

    Many photographers move away from using saturated, contrasting colors towards a more limited and subtle palette as their skills and vision evolve. As you look at the work of other photographers, especially professionals, you’ll find that a limited color palette is a mark of maturity and sophistication.

    Color in the landscape

    Landscape photography is a genre that is synonymous with saturated color. Back before digital, one of the most popular films for landscape photography was Fuji Velvia – a slide film noted for its contrasty, saturated images.

    In the modern era techniques like HDR and software like Lightroom and Photoshop help us create saturated, contrasty images. Often that’s what you’ll see.

    But what about exploring the subtleties of light and landscape?

    For example, instead of photographing the setting sun try waiting until after it has set. The colors are softer. If you have a clear sky the entire landscape may be bathed in a golden glow. The result is a much more subtle use of color.
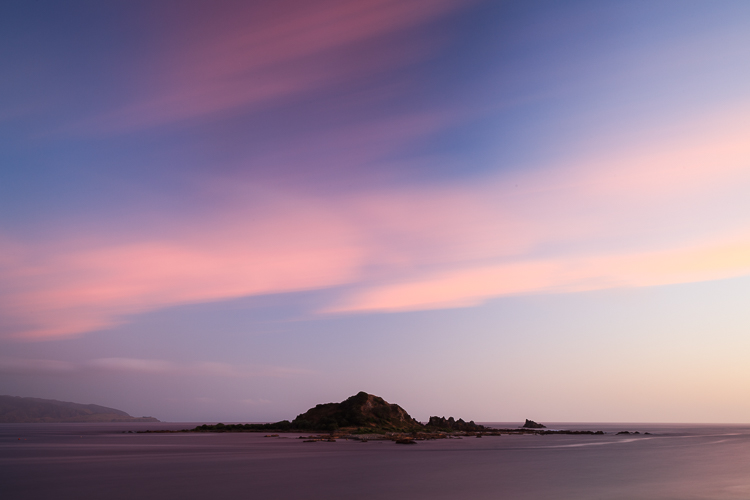
    Limited color palette

    Another technique is to explore the possibilities offered by bad weather.

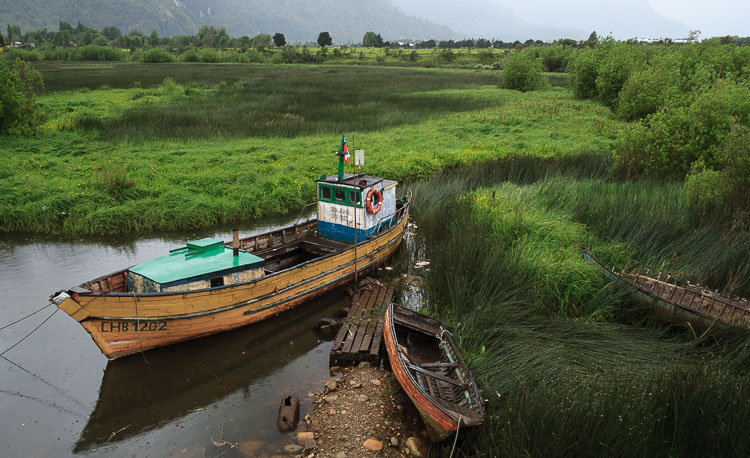
    I took the photo below in a town in southern Chile called Puerto Aysen. It rains a lot there, even in summer. When I took the photo it was raining. But the soft light captures the mood of the region well. The color palette is limited and dominated by green. Subtle contrast is provided by the colors of the painted boats.
    Limited color palette

    Limited color palettes and portraiture

    Think about the use of color carefully in portraiture. Here you have much more control than you do with the landscape, as you can ask your model to wear specific items of clothing. You also get to choose the background.

    If you haven’t decided in advance what your model is going to wear, a good tip is to ask them to bring along several options. Then you can choose the most appropriate outfit.

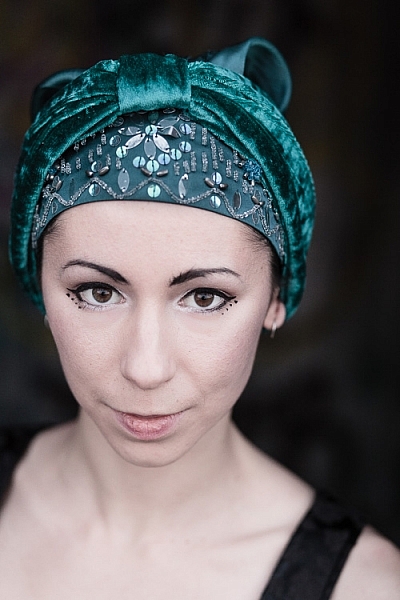
    Here, I liked the model’s unusual hat. I positioned her against a neutral background so that the green hat was the strongest, most dominant color in the composition.
    Limited color palette

    Still life and color

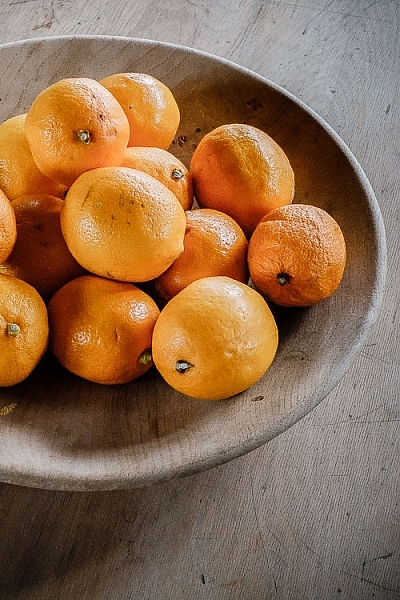
    Here’s a simple still life that I took in a restaurant in New Zealand. I liked the way the wooden platter and wooden table went together. The colorful fruit contrasts nicely with the neutral tones of the wood.

    The photo shows another composition technique in action, one that I touched upon in the earlier portrait section. It’s the technique of composing the photo so that a single strong color is placed against a neutral or gray background. You then have a photo with a subtle color palette consisting of gray (or neutral tones, like the wooden table) and a single, dominant color.
    Limited color palette

    This leads to my next point, which is an important one. One of the keys to using a limited or subtle color palette is to develop your observation skills. The photos shown so far have one thing in common – I saw the subtle colors and framed the photo in a way that uses them well.

    This an important skill to develop. One thing that elevates the work of the best photographers above everybody else is composition. Observation and composition go together. The more you learn to observe the world, and see how color, texture, tonal contrast, and the other building blocks of composition work together, the better your composition will be. In turn, this helps you create stronger, more memorable photos.

    Lightroom and color

    Don’t forget that Lightroom gives you several tools for controlling color.

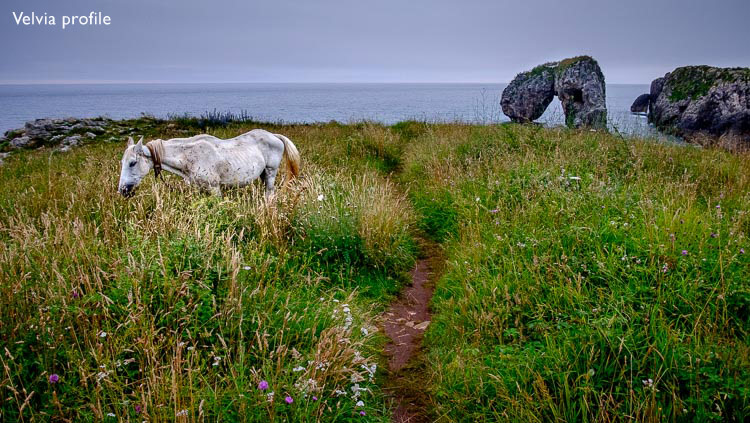
    The Camera Calibration panel is very important when it comes to processing Raw files. For most cameras, you will see Profile options like Landscape, Standard, Portrait, Neutral, and Faithful (with variations depending on camera model). Selecting Landscape gives you stronger, more saturated colors. Selecting Neutral or Faithful gives you more subtle, true to life colors.

    You can also use the Saturation and Vibrance sliders in the Basic panel to reduce the intensity of colors.

    The photos below show the difference it makes.
    Limited color palette

    Limited color palette

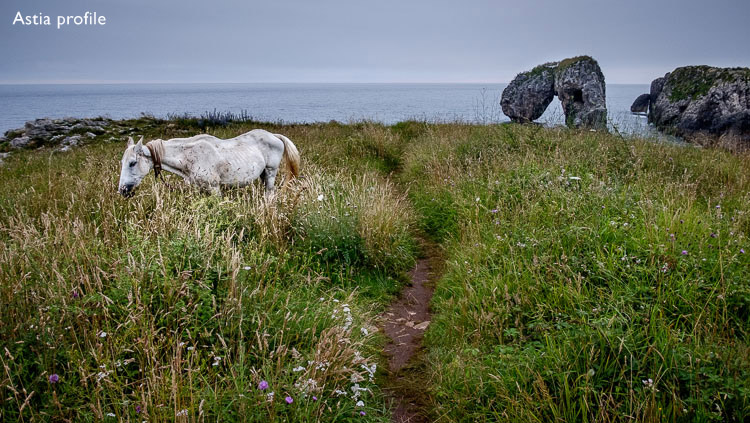
    The first was processed with the Profile set to Velvia (the equivalent of the Landscape setting on my Fujifilm X-T1). The second was processed with the Profile set to Astia, which gives softer colors, and Vibrance set to -12. You can see the difference, the colors in the second version are softer and more subtle.

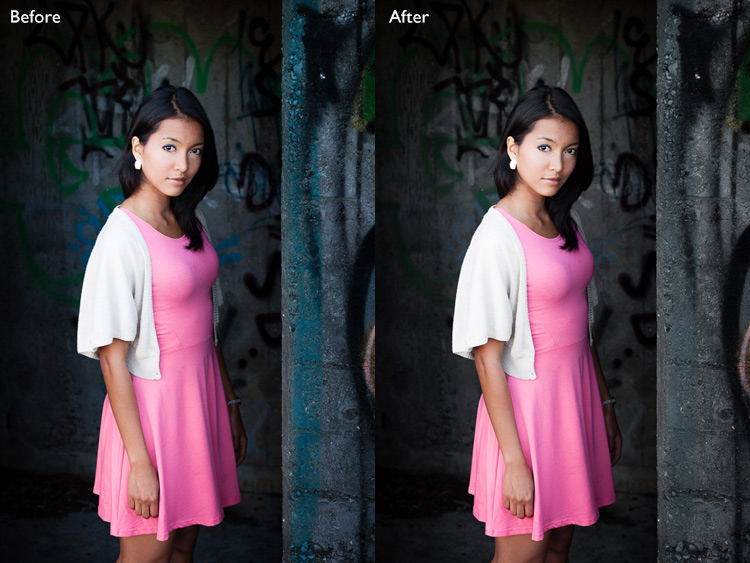
    The HSL / Color / B&W panel lets you target and adjust the saturation of specific hues. In this portrait example below, I used the Targeted Adjustment Tool to lower the saturation of the background, reducing the amount of blue in the photo. The result is that the model’s pink dress becomes the strongest color in the image. Reducing the saturation of blue simplifies the color palette and makes a stronger image.
    Limited color palette

    Hopefully, this article will help you understand that there is more to color than getting as much of it in the photo as possible. There’s plenty of room for using a more subtle approach and limiting the number of colors included in the frame.

    Do you have any ideas for ways to use a limited color palette or subtle colors in your photos? Please let us know in the comments.


    Mastering Composition

    If you’d like to learn more about color and composition then please check out my ebook Mastering Composition: A Photographer’s Guide to Seeing.

    googletag.cmd.push(function() {
    tablet_slots.push( googletag.defineSlot( “/1005424/_dPSv4_tab-all-article-bottom_(300×250)”, [300, 250], “pb-ad-78623” ).addService( googletag.pubads() ) ); } );

    googletag.cmd.push(function() {
    mobile_slots.push( googletag.defineSlot( “/1005424/_dPSv4_mob-all-article-bottom_(300×250)”, [300, 250], “pb-ad-78158” ).addService( googletag.pubads() ) ); } );

    The post How to Use a Limited Color Palette to Compose Strong Images by Andrew S. Gibson appeared first on Digital Photography School.


    Digital Photography School

  • Lenses and photo trips offered for top prize in Zeiss Photography Awards

    Tamina-Florentine Zuch won the 2016 ZEISS Photography Award with a project about the railway system in India

    German lens manufacturer Zeiss has put up a top prize that includes €12,000 of its lenses and €3000 towards a photographic excursion for the winner of the 2017 Zeiss Photography Award. In its second year, the award is made in conjunction with the World Photography Organization and is presented as a part of the Sony World Photography Awards program. Entrants are required to submit a collection of five to ten related images on the theme of ‘Seeing Beyond – Meaningful Places’ for a chance to win the single prize.

    The competition opens today and will close on 7th February 2017, with the winner being announced on the 14th March. The prize winner will be taken to London to the WPO awards ceremony in April and the winning series of images will form a part of the Sony World Photography Awards exhibition held at Somerset House in that city.

    For more information visit the Zeiss website.

    Press release:

    ZEISS Photography Award 2017

    Pushing the limits of creativity.
    The ZEISS Photography Award is a highly prestigious international photo competition run jointly by ZEISS and the World Photography Organisation (WPO). “Our lenses enable photographers to achieve superior imaging quality, and the ZEISS Photography Award is an expression of our dedication to premium-quality photography,” says Dr. Winfried Scherle, Executive Vice President and Head of the Consumer Optics business group at ZEISS.

    The motto “Seeing beyond – meaningful places” will also be used for the 2017 competition and accorded greater artistic significance. Photographers therefore have the chance to use their creative flair to lend unique places a special meaning and express this through their medium.

    The goal is to push the limits of creativity and grow as photographers. They could be places with a particular historical or future value, or perhaps places that exude adventure, the wonders of nature or depict a journey to a faraway place.

    “The lenses are mere tools – the real value of the images is down to the photographers and their flair for creativity.”
    Dr. Winfried Scherle

    Submissions
    All those who wish to take part in the ZEISS Photography Award 2017 are invited to submit a series of 5 to 10 photos complete with descriptions. Entries can be submitted between 11 October 2016 and 7 February 2017. The jury is looking for photos that reflect different perspectives as well as free interpretations of the terms “meaning” and “place.”

    Further information on the submissions for 2017 can be found here.

    Jury
    All entries will come under scrutiny from a jury composed of leading lights from the world of photography. The jury for the ZEISS Photography Award 2017 comprises 3 members. Their goal is to assess the photographic skill and artistic flair of the participants.

    • Claire Richardson, Lonely Planet
    • Sarah Toplis, The Space, WPO Academy Member
    • Jürgen Schadeberg Dr.(h.c.), Photographer, WPO Academy Member

    Prize
    At the end of the submission phase, a shortlist of photographers vying for the ZEISS Photography Award 2017 will be published and a winner will be selected. Inclusion on the shortlist is a great honor in itself. The winner will be announced on 14 March 2017.

    The winner of the ZEISS Photography Award 2017 will receive ZEISS camera lenses of their own choosing to a value of €12,000, as well as €3,000 to put towards a photo trip. He/she will attend a gala dinner in London on 20 April 2017 and their photos will be showcased at the Sony World Photography Award Exhibition at Somerset House in London. All flight and hotel expenses for the gala dinner in London will be covered. The winner will also get the chance to work with ZEISS on an individual basis.
    Key dates

    All the important dates for the ZEISS Photography Award 2017 are listed below:

    11 October 2016 : Competition open for submissions
    7 February 2017: Competition closed for submissions
    28 February 2017: Shortlist published
    14 March 2017: Winner announced
    20 April 2017: Gala dinner in London
    21 April to 7 May 2017: Winner’s photos exhibited at Somerset House in London

    Further information is available on the website of the World Photography Organization

    Articles: Digital Photography Review (dpreview.com)

  • Sigma 30mm F1.4 DC DN Contemporary Micro Four Thirds Lens Review

    The Sigma 30mm F1.4 DN DC Contemporary was announced February 2016, and sits atop Sigma’s line of DN mirrorless lenses, with a two-stop advantage over their previous 30mm F2.8 offering.

    As a Micro Four Thirds lens, it is one of only several current autofocus F1.4 prime lenses available, with its closest competitor being the Panasonic Leica Summilux DG 25mm F1.4. While the Panasonic offers a field-of-view equivalent to a ‘classic’ 50mm lens, the Sigma ends up around 60mm. While that makes its focal length possibly a bit long for street shooting, it helps a little when it comes to portraiture and close-up work.

    Let’s see how the basic specifications between the Panasonic Leica 25 and Sigma 30 compare:

      Panasonic Leica Summilux DG 25mm F1.4 Sigma 30mm F1.4 DC DN | C
    Price $ 598 $ 339
    Image Stabilization No No
    Max Aperture F1.4 F1.4
    Minimum Aperture F16 F16
    Aperture Ring No No
    Diaphragm Blades 7 9
    Minimum Focus 0.30 m (11.81?) 0.30 m (11.81?)
    Maximum Magnification 0.11x 0.14x
    Motor Type Micromotor Stepper motor
    Full Time Manual Yes No
    Weight 200 g (0.34 lb) 265 g (0.58 lb)
    Dimensions (DxL) 63 mm (2.48?)  X 55 mm (2.15?) 65 mm (2.56?) X 73 mm (2.87?)
    Sealing None None
    Filter Thread 46mm 52mm

    Regardless of where it sits in terms of focal length and usability, the Sigma enters the opposite of a crowded marketplace as an autofocus F1.4 Micro Four Thirds prime. It also gets the advantage of being the cheapest autofocus F1.4 Micro Four Thirds prime available, even undercutting the price of some F1.8 options as well. 

    Thankfully, the Sigma doesn’t feel entirely cheap. The barrel is well made with a satin black finish and ridges for grip when mounting or removing the lens. Sadly, the plastic hood feels a little inexpensive, and doesn’t feel like it clicks in to position with much confidence. Build quality of the lens itself is on par with the Pana-Leica, with both having smooth, sturdy focus rings with rubberized ridged grips.

    The extra bit of diameter and length on the Sigma make it a bit bulky and unbalanced when mounted to some of slimmer Micro Four Thirds cameras, like the Olympus PEN series, or the E-M5 II. When mounted to a larger SLR shaped body, like the GH4, the Sigma fits nicely.

    We’re assuming the extra size, relative to the Panasonic stems from it needing to be large enough to cover an APS-C sized sensor, in its E-mount incarnation.

    Does the discounted price mean the Sigma comes with discount performance? Can it shake off past stigmas about third party lenses and go toe-to-toe with a lens touting one of the most revered names in the business? Let’s take a closer look at the numbers.

    Articles: Digital Photography Review (dpreview.com)

  • How to Take Your Portrait Photos From Good to Great with a Single Click

    Do you enjoy portrait photography? Are you a Lightroom user? You’re going to love what we’ve just released today!

    It’s our all new Adobe Lightroom® presets bundle: 101 Lightroom Portrait Presets.

    NewImage
    With our new presets pack, transforming your portrait shots is a breeze.

    And for a limited time, the pack can be yours for the special introductory price of just USD $ 20 (that’s 60% off).

    Check it out here.

    In this comprehensive Portrait Presets pack you’ll get the following collections:

    • Art Series (7 presets): Get the look from the early 1900’s through to the 90’s.
    • Black and White (10 presets): A variety of black and white presets to give you that b&w portrait look.
    • Film Series (8 presets): Nothing beats the authenticity of film. These presets will re-create that professional film feeling.
    • Fix (20 presets): Fix a range of of issues including contrast, grain, highlights and sharpness.
    • Tone (14 presets): Change an array of tonal qualities.
    • Traditional Series (8 presets): Tweaks to give your portraits that classic look. Including Beach,
    • Outdoors, and Worn, amongst others.
    • Touch Up Kit: 37 brushes to help you touch up eyes, hair, lips and skin.

    Created by professional photographer and author Rachel Devine, she’s done all the hard work for you so you can get the perfect edit for every portrait, without the fuss.

    Here’s a short video of Rachel showing how easy it is to use these presets:

    Simply apply the effect and adjust as desired… it’s fast and easy!

    You’ll save a whole heap of processing time, while giving your portraits an instant “pop”. See Rachel demonstrate in the video on our product page.

    Transform your photos in just one click. Pick up our 101 Lightroom Portrait Presets today – while we’re still offering it at the introductory price.

    Please note: a copy of Adobe Lightroom is required to use these presets.

    Also: Haven’t used presets before? No worries. Full instructions are included in the pack.

    Lastly: like all our products this one has a 60 day satisfaction guarantee. If you buy it and find for whatever reason that it doesn’t suit your needs simply contact our support team and we’ll arrange a refund – no questions asked.

    googletag.cmd.push(function() {
    tablet_slots.push( googletag.defineSlot( “/1005424/_dPSv4_tab-all-article-bottom_(300×250)”, [300, 250], “pb-ad-78623” ).addService( googletag.pubads() ) ); } );

    googletag.cmd.push(function() {
    mobile_slots.push( googletag.defineSlot( “/1005424/_dPSv4_mob-all-article-bottom_(300×250)”, [300, 250], “pb-ad-78158” ).addService( googletag.pubads() ) ); } );

    The post How to Take Your Portrait Photos From Good to Great with a Single Click by Darren Rowse appeared first on Digital Photography School.


    Digital Photography School

  • Olloclip launches three lens kits for the iPhone 7 and iPhone 7 Plus

    Olloclip has announced the launch of three lens kits for the iPhone 7 and iPhone 7 Plus: the Active Lens Set, Core Lens Set, and Macro Lens Set. All three sets, of which there are eight lenses total, are joined by the new Connect interchangeable lens system, which makes quick work of swapping between the various iPhone 7 Connect lenses. The Connect system sits flush with the iPhone’s two cameras, and can be used alongside screen protectors up to 0.5mm in width.

    According to olloclip, the new iPhone 7 lenses are designed to offer ‘similar perspectives’ to what you get with DSLR lenses; they offer coated glass optics and ‘edge-to-edge clarity.’ 

    Core Lens Set ($ 99.99):

    • ‘Near 180-degree spherical effect’ Fisheye lens
    • ‘Advanced 4-element’ Super-Wide lens with greater than 120-degree field-of-view
    • Macro 15x lens

    Active Lens Set ($ 119.99):

    • Telephoto 2x optical zoom lens
    • Ultra-Wide 155-degree FOV lens

    Macro Pro Lens Set ($ 79.99):

    • Macro 7x lens
    • Macro 14x lens
    • Macro 21x lens

    Speaking about the lenses, company founder Patrick O’Neill said, “olloclip is committed to continually enhancing the mobile photography experience. That means giving full respect to mobility with no oversized, heavy lenses and paying strict attention to delivering beautiful photography with the simplest, quickest and most versatile user experience possible.”

    All three lens kits are available to pre-order now from Olloclip’s website and are expected to ship in early November. 

    Articles: Digital Photography Review (dpreview.com)

  • Samsung officially pulls the plug on its Note 7 smartphone

    Samsung Electronics has officially pulled the plug on its troubled Note 7 smartphone after repeated issues with the devices catching fire, including one incident in which a burning phone required the evacuation of a Southwest Airlines jet.

    The company initially recalled the Note 7 in September, offering other Samsung phones as loaners until a ‘replacement’ model arrived. Unfortunately, those too started to burn, and after several days of bad press, Samsung once again recommended that users power down their phones and exchange them for another device. Today, what many had been predicting finally happened: Samsung pulled the plug on the Note 7 entirely, stopping all production and marketing of the device.

    The Galaxy Note 7 was considered by many to be one of the top Android smartphones and, with a DxO Mobile score of 88, has one of the best cameras, as well.

    With the Note 7 now pulled from the market, many owners (this one included) are wondering what to replace it with. (The Google Pixel, LG V20 and, yes, the iPhone 7 Plus are the devices mostly commonly mentioned in online forums.) If you’re in the same boat, we’d love to hear what device you’re considering in the comments below.

    Via: NY Times, WSJ

    Articles: Digital Photography Review (dpreview.com)

  • Tripod versus Monopod – a Comparison and When to Use Each

    Tripods and monopods, you’re very likely to have seen them. They both have their uses and their purposes for existing. But when do you use one over the other and what advantages do each have? In this article, I’ll look to explain when you would use a tripod versus a monopod and how they’re not necessarily exchangeable in their properties.

    Tripods

    Jake Khuon

    By Jake Khuon

    Uses and pros of tripods

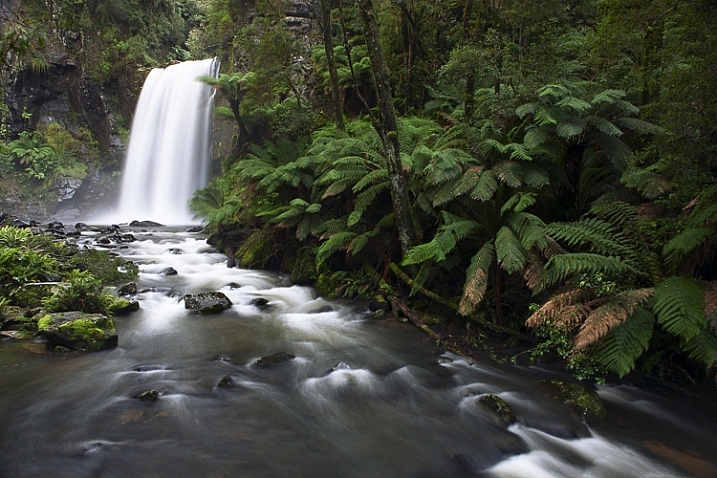
    Let’s start off with tripods. You know, those three legged stands that nearly all photographers have?! They provide your camera with a sturdy platform to which you attach your camera. Tripods come in all different sizes and have a huge variety of heads (the actual mounting point) to suit different shooting styles. They are especially helpful for avoiding camera shake when using slow shutter speeds. This is most useful when you want to blur water in a stream, show car light trails at night or simply do a long exposure.

    tripod versus monopod - use a tripod for long exposures

    With this frame, I used a tripod to prevent camera shake that would have been caused by the 3.2 second shutter speed. This shutter speed was used to blur the water.

    Tripods can also be extremely helpful with macro, still life, and studio photography as they hold the camera in the exact spot you want while you set your shot up. Time-lapse photographers can also benefit from using a tripod over a monopod as it will ensure that there is no jumping between each frame as the camera is securely locked in one position. However, tripods are not without their cons.

    tripod versus monopod

    Use a tripod for long exposures like this.

    Cons of tripods

    However, tripods are not without their cons. They can be heavy to carry around and take some time to set up. Depending on which head you are using, tripods can also be very limiting for quick camera movements which you may need when photographing moving objects. Everything about using a tripod is slower. So if it’s speed, and ease of portability that you’re looking for and stability isn’t your main priority, then perhaps a tripod is not the best item for you.

    Monopods

    tripod versus monopod - use a monopod for more mobility

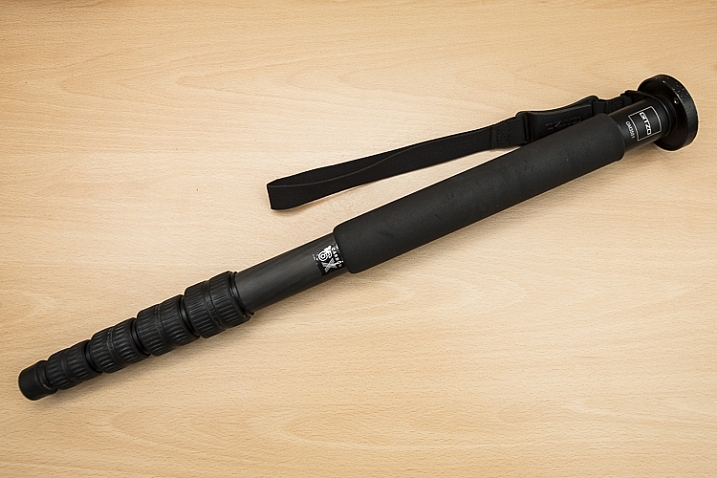
    This is the monopod I use. Here, it is compacted (54cm/21.26″) but it extends to be 192cm (6’2″). It is made of carbon fibre and weighs in at only 620g (1.36lb) but can hold up to 18kg (39lb).

    Uses and pros of monopods

    When a rock solid platform for stability isn’t a priority many photographers turn to a monopod for their camera support needs. Just as the TRI in tripod means three, the MONO in monopod means – you guessed it – one! They are simply a single leg support on which you can mount your camera and/or lens. They too come in different sizes and will support different weight limits.

    Monopods are perfect for taking the weight of a heavy lens/camera combination to stop aches and pains from a long day of shooting. If you’ve ever seen sports photographers with their long lenses, then you may have noticed that they are often being supported by a monopod. Monopods also offer much more versatility in movement as you now have only on one leg, not three, and they are much quicker to set up than their three-legged brethren.

    tripod versus monopod - use a monopod for more mobility

    This photo was taken using a 400mm f/2.8 lens. These lenses are quite heavy, so using a monopod is a great way to take the weight off your arms. Daniel Smith/Getty Images.

    Cons of monopods

    A monopod, however, will not offer you the same stability as a tripod, so if you’re considering a monopod as a lighter alternative to a tripod, do remember this. If it’s milky streams and flowing car lights that you’re after, a monopod will not help you here at all; you will still need a tripod.

    But if your arms get tired from holding your camera up all day, then a monopod may well be very suited to your needs.

    Conclusion

    tripod-versus-monopod

    While tripods and monopods offer extra support and in some cases, stability for your camera, there are times when one is more useful than the other and one cannot always be used in place of the other. Generally, for very long shutter speeds or time-lapse photography you’ll want to use a tripod to avoid camera shake and to maintain consistency between each frame. But if it’s a little extra support and to take the weight of a camera/lens combination, you can’t go wrong with a monopod.

    Do you have either or both of monopod and tripod? How do you find using each of them?

    googletag.cmd.push(function() {
    tablet_slots.push( googletag.defineSlot( “/1005424/_dPSv4_tab-all-article-bottom_(300×250)”, [300, 250], “pb-ad-78623” ).addService( googletag.pubads() ) ); } );

    googletag.cmd.push(function() {
    mobile_slots.push( googletag.defineSlot( “/1005424/_dPSv4_mob-all-article-bottom_(300×250)”, [300, 250], “pb-ad-78158” ).addService( googletag.pubads() ) ); } );

    The post Tripod versus Monopod – a Comparison and When to Use Each by Daniel Smith appeared first on Digital Photography School.

    Digital Photography School

  • Life After Death: Organic Burial Pods Turn Human Bodies into Living Trees

    [ By WebUrbanist in Culture & History & Travel. ]

    capsule-burial-pod

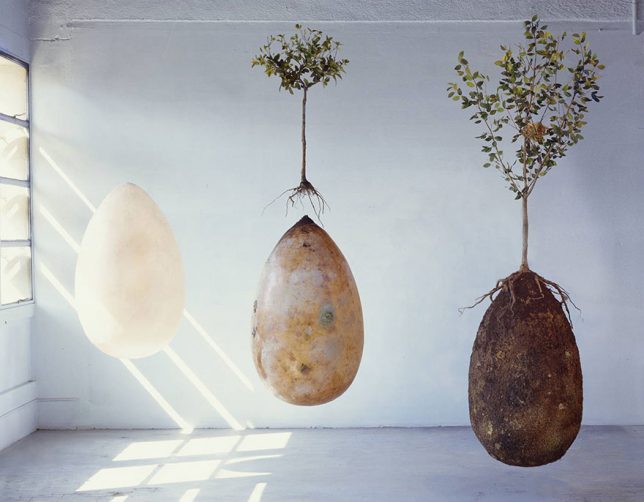
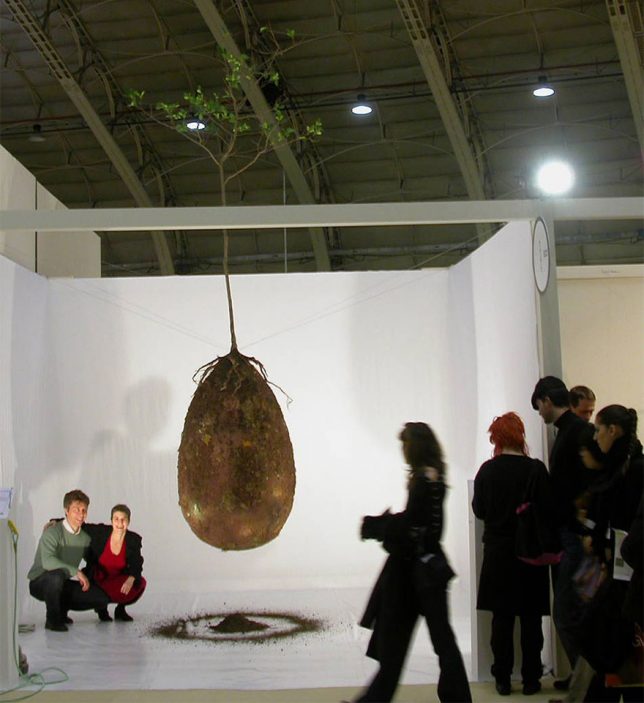
    Amidst a huge array of natural burial initiatives and urban cemetery alternatives, the Capsula Mundi stands out as a sustainable solution that serves wishes of the deceased as well as the land of the living.

    living-circle

    Italian designers Anna Citelli and Raoul Bretzel developed this solution in part to challenge constrictive existing laws surrounding burials in their home country.

    capsule-comparison

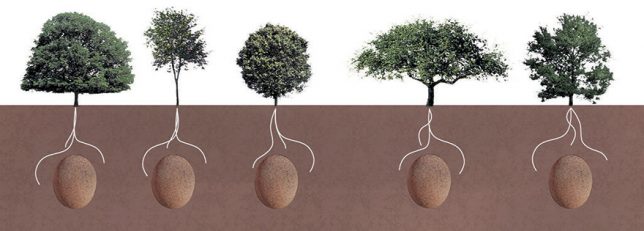
    Essentially, a body is interred in an organic and biodegradable burial capsule situated beneath the seedling of a chosen tree. Instead of filling graveyards with caskets and stone monuments to the deceased, this system would populate parks with living memorials – trees over tombstones. In turn, family and descendants can come to visit and care for the plants in honor of their loved ones.

    pod-concept

    Many other “green” burial solutions are generally not as ecological as they would first appear. Cremations, for instance, generate huge amounts of carbon dioxide in the burning process. And, of course, traditional burials are not very sustainable – chemicals, caskets, concrete, stone and space are all wasted in an effort to preserve something that will inevitably return to nature, one way or another.

    tree-of-death

    More from the project website: “Capsula Mundi is a cultural and broad-based project, which envisions a different approach to the way we think about death. It’s an egg-shaped pod, an ancient and perfect form, made of biodegradable material, where our departed loved ones are placed for burial. Ashes will be held in small Capsulas while bodies will be laid down in a fetal position in larger pods. The pod will then be buried as a seed in the earth.

    pod-reality

    “A tree, chosen in life by the deceased, will be planted on top of it and serve as a memorial for the departed and as a legacy for posterity and the future of our planet. Family and friends will continue to care for the tree as it grows. Cemeteries will acquire a new look and, instead of the cold grey landscape we see today, they will grow into vibrant woodlands. The project is still in a start-up phase, but encouraged by worldwide enthusiasm for our concept, we are working to make it become a reality.”

    Share on Facebook


    [ By WebUrbanist in Culture & History & Travel. ]

    [ WebUrbanist | Archives | Galleries | Privacy | TOS ]


    WebUrbanist

  • BenQ announces 32″ 4K high dynamic range monitor

    BenQ America will be showing its new 32″ 4K UHD high dynamic range monitor at PhotoPlus Expo later this month. The wide gamut SW320 offers 99% Adobe RGB and 100% sRGB/Rec. 709 color space coverage, and 10-bit panels should ensure smooth gradients. The display has built-in tools that integrate with color calibrators, allowing them to access the 14-bit internal LUT for more accurate calibration (compared to adjusting the – typically – 8-bit video card output.) These are some very high-end features that discerning photographers are sure to appreciate.

    What separates the SW320 from the SW2700PT (aside from size) is its support for high dynamic range input. We’ve reached out to BenQ for further comment on what the capabilities of this monitor are with respect to HDR, but our hopes are that the HDR certification means a higher static contrast ratio than the SW2700PT (which sports 1000:1 contrast, typical of IPS panels), and perhaps greater brightness as well. This will be important to content creators generating photos/videos for HDR displays, and also makes content consumption far more pleasing than one may be used to on IPS displays.

    For video pros, BenQ will also be displaying its PV270, a 27″ Technicolor Color Certified 4K UHD monitor, which offers 10-bit panels with 100% Rec. 709 and sRGB color space coverage, albeit considerably less coverage of Adobe RGB than the SW320 or SW2700PT (the PV270 is technically not a ‘wide gamut’ monitor).

    The SW and PV lines of monitors from BenQ are excellent for color critical work, as they are capable of reproducing color tones with Delta-E values ? 2, and have addressable 14-bit internal 3D LUTs for accurate color calibration.

    Both monitors will be available in January. Pricing has not been disclosed.

    Press Release:

    BenQ Fuels the Creative Process With New Professional Monitors at PhotoPlus Expo 2016

    Company Unveils Full Line of Professional Displays Designed to Maximize Workflow Efficiency

    COSTA MESA, Calif. — Oct. 10, 2016 — BenQ America Corp., a leading innovator of professional displays, today announced it will showcase its Creative Series monitors for the first time at PhotoPlus Expo 2016, Oct. 20-22 at the Javits Convention Center in New York. The new lineup will be on display for photographers, video post-production pros, graphic designers, CAD/CAM specialists and other creative professionals at BenQ’s booth 1169.

    “Our Creative Series monitors provide professionals with the color accuracy and efficiency that’s essential to their creative process,” said J.Y. Hu, vice president, business line management at BenQ America Corp. “At PhotoPlus, attendees will get a sneak peek of our new monitors and learn how they improve image visualization. They will also have an opportunity to participate in daily giveaways and hear a special session from polar wildlife photographer Joshua Holko.”

    For photography professionals, BenQ will showcase its 32-inch SW320 4K UHD high dynamic range (HDR) monitor along with the award-winning 27-inch SW2700PT QHD display, TiPA’s Best Photo Monitor of 2016. Both the SW320 and SW2700PT offer 99-percent Adobe RGB, 100-percent sRGB and Rec. 709 spaces to deliver the most accurate color reproduction with the aid of easy-to-use tools for hardware calibration. The SW Series photography monitors offer unparalleled technology and have been built to reproduce images with the same precise detail in which they are captured, delivering true-to-life image quality.

    Video post-production professionals will have a chance to experience the new Technicolor® Color Certified 27-inch QHD PV270 and the 32-inch PV3200PT 4K UHD monitors. With 10-bit 100-percent Rec. 709/sRGB color spaces, the PV Series video post-production monitors allow professionals to enjoy over 1 billion accurately displayed colors in accordance with the highest industry standards. All SW and PV Series color management monitors offer maximum color precision and reproduce color tones with a Delta-E value of less than or equal to two. A 14-bit 3D LUT achieves the most accurate color mixture for improved RGB color blending, resulting in impeccable color and gray tone reproduction.

    For graphic design creatives, the Technicolor Color-Certified PD3200U and PD2700Q are packed with robust features to maximize workflow efficiency. Showing for the first time, the 32-inch PD3200U offers exceptional 4K ultra-high-definition resolution, while the now available 27-inch PD2700Q displays rich graphics at 2K QHD resolution. A 32-inch QHD version (PD3200Q) is also planned for release in Jan. 2017. Each of the creative canvases features 10-bit depths of color, 100-percent sRGB and Rec. 709 to represent a wider range of more than 1 billion colors. These panels expand the working space and offer a wider viewing angle (178 degrees in both horizontal and vertical planes) with crystal-clear clarity at all angles. Three premium display modes are tailor-made for designers to easily configure settings to best fit their preferences, including a Dark Room mode for dimmed environments, a CAD/CAM mode for superior image contrast and an Animation mode providing 10 levels of display brightness to enhance details in dark shadows. Furthering workflow optimization, each monitor offers DualView capabilities that allow users to divide the monitor for side-by-side window viewing. Designers can also take application window multitasking to the next level with BenQ’s optional Display Pilot software, which provides enhanced desktop partition for multi-application viewing.

    In addition, attendees who stop by the BenQ booth 1169 can participate in daily giveaways and hear a special session from polar wildlife photographer Joshua Holko. He will be speaking about his remarkable expeditions and wildlife work on Oct. 21 and Oct. 22 at 2 p.m. Giveaways include a chance to win the new SW320 photography monitor and an opportunity to learn photo shoot techniques directly from expert wedding photographer Art Suwansang in California.

    Centered on BenQ’s commitment to offer purpose-built monitors for creative professionals, each of these displays adds incredible value with features that speed up the creative process and increase visual comfort through BenQ’s leading Eye-Care technology. The SW2700PT, PV3200PT and PD2700Q monitors will be available for purchase during PhotoPlus Expo 2016, while the new PD3200U, PD3200Q PV270 and SW320 will release in Jan. 2017.

    More information on the robust BenQ Creative Series monitor lineup is available at www.BenQ.us.

    Articles: Digital Photography Review (dpreview.com)

  • Western Digital gives My Passport and My Book drives a makeover

    Western Digital has partnered with design firm fuseproject to create a new look for its My Passport and My Book external hard drives. They continue to offer the same hardware encryption, password protection and storage capacities of existing models, but they’ve been given a cosmetic update with new textures and vibrant colors.

    The My Passport and My Passport for Mac drives will start at $ 79.99 and the My Book desktop drive starts at $ 129.99. Each comes with a two-year warranty.

    Press release:

    WESTERN DIGITAL UNVEILS NEW DESIGN LANGUAGE WITH REDESIGNED LINES OF ICONIC MY PASSPORT AND MY BOOK HARD DRIVES

    IRVINE, Calif., October 11, 2016 – Western Digital Corporation (“Western Digital”) (NASDAQ: WDC), today introduced modern and innovative redesigns of its My Passport®, My Passport for Mac, and My Book® hard drive lines, which have been highly recognized leading sellers for more than a decade. In partnership with fuseproject, an award-winning industrial design and branding firm, the reimagined products were built with the customer in mind. Developed to help make a connection between the device and user, the new drives also include password protection and hardware encryption so customers will love their hard drive as much as they cherish the content stored on it.

    “As the storage landscape continues to rapidly evolve, and the bars for design and user-experience have increased, the team focused on the design and user experience to catapult My Passport and My Book to the next level,” said Jim Welsh, senior vice president, Content Solutions Business Unit, Western Digital. “Through the reimagined design language, we want to engage consumers in a conversation about how storage is core to their lives and how they feel more empowered by the real benefits of capturing, protecting and enjoying life’s precious memories.”

    “The way we use data is changing; it’s becoming much more of a personal commodity, something we value,” says Yves Béhar, founder and Principal Designer at fuseproject. “Western Digital lies at the intersection of our physical life and the digital world, and we wanted to create a quality aesthetic that symbolizes this intersection.”

    As part of the reimagined design, the My Passport drives will come in six vivid colors – Black, Yellow, Red, White, Orange and Blue – while still providing reliable portable storage that perfectly complements an on-the-go lifestyle. The My Passport for Mac drive is available in a stylish Black color. The trusted desktop storage device, My Book, combines personal style with a massive amount of storage space, up to 8 TB, so users can keep their photos, videos, music, and documents. Each storage device comes with an automatic backup solution for a seamless, user-friendly process, as well as password protection to keep your precious data safe.

    The new WD® products include:

    • My Passport portable hard drives – trusted and loved portable storage, in a reimagined design, that fits in the palm of your hand
      • New attractive design with textured bottom
      • Password protection with 256-bit AES hardware encryption
      • Automatic backup with included WD Backup™ software
      • Up to 4TB capacity
    • My Passport for Mac drives – your MacBook® computer’s best friend
      • New attractive design with textured bottom
      • Password protection with 256-bit AES hardware encryption
      • Formatted for Mac OS® X and Time Machine® ready for easy backup
      • Up to 4TB capacity
    • My Book desktop hard drive – trusted, high capacity backup for PC and Mac®
      • Password protection with hardware encryption
      • Automatic backup with included WD Backup software
      • Up to 8TB capacity

    Pricing and Availability

    My Passport and My Passport for Mac portable hard drives are protected by a 2-year limited warranty and are available from wd.com and at select retailers and distributors around the world. My Passport drives have a Manufacturer’s Suggested Retail Price (MSRP) starting at $ 79.99 USD and the My Passport for Mac drive has a starting MSRP of $ 79.99 USD.

    My Book desktop hard drives are protected by a 2-year limited warranty and are available from the WD store at wd.com and at select retailers and distributors. My Book drives have a Manufacturer’s Suggested Retail Price (MSRP) starting at $ 129.99 USD.

    About Western Digital

    Western Digital Corporation (NASDAQ: WDC) is an industry-leading provider of storage technologies and solutions that enable people to create, leverage, experience and preserve data. The company addresses ever-changing market needs by providing a full portfolio of compelling, high-quality storage solutions with customer-focused innovation, high efficiency, flexibility and speed. Our products are marketed under the HGST, SanDisk and WD brands to OEMs, distributors, resellers, cloud infrastructure providers and consumers.

    Articles: Digital Photography Review (dpreview.com)