Blog

  • LG V20 owners report fragile, easily cracked camera glass

    Numerous reports have surfaced from LG V20 owners claiming that the glass covering the smartphone’s rear camera is easily shattered. In some cases, the glass reportedly breaks without any direct impacts, leading some to speculate that the LEDs may be the cause. Some users report receiving a new phone with glass that’s already cracked, while others indicate it cracks after only several hours or days of use.

    In addition to user reports on Reddit, smartphone durability tester ‘JerryRigEverything’ experienced the same issue. The glass camera covering is shown shattering in the video below a few moments after he rubs it with a pick to test its durability against scratches. LG has not issued a comment on the reported issue. For now, users are advised to keep the protective film covering on the camera glass in an effort to avoid cracks.

    Via: TechTimes

    Articles: Digital Photography Review (dpreview.com)

  • How to Expose Correctly for High Contrast Wildlife

    Photographing wildlife of deeply contrasting colors, such as black bears or white waterfowl, can present certain challenges setting up shots that are properly exposed for the wildlife and also the surroundings. Harsh lighting also makes exposing for these subjects especially difficult. The hurdle to overcome in these cases is to expose for the subject animal(s) properly and still capture a scene that is pleasing to the viewer. What often results are images where the exposure is correct for the surroundings, but the creature is either under or overexposed.

    Getting the subject wildlife exposed correctly is a more important aspect because the background can be dealt with later in post-production. In some cases, the background just doesn’t really matter in comparison to the photo capture of the often elusive wildlife in the scene.What follows are methods to use in stark color-contrasting situations. One is for dark colored wildlife such as black bears or ravens, and another for light colored wildlife such as egrets or swans.

    What follows are methods to use in stark color-contrasting situations. One is for dark colored wildlife such as black bears or ravens, and another for light colored wildlife such as egrets or swans.

    Exposure Details

    A reality of photographing wildlife is that when things happen, they happen fast. Lighting may change very quickly and there may not always be time to make adjustments while shooting the action of the wildlife in view.

    Most experienced photographers want control of all camera settings and don’t generally choose to shoot in auto modes for shutter speed and aperture in order to control movement and depth of field. So is there was a way to set the shutter speed and aperture and still get the correct exposure without the hassle of continually changing settings as the light changes?

    There are many ways of shooting wildlife resulting in a desirable exposure, but probably one of the most overlooked ways is using the Auto ISO setting in Manual mode. To use this method, set the camera in Manual mode, adjust shutter speed and aperture to the settings desired, and then set the ISO to auto-ISO. Most cameras will allow you to set a maximum ISO, so it’s helpful to know at what ISO the images become unacceptably grainy with your camera. However, this still doesn’t entirely solve the problem of correctly exposing for those dark and light animal subjects. To solve these problems you can fine-tune the exposure by using exposure compensation.

    Correcting the background in post-production

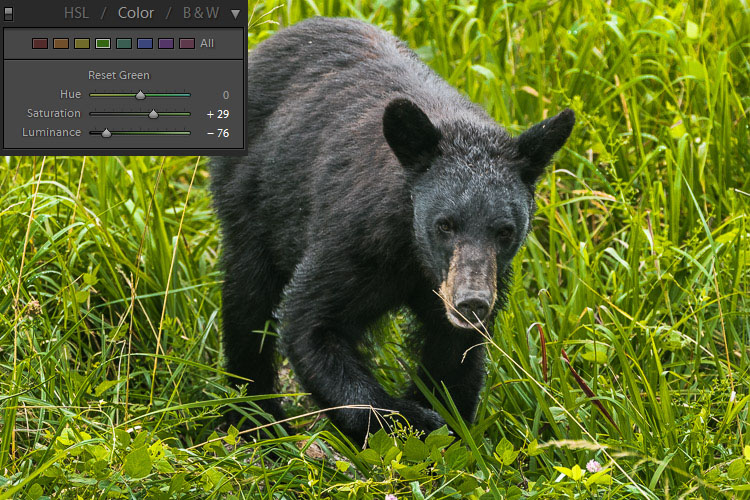
    As in any image, if editing is planned it is important that the image be shot in RAW mode. When opening an image in Adobe Raw Converter (ARC) (or Lightroom) and if the exposure for the animal is correct in camera, then only the background may benefit from corrections in post. In most cases for wildlife images, the background hues are green, yellow or blue. To enhance or balance these colors in ARC, go to HSL/Grayscale panel and simply darken or lighten the luminance for green, yellow or blue until the background exposure appears to match the exposure of the animal. A little saturation may also be added. If a little punch or contrast would improve any background flatness, one may use an adjustment brush to add some contrast and clarity to the background. It’s that simple!

    Dark Colored Wildlife

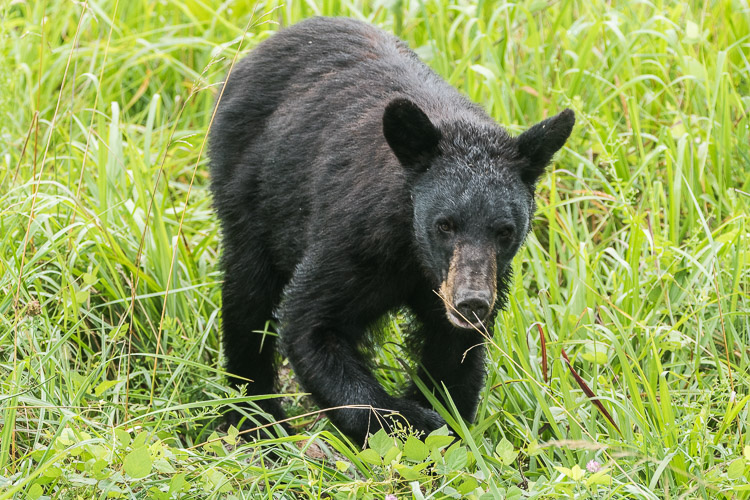
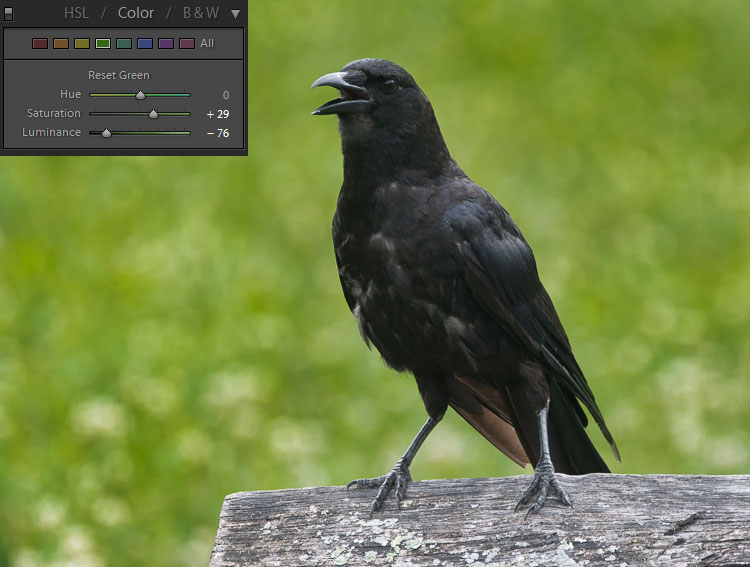
    In this image the correct exposure for the black bear over-exposes the green background.

    The luminance of the green has been adjusted to decrease the background exposure.

    The dark hues of some wildlife will absorb more light than the scene around them, so it becomes necessary to increase the light taken in by the camera by using exposure compensation as mentioned above. For wildlife with dark colored coats or feathers, use exposure compensation and adjust by adding light (+value). This will suffice in most cases, depending on the amount of natural light available.

    Keep in mind that the wild subject is the most important component in the image, so if any aspect of the image should be sacrificed in the moment, make it the background. For really dark creatures, such as bears, start out by using a compensation of +1. Remember, don’t worry about the background. The animal is the important exposure!

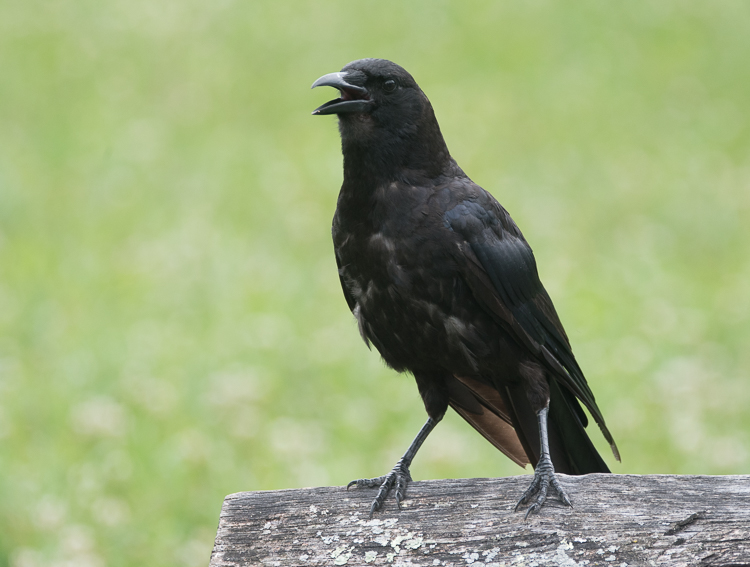
    The exposure is correct for the black bird, but the background is washed out and boring.

    Again, the luminance of the green has been adjusted. Then an adjustment brush has been used to add contrast, creating a vibrant background.

    Light Colored Wildlife

    Conversely, for light colored animals, use exposure compensation and adjust by subtracting light (- value). The whiter color of many beautiful creatures will reflect much more light than the background will, so it helps to decrease the light the camera takes in so as not to overexpose the animal.

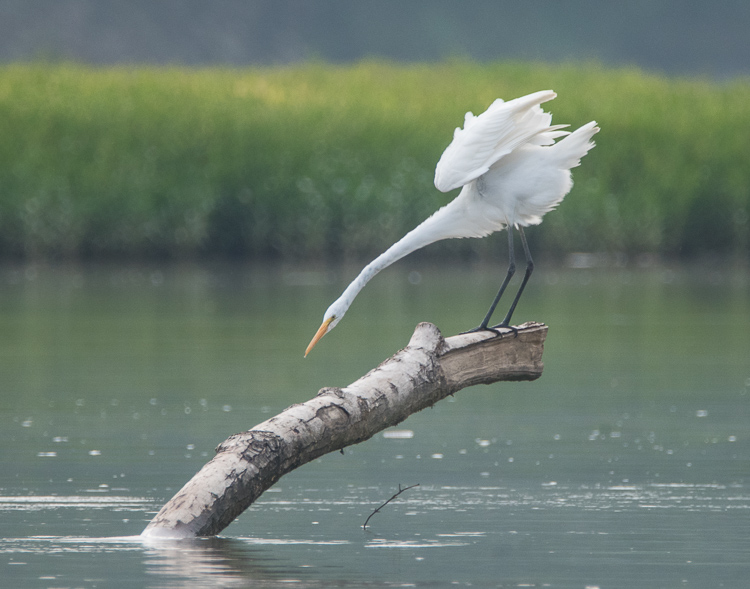
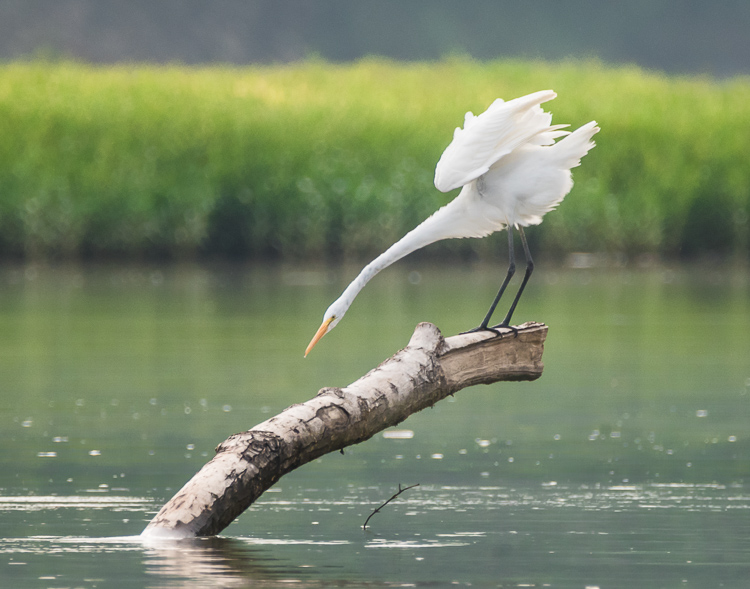
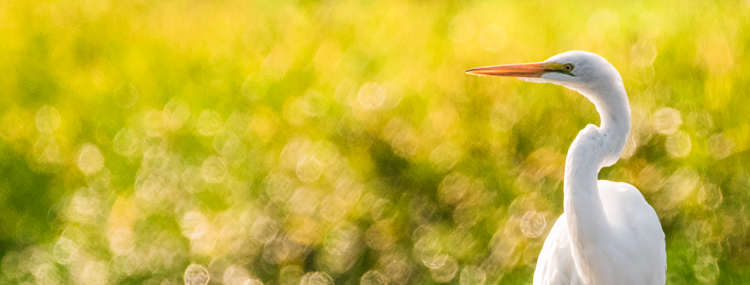
    In keeping the white egret from being overexposed, the background appears dull and dark.

    The green and yellow hues were adjusted to add life to the background. Notice that in every case the exposure of the subject is unchanged.

    Why can’t I just correct the exposure of the wildlife in post-production?

    Of course, this is an option. But there at least two reasons for not correcting the exposure of the subject later on the computer.

    1. Any time a major exposure correction is undertaken, there is a certain amount of digital data of the image that is lost. Therefore, it is best to get the main subject of the image captured as closely as possible in camera. (This is true of any image, not only wildlife subjects.)
    2. When photographing extremely light colored animals, if the white is over-exposed to absolute white there is nothing that can be done in post-production to pull out any detail. Darkening the subject will not bring back any nuance in the creatures coloring, and the image will lose desirable texture. Again, conversely, if the black-coated bear or bird is underexposed to absolute black there is no way to lighten the subject and pull out interesting details from the fur or feathers.

    What about the Eagle?

    Some animals are doubly challenging as in the case of the American Bald Eagle, with its white head and dark body. These magnificent creatures are almost impossible to photograph in harsh light. If choosing which end of your histogram to sacrifice, my opinion is to expose for the white head.  Again, avoid harsh lighting if at all possible.

    Conclusion

    Remember, when you’re faced with a choice of settings for an extreme exposure while photographing wildlife, never sacrifice your subject. Whether a light or dark-coated bird or animal, intentionally set up the shot to capture the creature and its distinctive features and keep the background as a secondary consideration. To make sure the subject will be correctly exposed, use a 3-shot bracketed exposure, with an exposure one stop over and another exposure one stop under the setting.

    Do you have any wildlife exposure tips? Please leave them in the comments below.

    googletag.cmd.push(function() {
    tablet_slots.push( googletag.defineSlot( “/1005424/_dPSv4_tab-all-article-bottom_(300×250)”, [300, 250], “pb-ad-78623” ).addService( googletag.pubads() ) ); } );

    googletag.cmd.push(function() {
    mobile_slots.push( googletag.defineSlot( “/1005424/_dPSv4_mob-all-article-bottom_(300×250)”, [300, 250], “pb-ad-78158” ).addService( googletag.pubads() ) ); } );

    The post How to Expose Correctly for High Contrast Wildlife by Bruce Wunderlich appeared first on Digital Photography School.


    Digital Photography School

  • Plastic Village: Tropical Housing Estate Built from 1MM Recycled Bottles

    [ By WebUrbanist in Architecture & Houses & Residential. ]

    plastic-bottle-architecture

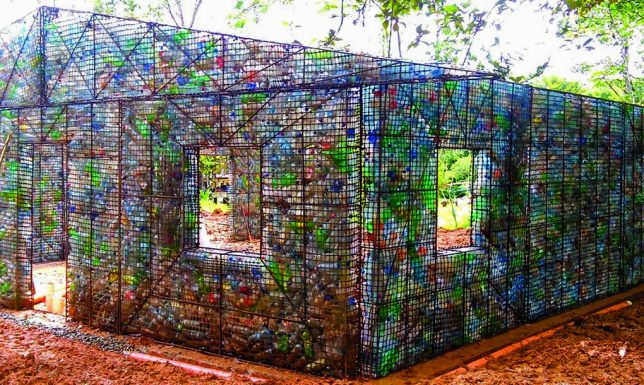
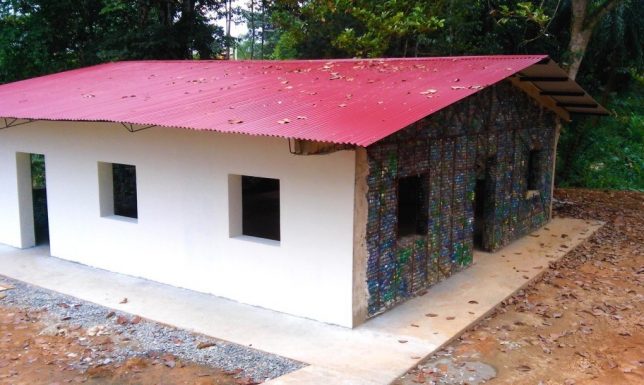
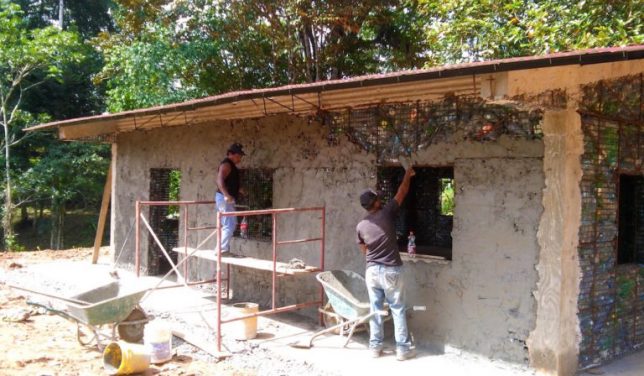
    At a glance, it would be impossible to guess that the finished houses in Panama’s Plastic Bottle Village featured walls packed with recycled drinking containers. What started as a recycling initiative by a expat Canadian entrepreneur has become an architectural adventure that will ultimately reuse over a million plastic bottles.

    plastic-bottle-finishing

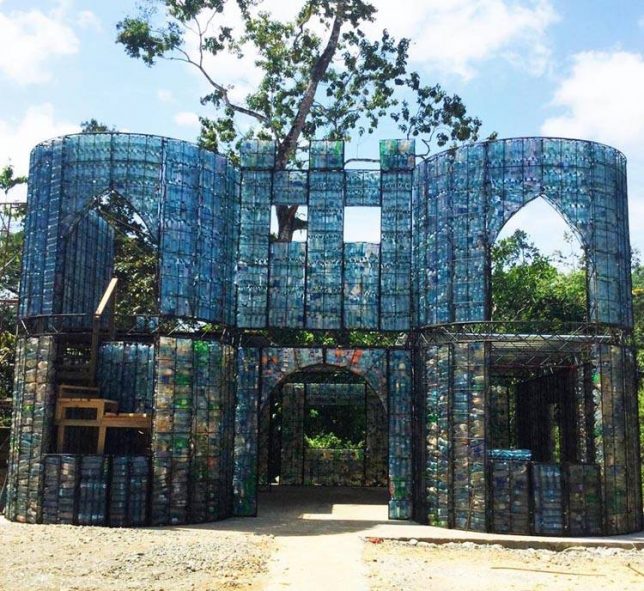
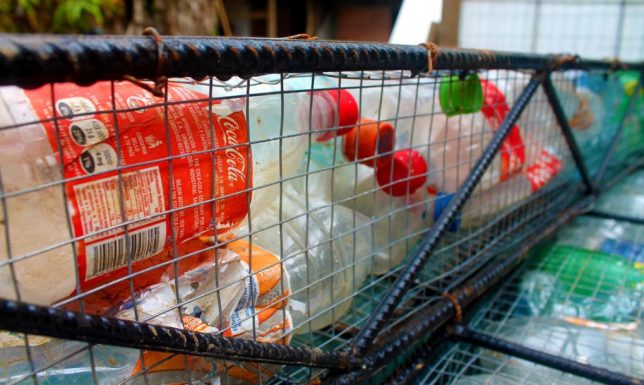
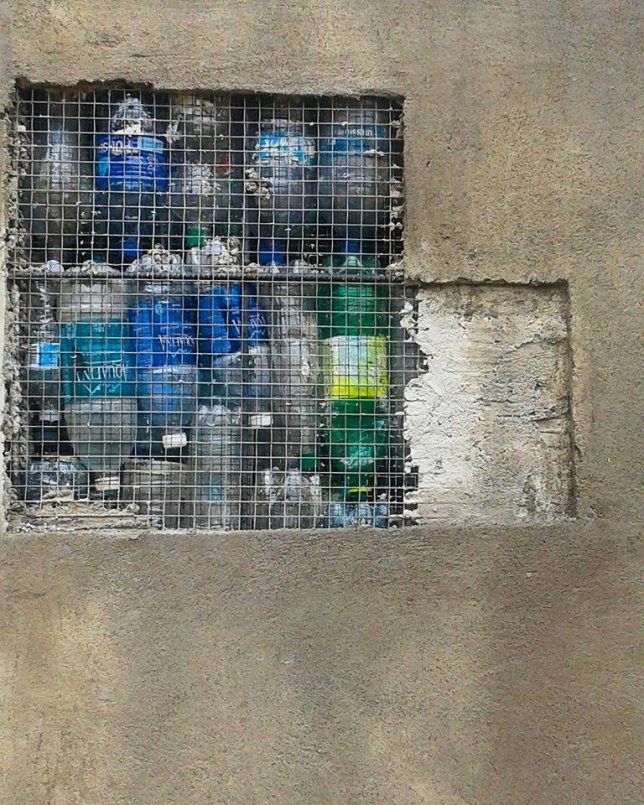
    Since 2012, tens of thousands of bottles have been brought to the growing town to make buildings. These are stacked in steel cages with stones to fill in gaps and provide rigidity. Cement plaster covers the structures inside and out, making them appear like solid concrete or finished stucco.

    The bottles, meanwhile, provide insulation while allowing airflow, keeping interiors in the hot climate a full 17 degrees cooler than the ambient outdoors.

    plastic-bottle-castle

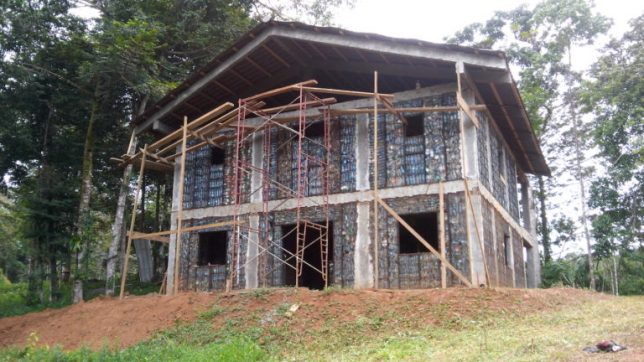
    Multiple bottle-based houses already constructed on nearly 100 acres of lush tropical jungle land purchased for the Plastic Bottle Village, which will eventually be home to over 100 such structures. Also in the works: a small public park, retail operation and yoga pavilion.

    plastic-bottle-complete

    The steel-framed structures provide a balance of strength and flexibility, helping them stand up and support roofs but also to resist earthquakes. The Plastic Bottle Village is about more than just one place, too: its founder is educating others about how to build with this cheap and ubiquitous material that many see simply as waste.

    plastic-bottle-cage

    caged-bottle-concrete

    The project puts consumption in context: “Average humans can consume 15 or more drinks in plastic bottles a month. If you were born after 1978, and live until 80 years old, you will leave behind a minimum of 14,400 plastic bottles on this planet.”

    “These bottles take hundreds of years to break down into tiny pieces of plastic, never to completely disappear. Most of the waste is consumed by fish and birds, which has shortened their lifespans greatly.”

    plastic-bottle-wall

    It also illustrates the potential offsets: “If you live in a two story plastic bottle house of 100 square meters or 1,000 square feet per floor, then your house will be built reusing 14,000 plastic bottles. These recycled bottles could neutralize the negative effect of your passage on this planet,  and move closer to leaving only your footprints.”

    Share on Facebook


    [ By WebUrbanist in Architecture & Houses & Residential. ]

    [ WebUrbanist | Archives | Galleries | Privacy | TOS ]


    WebUrbanist

  • How to Make a Sketch Inside a Photograph

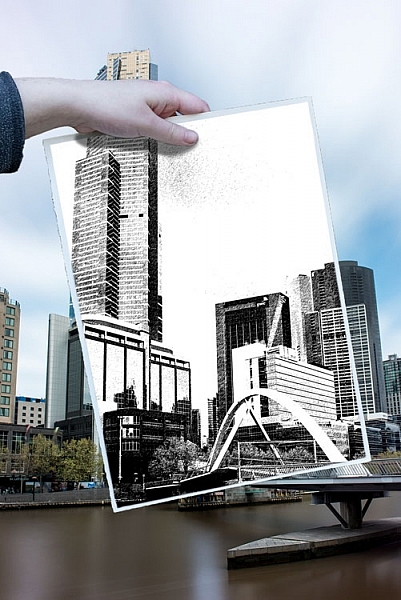
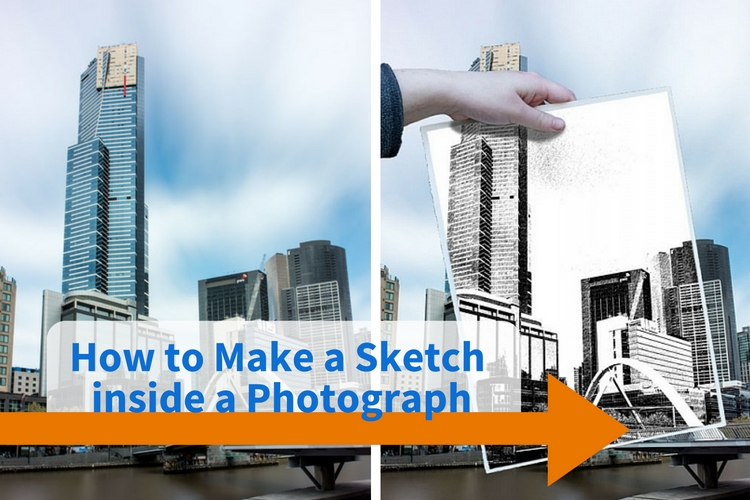
    This is one of those tutorials that’s great to play around with, maybe do it once or twice. But in the end, the thing they are great for is that they always teach you something. It may not be much, but it might help you think in a different way, or learn a skill you didn’t know about. This one is about how to make a sketch inside a photograph.
    how-to-make-a-sketch-inside-a-photograph


    This is a simple tutorial that can help you learn how to use layers, and combine images. There are so many things you can do with layers, but  in this example, we are going to work on putting a drawing of a scene in front of the photograph. Of course, it isn’t a real drawing, but one that is created from the image using the artistic filters in Photoshop.

    The image

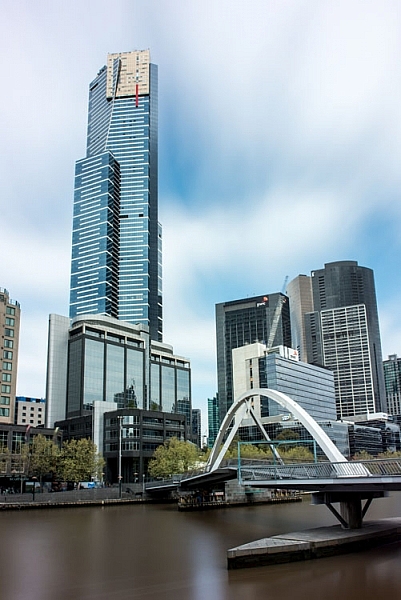
    Deciding which image you are going to use can be harder than you think. It could take a while to find one that will work well, one with lots of contrast is good. You want an image that will stand out when you put the drawing over the top of it.
    How to Make a Sketch inside a Photograph

    Open the image and process it normally to get it ready. If you have several layers flatten or merge all of them, and copy that new merged layer so there are two. To copy the layer press Ctrl/Cmd+J.

    Turn off the top layer by clicking on the eye icon next to the thumbnail. That will make it disappear, or turn off temporarily.
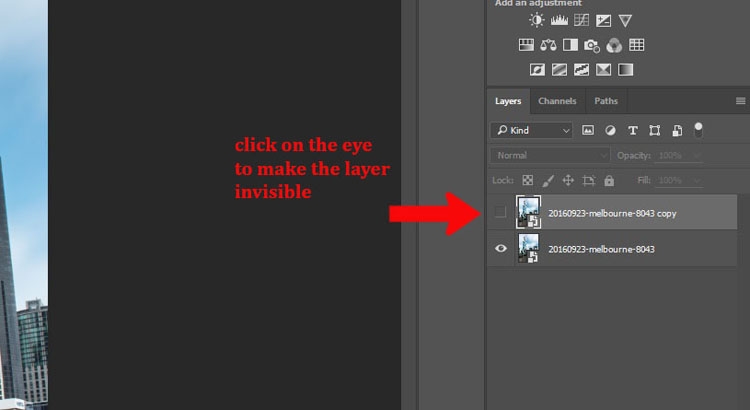
    How to Make a Sketch inside a Photograph - hide layer

    Click the bottom layer to select it as the one that you will change into a drawing.

    Making the drawing

    Go up to the Main Menu and click Filters > Filter Gallery, or use the keyboard shortcut Ctrl/Cmd+F.
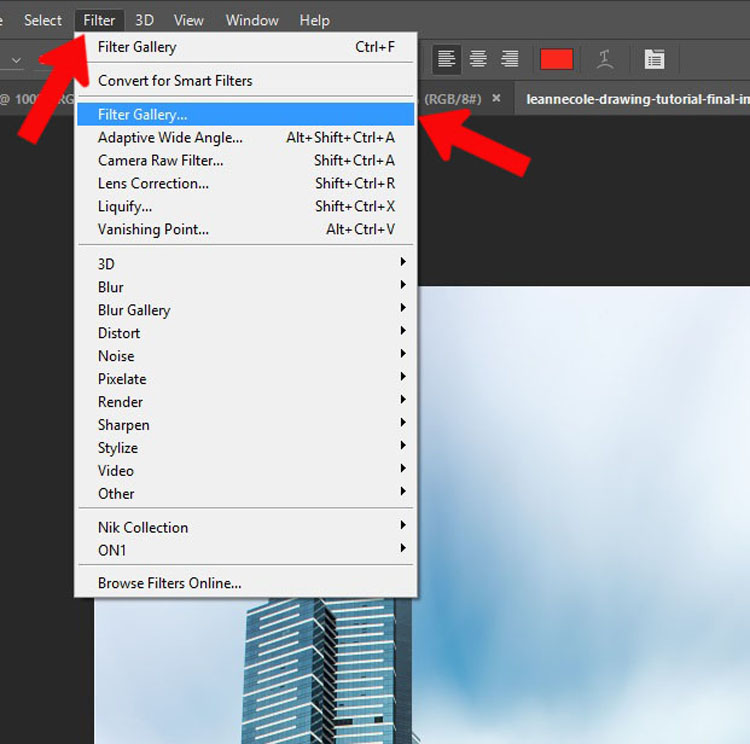
    How to Make a Sketch inside a Photograph - filter gallery

    If you can’t bring up the Filter Gallery or click on it in the menu, it may be because your image is either 16 or 32 Bits, so you will need to change it to 8 Bits.

    To change the image to 8 Bits select from the top menu bar: Image > Mode > 8 Bits/Channel. You should now be able to use the Filters Gallery.
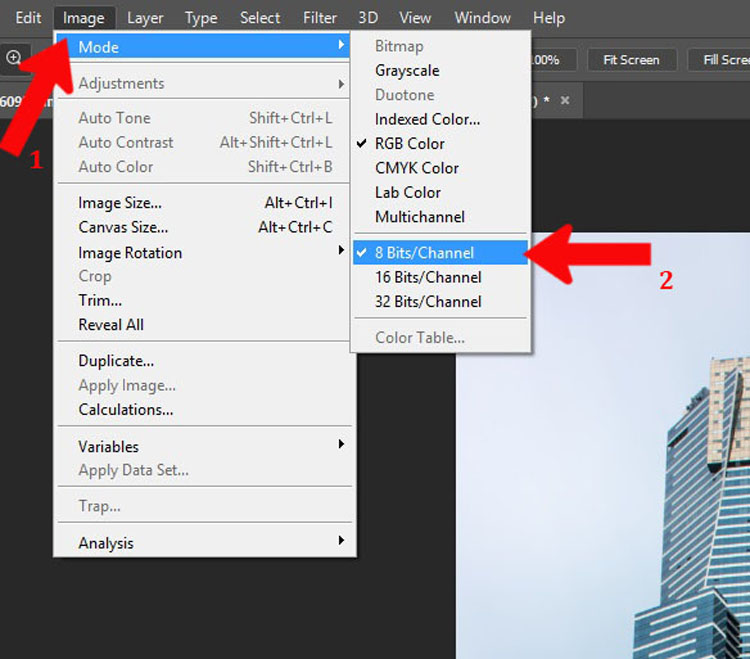
    How to Make a Sketch inside a Photograph - 8 bits

    There are loads of options in the gallery to give you an artistic look. Select the one you like. For this example, I used the Graphic Pen found in the sketch section. If you don’t like any of the ones that Photoshop has to offer, you can look for artistic actions (google search) that may give you a better drawing.
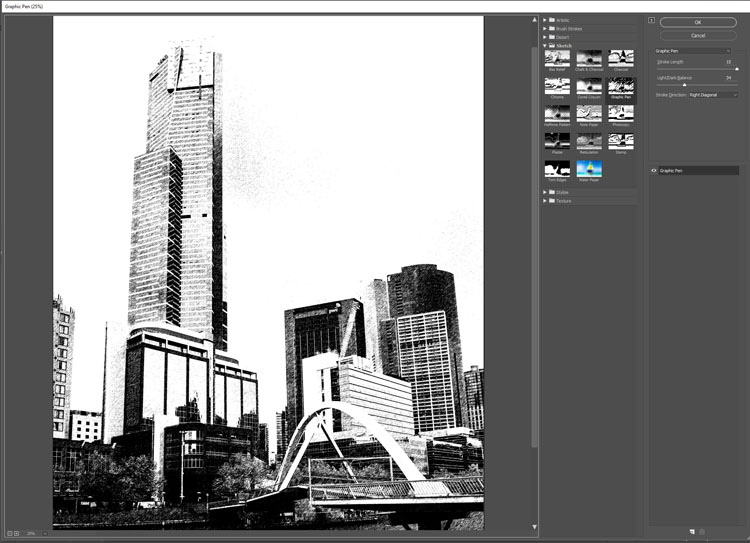
    How to Make a Sketch inside a Photograph - sketch filter

    Adding the hand

    I took several images of my daughter holding a piece of paper. It’s good to get a large variety, and if you have the time, shoot in different lighting conditions as well.
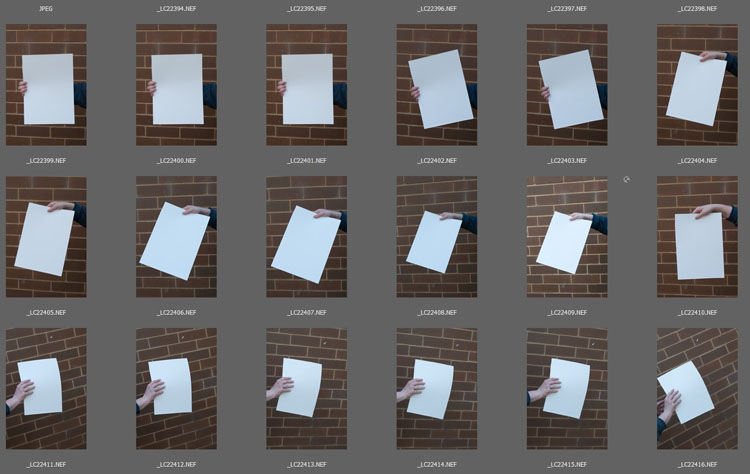
    How to Make a Sketch inside a Photograph - hands

    Choose an image of the hand holding the paper. Open it in Photoshop and use the Quick Selection tool to select the hand and paper. It doesn’t have to be exact, as long as everything you need is selected. Once you have the hand on the image you can fine-tune it.
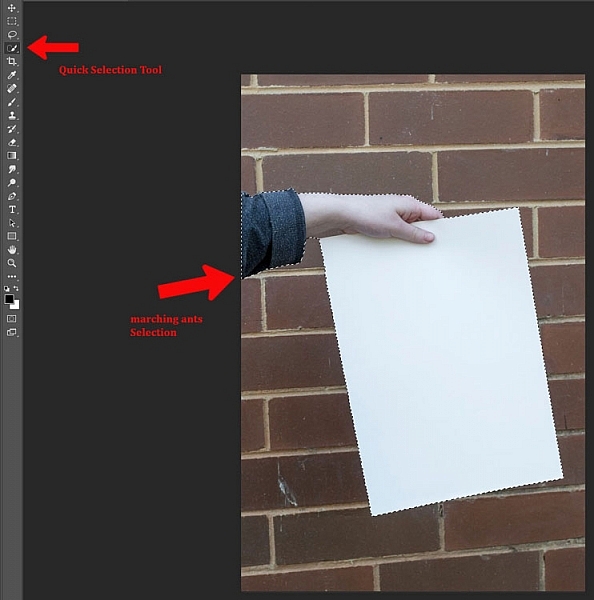
    How to Make a Sketch inside a Photograph - selection of hand and paper

    Press Ctrl/Cmd+C, then Ctrl/Cmd+V. This will copy and paste the selection onto a new layer (in the same document). However, if you go back over to your original image and pressCtrl/Cmd+V it will paste the hand onto your image as a new layer. Use the move tool, the top one in the tool bar.
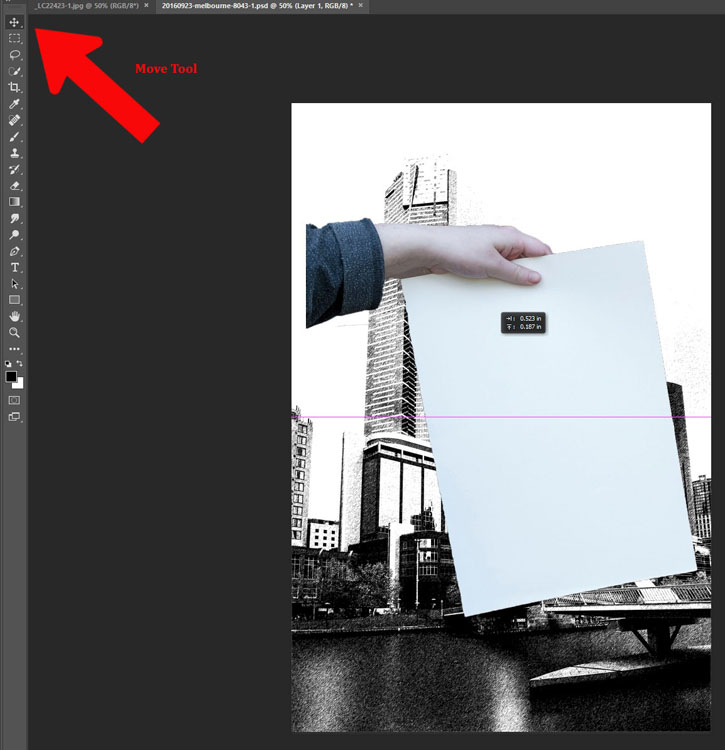
    How to Make a Sketch inside a Photograph

    Size and position the hand

    If you are lucky the hand will be the correct size, however, if it isn’t you may have to resize it. You might also have to change the angle. Free transform will allow you to do that, press Ctrl/Cmd+T to activate it. If you click on the corners you can make it bigger or smaller (hold Shift down to keep the proportions the same!). If you hover around the corners you will see a small curve appear with arrows on either end, this will allow you to rotate it to the desired angle.
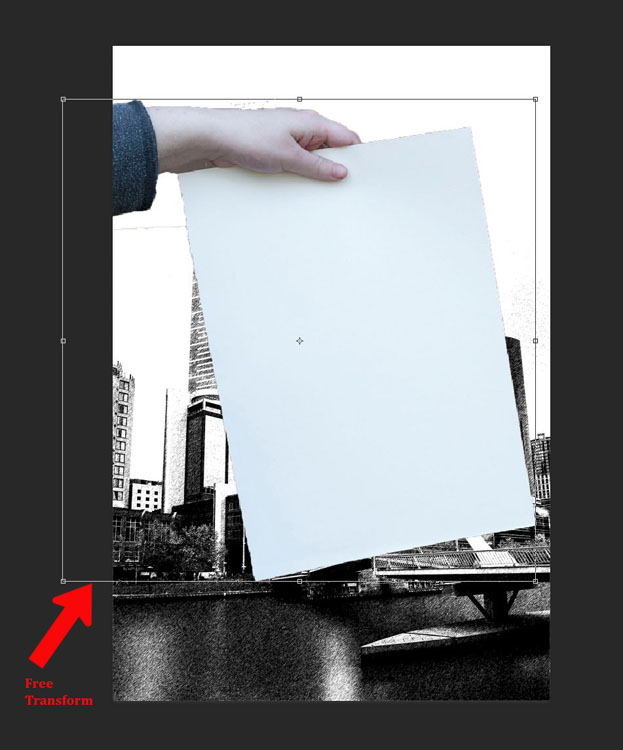
    How to Make a Sketch inside a Photograph - transform tool

    The hand looks a little odd because it needs a shadow. Take note of your original image and how the shadow was placed. You also need to look at the main image, it will look a bit off if the light is coming from a different direction than the image of the hand.

    Creating the drawing on the paper

    To get the image on the piece of paper you need to ensure the layer that is the photograph is still not visible. It should still be invisible from when you did the drawing.

    Add a mask to the layer with the hand and paper. At the bottom of the layers panel click on the mask icon, looks like a white rectangle with a round black circle in it. It should be down in the bottom right corner.

    Next, make sure the layer mask is selected. If there are white lines around the outside of the mask (not the image thumbnail, it means the mask is selected.

    Select the Brush Tool and make sure the foreground colour is set to black. Go down the tool bar and find the foreground and background colours. If white is on top click on the arrow above it to make it black (if other colors are showing hit D on your keyboard to set to the defaults of black and white).
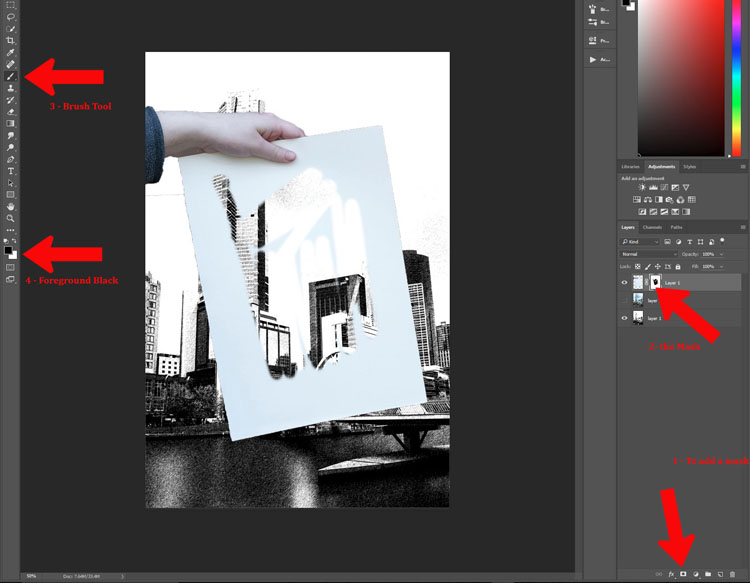
    How to Make a Sketch inside a Photograph

    You could mask out the whole sheet of paper, or leave an edge around the image. For this tutorial, I left a border intentionally. Once you think you have gotten the whole image, press Alt (PC) or Option (Mac), and click the mask. You should then be able to see what you have masked – the black areas are the mask, so make sure there are no white spots left. Brush over any white bits and remove them. If you realize that you are painting white, then the foreground color is wrong. Press X and it will reverse the color so you can go back to painting with black.
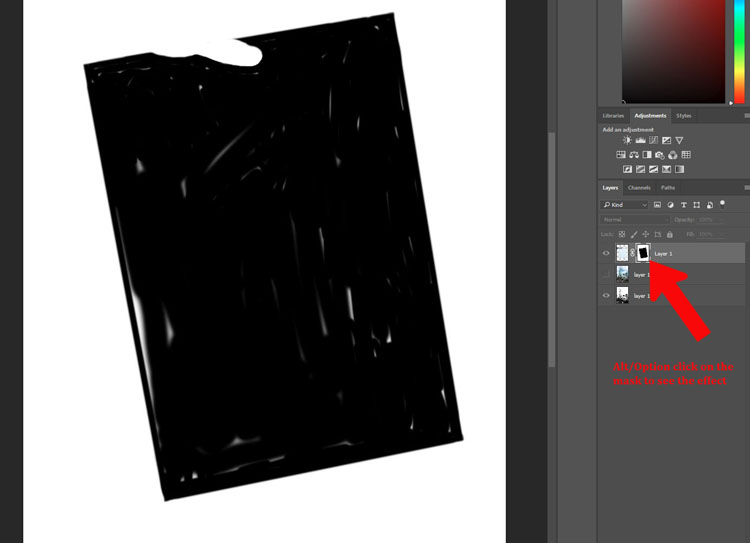
    How to Make a Sketch inside a Photograph

    Putting the photograph back

    Once you have the drawing showing through the paper, you need to make the photograph appear again. Click on the eyeball icon next to the image so it is visible. You will notice the whole drawing has disappeared, it is now behind the photograph. You will need to do another mask so you can see the drawing on the paper again.

    The beauty of this image is that you can use the same mask that you used for the paper layer.

    If you go to the layer mask that you used to show the drawing, press Ctrl/Cmd and click on the mask you will see it make a selection (marching ants around the selected areas). Press Ctrl/Cmd+C, to copy that selection. Then, make sure the photograph layer is selected and click the layer mask icon to create a new one. You should get a new layer mask the same as the other one. (Alternately you can click and hold Alt/Opt, and grab the layer mask from the paper layer and drag it over to the image layer. That will copy the same mask over for you).
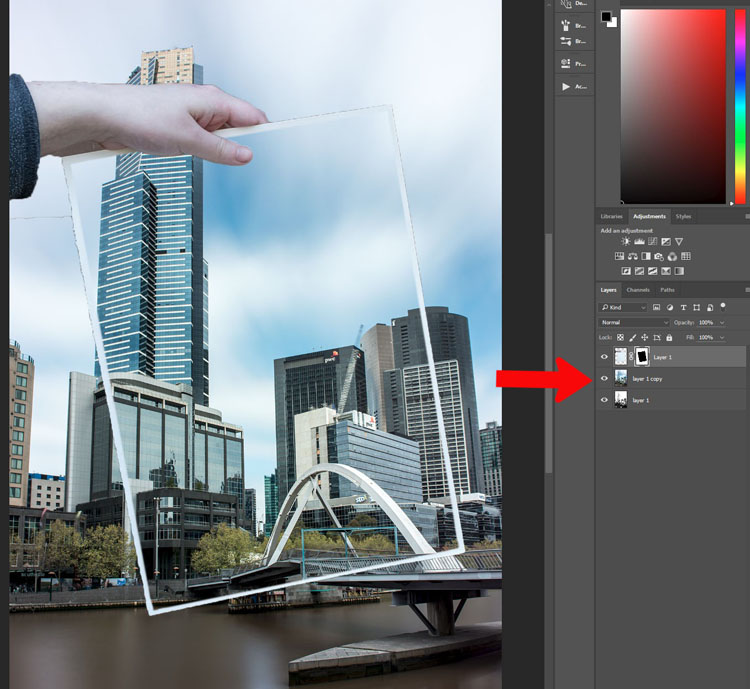
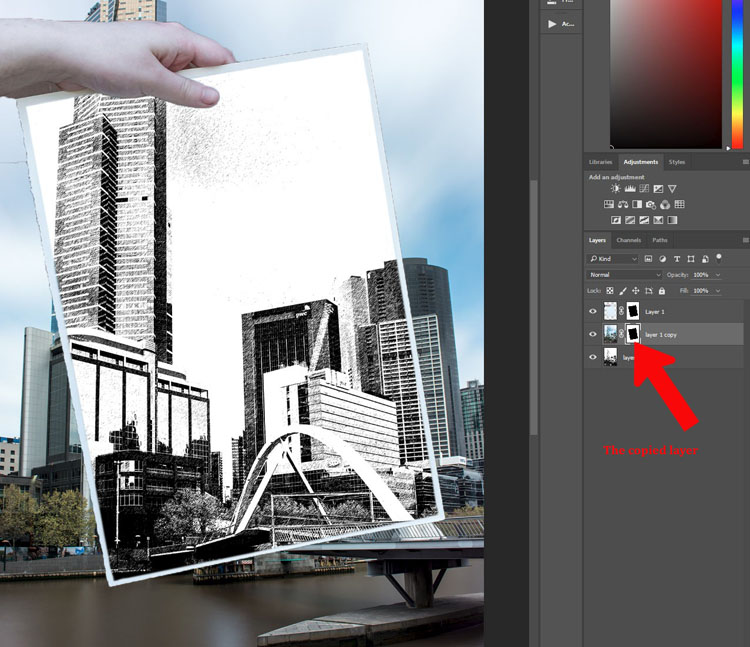
    How to Make a Sketch inside a Photograph

    How to Make a Sketch inside a Photograph

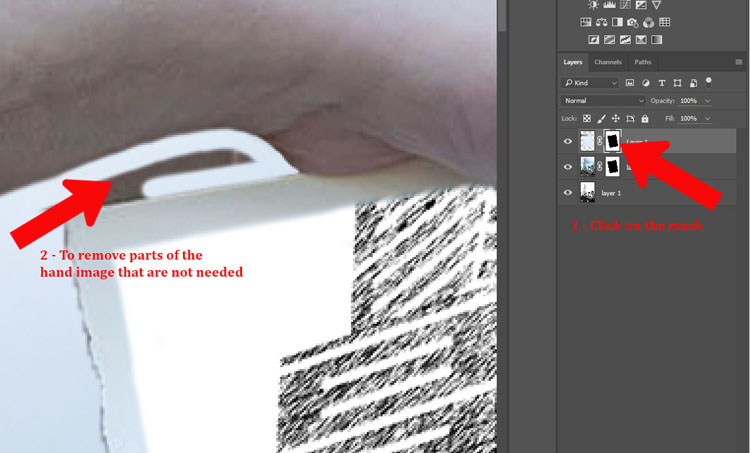
    It is time to remove the parts that don’t really belong. You can use the mask that you had for the hand layer. Use your brush tool and remember to make black the foreground colour. You can now mask out the parts of the hand that you didn’t mean to select when you did the quick selection (zoom in close, you can also use the refine edge function).
    leannecole-drawing-tutorial-13

    Fine tuning

    The hand can look a little weird, so next you need to add a shadow that the hand would have created. This will make it more believable looking.

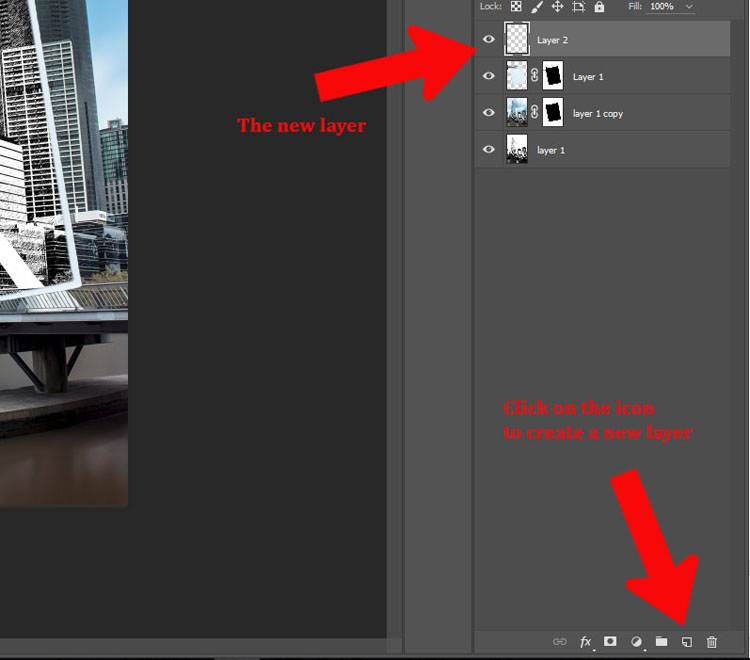
    Add a new layer by clicking the icon at the bottom of the layers panel. It is the square outline with the folded corner, usually located next to the trash can. Alternatively, you can go to Menu > Layer > New Layer.
    How to Make a Sketch inside a Photograph - new layer

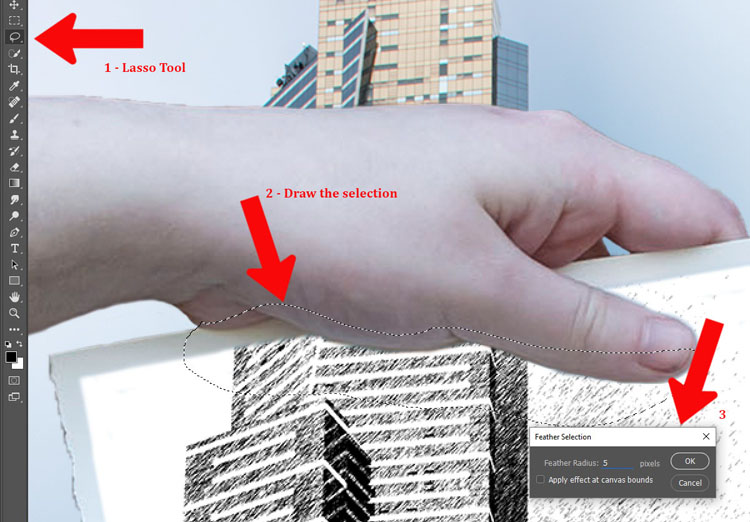
    You will need to use the lasso tool. It is also helpful to zoom in so you can see what you are doing. The zoom tool is also in the tool panel, or you can press the letter Z which will make it appear. Click the image to zoom in, or to zoom out press the Alt or Option key and click the image. (Note: Press B to get the brush back.)

    On the new layer, draw under the hand with the lasso tool to get the shadow. You don’t have to be exact as it is not going to be really dark. Go up to Menu > Select > Modify > Feather. In the popup window enter the amount of feathering you want. 5 pixels was the setting selected for this image. Alternatively you can press Shift+F6.
    How to Make a Sketch inside a Photograph

    Add in the shadow area

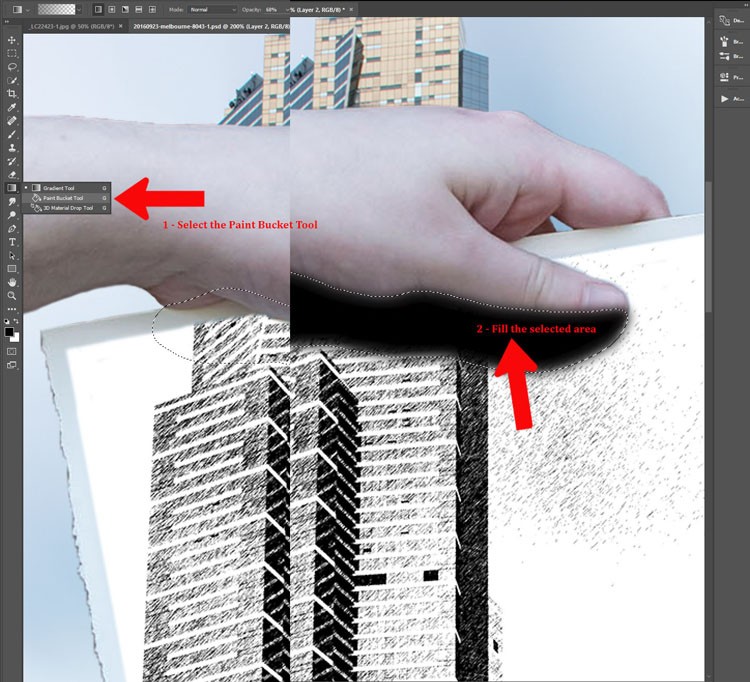
    Fill the selected area with black using the Paint Bucket Tool. Make sure that the foreground colour is black.
    How to Make a Sketch inside a Photograph

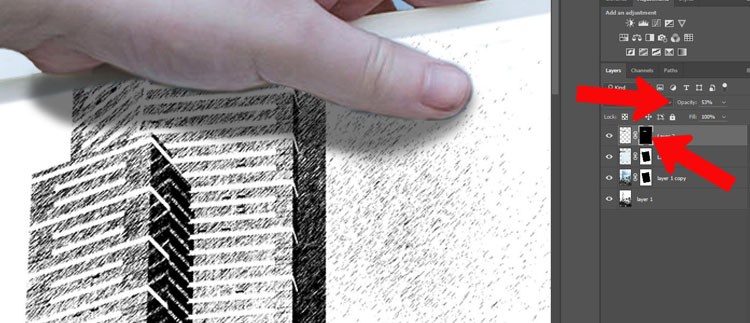
    You may need to add a mask to remove any parts of the hand that you don’t need. You can also change the opacity of the layer so the shadow isn’t as dark. The opacity slider is located at the top of the layers panel near the blending modes. Adjust to where you think the shadow looks natural.
    How to Make a Sketch inside a Photograph

    To deselect hit Ctrl/Cmd+D.

    How to Make a Sketch inside a Photograph

    The image is now done.

    Conclusion

    I don’t know how many of these you would do, but some of the techniques used to create it can be used for many other things. Try doing this tutorial a few times, then see how you can use some of the processes in different ways. Don’t forget to share your images so we can see what you have done.

    googletag.cmd.push(function() {
    tablet_slots.push( googletag.defineSlot( “/1005424/_dPSv4_tab-all-article-bottom_(300×250)”, [300, 250], “pb-ad-78623” ).addService( googletag.pubads() ) ); } );

    googletag.cmd.push(function() {
    mobile_slots.push( googletag.defineSlot( “/1005424/_dPSv4_mob-all-article-bottom_(300×250)”, [300, 250], “pb-ad-78158” ).addService( googletag.pubads() ) ); } );

    The post How to Make a Sketch Inside a Photograph by Leanne Cole appeared first on Digital Photography School.


    Digital Photography School

  • Starling vortex wins £10,000 Landscape Photographer of the Year prize

    2016 Take a View Landscape Photographer of the Year winners

    Landscape Photographer of the Year 2016 Matthew Cattell – Starling Vortex, Brighton, East Sussex, England

    The winners of the 2016 Take a View Landscape Photographer of the Year competition have been announced, with a shot of a flock of starlings flying in front of Brighton Pier taking the top prize. The competition, which accepts entries from around the world of pictures taken in the UK, is in its tenth year, and is run by landscape photographer Charlie Waite.

    There are ten main categories for manipulated and un-manipulated images taken by adults and by those 17 years and under, as well as additional competitions for supported by sponsors – such as railway company Network Rail’s Line in The Landscape, Adobe and the Visit Britain tourist service. The top prize is £10,000 and category winners receive £1000 or £500 for the youth prizes.

    Commended and runner up photographers get their images published in the Landscape Photographer of the Year book, and an exhibition of selected images runs at London’s Waterloo station for 12 weeks from 21st November.

    For more information and to see more of the winning images visit the Take A View website. You can also read our interview with Charlie Waite.

    2016 Take a View Landscape Photographer of the Year winners

    Adult Classic view – Winner Dougie Cunningham – Shelter from the Storm, Loch Stack, Sutherland, Scotland

    2016 Take a View Landscape Photographer of the Year winners

    Adult Classic view – Highly commended Scott Robertson – Binnein Beag through Steall, Scottish Highlands

    2016 Take a View Landscape Photographer of the Year winners

    Adult Classic view – Runner-up Scott Robertson – Stob Dearg, Buachaille Etive Mor, Glencoe, Scotland

    2016 Take a View Landscape Photographer of the Year winners

    Network Rail ‘Lines in the Landscape’ Award – Winner Francis Taylor – Sunshine breaks through, Ribblehead Viaduct, North Yorkshire, England

    2016 Take a View Landscape Photographer of the Year winners

    The Sunday Times Magazine Award – Winner Rachael Talibart – Maelstrom, Storm Imogen, Newhaven, East Sussex, England

    2016 Take a View Landscape Photographer of the Year winners

    Adult Living the view – Winner Martin Birks – Chrome Hill, Peak District, Derbyshire, England

    2016 Take a View Landscape Photographer of the Year winners

    The GREAT Britain #OMGB Award – Winner Mark Gilligan – Finding Gold, Wast Water, Cumbria, England

    2016 Take a View Landscape Photographer of the Year winners

    The Adobe Prize – Winner Damian Ward – Caister-on-Sea, Norfolk, England

    2016 Take a View Landscape Photographer of the Year winners

    Adult Your view – Winner Tony Higginson – Shifting sands, Silverdale, Lancashire, England

    2016 Take a View Landscape Photographer of the Year winners

    Adult Your view – Runner-up Daniel Pecena – A82, Glen Coe, Highland, Scotland

    2016 Take a View Landscape Photographer of the Year winners

    Young Landscape Photographer of the Year 2016 Hannah Faith Jackson – Mirror Bar, Glasgow, Scotland

    2016 Take a View Landscape Photographer of the Year winners

    Youth Living the view – Winner Rowan Ashworth – Sunset Explorer, Hushinish, Isle of Harris, Scotland

    Articles: Digital Photography Review (dpreview.com)

  • Beauty in Decay: Moody Murals Bring Human Faces Back to Abandoned Places

    [ By SA Rogers in Art & Installation & Sound. ]

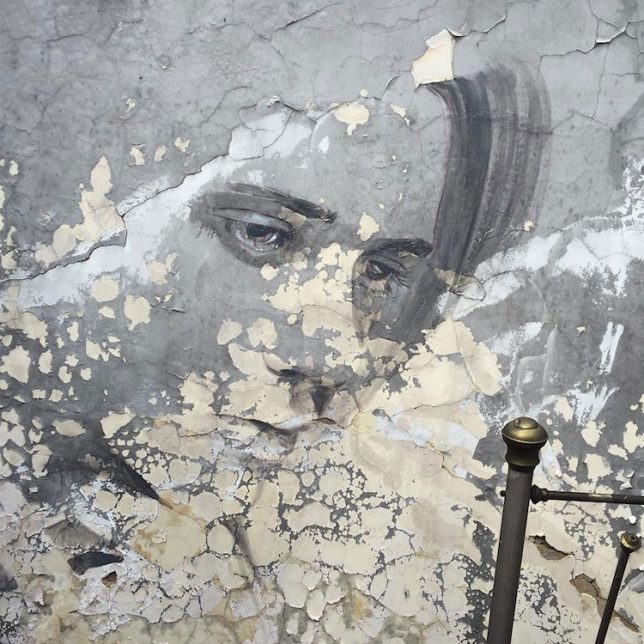
    rone-murals-abandoned-places-1

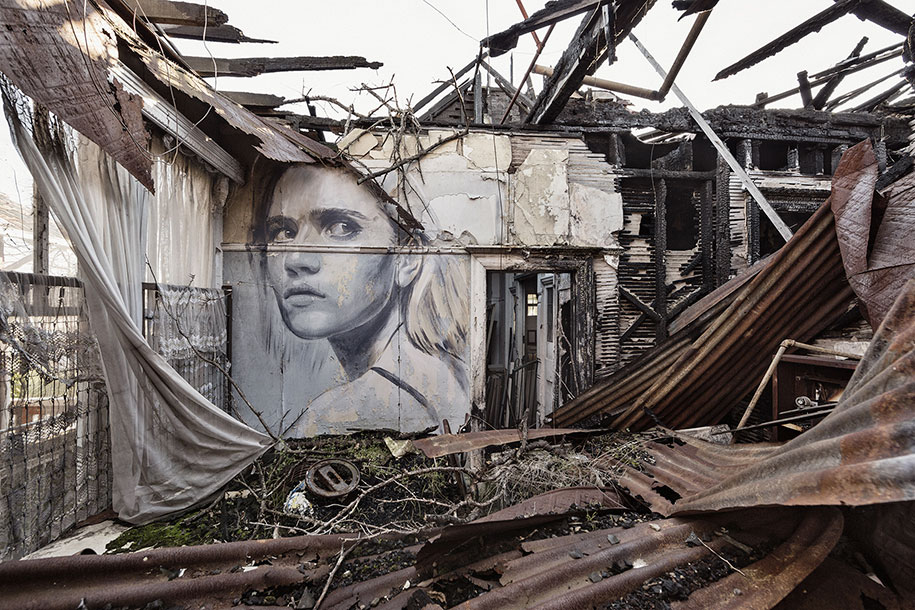
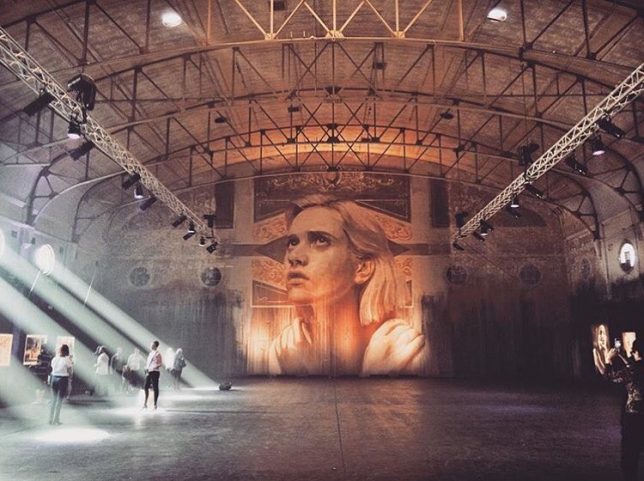
    Abandoned places are often steeped in a mixture of emotional impressions, commingling a sense of loss and a confrontation of our own mortality with slivers of hopefulness for a new future, as nature begins to take over what we’ve left behind. As we move through these deteriorating spaces, strewn with the belongings of former inhabitants who seem to have simply disappeared, we wonder who they were and why the spaces that once sheltered them as they went about their lives have come to this. It’s these emotional qualities that make a new series of murals by Australian street artist Rone all the more poignant and powerful.

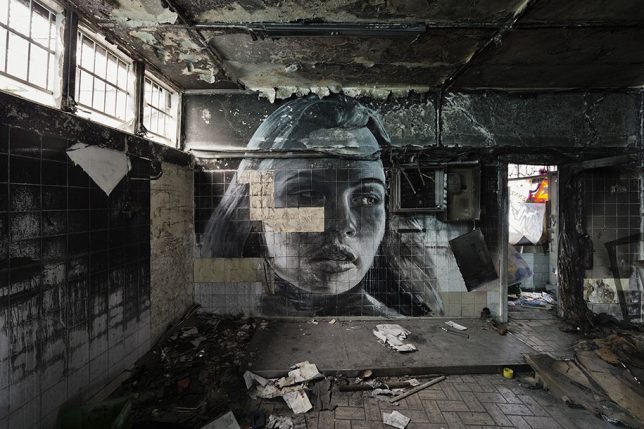
    rone-murals-abandoned-places-2

    rone

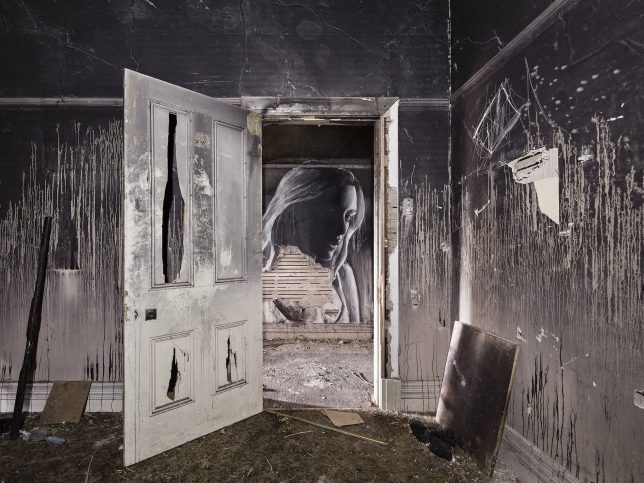
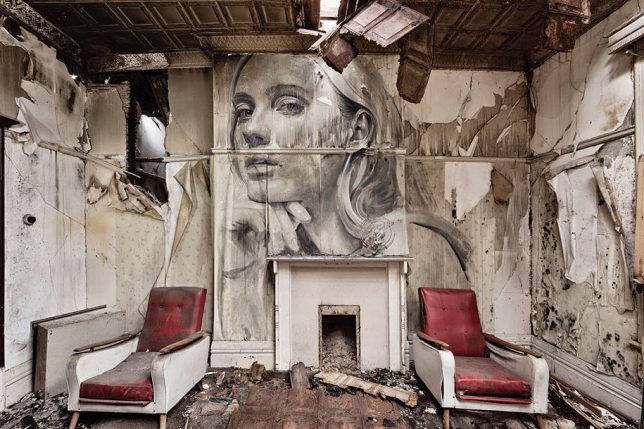
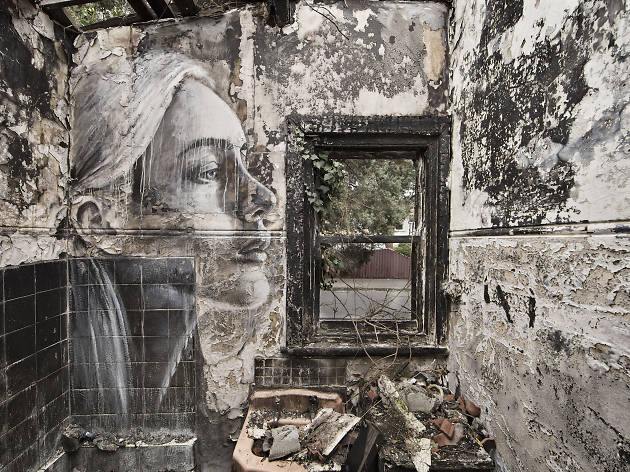
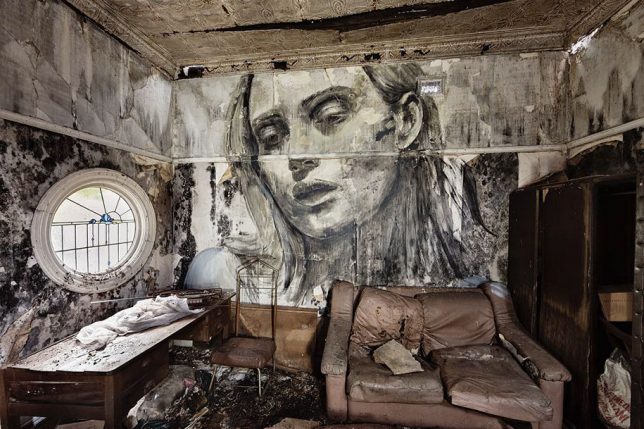
    Entitled ‘Empty,’ the series places the artist’s signature portraits of women on the walls of abandoned interiors, deepening their emotional weight. Much of the subjects’ glamour is stripped away as their skin takes on the texture of peeling paint, the lines of their faces are interrupted by fallen tiles and their gazes are pointed down at the destruction of their environments.

    rone-murals-abandoned-places-3

    rone-murals-abandoned-places-4

    For the Melbourne-based artist, this series represents a shift from the smooth, clean surfaces of his canvases and even the more clear-cut exterior walls upon which his murals are typically painted. But Rone has always found meaning in the temporary nature of these installations, as the artworks are gradually worn away by the elements or painted over by vandals and other artists.

    rone-murals-abandoned-places-5

    rone-murals-abandoned-places-6

    rone-murals-abandoned-places-7

    Rone exhibited ‘Empty’ at the soon-to-be-demolished Star Lyric Theatre building in Melbourne, presenting photographs of the murals in situ along with works on canvas and paper. The artist also painted a new mural directly onto the back wall of the theater, stretching nearly 33 feet from floor to ceiling. It’s a fitting way for the decaying Art Nouveau building to go out, with Rone’s canvases lining its blackened and stained surfaces. See more photos of the installation at Street Art News.

    Share on Facebook


    [ By SA Rogers in Art & Installation & Sound. ]

    [ WebUrbanist | Archives | Galleries | Privacy | TOS ]


    WebUrbanist

  • Oldest existing Nikon I camera goes up for auction with original lens and case

    $ (document).ready(function() { SampleGalleryV2({“containerId”:”embeddedSampleGallery_1322935571″,”galleryId”:”1322935571″,”isEmbeddedWidget”:true,”standalone”:false,”selectedImageIndex”:0,”startInCommentsView”:false,”isMobile”:false}) });

    The oldest known Nikon camera in existence has gone up for auction at WestLicht. This particular Nikon I, serial number 60924, was made in April 1948 and is notable as being the third camera produced by Nikon. WestLicht describes the camera’s condition as ‘B+,’ and says it includes the original Nikkor-H 2/5cm no.70811 with a matching Nikon cap in ‘fantastic original condition.’

    The Nikon I still has its original shutter, according to WestLicht, as well as engravings that indicate the serial number, ‘Nippon Kogaku Tokyo’ and ‘Made in Occupied Japan.’ In addition to the camera itself, the auction includes the original double-strap carrying case; WestLicht describes the case as ‘extremely rare.’ 

    The auction’s starting price is €90,000, with WestLicht estimating the camera will sell for between €160,000 to €180,000 (about $ 174,000 to $ 195,750). 

    Articles: Digital Photography Review (dpreview.com)

  • Swedish court rules drone photography is surveillance and requires a permit

    Sweden’s Supreme Administrative Court has issued a ruling that classifies drone photography as surveillance, thus meaning operators of drones with cameras would need to obtain a surveillance license – an unlikely case for members of the public. Swedish drone owners are understandably upset with the ruling, stating that it will effectively kill an entire industry. Local media outlets also find it troubling, since no exceptions are made for journalistic applications.

    UAS Sweden, an organization of Swedish drone operators, plans to try to convince lawmakers that the decision is an overreaction that will have a tremendous negative impact on their industry. Either way, the policy will likely be difficult to enforce. Swedish newspaper Aftonbladet points out that local police seem unlikely to prioritize any reports of suspected unauthorized surveillance. 

    Articles: Digital Photography Review (dpreview.com)

  • 5 Tips for Portraits of Musicians That Will Help You Hit All the Right Notes

    I’d like to share a few tips for portraits of musicians that will help you avoid the awkward photos that make any musician cringe.

    portraits of musicians

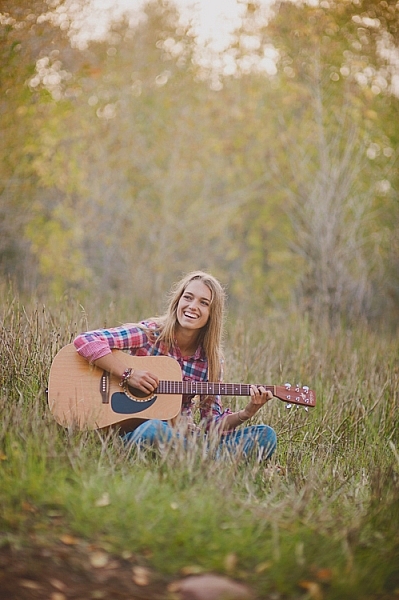
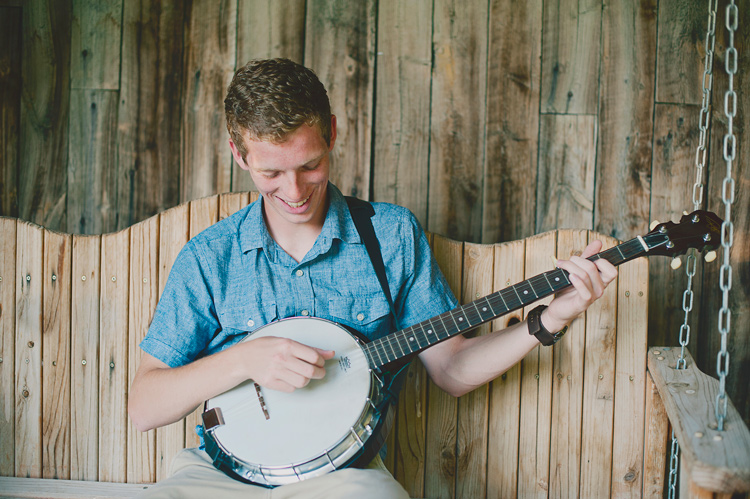
    Sometimes we are lucky enough as photographers to be asked to photograph someone with one of their most prized possessions: their musical instrument. Most people that want to be photographed with their instrument really and truly love it, and it’s a part of who they are. As a musician myself, I love photographs with gorgeous instruments in them, and I am especially bothered by photos that don’t capture those instruments naturally. Sometimes I’ll come across a photo that makes me cry out, “Why?? Nobody would EVER hold their instrument like that!!” You can still be creative with your photos without making them awkward.

    portraits of musicians

    1. Trust the musician

    If you aren’t familiar with the instrument you’re photographing, it is especially important to trust the musician. This isn’t the time to try every posing trick that you can come up with, ending up with flutes on top of the head, or cellos held under the chin.

    Ask your subject how they hold their instrument naturally. You can ask how they hold their instrument while playing, or when they’re relaxing between songs. If it’s a big instrument, like a piano, ask them how they would stand next to it before they perform, or how they sit by it when they’re thinking about what to practice. Ask them to demonstrate how they carry their instrument from one place to another. These might seem like silly questions, but you can really get a sense of what positions and holds are natural, then you can build from there.

    portraits of musicians

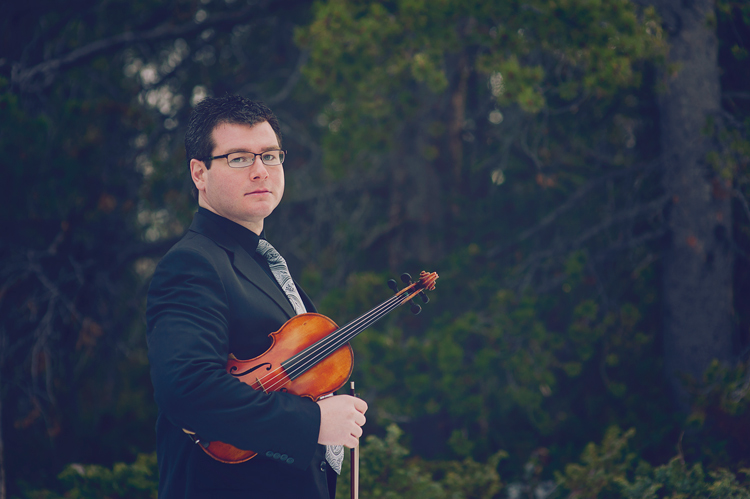
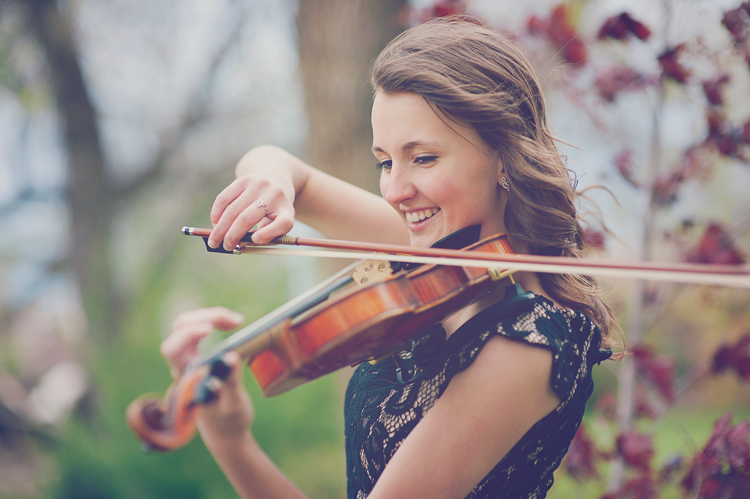
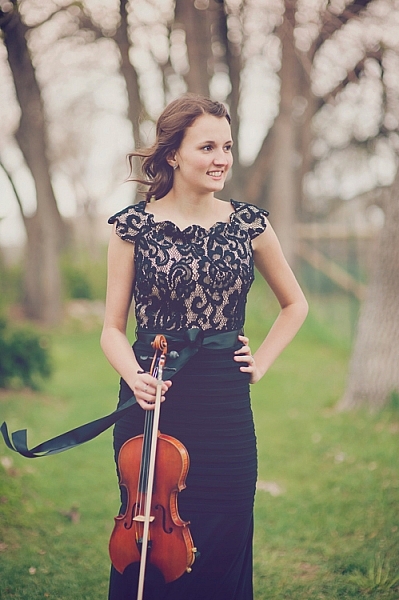
    As an example, a violinist may tell you that she holds her violin under her right arm when resting. You could take that position, ask her to sit on a chair in a formal pose holding the violin under her arm and get a beautiful portrait of a girl and her violin. The key is to remember that they are much more expert at how to naturally pose with their instrument than you likely are. However, if you do happen to know their instrument well, feel free to use your knowledge to get beautiful natural poses.

    2. Do your homework

    portraits of musicians

    Before a session with a musician, you could watch some videos on YouTube to see how people interact specifically with the instrument you’ll be photographing. Find a professional musician who plays the same instrument. Look at their website to see what kind of photos they have with their instruments. You may have a client who is very shy and need more guidance posing, so it’s helpful to have a few ideas ahead of time. Be prepared for challenges that an instrument might bring, such as unwanted reflections in brass, immobility of harps or pianos, sensitivity to temperature or weather, and have a plan.

    3. Ask the musician to play for you

    portraits of musicians

    If you can get your subject to give you a little performance during the photo session, you will get some great action shots. It usually helps loosen them up a little bit too, and brings out some natural smiles. Remind them that it doesn’t matter if they make mistakes because your camera doesn’t catch any audio. It will only capture the perfect moments of their playing. Also, remind them that you aren’t there to judge their skill, you just want to capture the relationship they have with their instrument. Move around as they play, and catch the beautiful moment from every angle you can, close, and far.

    4. Get close-ups of the action

    portraits of musicians

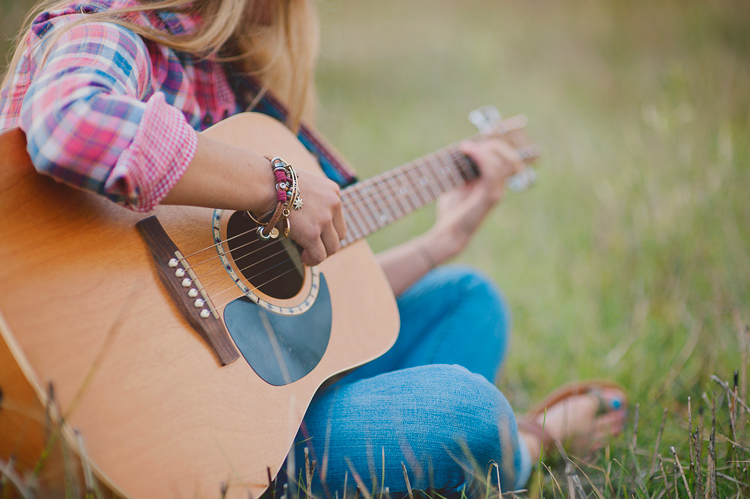
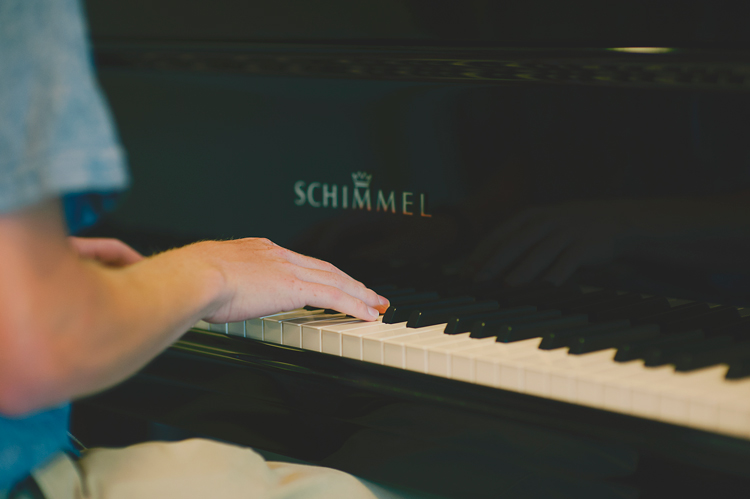
    Hands are the main part of playing most instruments. Get in close on the hands as they play. These shots often end up being some of my very favorites. Try focusing on the hands as you shoot down the neck of a guitar, the fingers on a flute, or hands that are frozen in mid-air during a drum solo. Getting in close on these details can create beautiful action photos that really tell the story. If their hands are moving too quickly for you to focus, ask them to freeze for a moment in that position while you get the shot.

    5. Make the instrument the star

    portraits of musicians

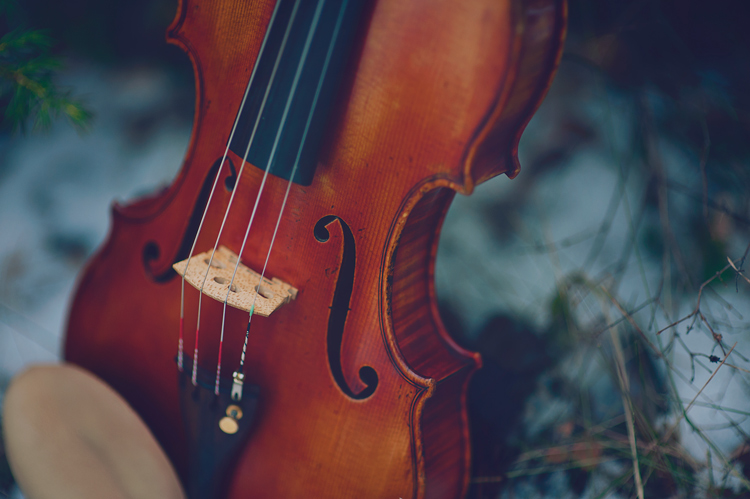
    Take a few photos of the instrument by itself, too. Musicians love their instruments, and they will love photos that show their beauty. Make sure to ask permission to touch their instrument, and to set it down, move it, or anything you might want to do for the shot that could potentially harm it in any way. You can even ask the owner to do all of the touching and moving, and you can move yourself around to get the photo that you want.

    Tell the musician what you have in mind, and they will most likely be on board, and be happy to help you get some amazing instrument photos. Instruments can be extremely expensive, and even more importantly, can have sentimental value that can never be compensated. Keep this in mind throughout the session, whether your subject is in the photo with the instrument, or not. Never ask them to do something that could harm or damage the instrument.

    portraits of musicians

    portraits of musicians

    Conclusion

    Every time I’ve been asked to create photos for album covers for musicians, head shots for websites, art to print and frame, or just to capture someone’s favorite hobby, my goal is to create a photo that they will love. One that will stay true to what they would naturally do with their instruments.

    I hope these tips can help you create beautifully genuine musician portraits too. I would love to see your musician portraits in the comments!

    googletag.cmd.push(function() {
    tablet_slots.push( googletag.defineSlot( “/1005424/_dPSv4_tab-all-article-bottom_(300×250)”, [300, 250], “pb-ad-78623” ).addService( googletag.pubads() ) ); } );

    googletag.cmd.push(function() {
    mobile_slots.push( googletag.defineSlot( “/1005424/_dPSv4_mob-all-article-bottom_(300×250)”, [300, 250], “pb-ad-78158” ).addService( googletag.pubads() ) ); } );

    The post 5 Tips for Portraits of Musicians That Will Help You Hit All the Right Notes by Melinda Smith appeared first on Digital Photography School.


    Digital Photography School
  • Facebook is planning to relax censorship rules for newsworthy images

     Image: Nick Ut/The Associated Press

    Last month Norway’s largest newspaper, Aftenposten, published an open letter on its front page, accusing Facebook CEO Mark Zuckerberg of ‘abuse of power.’ The letter was published as a response to Facebook removing the famous ‘Napalm Girl’ image, taken by photographer Nick Ut, from the newspaper’s Facebook page on the grounds of a blanket ban on nudity in all images posted on the social network.
    The picture had been used in an article about the seven most iconic images in the history of war. After receiving a wave of intense criticism following the incident, Facebook has announced in a blog post that it will be relaxing its photo censorship rules around news events:

    ‘In the weeks ahead, we’re going to begin allowing more items that people find newsworthy, significant, or important to the public interest — even if they might otherwise violate our standards. We will work with our community and partners to explore exactly how to do this, both through new tools and approaches to enforcement. Our intent is to allow more images and stories without posing safety risks or showing graphic images to minors and others who do not want to see them.’

    We will have to wait and see how exactly this will be defined but it’s fair to assume that Nick Ut’s picture would have been considered historically significant and therefore safe under the revised guidelines. 

    We should expect any changes to take effect within the next few weeks as Facebook is working on replacing its filter algorithms. The company says it will be working closely with experts, publishers, journalists, photographers, law enforcement officials and safety advocates to achieve this. 

    What do you think? Is this a step in the right direction for Facebook? Let us know in the comments.

    Articles: Digital Photography Review (dpreview.com)