Blog

  • Parasitic Art: 11 Installations Taking Over Buildings Like Organic Growths

    [ By SA Rogers in Art & Installation & Sound. ]

    parasitic-art-1

    Some art just can’t be contained, even by the buildings that house it, expanding beyond these constrictions like alien appendages to burst through windows, wrap around columns and slink onto the sidewalks below. Inorganic materials take on the qualities of living things, manifesting as artificial parasitic growths as they cling to the facades of buildings in architectural installations that take on lives of their own.

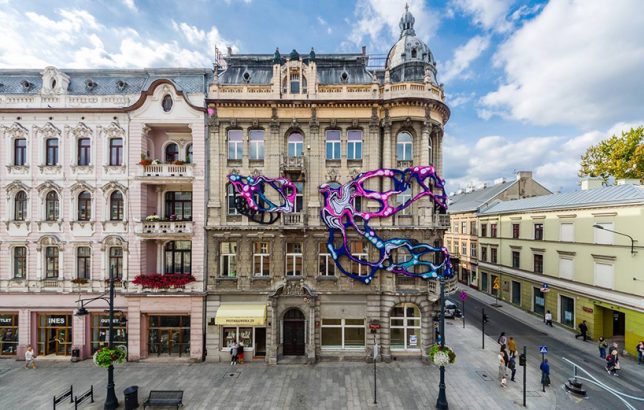
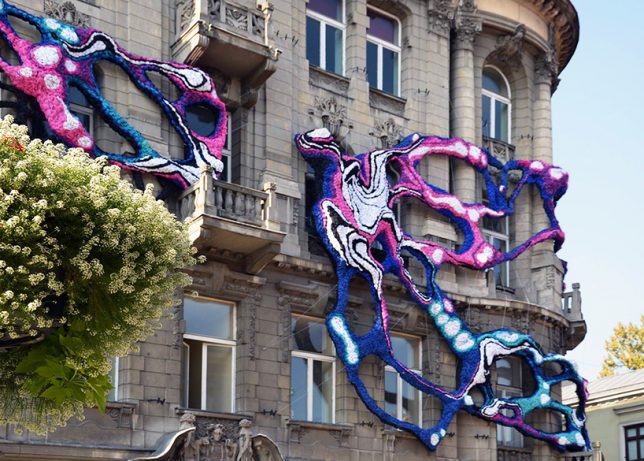
    Hyperbolic Installation by Crystal Wagner, Poland

    parasitic-art-2

    parasitic-art-3

    parasitic-art-4

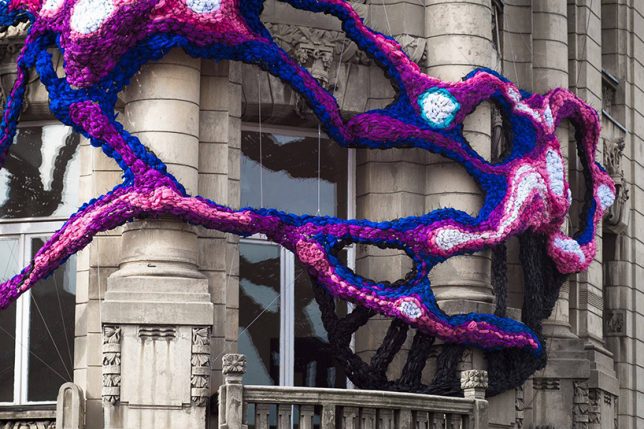
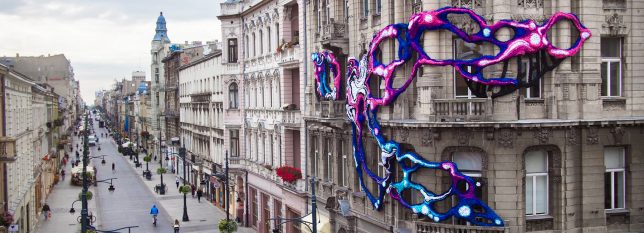
    An alien-like growth wraps itself around the corner facade of a historic building in Lodz, Poland, stretching tentacle-like appendages in shades of vivid pink, blue and purple. The site-specific work by Crystal Wagner is made from woven strips of plastic.

    Wood Tentacles by Henrique Oliveira

    parasitic-art-wood-4

    parasitic-art-wood-3

    parasitic-art-wood-2

    Wooden forms expand to fill entire interior spaces, taking over light root systems to push through windows and doorways and into the streets, or in one case, to act as a secret system of interior tunnels. Artist Henrique Oliveira of Brazil typically installs his organic sculptures in gallery spaces, but one particular work has it bursting out of the confines of Casa dos Leoes in Porto Alegre.

    10,000 Bats on the Nature Concert Hall

    parasitic-art-bats

    parasitic-art-bats-2

    parasitic-art-bats-3

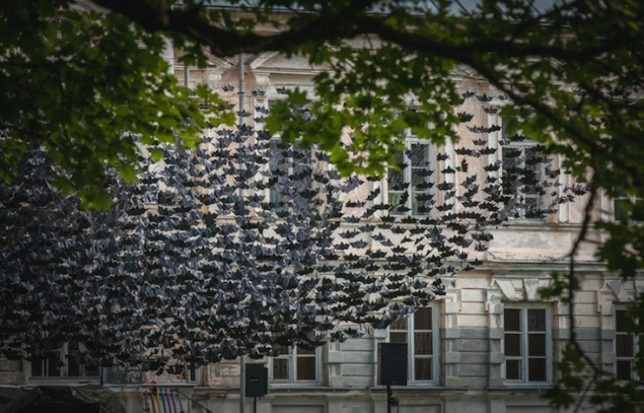
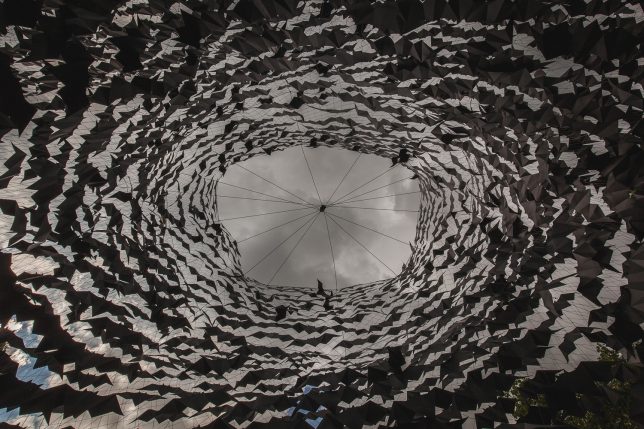
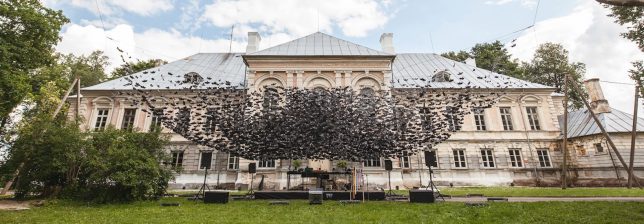
    Thousands of bats stream straight out of the front door of the Nature Concert Hall at Zalenieki Manor in Latvia, forming a surreal cloud on its lawn. Architecture firm DJA took inspiration from the unpredictable formations found in nature when assembling the congregation of 10,000 paper bats, which create a tunnel effect when viewed from below.

    Vortex by 1024 Architecture, Bordeaux, France

    screen-shot-2016-10-25-at-9-36-26-pm

    screen-shot-2016-10-25-at-9-37-33-pm

    screen-shot-2016-10-25-at-9-36-45-pm

    screen-shot-2016-10-25-at-9-37-42-pm

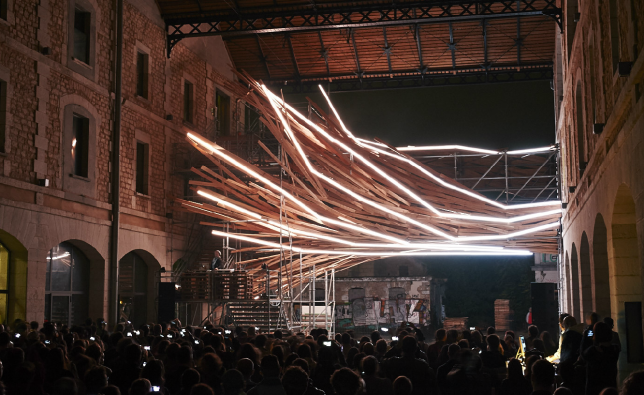
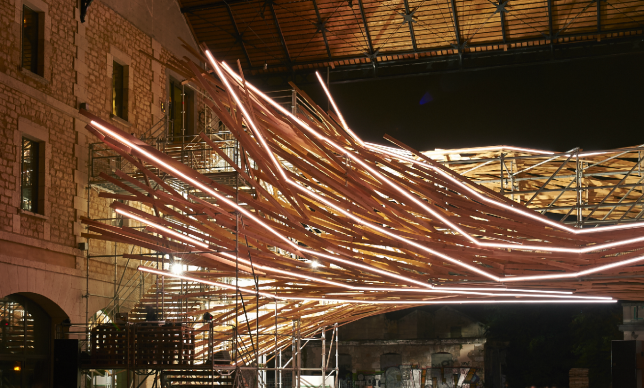
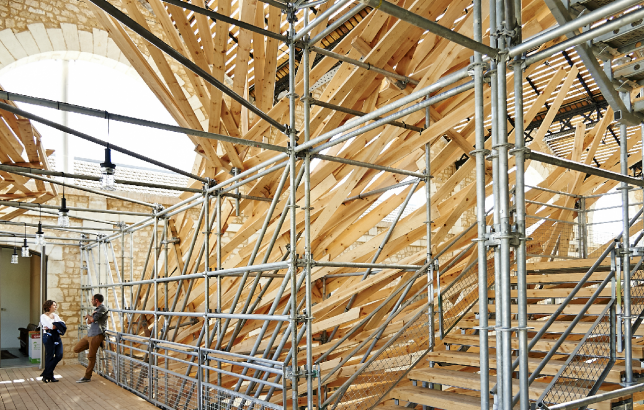
    Strips of wood have taken it upon themselves to escape one building and grip the exterior of another, streaming toward it in a manner suggestive of autonomy. ‘Vortex’ is a generative light sculpture by 1024 Architecture almost completely made of scaffolding, installed on the Darwin Ecosystem Project’s green building in Bordeaux, France. “Merging organic materials with new technologies, this hybrid architectural artwork wraps around and embraces the footbridge between the complex’s two buildings, revealing and enhancing the venue’s dynamic energy while working as a live visualizer of energy consumption.”

    Biografias by Alicia Martin, Madrid

    parasitic-art-books-1

    parasitic-art-books-2

    parasitic-art-books-3

    An ornate second-floor window seems to vomit thousands of books onto the sidewalk below in this installation by artist Alicia Martin, as if they, too, are hoping to escape the building. The effect is enhanced by the movement of the pages as they’re blown by the wind. Martin has created similar site-specific installations in buildings all over her home country of Spain.

    Glowing Star in an Unfinished Building by Jun Ong

    parasitic-art-star

    parasitic-art-star-2

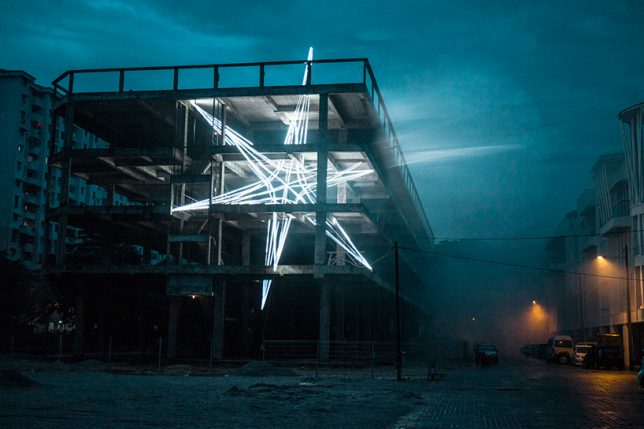
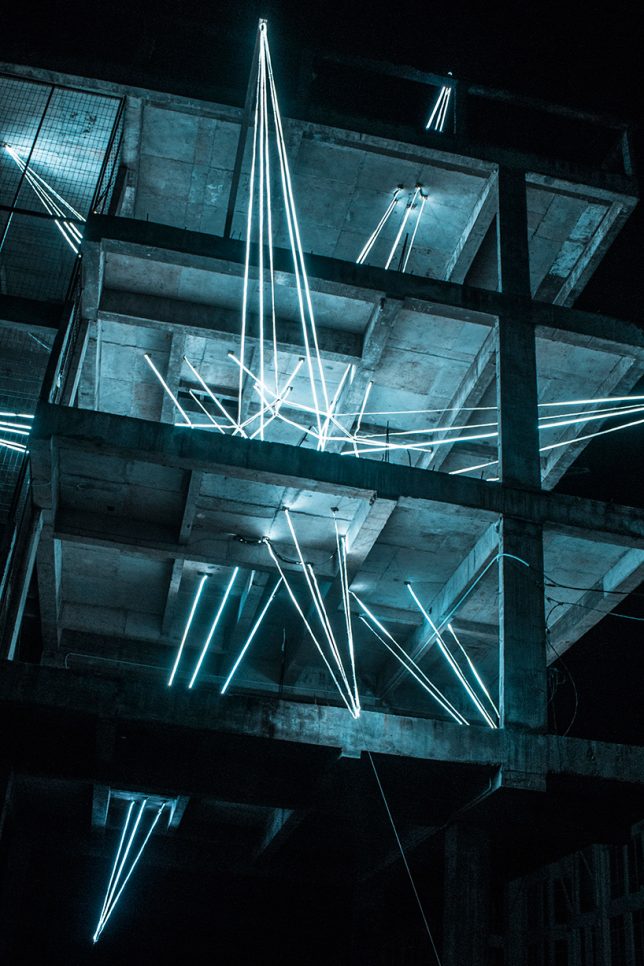
    Like some kind of alien life form that started out tiny and suddenly expanded, impaling an entire building upon itself, this five-story star made of light by Jun Ong suggests rapid growth that could not be contained. The artist envisions the LED sculpture as a physical manifestation of a glitch.

    Next Page – Click Below to Read More:
    Parasitic Art 11 Installations Taking Over Buildings Like Organic Growths

    Share on Facebook


    [ By SA Rogers in Art & Installation & Sound. ]

    [ WebUrbanist | Archives | Galleries | Privacy | TOS ]


    WebUrbanist

  • In The Pink – 19 Rosy Colored Images

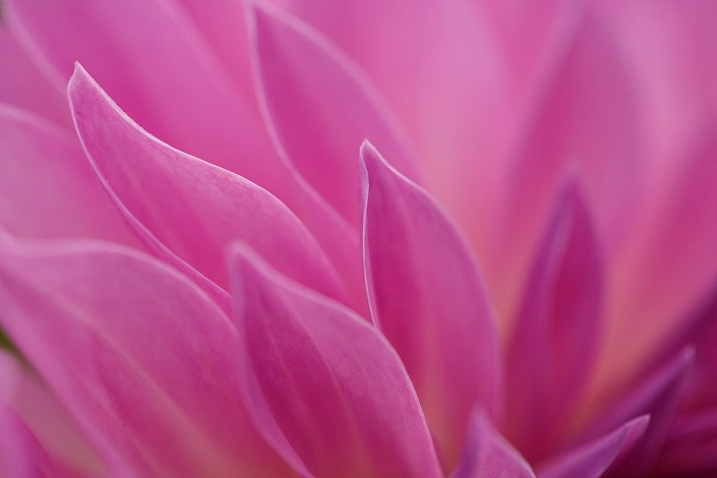
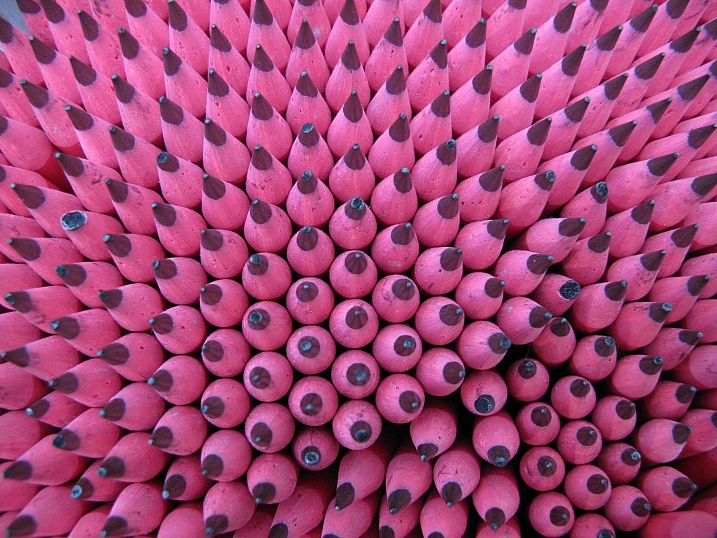
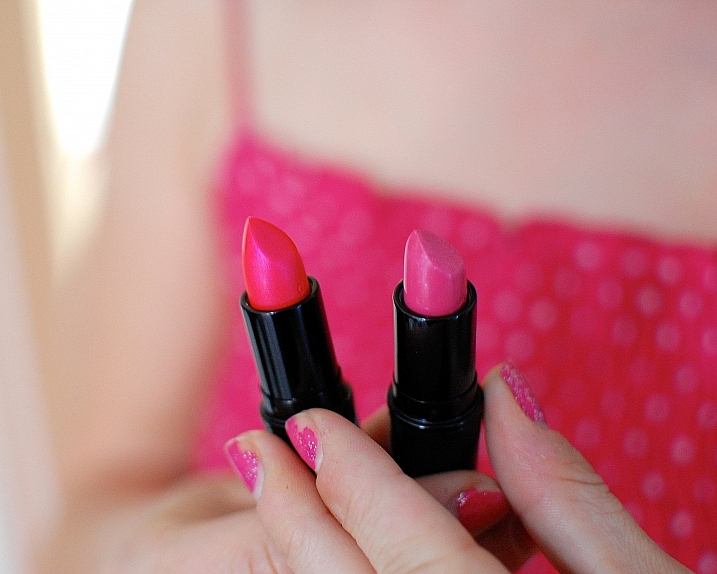
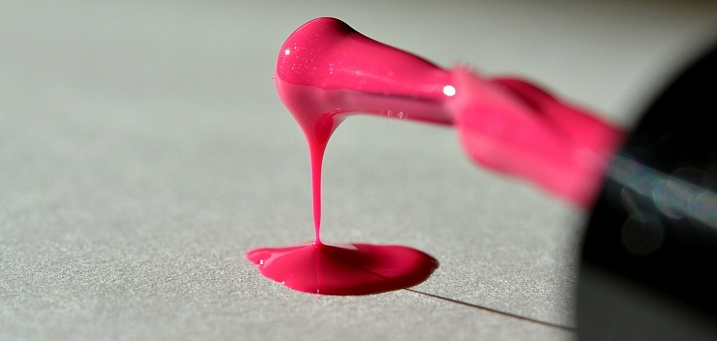
    Rose colored glasses, in the pink, tickled pink, pinkie finger and a pink elephant. This color can represent a lot of things. Here are some examples by different photographers who found unique pink subjects to shoot.

    Nuwandalice

    By Nuwandalice

    David Yu

    By David Yu

    Brian McHugh

    By Brian McHugh

    SurprisePally

    By SurprisePally

    Javcon117*

    By Javcon117*

    Katie Dalton

    By Katie Dalton

    Liliana

    By Liliana

    Howard Ignatius

    By Howard Ignatius

    Shimelle Laine

    By Shimelle Laine

    Paimei01

    By paimei01

    Louise Leclerc

    By Louise Leclerc

    *Ann Gordon

    By *Ann Gordon

    Ram Yoga

    By Ram Yoga

    Marchnwe

    By Marchnwe

    Duncan C

    By duncan c

    Ian D. Keating

    By Ian D. Keating

    John Verive

    By John Verive

    Chris Kennedy

    By Chris Kennedy

    Patrik Nygren

    By Patrik Nygren

    googletag.cmd.push(function() {
    tablet_slots.push( googletag.defineSlot( “/1005424/_dPSv4_tab-all-article-bottom_(300×250)”, [300, 250], “pb-ad-78623” ).addService( googletag.pubads() ) ); } );

    googletag.cmd.push(function() {
    mobile_slots.push( googletag.defineSlot( “/1005424/_dPSv4_mob-all-article-bottom_(300×250)”, [300, 250], “pb-ad-78158” ).addService( googletag.pubads() ) ); } );

    The post In The Pink – 19 Rosy Colored Images by Darlene Hildebrandt appeared first on Digital Photography School.


    Digital Photography School

  • ‘It’s about sharing your beautiful experience’: Nikon Photokina interview

    Photokina 2016 gave us a chance to speak to Nikon about the models it’s showing, where the market is going and the challenges it faces.

    It was a relatively quiet show for Nikon, with three KeyMission lifestyle cameras taking up as much space as the recently announced D3400 and 105mm F1.4 lens. We took the opportunity to speak to Naoki Kitaoka, Department Manager, Marketing Department and Masahiko Inoue, Group Manager, Marketing Group 2, to see how the company sees the market. Please note the following interview has been slightly edited for clarity and flow.

    What’s the key mission of KeyMission?

    We started by asking whether they foresaw DSLRs and other dedicated cameras returning to being the niche product they were at the end of the film era and where KeyMission fits in:

    ‘We don’t want to change our policy,’ said Kitaoka: ‘We will keep offering the best DSLR to the customer. On the other hand, smart devices are getting popular: almost everyone has one or two or three devices in their pocket. In the mobile era, we have to offer new solutions that are fit for the mobile era. We want to be the end to end solution for consumers. The KeyMission is one of our solutions I think.’

    The KeyMission range, including the KeyMission 360 are aimed at ‘immediate immersive storytelling,’ the company says.

    KeyMission, then, is intended as a way of bringing Nikon’s expertise to new customers, Inoue explains: ‘Our competence is high quality imagery. So we will continue to keep that our core competence and apply it into the KeyMissions.’

    ‘For instance, the lens in the KeyMission 360 has a very wide angle of view. But this kind of category needs the size to be wearable. Using our competence and some new techniques, we managed to keep the quality and realize the miniaturization.’

    ‘It’s a very wide-angle view. Very fast lens: F2.0. Very bright and very wide, normally that kind of lens is larger optical design but we try to do the miniaturization.’

    As well as image quality and size, simplicity is another aim for the camera, says Kitaoka: ‘It is not just an action camera. With the KeyMission series, we are bringing to market the ultimate tools for immediate immersive storytelling. They also demonstrate the role Nikon technology can play in the exciting new field of VR.’

    ‘The concept is about sharing your beautiful experience.’ Inoue concurs.

    This means making it easy to share a wide variety of content types, Kitaoka says: ‘We believe every single model, every single customer has a different image of sharing. We have expanded the categories we cover to include KeyMission so you can find your best camera, from KeyMission to DSLR. Additionally, different types of consumers with different purposes need different types of cameras for every mission. We don’t want to interrupt your adventure.’

    The value of sharing

    This need for simple sharing underpins the company’s plan to introduce a version of its SnapBridge sharing system across its entire model range: ‘Easy means setting up between camera and smartphone,’ says Kitaoka: ‘We launched the WMU app so we had kind of experience for this setup process. We tried to improve, to make the setting easier. But still some of you might feel it’s quite difficult. Now three or four steps are needed to connect camera to mobile phone. We are trying to reduce steps from four to one, and finally zero.’

    ‘Now three or four steps are needed to connect camera to mobile phone. We are trying to reduce steps from four to one, and finally zero’

    The company has chosen the technology it thinks will help. ‘We use Bluetooth Low Energy so it can realize smart link,’ says Kitaoka. There’s a benefit to this technique, despite its low bandwidth, he explains: ‘If we use Bluetooth you can use Wi-Fi at the same time. Once you can shoot your story and then camera automatically sends your story to smartphone. Your Wi-Fi can stay connected to the internet: you don’t need to switch Wi-Fi from the camera to Internet. We wanted to make your steps easier.’

    The future of Nikon 1

    Moving on, we asked about the future of the Nikon 1 series and what role it now plays in expanding Nikon’s audience. Despite a dearth of releases, the cameras featured prominently on Nikon’s booth and both men spoke positively about the system’s future.

    ‘The Nikon 1 concept is fit for some customers,’ says Kitaoka: ‘For now we’ll keep Nikon 1 as usual.’ The sudden focus on KeyMission doesn’t take away from this, he explains: ‘as I told you before, the action category getting popular. [The] market [is] always changing so we launched KeyMission series to expand our customers.’

    It’s been nearly two-and-a-half years since Nikon last released a Nikon 1 V-series body but we’re told the system is still part of the company’s plans.

    Inoue elaborates: ‘Some manufacturers have tried to enter the DSLR market with their mirrorless camera or something. Our standpoint is different. Because our product mix covers full-frame and APS-C DSLR and the Nikon 1, these three product categories mean we offer to the full lineup and we receive each customer’s good reactions.’

    ‘And then we’re not seeing cannibalization between the DSLR and the Nikon 1: the customer is completely different.’

    Totally different, but with an overlap

    While this distinction is clear for the J and S models, we wondered whether this also applied to V series customers. ‘The J, S and V models are different categories, says Kitaoka: ‘the V series is sort of special, people they well know about DSLR, what is a photograph, they understand these ideas.’

    The smaller size of the cameras provides a benefit for these customers, Kitaoka explains: ‘Sometimes you get work from a client that requires you to travel for the job and maybe go back to shoot more. In that kind of situation, sometimes the photographer doesn’t get enough money from their clients to carry their whole equipment because of the baggage costs of the airline.’

    ‘V3 helped them a lot. The telephoto lenses are smaller. Just in case, they use V series for second camera at the same time, so they can reduce the size of their systems.’

    ‘One of the most important features of the V series is the high frame rate and accuracy of autofocus. It’s fit for professional photographers’ demand. It’ll never be the main camera for a photographer but it can help them a lot.’

    Neither man would be drawn on whether Nikon intends to concentrate on one of these 1 series user groups over the other. ‘We really recognize the mirrorless type of camera, the possibility and we always study [the market],’ says Inoue: ‘but sorry, we won’t be able to comment on future products.’

    1V vs DL

    On the topic of future products, we also weren’t able to get clarification on when to expect the much-delayed DL compacts, so we asked how these users were distinct from the Nikon 1 V series customer:

    ‘DL’s concept and target is users of the D800 series,’ says Inoue: ‘Of course the D800 is a very nice camera but the DL… Anytime and anywhere [you can] take a high quality picture by using the DL. It’s a very good second camera for that kind of user. Therefore the switching and the menu, the GUI, is in accordance with the DSLR equipment. That kind of DSLR customer can use the DL without any stress. Even the power switch is in the same position as on DSLR. Zooming dial right here.’

    There’s still no news on when Nikon’s delayed DL series of 1″-type sensor compacts will arrive.

    ‘[They] borrow technology from Nikon 1 and DSLR. Of course the one inch sensor, on-sensor phase detection autofocus and high frame rate continuous shooting, everything from the Nikon 1, but the high quality images and the user interface and the Picture Quality control from our D series. Also the lens quality. You know, the DL has fast lenses with the nano crystal coating, but in a compact type of camera. This is the first time we’ve used that kind of technology in a DSC.’

    Who uses video?

    Finally, and continuing the theme of making models for more than one type of customer, we asked about the importance and challenges of video for Nikon.

    ‘There are two types of high end users [using video]’ explains Kikaota: ‘those who started [their careers] shooting still pictures, but also there are a lot of customers who started with video. In our company we have two types of customer. It’s difficult to make one solution to fit for both of them.’

    ‘I think that line between movie photographer and stills photographers has gone. The client wants to you to shoot the both of them at the same time to reduce costs’

    Shooting video with current cameras can often be quite complicated, we suggested. ‘[This] complicated operation is fit for the customer they started shooting from video. On the other hand there are professional [stills] photographers: they are not yet used to using video, their demand is easy operation. So there are two types of people. It’s a big problem.’

    ‘We are trying to make a solution fit for both of them. One solution is Flat Picture Control. Flat Picture Control is well suited for the professional photographer, who started shooting pictures and now find they have to shoot some video, too.’

    ‘They are not necessarily so familiar with video editing or modifying video. With Flat Picture Control they can understand from stills point of view.’

    ‘Now we have an exact solution right now, but we will keep considering [whether to make] a separate product or [if it should] go into the one product.’

    Nikon recognizes the challenge of adding video features that both stills and video shooters will appreciate.

    ‘I think that line between movie photographer and stills photographers has gone. The client wants to you to shoot the both of them at the same time to reduce the costs.’

    Kitaoka then expanded on the demands they’re hearing from customers: ‘First of all, quality of the movie is a basic demand so we have to answer that, second frame rate, then lens quality and autofocus, also, [the challenges of] movie AF and still AF totally different.’

    ‘Movie autofocus needs to be smooth, sometimes fast, sometimes slower, depends on the situation. Movie shooters want to [be able to] choose high speed autofocus or natural speed autofocus.’

    ‘Actually we equip the autofocus system fit for the movie but a lot of people [are finding it difficult to use] autofocus between still photo and movie. But we keep trying to [provide the] best movie autofocus in [our] DSLRs and across every single category.’

    Articles: Digital Photography Review (dpreview.com)
  • Weekly Photography Challenge – Pink

    We do a lot of weekly challenges around colors but we haven’t done one on pink yet on my watch! So I thought it was time.

    June Yarham

    By June Yarham

    Weekly Photography Challenge – Pink

    Pink is a color many people associate with femininity and girls or girly stuff. Most commonly we think of pink flowers when we talk about this color, but what else can you find that’s pink?

    Get out there this week and seek some pink items. It might be a flower, bubblegum, a rosy sunset, or even a cocktail or pair of sneakers. Use your powers of observation and look for this less common color. I bet you’ll start seeing it everyone once you start looking.

    Andrew Reding

    By Andrew Reding

    Rachel

    By Rachel

    Nerissa's Ring

    By nerissa’s ring

    Thomas Hawk

    By Thomas Hawk

    Share your images below:

    Simply upload your shot into the comment field (look for the little camera icon in the Disqus comments section) and they’ll get embedded for us all to see or if you’d prefer, upload them to your favorite photo-sharing site and leave the link to them. Show me your best images in this week’s challenge. Sometimes it takes a while for an image to appear so be patient and try not to post the same image twice.

    Share in the dPS Facebook Group

    You can also share your images on the dPS Facebook group as the challenge is posted there each week as well.

    googletag.cmd.push(function() {
    tablet_slots.push( googletag.defineSlot( “/1005424/_dPSv4_tab-all-article-bottom_(300×250)”, [300, 250], “pb-ad-78623” ).addService( googletag.pubads() ) ); } );

    googletag.cmd.push(function() {
    mobile_slots.push( googletag.defineSlot( “/1005424/_dPSv4_mob-all-article-bottom_(300×250)”, [300, 250], “pb-ad-78158” ).addService( googletag.pubads() ) ); } );

    The post Weekly Photography Challenge – Pink by Darlene Hildebrandt appeared first on Digital Photography School.


    Digital Photography School

  • How to do Non-Destructive Editing in Photoshop

    Picture this, you are about halfway through editing a beautiful urban landscape in Photoshop. You’ve already put hours into the image when suddenly you notice that a particular area of the image doesn’t add up. A wall you were working on has accidentally been Clone Stamped to look as if it were hanging at an unnatural angle. It just looks wrong. After repeatedly hitting the undo button you discover that Photoshop can only remember so much, and you are stuck with this disastrous looking edit. All you can do now is waste more precious time trying to fix the problem or close the program and start from square one. If only there was some other way – enter non-destructive editing in Photoshop.

    Non-Destructive Editing in Photoshop

    Now you see me…now you don’t! Editing with a non-destructive workflow means that you can edit your photos without leaving a trace on the original file.

    What is non-destructive editing?

    Fortunately, there is a better way! Non-destructive editing (sometimes called NDE for short) is a method of editing in Photoshop that allows you to make changes to an image without overwriting the original image data. This means that you will always be able to backtrack on adjustments made to an image as needed, retaining flexibility and keeping the resolution of the original image intact.

    You may have already encountered non-destructive editing while following online tutorials that instruct you to use a particular adjustment layer to make modifications rather than editing the actual image.

    Non-destructive editing is not one single technique. You can perform it in numerous ways in Photoshop depending on the desired outcome of an image. For this article, we will have a look at some of the most basic methods used by photographers for doing non-destructive editing .

    Duplicating the background layer

    No matter what image you have opened in Photoshop, the first step is always to duplicate the background layer. If you do happen to make an adjustment directly onto the image the background layer will remain untouched. Then you can start afresh with all your adjustment layers intact.

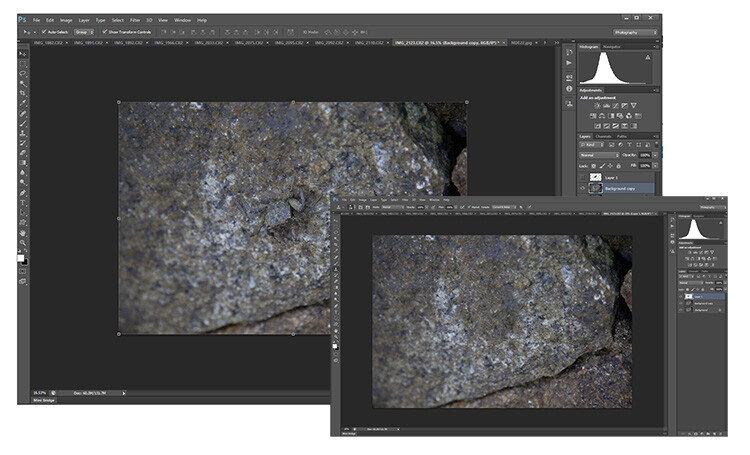
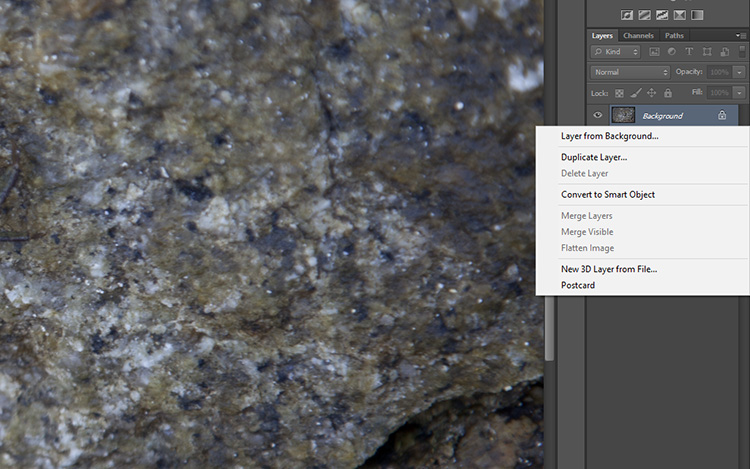
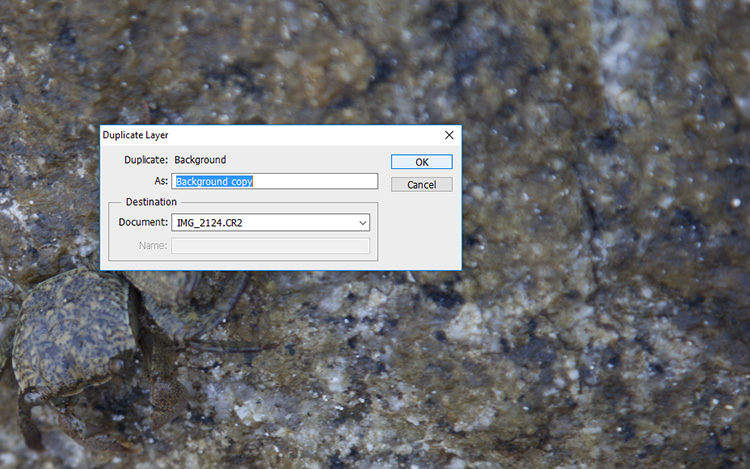
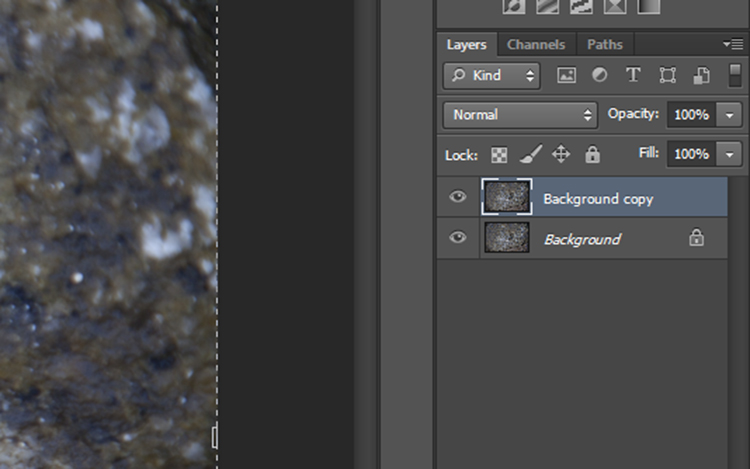
    To do this, open an image in Photoshop. Move the curser to the thumbnail image in the Layers panel and right click on the shaded area that says Background. Now select the Duplicate Layer option and select OK at the screen prompt. A new layer will appear above the Background layer in the layers panel titled Background Copy.

    non-destructive editing duplicate layer

    nondestructive editing Photoshop

    non-destructive editing

    Working with adjustment layers

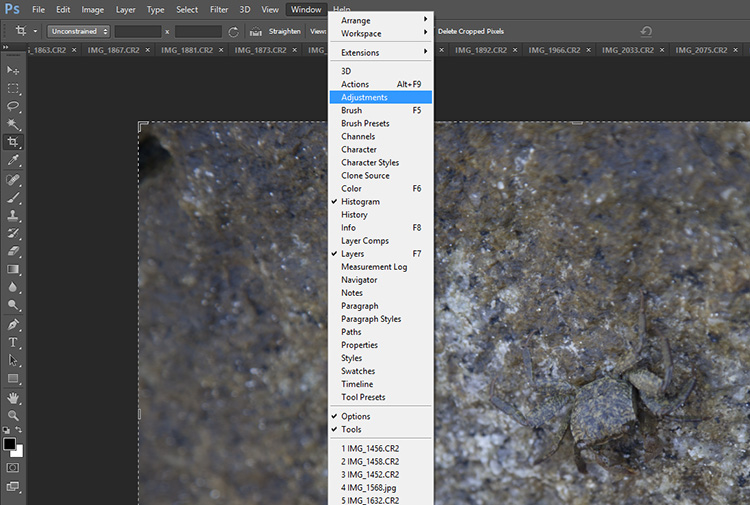
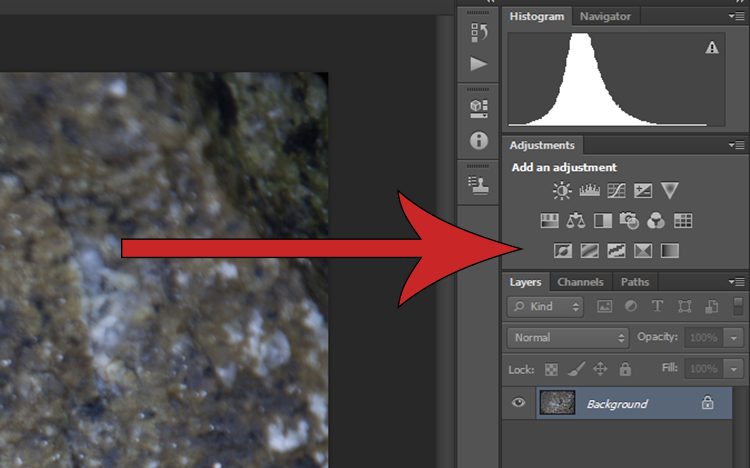
    Simply put, adjustment layers apply colour and tonal adjustments to an image without permanently changing any pixel values. To activate the adjustment layers panel click Window on the top menu bar and select Adjustments. It will bring up a panel with lots of adjustment options such as levels, hue/saturation, brightness/contrast, gradient overlays and black/white.  This is the go-to panel for digital editing and in most cases, it will provide all the editing tools you will need.

    Non-Destructive Editing in Photoshop

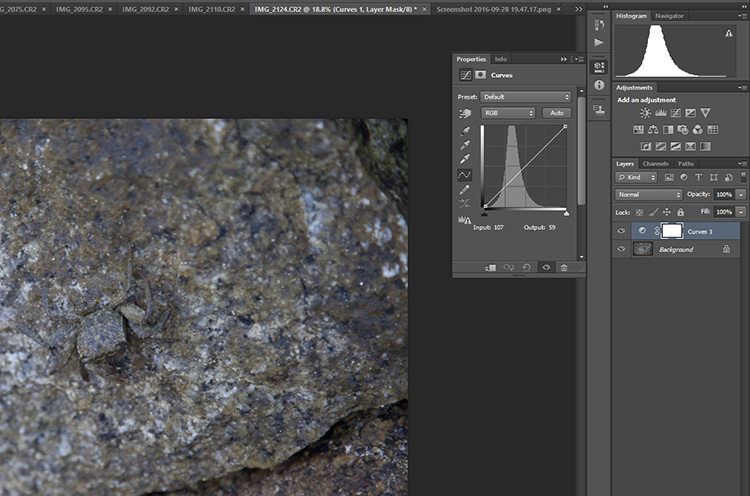
    Select one of the adjustment layers by clicking on an icon. The name of the icon will appear if you rest your mouse on it for a moment. In this example, I have chosen Curves to adjust the contrast in my photograph. Clicking that icon will cause the Curves panel to pop up with the available settings within that adjustment.

    non-destructive editing curves

    Non-Destructive Editing in Photoshop

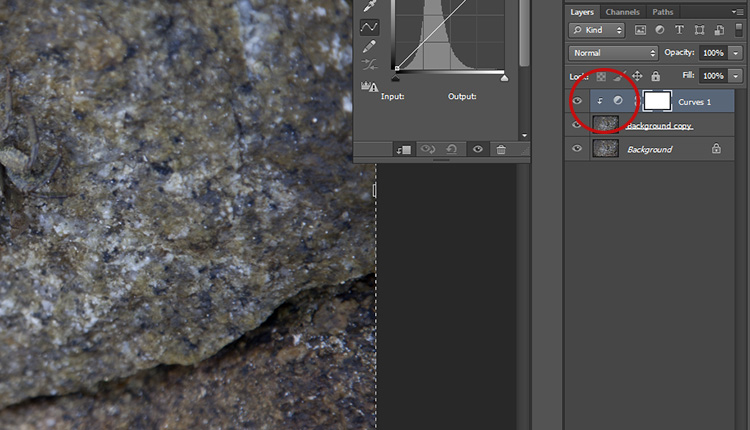
    Notice that there is now a new layer in the layers panel which is sitting above the one called Background. This means that any layers below the Curves layer will be affected by this adjustment. To limit the effect of an adjustment to a single layer only, right click on the adjustment layer and select Create Clipping Mask. A small arrow pointing down indicates that the adjustment layer will only affect the one that is sitting directly underneath it.

    Non-Destructive Editing in Photoshop

    Using Smart Filters

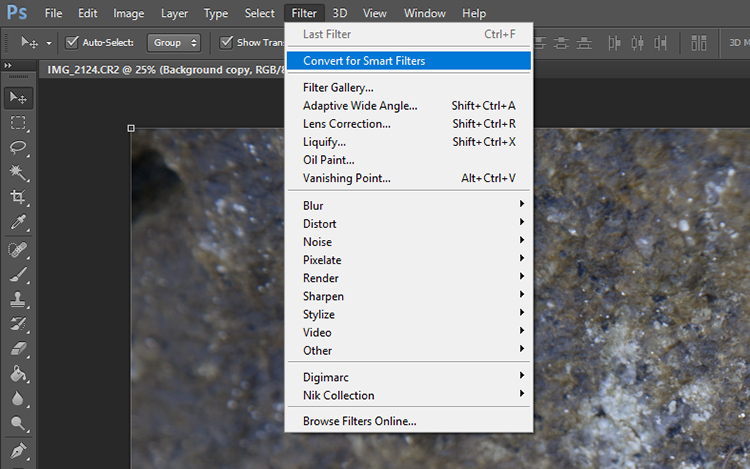
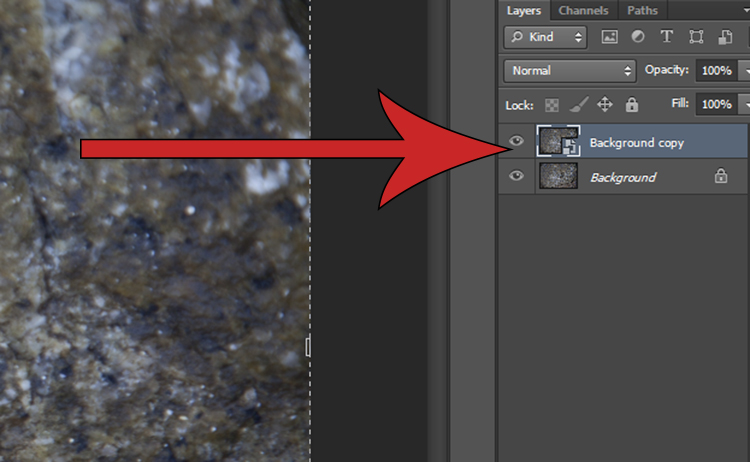
    Adding a filter to an image can be done non-destructively and will allow you to undo the effects of it later if you change your mind. Click on the layer you would like to apply a filter to and click on the Filter drop-down menu located on the top main toolbar. Select Convert for Smart Filters and a pop-up will appear saying that you must turn the selected layer into a Smart Object. Hit OK and a tiny document shaped icon will appear in the bottom left-hand corner of the selected layer thumbnail image.

    non-destructive editing convert smart filters

    non-destructive editing smart object

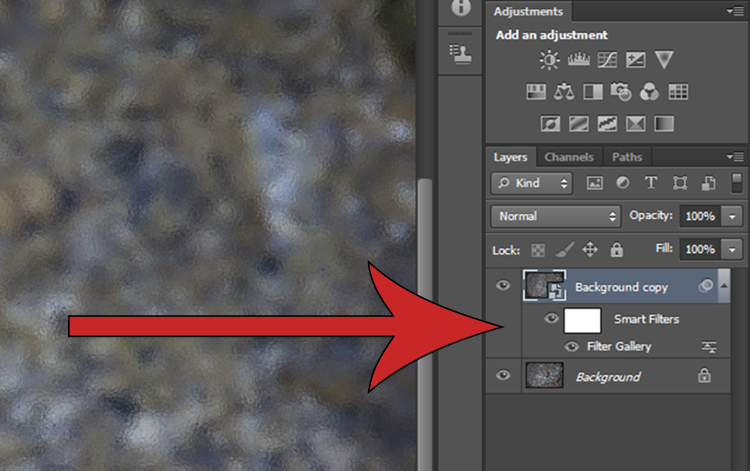
    After you select a filter from the Filter Gallery (via Filter > Filter Gallery) and apply it to the image, you will see two new items beneath the selected layer. Clicking on the eye icon next to the Filter Gallery layer will toggle the filter on and off, and double clicking near the Filter Gallery text will open the Filter Gallery adjustments. Right clicking on the Filter Gallery Layer will bring up a menu. If you want to remove a filter altogether, select delete and the filter mask will disappear without degrading your image.

    non-destructive editing

    Use Layer Masks instead of the Eraser Tool

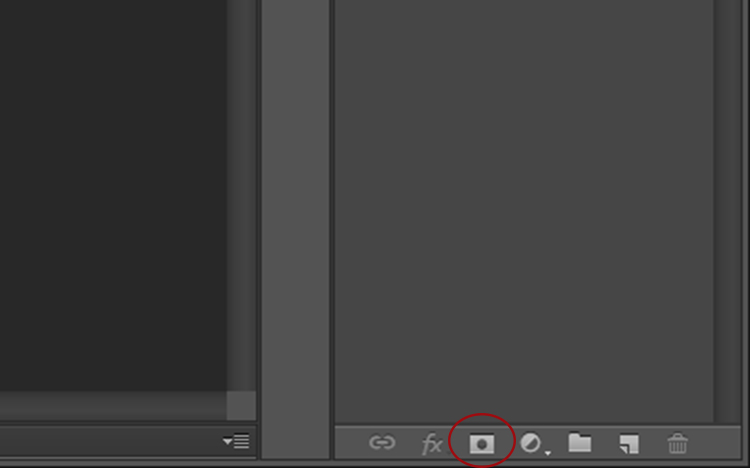
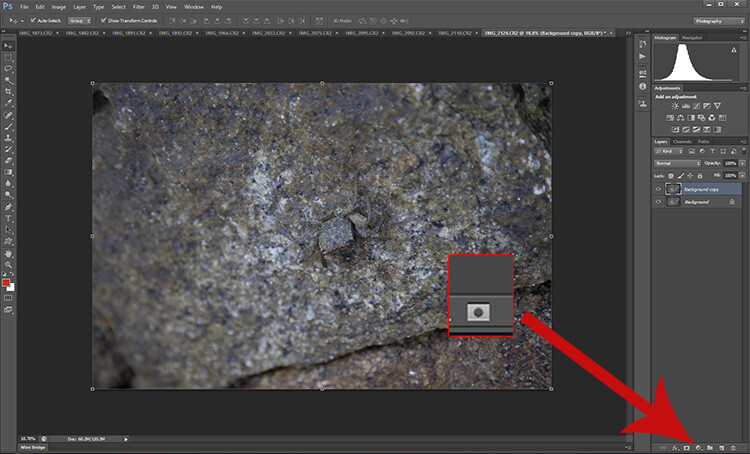
    Masking is one of the more common tools in the Photoshop master’s kit. Using a layer mask allows you to you hide or mmask off parts of an image rather than using the eraser tool to permanently remove parts of an image. To apply a layer mask, open an image, select the layer you want to edit and click on the small icon at the bottom of the layers panel.

    non-destructive editing mask

    Non-Destructive Editing in Photoshop

    A close-up of the Layer Mask button.

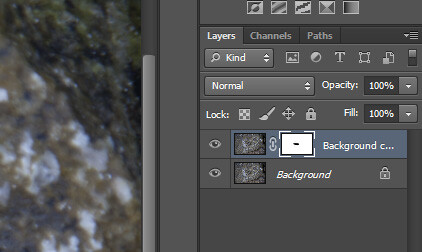
    A mask will appear next to the layer you have selected, with a small chain icon between the thumbnail and the mask. When you have the image icon selected any effects applied to the image will occur as normal. However, if you select the mask, you will find that painting onto it (with black) will hide parts of that layer.

    Close up of the selected mask layer - note the white lines around the corners of the layer.

    Close-up of the selected layer mask – note the white lines around the corners indicating which part is active.

    Non-Destructive Editing in Photoshop

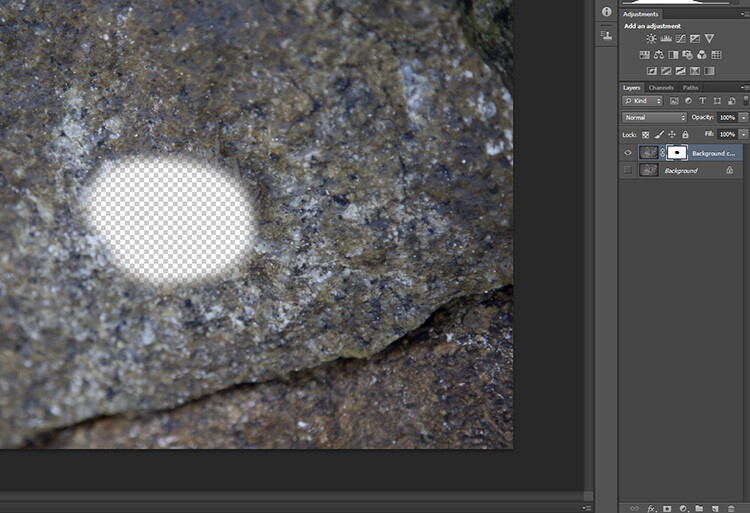
    With the background layer turned off (not visible) you can see that part of this layer is missing, or hidden by the layer mask where it is black. Black conceals or hides, white reveals.

    Now, if any hidden portion of the image is painted over in white on the layer, it will be visible again. If you then delete the mask all the hidden areas will reappear.

    Dodging and burning non-destructively

    The Dodge and Burn tools are used to lighten and darken areas of an image, but applying these effects directly to an image is destructive, preventing you from being able to edit the changes later.

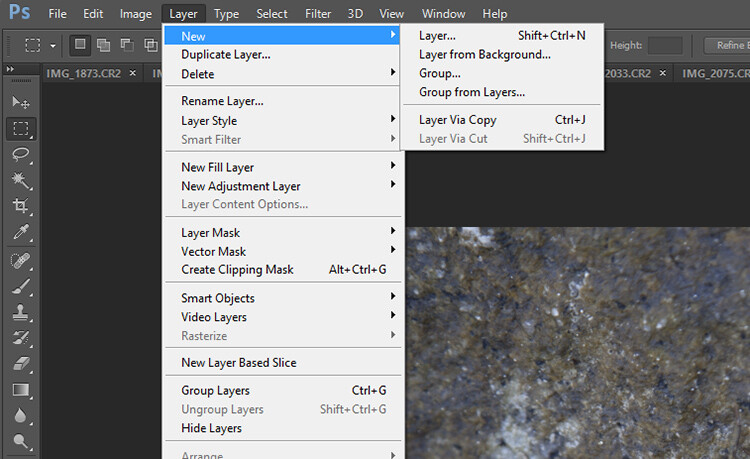
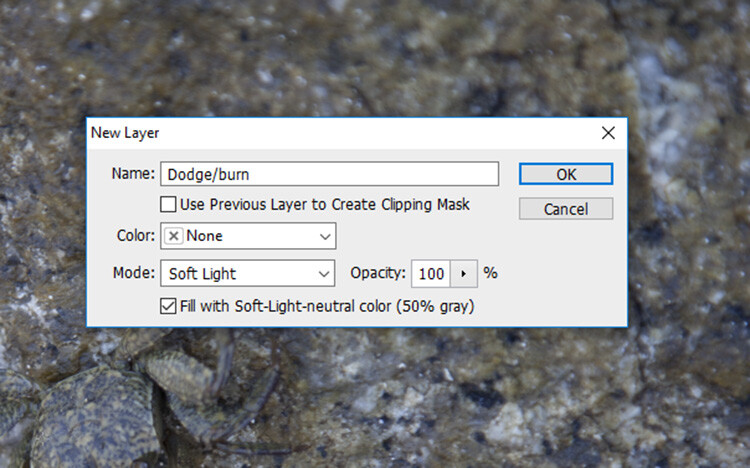
    To dodge and burn non-destructively, start by opening up your photo. Duplicate the background layer, then select Layer > New > Layer from the top menu bar. A dialogue box will pop-up, make sure your settings are the same as those shown below and hit OK. A new layer will be created.

    Non-Destructive Editing in Photoshop

    Create a new layer

    Use the settings you see below. That will fill the layer with gray and change the blend mode to make it effective for dodging and burning.

    non-destructive editing

    Use these settings for your dodge and burn layer.

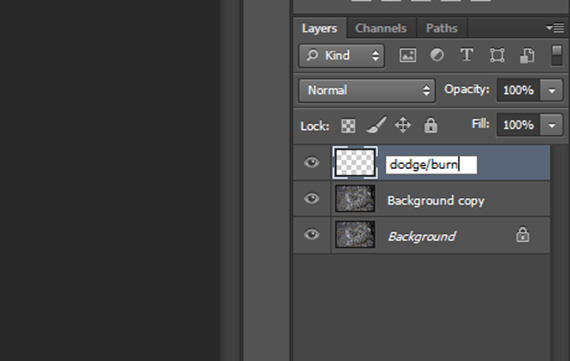
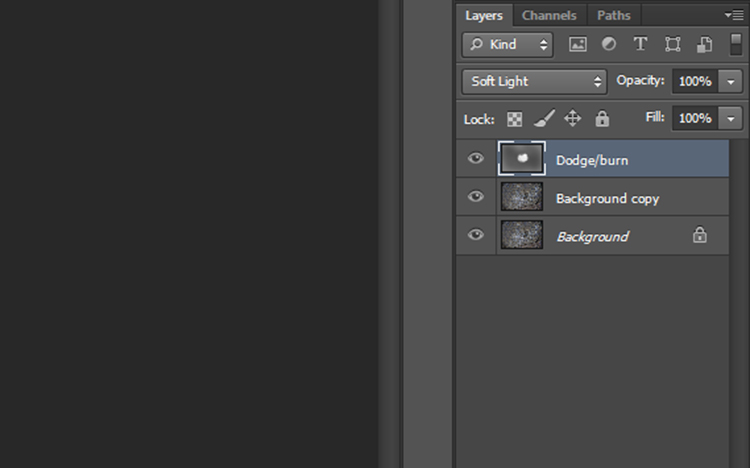
    You can give this layer a nickname to help you remember what it is doing. You can always do it later if you forget, by double-clicking on the layer name. I usually call this layer “dodge/burn”.

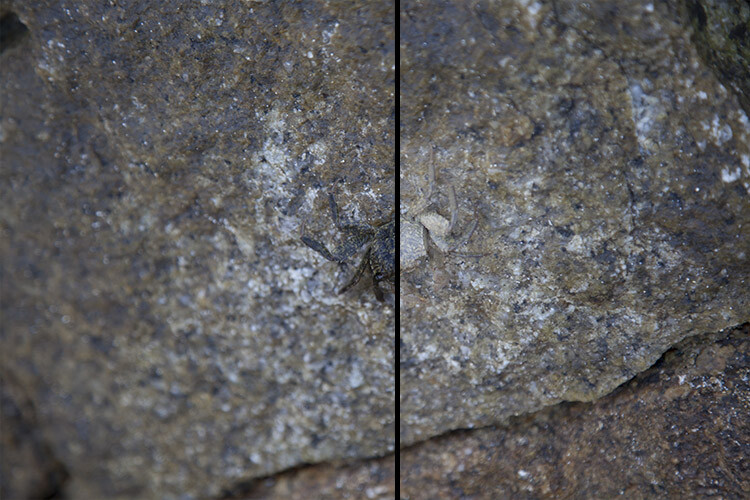
    Now simply select either the Dodge or Burn tool and apply any adjustments to this new layer. Though you are now editing one layer above the actual image, you have adjusted the blend mode so that the opacity of the grey Dodge/Burn layer is completely transparent, and any changes you make to this layer now appear to only adjust the image, without impacting the quality of the original pixels.

    non-destructive editing dodge burn layer

    Result of the dodge and burn layer

    Result of the dodge and burn layer

    Using the Clone Stamp non-destructively

    The Clone Stamp is another great tool used to remove bits and pieces you may not want in an image. Normally it works by moving pixels in the original image around but, you guessed it, that is a very destructive technique!

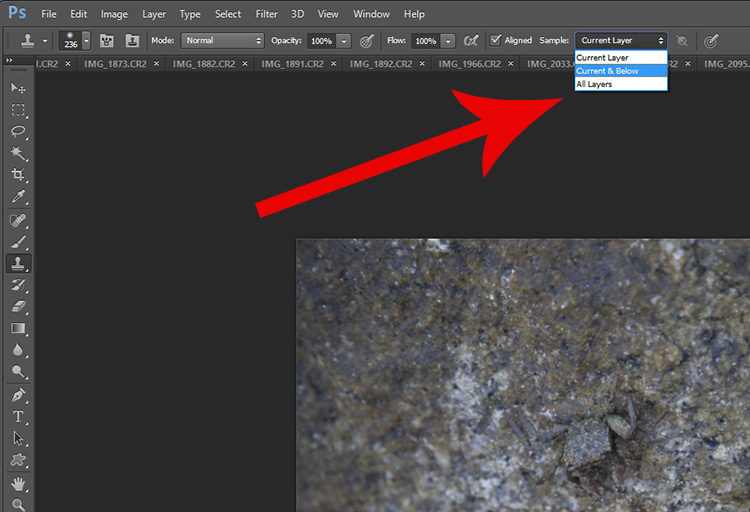
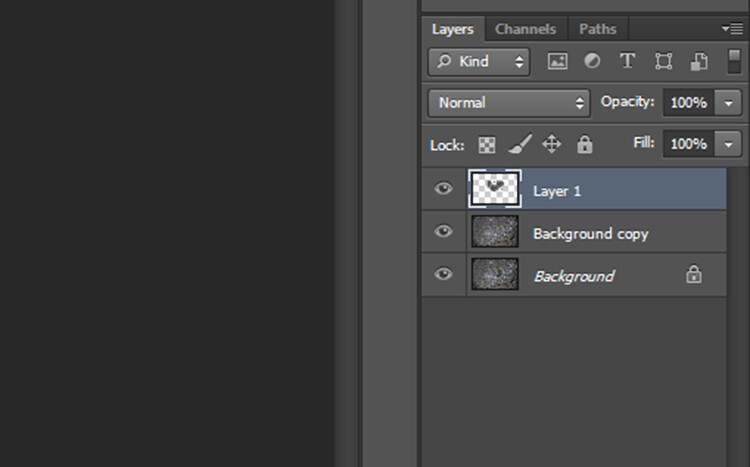
    To use the Clone Stamp Tool non-destructively simply create a new layer as before. Next, select the Clone Stamp Tool and in the Sample drop-down menu select the Current & Below option. Now the Clone Stamp Tool will sample everything in the image but only apply any changes to the top most layer.

    clone tool

    non-destructive editing

    The clone layer looks like this.

    clone tool non-destructive

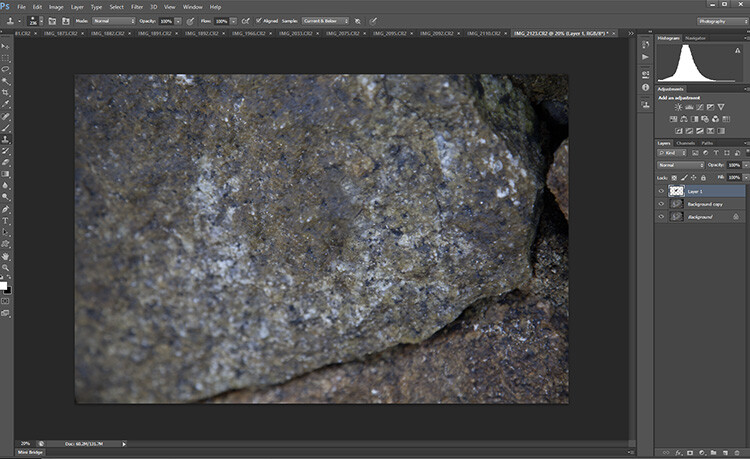
    The result of the clone layer being applied looks like this.

    Conclusion

    There are plenty of other methods to edit non-destructively. But as the basics show, non-destructive editing is mostly about using new layers that are placed above the original image rather than adjusting the original image itself. It may seem clunky at first, but it will soon become an automatic part of your workflow. The next time you find yourself with an awkward edit you’ll be glad you can simply turn a layer off rather than starting all over again.

    How do you use edit non-destructively in Photoshop?

    googletag.cmd.push(function() {
    tablet_slots.push( googletag.defineSlot( “/1005424/_dPSv4_tab-all-article-bottom_(300×250)”, [300, 250], “pb-ad-78623” ).addService( googletag.pubads() ) ); } );

    googletag.cmd.push(function() {
    mobile_slots.push( googletag.defineSlot( “/1005424/_dPSv4_mob-all-article-bottom_(300×250)”, [300, 250], “pb-ad-78158” ).addService( googletag.pubads() ) ); } );

    The post How to do Non-Destructive Editing in Photoshop by Megan Kennedy appeared first on Digital Photography School.


    Digital Photography School

  • 7 Tips for Attending a Photo Walk

    As a photographer, you might have noticed that photo walks are all the rage these days. Whether it’s an event run through meetup.com or eventbrite.com, or a more involved workshop from a teacher that you follow, photo walks are one of the best ways to see a place and to improve your photography.

    nyc-photowalk-750px-14

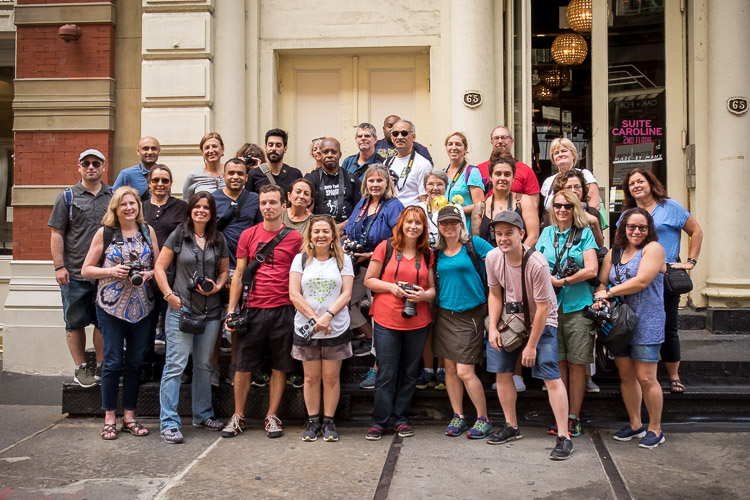
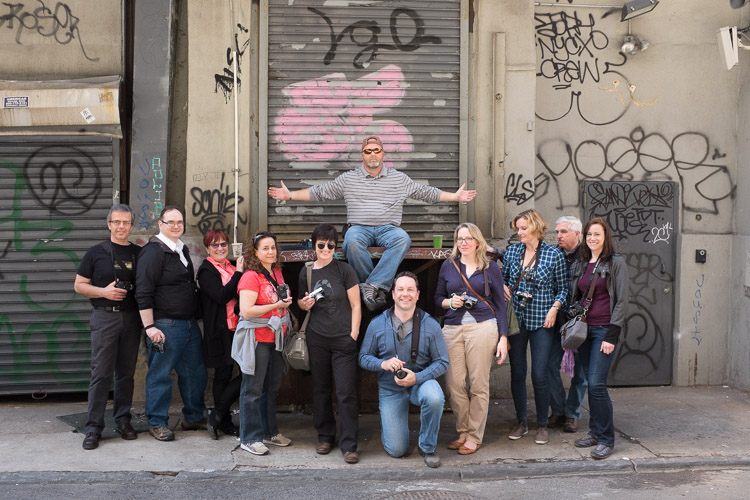
    NYC photo walk featuring dPS Managing Editor Darlene as my guest (I’m in the front row with the hat, she’s in blue with a hat on my right).

    Classroom and reading time are very important for improving, but nothing can replace the act of learning while you are out there photographing. This is where all the things you’ve learned come together and finally stick in your head. It is also the most fun way to learn.

    So if you haven’t already, I suggest that you start seeking photo walks out, and here are some tips to help when you do.

    1. Use them as an excuse to meet other photographers

    Photo Walk

    One of the main advantages to photo walks is that you are surrounded by like-minded people with similar passions. I don’t know about you, but most of my family and friends from growing up are not very into photography. So I try to find new photography friends whenever I can, but it can be tough to do that. Photo walks solve this problem.

    Introduce yourself, exchange information, and talk about possibly going out to shoot again. You can take your favorite few people from each walk and start building an awesome network of photographers to go out shooting with in the future.

    If you have questions, by all means, ask the organizers of the walk, but also see what the other people attending think. This is a chance to learn from many unique perspectives. Photography is a subject where there can be many correct, but differing answers to a question or problem, and it’s good to hear multiple opinions.

    2. Watch what other people are photographing

    Photo Walk

    You are there to have fun and learn, and sometimes a great way to learn in this environment is to watch the other photographers and see what they are attracted to. Just from teaching on photo walks for the last five years, I have found so many new interesting ways to capture the city by watching my students. I have walked down certain blocks hundreds of times and then suddenly someone will capture it in a way that I had never thought of. It is an incredible way to learn.

    3. Shoot on your own occasionally

    New York Photo Walk

    That being said, mix it up and take some time to break off and shoot on your own. You have the advantage here to learn from so many others, but at the same time you want to capture your own, unique photographs, and you need some quiet to do that. Step away a handful of times during the walk, but make sure not to get lost or slow down the group. After that, you can reengage with everyone else.

    4. Get out of your comfort zone

    New York Photo Walk

    This is a chance to do something you are not used to doing. If you are a street photographer and are on a street photography meet up, of course, that is what you will be focusing on. But if you are a landscape photographer, consider doing some street photography, and if you are a street photographer, consider trying more landscapes. Do some portraiture. Improve your lighting. There are photo walks for nearly everything.

    Seek out photo walks that will cover your interests and others that will challenge them. Everyone has their likes and dislikes, but this is a great chance to seek new perspectives and to round out your abilities.

    5. Learn about the area beforehand

    Photo Walk, New York City

    Some photo walk leaders will talk about the history of the neighborhood, while others will strictly focus on the photography. Both are great ways of running workshops, but history is very important to photography. It helps to inform what you are shooting and to improve your awareness of the place.

    Take some time on your own to read up about the area. Learn about the history, and explore the work of photographers that frequent those areas. Come prepared with this knowledge and it will make your day even that much more successful. This knowledge is not only inspiring but it will improve your ability to notice those special moments that create a magnificent photograph. In addition, some of the other walk attendees may find this knowledge fascinating as well.

    6. Organize one yourself

    Photo Walk

    As you continue to attend photo walks, build your network of local photographer friends and start shooting with them regularly. Once you all get to know each other this could become a very close group of friends. Keep in touch, build friendships, attend gallery events together, and share your work and ideas.

    Having a close group that all know you and your work is the best way to get a proper critique. If you just ask anybody or share your work on the web, you never know what the person’s perspective is who is giving you the critique. Usually, they just say “beautiful!” With a close group, that perspective will grow between all of you and these friends will not be afraid to tell you when they do not like something.

    7. Do not get run over by cars or bikes

    Photo Walk, New York City

    This is the hardest part of my job, so please help me and the other photo walk leaders out. When you are in a new place, photographing in a new way, or surrounded by competing stimuli and photographers walking around, your situational awareness can become distracted. People with their lens to their eye can suddenly walk backward into the street trying to get the correct perspective, but with no awareness of where they are and the dangers that could hurt them.

    Always be careful and look before you make a sudden stop or a move sideways or backward. If you are using a tripod on the sidewalk or street, be careful about the tripod legs. Make sure they are no wider than the width of your body so that bikers won’t trip on them riding by you.

    With a one-on-one workshop, I can do a good job at making sure people don’t make unwelcomed moves on the street, but with a large group it is out of my ability, so please watch out for both yourself and your fellow photo walkers.

    Conclusion

    Have you participated in any photo walks? Please share your experience and tips for them below.

    Now go out and find some photo walks!

    googletag.cmd.push(function() {
    tablet_slots.push( googletag.defineSlot( “/1005424/_dPSv4_tab-all-article-bottom_(300×250)”, [300, 250], “pb-ad-78623” ).addService( googletag.pubads() ) ); } );

    googletag.cmd.push(function() {
    mobile_slots.push( googletag.defineSlot( “/1005424/_dPSv4_mob-all-article-bottom_(300×250)”, [300, 250], “pb-ad-78158” ).addService( googletag.pubads() ) ); } );

    The post 7 Tips for Attending a Photo Walk by James Maher appeared first on Digital Photography School.


    Digital Photography School

  • Overview of the Yongnuo RF-603 Wireless Flash Trigger

    Off-camera flash is a key technique that can really differentiate your photography style and make you and your imagery appear more professional. The tools needed to achieve off-camera flash are relatively simple, consisting of just a flash unit and a cord or triggers to connect the flash to your camera. While a cord is by far the cheapest and most straightforward option, it’s also inconvenient since it physically binds you to your camera. Wireless triggers are a simpler solution, but they tend to be pricey, especially if you opt for Pocket Wizards. Enter a budget option: the Yongnuo RF-603 wireless flash trigger.

    Yongnuo RF-603 wireless flash trigger

    Features

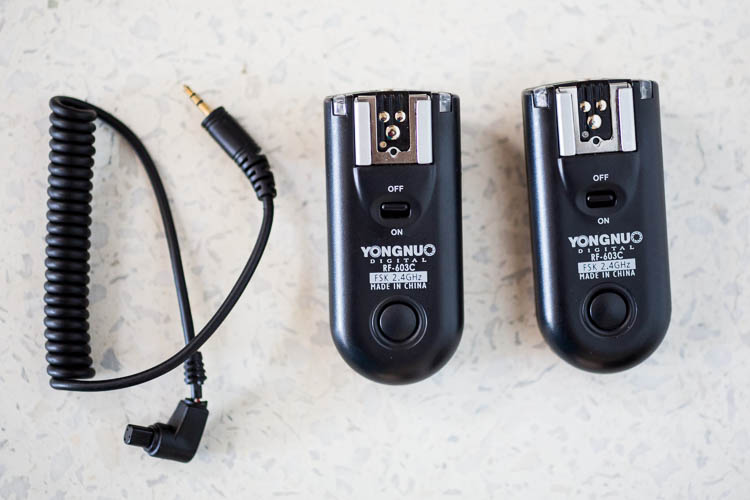
    Priced at under $ 35 for a set of two, the Yongnuo RF-603 works as both a wireless flash trigger and receiver. It can also function as a remote shutter release for your camera.

    Yongnuo wireless flash triggers

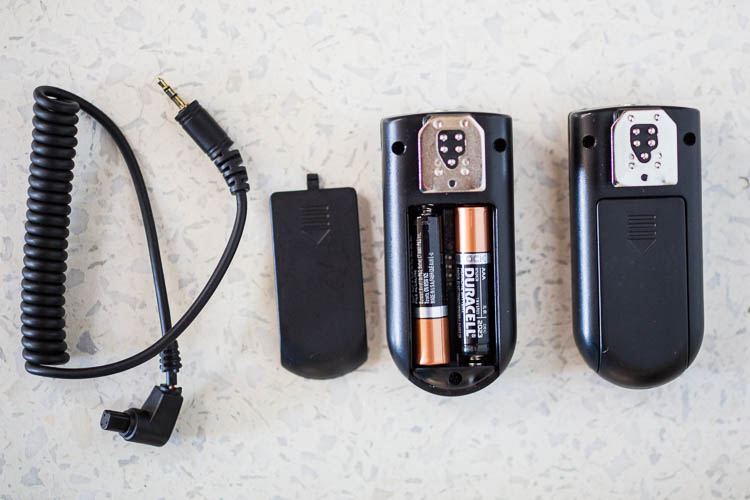
    What’s in the box: two (2) flash triggers, one (1) N1 shutter release cable. AAA batteries not included.

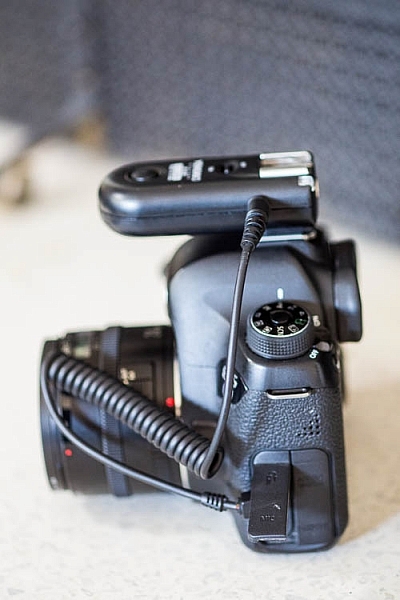
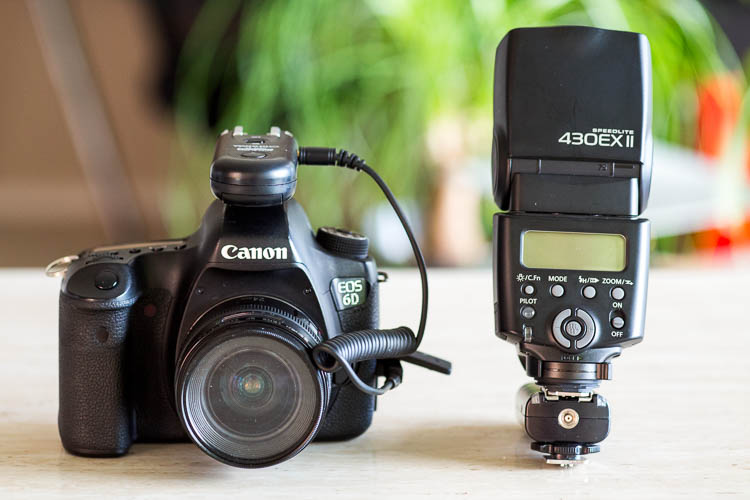
    One of the triggers attaches to your off-camera flash unit via the hot shoe mount. Ihe other slides onto your camera’s hot shoe mount and also connects via the included N1 shutter release cable. Then you simply turn the triggers, camera, and flash on and you’re good to start firing away!

    You can also purchase additional Yongnuo transceivers to trigger multiple flashes at once. To use the Yongnuo RF-603 as a shutter release, simply attach one unit to your camera’s hot shoe mount, turn both units on, and use the second unit to remotely fire your camera.

    Yongnuo wireless flash triggers

    How to Yongnuo RF-603 trigger attaches to your camera.

    Yongnuo wireless flash triggers

    Batteries

    Besides being very reasonably priced, these Yongnuo triggers are powered by two normal AAA batteries. They use the battery power very efficiently, meaning you won’t have to constantly switch out drained ones. The triggers are also very slim and lightweight in size at just three inches long, making them easy to slip into a bag or pocket. These triggers are compatible with most DSLR cameras, but double check to make sure you order the correct model that is compatible with yours.

    Yongnuo wireless flash triggers

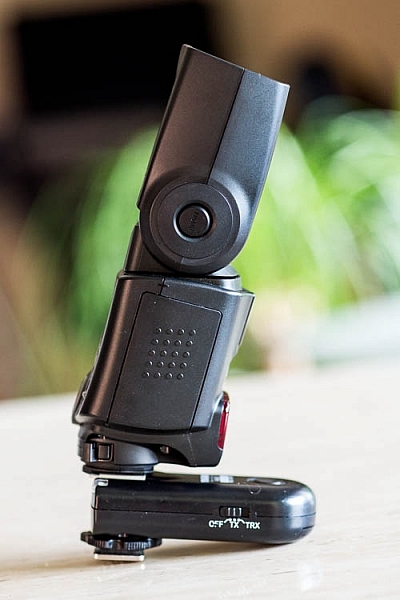
    Slim and low-profile, the Yongnuo RF-603 doesn’t add a lot of bulk to your flash unit.

    Shooting distance

    Another point to note is that these Yongnuo triggers use a 2.4GHz wireless frequency, and the remote control distance is up to approximately 100 meters (328 feet). Synchronization speed can reach 1/320, but may only reach 1/250 depending on the exact scenario you’re shooting in.

    Yongnuo wireless flash triggers

    Yongnuo RF-603, the original version.

    Yongnuo wireless flash triggers

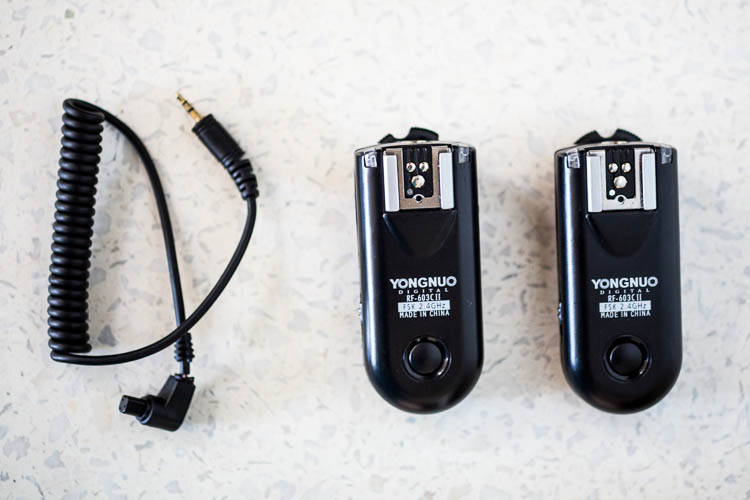
    Yongnuo RF-603 II, the latest version.

    Why the Newer Version is Better

    When shopping around, you might notice that there are two Yongnuo RF-603 models: RF-603 and RF-603 II. The older, original version looks like it has recently been discontinued by the manufacturer, but it is still available for sale. Thus, it’s important to note several key differences between the two models, and why you’ll probably want to opt for the newer version. Also note that the original and newer transceivers are compatible with each other, so you can mix and match if you happen to have both versions.

    Yongnuo wireless flash triggers

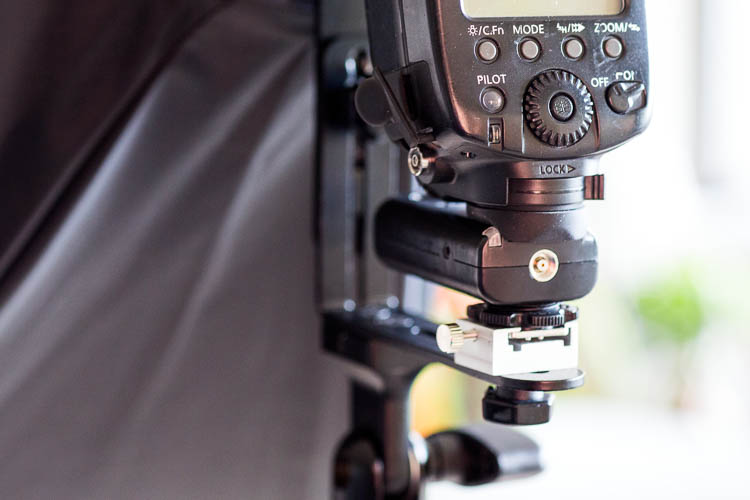
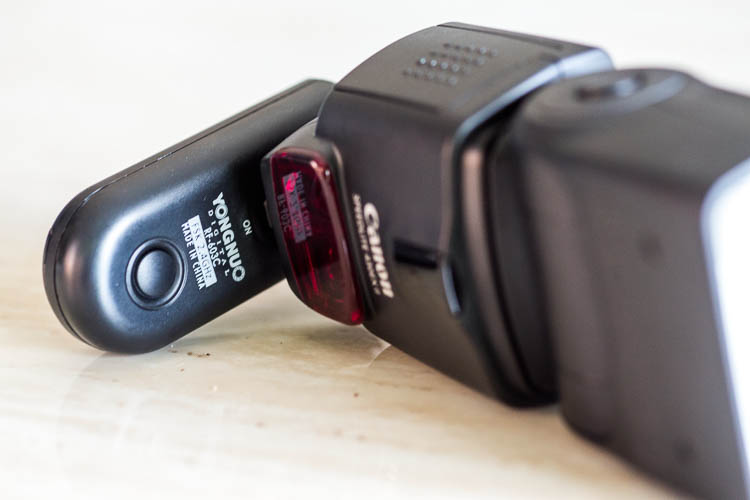
    The round locking mechanism above the metal hot shoe of the Yongnuo RF-603 II (the original version does not have this feature).

    Yongnuo wireless flash triggers

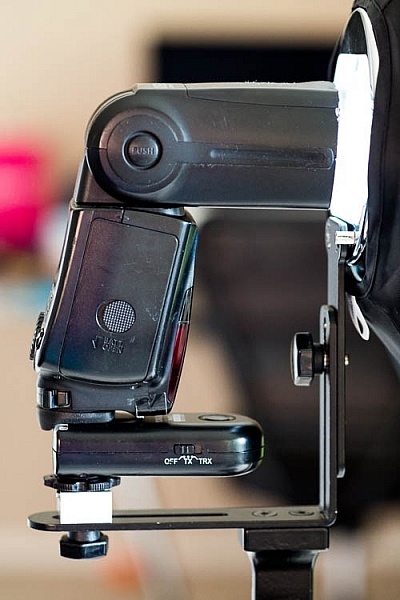
    An example of the locking mechanism being used to attach the flash to a lighting stand.

    Enhanced on/off switch is on the side for easier access

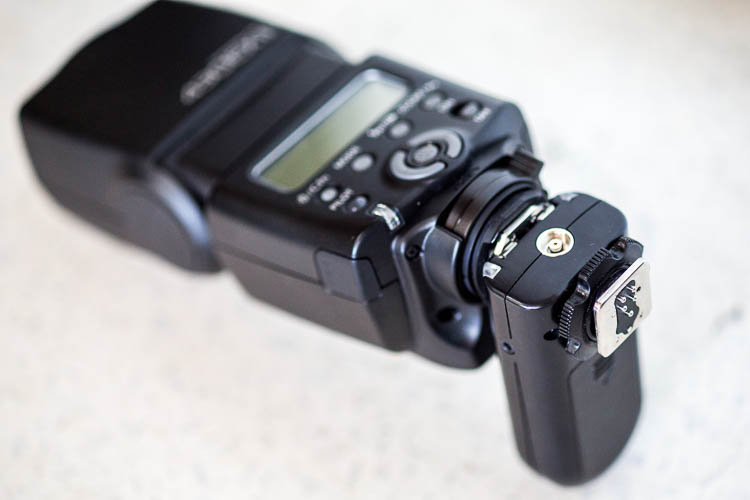
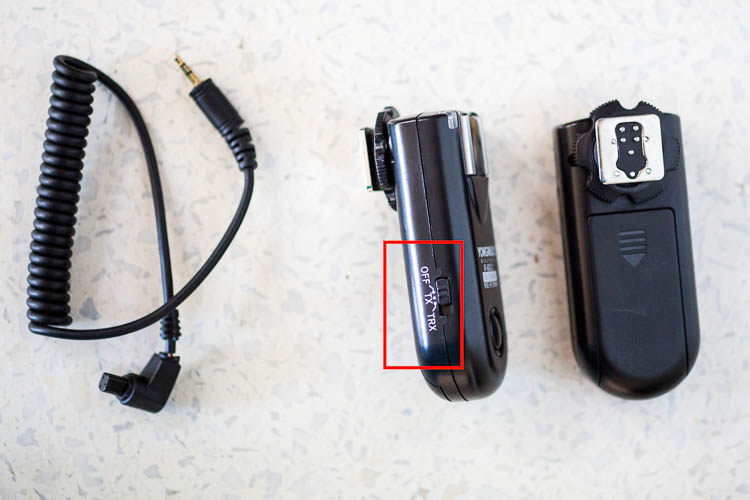
    The original trigger has the on/off button on the top surface, which means it is completely covered up when attached to your flash. Thankfully, Yongnuo fixed this problem in the second version, and moved the on/off button to the side of the trigger. The newer version also includes the option of designating the trigger as off, in TR mode or TRX mode, rather than simply on or off.

    Yongnuo wireless flash triggers

    Even before the flash unit is fully attached, the on/off switch of the original Yongnuo RF-603 is already covered and hard to access.

    Yongnuo wireless flash triggers

    The newer Yongnuo RF-603 II added options to the on/off button and moved it to the side of the trigger.

    Yongnuo wireless flash triggers

    Having the on/off button on the side of the trigger makes it easier to access with the flash attached.

    Who should use Yongnuo RF-603 Triggers

    If you’re a photographer looking for a low-cost way to experiment with off-camera flash, Yongnuo triggers and even their own brand name flash units are highly recommended. Based on multiple user reviews and my own experience with Yongnuo products, they are dependable, efficient, and incredibly easy to use despite being considered budget options.

    The only downside to these Yongnuo RF-603 triggers lies in their simplicity. Since this base model trigger only has a simple on/off button, you still have to manually adjust your flash settings if you want to tweak the flash power, flash zoom, etc. Upgrading to a more sophisticated trigger system such as the Yongnuo 622N TX ($ 85 for a pair approx.) gives you the full power of adjusting flash settings without having to even touch your flash. However, given the extra cost and complication of the Yongnuo 622N, only opt for this version if you truly need the extra features (in other words, stick with the RF-603 if you’re a beginner or on a budget).

    googletag.cmd.push(function() {
    tablet_slots.push( googletag.defineSlot( “/1005424/_dPSv4_tab-all-article-bottom_(300×250)”, [300, 250], “pb-ad-78623” ).addService( googletag.pubads() ) ); } );

    googletag.cmd.push(function() {
    mobile_slots.push( googletag.defineSlot( “/1005424/_dPSv4_mob-all-article-bottom_(300×250)”, [300, 250], “pb-ad-78158” ).addService( googletag.pubads() ) ); } );

    The post Overview of the Yongnuo RF-603 Wireless Flash Trigger by Suzi Pratt appeared first on Digital Photography School.


    Digital Photography School

  • iOS 10.1 adds ‘beta’ support for Portrait mode to iPhone 7 Plus

    Apple has released an update to iOS 10, which alongside various bug fixes and refinements, adds beta support for ‘Portrait’ mode in the iPhone 7 Plus.

    The Portrait mode feature is only supported by the dual-lens iPhone 7 Plus model running iOS 10.1, and is designed to replicate the look of shooting at a shallow depth of field – an effect traditionally limited to larger imaging formats. Although anyone with an Apple developer account has been able to shoot with the new mode for a while (we posted a gallery including some samples last month), iOS 10.1 represents the first truly public ‘beta’ test of the new feature.

    Are you curious? Have you downloaded it? Did you jump straight to the comments section before you finished reading this paragraph? Let us know. 

    Articles: Digital Photography Review (dpreview.com)
  • Google Pixel XL added to mobile studio test scene comparison

    Google’s Pixel and Pixel XL have garnered plenty of interest for their imaging capabilities since they were launched in the beginning of October. They each offer a 12.3MP camera with an F2.0 lens and a 1/2.3″ sensor – the same size used in yesteryear’s compact cameras – sporting 1.55µm sized pixels. The Pixel phones also utilize gyroscope-based stabilization for some seriously smooth video recording.

    We got our hands on a Pixel XL review unit, and while we wait for the clouds to part outside for some real-world samples, we put it in front of our studio test scene. Take a look below at its JPEG and Raw performance in daylight and low light. It’s quite impressive: the lens is relatively sharp across the frame, and our low light Raw shots show that despite receiving 1.33 EV less light than the iPhone 7, the Pixel shows only slightly more noise, meaning it comfortably outperforms the iPhone camera in low light.*

    $ (document).ready(function() { ImageComparisonWidget({“containerId”:”reviewImageComparisonWidget-20506681″,”widgetId”:423,”initialStateId”:null}) })

    Related: Google’s Pixel phones: what you need to know

    *Multi-frame noise reduction – used in low light by both the Pixel and iPhone 7 – may skew results in either direction for either camera, providing better performance for static subjects, or potentially blurry images for moving ones.

    Articles: Digital Photography Review (dpreview.com)
  • Xiaomi’s Mi Note 2 looks a whole lot like the Samsung Note 7

    Xiaomi has today launched the Mi Note 2, a device looks a lot like Samsung’s Galaxy Note 7, the production of which was ceased after repeated incidents of exploding batteries, and could neatly fill the gap in the market that was left by the Samsung device.

    Like the Note 7, the Mi Note 2 offers top-end specs all-around. In the camera department a 22.46MP 1/2.6″ Sony IMX318 Exmor sensor is coupled with a six-element lens, F2.0 aperture and on-sensor phase detection. There is an electronic stabilization system for video shooting but the camera has to make do without optical stabilization. On the plus side there is a low-light mode, which presumably uses image-stacking for lower noise and better detail, and a long-exposure mode. At the front the 8MP camera uses Sony’s IMX268 sensor and comes with autofocus, an F2.0 aperture and Xiaomi’s Beautify 3.0 selfie mode.

    Another highlight of the new device is its curved 5.7″ AMOLED display with extremely thin bezels and 1080p Full-HD resolution. It means the Mi Note 2’s screen-to-body ratio is an impressively high 77.2%. Processing power is provided by by Qualcomm’s latest Snapdragon 821 SoC which comes in combination with either 6GB RAM and 128GB storage or 4GB RAM and 64GB storage. Sound is optimized through a 24-bit / 192kHZ DAC and a large 4070 mAh battery that supports Quick Charge 3.0. should make sure you hardly ever run out of juice.

    The global version of the 6GB RAM/128GB storage option will be available for approximately $ 520 while the lower specced variant will set you back $ 415. No details on geographic availability have been provided yet.

    Articles: Digital Photography Review (dpreview.com)