Blog

  • How to Capture a Ghost (in a Photo) in 3-ish Ways

    As Halloween Approaches, you’re probably noticing more ghosts around.

    They can be quite camera-shy and tricky to photograph, so we’re here to show you how.

    Shhhh, now lean in close for this part.

    *whispers* We haven’t actually managed to photograph a real ghost, but we’re pretty good at faking it using just our phone. Read along to learn just how we do it.

    But only if you don’t scare too easily. *ghost sounds* OoooOooOOoOooo!
    (…)
    Read the rest of How to Capture a Ghost (in a Photo) in 3-ish Ways (290 words)


    © laurel for Photojojo, 2016. |
    Permalink |
    No comment |
    Add to
    del.icio.us

    Post tags:


    Photojojo

  • 3 Tips for Taking Portraits with a Kit Lens

    One of the first things that new photographers often hear is “your kit lens is garbage.” While there are certainly benefits to upgrading your glass as your budget allows, it’s also important to know that there is so much you can do with your kit lens if you understand how to use it to your advantage! In this case, let’s talk about portraits.

    Most photographers quickly upgrade to a 50mm or 85mm prime lens for portraits, and with good reason. These lenses are sharp, and can typically shoot as wide as f/1.4 or f/1.8, which means that it’s easier to achieve that nice blurred background in portraits.

    Taking Portraits with a Kit Lens

    Canon 50mm lens at f/2.0, 1/160th sec, ISO 100.

    If you plan to spend any significant amount of time taking portraits, I would absolutely recommend upgrading to at least a Nifty Fifty lens. When it comes to portraits, I almost always find myself reaching for my 50mm prime lens, and I really do think it’s worth the money. That said, when we’re living in the real world, there are a whole plethora of reasons why you might not upgrade lenses right away. Perhaps it’s a budget issue. Perhaps you’re still trying to decide which type of photography really interests you. Or maybe you just opened the camera box for the first time today and want to have a better understanding of your camera before you purchase anything else. Regardless of the reason, I’ve got good news for you–you can take great portraits with a kit lens!

    In this article, we’ll explore a couple of limitations when it comes to taking portraits with a kit lens, as well as some tips for working around those limitations and capturing the best portraits possible with the equipment you already have.

    1. Use Depth of Field to your advantage

    As I mentioned before, one of the benefits of using a prime lens for portraits is the ability to shoot as wide as f/1.4 or f/1.8 to easily achieve that nice blurry background (called bokeh) in almost any location. Most kit lenses can only shoot as wide as f/3.5 (at 18mm) and f/5.6 (at 55mm) which won’t blur the background as much as new photographers are typically hoping. That is unless they understand that aperture isn’t the only important factor in creating that nice blurry background for portraits.

    Taking Portraits with a Kit Lens

    Another key aspect in creating a blurry background is the distance from the subject to the background. The further the subject is from the background, the blurrier the background will be in the photograph.  So, to create the blurry background when using your kit lens, one of the easiest things to do is to position your subject as far away from the background as possible.

    Typically, when I use a 50mm lens to photograph my kids in the backyard, I have them sit on the grass about two or three feet away from our back fence. When using a kit lens, I have them sit about 30 feet away from the fence, as you can see in the image above. Then, I zoom-in to somewhere between 35-55mm, and shoot at the widest aperture the lens will allow for that focal length, in order to produce the most blur in the background possible.

    Taking Portraits with a Kit Lens

    Canon Kit Lens that came bundled with the Rebel XS. This image was shot at 37mm and f/4.5.

    2. Change your perspective

    Taking Portraits with a Kit Lens

    Both images were taken with a kit lens at f/5.6.

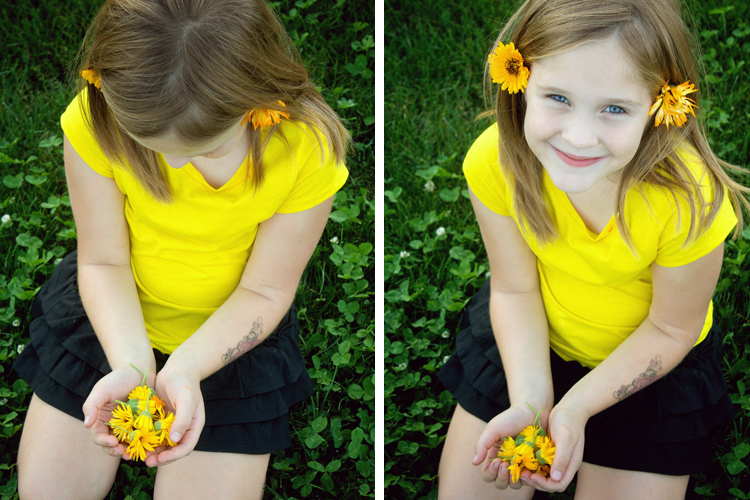
    If you can’t place your subject far away from the background and/or the background isn’t something you’d like to incorporate into your photograph, another option to consider is to change your perspective. Stand up, and have your subject sit on the ground, photographing them from above. Grass, cement, asphalt, and sand all photograph well from above, and can often be more visually pleasing in a portrait than a background that cannot be blurred as much as you’d like.

    Taking Portraits with a Kit Lens

    Shot with a kit lens at 55mm, f/5.6.

    Bonus Tip: When shooting from above, try converting to black and white! When converted to black and white, grass reads as a dark background that can be a nice contrast for lighter skin tones. Likewise, concrete often reads as a light background that can be a nice contrast for darker skin tones. Converting to black and white when shooting from above can be a great way to work around the inability to blur a background as much as you’d like in portraits.

    3. Try candid or semi-posed portraits

    Taking Portraits with a Kit Lens

    Shooting at f/4 or f/5.6 means that more of each image is going to be in focus than it would be if you were shooting at f/1.4 or f/1.8. Rather than consider this a disadvantage, think about the things that are easier to capture at those apertures.

    For example, at f/5.6, you have the freedom to capture images with a little more movement without risking a lot of blur from motion. This is a great opportunity to try taking portrait-style images that are candid or semi-posed. Try photographing kids running toward you or siblings mid-hug. Have your subject twirl or jump. Ask mom or dad to tickle their child. Though these images may be slightly different than the head-and-shoulders images that the word “portrait” often brings to mind, they often invoke emotion and movement in a way that is really compelling and valuable in photographs.

    Taking Portraits with a Kit Lens

    Shooting from a slightly wider angle than just head and shoulders also allows you to incorporate aspects of the surroundings into your images to tell a story. Perhaps it’s a handful of flowers at the park, a bunch of balloons for a child’s birthday, or even an ice cream cone on a hot summer day. The cold hard facts are that the story and emotion make the portrait, not the bokeh in the background.

    Using a kit lens in a nutshell

    My suggestion to you is to fudge the expectation of head-and-shoulders images when it comes to kit lens portraits. Instead, focus on capturing emotions and telling a story, while getting as close as you reasonably can. If you can move the subject far away from the background in order to create a nice blur, absolutely do so. If you can’t, consider changing your perspective to create a more uniform background that’s reasonably free from distractions so that the viewer will be able to focus solely on your subject.

    Taking Portraits with a Kit Lens

    Does a kit lens have limitations when it comes to portraiture? Absolutely. However, recognizing the limits of a kit lens when it comes to portrait photography isn’t prohibitive. Rather, it allows you to recognize the situations and applications that will be most effective in creating the images you want with the equipment you already have, and that’s always a good thing!

    Do you have a great portrait taken with a kit lens? Please share it in the comments below!

    googletag.cmd.push(function() {
    tablet_slots.push( googletag.defineSlot( “/1005424/_dPSv4_tab-all-article-bottom_(300×250)”, [300, 250], “pb-ad-78623” ).addService( googletag.pubads() ) ); } );

    googletag.cmd.push(function() {
    mobile_slots.push( googletag.defineSlot( “/1005424/_dPSv4_mob-all-article-bottom_(300×250)”, [300, 250], “pb-ad-78158” ).addService( googletag.pubads() ) ); } );

    The post 3 Tips for Taking Portraits with a Kit Lens by Meredith Clark appeared first on Digital Photography School.


    Digital Photography School

  • Audi Ad Fakery: These Hyperrealistic Photos Were Made with a $40 Scale Model

    [ By SA Rogers in Art & Photography & Video. ]

    audi-ad-fakery-main

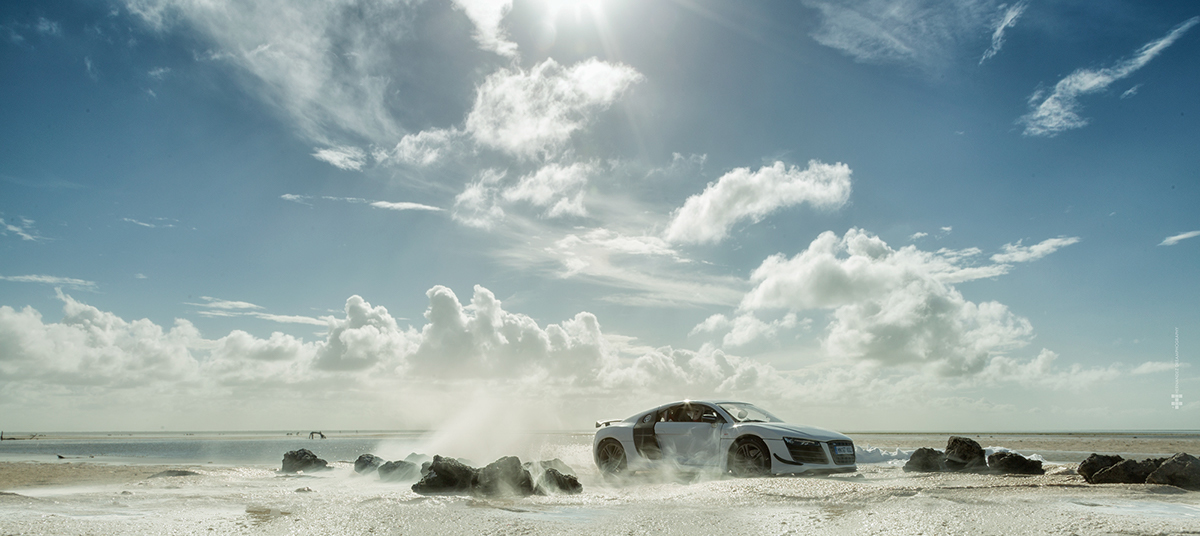
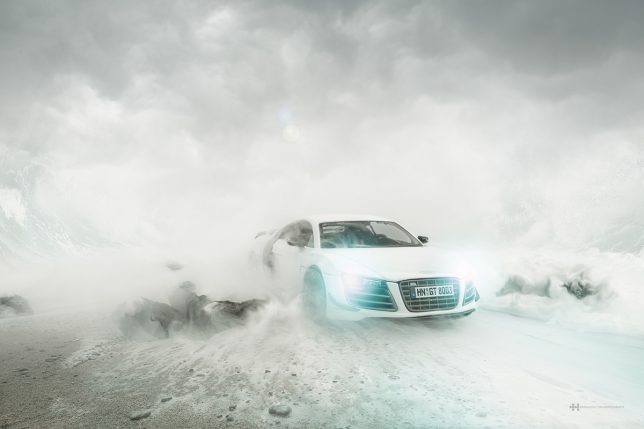
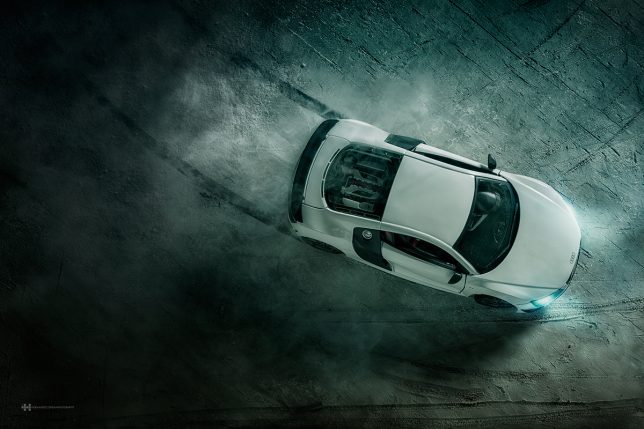
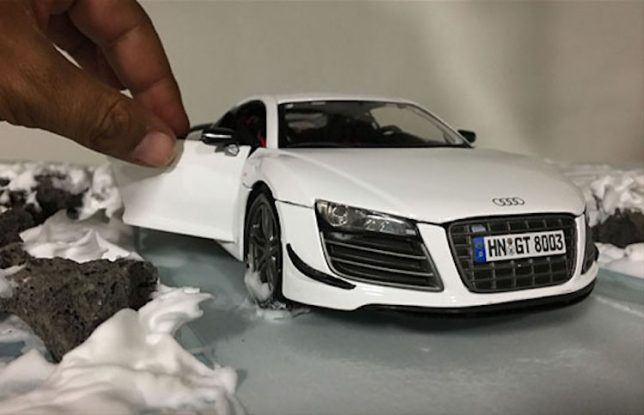
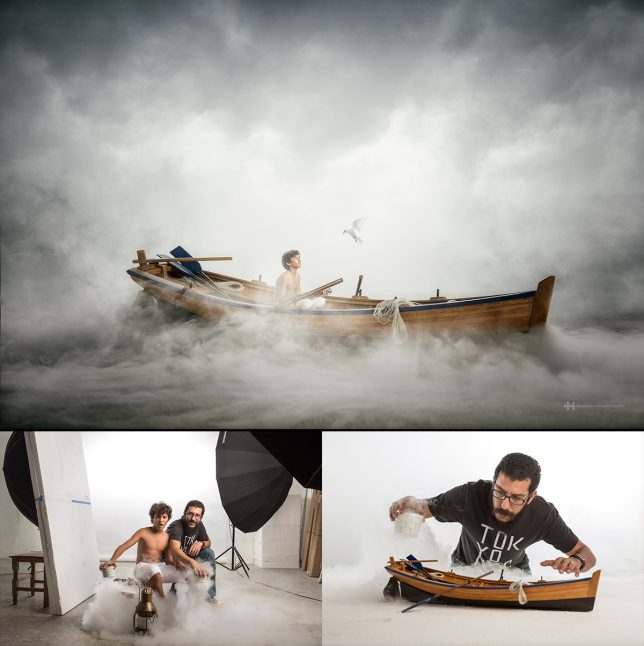
    These photos may seem to depict a $ 160,000 luxury automobile zooming through sand, snow, sea foam and salt flats, but the objects on your screen are smaller than they appear. The lack of a person sitting in the driver’s seat is not an indication that the car is self-driving: it’s because the car itself stands only a few inches tall. This version of it, anyway. Photographer Felix Hernandez bought a $ 40 scale model of the Audi R8 sports car on the internet and created the sets in his studio, with astonishingly realistic results.

    audi-ad-fakery-2

    audi-ad-fakery-3

    audi-ad-fakery-6

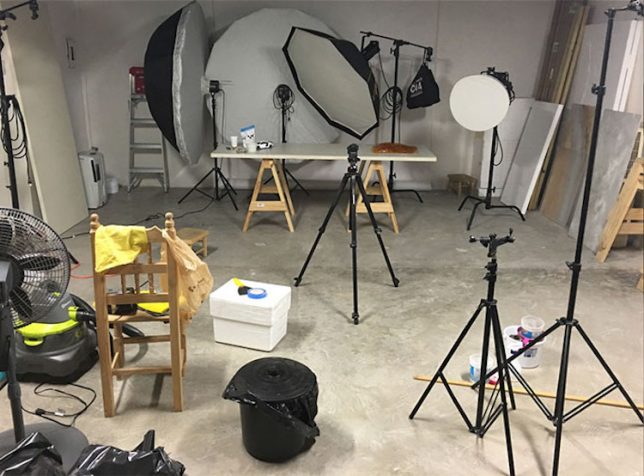
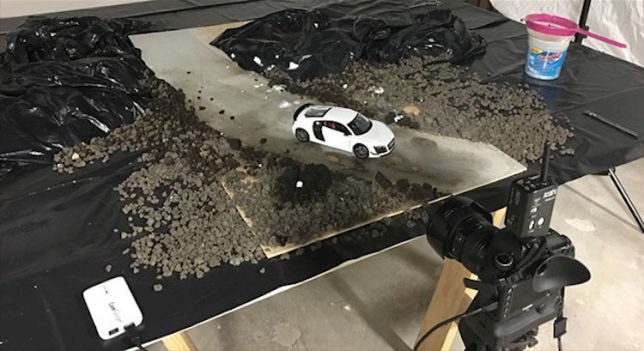
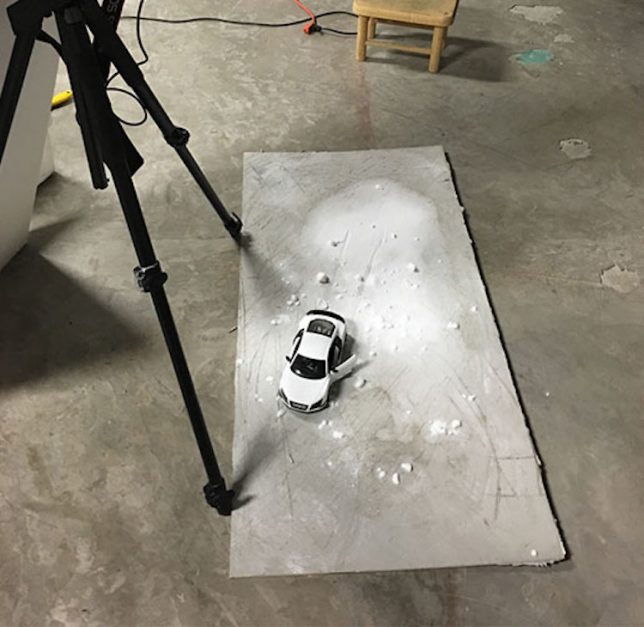
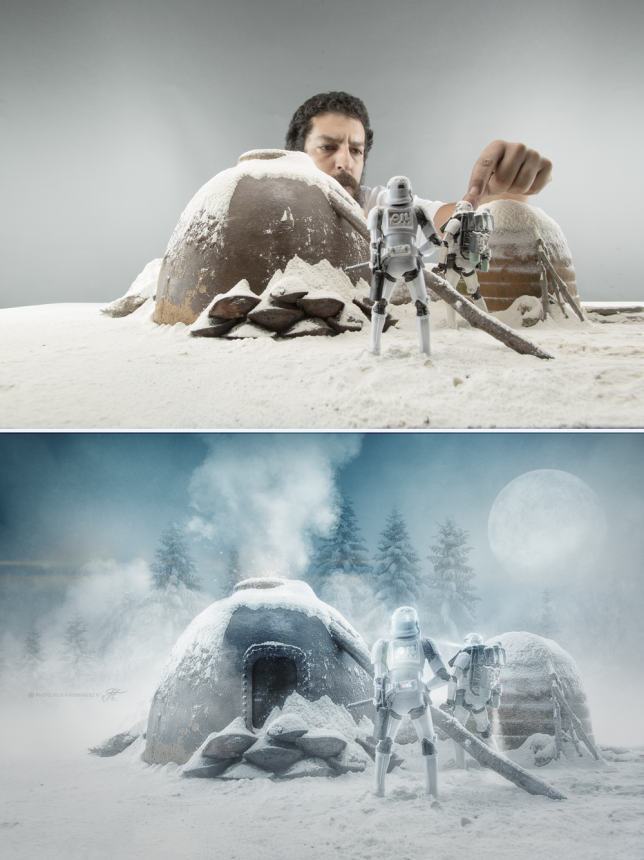
    The automaker commissioned Hernandez to create the series as a promotion for the high-end car. As behind-the-scenes photo of his studio setup reveal, most of the work is done with miniatures and special effects rendered mostly in ordinary edible household products. Careful lighting, staging and camera angles make the models appear full-sized, so minimal Photoshopping is needed for the final effect.

    audi-ad-fakery-4

    audi-ad-fakery-5

    audi-ad-fakery-7

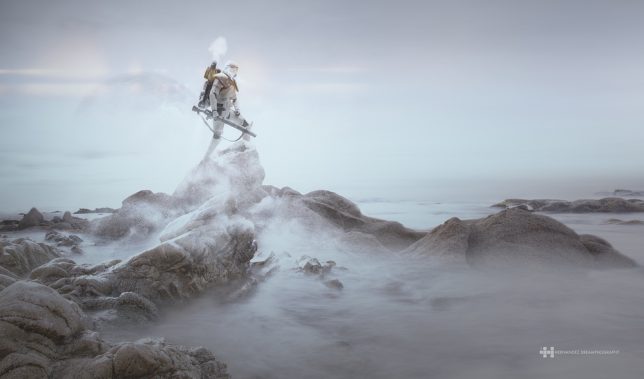
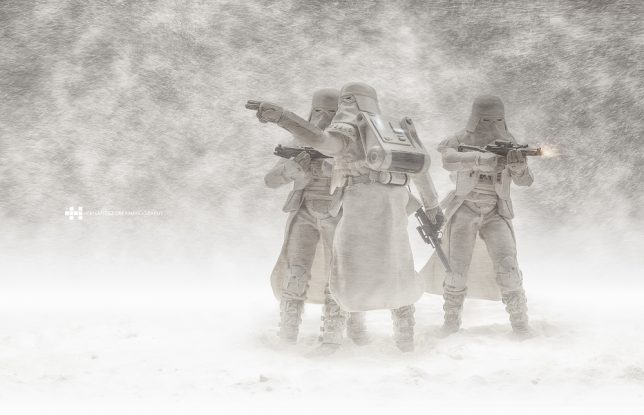
    “I love photo manipulation and digital art, but what’s really cool is doing as much as you can in-camera,” says Hernandez in a piece he wrote for PetaPixel. “For snow scenes, I use wheat flour. For desert scenes, I use corn flour. For atmosphere, I add smoke. For rain, I spray water. For droplets, I add corn syrup. In some photos, I add images into my background. I also use Photoshop for adding effects that are difficult or impossible to do in-camera – things like adding a sense of motion, color grading, etc.”

    hernandez-the-crow-and-the-dove

    hernandez-miniatures-2

    hernandez-miniatures

    hernandez-miniatures-4

    Previous photosets have included a series in which the artist took photos of a young boy and a miniature boat and blended them together in Photoshop, as well as Stormtrooper figurines hand-painted to make them appear more rugged and worn. See them all on Behance.

    Share on Facebook


    [ By SA Rogers in Art & Photography & Video. ]

    [ WebUrbanist | Archives | Galleries | Privacy | TOS ]


    WebUrbanist

  • The Sony a99 ll will be available on time – but in very short supply

    Sony has announced that its a99 ll full-frame SLT camera will go on sale on November 25th as expected, but it will not be able to supply nearly enough to meet demand straight away. The company has issued a statement saying that domestic demand has ‘significantly’ exceeded the Japanese company’s sales plans and that customers should expect some delay in the delivery of ordered cameras.

    The 42MP camera offers a top shooting rate of 12 fps and features a combined phase detection and contrast detection AF system that the company says provides speed, accuracy and improved tracking. The camera was the surprise launch of Photokina this year, as many assumed Sony had abandoned its SLT cameras in favor of the more popular mirrorless models.

    It seems even Sony has been caught off-guard by the demand of the a99 ll, and if there are to be delays in the Japanese market there will almost certainly be delays in the rest of the world. The a99 ll is due to be priced at ¥388,880/$ 3200/£3000/€3500. For more information see the Sony website.

    Articles: Digital Photography Review (dpreview.com)

  • An array of Canon 400mm F2.8L II lenses is helping astronomers discover new galaxies

    The Dragonfly Telephoto Array. Photo by Pieter van Dokkum

    When Astronomer Pieter van Dokkum was looking for ways to study galaxies, he turned to the equipment he was familiar with as an amateur photographer. Thanks in part to some advanced optical coatings, he and his research team have been able to discover previously unseen galaxies.

    In 2011, van Dokkum and fellow professor and astronomer Roberto Abraham, were discussing ways to find a way to get a better look into the very diffuse cosmic light that’s scattered by traditional telescopes like Hubble. Van Dokkum’s thoughts turned to his consumer imaging equipment, and some claims Canon was making about its then-recently-released 400mm F2.8L II. 

    Introduced in August the previous year, the 400mm F2.8L II offers what Canon calls ‘a SubWavelength Structure Coating (SWC), which uses microscopic cone-shaped structures smaller than a wavelength of visible light’ to reduce internal reflections and scattered light. This kind of coating would theoretically help collect enough light to study galaxies with low ‘surface brightness’, and sure enough, it did. Says van Dokkum: ‘We compared their performance to those of the best reflecting telescopes, and found that they produce almost an order of magnitude better suppression of the wings of the point spread function – probably in part because of the SWC coatings.’ In short, the 400mm F2.8L II fit the bill.

    More lenses were acquired and the Dragonfly Telephoto Array was born (clustering lenses allows researchers to increase the effective aperture of the system). Van Dokkum and Abraham started with eight lenses, and now operate two mounts with a total of 48 lenses.

    Custom connectors, as well as off-the-shelf components like Intel Compute Sticks help drive Dragonfly. Photo by Pieter van Dokkum

    You won’t find a Canon EOS 5DSR behind anywhere on the array, though. Each lens is attached to its own science-grade 8MP CCD camera, and has a custom astronomical filter slotted in. There’s a custom-built connector between each camera and the lens that can drive focus, and an Intel Compute Stick attached to each camera takes care of data recording and some processing. It’s all controlled by a central computer that can carry out commands like ‘auto-observe Mars’ and ‘expose 900 seconds’. 

    The array has helped examine much-observed heavenly bodies like the Coma Cluster, where they’ve been able to identify what the research team has dubbed ‘ultradiffuse galaxies.’ They continue to discover more of these galaxies with the help of Dragonfly, and aim to keep learning about their variety and formation. 

    Articles: Digital Photography Review (dpreview.com)

  • Google acknowledges lens flare issue on Pixel camera, promises software fix

    Since the Google Pixel and Pixel XL smartphones have become available for purchase, there have been several reports about the camera of the devices, despite stellar scores in the DxOMark ranking, being very prone to lens flare with the sun at a certain angle to the camera lens. Now a group of affected Reddit users has described the problem in the Google Product Forum and got a quick reply from a Google employee:

    ‘First, for some background — flare is a property of ALL camera lenses. It comes in a ton of different shapes and sizes and can even be used for creative effect — good and bad :-). The shape, color, amount, etc. of flare is related to dozens of different parameters of the lens structure and inclement light. However, we have seen reports about this “halo/arc flare”. This is the specific kind of flare that appears as a bright/low-contrast arc in the corners of the frame.
     
    You can expect a software update in the next few weeks that will improve the effects of this issue. We’re working on some algorithms that recognize the halo/arc flare, characterize it mathematically, and then subtract it from the image. 🙂 You will need to use HDR+ to see the benefits of this software.’
     
    So it appears Google is planning to solve a hardware problem with a software solution and bake an algorithm, that mathematically removes the flare from the image, into the Pixel camera’s HDR mode. This means the measure will only be effective when shooting in this mode and it remains to be seen if there is any impact on noise and/or image detail in the affected areas of the image. We will certainly have a closer look at the Pixel’s flare behavior in our own test of the device.

    Articles: Digital Photography Review (dpreview.com)

  • How to Correct Skin Tones Using Lightroom’s Color Curves

    Lightroom gives you a million and one ways to complete most photo edits. Having options is important. No two photos are alike, so no two edits are alike either. In this article, I’ll show you how to correct skin tones using Lightroom’s color curves.

    There are times when the best way to edit color in general, and skin tones in particular, is to use Lightroom’s Color Curves. After reading this tutorial, you’ll be able to; measure RGB skin tone numbers to give you a general idea of which edits your photo needs, and correct the color issues using Lightroom’s Color Curves

    skin-tones-Lightroom-curves-13.jpg

    Finding the color numbers

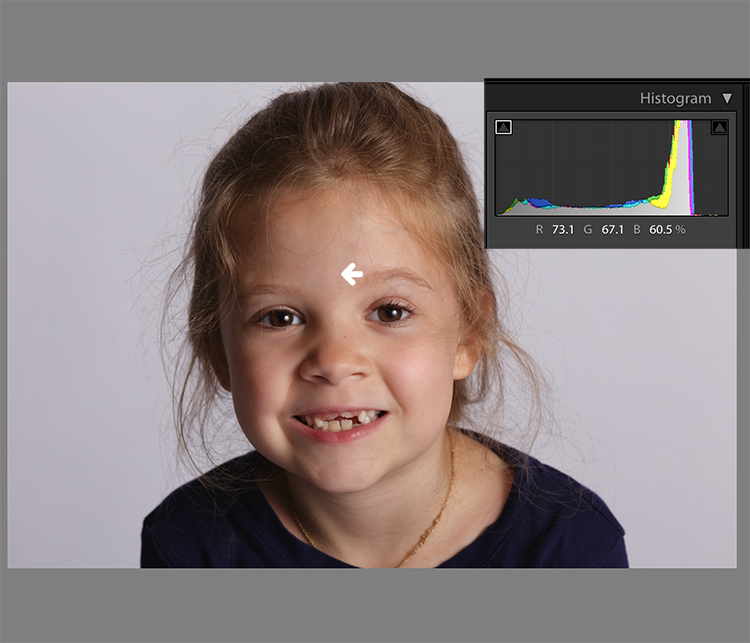
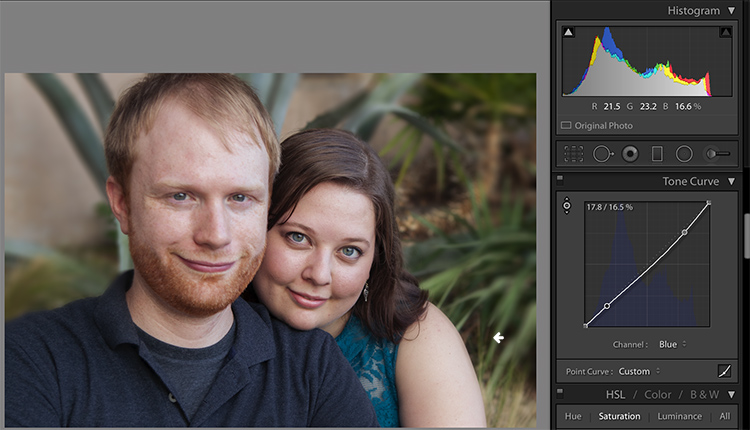
    The image below is a photo that came out of the camera with a pretty good white balance and skin tone. Do you see the numbers under the histogram? Those are Red, Green and Blue (RGB) numbers.

    Skin tones Lightroom curves 01

    You can display the RGB numbers for your photos too. In Lightroom’s Develop module, hover your cursor over the area you want to measure. Look under the histogram for the corresponding RGB measurements.

    These measurements tell us that the pixels next to the arrow in the screen shot had the following measurements:

    • Red: 73.1%
    • Green: 67.1%
    • Blue: 60.5%

    RGB numbers are usually measured on a scale of 0-255, unless you are working in Lightroom. In Lightroom, you generally see them on a percent scale. 0% is the darkest value for any color, it’s so dark that there is no visible detail in that area. 100% is the brightest, and is so bright that no detail is visible.

    Analyzing the color numbers

    When analyzing RGB numbers for skin tone, look for the following indicators:

    • Red should be higher than Green. Green should be higher than Blue. This pattern is universal to all skin tones, regardless of age or ethnicity.
    • Each color should have at least a 2% difference, usually more, between it and the next number. Do you know how to identify a pure gray? That is a pixel that measures exactly the same in its Red, Green and Blue numbers. So skin whose RGB numbers are very close to each other is going to look gray. Not very appealing, right?
    • If any colors measure 94% or above, you probably have overexposure to deal with.
    • If any colors measure 6% or below, you probably have underexposure to deal with.

    The RGB numbers in the photo above are consistent with expectations. This means that the skin is within “proper range” of a well-exposed photo with good white balance.

    What do to with bad numbers?

    What happens, however, if your photo doesn’t look so good straight out of camera?

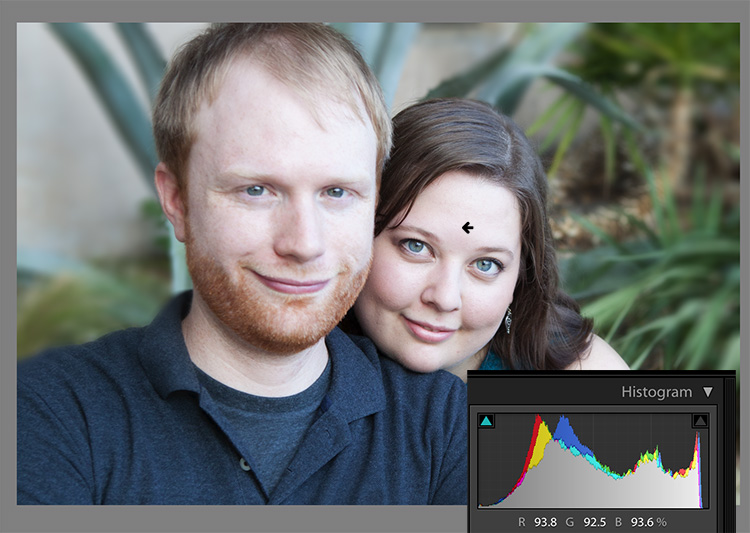
    Skin tones Lightroom curves 02

    In this photo, the measurement point was just next to the arrow on her forehead. The numbers read: Red 93.8%, Green 92.5%, and Blue: 93.6%.

    Anytime you see a photo with skin tones that measure like this, your eyes are going to tell you that something is off before the numbers do. The benefit of using the numbers is that they give you the direction to which your edits for the image need to go.

    The numbers in this photo cause concern because:

    • Anything higher than 94% or so in Lightroom is bright enough that your image, if you print it, might not render good detail in those areas. That means that these areas are too bright.
    • Blue is higher than Green. Red should always be the highest and Blue the lowest otherwise the skin tone will appear cold.
    • The RGB numbers are too close together – they are approaching gray. This skin in this photo is lifeless as a result.

    Correcting the skin tones

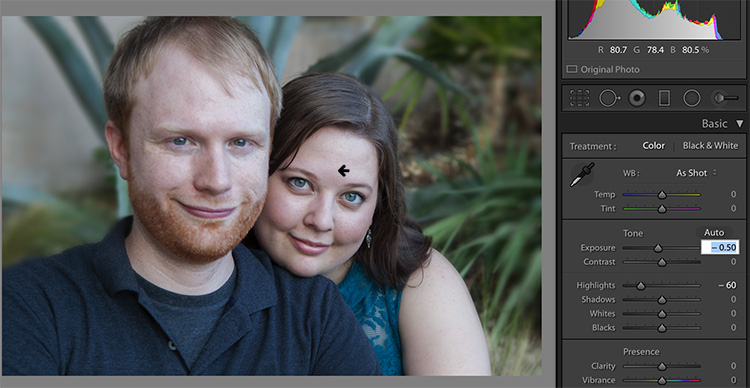
    To fix this image, you would start by tweaking exposure. Proper exposure is a huge component of proper skin color. In fact, it’s often impossible to assess skin tone issues correctly without correcting exposure first.

    A little-known bit of Lightroom awesomeness is that it’s easy to correct exposure while keeping an eye on the RGB numbers. In the Develop module, double click in the numeric entry field for Exposure so that the number is highlighted. Next, hover your cursor over the area of skin you are measuring without clicking. Use the up or down arrows on your keyboard to change exposure until a more appropriate measurement for the Red value appears under the histogram.

    Skin tones Lightroom curves 03

    Adjust Highlights (or Shadows, Whites, or Blacks) in the same way. Activate the numeric input field for editing then hover the cursor over the arrow you want to measure. Use the arrow keys on your keyboard to increase or decrease the adjustment.

    Exposure for this photo is better with the adjustments you see above, but color is still off. When the RGB numbers are as close together as you see here, it’s often better to use Color Curves than the White Balance sliders to fix the issue.

    Using Color Curves instead of White Balance Sliders

    Color Curves has two major advantages over the white balance (WB) sliders.

    You might have noticed already that Lightroom measures three colors (red, green and blue) for each pixel. However, the White Balance sliders don’t allow for editing the most important component of skin color – red. But, you can edit Red tones using Lightroom’s Color Curves.

    The other big benefit of using Color Curves is that you can adjust colors in limited parts of the tonal range. For instance, if you reduce yellow in an image using the Temperature slider in the White Balance section, you are reducing yellow globally (everywhere in the image equally). Using Color Curves, however, you could reduce yellow only in the shadows, without taking away the yellow that properly belongs in the mid tones and highlights of an image.

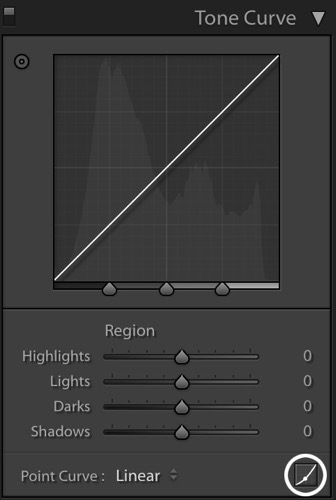
    To find Color Curves in Lightroom, scroll down to the Tone Curve section. By default, it shows you the parametric curve, which looks like this:

    Skin tones Lightroom curves 04

    Click on the small button in the lower right corner of the Curves panel to access the Point Curve. (It’s circled in the screen shot above.)

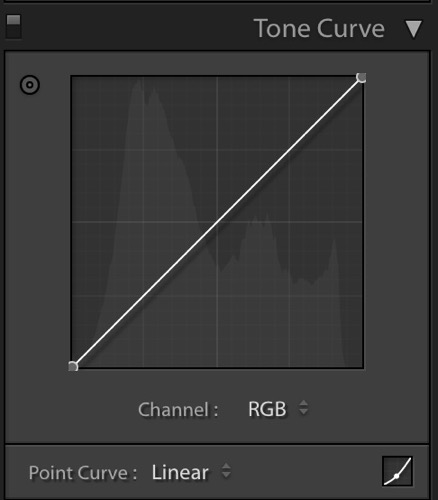
    Now you are looking at the Point Curve interface:

    Skin tones Lightroom curves 05

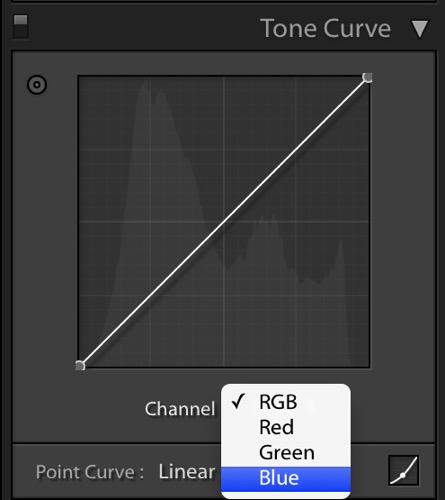
    Using the Channel drop down menu, select the color you’d like to adjust.

    Skin tones Lightroom curves 06

    Which color channel to edit?

    At this point, you may be wondering about adjusting colors other than red, green, and blue. For instance, what if your photo has too much yellow or orange? Think about it like this.

    Each of the three colors measured in Lightroom has an opposite:

    • Red is the opposite of cyan
    • Green is the opposite of magenta
    • Blue is the opposite of yellow

    Reducing any one of those colors using Color Curves, increases that color’s opposite. In other words, reducing blue is the same as increasing yellow.

    Looking at the Curves panel, do you see the histogram behind the straight line? When you click and drag the straight line to create a curve, this tells Lightroom to adjust the pixels corresponding to that part of the histogram.

    Say, for instance, that you wanted to add blue to the mid tones of an image. You would select the Blue channel and click the line in the middle of the histogram, where the midtones live. Dragging the line up would add blue to the bright parts of your photo’s tonal range.

    Dragging up increases the color the channel is named after – blue, in this case. If it increases blue, that means that it’s also decreasing blue’s opposite, yellow.

    Skin tones Lightroom curves 07

    Dragging down decreases the color the channel is named after.

    skin-tones-lightroom-curves-08b

    Using the Targeted Adjustment Tool for Curves

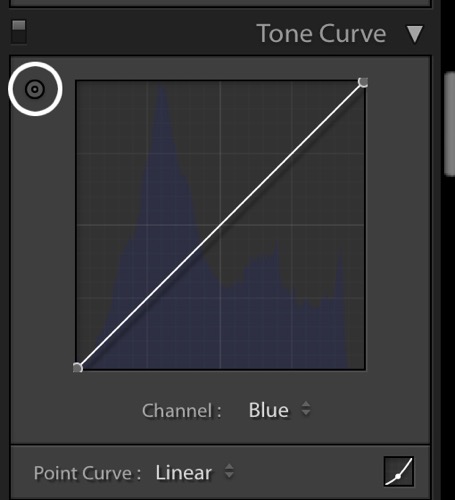
    That’s the way it works in general. But you can get much more precise color control by using Lightroom’s Targeted Adjustment Tool. Click on the button at the top left corner of your Curves panel to activate it (circled below).

    Skin tones Lightroom curves 08

    Hover this tool over the spot you’re using to measure the skin tone in your photo, but don’t click! Use the up and down arrows on your keyboard while keeping an eye on the RGB numbers beneath your histogram until the both the appearance of the photo and the RGB numbers improve.

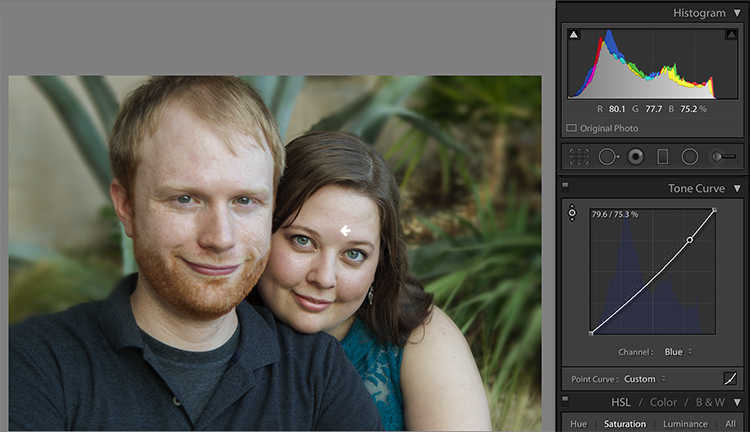
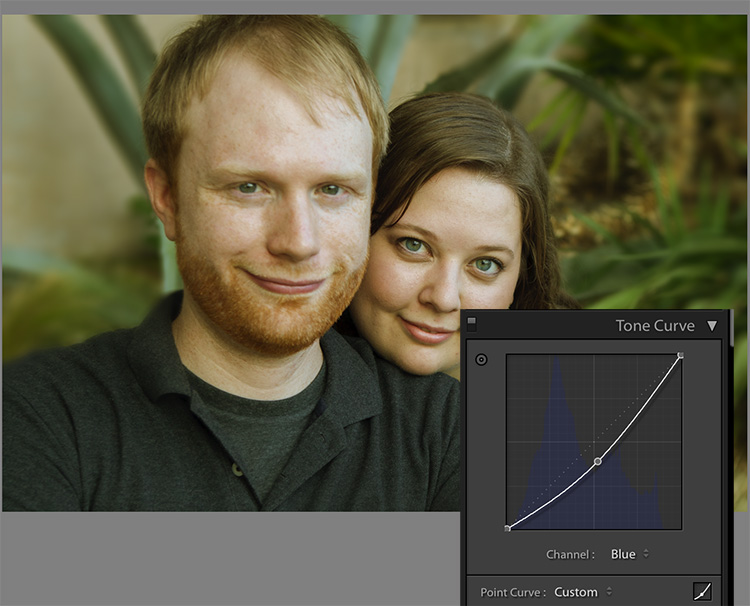
    Moving the blue curve down, as in the screenshot below, provides better separation between the Green and Blue measurements. It also gives the photo the warmth it’s lacking.

    Skin tones Lightroom curves 09

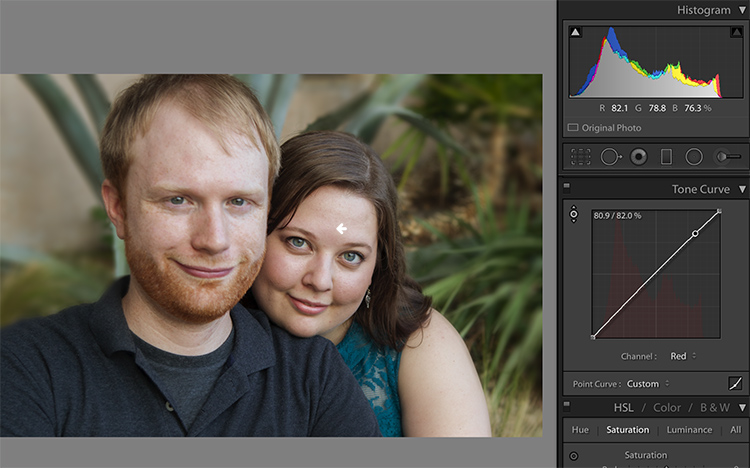
    If the image still lacks vibrance, as this one does, move to the Red curve and increase the Red channel. Adding a touch of red is the best way to counteract gray skin.

    Skin tones Lightroom curves 10

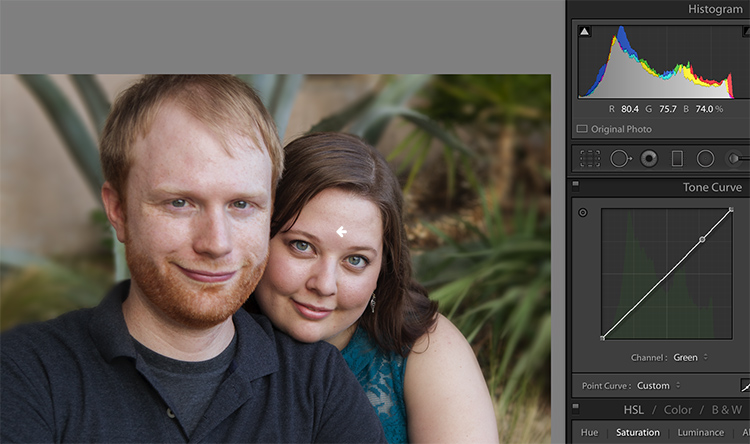
    Next, decreasing green (to add magenta) makes the skin color, as well as the corresponding RGB numbers, look just about right.

    Skin tones Lightroom curves 11

    Tweaking things

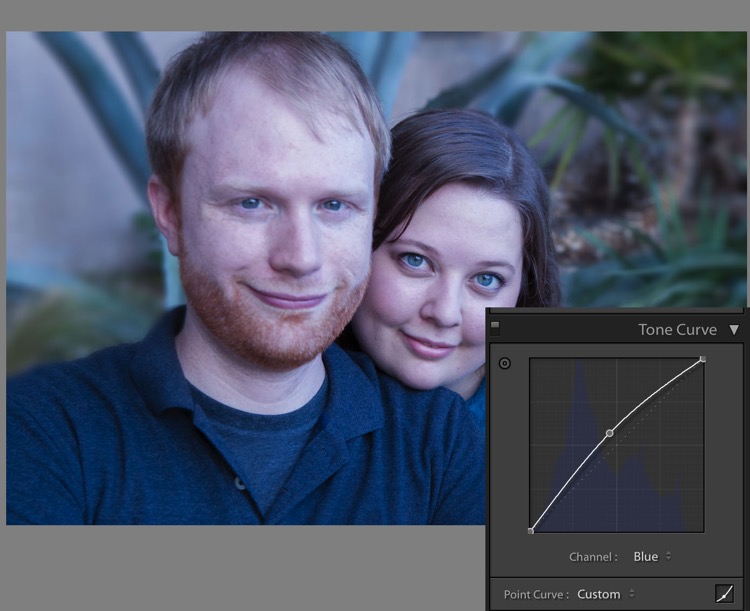
    However, the warmth of the plants behind them is overpowering the subjects. To downplay it, return to the Blue channel.

    Using the Targeted Adjustment Tool, add Blue to the the shadows by hovering over a dark area of the photo and hitting the up arrow on your keyboard.

    Skin tones Lightroom curves 12

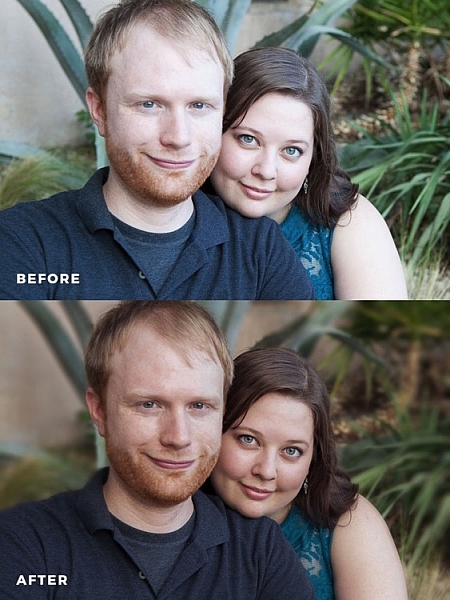
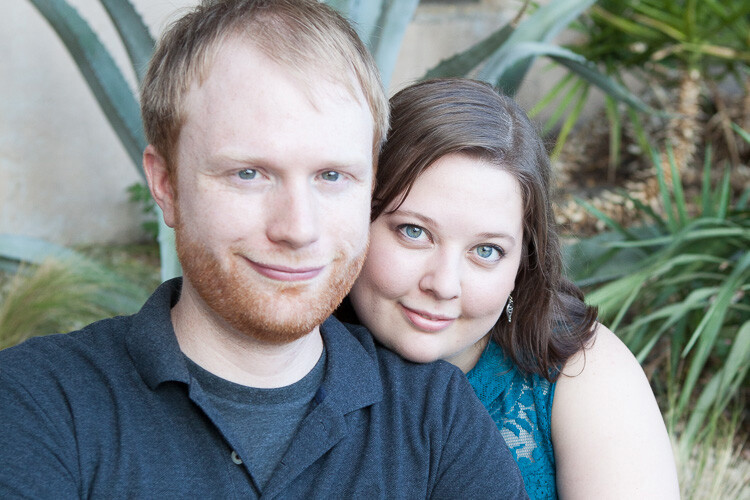
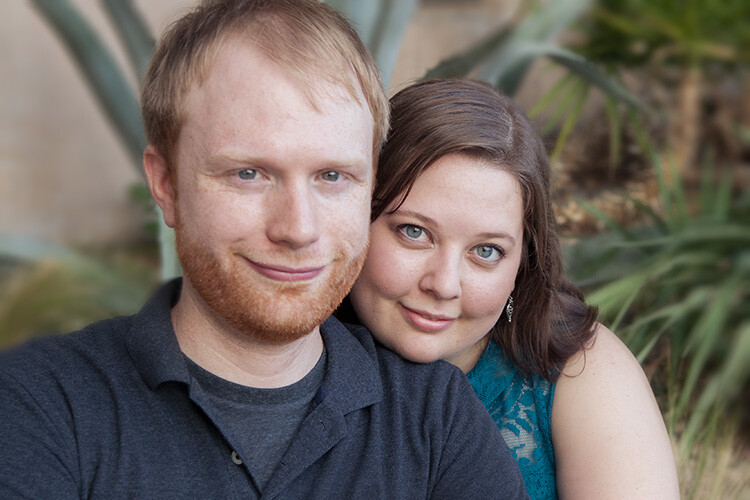
    Compare the original and edited photos here:

    Before

    Before

    After

    After

    Editing your own images with Color Curves and RGB numbers

    Keep the following tips in mind when editing your own images.

    #1 – First, a big caveat to anyone who has heard that using RGB numbers to edit will solve all skin tone problems! There are as many proper RGB measurements as there are people in the world. As you study RGB numbers, let trends in the numbers and generalities guide your edits, but don’t try for an exact numeric match.

    #2 – Measure skin tones in the middle range of brightness. Look for mid-tones rather than bright highlights or deep shadows. Also avoid measuring on cheeks, the end of the nose, or other areas that are usually redder than others.

    #3 – In general, when I’m editing photos, I look for tones in these ranges:

    • Red is highest > Green is middle > Blue is lowest – always.
    • The Red channel is usually between 70% and 90%. Very light skin can be as high as 94%. Very dark skin can go as low as 40-50%.
    • The Blue channel is usually between 30% and 80%.
    • It’s not possible to generalize how many percentage points difference should be between Red and Green, or Green and Blue. However, skin that has warmer tones will have less Blue in proportion to Red and Green.

    #4 – Small movements of your tone curve impact your image dramatically. Don’t go overboard!

    Conclusion

    Studying the patterns in the RGB numbers of your photos is a great way to develop your editing eye. Everyone has photos that aren’t quite right. Analyzing the relationship between the numbers and the appearance of the photo will help you get to the point where you can eyeball a photo’s needs without referring to the RGB numbers at all.

    Any questions? We could talk about this topic all day. Comment below and tell me what you think.

    googletag.cmd.push(function() {
    tablet_slots.push( googletag.defineSlot( “/1005424/_dPSv4_tab-all-article-bottom_(300×250)”, [300, 250], “pb-ad-78623” ).addService( googletag.pubads() ) ); } );

    googletag.cmd.push(function() {
    mobile_slots.push( googletag.defineSlot( “/1005424/_dPSv4_mob-all-article-bottom_(300×250)”, [300, 250], “pb-ad-78158” ).addService( googletag.pubads() ) ); } );

    The post How to Correct Skin Tones Using Lightroom’s Color Curves by Erin Peloquin appeared first on Digital Photography School.


    Digital Photography School

  • Microsoft Surface Studio morphs the photographer’s desktop into a studio

    $ (document).ready(function() { SampleGalleryV2({“containerId”:”embeddedSampleGallery_6194580448″,”galleryId”:”6194580448″,”isEmbeddedWidget”:true,”standalone”:false,”selectedImageIndex”:0,”startInCommentsView”:false,”isMobile”:false}) });

    Microsoft today expanded its Surface lineup, announcing the ‘world’s thinnest LCD monitor’ but in an exciting form factor: a touch-based all-in-one desktop PC with a 28″ 4.5K PixelSense display. The 4500 x 3000 3:2 display sports 13.5 million pixels, and at 192 PPI almost approaches the 218 PPI figure of the 5K Retina iMac, but with 10-point multi-touch capabilities. Like the 5K iMac, the display’s color gamut extends to DCI-P3 (25% larger than sRGB), something photographers routinely editing and printing will appreciate. Microsoft is calling the 10-bit display ‘TrueColor’.

    But the real story here is the touch-based, pen-enabled display. Wacom Cintiq: take a hike. Apple iMac: mice and Wacom pens are so yesterday. The Surface Studio literally combines these devices into one, allowing you to draw directly on the surface with the precision Surface Pen. With a simple push of the screen, you can adjust the angle of the display down to a 20-degree orientation – then use it like a drafting table. And the new Bluetooth Surface Dial radial accessory will allow you to change settings, like the color you’re drawing with or brush size, on-the-fly. The display and dial sense each other, and with time and adoption we expect to see all sorts of creative solutions emerge that integrate the capabilities of the display, dial and pen. 

    The new Microsoft Surface Studio is a powerful all-in-one desktop with a 28″ 4.5K wide-gamut PixelSense display touting touch, pen and dial capability. It easily folds down to drafting table-esque low angle for easy drawing and image editing.

    A number of apps at launch, like Paint 3D and Sketchable, will support enhanced capabilities with the dial and pen, and we expect creative applications, like Adobe’s Creative Suite, to quickly follow suit, particularly because Microsoft has made it easy for developers to do so. Microsoft’s approach with Windows 10 and its hardware products prioritizes a unified app experience across all devices. With one operating system, app developers simply build new UI layers on top of existing apps, meaning less work for developers (than building a whole new app for, say, iOS) and, perhaps more importantly, a consistent user experience: Photoshop on the Surface is just like Photoshop on a desktop PC, but with an added pen/touch layer. 

    Microsoft’s approach prioritizes a unified app experience across all devices. 

    To keep the display on the Surface Studio thin, Microsoft put a lot of the guts of the Surface Studio in the base, and the specs are impressive. Three configurations ranging from $ 2,999 to $ 4,199 are available, all using Intel’s 6th generation Quad core i5/i7 processors with 8, 16, or 32GB RAM. Every Studio comes with a dedicated nVidia discrete GPU, with the lower two configurations using the GTX 965M with 2GB GDDR5 memory, and the highest configuration using the GTX 980M with 4GB GDDR5 memory. There are a number of connectivity options, including 4 USB 3.0 ports, SD card reader, Mini Displayport, Bluetooth 4.0, 802.11ac Wi-Fi, Gigabit ethernet, and Xbox Wireless. A 5MP/1080p Windows Hello capable front-facing camera is built in, as are 2.1 Dolby Audio speakers, and dual microphones.

    Microsoft also announced three new Surface Book models with Performance Bases, touting 6th generation Intel Core i7 processors and more than twice the graphics processing power of the original Surface Book.

    Windows 10 Creators Update promises ease of creation, sharing and experiencing 3D models and mixed reality (with accompanying VR headsets).

    Microsoft is pushing their Surface solutions as tools for creatives, with a big focus on 3D. To that end the Windows 10 Creators Update, slated for early 2017 release, updates a number of apps to allow users to work seamlessly with 3D models, including ones they can generate themselves by scanning real-world objects with their phone. The popular Paint app will now be Paint 3D, and over the next year the popular Microsoft Office suite will also gain 3D capabilities. The Creators Update also promises ease of creation, sharing and experiencing mixed reality. Microsoft announced that HP, Lenovo, Dell, Acer and ASUS will ship the first VR headsets capable of mixed reality through the Creators Update.

    Microsoft’s newly announced products are available for pre-order today, and early adopters of the Surface Studio will get a free Surface Dial. For more coverage and details on today’s launch event, head over to Microsoft’s dedicated site on the launch event.

    Press Release:

    NEW YORK — Oct. 26, 2016 Microsoft Corp. on Wednesday unveiled a broad vision to empower a new wave of creativity with a major update coming to more than 400 million Windows 10 devices and the introduction of Surface Studio, Surface Dial and a more powerful Surface Book.

    Expanding the Surface family, Surface Studio is a new class of device that transforms from a workstation into a powerful digital canvas, unlocking a more natural and immersive way to create on the thinnest LCD monitor ever built.1 With a stunning ultra-HD 4.5K screen, Surface Studio delivers 63 percent more pixels than a state-of-the-art 4K TV. Surface Studio works beautifully with pen, touch and Surface Dial — a new input device designed for the creative process that lets you use two hands on the screen to compose and create in all new ways.

    Launching as a free update in early 2017, the Windows 10 Creators Update will enable anyone to create, share and experience in 3-D and mixed reality, connect people faster to those they care about most, and empower every gamer to be a broadcaster. And with the Creators Update, Microsoft Edge will be the first browser to fully embrace 3-D.

    “At Microsoft, our mission is to empower every person and every organization on the planet to achieve more,” said Satya Nadella, CEO, Microsoft. “With Windows 10, Microsoft Surface and the medium of Mixed Reality, we aim to empower the builders, the makers and the creators with the tools to create, collaborate and express themselves in new ways.”

    Surface Studio turns your desk into a creative studio

    Surface Studio is a new class of device designed for how people naturally create and bring ideas to life. The 28-inch PixelSense™ Display immerses the user in 13.5 million pixels of pure, true-to-life color, and the Zero Gravity Hinge allows the screen to effortlessly adjust to each stage of the creative process. When the screen transitions from Desktop Mode to Studio Mode, it sits at a 20-degree angle, the same angle as a standard drafting board, making it ideal for sketching, writing and designing.

    The 6th Generation Intel® Core™ processors accelerated by a discrete NVIDIA® GeForce® GPU deliver smooth and immersive graphics performance and the power to run professional programs such as Siemens’ NX™ software,2 taking people through their workflow from end to end. Now architects can sketch their ideas with the Surface Pen, put them into production using powerful 3-D modeling software, and review and mark up plans with a client, all on one device.

    Surface Studio starts at $ 2,999 estimated retail price (ERP) USD. It is available for pre-order today in the U.S. through Microsoft Stores, MicrosoftStore.com and BestBuy.com, and will begin shipping in limited quantities this holiday with broader availability in early 2017.

    Surface Dial — a new spin on creativity

    Surface Dial is a new peripheral designed for the creative process. It integrates with Windows 10 to work with Surface for a faster and more intuitive way to scroll, zoom and navigate. The Dial also enables a set of unique experiences exclusive to Surface Studio. When you place the Dial directly on the screen, it brings up a set of digital tools specific to the app that is open, allowing people to more seamlessly move through their workflow. For example, with Surface Dial, artists can change the color or the size of their brush tip as they paint without ever moving the pen away from the screen. The combination of Dial, pen and touch creates a more immersive and tactile way for people to create in digital environments. Partners like BlueBeam Inc.,2 Drawboard,2 Mental Canvas,2 Siemens PLM Software,2 Silicon Benders,2 Smith Micro Software, Inc.2 and StaffPad have already optimized their software to take advantage of the new experiences Surface Dial provides.

    Surface Dial is available for pre-order today in the U.S. through Microsoft Stores, MicrosoftStore.com, select Best Buy locations and at BestBuy.com, and will be available for $ 99 ERP USD starting Nov. 10.

    The most powerful Surface Book yet

    Microsoft also introduced Surface Book with Performance Base, making the most powerful laptop in its class even better. The three new Surface Book models feature 6th Generation Intel® Core™ i7 processors and pack more than twice the graphics processing power as the original Surface Book. Plus Surface Book with Performance Base brings 16 hours of battery life3 into the same sleek, versatile design people love. With Surface Book with Performance Base, engineers can spin 3-D CAD models with thousands of parts, designers and developers can render large files quickly, and gamers can play more of their favorite games. No other laptop combines similar battery life, performance and pixels in as lightweight a package.

    Surface Book with Performance Base starts at $ 2,399 ERP USD. It is available for preorder today at Microsoft Stores,4MicrosoftStore.com and select retailers in the U.S., Canada, Australia and New Zealand, and is available starting Nov. 10.

    The Windows 10 Creators Update

    Empowering everyone to create, share and experience in 3-D

    With the Windows 10 Creators Update, Microsoft unveiled a comprehensive vision across hardware and software to bring 3-D to everyone.

    Microsoft introduced a new way to bring your ideas to life with Paint 3D. Building on the popularity of Microsoft Paint, with more than 100 million monthly users on Windows, Paint 3D will be your all-new, easy-to-use 3-D art studio. The company also introduced the new online community Remix3D.com, connecting creators and creations around the world. Remix 3D will enable all-new scenarios for creators, including the ability for Minecraft players to share their 3-D creations broadly with the Remix 3D community.

    To inspire a new wave of creativity, Microsoft is partnering with Trimble to bring the 3-D modeling program Sketchup — and its millions of creators and creations from 3D Warehouse — to Remix3D.com.

    To further demonstrate the possibilities of 3-D in Windows 10, Microsoft showed how easy it is to use your phone to capture a real-world object in 3-D — like a sand castle from your family vacation — to save, personalize and share as a 3-D memory or photo. To bring your ideas to life, Microsoft is also adding support for 3-D in Word, Excel and PowerPoint over the next year, which means with the Windows 10 Creators Update, Office features will work seamlessly with 3-D models.

    Everyone is welcome to start creating and sharing in Paint 3D today by joining the Windows Insider Program at insider.Windows.com. To learn more about 3-D in Windows 10, go to http://www.Remix3D.com.

    Empowering everyone to experience mixed reality

    Mixed reality blends the virtual world with the real world to change the way people create, communicate, learn and play across virtual reality, augmented reality and everything in between. To demonstrate the possibilities of mixed reality, the company showed a proof of concept together with Houzz — a leader in home renovation and design. Using the Microsoft Edge browser on HoloLens, Houzz users could preview products in their own home before they buy. Microsoft Edge was the first browser to bring inking to the web, and will be the first browser to fully embrace 3-D.

    The Creators Update will be the most powerful and affordable way to experience mixed reality. Microsoft announced that HP, Lenovo, Dell, Acer and ASUS will ship the first VR headsets capable of mixed reality through the Creators Update. Coming in 2017, these accessories will contain built-in sensors to enable inside-out, six-degrees of freedom for simplified setup and to more easily move around your home as you experience virtual worlds —no markers required.

    Less powerful VR accessories today start at over $ 500 ERP USD. With the Windows 10 Creators Update, the new VR accessories will work with affordable laptops and PCs and start at just $ 299 ERP USD.

    Windows 10: the best platform for 4K gaming and in-game broadcasting

    Gaming has exploded in popularity as both spectator entertainment and as a sport. The Windows 10 Creators Update will make it easy for every gamer to create and enjoy live game streams and customized eSports tournaments on the fastest, most reliable multiplayer network, Xbox Live.5

    The Creators Update will include Beam system integration on Xbox One and Windows 10 for interactive broadcasting and viewing of gameplay on Xbox Live, with even more features yet to be announced. And with interactive broadcasting, you don’t just watch your favorite streamer play, you interact in real time right along with them.

    The Creators Update will also bring the power of user-generated tournaments via Arena on Xbox Live, where anyone can define the rules of competition, invite friends and track tournament progress seamlessly across devices, whether it’s on Windows 10 or Xbox One.

    Plus, with a Windows 10 gaming PC, you’re able to play games like “Forza Horizon 3,” “Gears of War 4” and more in 4K,6 the highest possible visual fidelity that this holiday’s biggest blockbusters can deliver.

    A faster way to connect and share with people who matter most

    With the Windows 10 Creators Update, Microsoft is putting the people you care about most at the center of your experience — right where they belong — with Windows MyPeople. Now, with the Windows 10 Creators Update, your most important friends, family and co-workers will be instantly accessible across any Windows PC.

    With MyPeople, you can pin your favorite contacts to the Windows task bar and easily drag and drop any document, photo or video right on top of the contact for easy sharing. Get unique notifications, called “Shoulder Taps,” from your most important people and easily open and see an integrated view of emails, IMs, shared documents and more, all in one place. The Windows MyPeople experience will be integrated across Universal Windows Platform (UWP) apps for easy sharing.

    More to come

    Windows Insiders will be able to preview the Windows 10 Creators Update through the Windows Insider Program at https://insider.Windows.com. 3-D and mixed reality for everyone, in-game broadcasting and MyPeople are just some of the new experiences coming to the Windows 10 Creators Update in early 2017. Additional productivity, creativity, security and gaming features will also be included and announced soon.

    Microsoft (Nasdaq “MSFT” @microsoft) is the leading platform and productivity company for the mobile-first, cloud-first world, and its mission is to empower every person and every organization on the planet to achieve more.

    1 Average cross-section thickness across entire display

    2 Sold separately

    3 Surface Book with Performance Base features 16 hours of battery life for local video playback.

    4 Where available

    5 Network claim: Independent IHS Markit study, June/July 2016. Tested on Xbox One versus PlayStation 4 on top five selling games with matchmaking; results may vary, not an endorsement. Visit xbox.com/betternetwork.

    6 Games sold separately. 4K functionality available with supported games, monitors and graphics chips. Check PC to determine graphics chip compatibility.

    Articles: Digital Photography Review (dpreview.com)

  • Chronos 1.4 is a $2500 camera that can shoot at 21,650 fps

    Late last month, a homemade camera dubbed Chronos surfaced alongside the claim that it can shoot at speeds up to 21,650 fps. The camera was notable not only for its ultra-high-speed shooting capabilities, but also its comparitively affordable $ 2500 price tag. The camera was the subject of a recent YouTube video showing off its various features and functionalities.

    Chronos 1.4 is the brainchild of engineer David Kronstein, who first demonstrated the camera’s hardware and recording capabilities with a production-level prototype under his YouTube handle ‘tesla500.’ The camera can record 1,057 fps at 1280 x 1024, and up to 21,650 fps at lower resolutions. Kronstein lists the pre-production camera features as the following:

    • 1.4 Gigapixel per second throughput
    • 1280 x 1024 at 1050 fps
    • Lower resolutions at higher speeds
    • 8, 16, or possibly 32GB RAM
    • Storage on SD card, USB drive, SATA hard drive
    • Raw video saving
    • No PC needed for operation
    • AC Adapter or battery (1.75 hour per charge)

    You can see a full review of the camera in Taofledermaus’s new video below. Per his video, it seems the current plan is to launch the camera on GoFundMe rather than Kickstarter in the next month or so, but details on that are still slight at this time.

    Via: PetaPixel

    Articles: Digital Photography Review (dpreview.com)

  • Shooting Festivals and Events – Tips for Travel Photographers

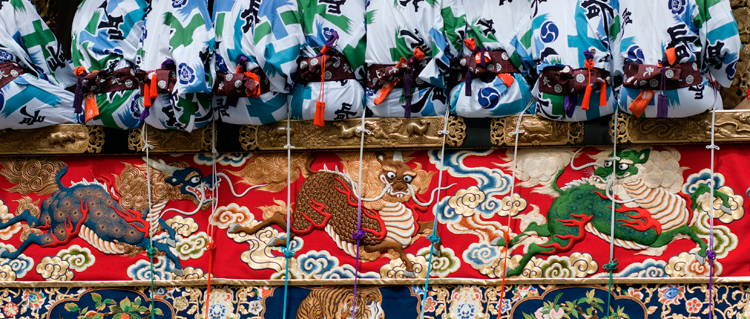
    Festivals, fairs, and carnivals are a great visual opportunity for any travel photographer because they provide us with a glimpse into the local culture. I remember working in the Gion Matsuri festival in Japan. While one can say that Japan is super modern and hi-tech, the festival allowed me to see a different, more traditional side of the place – from the local food to the clothing.

    festivals and events travel photographer

    Here are some tips that will allow you to make the best out of your next festive event

    Before you go

    Build your next vacation around a festival. Why not schedule your next trip or family vacation around a festival? Not only can festivals and local events give lots of great visual opportunities, but a festival can be a good experience for your non-photographing partners as well. Thus, you can combine a family vacation with your love of photography at the same time and place.

    How to find your next festive vacation

    Choose your destination according to your schedule. If you know that you can take some time off in the summer, Google “best festivals in July and August” and Mr. Google will offer some great ideas – from a music festival in England to a tribal festival in Papua New Guinea. Now, all you have to do is to choose.

    Or, choose your schedule according to your destination if you already decided on your next destination. If possible, try to choose the time and season according to a local festival or event.

    festivals and events travel photographer

    Booking and planning your trip

    Book your trip as early as possible. Well-known festivals and fairs tend to attract huge groups of visitors from all around the world. Everything from booking a flight ticket to getting a good hotel can be extremely expensive or even impossible. So, do your best to book everything well in advance.

    Choose smart lodging. While traveling, time is everything and as a cultures photographer, you want to maximize your time by selecting a smart lodging. Don’t waste your time and money on a hotel which is far from the main attractions. Be on the streets with first light, before the crowds.

    Get the event schedule. Knowing when and where to be is important for every photographer, but this is a must if you are working around a moving festival (like a parade). If possible, look for the event schedule online, and be sure to double check it with a local (like a receptionist at your hotel or a local taxi driver) upon your arrival.
    festivals and events travel photographer

    On location

    Get there before the crowds. To get yourself a spot in the first row, you will need to be there as early as possible. It might feel a bit boring or like a waste of time, but this is essential if you want to photograph the action and not just the backs of people’s heads.

    Get a good vantage point

    Find an off-public vantage point. Get creative and find yourself a (legal) way to avoid the hustle of the street (and standard imagery) by getting to a high vantage point. Scout a location – balconies or windows that can give you a better perspective on the event, and seek the owner’s approval in advance.

    Build your own vantage point. I saw this technique while working on that story on the Japanese festival in Kyoto. To get a higher vantage point, the local photographers brought small ladders and stools that allowed them to shoot the action without thousands of heads in their frame. This is a smart and extremely practical idea.

    festivals and events travel photographers

    Be safe

    Watch yourself and your gear. Besides being a paradise for pickpockets, some festivals and events can get pretty wild and even violent (I never got so many elbows and punches as I had in India). Avoid getting into a situation that might get too crowded or dangerous!

    This recommendation is relevant for any significant event, but from my experience, mostly in festivals which are religious in nature.

    Back home

    Create a diverse set of images. While sorting and editing your work, try to make your set of images as diverse as possible. Showcase the event from different points of view; high vantage points, portraits, day and night, food, local arts and crafts, etc.

    festivals

    Approach organizers and pitch your work. Sending your work to the event organizers can be a great way to get published, and it may get you a ticket for the non-public areas at next year’s festival. In a case of a traditional festival, you can always send your images to the local embassy and offer them to use your work.

    Here is my list of some of the best festivals for photographers. You may want to add some of these to your list.

    Well known festivals

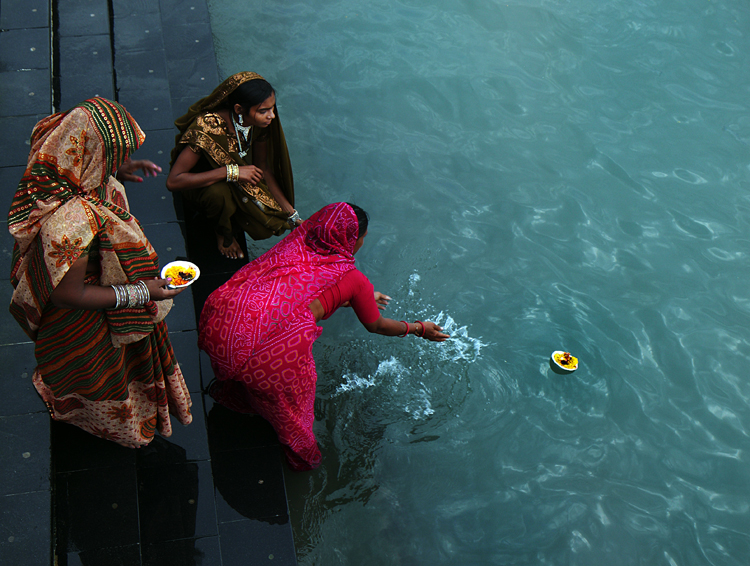
    Kumbh Mela festival India

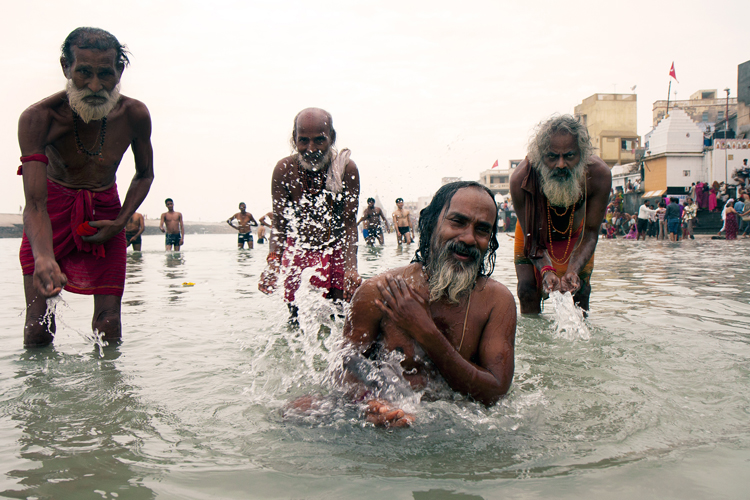
    The Indian Kumbh Mela festival is the largest religious gathering in the world, with millions of people coming to bath in the holy Ganges River.

    • When: Every 12 years, with the next one on 2022.
    • Where: Haridwar, Allahabad , Nashik-Trimbak and Ujjain in India.

    Kombh Mela festival India

    Dia de Muertos Mexico

    The Dia de Muertos, or the Day of the Dead, is a unique and photogenic festival which takes place in Mexico. On that day, locals believe that their dead will return to earth and are preparing for the event. After preparing food and offering, the locals will visit the cemetery, decorating the graves with candles and flowers, making it both spooky and very photo worthy.

    • When: The beginning of November.
    • Where: Throughout Mexico.

    Songkran festival Thailand

    In this festival, which is the Thai New year, you will need to find a solution to cover your camera, because you are going to get wet. Very wet! In the Thai culture (and in many other cultures as well) water are considered as a purifying source and this festival is the largest water fight in the world. Along with great food, music, and dancing in the streets, it is the Thai culture as its best.

    • When: 13-15th of April
    • Where: Throughout Thailand.

    8.jpg

    Hanami – Japan

    If you thought that Japanese people could be a little crazy sometimes, wait until you meet them at cherry blossom time. Local picnics, karaoke singing, and amazing natural sight of the white cherry flowers, making it a local event to experience.

    • When: Depending on temperature and location on the island, but aiming for late March will be the best.
    • Where: Throughout Japan

    Kombh Mela festival India

    Less well-known festivals

    Damadihana – Madagascar

    Turning of the bones. A Malagasy tradition in which local families, take out the remains of their ancestors from the family graves and wrap them in new cloth. Dancing with the remains to the sound of local music is part of this morbid festival.

    • When: Throughout the second half of the year.
    • Where: Highlands of Madagascar.

    Argungu Fishing Festival – Nigeria

    This festival take place every year in the Northern part of Nigeria. The main event is a competition where thousands of men and women jump into the river with limited time to catch the largest fish, using only traditional tools or their hands.

    • When: February or March.
    • Where: Northern Nigeria.

    Kombh Mela festival India

    German Christmas market

    Maybe not as exotic as the other events on this list, but the Christmas markets in Germany are an experience not to be missed. Local art stalls, outstanding food, music, and everything from the unique design of the stalls to the lights illuminating the streets, is so visually interesting!

    • When: November and December.
    • Where: Throughout Germany.

    Conclusion

    Do you have any other festival or event photography tips to share? Or maybe you know of some other great festivals to add to this list. Please share in the comments below.

    googletag.cmd.push(function() {
    tablet_slots.push( googletag.defineSlot( “/1005424/_dPSv4_tab-all-article-bottom_(300×250)”, [300, 250], “pb-ad-78623” ).addService( googletag.pubads() ) ); } );

    googletag.cmd.push(function() {
    mobile_slots.push( googletag.defineSlot( “/1005424/_dPSv4_mob-all-article-bottom_(300×250)”, [300, 250], “pb-ad-78158” ).addService( googletag.pubads() ) ); } );

    The post Shooting Festivals and Events – Tips for Travel Photographers by Oded Wagenstein appeared first on Digital Photography School.


    Digital Photography School