Blog

  • Fujifilm X-T1 and X-Pro2 firmware updates released, X-T2 update delayed again

    Fujifilm has released two firmware updates: firmware version 5.00 for the X-T1 and version 2.01 for the X-Pro2. Unfortunately, X-T2 owners will have to wait a few more weeks for their own firmware update, which is now scheduled to release on November 29th. When the X-T2 firmware is finally released, it will add support for tethering with Adobe Lightroom.

    The new X-Pro2 camera body firmware update brings several bug fixes, as well as improvements to AF tracking and phase detection AF accuracy, improvements to optical image stabilization when using the electronic shutter, and the addition of an auto power save feature to the ‘Power Management’ menu.

    The X-T1 firmware, meanwhile, is very small, and involves added support for the EF-X500 Shoe Mount Flash, as well as new menu and function items related to it.

    The X-T1 firmware update is available here, and the X-Pro2 update is available here.

    Articles: Digital Photography Review (dpreview.com)

  • Art of Camouflage: Flying Bird Silhouettes Blend into Broken Window Voids

    [ By WebUrbanist in Art & Installation & Sound. ]

    cracked-glass-frame-art

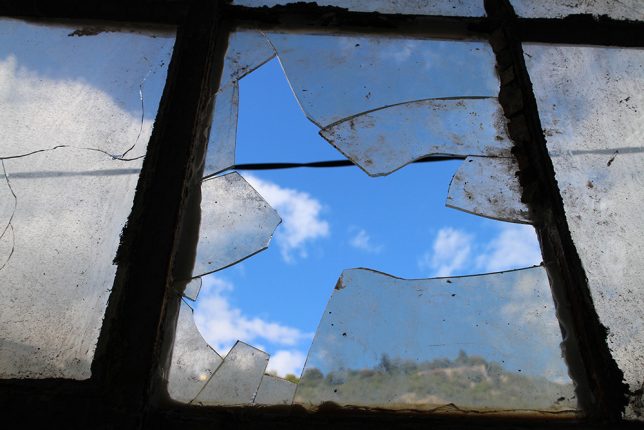
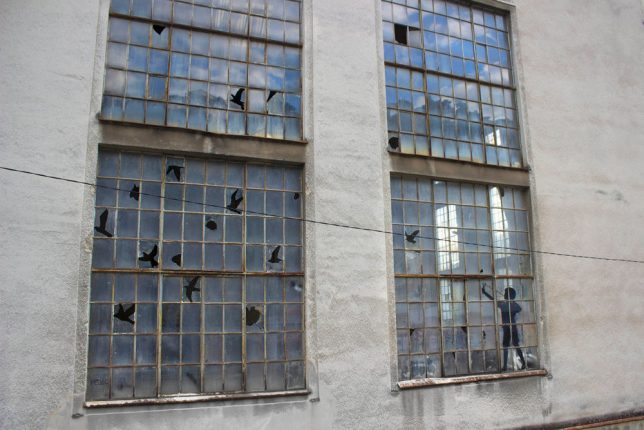
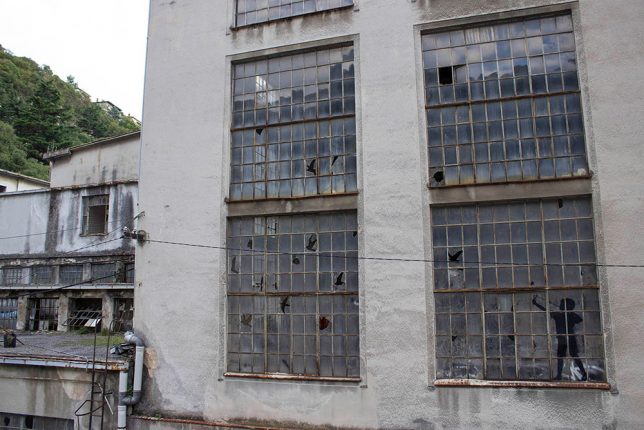
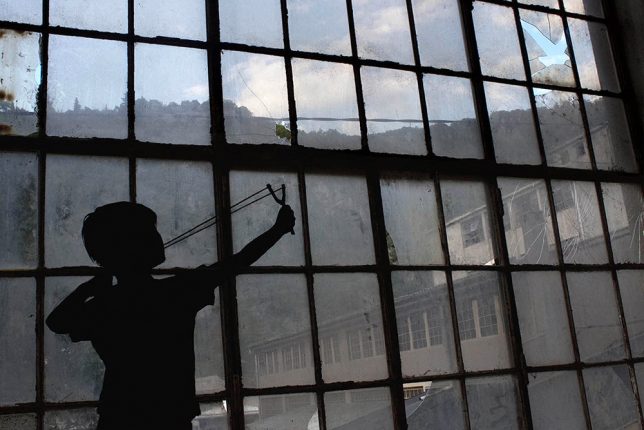
    A boy aiming his slingshot into the sky seems to aim both at the broken windows of an abandoned building but also a series of birds that seem to appear in the gaps of cracked glass, transfixed in various stages of flight.

    broken-glass-bird-art

    Artist Pejac is well known for his negative-space interventions, from pealing back paint chips to carefully reveal brick beneath to other contextual installations. Much of the art is in the craft: a meticulous removal (or breaking) of materials to slowly reveal some new whole, much like a sculptor chips away at a marble edifice.

    bird-window-boy-shooting

    This latest piece was produced during his residency with the Museum of Modern and Contemporary Art in Rijeka, Croatia, where he spent multiple weeks crafting site-specific works.

    bird-windows-power-plant

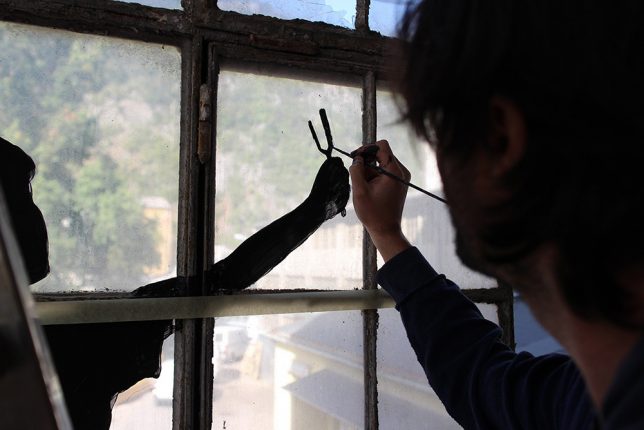
    Camouflage (Tribute to René Magritte) is set in the huge windows of an old paper factory power plant, depicting a flock of birds that might be hard to spot were it not for the outline of a boy taking aim below them. His figure calls attention to the larger work, signalling a passer by the existence of something both large and subtle going on in the frame.

    boy-taking-aim

    painted-boy

    The implied story is one about hunting and survival, the birds disguising themselves against a backdrop of broken window panes, making them harder for the child to spot. The boy, too complex a figure to render through even the most craftily broken glass, is painted over a series of panes (images by Sasha Bogojev).

    Share on Facebook


    [ By WebUrbanist in Art & Installation & Sound. ]

    [ WebUrbanist | Archives | Galleries | Privacy | TOS ]


    WebUrbanist

  • The Leica TL is an upgraded Leica T mirrorless camera

    Leica has today unveiled the Leica TL, which is an updated version of the Leica T that was launched in 2014. The new model’s design has pretty much remained untouched but there is now a new Titanium color option with anodized finish that also comes with chamfered edges.

    Images are still captured on a 16MP APS-C sensor but Leica says it has improved autofocus performance, especially when shooting in continuous AF-C mode. The camera also features a 3.7″ touchscreen, 5 fps continuous shooting, an ISO range of 100 to 12500, DNG Raw file format and 1080p video. There is also a built-in pop-up flash and the TL has the ability to connect to a mobile Android or iOS app via Wi-Fi. This allows for viewing of the live view image on the mobile device and remote control of some camera functions.

    In addition the internal memory has been increased form 16 to 32GB, of course the TL also takes SD memory cards. The Leica TL system currently offers 6 lenses, 3 primes and 3 zoom lenses, and TL users can now also make use of legacy Leica R-lenses via the R-Adapter L. The Leica TL will be available in November for $ 1,695. 

    Official Leica sample images

    $ (document).ready(function() { SampleGalleryV2({“containerId”:”embeddedSampleGallery_8370596342″,”galleryId”:”8370596342″,”isEmbeddedWidget”:true,”standalone”:false,”selectedImageIndex”:0,”startInCommentsView”:false,”isMobile”:false}) });

    Leica presents the TL-System:

    The new camera system impresses with perfected features, unique design, precise, high-performance lenses and a range of functional accessories and technical equipment.

    Wetzlar, 8 November 2016. Building on the Leica T camera system, which has been continually advanced in terms speed, ease of handling and flexibility since its launch in 2014, the Leica TL embraces all the perfected features and leads the innovative camera concept into a new generation with even more innovations and new aspects of its design. One of these innovations is the doubling of the size of its internal buffer memory to 32 GB. Other new features are improved autofocus, especially in AF-C mode, and optimised compatibility with lenses from other Leica camera systems. For instance, the Leica TL now supports SL-Lenses with OIS and allows the use of Leica R-System lenses in combination with the R-Adapter L. A new Leica TL app with revised functions offers additional options for sharing pictures by email or on social networks and is now available for the first time for Android as well as iOS devices.

    The Leica TL will in available in three colour options from the date of launch: the silver and black versions are identical in design and construction, while the titanium-coloured option is distinguished by a bevelled edge (chamfer) to the top and bottom plates. Functional camera accessories, such as the new high-quality protectors in Nappa leather, which can stay on the camera when changing the battery, and colour-coordinated carrying straps in stone-grey, black, red and cemento, round off the TL system portfolio.

    In combination with its high-performance image processor, the large, APS-C-format, CMOS image sensor of the Leica TL guarantees exceptional imaging quality and delivers brilliant pictures with outstanding contrast, finest detail resolution and natural colour rendition – even in unfavourable lighting conditions.

    The comprehensive portfolio of lenses for the Leica TL offers an ideal range of focal lengths for all situations and types of photography. The TL-System currently comprises six lenses – three prime lenses and three zooms – that meet the needs of every photographic situation. The two fast prime lenses, the Leica Summicron-TL 23 mm f/2 ASPH. and the Summilux-TL 35 mm f/1.4 ASPH., are classic focal lengths for reportage photography, and the APOMacro-Elmarit-TL 60 mm f/2.8 ASPH. complements them ideally as a lens for finely detailed close-up photography. The three compact zoom lenses, the Leica Super-VarioElmar-TL 11–23 mm f/3.5–4.5 ASPH., Vario-Elmar-TL 18–56 mm f/3.5–5.6 ASPH. and APO-Vario-Elmar-TL 55–135 mm f/3.5–4.5 ASPH., cover an entire range of focal lengths equivalent to 17 to 200 mm in 35 mm format and deliver outstanding images with rich contrast from corner to corner of the frame.

    All Leica TL-Lenses impress with exceptional imaging performance at all distances from their close focusing limits to infinity and deliver pictures with the inimitable ‘Leica look’ and unique bokeh. Developed by optical design specialists in Wetzlar, they offer the exceptional imaging performance for which Leica lenses are famed. The combination of optical and precision engineering expertise and the use of finest materials in their construction ensures their constant quality and reliability in use.

    Thanks to the L-Bayonet mount shared by the Leica TL and SL cameras, SL-Lenses can also be used without an adapter on the Leica TL. With this, Leica once again carries forward its fundamental principles of cross-system compatibility and sustainability, which is now also reflected in a uniform product designation. Appropriate adapters are also available for using Leica M and R lenses on the camera.

    The particular trademark of the Leica TL is the unusual design of its extremely compact body. Each camera body is precisely machined from a single block of aluminium in the Leica factory. The use of premium materials and their processing in an elaborate manufacturing process are unique in the history of camera construction and lend the Leica TL-Camera an unmistakeable look, feel and solidity.

    The handling concept of the Leica TL is clearly structured, intuitive to use and concentrates only on relevant functions. The ‘control centre’ of this concept is its clearly laid out, 3.7- inch touchscreen display. It is generously dimensioned and generates a bright and clear image that allows precise and reliable assessment during subject composition and in playback mode. Numerous functions in capture and playback mode can be controlled simply by touching the screen. The only other controls are four ergonomically positioned haptic control elements that are intuitive in their operation. This ensures that camera users can concentrate fully on composing their pictures – without any unnecessary distractions. The freely configurable MyCamera menu of the Leica TL offers even greater flexibility, even in spontaneous snapshot situations. This means that the photographer always has fast access to the most frequently used features and personalised presets.

    Thanks to its integrated WiFi module and the function for setting up its own mobile hotspot, the Leica TL can conveniently transfer stills and videos by WLAN to smartphones, tablets, laptops or desktop PCs from almost anywhere and allows users to share their pictures and films by email, on Facebook or in other social networks. A free Leica TL app for iOS and Android devices is available with the release of the camera. A particularly practical feature of the app is the remote function. This lets users connect a smartphone or tablet to the camera by WLAN as an electronic viewfinder for the Leica TL and offers remote control of shutter speed and aperture settings – for example for shots with the self-timer or from unusual angles.

    Articles: Digital Photography Review (dpreview.com)

  • You can see Elton John’s rare print collection starting this week at Tate Modern

    Photos from the Sir Elton John Collection at Tate Modern

    Man Ray 1890-1976, Glass Tears 1932. Photograph, gelatin silver print on paper. 229 x 298 mm. The Sir Elton John Photography collection © Man Ray Trust/ADAGP, Paris and DACS, London 2016

    London’s Tate Modern gallery is about to host an exhibition of ‘modernist photography’ drawn entirely from the Elton John Photography Collection that will feature only vintage prints made by the photographers themselves. The show, which comprises 150 images taken by over 60 photographers, is called The Radical Eye: Modernist Photography from the Sir Elton John Collection and will open this Thursday 10th November and will run until 7th May 2017.

    The exhibition will concentrate on the ‘coming of age’ of photography which the museum says occurred between 1920 and the 1950s – a period when photography developed into a powerful tool for communicating as technology made it more flexible and convenient to use.

    Visitors can expect to see works by Man Ray Kertesz, Rodchenko, Steichen, Tina Modotti, Imogen Cunningham and Margaret Bourke-White, as well as a collection of portraits of some of those photographers themselves taken by other famous artists. According to Tate Modern this will also be the first chance for the public to see an ‘incredible’ series of Man Ray portraits that John has collected and brought together over the last 25 years. Elton John has over 7000 fine art prints in a collection he started in 1991.

    For more information on the exhibition, which will cost £16.50 to visit, see the Tate Modern website.

    Press release

    Tate Modern to exhibit unparalleled modernist photography from the collection of Sir Elton John

    Tate Modern today announces a major new exhibition, The Radical Eye: Modernist Photography from the Sir Elton John Collection, opening on 10 November 2016. The show will be drawn from one of the world’s greatest private collections of photography and will present an unrivalled selection of classic modernist images from the 1920s to the 1950s.

    Featuring over 150 works from more than 60 artists the exhibition will consist entirely of rare vintage prints, all created by the artists themselves. It will showcase works by seminal figures such as Man Ray, André Kertész, Berenice Abbot, Alexandr Rodchenko and Edward Steichen, offering the public a unique opportunity to see remarkable works up close. The quality and depth of the collection will allow the exhibition to tell the story of modernist photography in this way for the first time in the UK. It also marks the beginning of a long term relationship between Tate and the Sir Elton John Collection.

    The exhibition introduces a crucial moment in the history of photography – an exciting rupture often referred to as the ‘coming of age’ of the medium, when artists used photography as a tool through which they could redefine and transform visions of the modern world. Technological advancements gave artists the freedom to experiment and test the limits of the medium and present the world through a new, distinctly modern visual language. This exhibition will reveal how the timeless genres of the portrait, nude and still life were reimagined through the camera, as well as exploring its unique ability to capture street life and the modern world from a new perspective.

    Featuring portraits of great cultural figures of the 20th century, including Georgia O’Keeffe by Alfred Stieglitz, Edward Weston by Tina Modotti, Jean Cocteau by Berenice Abbott and Igor Stravinsky by Edward Weston, the exhibition will give insight into the relationships and inner circles of the avant-garde. An incredible group of Man Ray portraits will be exhibited together for the first time, having been brought together by Sir Elton John over the past twenty-five years, depicting key surrealist figures such as Andre Breton and Max Ernst alongside artists including Henri Matisse, Pablo Picasso and Dora Maar. Ground-breaking experimentation both in the darkroom and on the surface of the print, such as Herbert Bayer’s photomontage and Maurice Tabard’s solarisation, will examine how artists pushed the accepted conventions of portraiture.

    As life underwent rapid changes in the 20th century, photography offered a new means to communicate and represent the world. Alexandr Rodchenko, László Moholy-Nagy and Margaret Bourke-White employed the ‘worm’s eye’ and ‘bird’s eye’ views to create new perspectives of the modern metropolis – techniques associated with constructivism and the Bauhaus. The move towards abstraction will also be charted, from isolated architectural elements to camera-less photography such as Man Ray’s rayographs and Harry Callahan’s light abstractions.

    Further themes explored in the exhibition will include new approaches to capturing the human form, highlighted in rare masterpieces such as André Kertész’s Underwater Swimmer, Hungary 1917, while Imogen Cunningham’s Magnolia Blossom, Tower of Jewels 1925 and Tina Modotti’s Bandelier, Corn and Sickle 1927 will feature in a large presentation dedicated to the Still Life. The important role of documentary photography as a tool of mass communication will be demonstrated in Dorothea Lange’s Migrant Mother 1936 and Walker Evans’ Floyde Burroughs, Hale County, Alabama 1936, from the Farm Security Administration project.

    Sir Elton John said: “It is a great honour for David and I to lend part of our collection to Tate Modern for this groundbreaking exhibition. The modernist era in photography is one of the key moments within the medium and collecting work from this period has brought me great joy over the last 25 years. Each of these photographs serves as inspiration for me in my life; they line the walls of my homes and I consider them precious gems. We are thrilled to be part of this collaboration with Tate Modern and hope that the exhibition audience experiences as much joy in seeing the works as I have had in finding them.”

    Nicholas Serota, Director, Tate said: “This will be a truly unique exhibition. There are few collections of modernist photography in the UK, so we are delighted that Sir Elton John has allowed us to draw on his incredible collection and give everyone a chance to see these iconic works. Coming face-to-face with such masterpieces of photography will be a rare and rewarding experience.”

    The Radical Eye: Modernist Photography from the Sir Elton John Collection at Tate Modern will run from 10 November 2016 until 7 May 2017. It is curated by Shoair Mavlian with senior curator Simon Baker and Newell Harbin, Director of the Sir Elton John Photography Collection, assisted by Emma Lewis. It will be accompanied by a major new catalogue from Tate Publishing, featuring an interview with Sir Elton John by Jane Jackson and an essay by Dawn Ades, Professor Emerita at the University of Essex.

    Sir Elton John Photography Collection:

    Sir Elton John began collecting photographs in 1991 and his collection is now regarded as one of the leading private photography collections in the world, distinguished by its exceptional quality and remarkable range and depth. From major vintage 20th century modernist works to cutting-edge contemporary images, the collection now holds over 7,000 fine art photographs. To make this exhibition possible Tate has worked in collaboration with Newell Harbin, Director of the Sir Elton John Photography Collection.

    Photos from the Sir Elton John Collection at Tate Modern

    Herbert Bayer 1900-1985, Humanly Impossible (Self-Portrait) 1932. Photomontage, bromoil gelatin silver print with gouache and airbrush on paper. 394 x 295 mm. The Sir Elton John Photography collection © DACS, 2016

    Photos from the Sir Elton John Collection at Tate Modern

    Dorothea Lange 1895-1965, Migrant Mother 1936. Photograph, gelatin silver print on paper. The Sir Elton John Photography collection

    Photos from the Sir Elton John Collection at Tate Modern

    Otto Umbehr (1902-1980), Cat 1927. Photograph, gelatin silver print on paper. The Sir Elton John Photography collection © DACS, 2016

    Photos from the Sir Elton John Collection at Tate Modern

    Ilse Bing 1899-1998, Dancer, Willem van Loon, Paris 1932. Photograph, gelatin silver print on paper. 276 x 184 mm. The Sir Elton John Photography collection © The Estate of Ilse Bing

    Photos from the Sir Elton John Collection at Tate Modern

    André Kertész (1894-1985) Mondrian’s Eyeglasses and Pipe, Paris 1926. Photograph, gelatin silver print on paper. 76 x 89 mm. The Sir Elton John Photography collection

    Photos from the Sir Elton John Collection at Tate Modern

    Alekandr Rodchenko 1891-1956, Shukhov Tower 1927. Photograph, gelatin silver print on paper. The Sir Elton John Photography collection © DACS, 2016

    Articles: Digital Photography Review (dpreview.com)

  • 5 Non-HDR Things You Can Do With MacPhun’s Aurora HDR 2017

    Yes Aurora HDR was developed for creating HDR photographs. But did you ever think of using it for non-HDR tasks?

    You’re in luck because in the next few minutes I’m going to open your eyes to some new ideas. Specifically ideas for using Aurora HDR in your photography workflow without using the term HDR.

    What is Aurora HDR?

    If you haven’t heard of Aurora HDR, it’s MacPhun’s answer to all the other HDR software out there. Developed in partnership with Trey Ratcliff, Aurora HDR has unique tools which rival even non-HDR software. I look at it as a mix between Photoshop and MacPhun’s Intensify.

    But this isn’t about HDR. It’s about anything other than HDR. Before we dig in, know that the software can open a single image just like any other app or plugin. Let’s take a look inside:
    scott-wyden-kivowitz_dps_1

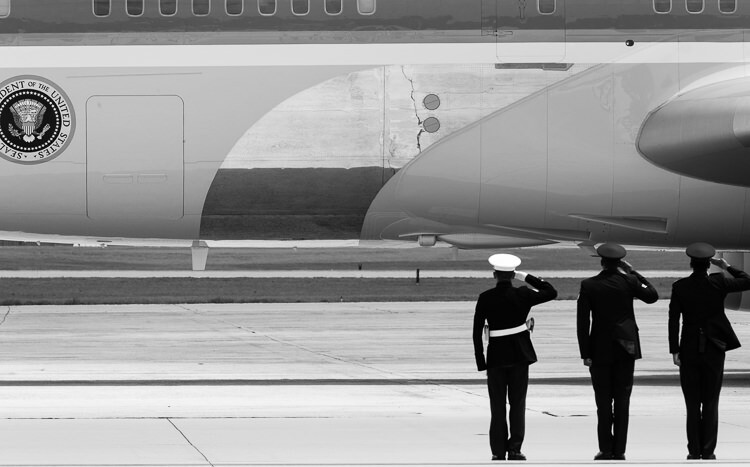
    Air Force Airmen saluting Air Force One as it takes off.

    1. Local Adjustments

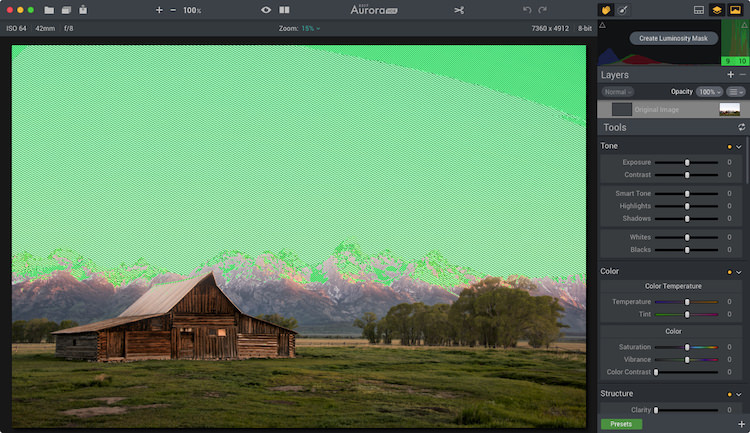
    Aurora HDR 2017 includes some local adjustment features which you are used to seeing in non-HDR software, like Lightroom or ON1. It includes things like gradient filters, radial filters, and the new Zone System Luminosity Masking. These are all powerful tools to make unique changes to specific areas of a photograph. The beauty is that any edits made to those local areas do not impact any other region of the image.

    One local adjustment feature often overlooked is the Top & Bottom Adjustment module. It’s like the gradient tool but has a few sliders specific to this module. It includes things like exposure, warmth, vibrancy, and contrast. Each of which appears twice; once for the top of the frame and once for the bottom of the frame.
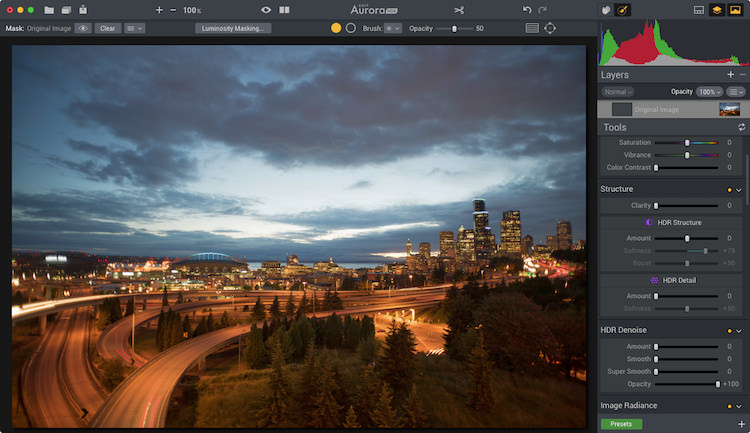
    Before
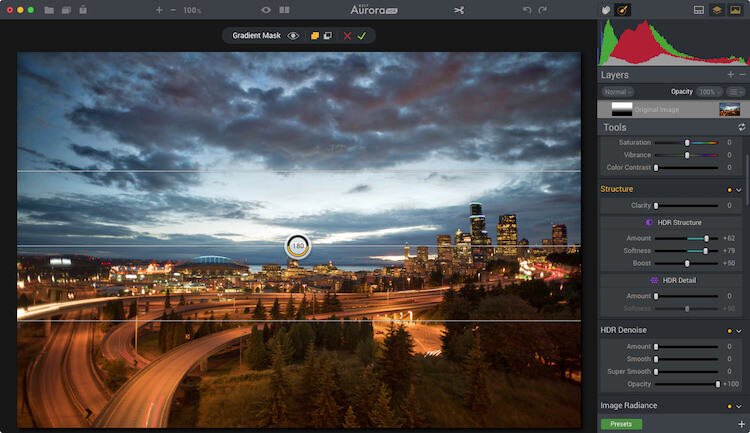
    Before

    After the Top and Bottom Adjustment.

    After the Top and Bottom Adjustment.

    What makes this even cooler is the quick slider method of changing the gradient smoothing (blend), X or Y axis location of the tool (shift), and the rotation which makes it vertical or horizontal.

    Because the standard gradient tool in Aurora HDR 2017 requires you to make adjustments to the mask, having this module makes quick adjustments to a larger local area really quick.

    Local adjustments in Aurora HDR 2017

    Local adjustments in Aurora HDR 2017

    2. Luminosity Masking

    Aurora HDR Pro (pre-2017 version) had Luminosity Masking, but it has been improved in the new version.

    Luminosity Masking is popular in portrait processing, but it’s also useful for other kinds of photography. What MacPhun did in the new version is to take a page out of Ansel Adam‘s book, by adding the Zone System into the Luminosity masking tool. Now you can create a mask based on specific zones of light. And they made it so simple.
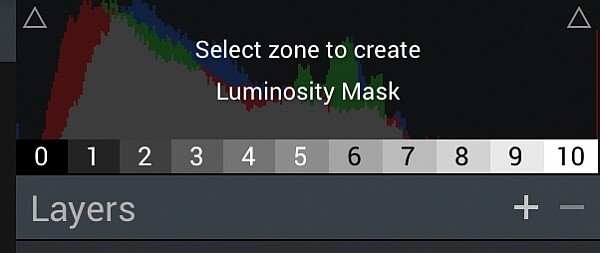
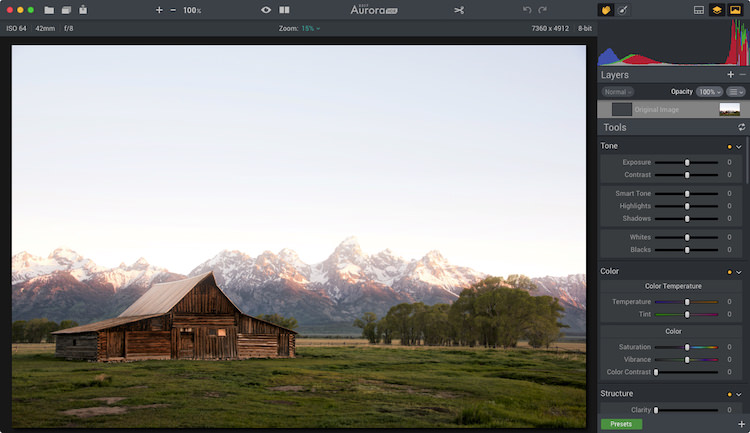
    Aurora HDR 2017's Zone System Luminosity Masking.

    Aurora HDR 2017’s Zone System Luminosity Masking.
    luminosity-masking-before

    With the Luminosity Mask applied.

    With the Luminosity Mask applied (masking the sky).

    3. Advanced Masking

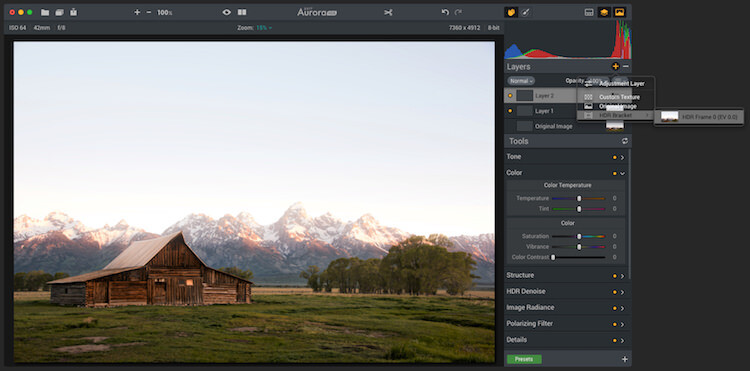
    The layers and masking tools in the software are advanced. When you add a layer, you can do it from a single bracket, a blank slate, and other choices. The options enable you to load any amount many brackets you want, and not process them as HDR, but instead do regular masking and editing.

    Masking can be implemented using a Wacom Tablet and as a radial or gradient brush, or using the new zone system tool.
    adv-masking

    This shows both color toning being combined with a brush mask.

    4. Color Toning

    Aurora has heavy duty color toning (split toning) features built into the software. Like Lightroom, users can choose a color to tone the highlights and shadows individually. But Aurora goes beyond that by adding highlight protection of the color. That way you can be more strategic on how much of the highlights are affected by the toning. You also have saturation control of the color for both highlights and shadows.

    Like Lightroom, Aurora provides the ability to adjust the balance of the color tone. To add more or less color in either the highlights or shadows. Of course, there is also an amount slider which enables you to reduce the impact of the color on the complete photo.
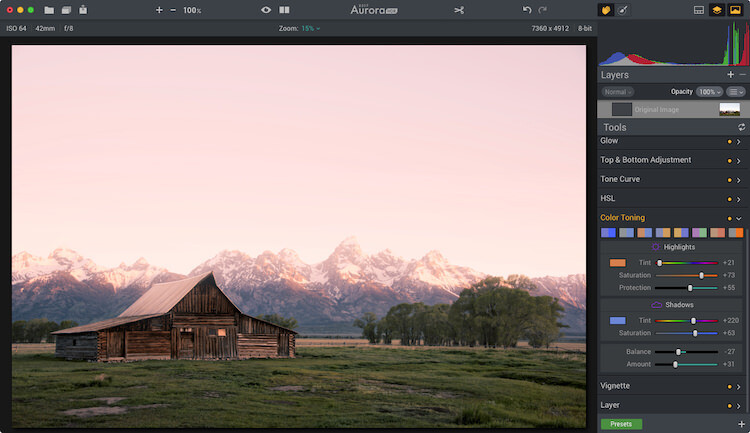
    Color toning applied.
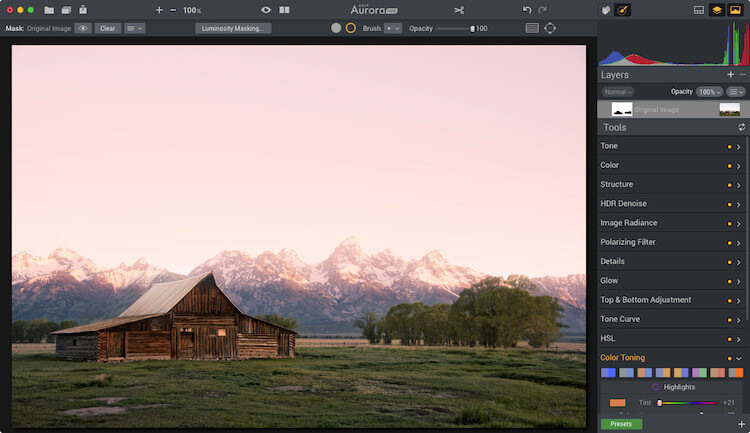
    Color toning applied.

    Mask applied to keep the color toning off the roof of the barn and other areas.

    Mask applied to keep the color toning off the roof of the barn and other areas.

    There are also a variety of preset color toning swatches included, or you can make your own by making an Aurora HDR 2017 preset. When combining color toning with the masking tools you have some incredible color options.

    5. Batch Processing

    Batch Processing might sound silly to some but think about it for a moment. Imagine you like one of the editing tools in the software, like the color grading tool, and you want to add that to a large volume of photos. With the batch processing tool, you can do that. You would launch the Batch Processor and then choose the preset and settings you want to be used. So if you want color grading, make a preset with it. Simple!

    The way MacPhun does it is you can drop a folder of images and pick what preset you want to use on the photos. It will then run through it quickly without you having to do anything.

    So Much More

    Aurora HDR 2017 is made for HDR photography. I think that’s obvious by its name. But I think it’s important for photographers to understand when a tool can be beneficial, even when it is least expected.

    This software has made its way into my regular rotation of post-processing tools. The reason is that when using a tool with a different user experience and features my creativity expands. Doors are opened which were once closed, and I walk away with fun edits of photographs I once didn’t know if I would touch.
    scott-wyden-kivowitz_dps_3

    Not the end!

    If you have made it to the end and wanted one more takeaway, here goes.

    My last piece of advice for you is this – go for it and try something new. Even if it’s not this software or the next. If you don’t try, you won’t learn and grow. But really, as a wise green man once said, “Do or do not, there is no try.”

    googletag.cmd.push(function() {
    tablet_slots.push( googletag.defineSlot( “/1005424/_dPSv4_tab-all-article-bottom_(300×250)”, [300, 250], “pb-ad-78623” ).addService( googletag.pubads() ) ); } );

    googletag.cmd.push(function() {
    mobile_slots.push( googletag.defineSlot( “/1005424/_dPSv4_mob-all-article-bottom_(300×250)”, [300, 250], “pb-ad-78158” ).addService( googletag.pubads() ) ); } );

    The post 5 Non-HDR Things You Can Do With MacPhun’s Aurora HDR 2017 by Scott Wyden Kivowitz appeared first on Digital Photography School.


    Digital Photography School

  • Xiaomi Redmi Pro quick review: dual-cam on a budget

    Xiaomi Redmi Pro quick review: dual-cam on a budget

    Dual-cameras are all the hype in 2016 and we have seen several high-end smartphones with the technology being launched in the past months, including the Huawei P9, LG G5 and, most recently, the Apple iPhone 7 Plus. While each device uses the dual-camera technology in different ways, one thing is common to all of those devices: a high price tag.

    In the mid-range bracket of the market dual-cameras are still a rarity, but with the Redmi Pro, Chinese manufacturer Xiaomi has recently launched a dual-camera smartphone that is suitable for smaller budgets. The standard version with 3GB RAM and 32GB of internal memory is currently available for approximately $ 300. Not only is the dual-camera unusual at this price point, but its very solid metal body, deca-core chipset and 5.5″ OLED display make the Redmi Pro look and feel like a much more expensive device. 

    The dual-camera setup combines a 13MP Sony IMX258 1/3.06″ sensor with a 5MP Samsung depth sensor. The system does does not offer any optical zoom capability, as on the LG G5 or iPhone 7 Plus, nor does it combine the captured image information from both sensors for improved image quality, ala the Huawei P9. Instead, it uses the dual-camera to simulate the bokeh of a fast lens on a large-sensor camera, something we first saw on the HTC One M8.  There is also a dual-tone LED flash and at the front the Xiaomi comes with a 5MP selfie-camera.

    Thanks to retailer Gearbest.com that ships Xiaomi devices worldwide, we’ve had the chance to try the Redmi Pro and its dual-camera, shoot a wide range of samples and see how it generally performs as a device for mobile photography.

    Key Specifications:

    • 13MP Sony IMX258 1/3.06″ sensor
    • Secondary 5MP Samsung depth sensor
    • F2.0 aperture
    • Dual-tone flash
    • 1080p video
    • 5MP front camera
    • 5.5-inch 1080p OLED display 
    • Mediatek Helio X20 Deca-Core processor
    • 3GB RAM
    • 32GB storage
    • MicroSD support
    • 4050mAh battery
    • USB Type-C port with quick-charging

    Camera App

    The Redmi Pro’s camera app is intuitively structured and easy to use.

    The Redmi Pro’s camera app comes with a pleasantly simple and intuitive design. Above the shutter button you can find the button for switching to video mode. Other controls on the main screen let you activate HDR capture and the dual-cam’s Stereo mode. Swiping up opens the camera mode screen where you can enter Panorama and Manual modes among others. The latter only offers manual ISO and white balance, though. There is no manual control over shutter speed. Swiping down on the main screen opens up a thumbnail preview array of 12 simple filter effects. 

    Image Quality

    In bright light the Xiaomi Redmi Pro camera captures 13MP images that show very pleasant colors and good exposure in most conditions. For a smartphone in this price category the Redmi deals well with higher contrast scenes, keeping highlight clipping pretty well under control. 

    Things don’t look quite as good when you start zooming into the image, though. At the center of the frame, image detail is decent for a mid-range device and luminance noise is kept at bay as well. However, our test sample’s lens shows strong softness on both the right and left edges of the frame, which is quite noticeable when viewing the image at screen size.

    ISO 101, 1/834 sec
    ISO 103, 1/1273 sec

    In low light situations the Redmi Pro uses a maximum ISO setting of 2050 and slowest shutter speed of 1/15 sec, which in combination with the F2.0 aperture, allows for usable exposures even in pretty dark interiors and night scenes. There is no optical image stabilization, so holding the phone steadily when shooting in dim conditions is recommended, but overall camera shake is not too much of an issue. 

    As you can see in the samples below, the Redmi Pro is capable of capturing nice exposures and colors, even in pretty dim light. Lens softness aside, detail is pretty good for this type of device at lower ISO levels, but things start falling apart at ISO 800 and above. On the plus side, luminance noise is well-managed and chroma noise is hardly visible, even at the highest sensitivity setting. Overall, the Redmi Pro’s low light images look nice at web and typical social network size, but at larger viewing sizes the smearing of detail and strong lens softness don’t make for a good combination. 

     ISO 155, 1/30 sec
     ISO 405, 1/30 sec
     ISO 841, 1/30 sec
     ISO 1413, 1/15 sec

    Dual-camera Stereo Mode

    Stereo mode is The Redmi Pro’s feature highlight. Thanks to the secondary depth-sensing camera, the Redmi can distinguish between foreground and background. Applying digital blur to the latter simulates the shallow depth-of-field you can achieve with a DSLR and fast lens. In the camera app you adjust the ‘virtual aperture’ between F0.95 and F5.6 to control the degree of background blur. Alternatively you can change the focus point and the aperture after capture in the gallery app.

    As you can see in the samples below, the feature works reasonably well, but under closer scrutiny it becomes obvious that Stereo mode is not too precise at distinguishing the focal plane, and the transition of blur is often too abrupt to look natural. Generally things look better if you choose a smaller aperture setting and make sure there is some distance between the foreground subject and the background. Stereo images are captured in 16:9 format and are 5.3 MP large.

     ISO 434, 1/30 sec, F2.4 virtual aperture
      ISO 101, 1/1445 sec, F2.0 virtual aperture
      ISO 101, 1/896 sec, F3.5 virtual aperture

    In addition to refocusing and controlling the background blur you can apply a range of effects to your Stereo images in the gallery app. Again, the foreground/background separation is not too precise, but the modes can be fun to play with. 

     In the gallery app several effects can be applied to Stereo images.
    Blackboard effect

    Conclusion

    In its price bracket the Xiaomi Redmi Pro can score a lot of points with its premium look and materials, a bright and sharp OLED display and very good battery life. The 13MP camera delivers good color and exposure across the ISO range but our test sample suffered from strong lens softness away from the center of the frame.

    The dual-camera does not offer the same zooming or image quality improvement functions we have seen on some recent high-end models, but the effects can be fun to play with. Close-up the results of the shallow depth-of-field simulation do look a little artificial but they are good enough for social sharing.

    Overall, the Redmi Pro looks like a good choice for those who want a high-end look and feel for little money and want to try out the dual-camera as a bonus. However, if image quality is your number one priority, and you can live without the dual-cam and metal body, the Motorola Moto G Plus might be a good alternative at a similar price point. The 32GB version of the Xiaomi Redmi Pro is currently available at Gearbest.com for $ 299.

    What we like:

    • Premium look and feel
    • Very god battery life
    • Bright and sharp OLED display
    • Good exposure and color across the ISO range

    What we don’t like:

    • Lens softness
    • No manual control over shutter speed
    • Imprecise background separation in Stereo mode

    There are 22 images in our Xiaomi Redmi Pro gallery. Please do not reproduce any of these images on a website or any newsletter / magazine without prior permission (see our copyright page). We make the originals available for private users to download to their own machines for personal examination or printing (in conjunction with this review), we do so in good faith, please don’t abuse it.

    Unless otherwise noted images taken with no particular settings at full resolution.

    Review sample gallery

    $ (document).ready(function() { SampleGalleryV2({“containerId”:”embeddedSampleGallery_1116046053″,”galleryId”:”1116046053″,”isEmbeddedWidget”:true,”standalone”:false,”selectedImageIndex”:0,”startInCommentsView”:false,”isMobile”:false}) });
    Articles: Digital Photography Review (dpreview.com)

  • The filmmakers who took a stroll on Yellowstone’s Grand Prismatic are facing jail time

    Three of the four Canadian filmmakers who were caught roaming onto Yellowstone’s Grand Prismatic hot spring have pled not guilty to charges of foot travel in a thermal area and disorderly conduct. Hamish McNab Campbell Cross was the only member of the group representing clothing brand High on Life to plead guilty to his charges. He’ll pay a fine of $ 8000 and accepts a five year unsupervised probation.

    The remaining three have received court-appointed lawyers and may face a bench trial if they do not accept plea deals. The Jackson Hole News and Guide reports that the group’s previous attorney, who removed himself from the case due to a conflict of interest, mentioned that the US Attorney is considering jail time.

    The Grand Prismatic incident is just one of quite a few recent cases park vandalism. Stiffer penalties for offenders may help reduce incidences of vandalism, but is an $ 8000 fine enough? Do the filmmakers pleading not guilty deserve jail time? Tell us what you think in the comments.

    Related: Opinion: Park vandals need to be stopped

    Articles: Digital Photography Review (dpreview.com)

  • How to Travel Safely with Your Camera Gear

    One of our favorite things about becoming photographers is the way the entire world seemed to open up once we picked up a camera. We currently live wherever we’re shooting. Over the past year, we’ve visited 10 countries on three continents, and countless cities in between. While we love the freedom of travel, our biggest concern is always how to travel safely with our gear. Whether you’re hopping on flights every other week or want to keep your camera with you to document your kiddos around town, there are some simple hacks to keep your gear in good shape and out of thieving hands.

    travel-safely-with-gear-10

    Make a list and check it twice

    Before you leave the house, make a detailed list of every piece of equipment you’re taking with you, along with all the serial numbers. It’s helpful to be able to tally the list up whenever you’re in transit. There isn’t a worse feeling than hopping on a train and realizing you thought your 50mm lens was in your backpack when it is actually waiting for you on the kitchen table. Make a list, run through it, and save yourself the effort of keeping every piece of gear in your own head. Having the serial numbers recorded will help you report and track them should they ever go missing.

    travel-safely-with-gear-1

    Our travel gear checklist changes depending on how long and far we’re traveling. When we took a six-month honeymoon in Asia last autumn, our list looked very different from when we fly to say, New York to shoot a wedding. Our two checklists look something like this:

    Personal Travel Checklist

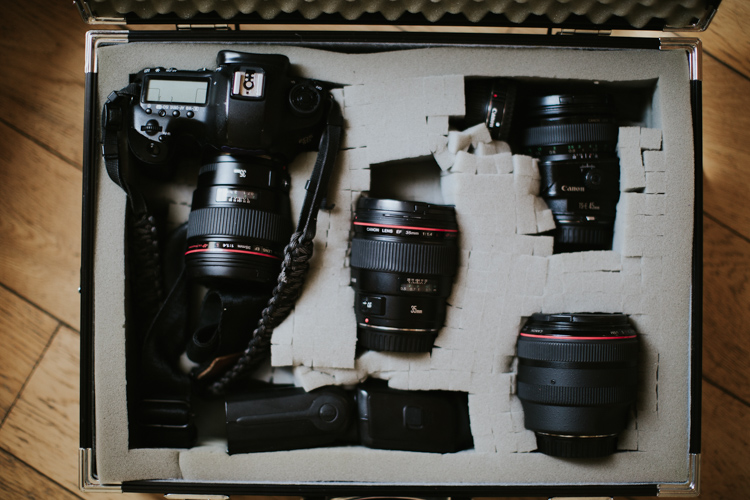
    • 2 Canon Mark IIIs – one for each of us, though sometimes we get crazy and only bring one body.
    • 50mm f/1.2 lens – ALWAYS. We never leave home without this lens as it affords us the greatest flexibility to shoot any scene.
    • 45mm f/2.8 tilt-shift lens – When we travel through cities, having a tilt-shift is ideal for us, and since we also love shooting portraits with it, it somehow became one of our most versatile lenses.

    Professional Travel Checklist

    • 2 Canon Mark IIIs
    • 50mm f/1.2 – If pressed, we could probably shoot an entire wedding with it!
    • 45mm f/2.8 tilt-shift – Again, awesome for setting scenes and for individual portraits.
    • 35mm f/1.4 – Shooting couple’s portraits with this one sets a slightly more interesting scene than the 50mm and allows you to get better environmental details. It’s also our go-to for dance floor shots.
    • 85mm f/1.2 – Though we wish this one had a faster focus, it is just nuts how gorgeous this lens is. It takes portraits to an entirely new level. But it also weighs roughly one million pounds, so we use it less often than we’d like because it’s just too heavy for casual personal travel.

    travel-safely-with-gear-4

    Depending on the size and scope of the project, we may also bring:

    • 70-200mm f/2.8 – This is a battle because we definitely prefer to not carry it. But it’s a great catch-all lens for shooting from the very back of large ceremonies or capturing wedding guests from a distance and staying out of a scene.
    • 17-40mm f/4 (we use this wide-angle lens less and less, but occasionally it provides a good way to grab an entire wedding ceremony or a building from closer up. We’re increasingly turning to our 35mm for the work we used to put on the wide angle.)

    Our lighting setups are the most difficult part of travel, and inevitably earn us a long date with security. If we’re bringing our bare minimum, it includes the following:

    • Canon Speedlite 600EX-RTs – We have two matching Speedlites and the ST-E3-RT Transmitter. These serve us well for most weddings, but if we have to bring something a little heftier, we’ll also add . . .
    • Profoto B1 setup – This light is amazing. But it adds one more whole bag to carry on with us and we try to leave it for home studio work as much as possible to reduce our carry-ons. with the Profoto 36″ RFI Octa Softbox. The B1 also requires a . . .
    • C-stand –These are heavy as heck and a huge hassle to fly with, so we normally end up leaving it at home and just renting it wherever we land. For some equipment that is just too bulky, heavy, or awkward, consider the relative costs and benefits of renting it at your shoot location. For us, the $ 20 or so to rent a C-stand far outweighs the hassle of traveling with it.

    travel-safely-with-gear-9

    Before you leave for any trip, whether personal or professional, it’s imperative to know your ideal outcome for photos. We don’t bring a zoom lens or flashes on personal trips because we don’t shoot wildlife or anything that would require long lenses. We use only ambient light whenever possible and prefer our night photography to only incorporate the light that already sets the scene.

    Even for professional projects, we pack very carefully and keep our projects in mind as we put our gear together. Some large weddings or events might require a wide angle lens or a longer zoom, but if we can avoid bringing a lens we will. This requires more work on the planning end, working closely with our clients, and knowing our equipment really well. But it’s worth it when we can pack all of our gear into a little bag and be very confident that we can produce great work with it!

    Downsize

    On that note, pre-travel is a great time to downsize your gear. Take only what is most important to you, and consider the images you’ll be aiming for while you travel. We never leave home without our 50mm f/1.2, but depending on the kind of trip we may also bring along our tilt-shift lens or our 1950s Yashica film camera as well. You want to have options, but bringing along your entire catalog of gear without a specific plan for it will only add stress to your life. Keep it light, and use what you’ve got.

    travel-safely-2

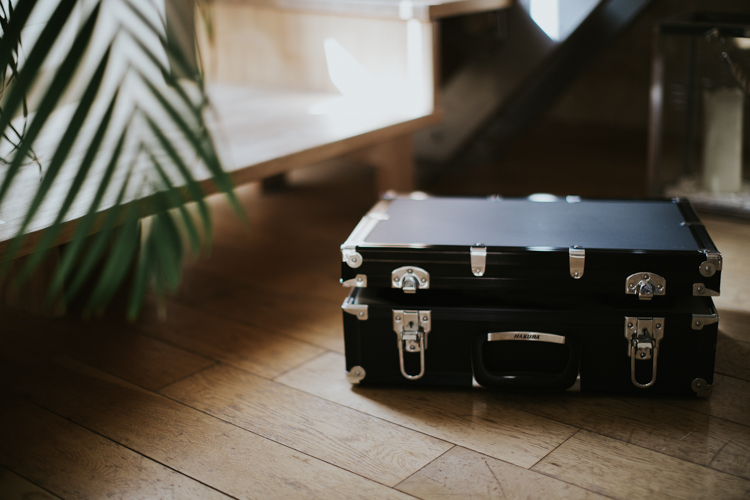
    We got this case used for $ 20 at a camera shop and it has the best repackable/removeable foam pads in it.

    travel-safely-1


    If you’re flying, this is especially true. Keep your gear minimal enough to fit in your carry-on luggage. We would rather crawl to a destination than check a bag containing our most precious gear and let it out of our sight. Yes, it’s a super hassle to run your gear through security (they always seem to be blown away by light sets, old film cameras, and unusual lenses), but it also leads to some good conversations, and the extra time is worth the peace of mind.

    Going through customs

    A thought on customs forms: If you enter a country that may have an iffy relationship with journalists, lay low and don’t mark “photographer” or “journalist” on their customs forms. Drawing attention to your camera gear and your ability to use it will often create more hassle at the airport when you land. While we don’t encourage anyone to lie on their entry forms, the more you can stay under the radar the better.

    travel-safely-with-gear-11

    Protect your data

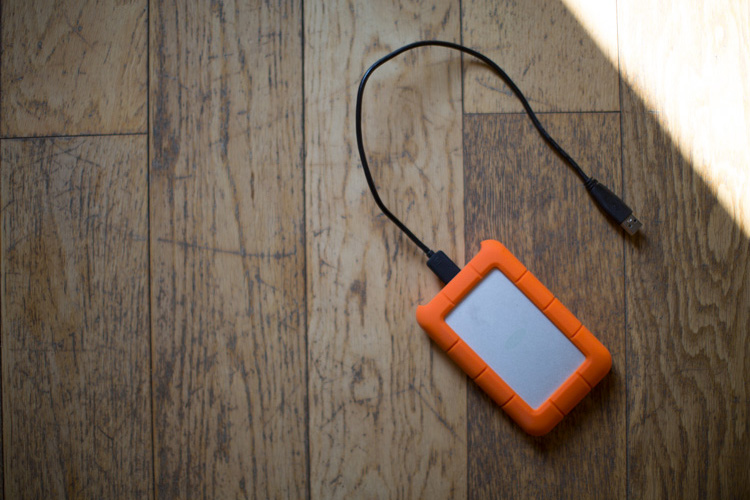
    We carry LaCie Rugged hard drives with us everywhere and back up whenever we can. We use online storage when we can find fast internet, but good luck finding wifi strong enough to upload a thousand raw files when you’re high up in the Burmese mountains. I keep track of this thing just as closely as I keep track of my passport. Why LaCie Rugged? The last thing we need is a hard drive failing because the dirt road was too bumpy when it was sitting in the back of some mud covered jeep.

    Note: Price LaCie Rugged drives on Amazon.com and B&H Photo’s websites. 

    lacie-drive-travel-photography

    We also use large memory cards that we back up every night. We always have a backup card in our briefcase, but as long as our cameras are with us, the memory card is as well. 

    Make your gear look cheap

    Avoid fancy, overdone camera cases and accessories. Anything with brand logos or obviously expensive features will draw attention to you. While you move your gear into your new low-key camera bag (there are lots of solid options out there that look like a regular bag, or you can buy protective inserts to slip into the old backpack that’s already sitting in the back of your closet), make a couple of tweaks to your gear that will instantly make it look less conspicuous:

    • Remove your logo-covered camera strap (I mean, unless Canon is paying you to advertise for them, you don’t need their logo on your strap) and replace it with something more personal.Cover up your camera brand on the body with black gaffer’s tape (or even duck tape if you’re super committed). Not having that white print will make your camera look more average and take the attention away from how much you might have paid for it.

    travel-safely-with-gear-14

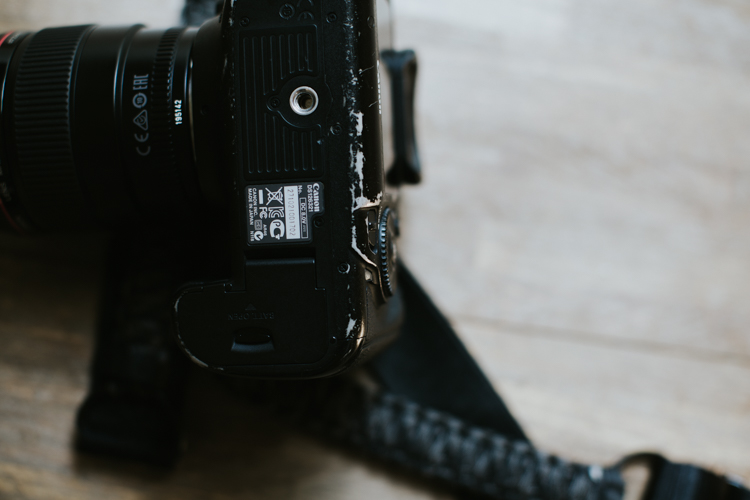
    • Scuff it up, baby! We’ve been shooting on our Canon 5D Mark IIIs for over three years now, and they are certainly showing the wear and tear of being dragged all over the world—and I love it! It’s like that well-worn sweater that everyone else thinks is a bit too beat-up, but you love it more every time you wear it. Those scuffs and marks mean you’re using your gear and that it’s serving you. Don’t rush to polish it up or replace it when it looks old. That charm is hard-earned and will cause anybody eyeing your gear to think it’s worth less than it probably is. Double win.

    travel-safely-with-gear-12

    Safety at your location

    Of course, getting to a place in one piece is only half the battle. Once you’ve landed, you have to keep your wits about you and work wisely. A few brief thoughts on shooting safely once you arrive:

    • Just like at home, don’t display your camera gear in a way that invites attention. Keep it close to your body, on a strap, or zipped into a bag that’s close to you. It’s amazing to me how many people will wander around with their cameras on full display, which doesn’t just make you look like a tourist, it’s inviting thieves to follow you.
    • Don’t talk to strangers about your stuff! We sat next to some drunk and friendly travelers in a bar once who wanted to show us their big zoom lenses they just bought. They made fun of our tiny 50mm, but we couldn’t help but feel like we’d get the last laugh as our camera setup was (though more expensive than theirs) tiny, inconspicuous, and less appealing to thieves who don’t know the difference.travel-safely-with-gear-8
    • A thought on tripods: we never, ever travel with them. They are awkward to set up in public areas, invite unwanted attention, and in 99% of cases aren’t actually necessary. We use makeshift tripods – things like banisters, tables, rocks, bar tops, etc., to get a steady shot when needed. We too often see other photographers making a big deal out of setting up a tripod Hi, thieves! We’re over here!) when they could have gotten just as excellent a shot with a slightly faster shutter speed. Strongly consider whether or not you need a tripod and make the best decision for yourself, and if you do bring one, keep your camera strap around your neck while you shoot
    • While you should always be careful in unsafe neighborhoods, we also recommend that you do not limit yourself to only visiting “safe” areas while you travel. Not only can theft happen anywhere, but you’ll miss some of the best parts of travel if you restrict yourself too much. When shooting in neighborhoods with a higher likelihood of crime, be alert. Walk confidently with your head up and avoid hunching around your gear as if you have something to hide. Keep your bags zipped and always be aware of pick-pockets, no matter where you are. Shoot confidently without inviting too much attention to yourself. 

    Conclusion

    travel-safely-with-gear-7

    Capturing all the beauty and hidden corners of this world is one of the most satisfying things about becoming more proficient with our gear. Though there are risks anytime you leave the house with pricey items strapped to your shoulder, this gear is made to be used, to show some wear and tear, and not to be thought of as so precious that it’s left at home.

    How do you protect your gear when you travel? Please share your comments and tips below.

    googletag.cmd.push(function() {
    tablet_slots.push( googletag.defineSlot( “/1005424/_dPSv4_tab-all-article-bottom_(300×250)”, [300, 250], “pb-ad-78623” ).addService( googletag.pubads() ) ); } );

    googletag.cmd.push(function() {
    mobile_slots.push( googletag.defineSlot( “/1005424/_dPSv4_mob-all-article-bottom_(300×250)”, [300, 250], “pb-ad-78158” ).addService( googletag.pubads() ) ); } );

    The post How to Travel Safely with Your Camera Gear by Tim Sullivan appeared first on Digital Photography School.


    Digital Photography School
  • Rugged Luxury: Take Your Queen Bed On the Road In This Modern Camper

    [ By SA Rogers in Technology & Vehicles & Mods. ]

    tvan-mk4-trailer-main

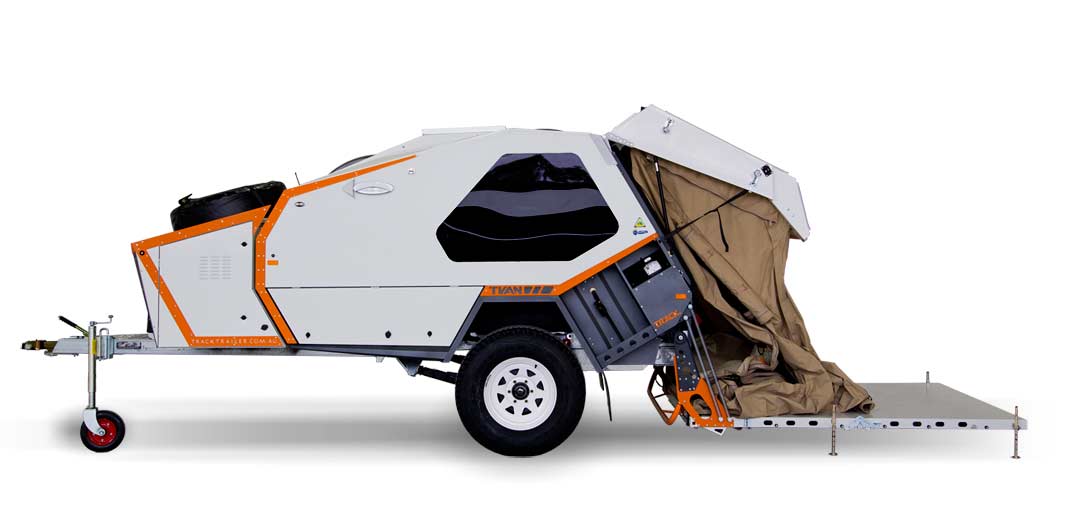
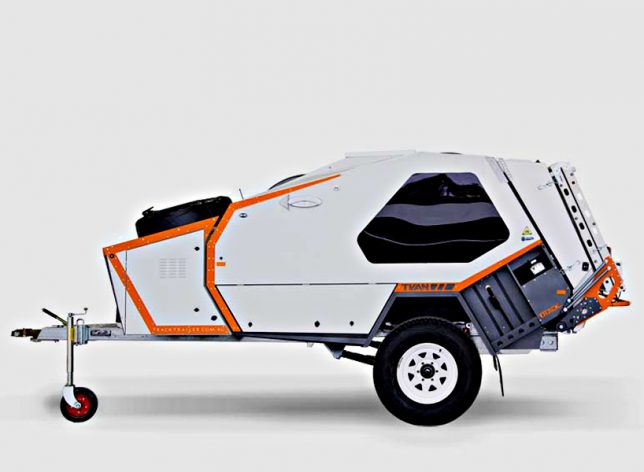
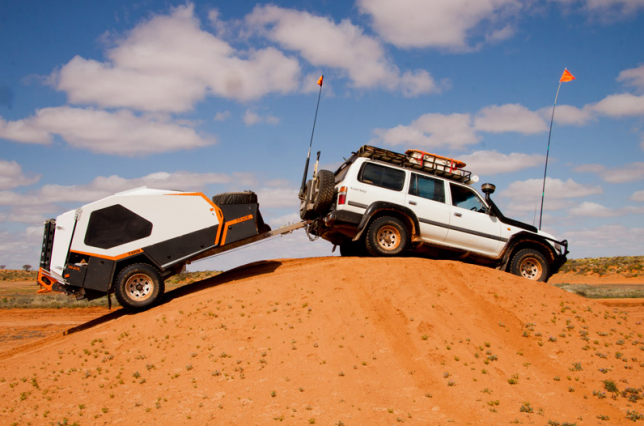
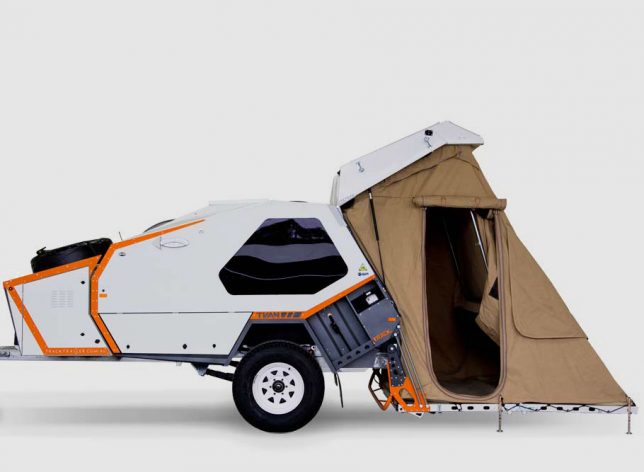
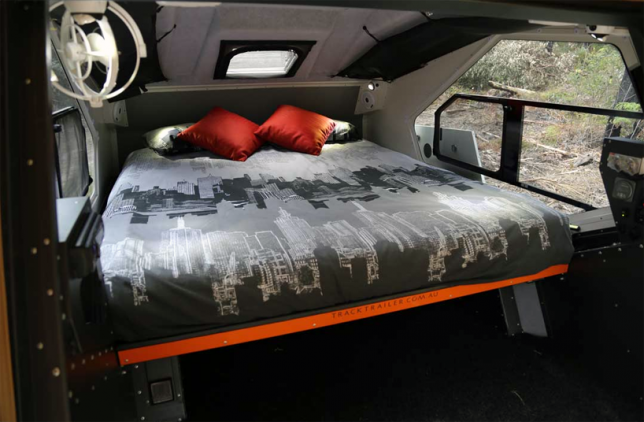
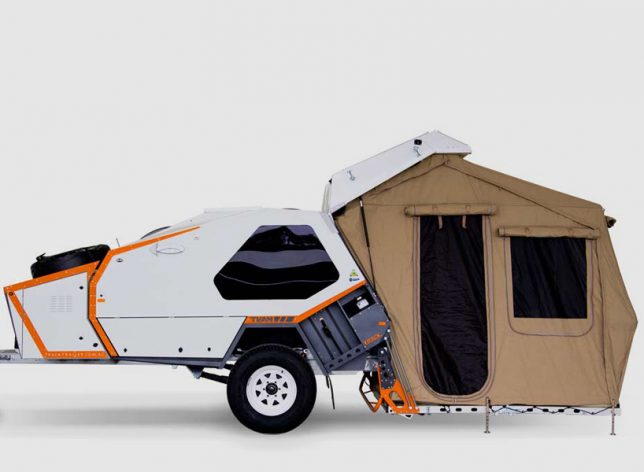
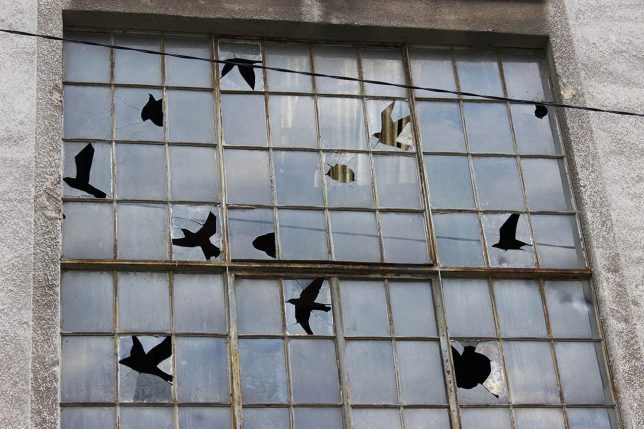
    If your camping style is somewhere in between sleeping under the stars and ‘glamping’ with all the comforts of home, Track Trailer’s MK4 ‘Tvan’ camper has your number. Designed to be towed behind standard trucks and SUVs, it’s basically a hotel room on wheels, packing a queen-sized bed, two kitchen configurations, air conditioning and a quick-erect tent to multiply the available space.

    tvan-trailer-3

    tvan-trailer-7

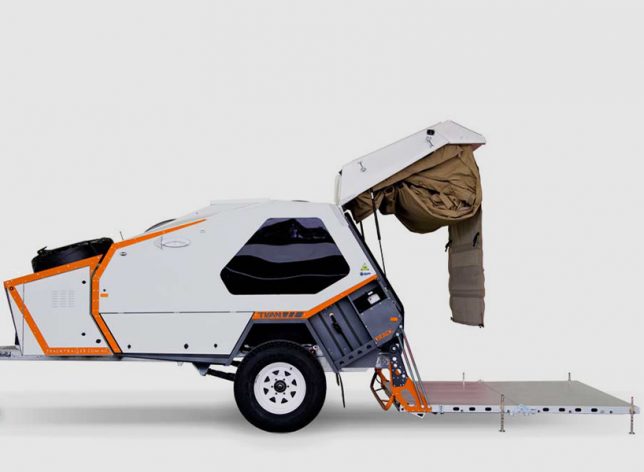
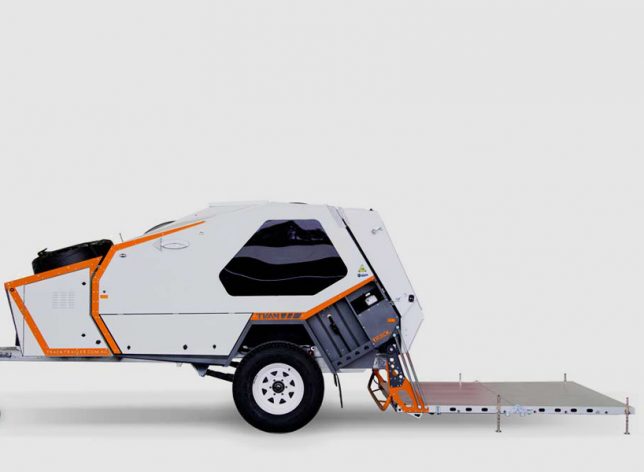
    The latest in a series of Tvan designs, this camper trailer enables the most rugged of adventurers to go deep into the wilderness, and it’s gotten a thumbs-up from explorers of Australia’s most punishing desert landscapes. The Tvan is manufactured in Melbourne and has been around since the early ’80s, and features MC2 suspension, a riveted steel and aluminum cabin body, hot-dipped galvanized chassis, and a rear folding platform for the tent, which stows away in its own compartment.

    tvan-trailer-4

    tvan-trailer-5

    tvan-trailer-6

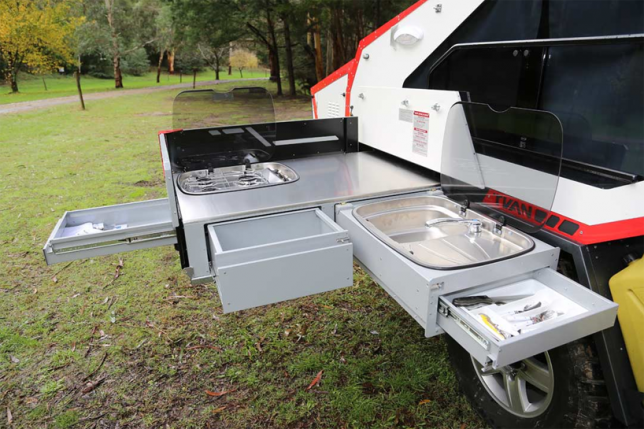
    The slide-out kitchen offers a surprising number of features, including four burners, a sink, counter space and three storage drawers, and it all packs up tight for travel, remaining secure even when you’re driving over rocky terrain. There’s an integrated windshield that deploys simply by raising it into position so windy conditions don’t blow out the flames on the range.

    tvan-trailer-2

    tvan-trailer

    tvan-trailer-8

    The cabin itself is substantial enough to block out noise, sun, heat, cold and wind, and when the tent is in use, it secures to the hard fold-out floor, keeping it up off the ground. The rear hatch is assisted by gas struts to make it easy to open and close, and the whole thing is aerodynamic, making it easy to tow.

    Share on Facebook


    [ By SA Rogers in Technology & Vehicles & Mods. ]

    [ WebUrbanist | Archives | Galleries | Privacy | TOS ]


    WebUrbanist

  • Olympus STF-8 Macro Flash is first weatherproof model of its kind

    Olympus has announced what it says is the first ever macro twin flash with a weatherproof construction: the new STF-8 Macro Flash. This model is, according to Olympus, both splashproof and dustproof with construction that can withstand temperatures as low as -10°C / 14°F. Features include a guide number of 8.5 when both heads fire and of 6 when one head fires, as well as full TTL auto-sync, removable heads, customizable positioning, and manual output control down to 1/128.
    The new Macro Flash is compatible with the following lenses:

    • M.ZUIKO Digital ED 30mm F3.5 Macro
    • M.ZUIKO Digital ED 60mm F2.8 Macro
    • M.ZUIKO Digital ED 12-40mm F2.8 Pro

    Says Olympus, users can also attach third-party step-up and step-down rings to use other lenses. The STF-8 is available to preorder from some retailers now, including B&H Photo, for $ 479 / $ 600 CAD. Shipping will start in January 2017. 

    Source: Olympus

    Articles: Digital Photography Review (dpreview.com)