Blog

  • DxO ONE adds Raw image workflow for iOS

    DxO announced that it has added a full Raw processing workflow to its iPhone-connected DxO ONE camera. Taking advantage of Raw image support in iOS 10, the update provides one-touch transfer of DxO ONE Raw files to the iOS photo library, from which images can be processed or shared.

    Additionally, the company has introduced new Raw files that save an average of 30% space, improved responsiveness and boot time, faster application startup, full remote control of the camera using a direct Wi-Fi connection and a smart lighting feature to enhance dynamic range in difficult lighting situations.

    A free update to the DxO ONE iOS app (v2.1) will be available in November, however the company did not provide a specific date.

    Press release:

    DxO ONE 2.1 update integrates full RAW processing workflow in an iPhone environment

    DxO ONE update makes mobile an option for demanding photographers

    PARIS—November 10, 2016—DxO, pioneer in digital imaging technologies, announces a major update to its award-winning DxO ONE miniaturized camera that lets demanding photographers take their mobile image making to the next level. Less than three months after the release of a 2.0 update that brought Wi-Fi as a new feature, DxO continues to extend the use of its pro-quality camera by introducing the world’s first seamless RAW workflow, direct from the DxO ONE to your iPhone or iPad. The version 2.1 update takes full advantage of RAW support in iOS 10, enabling a one-touch transfer of DxO ONE RAW files to the iOS Photos library where they can be processed on-the-go. Available to all DxO ONE users free of charge, the update also enables direct Wi-Fi remote control, and adds other performance boosting enhancements.

    The DxO ONE camera revolutionized mobile photography by being the first to combine a large, high- resolution sensor and fast, razor-sharp lens in a miniaturized design that pairs directly with the iPhone or iPad. From the start, the DxO ONE has allowed photographers to store images in the RAW file format, which offers superior quality over JPEGs and considerable flexibility. Until now, post processing of RAW images necessitated they first be imported to a desktop computer. With this latest update, the DxO ONE camera can seamlessly transfer RAW photos direct to the iPhone where they can be further enhanced by Google Snapseed, Adobe Lightroom Mobile, and other popular iOS photo editing applications that have embraced support for mobile RAW image processing.

    “I prefer to capture in RAW, because it gives me enhanced dynamic range, which is especially useful in bringing back details in blown highlights and deep shadows,” said professional photographer Camilla Ferrari. “Thanks to new developments by Apple and DxO, I’m now able to transfer RAW images from my DxO ONE camera right to my iPhone with a single tap, where I can process them in Adobe Lightroom Mobile and other iOS apps while I’m still on location. Welcome to the future!”

    To further streamline the new mobile RAW workflow, DxO has introduced a lighter and faster recording speed for RAW files, which squeezes an average of 30% more storage space out of existing microSD cards. Overall responsiveness has also been improved, with a faster boot time for the camera, quicker application start-up, and improvements to the loading speed of the photo gallery.

    The update also adds a number of other enhancements to the user experience, including a direct Wi- Fi connection that provides full remote control over the DxO ONE camera even when no existing Wi- Fi network is available. Version 2 also added a host of innovative features further extending the many uses for the DxO ONE, including the ability to tap into the Wi-Fi network that your iPhone is already logged into for remote control in-home or in-office, and a Mobile Smart Lighting feature designed to dramatically enhance the dynamic range of photos taken in tricky lighting situations. DxO also recently introduced a complete ecosystem of accessories, including a waterproof outdoor shell, ultra- compact stand and optical adapters, all intended to let photographers take their DxO ONE absolutely anywhere, without restrictions, to extend their creativity even further.

    Pricing & Availability

    The DxO ONE Miniaturized Pro Quality Connected Camera for iPhone® and iPad® is available for purchase at dxo.com, Amazon, Best Buy, B&H, Target and other respected retailers for $ 499 (US).

    The DxO ONE 2.1 iOS app and companion Apple Watch® app will be made available in November as free software updates via the iTunes App Store®. Every DxO ONE user is invited to download DxO Connect for Mac/PC, or on Mac DxO OpticsPro for Photos – DxO ONE camera only, both of which harness the power of the DxO OpticsPro photo engine designed to make your best photos look even better.

    Articles: Digital Photography Review (dpreview.com)

  • How to Photograph the Magical Microscopic World – Photomicroscopy

    What is photomicroscopy

    There is a whole world right under your eyes where everyday and unique objects take on a fascinating new appearance. This world is microscopic and even though it is right in front of you, the tiny scale makes it difficult to see the incredible detail.

    Photomicroscopy in its simplest form is high magnification photography, which in practice involves the use of a microscope to magnify images followed by using a camera for image capture. With the advent of eBay and other online auction style sites, photomicroscopy is becoming far more accessible to the wider population, allowing anyone to see the incredible detail.

    photomicroscopy photomicrograph micrograph

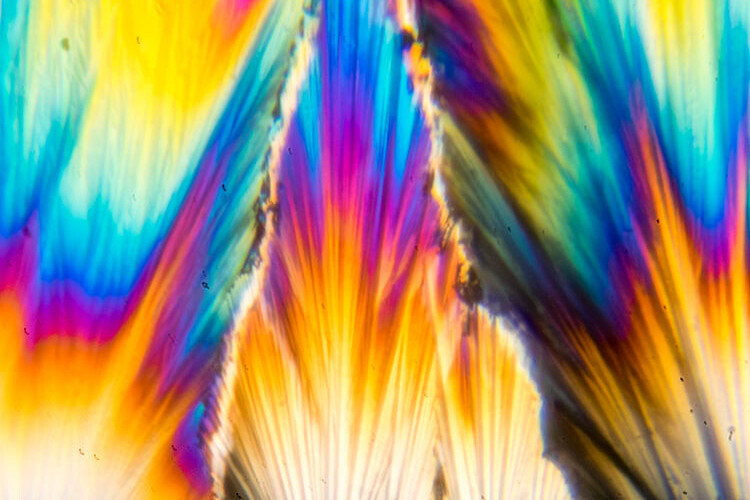
    Monosodium Glutamate (MSG) at high magnification by polarized light microscopy.

    My passion for photomicroscopy

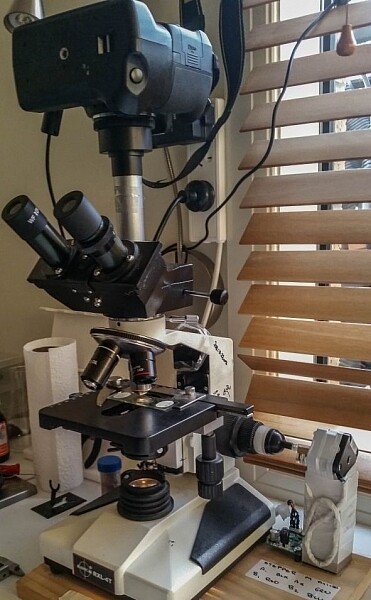
    As a scientist, I spend a significant part of my time conducting investigations which require me to use microscopes. It was this exposure (and my embedded love of science) that got me interested in microscopy. Once I caught the bug, I acquired a microscope from an online auction store and purchased the accessories needed to couple the microscope to my Nikon DSLR. It should be noted that you can easily find accessories to couple with most camera brands, so this is not limited to Nikon.

    My Nikon attached to the microscope.

    My Nikon attached to the microscope.

    Over time my setup expanded, to try and optimize the workflow through the addition of focus stacking software and hardware to counter the very shallow depth of field microscopes have.

    How to take photomicrographs

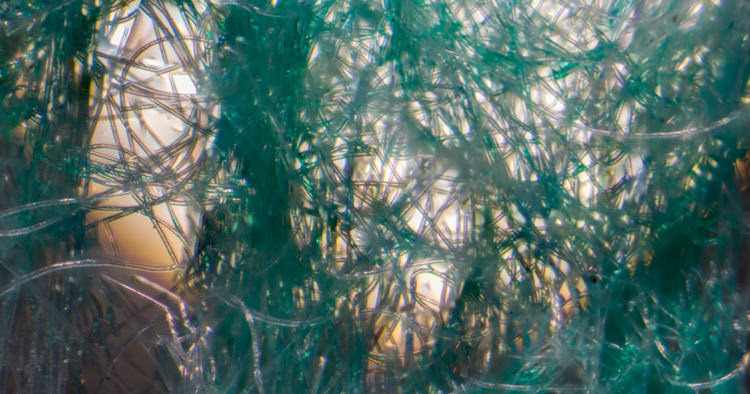
    photomicroscopy photomicrograph micrograph - toile paper

    Two-ply toilet paper by transmitted light microscopy.

    Photomicrographs are high magnification images which are captured using both a microscope and a camera, in my case a Nikon D5300 DSLR. First, you need to find an object that can be imaged and prepare it.

    Because the depth of field is so narrow, most item(s) need to be cut into thin slices or focus stacked to get an adequate depth of field. Once you have found the item you want to photograph, it is then a case of putting it under the microscope on a glass slide, setting the light to evenly illuminate the item and setting your camera to take the image.

    One point to note is that many entry level DSLR’s (including the Nikon D5300) do not meter with microscope adapters. As such, to capture an image you will need to have the camera in Manual mode and use trial and error to adjust your shutter speed to expose the image properly.

    photomicroscopy photomicrograph micrograph - chili

    Dried chili flake by transmitted light microscopy.

    What items look great under the microscope?

    A significant number of everyday objects look incredible under the microscope, some of these can be found in the kitchen, while others are more likely to be found outside. Here are a few ideas:

    • Insect wings
    • Pine needle cross-section
    • Lake water creatures (e.g. water fleas)
    • Granules of sand
    • Onion skin
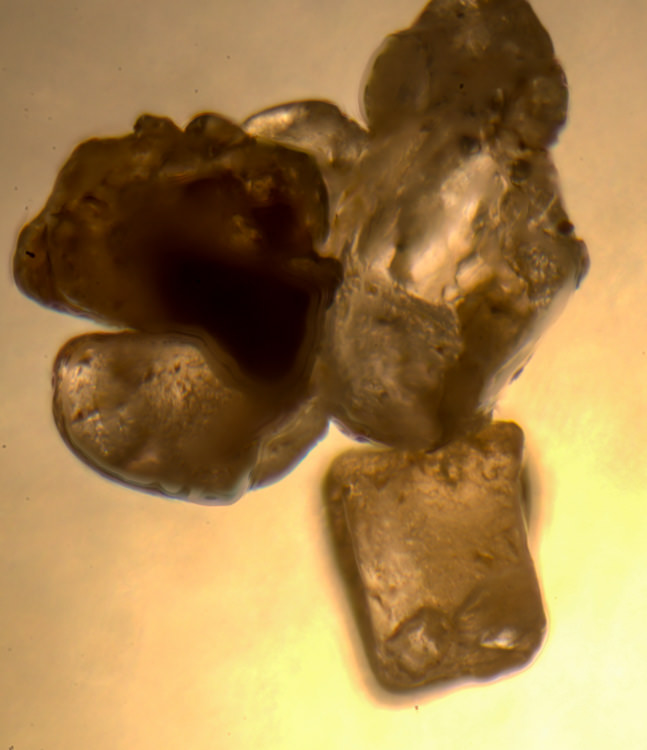
    photomicroscopy photomicrograph micrograph - sand grains

    Sand grains by transmitted light microscopy (and focus stacked).

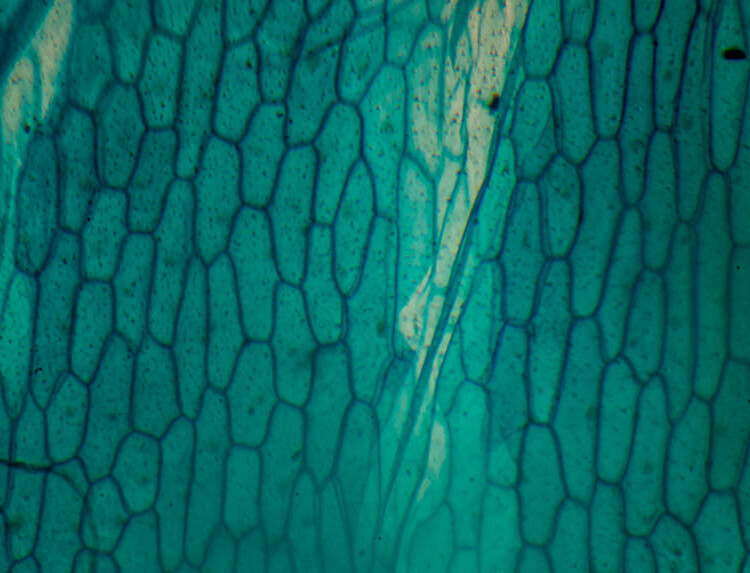
    photomicroscopy photomicrograph micrograph - onion skin

    Onion skin by transmitted light microscopy (and focus stacked).

    When you start to add polarization to the mix, a number of chemicals take on a new life, some of these are every day, while others are more unique:

    • Caffeine
    • Menthol
    • Nicotinic Acid
    • Benzoic Acid
    • Stearic Acid
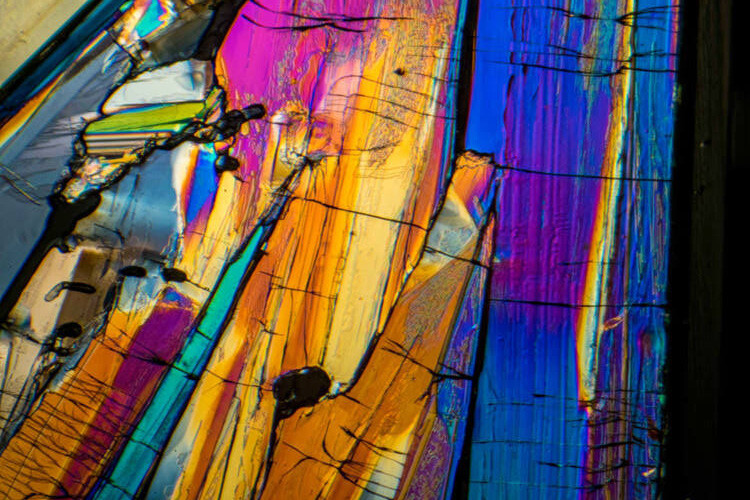
    photomicroscopy photomicrograph micrograph - benzoic acid

    Benzoic acid by polarized light microscopy.

    photomicroscopy photomicrograph micrograph - caffeine

    Caffeine by polarized light microscopy.

    Tips and tricks for photomicroscopy

    As with photography, lighting is essential for photomicroscopy. Microscopes essentially have two types of lighting. One is transmitted lighting which is where the light is shone up through the item. The second type of lighting is where light is shone on the item which is known as reflected lighting. Transmitted lighting is best for transparent samples, while reflected lighting is best for opaque samples.

    Using a polarizing filter retrofit will make many chemicals under the microscope come to life due to a property called birefringence. This property is where the refractive index of a material changes based on the degree of polarization and light, leading to many different colors within chemical crystals.

    The depth of field in photomicroscopy is VERY shallow, as such you may need to either use thin slices of a material or do focus stacking to achieve a suitable depth of field. There is a range of software packages which can help with focus stacking, these include; Helicon Focus, Zerene Stacker and Photoshop.

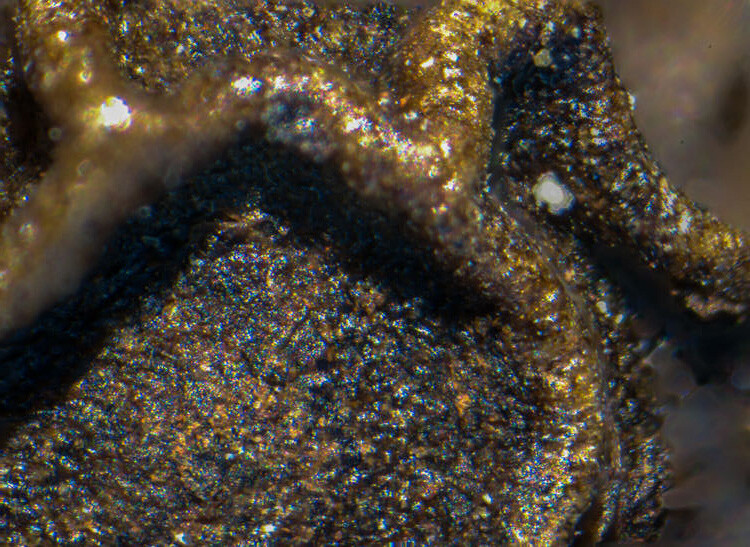
    photomicroscopy photomicrograph micrograph Peppercorn by reflected light microscopy.

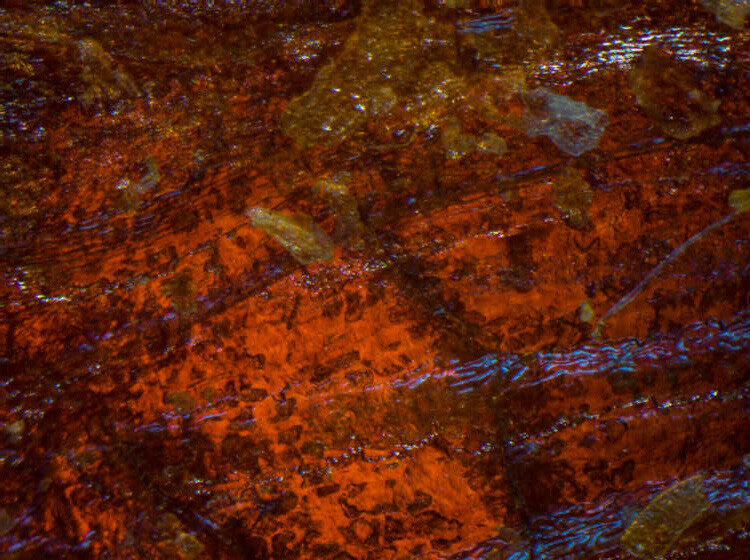
    Peppercorn by reflected light microscopy.

    A few more images

    Here are a couple more example images.

    photomicroscopy photomicrograph micrograph

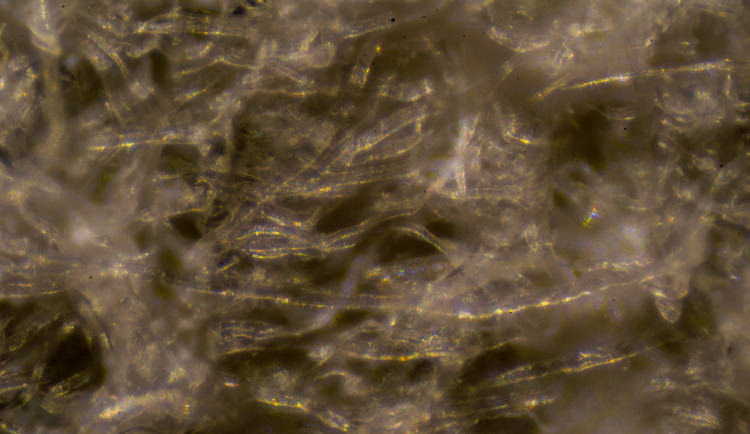
    Absorbent Wipe by reflected light microscopy.

    photomicroscopy photomicrograph micrograph

    Butterfly wing by dark field microscopy.

    photomicroscopy photomicrograph micrograph

    Glutamaic Acid

    photomicroscopy photomicrograph micrograph

    Sponge

    Have any idea(s) on what might look great under the microscope? Let us know in the comments below, please.

    googletag.cmd.push(function() {
    tablet_slots.push( googletag.defineSlot( “/1005424/_dPSv4_tab-all-article-bottom_(300×250)”, [300, 250], “pb-ad-78623” ).addService( googletag.pubads() ) ); } );

    googletag.cmd.push(function() {
    mobile_slots.push( googletag.defineSlot( “/1005424/_dPSv4_mob-all-article-bottom_(300×250)”, [300, 250], “pb-ad-78158” ).addService( googletag.pubads() ) ); } );

    The post How to Photograph the Magical Microscopic World – Photomicroscopy by Travis Hale appeared first on Digital Photography School.


    Digital Photography School

  • Step by Step Plan for Backing Up Your Images While Traveling

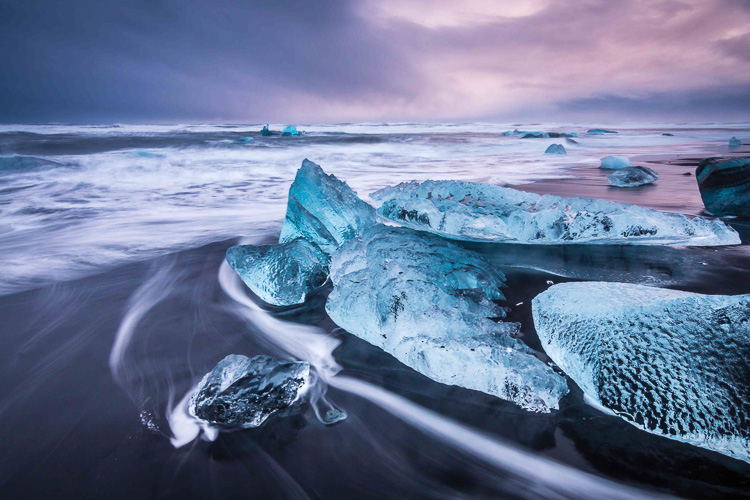
    Planning how to back up your images while you travel isn’t nearly as exciting as planning your itinerary or buying gear for your upcoming trip. But it’s an important step in the travel planning process. Especially if you’re going someplace rugged and amazing like Iceland in the dead of winter, having a plan for uploading and backing up your images while you travel will help you ensure that all of your images are securely stored in multiple locations. After all, if you finally get a chance to photograph ice caves and the aurora borealis, you don’t want to worry about getting those hard-won images safely home with you.

    Backing up images traveling 01

    Following is a step-by-step plan for backing up your images starting with preparing to travel, guidelines for backing up during your trip, and how to complete the process once you return home.

    Part I. Before you leave on your trip

    Step #1 – Examine, reformat and test all of your memory cards

    Before you leave on your trip, make sure that you have plenty of memory cards. I budget approximately two 32gb cards per day. You may need more or fewer, depending on your style of shooting.

    First, examine all of your memory cards for damage. If any are visibly bent, warped or deeply scratched, it might be time to retire them.

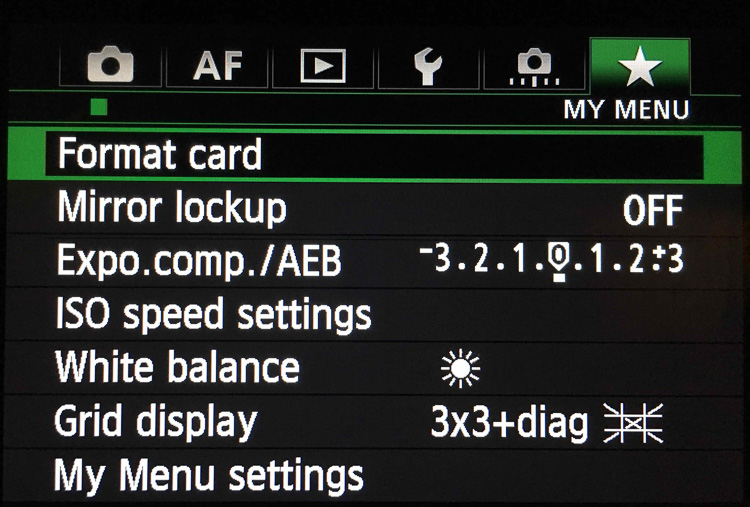
    Next, reformat all your memory cards in your camera. Take and save several images on each memory card and then upload the images, one card at a time. This test verifies that each memory card is still in good working order. If a memory card does not pass the upload test, retire it.
    Backing up images traveling 02

    Step #2 – Buy smaller memory cards to reduce risk

    If you need to buy additional memory cards, evaluate using smaller cards like 32gb and 64gb. You have to change memory cards more often while you’re shooting but if one memory card goes bad, you’ll have endangered far fewer images than if a huge 256gb or 512gb memory card corrupts.

    Use stickers to indicate if memory cards are full or empty.

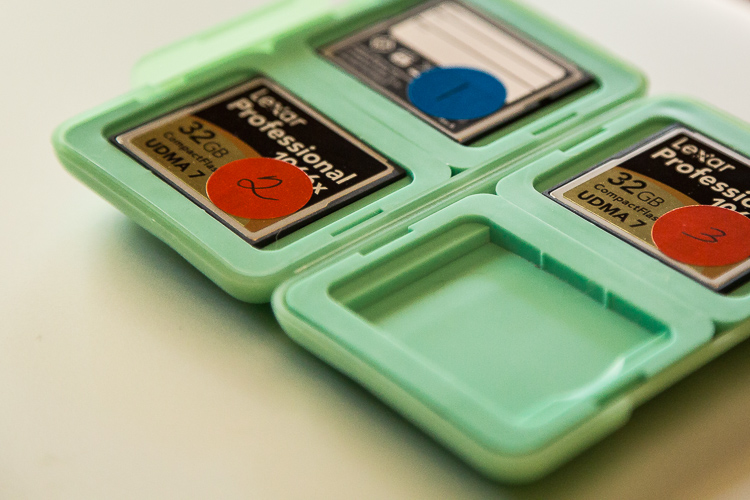
    Create a system to keep full memory cards separate from empty memory cards. An easy method is to buy a memory card case or folder with clear pockets. Put blue sticker dots on one side of your memory cards. Put red sticker dots on the other side of your memory cards.

    Blue sticker dots mean used or full cards. You can remember this mnemonically since blue, used and full all contain the letter U in them. Red sticker dots mean empty cards. You can this remember this mnemonically since red and empty all contain the letter E in them.
    Memory cards case stickers Image C

    Step #3 – Number your memory cards sequentially

    Before placing the stickers on the cards, I also like to number the sticker dots one through however many cards I have. I file the memory cards numerically in the case. On day number one of my trip, I’m using cards numbered one and two. On day number two of my trip, I’m using cards three and four. By numbering the cards, I ensure I rotate them which further reduces the chance of corruption since no one card is used excessively. Then if I do lose a card, it’s also easier to keep track of which card from which day has gone missing if the memory cards are numbered sequentially.

    Lastly, if a card does corrupt, it’s easy to keep track of which one because it’s numbered. I usually pull it out of my case and stow it separately in a secure pocket elsewhere in my bag. If memory card number four goes bad on a trip, I want to ensure I don’t accidentally reformat it or save more images to it before I’ve tried to recover the images.

    After you test, number, and sticker all of your memory cards, place them in the case with the red sticker dot facing up. While you’re traveling, place full (used) memory cards back into the case sequentially with the blue dots facing up. If you’ve budgeted the amount of cards you need for your trip correctly, on the last day of your trip, all of the memory cards in your case should have blue dots facing up.

    SD or CF cards or both?

    If your camera has two memory card slots, evaluate carefully whether or not you want your main memory card to back up to the second card while you’re shooting. My Canon 5D Mark III has two memory card slots. One is a CF card slot and the other is for an SD card. I typically only use the CF card slot because they write faster than SD cards. Since I photograph horses and wildlife and set my camera to high-speed burst mode, I want my images to write to my memory card as fast as possible. Since my camera defaults to the write speed of the slowest card, I leave the SD card slot empty.

    While this method works for me, your camera might function differently than mine. You may also have different priorities than I do when you shoot. Landscape photographers, for example, don’t use high-speed burst mode very often. Neither do macro photographers. If you specialize in landscape or macro photography, automatically creating a backup in camera by writing your RAW images to two memory cards simultaneously might be a good failsafe for you.

    Step #4 – Buy two identical portable hard drives for travel
    Travel Hard Drives Image D

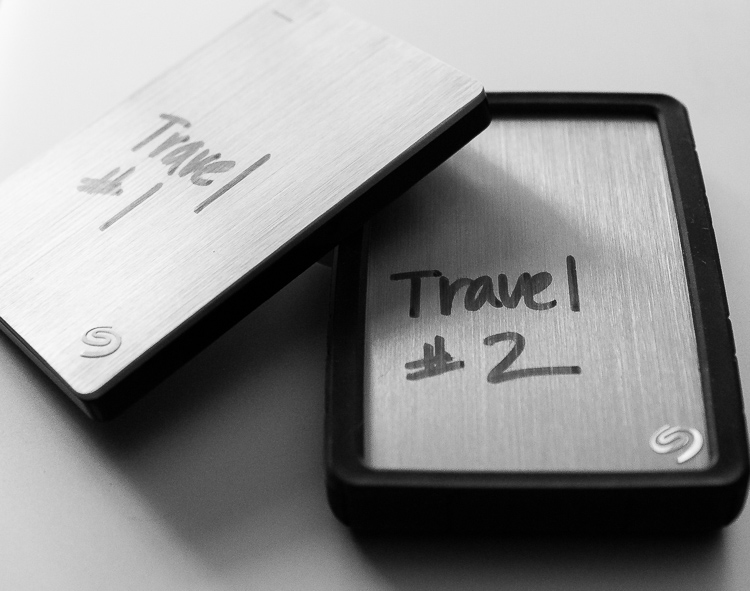
    I recommend uploading your travel images to two identical, high-quality, portable hard drives. I use 1TB drives. One terabyte is typically enough for my style of shooting since I rarely travel for more than 10 days at a time. Digital storage is inexpensive these days. So evaluate the best size portable hard drive for you by reviewing your image files from past trips. Buying more storage than you think you need is more effective in the long run. So if you think you need 500gb drives, buy 1TB. If you think you need 1TB, buy 2TB.

    Step #5 – Protect your new hard drives

    Now that you have two new hard drives to keep your images safe, you need to physically protect them. Use rubber bumpers or cases to protect the drives in case they fall out of your bag or are dropped. If you’re shopping online, you can usually find the correct size bumper or case listed on the same web page as your hard drive.

    Step #6 – Label your portable hard drives

    When you are setting up your new portable hard drives, label each one clearly. I literally use a thick permanent marker to do this. Keep the names consistent since you’ll be referencing these drives frequently. Mine are simply called Travel #1 and Travel #2.

    Step #7 – Format and set up your portable hard drives

    Format your new portable storage drives according to your operating system – usually OSX or Windows. When you’re formatting the hard drives, you’ll probably also be prompted to register them with the manufacturer. Registering your new drives might seem like a silly step but it often activates your warranty or image rescue software so don’t skip it.

    Step #8 – Create a backup recipe

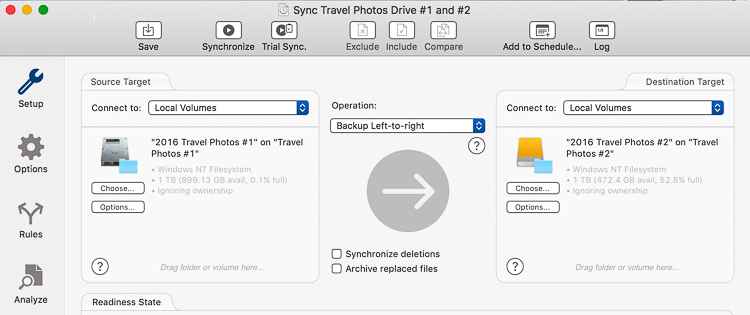
    Once my new portable hard drives are set up and working, I create a folder on each drive called Travel Photos #1 (on drive Travel #1) and Travel Photos #2 (on drive #2). I use a software program called Chronosync (for Mac) to create a recipe that when it is run, backs up drive Travel #1 to drive Travel #2. There are many options for backup software and I would encourage you to do a little research to find the software that’s best for you.
    Backing up images traveling 05

    Step #9 – Back up and update your laptop

    Right before you go, back up the entire contents of your laptop. I use a MacBook Pro so I run Time Machine. After the backup finishes, I have an up-to-date copy of everything on my laptop on a small hard drive that I leave at home. That copy will come in handy if my laptop is stolen or damaged while I’m traveling. Also, I also check for software updates – especially any related to security – and install those as well.

    I skip beta versions or major operating system upgrades since sometimes those are glitchy. I want my laptop software as safe and secure as possible while I travel but I don’t want to have to deal with any new OSX headaches.

    Now that you’ve done all that prep work, it’s time to pack, hit the road and make some memorable images.

    Part II. While you’re traveling

    I know that after a long day of travel, the last thing you want to do is unpack your laptop, upload, and duplicate your image files. But get in the habit of doing it anyway. After a while, it will become routine, like brushing your teeth or washing your face, and you won’t dream of skipping it.

    When your friends tell you their horror stories about losing images while they travel, you’ll have to work hard to wipe the smug look off your face because you’ll know you’ve minimized your chances of that happening to you.

    Step #1 – Upload images with Lightroom

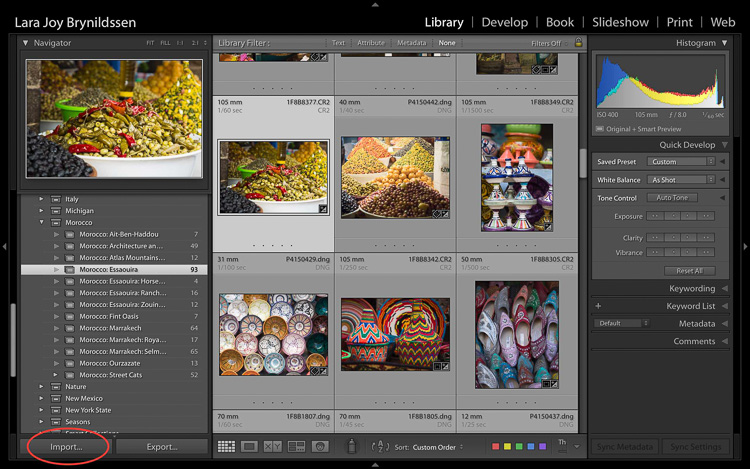
    My first step when I upload images is to plug in my hard drive called Travel #1, then I plug in my CF card reader, insert the memory card and open up Lightroom CC. I always use Lightroom to catalog all of my images. When uploading, I tell Lightroom to import the day’s images to the folder called Travel Photos #1 on the portable hard drive called Travel #1.
    Backing up images traveling 06

    Step #2 Option A – Duplicate images on import

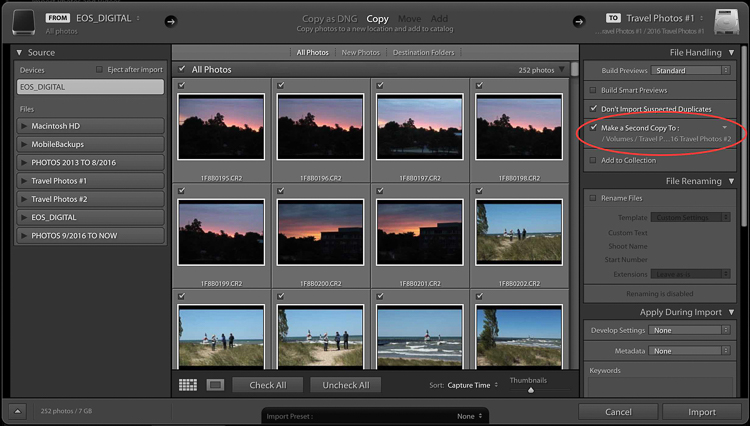
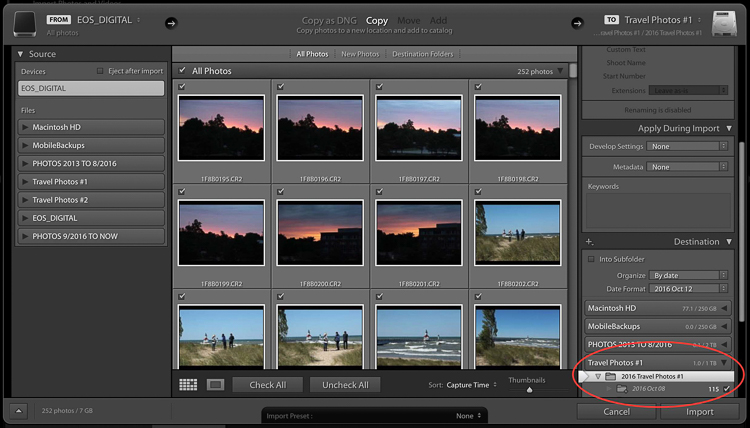
    In the Import Dialog, you can check a box to tell LR to “Make a 2nd copy to” and duplicate your images by importing them to two locations at once. If you check that box, you also want to click the tiny arrow to the right, click Choose Folder and select the location you want the duplicate images to be stored.

    In my case, I would choose the folder called Travel #2 on the portable hard drive called Travel #2. I normally do not duplicate on import because I only have two USB ports on my MacBook Pro. During the import process, both are in use: one for the hard drive Travel #1 and one for my CF card reader. If you have space in your camera bag, you can carry a USB port hub that enables you to attach more drives to your laptop at the same time.
    Backing up images traveling 07

    Backing up images traveling 08

    Step #2 Option B – Use software to create a backup

    Since I don’t carry a USB port hub, instead of checking the “Make a 2nd copy to” box in the LR import dialog, I use Chronosync to sync one drive to another. This is the backup recipe we set up above. After the images are loaded to my first drive, I run my Chronosync recipe to duplicate them to the second drive. Once I’m done, I have three copies of each image; one on the original memory card and one on each portable of my portable hard drives, Travel #1, and Travel #2.

    Don’t erase your memory cards

    If possible, don’t erase the images on your memory cards while you’re on the trip. Instead, save them in the memory card holder you prepared in Part I.

    Step #3 – Upload after every shoot

    When you travel, I encourage you to upload and back up images after every shoot. If you have one shoot per day at sunset, upload and back up before you head out to dinner.

    Tip: This is a good time to plug in and charge your batteries too.

    Before you head to bed, verify that the image files are mirrored on each drive. Swap the batteries in your charger before bed too to make sure you’ll be all set to shoot again in the morning.

    If you have two photo shoots per day, follow these same steps, except do them twice a day. In addition to uploading before dinner, I upload before lunchtime. I usually sneak in a quick nap then too.

    Aurora borealis Image A

    Step #4 – Sync images to the cloud

    If you have an excellent Wi-Fi connection you might also consider syncing to your cloud service. I normally don’t have very strong Wi-Fi service when I travel so I don’t waste time with this step.

    Step #5 – Store your hard drives in different locations

    Now that you’ve done all this work setting up this system to back up your travel images, you have one more step to ensure their safety while you travel. You want to keep each of your two drives in different locations. For example, keep one drive in your camera bag and keep one in your luggage.

    Always make sure to keep one drive in the bag on (or very near) your person. Keep your luggage with your second drive in your hotel room (or locked in the trunk of the car if you are traveling between locations). In the case of theft, accident, or fire, one copy of your images will be safely stored on the drive in the alternate location.

    Part III. When you return home

    Once you return home, you need to move your images from Travel Drive #1 to your main photography hard drive. The easiest way to do this is to do it inside Lightroom.

    Step by step

    Here’s a step-by-step guide for moving your images from your travel drive to your main photography storage drive:

    1. Attach Travel Drive #1 to your laptop.
    2. Attach your main photography hard drive to your laptop. In this example, my main drive is called PHOTOS 9/2016 TO NOW.
    3. Open Lightroom CC in the Library module.
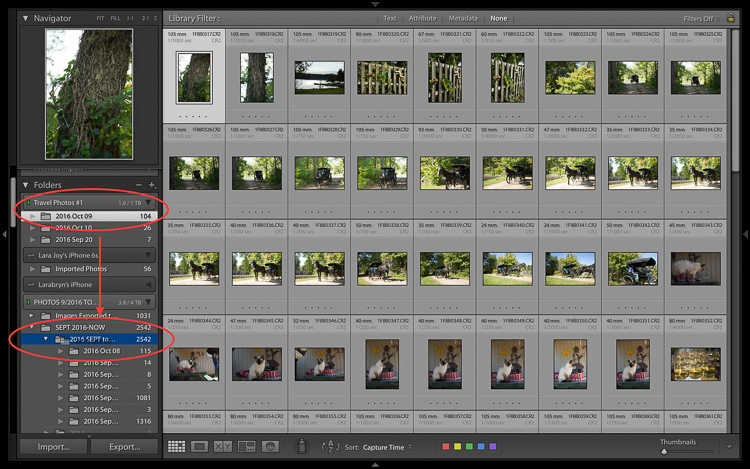
    4. One by one, drag and drop each folder of your images from Travel Drive #1 to your main storage drive.
    Backing up images traveling 09

    1. Note that at this stage, since I keep all my images organized chronologically I drop my travel images into the folder on the drive labeled 2016 SEPT to DEC. Next year I’ll drop images into the folder labeled 2017.
    2. Be patient while your computer works. It takes a few minutes for Lightroom to show you that this task is complete and your images have been successfully moved to your main storage drive. Tip: This is a good time to clean your gear.
    3. Now that your images are on your main drive, run another backup.
    Backing up images traveling 10

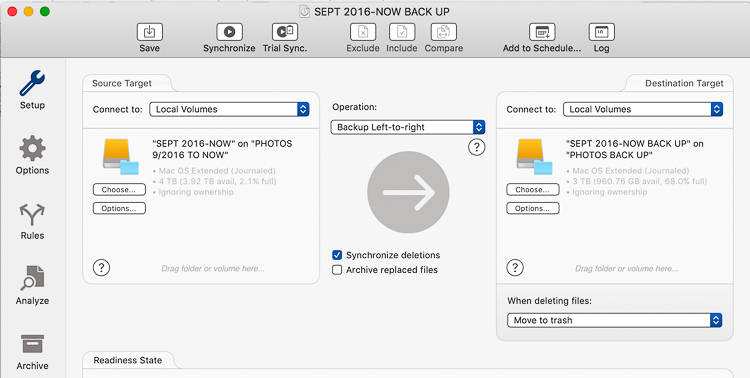
    1. I use a Chronosync recipe to back up my drive called PHOTOS 9/2016 TO NOW to my drive called PHOTOS BACK UP.
    2. After completing this step, verify that the images have been moved. I do this by opening a Finder window on my MacBook Pro and checking that the image file names match on both my main storage drive and my backup drive.
    3. After you verify that you have two copies again, you can wipe your travel hard drives and memory cards to prepare them for your next trip.
    4. At this point, it’s good idea to back up to your cloud service so that you once again have three copies of your images.

    Final notes

    Since I travel often, I find it easiest to keep my entire Lightroom catalog on my MacBook Pro. If I need to work on a bigger screen, I connect to an external display.

    If you keep your main Lightroom catalog on a different computer than the one you travel with, rather than dragging and dropping as I’ve instructed above, attach your travel hard drive and your main photography storage drive to your home computer, open Lightroom and go through the complete import process to your main storage drive. After you’ve imported your travel images to your main Lightroom catalog on your home computer, in addition to formatting your memory cards and wiping your travel hard drive, I’d recommend completely removing the images from the Lightroom catalog on your laptop.

    Now you can go unpack and do laundry. Or, if you’re like me, you can start to cull, edit, and create collections with your travel images.
    Backing up images traveling 12

    googletag.cmd.push(function() {
    tablet_slots.push( googletag.defineSlot( “/1005424/_dPSv4_tab-all-article-bottom_(300×250)”, [300, 250], “pb-ad-78623” ).addService( googletag.pubads() ) ); } );

    googletag.cmd.push(function() {
    mobile_slots.push( googletag.defineSlot( “/1005424/_dPSv4_mob-all-article-bottom_(300×250)”, [300, 250], “pb-ad-78158” ).addService( googletag.pubads() ) ); } );

    The post Step by Step Plan for Backing Up Your Images While Traveling by Lara Joy Brynildssen appeared first on Digital Photography School.


    Digital Photography School

  • LEGO at Large: Modern Block Vehicles Hit the Historic Streets of Rome

    [ By WebUrbanist in Art & Photography & Video. ]

    block-car

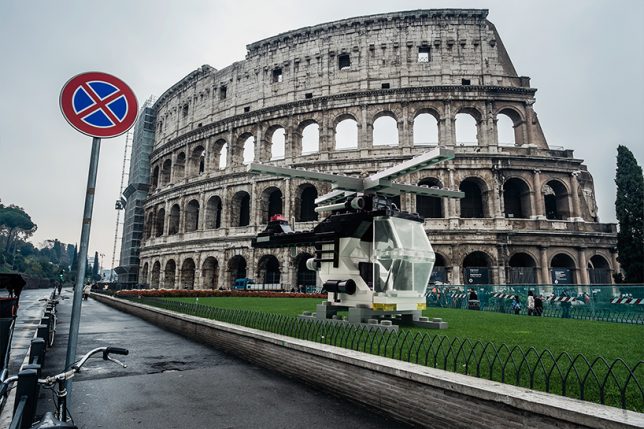
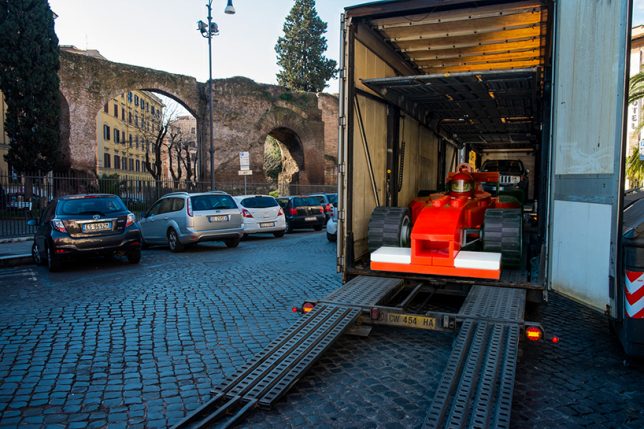
    A sports car parked in a residential alley, train emerging from a tunnel and helicopter landing next to the Colosseum are all believable sights in Italy’s capital … except in this case they are constructed from LEGO.

    lego-train-tracks-tunnel

    lego-landing-helicopter

    Italian photographer Domenico Franco imagines these block-built vehicles at human scale in his series LEGO Outside LEGOLAND, masterfully faked scenes of photo-realistic quality.

    lego-race-car-unloading

    lego-large-in-rome

    In his series, normal conveyances are swapped with LEGO creations that stand out as simplified block forms against the rich historical fabric of Rome.

    lego-parked-speeder

    lego-construction-vehicle

    While some are clearly toys writ large, others are more convincing: a passing glance at a tractor trailer doing road work might not immediately belie its fictional origins.

    lego-car-tight

    Landmark buildings and aged cobblestone roads come alive thanks to the contrast created by intervening toys. Ordinary gray-blue weather and aged architecture seems even more real than in a normal photograph.

    lego-ambulance-parked

    “The aim is to transform ordinary contexts in extraordinary ones,” says the artist, “thus compelling the toys to get out of the idyllic and politically correct landscapes belonging to their perfect and idealistic cities, with the result of instilling in them those vices, virtues and desires typical of human beings.”

    Share on Facebook


    [ By WebUrbanist in Art & Photography & Video. ]

    [ WebUrbanist | Archives | Galleries | Privacy | TOS ]


    WebUrbanist

  • Omnivision introduces new sensors for mobile devices with wider DR and lower noise

    Chinese sensor manufacturer OmniVision Technologies has announced four new image sensors for smartphones that feature improved dynamic range and noise performance. The 16MP and 20MP sensors offer higher full-well capacity which allows pixels to collect more charge before clipping: increasing dynamic range.

    A new structure allows pixels to convert more of the light captured into electrical charge, resulting in a claimed 12.5% improvement in sensitivity, giving better low light performance. Better separation between pixels also improves noise by helping to prevent color crosstalk, and thus should produce a cleaner image in dim conditions.

    The standard versions of each chip allow further improvements in dynamic range using a method that records two different exposures simultaneously called zHDR. The sensor divides the pixels in a zig zag pattern so that some record a long exposure and others a short one, and the two exposures are combined to form an image with a wider range of tones.

    These are second generation sensors that already use phase detection AF and which can record 4K video.

    ‘4C’ variants of both chips include a non-standard color filter array pattern that makes it easier to combine the signal from four pixels, to give less noisy, lower resolution images.

    The company says that they will be ready for mass production in the early part of next year. For more information see the OmniVision website.

    Press release

    OmniVision Debuts Second-Generation PureCel®Plus and PureCel®Plus-S Technology and Product Families

    OmniVision’s Newest Pixel Architecture Brings Exceptional Low-Light Performance and Increased Dynamic Range to Advanced Imaging Applications

    OmniVision Technologies, Inc., a leading developer of advanced digital imaging solutions, today introduced its latest advancement in leading-edge pixel technologies: second- generation PureCel®Plus and PureCel®Plus-S. In keeping with OmniVision’s tradition of delivering industry-leading image sensors, the second- generation PureCel Plus technology offers significant improvements over the previous generation, such as higher full-well capacity (FWC), better sensitivity, increased signal-to-noise ratio (SNR) and enhanced low-light performance. Though the initial development was focused on supporting small-pixel products for mobile applications, this technology will ultimately benefit many other image sensor applications.

    OmniVision’s second-generation PureCelPlus technology showcases various performance improvements, including:

    • 20 percent increase in FWC, enabling higher dynamic range.
    • A newly introduced composite metal grid (CMG) structure, which increases pixel quantum efficiency and enhances sensor low-light performance, leading to a 12.5 percent improvement in sensitivity.
    • Improved deep trench isolation (DTI) structure, which further reduces color crosstalk and improves the SNR10 (low-light performance index) number by 10 lux.

    These structure improvements also enable small-pixel sensors to have better tolerance to incident light angles. This in turn allows imaging systems to use lower F-number lenses for better brightness, and to realize lower module heights that are essential for slimmer phone designs.

    “Maintaining good image quality and sensor performance for small pixels in low-light conditions has always been a challenge in the digital imaging space. OmniVision has delivered increasing engineering advances over the years to address this market need,” said Dr. Song Xue, senior manager of sensor technology at OmniVision. “Our second-generation PureCelPlus technology enables our end users to capture high-quality, high-resolution photos, even in challenging lighting environments.”

    OmniVision’s second-generation PureCel Plus-S technology will empower new families of compact 20-megapixel and 16-megapixel sensors. The 20-megapixel OV20880 and OV20880-4C and the 16-megapixel OV16885 and OV16885-4C are designed to deliver high-resolution images to high-end smartphones across a variety of lighting conditions.

    The OV20880, OV20880-4C, OV16885 and the OV16885-4C are currently available for sampling and are expected to enter volume production in the first quarter of 2017.

    Articles: Digital Photography Review (dpreview.com)

  • Grounded: GoPro recalls Karma drone

    Action-cam maker GoPro announced a recall of its new Karma drone after the company discovered that a small number of units lost power during operation. GoPro indicated that it is investigating the issue, but stresses that even if your Karma drone appears to operating normally you should cease using it immediately.
     
    The $ 799 Karma, GoPro’s first drone, just became available on October 23. The company reports that approximately 2,500 units have been sold to date, and that it plans to resume shipment of the product as soon as the issue is resolved. If you own a Karma and need more information on the recall you can find FAQ and return instructions here.
     
    Press release:

    GoPro Announces Karma Recall and Refund Program

    SAN MATEO, Calif., Nov. 8, 2016 /PRNewswire/ — GoPro Inc. today announced the recall of the approximately 2500 Karma drones purchased by consumers since October 23. The recall was announced after GoPro discovered that in a very small number of cases, Karma units lost power during operation. No related injuries or property damage have been reported.
    Owners of Karma can return their units to GoPro, or their place of purchase, for a full refund. Replacement units are not being offered. GoPro plans to resume shipment of Karma as soon as the issue is resolved.
    To participate in the recall, visit GoPro’s webpage at: www.gopro.com/2016karmareturn
    “Safety is our top priority,” said GoPro Founder and CEO Nicholas Woodman. “A very small number of Karma owners have reported incidents of power failure during operation. We have moved quickly to recall all units of Karma and provide a full refund while we investigate the issue. We are working in close coordination with both the U.S. Consumer Product Safety Commission and Federal Aviation Administration. We are very sorry to have inconvenienced our customers and we are taking every step to make the return and refund process as easy as possible.”

    Articles: Digital Photography Review (dpreview.com)

  • Throwback Thursday: Olympus C-3040 Zoom

    In the year 2000, Olympus updated its enthusiast-friendly digital zoom compact. The C-3040 Zoom bears the adorably 90’s ‘Camedia’ logo, and when it was introduced updated the previous model with some cosmetic improvements, a faster lens and a couple of feature updates like one-touch manual white balance. This 3.3MP powerhouse fetched $ 800 when we reviewed it in 2001 – here’s what all those clams got you:

    • 3MP 1/1.8″ CCD sensor
    • Built-in optical viewfinder
    • 320 x 240 video at 12.5 fps without audio
    • 3.5 fps burst shooting
    • 1.8″ LCD
    • Auto, 100, 200, 400 ISO settings
    • Full manual exposure modes

    The C-3040 Zoom offered a 35-105mm equiv. F1.8-2.6 zoom, a boost over its predecessor’s 32-96mm equiv. F2.8 constant aperture lens. When we reviewed it we found the new lens to be noticeably sharper, and welcomed the minor improvements, but considered Olympus to be trying to extend the shelf life of an already aging design without bringing anything new to the market. Still, for $ 800 in its time it was a good bargain.

    Did you own the 3040 Zoom or its predecessor? Do you have fond memories of using one? Share in the comments below.

    See our Olympus C-3040 Zoom Review

    $ (document).ready(function() { SampleGalleryV2({“containerId”:”embeddedSampleGallery_9040790553″,”galleryId”:”9040790553″,”isEmbeddedWidget”:true,”standalone”:false,”selectedImageIndex”:0,”startInCommentsView”:false,”isMobile”:false}) });
    Articles: Digital Photography Review (dpreview.com)

  • Sony announces the PXW-FS7 ll with electronic variable ND filter and new handling features

    Sony is preparing to release an updated version of its popular PXW-FS7 professional video camera that will feature an electronic variable neutral density filter that automatically compensates for exposure shifts of between two and seven stops. The filter can adjust itself so that apertures and shutter speeds can remain constant even when light intensity changes quite dramatically – thus maintaining the ‘look’ of the video. The new feature also allows aperture changes that alter the depth of field during recording without affecting the exposure of the footage.

    The new camera doesn’t replace the existing FS7 as Sony says it will retain both models in the range to give videographers a choice. The new model will cost more than the original, so there will be models to suit different budgets.

    Another new feature of the FS7 ll will be a locking collar around the lens throat that allows E-Mount lenses to be fitted directly to the camera without the need to twist them into place. The lens can be offered up to the throat and the collar rotated to lock it into place. This, Sony says, makes changing lenses much quicker as lens support rigs won’t need to be taken off to complete the lens switch.

    Sony has altered the shoulder mount and the viewfinder so that they can be adjusted without tools, using wing nuts and finger screws to secure them in place. The monitor arm and the micro holder can now be switched for left-eye viewers, and the number of external assignable buttons has increased from six to ten.

    The camera can accept A-mount lenses via an adapter

    Like the FS7 the new FS7 ll uses a Super 35mm format sensor and can record 4K and full HD video at a range of frame rates up to 180fps and in a wide range of formats.

    At the same time Sony announced the FS7 ll it also announced a new kit lens for the FS7 series and a G-Series 256GB XQD card with a 400Mbps write speed. The new lens is the SELP18110G 18-110mm f/4 power zoom with Optical SteadyShot built-in. Although Sony had said originally that the lens would be suited to be paired with the SEL14TC and SEL20TC teleconverters it has now announced that it will not in fact be compatible.

    The Sony PXW-FS7 ll is due to arrive in January 2017, and the company has yet to release pricing information (the current model costs about £8000/$ 8500). For more information visit the Sony Pro website.

    Press release:

    Sony Expands FS Series with New FS7 II Camcorder

    New Model Delivers Advanced Features for creative Documentary and Indie Production with Electronic Variable ND Filter, Lever Lock Type E-mount and Refined Mechanical Design

    Sony is expanding its FS Series Super 35mm professional family with the addition of the new FS7 II camcorder. The new model builds on the original FS7’s strengths by adding advanced features including Electronic Variable ND technology, a lever lock type E-mount, and a new mechanical design for faster and easier set-up.

    Since its introduction in 2014, the FS7 has become one of the most widely used cameras in a range of production applications, and the original model remains in the Sony line-up. The new FS7 II now gives creative professionals a broader range of creative tools, with new features all based on end user feedback.

    The new FS7 II camcorder is designed for long-form shooting and production applications, especially for documentaries and independent filmmaking. Amongst the many enhancements outlined below, the FS7 II can also record in BT2020 colour space, hence making it ideal for today’s 4K broadcast productions.

    Electronic Variable ND Technology

    The camcorder’s Electronic Variable ND Filter system, combined with its large sensor, delivers greater exposure control, with the option of preset or variable operation modes. Variable ND mode (clear + 2~7 stop range, in seamless transition steps up to 1/128) allows the user to vary the density of the ND filter during shooting and to transition seamlessly between steps. This also ensures an optimum motion delivery by maintaining desired shutter speed.

    The camera’s expanded ND operations enables fine exposure adjustment by relegating iris to set depth of field, prevents soft focus caused by diffraction, and prevents colour shift caused by stacking multiple external ND filters.

    The camera can compensate for exposure fluctuation caused by iris control while adjusting the depth of field. Users can adjust exposure while keeping the same bokeh in changing shooting or lighting environments.

    Preset mode lets users assign three ND settings to the filter turret, useful in selecting the most appropriate filtration range for changing light conditions, for example. Auto ND mode is also available allowing exposure to stay at a fixed level while adjusting the depth of field with iris control.

    E-mount (Lever Lock type) for professional shooting

    The FS7 II revisited E-mount (lever lock type) gives users the ability to change lenses by rotating the locking collar rather than the lens itself, which means that in most cases lens support rigs don’t need to be removed, saving time during a production. The new E-Mount has been designed for demanding applications in the professional environment and will fit any existing E-mount lenses in the market and other mount lenses with an adapter. The new FS7 II camcorder also supports Sony ? Mount System, which includes more than 70 lenses.

    Mechanical Design Enhancements

    Like its counterparts in the FS Series family – the FS7 and FS5 models – the new FS7 II features several design and ergonomic updates for comfortable and functional use in the field. These new features are based customer feedback around the FS7.

    The FS7 II “tool-less” mechanical design lets users make on-the-fly changes to the camera’s set-up and operation. For example, no tools are required to adjust the Smart Grip or viewfinder positions.

    The detachable viewfinder eyepiece, which comes with a pop-up hood, provides a third stabilizing contact point when shooting handheld. Durable square section rods and lever-clamps on the LCD and camera body provide simple and precise front-to-back VF adjustment while retaining level positioning.

    New Sony 18-110mm Sony G lens

    Sony also introduced a new E-mount, Super 35mm lens specifically designed for documentary and motion picture production.

    The new lens, model E PZ 18-110mm F4 G OSS, covers Super35mm and APS-C sensors. Compact and lightweight — 2.4 lbs (1.1Kg) — with an 18 to 110 focal range (6x zoom) it uses a new fully mechanical/servo zoom switchable system, capable of snap zooms and entirely devoid of lag. The focal range is optimised for Super 35 and APS-C sensors.

    The lens is compatible with Sony ? Mount System cameras, including the ?7 series interchangeable-lens cameras and professional Super 35mm 4K camcorders like the FS7 or FS5. Although perfectly suited for still image taking, filmmakers will fully appreciate the lens’ extended creative capabilities for shooting motion images.

    The lens benefits Smooth Motion Optics (SMO) design from Sony, which is developed to optimise performance during motion image capture. This lens design eliminates undesirable characteristics and artifacts that do not affect still image taking, but can severely limit a lens’ usefulness for motion shooting, such as:

    • Ramping: F stop gradually diminishes when zooming tight
    • Not holding focus while zooming
    • Breathing (angle of view variation while focusing)
    • Optical axis shift (image moves in the frame while zooming)

    *Due to a change in the SELP18110G specifications it is no longer compatible with the SEL14TC and SEL20TC teleconverters.

    XQD Cards

    The FS7 II supports the XQD memory card format, designed for capturing and transferring high-bandwidth, high resolution files. The newest XQD card from Sony, QD-G256E — with an industry first 256 GB capacity — enables recording time of approximately 45 minutes at 4K 60P and 3.5 hours at 2K 30P. Combined with a read speed of 440MB/s and write speed 400MB/s, users can shoot for longer without needing to change media cards.?

    The FS7 II is planned to be available in January 2017. For more information, please visit the product page.

    Articles: Digital Photography Review (dpreview.com)

  • Nikon D5600 DSLR announced, though not in the US

    $ (document).ready(function() { SampleGalleryV2({“containerId”:”embeddedSampleGallery_5883354817″,”galleryId”:”5883354817″,”isEmbeddedWidget”:true,”standalone”:false,”selectedImageIndex”:0,”startInCommentsView”:false,”isMobile”:false}) });

    Nikon has made a global announcement of its D5600 mid-range DSLR. It evolves the line by adding SnapBridge (Wi-Fi + Bluetooth + NFC) as well as touchscreen enhancements and a time-lapse feature. Like its D5500 predecessor, it uses a familiar 24MP sensor and EXPEED 4 processor.

    The D5600 also maintains a 3.2″ fully articulated LCD, but adds a few new functions: enabling and disabling auto ISO is now possible via the touch Fn button and the D5’s frame advance bar touch interface has been adopted. In-camera time-lapses are also offered with an auto exposure smoothing feature to make varying exposures due to changes in lighting look less jarring.

    The Nikon D5600 is announced for areas outside of the US – no shipping or pricing information is available at this time. 

    Press release

    Digital SLR Camera, Nikon D5600

    Entry-level DX-format Digital SLR Camera with Seamless Connectivity Ignites Creativity and Sharing by Transforming Social Storytelling

    TOKYO – Nikon Corporation is pleased to announce the release of the D5600, an entry-level DX-format digital SLR designed for photography hobbyists and content creators to explore different creative and artistic expressions. With convenient connectivity features, the D5600 is also built for easy sharing and social storytelling.

    The Nikon D5600 is equipped with a range of features that encourages users to capture and communicate their stories. Featuring a Vari-angle LCD monitor that flips out and rotates, it is possible to shoot from nearly any angle for greater creative freedom. The touch-screen operation so popular with the D5500 has been further enhanced in the D5600 with the addition of a crop function for use during playback zoom, and a frame advance bar that lets users scroll through images in playback mode easily. The D5600 also incorporates the time-lapse movie function equivalent to that of the more advanced Nikon D7200, enabling users to capture changing scenes over a time period and create stunning time-lapse videos.

    In addition, a constant connection between the Nikon D5600 and a smart device is possible using the SnapBridge app and Bluetooth® low energy (BLE) technology. Images captured are automatically transferred to the paired smart device and users can upload and share high quality images in a seamless, integrated process. The image transfer continues even after the camera has been turned off. SnapBridge also enables automatic image upload to NIKON IMAGE SPACE. Furthermore, wireless video transfer and remote shooting are –possible via Wi-Fi®.

    Primary Features

    1. SnapBridge support for constant connection of the Nikon D5600 to a smart device

    Support for the SnapBridge app*1 means that with one-time setup, a constant connection between the D5600 and a smart device*2 is maintained, realizing simple automatic transfer*3 of photos. In addition, a number of convenient functions, including automatic upload to Nikon’s photo sharing service, NIKON IMAGE SPACE*4, the addition of copyright information and comments to photos, and automatic synchronization of camera date/time and location information with that of the smart device, can be used. What’s more, the Nikon D5600 also supports the high-speed transfer of selected still images, movie transfer, and remote capture of still images when Wi-Fi“*5 is enabled.

    *1 The SnapBridge app can be downloaded free of charge from the App Store® and Google Play™.
    *2 The SnapBridge app is available for compatible iPhone®, iPad® and/or iPod touch®, and for smart devices running the Android™ operating system.
    *3 Images (JPEG) reduced to 2-megapixel equivalent can be transferred automatically. RAW/TIFF data cannot be transferred. Movies can be transferred by switching to Wi-Fi®.
    *4 To upload images automatically to NIKON IMAGE SPACE, Nikon ID registration (free) is required, which can be easily setup via [Nikon ID registration/change] menu on the SnapBridge application. Only when uploading to NIKON IMAGE SPACE via SnapBridge, JPEG data reduced to 2-megapixel equivalent can be uploaded unlimitedly in number and capacity.
    *5 The camera cannot be directly paired with a smart device using Wi-Fi. Wi-Fi can be used by enabling it after the camera has been paired with the smart device using Bluetooth®.

    2. A Vari-angle LCD monitor that makes capturing creative photos easy from any angle

    The Nikon D5600 is equipped with a 3.2-inch Vari-angle LCD monitor that enables shooting from low angles, high angles, and even selfies. A touch screen has also been adopted. Naturally, it supports the same touch operation available with the D5500, but it also supports the frame advance bar adopted for the high-end D5 and D500 for scrolling through images in full-frame playback. In addition, the touch Fn function so popular with the D5500 has been expanded to support the enabling and disabling of auto ISO sensitivity control, and operation with viewfinder shooting has also been improved.

    3. An effective pixel count of 24.2-million pixels and support for a broad range of sensitivities—ISO 100–25600—enable expression with superior image quality

    The camera offers an effective pixel count of 24.2-million pixels. It is equipped with a Nikon DX-format CMOS sensor with no optical low-pass filter. This enables capture of images that make the most of the superior rendering characteristics of NIKKOR lenses. The EXPEED 4 image-processing engine has been adopted, and a broad range of standard sensitivities are supported—ISO 100 to 25600, the combination of which enables capture of highly detailed images in which noise is effectively suppressed, even with shooting in dark or dimly lit surroundings.

    4. Equipped with the same time-lapse movie function found in more advanced models

    The Nikon D5600 is newly equipped with the time-lapse movie function, which allows users to easily compress long periods of time into short ones, entirely within the camera, to express changes that occur over time, such as the shapes of clouds as they roll by, or the movement of people and cars through city streets. In addition, the exposure smoothing function makes capturing beautiful time-lapse movies easier by suppressing variations in exposure caused by changes in lighting that occur naturally, such as when the sun comes up or goes down. Time-lapse movies recorded with the camera can also be transferred to a smart device via SnapBridge.

    • The Bluetooth® word mark and logos are registered trademarks owned by Bluetooth SIG, Inc. and any use of such marks by Nikon Corporation is under license.
    • Wi-Fi and the Wi-Fi logo are trademarks or registered trademarks of the Wi-Fi Alliance.
    • Apple®, App Store®, the Apple logos, iPhone®, iPad®, and iPod touch® are trademarks of Apple Inc. registered in the U.S. and/or other countries.
    • Android™ and Google Play™ are trademarks of Google Inc.
    • Other trademarks and trade names are those of their respective owners.

    Nikon D5600 specifications

    Body type
    Body type Compact SLR
    Body material Composite
    Sensor
    Max resolution 6000 x 4000
    Other resolutions 4496 x 3000, 2992 x 2000
    Image ratio w:h 3:2
    Effective pixels 24 megapixels
    Sensor photo detectors 25 megapixels
    Sensor size APS-C (23.5 x 15.6 mm)
    Sensor type CMOS
    Processor Expeed 4
    Color space sRGB, Adobe RGB
    Color filter array Primary color filter
    Image
    ISO Auto, 100 – 25600
    White balance presets 12
    Custom white balance Yes
    Image stabilization No
    Uncompressed format RAW
    JPEG quality levels Fine, Normal, Basic
    File format
    • JPEG (Exif v2.3)
    • Raw (Nikon NEF, 12 or 14-bit)
    Optics & Focus
    Autofocus
    • Contrast Detect (sensor)
    • Phase Detect
    • Multi-area
    • Center
    • Selective single-point
    • Tracking
    • Single
    • Continuous
    • Touch
    • Face Detection
    • Live View
    Autofocus assist lamp Yes
    Manual focus Yes
    Number of focus points 39
    Lens mount Nikon F
    Focal length multiplier 1.5×
    Screen / viewfinder
    Articulated LCD Fully articulated
    Screen size 3.2
    Screen dots 1,037,000
    Touch screen Yes
    Screen type TFT LCD monitor
    Live view Yes
    Viewfinder type Optical (pentamirror)
    Viewfinder coverage 95%
    Viewfinder magnification 0.82×
    Photography features
    Minimum shutter speed 30 sec
    Maximum shutter speed 1/4000 sec
    Exposure modes
    • Auto
    • Program
    • Shutter priority
    • Aperture priority
    • Manual
    Scene modes
    • portrait
    • landscape
    • child
    • sports
    • close up
    • night portrait
    • night landscape
    • party/indoor
    • beach/snow
    • sunset
    • dusk/dawn
    • pet portrait
    • candlelight
    • blossom
    • autumn colors
    • food
    Built-in flash Yes (Pop-up)
    Flash range 12.00 m (at ISO 100)
    External flash Yes (Hot-shoe)
    Flash modes Auto, On, Off, Red-eye, Slow sync, Rear curtain
    Flash X sync speed 1/200 sec
    Drive modes
    • Single frame
    • Continuous (low, high)
    • Quiet shutter release
    • Self-timer
    • Interval timer
    Continuous drive 5.0 fps
    Self-timer Yes (2, 5, 10 or 20 sec)
    Metering modes
    • Multi
    • Center-weighted
    • Spot
    Exposure compensation ±5 (at 1/3 EV, 1/2 EV steps)
    WB Bracketing Yes (3 frames in either blue/amber or magenta/green axis)
    Videography features
    Format MPEG-4, H.264
    Microphone Stereo
    Speaker Mono
    Storage
    Storage types SD/SDHC/SDXC
    Connectivity
    USB USB 2.0 (480 Mbit/sec)
    HDMI Yes (mini-HDMI)
    Microphone port Yes
    Headphone port No
    Wireless Built-In
    Wireless notes 802.11b/g/n with Bluetooth 4.1 LE and NFC
    Remote control Yes (MC-DC2 (wired), WR-1/WR-R10 (wireless))
    Physical
    Environmentally sealed No
    Battery Battery Pack
    Battery description EN-EL14a lithium-ion battery & charger
    Weight (inc. batteries) 465 g (1.03 lb / 16.40 oz)
    Dimensions 124 x 97 x 70 mm (4.88 x 3.82 x 2.76)
    Other features
    Orientation sensor Yes
    Timelapse recording Yes
    GPS Optional
    GPS notes Optional GP-1/GP-1A

    Articles: Digital Photography Review (dpreview.com)

  • 5 Steps to Achieve the Look of Black and White Film Using Lightroom

    As a hobbyist, amateur, or professional photographer, you may be interested in achieving the look and feel of black and white film without the hassle and investment in equipment and gear. You can edit a digital image using Lightroom with this goal without having your hands smell like rotten eggs (developing chemicals). If you shoot black and white film often, as I do, then you might actually love that smell. If not, then you might want to read on.

    Look feel black white film Lightroom01

    The feel of black and white film – research first

    The objective here is to provide you with a few basic steps to get you started on the path to edit your digital images to look like they were shot on black and white film, without the mess. If you are not familiar with the qualities of film images or have not examined them closely, it would be a good idea to do so. Try to pick up and look closely at some actual prints on photographic paper. You might find these in your grandmother’s attic or your local museum. Photography books or online searches will yield many reprinted or scanned examples as well.

    First, consider the subject of style as it relates to film photography. Film photographs generally have a certain nostalgic or vintage look and quality to them that distinguish them from the clarity and realistic look of a well-composed digital image. Film tends to render subjects and scenes in a more abstract manner. Although you can make tack sharp and very realistic looking images using today’s film and gear, that’s not really the role of film photography.

    Look feel black white film Lightroom02

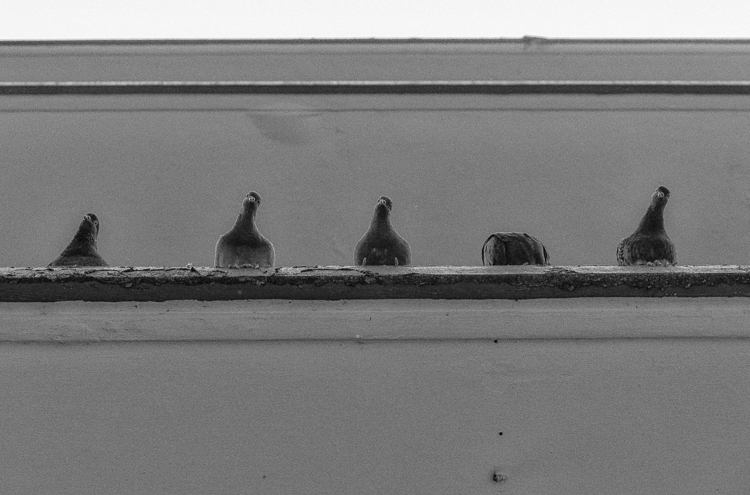
    If you want clean, shoot digital. Film should look old, slightly out of focus, and definitely grainy. All film has some or a lot of grain and it is basically the equivalent of digital noise. While you may prefer some of your images to look super sharp and smooth, you may also find it pleasing to add a little (or a lot) of grain from time to time.

    Film adds an air of mystery

    You might want to experiment with this more abstract style or look of film that comes with a distinctive aesthetic. One advantage of presenting this style of image is that the viewer is given the task of filling in the blanks, so to speak. Subjects in your image that are not entirely in focus or even blurry can be representative of anything or anyone. Your image can be more open to interpretation by the viewer as compared to an image that was sharply composed with a subject that is obvious. In other words, you might want to leave some room for mystery in your images. Film photography, or working towards the look and feel of film, can do that for your images.

    Look feel black white film Lightroom03

    Like digital, film is really just another medium in which we can express ourselves as artists and photographers. I love many things about both film and digital and each has a place in my professional and personal photography life.

    5 steps to getting the look and feel of film using Lightroom

    If you shoot digital and are looking to achieve the look and feel of film, below are five easy steps using Lightroom.

    1. Set your ISO high

    ISO should be set to somewhere between 1600 and 6400. Digital noise is the modern day equivalent of the grain in film. The grain or digital noise creates atmosphere and the look or aesthetic that you are trying to emulate.

    2. Make an image of something interesting

    Look feel black white film Lightroom04

    Choose a subject. Framing and composition should be pleasing, and be careful to avoid too many distractions. Emotion is usually a good idea to include if there are people or animals in your photo. Any additional compositional techniques can be applied to the image. The subject could be in focus or blurry. This is completely up to you and your vision.

    3. Convert the image to black and white

    To convert your image to black and white, press V or use another method for black and white conversion in Lightroom. You can stay in color, but the look and feel of color film is more difficult to achieve and will require some additional steps.

    4. Open the Develop module in Lightroom

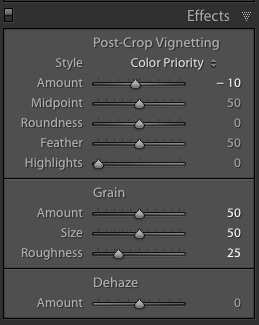
    Look feel black white film Lightroom11In the bottom panel of the Develop module called Effects, make the following adjustments:

    • Using the sliders, set the Post-Crop Vignetting to -10. Older camera lenses tended to impart some vignetting onto the image. This will give the image an authentic older film quality to it. Ansel Adams famously burned (darkened) the edges to all of his prints.
    • Set the Grain Amount slider to 50.
    • Adjust the Grain Size to 50.
    • Set the Grain Roughness to 25.

    5. Review your image and make the finishing touches

    Adjust the sliders to increase or decrease the three Grain options to achieve your vision for the given image. You can also dial in or out the vignette as well. All images are different and all digital image files will respond differently to these adjustments based on the sharpness and ISO settings.

    Look feel black white film Lightroom05

    You may want to consider the following questions to evaluate your adjustments at this point. Do these edits help the image? Does it assist in the presentation of the image as more abstract so that it might connect better with the viewer? Did the adjustments achieve the look at feel of film that you were gong for? You can decide on the answers to these questions and make editing decisions as you see fit or recruit a friend to provide a critique.

    If you like your results and would like to explore this topic further, there are free online software programs such as Analog Efex Pro that are part of Google’s Nik Collection. Presets are also available that will aid you in this process and even help you to achieve the look and feel of color film. You might want to consider making your own presets and applying them en masse to a given photo shoot or batch of images as well.

    Look feel black white film Lightroom06

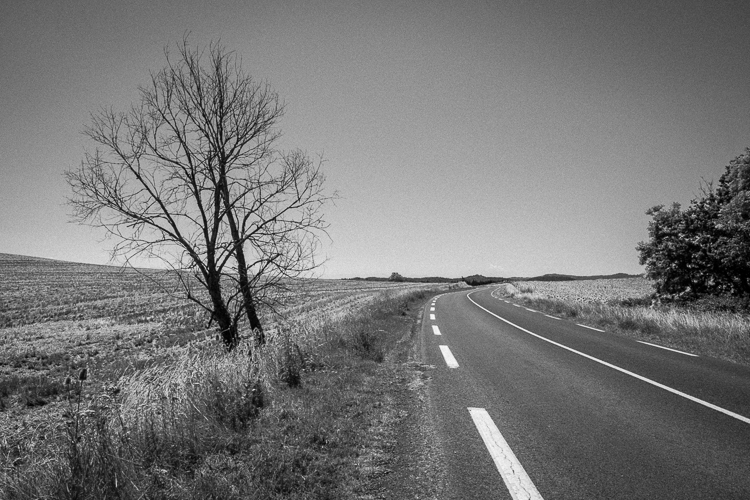
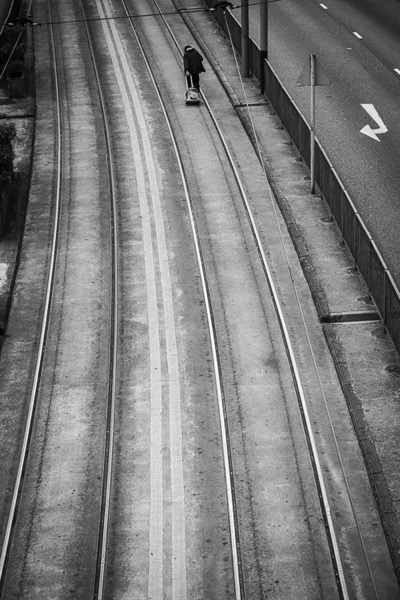
    Below are a few images representing multiple genres that I made with a digital camera then edited to achieve the look I was going for using the settings in the Effects panel above.

    Look feel black white film Lightroom07

    Look feel black white film Lightroom08

    Look feel black white film Lightroom09

    Look feel black white film Lightroom10

    Do you enjoy shooting film or reproducing the look of it using digital methods? Do you have a favorite way to achieve it? Please share in the comments below.

    googletag.cmd.push(function() {
    tablet_slots.push( googletag.defineSlot( “/1005424/_dPSv4_tab-all-article-bottom_(300×250)”, [300, 250], “pb-ad-78623” ).addService( googletag.pubads() ) ); } );

    googletag.cmd.push(function() {
    mobile_slots.push( googletag.defineSlot( “/1005424/_dPSv4_mob-all-article-bottom_(300×250)”, [300, 250], “pb-ad-78158” ).addService( googletag.pubads() ) ); } );

    The post 5 Steps to Achieve the Look of Black and White Film Using Lightroom by Jeremy H. Greenberg appeared first on Digital Photography School.


    Digital Photography School