Blog

  • Sony Xperia XZ scores 87 in DxOMark Mobile testing

    It seems the DxOMark test engineers have been very busy in the run-up to Christmas. After the results for the LG V20 and Huawei Mate 9 they have now also published the test report for Sony’s current flagship, the Xperia XZ. The XZ combines Sony’s own 23MP 1/2.3” CMOS sensor with a 24mm-equivalent F2 lens but, unlike most of its direct rivals, has to make do without an optical image stabilization system.

    When testing the device the DxOMark team were particularly impressed by the XZ’s AF-system that is fast and accurate in all conditions. They also liked the target-exposure, color and reliable white balance system. However, the Sony scored low for photo artifacts, such as haloing, ringing, and over-sharpening and lacked dynamic range in some situations. Overall photo score was 87 points.

    Thanks to its efficient video stabilization and exposure adaption the XZ could achieve an even better 88 points for its video mode. However, like the still images, video clips lack dynamic range and show some noise in low light scenes. The Sony’s overall score of 87 points puts it on the same level as the Xperia Z5 and just behind the Samsung Galaxy S7. You can find the full report on DxOMark.com or read our own review here at DPReview.com.

    Articles: Digital Photography Review (dpreview.com)

  • Photographer applies iris design to Aperture Wrench concept

    $ (document).ready(function() { SampleGalleryV2({“containerId”:”embeddedSampleGallery_7785582854″,”galleryId”:”7785582854″,”isEmbeddedWidget”:true,”standalone”:false,”selectedImageIndex”:0,”startInCommentsView”:false,”isMobile”:false}) });

    Photography hobbyist and industrial designer Jordan Steranka has published images of a new concept tool called the Aperture Wrench, a wrench with a design inspired by a camera’s diaphragm. Unlike an ordinary wrench, the Aperture Wrench features blade-like elements that open and close via a rotating wheel and lock in place with the press of a button.

    Steranka’s goal was to design a wrench that could be adjusted to fit any nut size, removing the guesswork involved in finding a correctly-sized wrench. The end result is a tool with aperture blades, an adjustment dial, a locking button, and a built-in light for better visibility. As with any concept, though, it’s possible the design will never make its way into mass production.

    Via: DesignBoom

    Articles: Digital Photography Review (dpreview.com)

  • Weekly Photography Challenge – Fishing

    Fishing and fishermen can be a fascinating subject for photographers. You can see that for yourself in these images we shared earlier. Here are a few more of my images of the fishing village in Nicaragua:

    fishermen-darlene-nicaragua-05

    The combination of the fish tails, pineapple, and a bottle of Coke caught my eye. With a bustle of activity on the beach behind it.

    fishermen-darlene-nicaragua-04

    These ladies were negotiating, a serious business.

    fishermen-darlene-nicaragua-03

    Happy with her purchase. Dinner tonight.

    fishermen-darlene-nicaragua-02

    This lady was a stern business woman. The men were not messing with her. It was all “yes maam, yes maam”

    fishermen-darlene-nicaragua-01

    A young helper. The family members come to help bring the haul in and get a few fish in exchange for their labor.

    Weekly Photography Challenge – Fishing

    This week we want to see images of fishing. Either people or animals in the act of actually catching fish or the equipment that we humans use such as nets, poles, boats, etc. to catch them.

    Nate2b

    By nate2b

    Luyen Chou

    By Luyen Chou

    Prayudi Hartono

    By Prayudi Hartono

    Florian F. (Flowtography)

    By Florian F. (Flowtography)

    Cycling Man

    By Cycling Man

    Riccardo Cuppini

    By Riccardo Cuppini

    Share your images below:

    Simply upload your shot into the comment field (look for the little camera icon in the Disqus comments section) and they’ll get embedded for us all to see or if you’d prefer, upload them to your favorite photo-sharing site and leave the link to them. Show me your best images in this week’s challenge. Sometimes it takes a while for an image to appear so be patient and try not to post the same image twice.

    Louis Vest

    By Louis Vest

    EPi.Longo

    By ePi.Longo

    Ilkka Jukarainen

    By Ilkka Jukarainen

    Vince Alongi

    By Vince Alongi

    Janmennens

    By janmennens

    Share in the dPS Facebook Group

    You can also share your images on the dPS Facebook group as the challenge is posted there each week as well.

    googletag.cmd.push(function() {
    tablet_slots.push( googletag.defineSlot( “/1005424/_dPSv4_tab-all-article-bottom_(300×250)”, [300, 250], “pb-ad-78623” ).addService( googletag.pubads() ) ); } );

    googletag.cmd.push(function() {
    mobile_slots.push( googletag.defineSlot( “/1005424/_dPSv4_mob-all-article-bottom_(300×250)”, [300, 250], “pb-ad-78158” ).addService( googletag.pubads() ) ); } );

    The post Weekly Photography Challenge – Fishing by Darlene Hildebrandt appeared first on Digital Photography School.


    Digital Photography School

  • MicroPAD: Tiny Mobile Units Aim to End Homelessness in San Francisco

    [ By SA Rogers in Architecture & Houses & Residential. ]

    micropad-tiny-housing-unit-1

    Could tiny prefabricated stackable mobile housing units help solve homelessness in cities like San Francisco, where nearly 7,000 people sleep in the streets every night? Affordable housing has all but disappeared in the Bay Area, pushing thousands of people out and giving many people nowhere to go. While most developers in San Francisco are busy working on building the kinds of expensive condos that exacerbate the problem, one is offering a potential solution in the form of minimalist pods.

    micropad-tiny-housing-unit-4

    micropad-tiny-housing-unit-8

    Patrick Kennedy and his team at real estate development and rental company Panoramic Interests present the MicroPAD, a self-contained, 160-square-foot mobile home that can stand alone or be stacked into a complex of up to 300 units. Nine-foot ceilings and generous windows flood the interiors with natural light, and each home contains a bed with storage drawers, a modest kitchenette, armoire closet, desk with chair and shelves, and a bathroom with a toilet and shower.

    micropad-tiny-housing-unit-6

    micropad-tiny-housing-unit-7

    The units can be manufactured in about a week, exceed California seismic code, are made of non-combustible materials and feature engineered soundproofing and 24/7 filtered ventilation. Ultimately, aside from the size, the MicroPAD offers better quality housing than the more conventional apartments for which many of the city’s residents already pay lots of cash. The size and stickability is a response to the eye-watering $ 1,200-per-square-foot cost of development within the cramped city – it’s quick and easy to build, and doesn’t take up a lot of space.

    micropad-tiny-housing-unit-11

    Using prefab materials shaves 40% off the cost of conventional construction, and the developers note that the units can be built on, or in the airspaces above, unused and underutilized city-owned lots to further cut costs. At a cost of $ 1,000 per unit per month, the MicroPAD would come in at well under the average $ 17,353 currently spent per year on each homeless person in other forms of supportive housing. Panoramic Interests has a bunch of proposals on their site showing how and where the units could be stacked into 33-unit or 300-unit buildings.

    micropad-tiny-housing-unit-2

    Clearly, a lot of thought has been put into this proposal, and the company has already produced a number of prototypes to demonstrate exactly how the units work – one is placed outside Kennedy’s office on Ninth and Mission, a neighborhood with a significant population of homeless people. Of course, in a city where anyone who isn’t a tech worker struggles to get by, this concept could and should be scaled up to offer affordable housing for all.

    Share on Facebook


    [ By SA Rogers in Architecture & Houses & Residential. ]

    [ WebUrbanist | Archives | Galleries | Privacy | TOS ]


    WebUrbanist

  • Sensor innovations push global shutter chip capabilities

    Engineers with Tohoku University have detailed a new project in which a CMOS sensor with a global shutter is able to record ultra-high-speed footage without the constraints of existing technology, namely short-duration recording and low resolutions. The end result is a CMOS sensor capable of recording one million frames-per-second over a ‘large’ duration of time, relatively speaking (480 micro-seconds in this case), at full resolution.

    By re-designing the sensor’s memory bank, researchers have tested a 96 x 128 pixel array with global shutter at 480 frames. The design is intended to be tiled on a sensor with 1MP resolution – clearly not enough for consumer photography, but great for engineering applications. 

    Don’t feel left out though, consumer photography and videography may also see benefits from this kind of technology – Canon also reported progress on its research of global shutter sensors. Canon’s technology similarly uses memory in an innovative way: by assigning each pixel its own memory cell. While Tohoku University’s research is concerned with ultra high speeds, Canon is looking for ways to improve the dynamic range of global shutter sensors. The company has tested a 10MP sensor at 30 fps – take a look at the results below. 

    Global shutter chips typically offer poor dynamic range. To improve DR, Canon has increased the number of ‘accumulations’ per frame, or the number of times each pixel deposits electrons to its associated memory cell. Image supplied by Canon

    Via: IEEE Spectrum

    Articles: Digital Photography Review (dpreview.com)

  • Google Pixel XL camera review

    $ (document).ready(function() { SampleGalleryV2({“containerId”:”embeddedSampleGallery_1207849172″,”galleryId”:”1207849172″,”isEmbeddedWidget”:true,”standalone”:false,”selectedImageIndex”:0,”startInCommentsView”:false,”isMobile”:false}) });

    For its latest smartphone generation, Google has dropped the Nexus moniker of previous models and used Pixel branding borrowed from the company’s top-end Chromebooks and tablets. The Pixel XL is the larger of two models and comes with a 5.5″ QHD-screen that uses AMOLED technology. 

    In terms of technical camera specifications, not much has changed compared to last year’s Nexus devices. A 1/2.3″ 12MP sensor is paired with an F2.0 aperture but offers no optical image stabilization. However, Google has flexed its muscles on the software side of things and added a new gyroscope-based video stabilization system that reads gyro data 200 times per second for smoother panning and shake-free handheld video recording.

    Additionally, thanks to more powerful processing and zero shutter lag the excellent HDR+ mode is now on by default, using an image stacking approach to reduce noise, capture better detail and increase dynamic range. While the Pixel XL’s camera hardware looks promising, it is these innovative algorithms that make the Google device one of the most interesting smartphones for photography released this year. 

    Key Photographic / Video Specifications

    • 1/2.3” 12MP CMOS sensor with 1.55µm pixels
    • F2.0 aperture
    • AF with on-sensor phase detection and laser-assistance
    • Dual-tone LED flash
    • 4K video at 30 fps
    • 1080p slow-motion at 120fps, 720p at 240fps
    • Manual controls and Raw-support with third-party camera apps
    • Gyroscope-based video stabilization
    • 8MP front camera, 1/3.2″ sensor, 1.4 µm pixels, F2.4, 1080p video
    • Unlimited cloud storage for full-resolution images and videos

    Other Specifications

    • 5.5-inch Quad-HD AMOLED screen
    • Qualcomm Snapdragon 821 chipset
    • 4GB RAM
    • 32/128GB storage
    • 3,450mAh battery
    • Splash and dust resistant
    • Fingerprint reader

    DPReview smartphone reviews are written with the needs of photographers in mind. We focus on camera features, performance, and image quality.

    Articles: Digital Photography Review (dpreview.com)

  • Save 60% off with these Professional Photoshop Actions & Lightroom Presets

    It’s Day 5 of our 12 Days of Christmas sale and today our friends over at Shutter PulseShutterPlus are offering an exclusive 60% off to dPS subscribers.

    Shutter pulse

    Today you can save 60% on their Professional Photoshop Actions and Lightroom Presets.

    Quality Photoshop Actions and Lightroom Presets allow you to save a massive amount of time during post processing, and they can also help you to achieve impressive looks and effects with ease.

    Today you have the option to pick up the following ShutterPlus Packs:

    • 300+ Photoshop Actions Bundle – Just $ 29, normally $ 39
    • 330+ Lightroom Presets Bundle – Just $ 29, normally $ 59
    • OR… get Both Bundles for an even bigger saving of just $ 39, normally $ 98!

    These Bundles Include 100’s of effects including:

    • Stunning HDR Effects
    • Vintage Effects
    • Cinema-Inspired Effects
    • Film-Inspired Effects
    • Matte and Haze Effects

    Pick up your bundle before it’s gone!

    P.S. You’ll need a copy of Adobe Lightroom and/or Photoshop to use Presets or Actions.

    P.P.S These presets are completely different to the dPS presets on sale yesterday, so here’s your chance to build up your preset collection so you have the right look for every occasion!

    googletag.cmd.push(function() {
    tablet_slots.push( googletag.defineSlot( “/1005424/_dPSv4_tab-all-article-bottom_(300×250)”, [300, 250], “pb-ad-78623” ).addService( googletag.pubads() ) ); } );

    googletag.cmd.push(function() {
    mobile_slots.push( googletag.defineSlot( “/1005424/_dPSv4_mob-all-article-bottom_(300×250)”, [300, 250], “pb-ad-78158” ).addService( googletag.pubads() ) ); } );

    The post Save 60% off with these Professional Photoshop Actions & Lightroom Presets by Darren Rowse appeared first on Digital Photography School.


    Digital Photography School

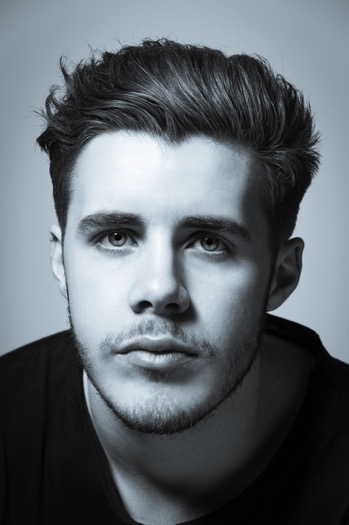
  • 5 Top Tips for Incredible Headshots Every Time

    Headshots are arguably the unsung heroes of the photography world. They’re everywhere, from social media profiles and advertisements to portfolios and hanging on the walls of the home. These carefully crafted images didn’t take themselves, though.

    If your headshot skills are a little wanting, there are a few tips you could take to improve your game. If you’re after magnificent snaps, for personal or professional reasons, follow these steps for a perfect shot every time.

    1. Let the eyes be the stars

    Eyes headshot tips Eyes headshot tips

    As cliché as it may sound, eyes really are the windows to the soul. By creating a clear focus on them, this is a world of opportunities that can instantly draw in the attention of a viewer. If you want to capture a certain emotion it’s easy to do so.

    Depending on the intended use of the images, you can convey a specific message. Want to create a professional looking photo? Focus on welcoming eyes that encourage contact. After a serious acting portfolio? Concentrate on targeting a stern appearance stemming from the eyes.

    Don’t be afraid to experiment with different poses, eye positioning, and lighting. After a few shots, you’ll know exactly what to do.

    2. Think about light

    Light headshots

    It may sound rather obvious, but light can create a number of different variations of the same photo. The best photographers know how to use light to their advantage and create excellent works of art.

    Again, this is largely dependent on the purpose of the shoot. Natural light and the outdoors are great for showcasing a genuine feel. Natural light can be powerful for achieving real-life situation photos. It will also allow you to grab an honest and genuine aura of the person.

    Light headhsots

    Artificial or studio light is an exceptional tool for providing a highly professional end result. You’ll be able to inject light where you see fit, creating a photo that screams professionalism. This is probably the better option for taking corporate headshots as it allows for a uniform lighting pattern amongst a team.

    3. The lens is key

    Lens headshots Lens headshots

    You’re probably very familiar with your lenses but with so many available, it can sometimes be difficult to know which one will work for each shot. Generally speaking, headshots aim to achieve two things. Compliment the subject and grab a clear and concise image.

    Even the best lenses on the market are vulnerable to distortion if used in the wrong way. Mid to wide angle options are best avoided, as headshots are taken within a fairly close range to the subject (they will create facial distortion).

    Using a 90mm or longer telephoto lens will let you capture a stunningly clear image, with the added benefit of slimming the face, which most subjects would be thrilled with.

    4. Capture the mood with your background

    Backdrop headshots

    Pathetic fallacy works on so many levels. Primarily used as a literary term for setting a mood or humanizing elements, the same criteria can be applied to the camera.

    If your shoot is outdoors, you don’t have to do too much to convey the message. Typically speaking, you wouldn’t capture a happy face in the rain unless you were doing a contrast shoot. You’d wait until the weather brightens up and use the environment to further enhance the purpose of the image.

    Backdrop headshots

    Healthy trees and plants have lively connotations; a park can showcase a playful personality. There are literally thousands of ways you can use a backdrop to strengthen your headshots. Just be careful that the attention isn’t taken away from the subject, though.

    5. Live the shoot as a director

    Director headshots

    As a photographer, you’re essentially the director of a film split into still photographs. This might not be completely for your benefit, but you’re the one who knows exactly how it should be done.

    Of course, it’s important to listen to the subject’s requirements, but from there you are the captain. Dictate how the shoot goes. Explore different angles. You are the professional after all.

    You’ll be working together to achieve the end goal. With your direction, knowledge, and experience, you’ll both get the best possible results.

    Director headshot tips

    It’s easy once you know how

    Headshots are among the trickiest photographs to capture. A demand for perfection is there almost every single time. With so many variants to take into account, what works for one shoot may be completely wrong for another.

    With a little thought and by leaning on your expertise, you’ll get incredible results. You’ll produce your best work and the subject will be more than happy. Everybody wins.

    Please post any questions or share your images in the comments section below.

    googletag.cmd.push(function() {
    tablet_slots.push( googletag.defineSlot( “/1005424/_dPSv4_tab-all-article-bottom_(300×250)”, [300, 250], “pb-ad-78623” ).addService( googletag.pubads() ) ); } );

    googletag.cmd.push(function() {
    mobile_slots.push( googletag.defineSlot( “/1005424/_dPSv4_mob-all-article-bottom_(300×250)”, [300, 250], “pb-ad-78158” ).addService( googletag.pubads() ) ); } );

    The post 5 Top Tips for Incredible Headshots Every Time by John Kemp appeared first on Digital Photography School.


    Digital Photography School

  • How to Understand and Use the Lightroom Histogram

    The histogram in Lightroom is a useful tool that is easily overlooked. Its main purpose is to help you understand the relationship between the sliders in the Basic panel and the tones in your photos. It helps you get brightness levels spot on and edit images without losing highlight detail.

    Where is the Lightroom histogram?

    The histogram is found in two places, at the top of the right-hand panels in both the Library and Develop modules. In the Library module, it helps you see what is happening to your image when you make adjustments in the Quick Develop panel. You also need it in the Develop module so you can see how any adjustments you make during post-processing affect the histogram.
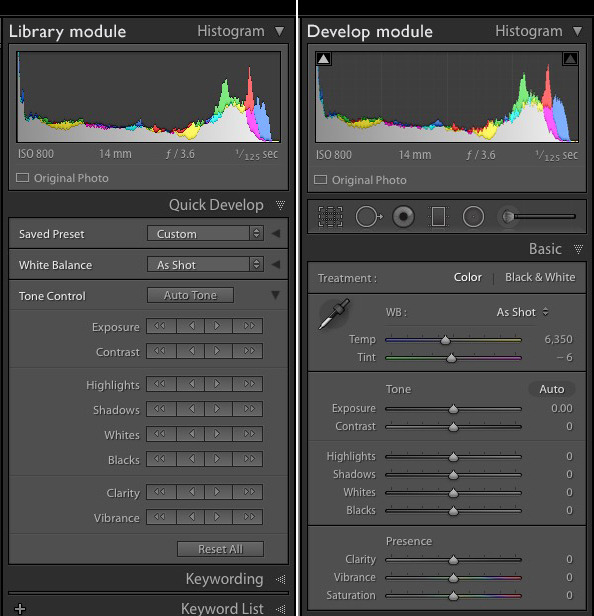
    The Lightroom histogram

    What does the LR histogram tell you?

    The histogram tells you whether you have any clipped highlights or shadows. It also tells you how much contrast the photo has. This information lets you decide whether you need to adjust exposure and contrast. It also tells you whether the original photo was over or underexposed. The histogram changes as you move sliders around in the Basic panel, so you can immediately see the effect.

    Important: Please note that the following features work with the Develop module histogram, but not the Library module histogram.

    How to check for clipping

    Clipping is indicated by the Show Shadow Clipping and Show Highlight Clipping triangular icons in the top left and right (circled below). Use the keyboard shortcut key J to show and hide clipping.
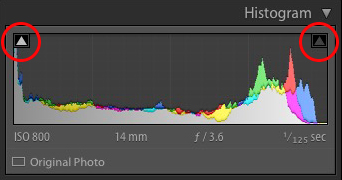
    The Lightroom histogram clipping

    In this histogram, the Show Shadow Clipping icon is colored white to show that the image contains clipped shadows (this is perfectly normal in many images and nothing to worry about).

    If you click on (or hover over) the Show Shadow Clipping icon, those clipped shadows are shown in blue in the photo.
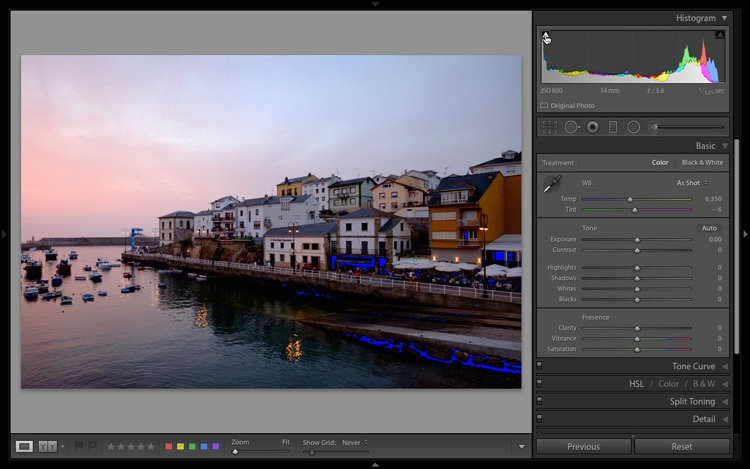
    The Lightroom histogram clipped shadows

    The Show Highlight Clipping icon on the right is colored gray to indicate that there are no highlights clipping. This is a good sign, as most photographers expose to preserve highlight detail.

    The Clipping icons also come in useful to indicate if you are losing detail in the highlights or shadows as a result of making adjustments in the Basic panel.

    If I set Exposure to +1.00 for this particular image, the histogram tells me that I have lost detail in the sky. The Show Highlight Clipping icon is colored white to indicate this. If you click the icon, clipped highlights are displayed in red in the image. You can see from the screenshot that only a small part of the sky is clipped. This may not be important, but it indicates that perhaps I increased the Exposure too much.
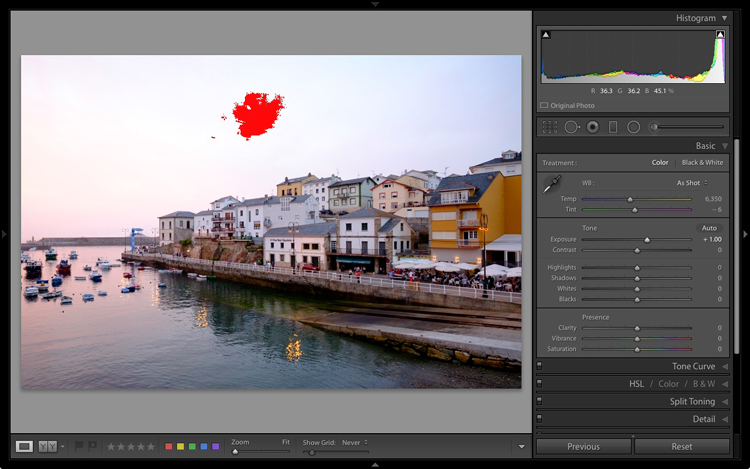
    The Lightroom histogram clipped highlights

    If I set Highlights to -100 the detail comes back in the sky and there is no clipping. Notice how the histogram has changed from above to the one below.
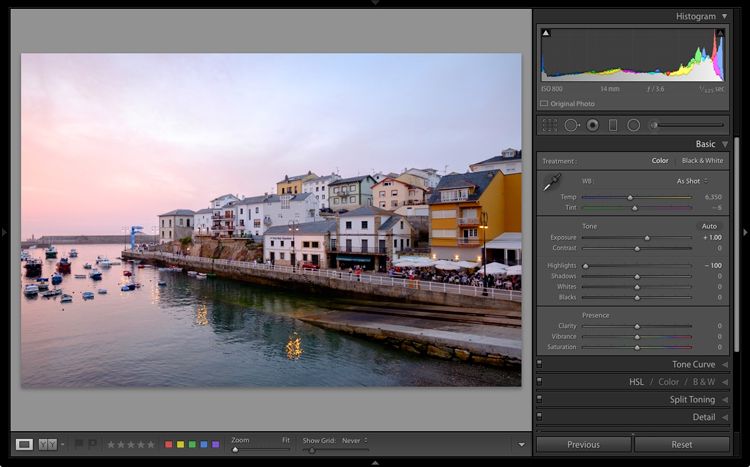
    The Lightroom histogram

    This simple example shows you how you can push sliders around, using the histogram to make sure that you don’t lose highlight or shadow detail.

    The histogram and underexposure

    If there is a gap on the right side of the histogram it probably indicates that the image was underexposed (an exception would be if the photo has lots of dark tones but few light ones – like a photo of a black cat sitting on a black rug).

    Here’s an extreme example. The photo generating this histogram was underexposed by over a stop.
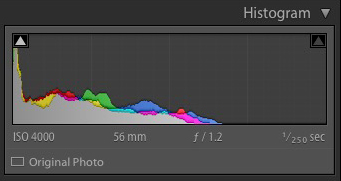
    The Lightroom histogram underexposed image

    A look at the photo confirms the histogram is correct and that it is underexposed (too dark).
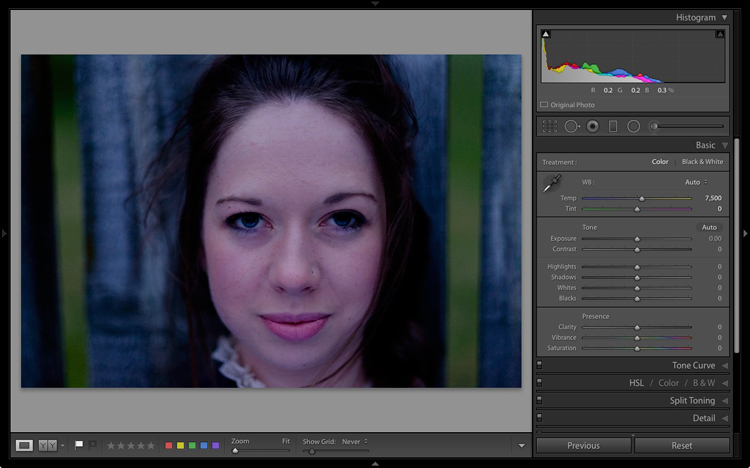
    The Lightroom histogram

    While it is best to get the exposure right in the first place, you can fix this by moving the Exposure slider to the right. As you do so, the histogram also moves to the right. The Exposure slider is quite clever and increases brightness mostly in the mid-tones to prevent highlight clipping. You may be able to push it a long way to the right without losing any highlight detail.

    Here, I set Exposure to +1.6, and the histogram looks much better.
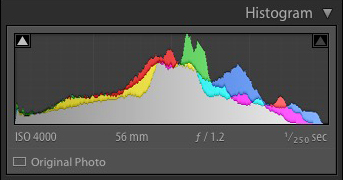
    The Lightroom histogram

    This is what the photo itself looks like after that simple adjustment. Now it is ready for further refinement.
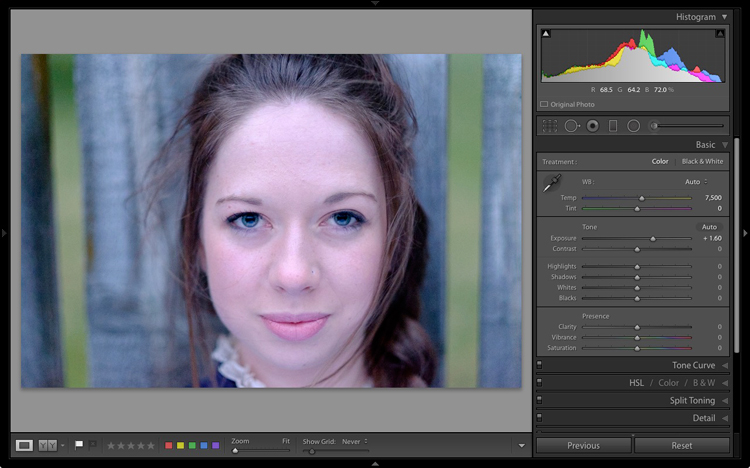
    The Lightroom histogram

    If you see a gap on the right side of the histogram yet the brightness of the photo looks okay to your eye, it could be a sign that the brightness of your monitor is set too high. If this is the case, you will find your photos look dark when printed or viewed on other people’s monitors. Ideally, you want to calibrate your monitor to be the correct brightness.

    The histogram and contrast

    If the histogram is bunched together and doesn’t cover the entire range of the graph this indicates that the photo has low contrast. This is most likely to happen when shooting in flat light.

    Here’s a histogram that demonstrates this.
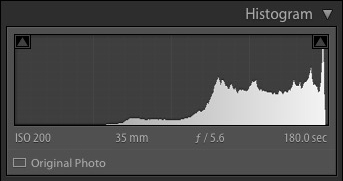
    The Lightroom histogram low contrast

    The histogram belongs to a black and white photo taken on a cloudy day in warm and humid conditions. The spray coming from the sea reduced the contrast of the scene, resulting in a very flat image.
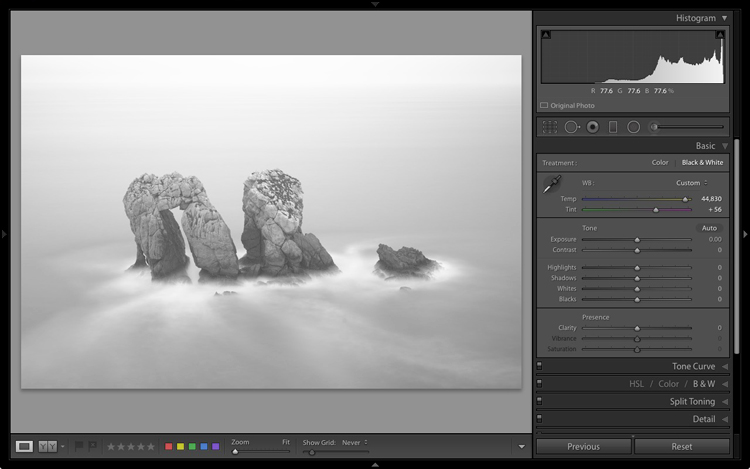
    The Lightroom histogram

    I used the Tone sliders to increase contrast and stretch the histogram so that it filled the space available. The histogram acted as a guide that told me exactly what was wrong with the image and helped me add the contrast back into the photo that it lacked.
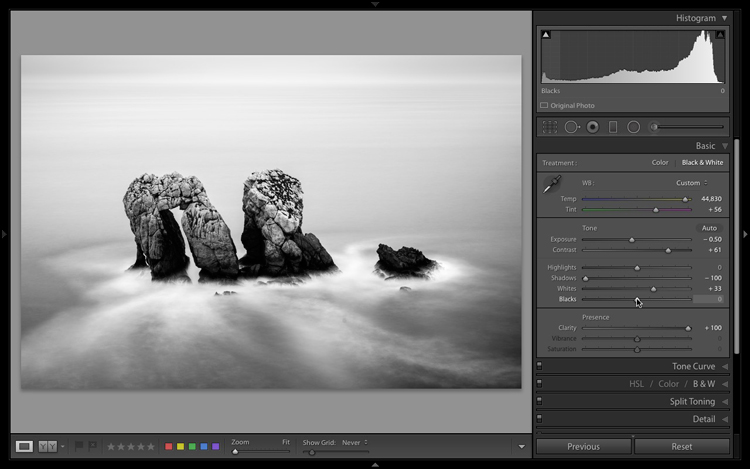
    The Lightroom histogram contrast adjusted

    The histogram and the Tone sliders

    There are five zones in the Lightroom histogram.

    When you move the mouse over the Exposure, Highlights, Shadows, Whites or Blacks sliders in the Basic panel the zone that is affected by that slider is shown in light gray in the histogram. I’ve added red lines to make it clear where each zone falls.
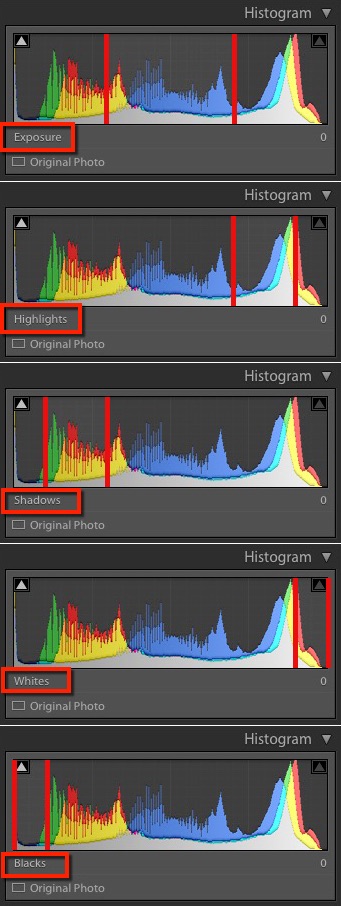
    lightroom-histogram-zones

    The same zones are shown when you move the mouse over the histogram itself. The name of the slider that controls the tones in that part of the histogram is displayed underneath.

    This diagram (right) shows the zone that corresponds to the Shadows slider.lightroom-histogram-sliders
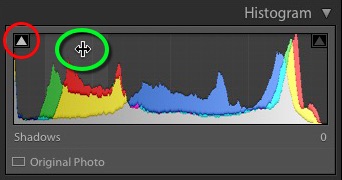
     

    When you see the icon with the two arrows (circled in green), hold the left mouse button down and move side to side to adjust move the Shadows slider left or right. The histogram will change as you do so. This technique gives you control over the Tone sliders from the histogram itself.

    Each slider controls a particular zone, but bear in mind that those adjustments also make changes in the other zones. Don’t worry if this sounds complicated – it will make perfect sense once you try it out for yourself. The key is to practice, and you will soon understand the relationship between the Tone sliders and the histogram.

    Luminance and color histograms

    If you’re processing a color photo you’ll notice part of the histogram is colored. Lightroom is actually showing you four histograms in one. On top is the luminance histogram, shown in gray. This shows brightness values only and has nothing to do with color. This is similar to the luminance histogram on your camera. The other three histograms are colored red, green and blue and correspond to the color channels in the image (some cameras also show these histograms).

    You’ll also see some additional colors (like yellow) where the red, green and blue histograms overlap.

    Saturation and the histogram

    The color controls in the Basic panel affect the color histograms. The easiest way to show you is by demonstrating how the Saturation slider affects the color histograms. Here is a histogram belonging to a color photo, with Saturation set to zero.
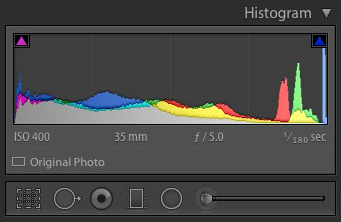
    The Lightroom histogram

    This is what happened when I set Saturation to +100. Increasing Saturation means that the colors are stronger. The result is that the peaks of the color histograms are higher.
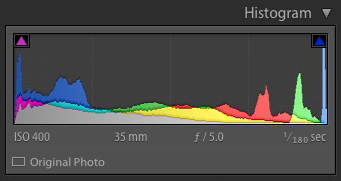
    The Lightroom histogram

    You’ll also notice that the Shadow Clipping icon (on the left) has turned magenta, and that the Highlight Clipping icon (on the right) has turned blue. These indicate that there is clipping in the shadows, but only in magenta hues, and that there is clipping in the highlights, but only in the blue channel.

    This is an extreme example because in real life you will never increase Saturation to +100. But there may be times when you make adjustments that clip colors rather than brightness values. It probably doesn’t matter in images viewed on a computer screen, but it may do with images that are printed on paper or reproduced in a book or magazine.

    Finally, when I move the Saturation slider to -100, which removes all color from the photo, the color histograms disappear and we are just left with the luminance histogram. This is a useful tip if you would ever like to see the luminance histogram by itself.
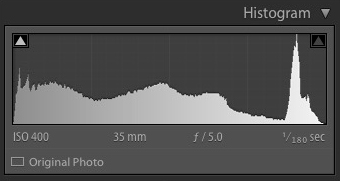
    The Lightroom histogram

    Conclusion

    That concludes our overview of the histogram in Lightroom. Hopefully, you can see what a useful tool it is for processing photos in Lightroom. If you have any questions about the histogram, please let me know in the comments below.


    If you enjoyed this article and woudl like to learn more about Lightroom then please check out my Mastering Lightroom ebooks.

    googletag.cmd.push(function() {
    tablet_slots.push( googletag.defineSlot( “/1005424/_dPSv4_tab-all-article-bottom_(300×250)”, [300, 250], “pb-ad-78623” ).addService( googletag.pubads() ) ); } );

    googletag.cmd.push(function() {
    mobile_slots.push( googletag.defineSlot( “/1005424/_dPSv4_mob-all-article-bottom_(300×250)”, [300, 250], “pb-ad-78158” ).addService( googletag.pubads() ) ); } );

    The post How to Understand and Use the Lightroom Histogram by Andrew S. Gibson appeared first on Digital Photography School.


    Digital Photography School

  • Modern Mirrorless: Canon EOS M5 Review

    Introduction

    The Canon EOS M5 is the most enthusiast-friendly EOS M yet. It’s a 24MP mirrorless camera built around a Dual Pixel APS-C sensor, giving it depth-aware focus across most of the frame. On top of this it adds a built-in electronic viewfinder, a good number of external controls (including twin control dials) and a well implemented touchscreen.


    This level of direct control puts it comfortably ahead of Sony’s a6000 and a6300, and more on par with Panasonic’s GX85 (GX80 in some markets) and GX8 enthusiast models. All of these cameras aim to offer stills and video capabilities in relatively small bodies but with a reasonable level of direct external control.

    Key Specifications

    • 24MP Dual Pixel APS-C CMOS Sensor
    • 2.36M-dot OLED electronic viewfinder
    • 1.62M-dot tilting rear touchscreen
    • Electronic video stabilization combines with in-lens IS to give 5-axis IS
    • 7 fps continuous shooting (9 fps with focus and exposure locked)
    • Wi-Fi with always-connected Bluetooth

    The Canon EOS M5 is a very approachable camera, despite all those buttons and dials. In fact, it’s the implementation of this touchscreen that, in general, we’re most impressed with. Much like the system developed by Panasonic, the M5 not only lets you use the rear touchscreen to position focus, it also allows its use as a touchpad to move the focus point when you’re shooting through the viewfinder. This, combined with decisive autofocus, has proven to be significant for both stills and video shooting. 

    The camera has four dials in total: two main dials on the top of the camera, a dedicated exposure compensation dial and a fourth dial encircling the four-way controller on the back of the camera. This is a much higher level of direct control than offered on the simpler EOS M-series models offered previously, suggesting Canon expects the user to take more hands-on control of the shooting experience.

    Three of the four control dials on the M5 are on the top plate, giving users easy access to exposure parameters.

    While the lack of 4K video capability is a disappointment, the ability to use the touchscreen to re-position the focus point with a high level of confidence that the camera will smoothly glide the focus to the right point is highly desirable.

    The touchscreen-plus-Dual-Pixel-AF combination is also useful for stills shooting – you can not only use the touchscreen to drag the focus point around the screen but also use it to select between available faces if shooting or recording in face detection mode.

    The other significant benefit of the M5 finally receiving Canon’s Dual Pixel AF system is that it is now able to focus adapted EF and EF-S lenses very effectively – overall performance isn’t quite the same as an 80D in Live View mode, but it’s leaps and bounds ahead of any previous M camera. You’re also no longer limited to the small central focus area offered when using comparable Rebel / EOS x-hundredD DSLR models, and focusing is almost DSLR-quick and decisive.

    Compared with its peers

    The enthusiast photographer has a good number of choices when looking for a reasonably sized mirrorless camera with a good degree of direct controls. Sony offers the a6000 and a6300 (the higher-specced a6500 comes in at a significant premium over the EOS M5), depending on how much you need 4K video and how demanding your AF needs are. Meanwhile, Panasonic offers both the GX85 and GX8, with the more expensive model offering higher resolution and a better viewfinder. Olympus’s E-M5 Mark II offers a broadly similar feature set and form factor. All of these models are extremely capable, with ease-of-use being the Canon’s most obvious response to their broadly higher video specifications.

      Canon EOS M5 Sony a6300 Panasonic GX8
    MSRP $ 1099 with 15-45mm lens $ 1149 with 16-50mm lens $ 1199 body only
    Pixel count 24MP 24MP 20MP
    Focus method ‘Dual Pixel’ on-sensor PDAF On-sensor PDAF Contrast detection*
    EVF 2.36M dots 2.36M dots 2.36M dots
     Dials Two on top plate
    Exposure Comp
    Four-way/dial
    Top plate
    Four-way/dial
    Two on top plate
    Exposure Comp
    Continuous shooting 9 fps
    (7 with live view and C-AF)
    11 fps
    (8 with live view)
    8 fps
    (5.5 with live view)
    Video specifications 1080/60p 4K/30p
    1080/120p
    4K/30p
    1080/60p
    Peaking/Zebra Yes/No Yes/Yes  Yes/Yes
    Touch focus in video Yes No  Yes
    Battery life
    Screen/EVF
    295/295 shots 400/350 shots 330/310 shots

    * When using Panasonic-branded lenses the GX8 adds distance prediction based on the out-of-focus characteristics of the lens (A system the company calls ‘Depth From Defocus’).

    So, is the EOS M5 the mirrorless tour de force we’ve been expecting from Canon? It’s no secret that we found it to be an incredibly promising camera, even if it is a bit late to the party. To find out just how compelling an option the M5 is, let’s press on.

    Articles: Digital Photography Review (dpreview.com)