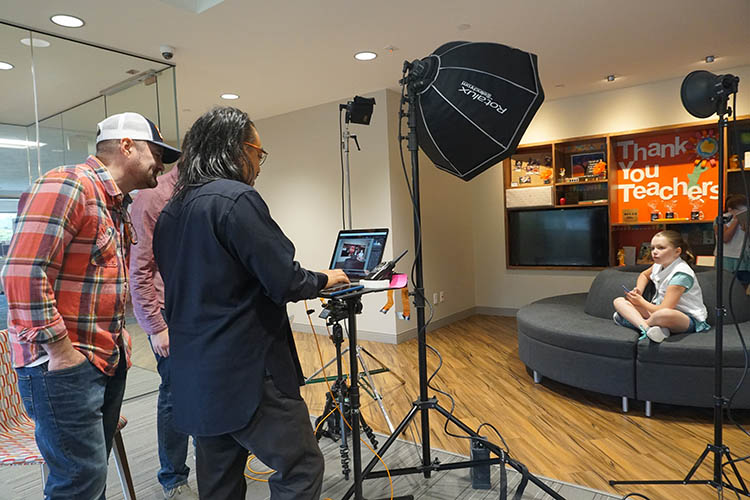
Blog

  • Nokia Lumia 1020 used as microscope in low-cost DNA sequencer

    The Nokia Lumia 1020 was launched back in 2013, but with its large 41MP sensor and innovative down-scaling algorithms is by many still regarded as one of the best smartphone cameras today. 

    Now, a team of researchers from the University of California, Sweden’s Stockholm University and Uppsala University has used exactly that camera to design a smartphone-based low-cost DNA sequencer and molecular analyzer. A $ 500 3D-printed attachment turns the Lumia camera into a microscope that can then be used by health workers in developing nations and remote locations to find genetic mutations that cause diseases without analyzing samples in a lab. Usually, the equipment needed for this task costs tens of thousands of dollars. 

    When testing, tissue samples are placed in a small container. The Lumia and optical attachment are then used to record multi-color fluorescence and bright-field images. The captured image data is fed into an algorithm for analysis in order to find any possible mutations. The teams says the design can detect even a small amount of cancer cells or other genetic mutations within a large amount of normal cells. 

    Given the Lumia 1020 has been out of production for quite some time it’s good news that the optical attachment can be adapted to work with more recent smartphone models. 

    Articles: Digital Photography Review (dpreview.com)

  • How to Create a Rim Light Effect Using Photoshop

    Lighting is a huge integral part of a movie’s success. The same applies to photography. It’s all about the light or lack of it to create the drama in an image. Rim lighting, as the term suggests, is also called edge or back lighting. In this article I will show you how to create this dramatic style of lighting.

    how to create a rim light effect in Photoshop

    A rim light effect created in-camera and an Inner Glow effect added in Photoshop.

    Rim lighting adds drama

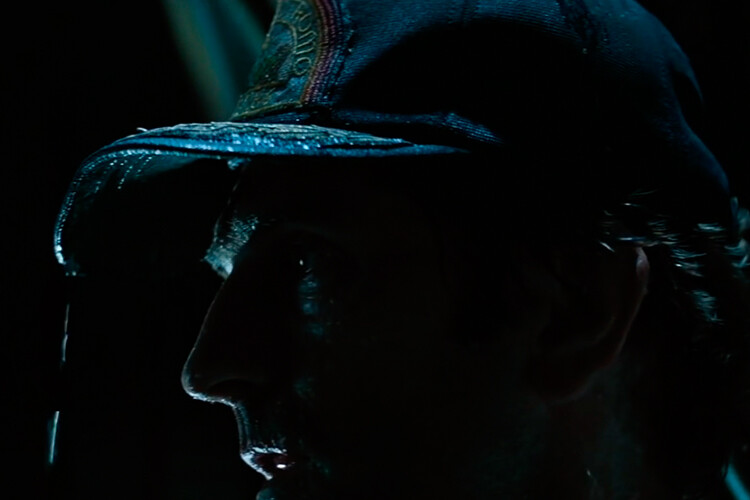
    There’s a particular scene in the movie Alien (1979) in which the character played by Harry Dean Stanton goes to find Jones the cat. That scene had me glued to my chair with both hands up to my mouth and fingers lodged between my teeth. You just knew something bad was going to happen but it was drawn out with unbelievable tension.

    How to Create a Rim Light Effect Using Photoshop Alien

    Alien Courtesy of 20th Century Fox

    The lighting throughout the movie was low key to give that moody atmospheric feel.

    A good example of rim lighting is using two side lights or one light from behind the subject, as in the image below.

    How to Create a Rim Light Effect Using Photoshop

    In this photo the light is behind the subject creating an edge or rim light around the subject’s head. This is also called a hair light.

    Before I demonstrate how to create a rim light effect in Photoshop. I want to show you just how easy it is to get a rim light effect in-camera, so you can try it out in the comfort of your own home.

    Create a rim light effect in-camera at home

    I used the following setup to create my rim light:

    • One bottle of water
    • One glossy black tile
    • Two lights
    • A camera mounted on a tripod

    I picked up a sample black glossy tile from a local tile shop, where I was able to purchase just the one. As for the lighting, strip softboxes are ideal for this type of rim lighting. You place a strip softbox on each side, and slightly behind (closer to the background), the subject.

    Unlike standard softboxes, strip softboxes are narrow and rectangular in shape. But, for the purpose of this article so that you can easily do a similar setup in your own home, use whatever light sources that you already have at your disposal.

    Using my iPad placed vertically to one side of the bottle, I opened the Soft Box app which is free to download and set it to white. I placed an LED light on the other side of the bottle. My kitchen table was used for the setup.

    As you can see in the photo below, I was able to angle the lights so that I could control the rim light hitting the bottle. My camera settings were: ISO 2000, 1/60th of a second, at an aperture of f/5.6.

    How to Create a Rim Light Effect Using Photoshop

    A simple setup that you can do at home to create a rim light effect in-camera using a black glossy tile, a prop, and two lights.

    NOTE:

    If you don’t want to use two lights and you have a regular softbox, try placing it directly behind the object and cover the center of the softbox with a strip of black card (that will become your background). You will need to experiment to get the rim lighting around the object.

    how to create a rim light effect in Photoshop

    This is the bottle of Water straight out of the camera.

    Let’s dive into Photoshop.

    Creating a rim light effect in Photoshop

    The key to adding the rim light effect in Photoshop is Layer Styles and having the subject isolated from the background. Before any layer style can be applied, it is necessary that the image that you are applying the style to has been carefully cut out. Use whatever selection tool you want but I would recommend using the pen tool.

    Layer style

    Let’s take a look at Layer Styles. With Photoshop open, go over to the Layers Panel. Scroll down to the bottom and you will see a group of icons. You will see this icon, fx second to the right. Click on that and a pop-up dialog box will appear with different preset style options.

    How to Create a Rim Light Effect Using Photoshop layer styles

    The Layer Styles presets are accessed by clicking on the fx icon located at the bottom of the Layers Panel.

    How to Create a Rim Light Effect Using Photoshop - The Inner Glow preset

    The Inner Glow preset

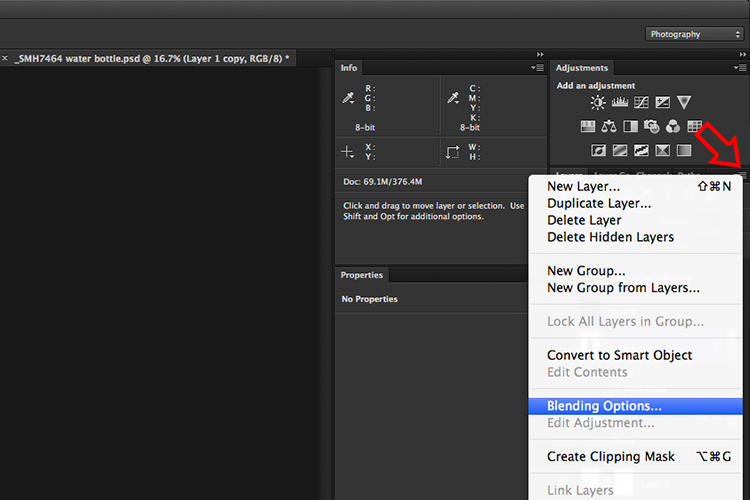
    Alternatively, you can access the Layer Styles by going back to the top right corner of the Layers Panel and clicking on the downward arrow icon with horizontal lines beside it. Scroll down to where it says Blending Options. The same Layer Style option box appears and just click on Inner Glow.

    How to Create a Rim Light Effect Using Photoshop

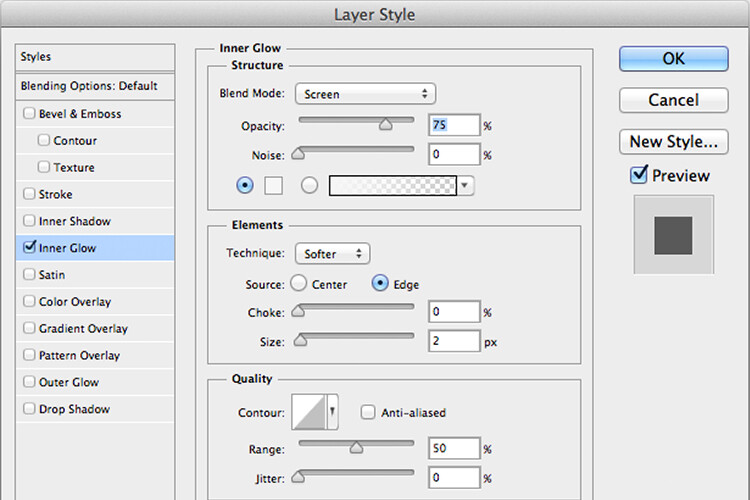
    When you click on any of the Layer Style options, the settings are all preset options, but they can be easily edited. In this example, leave some of the settings as they are and only adjust the following three:

    1. Choke – similar to feathering
    2. Size
    3. Opacity

    Experiment until you get the desired effect, then click the OK button.

    How to Create a Rim Light Effect Using Photoshop

    The Layer Style pop-up dialog box with the default settings.

    adding a rim light effect in Photoshop

    A rim light effect is added in Photoshop using Inner Glow from the presets in the Layer Styles.

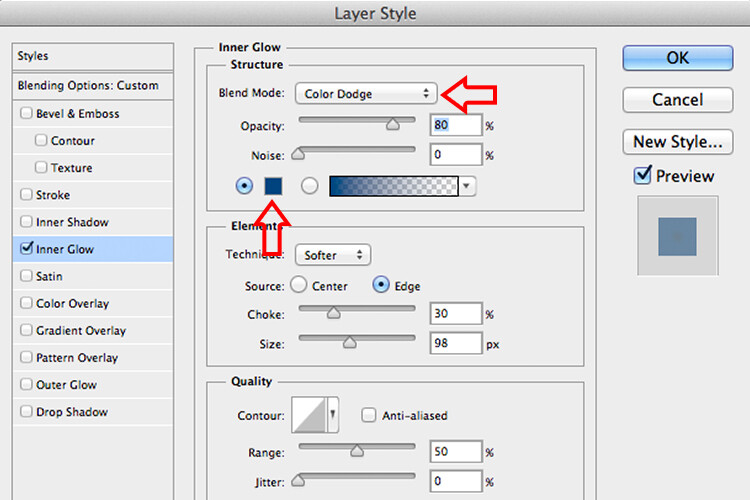
    Using Color Dodge Blend Mode instead of Screen

    My preference when using this Layer Style technique is to change the Blend Mode from Screen to Color Dodge. I used this on the bottle of water in the title shot. To illustrate the subtle differences between the two Blend Modes, see the two photos below. The first image is the Inner Glow with Screen as the

    The first image is the Inner Glow with Screen as the default setting. For the second image, I changed the Blend Mode to Color Dodge.

    alt=

    Changing the Blend Mode to Color Dodge

    How to Create a Rim Light Effect Using Photoshop inner glow

    Rim light effect created in Photoshop using Inner Glow from the presets in Layer Styles.

    How to Create a Rim Light Effect Using Photoshop

    This rim light effect is created using Inner Glow from the Layer Style presets but I changed the Blend Mode to Color Dodge.

    Creating a rim light from scratch using Photoshop

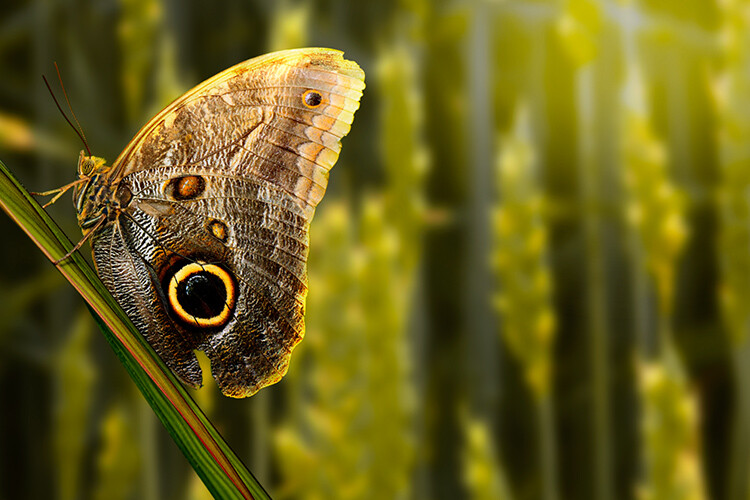
    However, this technique really does shine when you have to create the rim light effect totally in Photoshop. For example, take this Owl Butterfly image that I got from www.pixabay.com. It has no rim light effect on it at all.

    How to Create a Rim Light Effect Using Photoshop owl

    Owl Butterfly from Pixabay 1668956 – dowload the image if you want to follow along.

    I isolated the Owl Butterfly from the background using the Pen Tool and placed it against a different background shot to which I added a Gaussian Blur.

    How to Create a Rim Light Effect Using Photoshop owl

    Wheat from Pixabay 8244_1920

    As I had the Butterfly on its own separate layer, I added an Inner Glow from the Layer Styles and changed the Blend Mode to Color Dodge and chose a darkish yellow. I wanted a backlight to appear on the wings of the Butterfly caused by the setting sun in the background.

    How to Create a Rim Light Effect Using Photoshop owl before

    The Owl Butterfly was cut out using the Pen Tool in Photoshop and placed it against another background image. I blurred the background using Gaussian Blur.

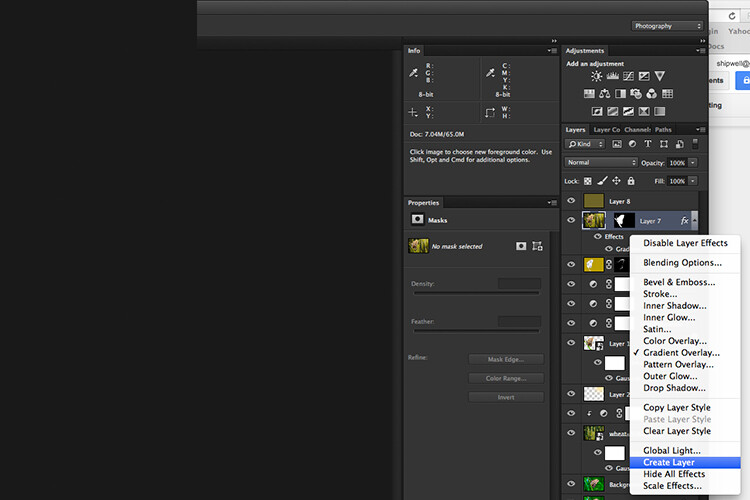
    I put this Layer Style effect on its own separate layer. Then I applied a layer mask and brushed in the yellow glow on the wings to give it a more realistic look. I did a bit more retouching by adding a gradient Overlay and then applied the Filter>Blur>Average to blend the colors from the two images.

    How to Create a Rim Light Effect Using Photoshop layer style

    By placing the Layer Style effect on its own separate layer. I was able to apply a layer mask and brush the Glow effect onto to the wings of the Butterfly.

    How to Create a Rim Light Effect Using Photoshop owl after

    An Inner Glow was added using the blend Mode set to Color Dodge. I then added a Gradient Overlay to darken the bottom part of the Butterfly and I applied an Average Blur to blend the color of the two images.

    Your turn

    I hope I have been able to show you how effective creating a rim light in Photoshop can enhance your images. Do you use this effect on your images? Feel free to give it a try and post your results below, I will try to answer any questions and would love to see your images.

    googletag.cmd.push(function() {
    tablet_slots.push( googletag.defineSlot( “/1005424/_dPSv4_tab-all-article-bottom_(300×250)”, [300, 250], “pb-ad-78623” ).addService( googletag.pubads() ) ); } );

    googletag.cmd.push(function() {
    mobile_slots.push( googletag.defineSlot( “/1005424/_dPSv4_mob-all-article-bottom_(300×250)”, [300, 250], “pb-ad-78158” ).addService( googletag.pubads() ) ); } );

    The post How to Create a Rim Light Effect Using Photoshop by Sarah Hipwell appeared first on Digital Photography School.


    Digital Photography School

  • GIMP seeks funding for future advanced features

    Open source image editing application GIMP has always been free, but the work required to continue building and improving the software doesn’t come without cost. In a recent post, the team asks GIMP’s users to lend financial support to Øyvind Kolås, the man behind the Generic Graphics Library (GEGL) and 42% of its commits.

    Kolås is responsible for numerous improvements to the graphics engine GEGL, as well as the pixel data conversion library babl. Thanks to this work, in part, GIMP 2.10 will offer numerous notable features including the previously announced 16-bit and 32-bit color channel processing. However, some requested features are still missing, including CMYK and spot colors support, additional filters, better GPU usage and more. 

    To help get the ball rolling on those features and others like them, GIMP is pointing users toward a Patreon page for Kolås, where he explains, “GIMP does not redistribute donations to developers/contributors — and I am currently living off savings…” Thus far 186 patrons have lended a total of $ 793/month support for Kolås. Support options for prospective patrons starts at $ 2/month, and ranges up to $ 128/month or higher for institutions.

    Via: GIMP

    Articles: Digital Photography Review (dpreview.com)

  • How to Stand Out as a Photographer in a Crowded Market

    In today’s world of rapidly changing technology, there’s one big problem that you and every aspiring photographer must face; you are one among many. It no longer takes years of practice or even an expensive camera to make someone a talented, and in some cases professional, photographer. Whether you are an aspiring pro or just taking up photography as a hobby, here are five ways to challenge yourself and stand out as a photographer in today’s crowded market.

    How to Stand Out as a Photographer in a Crowded Market

    1. Keep evolving your craft

    Let’s start with the good news; just because someone has a camera doesn’t mean they know how to take great photos. In fact, there are very few people who desire to shoot in anything other than the automatic program function of their cameras.

    Dedicate yourself to mastering every aspect of photography. If you’re shooting in full auto, learn how to shoot in Aperture Priority, then Shutter Priority, and then finally Manual mode. If you’ve mastered natural lighting, move on to off-camera flash and other lighting techniques. Keep pushing forward and challenging yourself to master new aspects of photography, and you’ll always be a step ahead.

    How to Stand Out as a Photographer in a Crowded Market

    2. Focus on one area of expertise

    Just as the photography market has become saturated, so has the industry for teaching photography skills. From websites like dPS to local workshops, there are many avenues to learn about every aspect of photography. In order to keep evolving your craft and not get overwhelmed by the plethora of information out there, focus your studies on one aspect of photography to start. Also, limit the resources you use for the sake of consistency.

    This same strategy of limiting your areas of expertise is also true if you’re aiming to start a photography business. Narrowing your focus makes it much easier to grow your skills quickly, and also attract clients that you actually want to work with.

    How to Stand Out as a Photographer in a Crowded Market

    3. Only implement new technology if it’s working for you

    No matter how many features are packed into a camera, your job is ultimately about producing a good photo. Sometimes, having the latest camera packed with tons of fancy new high-tech features can actually overcomplicate your work. I remember the first time I tried shooting tethered for a new corporate client. It was only my third time using that process, and I was so overwhelmed by other factors on set that my attempt at using technology just caused more frustration.

    If you invest in new technology, be sure it is actually enhancing your workflow and not holding you back. Take the time to practice using it over and over until it feels like second nature. And always have a fallback plan, since technology notoriously fails at one point or another.

    How to Stand Out as a Photographer in a Crowded Market

    4. Work your people skills

    Being a skilled photographer isn’t just about growing your technical abilities. You should also have excellent people skills. As a professional photographer, it’s not uncommon to be hired for a photo shoot or complemented on my work before my client even looks at my photos. I’ve come to realize it’s all about people skills and making people feel comfortable even before delivering a service.

    Even if you don’t photograph people, you still interact with them to set up photo shoots and sell your services. Practice your people skills and get good at putting a smile on someone’s face even when they’re not in front of your camera.

    How to Stand Out as a Photographer in a Crowded Market people skills

    5. Continue to network and put your work out there

    Another positive aspect to a growing interest in photography is the huge uptick in communities for photographers. From Instagram and Facebook Groups to local Meetups, there are tons of places to meet fellow photography enthusiasts. Take part in communities such as the Digital Photography School Group. Check out the questions and conversations others are having. Put your work out there to get feedback from others and make improvements accordingly. Also, don’t be afraid to chime in and offer your own constructive criticism.

    In Conclusion

    What are your thoughts on the role of evolving camera technology today? Do you have your own tips and strategies for standing out as a photographer in a saturated market? Let me know in the comments below!

    googletag.cmd.push(function() {
    tablet_slots.push( googletag.defineSlot( “/1005424/_dPSv4_tab-all-article-bottom_(300×250)”, [300, 250], “pb-ad-78623” ).addService( googletag.pubads() ) ); } );

    googletag.cmd.push(function() {
    mobile_slots.push( googletag.defineSlot( “/1005424/_dPSv4_mob-all-article-bottom_(300×250)”, [300, 250], “pb-ad-78158” ).addService( googletag.pubads() ) ); } );

    The post How to Stand Out as a Photographer in a Crowded Market by Suzi Pratt appeared first on Digital Photography School.


    Digital Photography School

  • Waste Not: The Trash Can that Inspired the World’s Tallest Condo Tower

    [ By WebUrbanist in Architecture & Houses & Residential. ]

    park-avenue-trashscraper

    432 Park Avenue in Manhattan has taken criticism for various reasons since well before it was completed, but its source of inspiration makes it almost too easy: the skyscraper was inspired by a garbage bin.

    trash-can-skyscraper

    Specifically, Rafael Viñoly cited a 1906 trash can designed by Josef Hoffmann of the Vienna Workshops as a pattern basis for the gridded exterior of the supertall tower. The design origins were confirmed by the developer but are also plain to see. The infamous bin itself retails for $ 225, which could be considered cheap for a classic design object … or expensive for something you fill with garbage.

    That grid design is intended to mask the fact that the columns of the building need to be wider at the base in order to support its immense height. The thick grid from top to bottom disguises this transition from wider to narrow, covering structural columns toward the top. It is the third-tallest structure in the United States and tallest residential tower on the planet.

    trash-tower-design

    Aside from aesthetic critiques, the skyscraper has come under fire for supply a relatively handful (just over 100) units at immense sizes to support occupancy but the wealthy elite. Of course, it is not that unusual for industrial design to inspire architecture. Still, the fact that its design was inspired by a waste receptacle only adds fuel to those who see it as an eyesore and sign of urban opulence.

    Share on Facebook


    [ By WebUrbanist in Architecture & Houses & Residential. ]

    [ WebUrbanist | Archives | Galleries | Privacy | TOS ]


    WebUrbanist

  • Throwback Thursday: Fujifilm X100

    The X100 wasn’t the first compact camera to include a truly large sensor: Sigma gets the credit for that, but it was the first to get enough right to really grab the attention of photographers.

    We’d been asking manufacturers to build a small camera with a big sensor for a number of years, so you can imagine the buzz in the office when Fujifilm showed up in London with a pre-production X100 and asked ‘Is this what you meant?’

    The company had recognized that its most successful niche (the S-series superzooms) was becoming a commodity market, with most customers caring more about how many ‘X’ the zoom range was, rather than which brand name was printed on the front. So it set out to build a product to appeal to serious photographers.

    Its response was to create a retro-looking camera that recreated the look and concept of the fixed-lens rangefinders cameras that sold so well throughout the 60s and 70s. But the X100 wasn’t a rangefinder, instead incorporating a clever ‘hybrid’ viewfinder that let you switch between an optical and digital preview, depending on what you were trying to shoot. And photographers loved it.

    The X100’s fixed 35mm equivalent lens, relatively small size and easy-to-access external controls make for an exceptional ‘walk around’ second camera. Photo by Carey Rose

    The camera’s size and styling meant it immediately caught the photographic imagination. The fixed lens design meant that users of other system didn’t have to worry about lens compatibility or changing systems, it was another tool that did a different thing, which helped it find space in the camera bags of all kinds of photographers.

    In the wake of this success, we’ve seen several other manufacturers try to burnish their photography credentials by introducing large sensor, prime lens cameras. Sony went full frame with the capable but quirky RX1, Nikon followed Fujifilm’s lead and stuck its consumer compact branding on the 28mm-equiv Coolpix A and Ricoh gave its GR series a new lease of life by putting an APS-C sensor inside, but none of these have hit the combination of features, price, capability and downright desirability that the X100 achieved.

    Stumbling start

    That said, at launch, the camera was more cool concept than polished product. It was slow, it was full of maddening quirks and it needed to be switched to Macro mode at exactly the focus distance you wanted to use it at. In fact it was so far from the level of refinement that we were used to that we included a whole page listing the bugs, quirks and idiosyncrasies at the end of our review.

    And, to its credit, Fujifilm listened. In a series of firmware updates the company not only smoothed-over a host of the camera’s most annoying rough edges, but then went about adding features.

    It’s hard to remember, now, but as recently as 2010 it was very rare for camera makers to do anything beyond fixing critical bugs with firmware. A combination of not wanting to acknowledge any shortcomings and of wanting to divert development resources to the next project meant that cameras didn’t tend to get much better after launch.

    Even in the troubled early days, the files – and especially the colors – from the X100 were as handsome as the camera itself. Photo by Carey Rose

    Fujifilm rode-out the internet sniping about ‘releasing unfinished products’ and established a model of mid-life improvements and updates that is being increasingly adopted across the industry. More than three years after the X100’s launch, Fujifilm continued to offer not only autofocus improvements but also additional features such as focus peaking that hadn’t even been considered at the camera’s original launch.

    And there are some aspects of the camera that firmware could never fix. The manual focusing remains vague and fussy, the lens’ otherwise excellent performance drops off significantly at close distances and the focus mechanism, which moves a relatively large, heavy focusing group, is never going to be ‘snappy.’ Yet the X100 and its successors remain versatile, likeable cameras.

    A camera to love

    Our original (initial firmware) review concluded that ‘the X100 is too flawed to quite earn our outright recommendation, but if you’re prepared to tolerate its foibles as the price to pay for its superb image quality, it’s a camera you can easily grow to love.’

    And it’s that last sentiment that captures the X100 perfectly. In spite of all of its flaws, several members of DPR staff went out and bought the camera and there’s barely a member of staff since who hasn’t owned at least one camera from the X100 series.

    Onward and upward – though Fujifilm has been busy keeping the X100 line up to date, we’ll always have a soft spot in our hearts (and for some of us, a space in our camera bags) for the original. Photo by Carey Rose

    In the six years since the launch of the original X100, retro design has become commonplace, large sensors in small cameras have become ubiquitous but the X100’s combination of concept, capability and style still help it stand out. For all its faults, its status as a classic, rather than a camera designed to resemble one, looks assured.

    Do you own any X100-series cameras? Will you be buying the new X100F? Let us know in the comments!

    Original Fujifilm FinePix X100 Sample Gallery

    Please do not reproduce any of these images on a website or any newsletter / magazine without prior permission (see our copyright page).

    We make the originals available for private users to download to their own machines for personal examination or printing (in conjunction with this review), we do so in good faith, please don’t abuse it. Unless otherwise noted images taken with no particular settings at full resolution.

    Note: Please click through for full-size images from this legacy gallery.

    $ (document).ready(function() { SampleGalleryV2({“containerId”:”embeddedSampleGallery_5116050090″,”galleryId”:”5116050090″,”isEmbeddedWidget”:true,”standalone”:false,”selectedImageIndex”:0,”startInCommentsView”:false,”isMobile”:false}) });
    Articles: Digital Photography Review (dpreview.com)

  • Photographer captures stunning Aurora Borealis time-lapse from airplane

    If you’re seated next to a window on a flight to Iceland, it’s a good idea to keep your camera close. Landscape photographer Aryeh Nirenberg did, and was treated to an incredible show from the Aurora Borealis at 35,000 feet. With an empty row and his camera nearby, he created an impromptu rig to stabilize the camera and record the time-lapse above.

    Whatever works, right? Nirenberg’s D810 is braced against the window with a tripod, and a blanket cuts glare from the cabin lights.

    Nirenberg propped his Nikon D810 against the window using his tripod, and wrapped a blanket around the lens to cut the glare from cabin lighting. We think the effort was well worth it for a unique view of one of nature’s best light shows.

    Check out Aryeh Nirenberg’s Instagram to see more of his work.

    Articles: Digital Photography Review (dpreview.com)

  • Modern Mazes: 15 Labyrinths Made of Glass, Steel, Light and Salt

    [ By SA Rogers in Art & Installation & Sound. ]

    light-maze-1

    Escaping the convoluted confines of the conventional hedge-in-a-garden, the labyrinth takes on ever more complex forms to better confuse you with, especially when mirrors, glass or mechanical elements are involved. These immersive installations use unusual materials and disorienting configurations to encourage visitors to wander, explore, face uncertainty about their paths and pause to marvel at the beauty of it all.

    Maze Made of Light by Brut Deluxe

    light-maze-2

    light-maze-3

    light-maze-4

    This immersive light maze made of acrylic panels with dichroic film applied to one side creates a reflective rainbow you can walk through. Once you’re inside, circles cut into the acrylic transmit colors from other areas of the maze. ‘Yûzhóu’ was craeated by architecture and design studio Brut Deluxe for the Luneng Sanya Bay Light and Art Festival in Hainan, China.

    Vertical Maze Tower in Dubai

    maze-tower-2

    This 56-story skyscraper in Dubai is the world’s tallest vertical maze according to Guinness. DAR Consult worked with maze designer Adrian Fisher to design the eye-catching accent, highlighting it in thousands of LED lights to make it stand out after dark.

    Big Maze by Bjarke Ingels Group at the National Building Museum

    big-maze-1

    big-maze-2

    big-maze-3

    big-maze-4

    With high birch panel walls that tower over you along the edges shrinking to waist-height at the very center, this maze by architecture firm Bjarke Ingels Group gets easier the navigate the further you go. The life-sized indoor maze was assembled inside the National Building Museum in Washington DC. “The concept is simple: as you travel deeper into a maze, your path typically becomes more convoluted,” say the architects. “What if we invert this scenario and create a maze that brings clarity and visual understanding upon reaching the heart of the labyrinth?”

    Steel Labyrinth by Gijs van Vaerenbergh at C-Mine Art Centre, Belgium

    steel-maze-1

    steel-maze-2

    steel-maze-3

    steel-maze-5

    steel-maze-4

    The architect duo known as Gijs Van Vaerenbergh experimented with the classic form of the labyrinth for a sculptural installation at the center of the C-Mine Arts Centre in Genk, Belgium. The design, made of 5mm-thick steel plates weighing a total of 186 tons, is envisioned as a composition of walls and voids that strategically frame various areas with cut-outs. An accompanying tower outside the maze allows visitors to get a bird’s eye view of the entire thing.

    Salt Labyrinths by Motoi Yamamoto

    salt-labyrinth-2

    salt-labyrinth-1

    salt-labyrinth-3

    This labyrinth is so minuscule in scale, only insects could ever hope to navigate it, but it’s a wonder to take in from above. Artist Motoi Yamamoto is known for his intricate temporary sculptures made of salt, creating complex arrangements that almost seem organically formed.

    Next Page – Click Below to Read More:
    Modern Mazes 15 Labyrinths Made Of Glass Steel Light And Salt

    Share on Facebook


    [ By SA Rogers in Art & Installation & Sound. ]

    [ WebUrbanist | Archives | Galleries | Privacy | TOS ]


    WebUrbanist

  • Architectural Relics: When Demolition Leaves Behind Nonsensical Structures

    [ By SA Rogers in Architecture & Cities & Urbanism. ]

    thomasson-2

    Steps that go nowhere, pedestrian walkways that dead-end into elevated bridges, doors that open out into mid-air: these so-called ‘Thomassons’ are what happens when workers demolishing an outdated structure leave part of it behind, whether out of necessity or laziness. Ultimately, they become almost sculptural in their absurdity, visual ties to the past of a particular place. Walking up one of those staircases to nowhere almost seems like it could be the key to time travel.

    thomasson-10

    thomasson-3

    Japanese artist Akasegawa Genpei named these nonfunctional structures ‘thomassons’ or ‘hyperart thomassons’ in the ’80s in reference to a baseball player with a ‘useless position’ on his team. He noted one such structure in Tokyo in 1972, a staircase that had no entranceway once you reach the top. Discovering more around the city, Akasegawa began giving them names like “the useless window of Ekoda,” building a collection that was published as a book called Chogeijutsu Tomason.

    thomasson-5

    thomasson-6

    thomasson-7

    ???????? #???? #????? #?????

    A photo posted by ???? ?????????Y????? (@ytanet) on


    These days, images of such relics are collected via Instagram tags, on the Hyperart: Thomasson tumblr and on Reddit. There’s even a Thomasson Observation Center on Facebook, accepting public submissions and curating them into new visual references.

    ???????? ?????? #????#??#??????? #?????#

    A photo posted by uu_architects (@uu_architects) on

    ?????? #????

    A photo posted by ??????/masataka matsuoka (@masatakamatsuoka) on

    thomasson-wikimedia-1

    thomasson-wikimedia-2

    Like the human appendix, these vestigial structures have long since ceased to be useful, yet somehow they’re still around, even as the world constantly shifts and changes. That in itself is pretty strange and incredible.

    (images: Mathieu C, Matthew Fargo, Seng Chen and mindbomb via hyperart thomasson tumblr; reddit; wikimedia commons)

    Share on Facebook


    [ By SA Rogers in Architecture & Cities & Urbanism. ]

    [ WebUrbanist | Archives | Galleries | Privacy | TOS ]


    WebUrbanist

  • The Myths and Realities of Becoming a Professional Photographer

    As a professional photographer, I think the number one mistake for aspiring pros is to fall for certain myths about the craft and career. In this article, we’ll look at some of the myths and realities of being a professional photographer. If you’re on the fence about taking the leap it may help you decide.
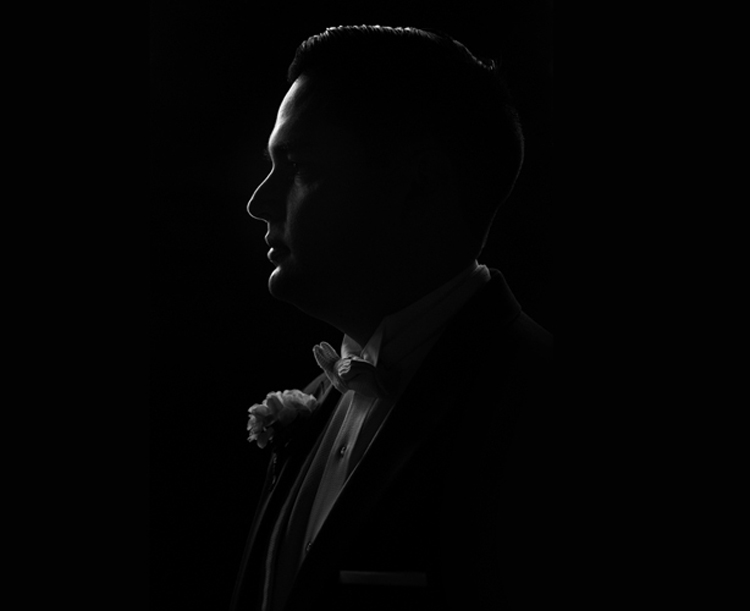
    professional photography myths

    But first a little story

    My heart was beating fast as I approached the school. My dad was holding my hand when I started to put my foot down on the ground. Despite my protests, my dad quickly dropped me in class and left in a flash. I wasn’t his problem anymore.

    Bad move. I started screaming.

    The teacher, as wise and as calm as she could, tried to calm me down. She made the mistake of putting her hands near my face. I opened my mouth just like you see in the movie jaws and WHAM I bit her hands and pressed as hard as I could. I bit her so bad you would think an enraged dog bit her.

    The moral of the story

    What, you may ask, does that have to do with professional photography? In a sense, everything, because that episode taught me about one thing I would like to talk about today – setting expectations.

    You see, I had absolutely no idea what I was getting into both as a 5-year-old heading to school for the first time and starting out as a professional photographer. They both caused me trouble. If you do not plan, you plan to fail, but it’s hard to plan when you have absolutely no idea what to expect!

    professional photography myths

    Here are a few myths that I believed about professional photography and how reality slapped me hard. Hopefully, these will help you avoid the same mistakes I made.

    Myth #1 – Being a professional photographer = validation

    I don’t know where the idea comes from, but it seems like for everyone that picks up the camera, the pinnacle of achievement seems to become a professional photographer. It’s almost like a necessary evolution. At first, you have a camera, people start complimenting your work, then you decide to become a pro. It was too late for me to realize it, but I would have been perfectly happy as an amateur.

    At the end of the day what really matters is the images, if you can get a few bucks for them, great! But becoming a pro will not magically validate you or your images. I expected to feel better about my images and myself when money started rolling in, but that never really happened.

    Myth #2 – You get to spend all your time shooting

    pro-photography-myths-1

    This is most likely the biggest myth of all time in regards professional photography. People sell it to you like all you will be doing is shooting all day, every day. But that is far from the truth because you will spend more time seeking work than actually working.

    You don’t spend most of your time shooting, you spend it marketing, attending events, networking, putting yourself out there. Whatever time you get in front of the camera, you’ll spend two to three times as much simply editing as well.

    If you believe photography is hard, it is actually the easy part. The hard part comes after; selling your work. It’s a sobering truth that probably hits every photographer, writer, painter, etc., that the product or service is only the first and easiest part of the process, the hardest effort comes afterward.

    professional photographer myths

    But you say, “I believe that I am good photographer, and people will realize how much better I am than Joe Shmoe.” I understand the feeling, and you are probably better than Joe, but that brings us to the next myth.

    Myth #3 – Being good is enough

    I call this myth the “best product fallacy”. Just because you are good doesn’t mean anything. Van Gogh was good yet he died in obscurity. Talent is not enough, the world has millions of talented photographers, painters, actors and more that are eating dust.They had a social experiment where they put one of the

    There was a social experiment where they put one of the world’s highest paid musicians in a subway station, playing a million dollar violin by the way. Did the world recognize his talents, did they put their wallets out begging him to take their money? No. Nobody really cared. Watch the video below.

    We’ll get back to this later but for now, just know it doesn’t matter that you’re a good photographer. Don’t get me wrong, you’d better be good at what you do, but that does not in any way shape or form guarantee you success by itself. Talent is just not enough.

    Myth #4 – You’ll be rich and famous

    If everything you see is success story after success story, doesn’t it follow that if you try it too, you might become rich and famous? Even more, won’t you just blaze through it because you are talented? Many photographers make a living telling you how to be a professional, so of course, they will sell you a dream. It’s like many guys on YouTube, you’ve probably seen a few.

    professional photographer myths

    They try and sell you a dream. But the reality for all the photographers that I know, is that it’s an income that pays the bills. And they sure aren’t well-known outside their local area. Sure there are superstar photographers in the world but that is what they are, stars. Just like the Hollywood stars, for every well-known one, there are others just making a living.

    The things is that not everyone can be a superstar photographer (depending on who you ask, a superstar makes more than $ 40,000 a year) because when it comes to wealth distribution there is inherent inequality. There will always be a group that makes more than the rest combined. For example, there’s about 20% of the countries that have 80% of the wealth, about 20% of actors make 80% of the wealth, about 10% of the companies that make 90% of the wealth: Companies like Apple, Google, Microsoft, Samsung, etc., take the lion’s share.

    Only the top elite will ever reach that level

    Same for photography, there’s a group that earns more than all others combined (and if you really want to go deep, a group within that group that earns more than the others combined again, Terry Richardson, who earned 58 million in one year, is probably in that group ).

    professional photographer myths

    The worse part is that many of them make it sound easy because they want to teach you how to become a professional photographer. I’m not saying you can’t become rich and famous. What I am saying is, that when you are on your quest for fame and fortune know that there’s only a few that can make it to the very top. It’s a bit like football, not everyone can be an NFL player. That should put in perspective the amount of effort required.

    Count the costs

    A few years ears ago I had to rent a U-Haul truck to move from my apartment to my wife’s parents’ house with our baby in tow. The reason was that I had failed to understand that professional photography was as much about marketing and selling as it was photography. It almost cost me my marriage as well.

    So, count the costs. If you want to build a house, add up the costs, if you want to be a pro, count the costs. It’s not just about shooting, see the sacrifices and the long and hard road ahead.

    professional photographer myths

    Also, understand the nature of the beast. You will usually see success stories but never those who have failed…and there’s more of the latter than the former. Take it from me, I cried many times because things were not working.

    What now?

    This article is by no means meant to discourage you from becoming a professional photographer, just the opposite. It is meant to empower you to avoid unnecessary pitfalls due to unrealistic expectations. That episode at 5-years old would not have happened if only my dad prepared me for exactly what was going to happen. I would not have needed to move out to my in-laws’ if I had known what to expect going pro.

    If you want to become a pro, by all means, go for it, just be realistic about it. You’ll need to learn a whole other field (business, marketing, etc.) above and beyond photography. Coming back to Joshua Bell (the violinist), he didn’t change, his skills didn’t change, the only difference between him and countless other metro violinists is his marketing. So the wisest thing you can do is to learn about marketing, running a business, and how to sell your work. This is probably the single most important piece of advice I could ever give you, because trust me, your images won’t sell themselves.

    professional photographer myths

    Conclusion

    I love being a professional photographer, I wouldn’t do anything else, it’s in my blood. But making a living from photography is harder than many would lead you to believe. It’s not just about being talented, it’s about selling yourself, and more of your time will be spent doing the latter than the former.

    I believe people make mistakes so that not only they can learn from them, but others can benefit as well. So, take it from me, I had to move in with my wife’s parents, I was on the brink of divorce and had many teary nights. Count the costs, and learn how to sell.

    Be yourself, stay focused, and keep on shooting.

    googletag.cmd.push(function() {
    tablet_slots.push( googletag.defineSlot( “/1005424/_dPSv4_tab-all-article-bottom_(300×250)”, [300, 250], “pb-ad-78623” ).addService( googletag.pubads() ) ); } );

    googletag.cmd.push(function() {
    mobile_slots.push( googletag.defineSlot( “/1005424/_dPSv4_mob-all-article-bottom_(300×250)”, [300, 250], “pb-ad-78158” ).addService( googletag.pubads() ) ); } );

    The post The Myths and Realities of Becoming a Professional Photographer by Olivier Duong appeared first on Digital Photography School.


    Digital Photography School