Blog

  • NAB 2017: Hot products and trends

    NAB 2017

    Yesterday marked the end of NAB 2017, the annual convention of the National Association of Broadcasters. NAB isn’t really a consumer-oriented event, but we like to go because it gives us some insight into trends and technology that will trickle down to prosumer and consumer products within a few years, as well as new products designed for these users.

    With over 100,000 people in attendance, and almost 2,000 companies exhibiting, it’s a safe bet that we can’t share everything from NAB with you. (And really, do you want to hear about things like the latest advances in rack-mount news van hardware?) That said, let’s take a look at some of the things that did catch our eye at NAB 2017.

    Atomos rocks the house

    An afternoon trip to the Atomos booth is like the NAB equivalent of trying to get into a U2 concert. Things got so crazy in recent years (thanks in part to daily equipment giveaways), that for 2017 Atomos built a booth where CEO Jeromy Young could hold court and do live demos for the masses from an elevated perch. I almost expected him to start singing ‘Don’t cry for me, Argentina’ as he leaned over the balcony.

    But the masses had good reason to be excited, because Atomos showed off a couple very cool products… 

    Atomos Ninja Inferno

    Although it was announced about a month ago, this was the first chance many people had to get their hands on the new Ninja Inferno off-camera monitor and recorder. The Ninja Inferno is basically a non-SDI version of the company’s flagship Shogun Inferno, and Atomos is specifically targeting Panasonic GH5 users with support for 4K/60p recording via HDMI-out. For $ 995 it seems like a pretty compelling package, and apparently the masses agreed.

    We have a Ninja Inferno we’ve been testing with the GH5, so we’ll be bringing you an in-depth look at this combination in the near future.

    Atomos Sumo

    While Shoguns and Ninjas drew people into the Atomos booth, what really got their attention was the new Sumo. Imagine an oversized, 19″ Shogun recorder and you’ll have a pretty good mental image of what it is. It can record 4K 12-bit Raw, 10-bit ProRes/NNxHR.

    But the Sumo isn’t just for on-set monitoring and recording. It’s also designed to be an HDR color grading monitor, either in the field or in your edit suite. With a brightness of 1200 nits and a claimed 10+ stops of dynamic range, the Sumo can accept Log, PQ, or HLG signals from your editing software and display color accurate HDR footage with 10-bit quality.

    This thing is a beast. If you want a sense of scale, look at the lower right hand corner of the picture above. See that little thing next to it? That’s a 7″ Shogun recorder. And with a price tag of $ 2,495, it’s surprisingly affordable. I want one of these things!

    Blackmagic URSA Mini Pro

    Blackmagicdesign is another company on fire with useful products for emerging filmmakers and even consumers. At NAB the company showed off its recently released URSA Mini Pro 4.6K camera. It offers a user-swappable lens mount, with support for EF, PL, and B4 mounts, and the company promises a Nikon mount later this year. Its Super 35 sensor captures 15 stops of dynamic range, and the camera includes built-in ND filters for optimal exposure. 

    the URSA Mini Pro feels like a very solid piece of equipment, and with a price tag of $ 5,995 it offers a lot of bang for the buck.

    DaVinci Resolve: More features, lower price

    Blackmagic also announced upgrades to its industry standard DaVinci Resolve software.

    Branded as DaVinci Resolve 14, the new version promises to revolutionize the Resolve experience. In addition to a fully integrated NLE and industry leading color grading tools, Resolve 14 now includes pro-level audio tools, the result of a 2016 acquisition of Fairlight, a manufacturer of audio hardware and software for motion picture production. The addition of Fairlight audio tools means that users have access to professional editing, color correction, and audio tools in a single piece of software. Blackmagic claims that Resolve 14 also improves playback performance by a factor of 10.

    What’s possibly just as interesting as the new features is the new price. While the basic version of Resolve will remain free, the full DaVinci Resolve Studio 14 will cost $ 299, a significant decrease from the previous price of $ 995. This is a shot across the bow of Premiere Pro and Final Cut Pro X, and should attract a lot more new users to the system. A beta of Resolve 14 is available now.

    Blackmagic Mini and Micro Panels

    One of the important features of the DaVinci Resolve experience has been integration with the DaVinci Resolve Advanced Panel, a $ 30,000 piece of hardware used by professional colorists, but out of reach to users with smaller budgets.

    A few weeks ago, Blackmagic introduced two smaller panels, the Resolve Mini Panel ($ 2,995) and the Resolve Micro panel ($ 995). These smaller panels would be useful for a pro to use in the field, or in a smaller home studio, however they also represent a very affordable way for smaller production companies, or even enthusiasts, to access pro-level editing equipment at an affordable cost. I found both panels to be very easy to use: the trackballs and dials are very smooth and well-weighted, and the panels actually feel a lot more solid than they appear in pictures (at least to me). I think this is a great addition to the Resolve family of products, and I hope to do an extended test at some point.

    Blackmagic Web Presenter

    I know, I’ve covered a lot of Blackmagic products already, but I’m going to throw in one more. The Blackmagic Web Presenter is a box that does one basic thing, but does it really well. It takes output from any camera via HDMI or SDI, and converts the signal to a high quality 720p stream that gets sent to a computer through USB so that it appears as a standard webcam.

    What that means is that you an use virtually any camera as a high quality webcam for applications like Skype, YouTube Live, or anything else that uses a webcam as a video source. So, if you’re tired of using your cheap built-in camera or mobile phone for your guest appearances on CNN, plug your GH5, 5D IV, or E-M1 II into the Web Presenter and Anderson Cooper will have no idea you’re coming to him live from your living room.

    DJI meets Hasselblad: 100MP aerial photos ensue

    Remember that time when DJI took an ownership stake in Hasselblad? Remember how we all joked that DJI would put a medium format camera on a drone? We all got some good laughs out of that, didn’t we?

    Well, they went and did it, pairing a DJI M600 Pro hexacopter and a Hasselblad H6D-100c 100MP camera mounted on a Ronin-MX gimbal. Pricing hasn’t been announced, but the good news is that you can get the M600 Pro for only $ 5,000. Of course, you’ll still need a $ 30,000 H6D-100c to complete the package. (Though I hear free shipping is common…)

    Curiously, there were a couple Hasselblad X1Ds sitting next to the drone as well, a camera whose size and weight might be more amenable to flight. I asked a Hasselblad representative if there were plans to release a similar combination using the X1D instead, but he wouldn’t confirm if that were the case. Of course, he didn’t deny it either.

    Virtual Reality

    Virtual reality, or VR, has been trying to get traction in the market for several years. Although it has gained some success in the gaming community, adoption of VR technology for photos and video has been slower. However, that certainly isn’t keeping people from trying to find the magic formula, and there’s a lot of investment from companies trying to do just that. Let’s take a look at a few VR products that grabbed our attention.

    New Ricoh Theta

    By now, everyone has probably heard of the Ricoh Theta. In fact, it’s one of the few VR cameras that has seen fairly wide adoption, thanks to its compact size and ease of use. However, the current Theta S still suffers from relatively low 1080p video quality and a lack of spatial audio.

    The new Theta prototype on display at NAB addresses both of those issues, with 4K capture, four microphones, and also live 4K streaming capability. What really stands out to me here is the directional audio. Even at 4K, your VR viewing experience is still somewhat limited by the relatively low resolution of most viewing hardware, however in a demo the spatial audio was immediately noticeable. Instead of guessing where sound is coming from and trying to correlate it with what’s in front of your eyes, directional sound allows you to tell where the sound is coming from, providing a more immersive experience. No word on when the next Theta will be released.

    Ricoh Theta R Development Kit

    We first saw the Ricoh Theta R development kit at CES, but it was on full working display at NAB. The Ricoh R is based on the same overall design as the Theta, but has a very different purpose: it’s designed to provide 24-hour 360º live streaming. As such, there are a few differences in the product.

    The most obvious one is a ribbed surface on the camera, which we’re guessing is to assist with heat dissipation. Also, unlike the upcoming version of the Theta, the Ricoh R still uses 1080p resolution, which should reduce data usage while streaming 24/7. Additionally, all image stitching is done in-camera, which makes it easy to feed out VR video for streaming. There’s no internal battery either, which probably makes sense for a device designed to run 24 hours a day.

    What will the Ricoh R be used for? Well, pretty much anything you want, ranging from a security camera to placing it in the middle of a falcon’s nest. Ricoh wants you to develop unique applications. It will be available in June, and you can pre-order it now for $ 499.

    YI Halo VR camera

    YI Technology arrived in town with the new YI Halo, a VR camera built around Google’s Jump platform. The Halo utilizes 17 synchronized 4K YI cameras to record 8K stereoscopic video. At first glance, it appears that the cameras in the Halo are just standard YI 4K action cameras, but that’s not the case. While similar in size and shape, YI has actually made special cameras optimized for easy swapping and improved heat management.

    After watching some sample videos from the Halo I have to admit I was pretty impressed. It’s some of the better VR footage I’ve seen. What particularly stood out were outdoor scenes with bright clouds. Clouds tend to be blown out on most VR cameras due to limited dynamic range, but on the Halo footage you could still see quite a bit of detail without darker areas on the ground being crushed to black. 

    The Halo is expected to be available this summer for a cool price of $ 17,000.

    Insta360 Pro

    The new Insta360 Pro is an impressive VR camera that captures 8K video, or 6K stereoscopic video, in a small, spherical package. It emphasizes the ability to get very high quality footage straight out of camera that can be streamed or posted online quickly, for example by a reporter in the field. In addition to six fish eye lenses, the Insta360 Pro includes four integrated microphones for spatial audio, but also supports external audio and power for extended use. All stitching is done in-camera, making it easy to stream out content live during an event.

    Video quality was surprisingly good, though I still noticed obvious stitching artifacts in places. Also, whenever I looked at the camera, I couldn’t get over the feeling that it was smiling and staring back at me. Kind of like an evil clown. But if you can get past that, it’s possible to order one now for $ 3,500, with units expected to ship in mid-May.

    The VR camera we all want

    Of course, if you really want to do VR right, you build a spherical rig for 10 Arri Alexas. It’s the perfect solution if you have ten Alexas sitting around. 

    Just sayin’.

    Sony still makes video tapes

    Yes, Sony still makes video tapes. And yes, there’s still a market for them.

    Fujinon MK50-135mm T2.9 cine lens

    In the past year we’ve seen a lot of new cine lenses aimed at emerging filmmakers who want the quality of cine lenses without spending $ 20,000 and up for the privilege. In fact, just a couple months ago, Fujifilm announced its new MK series of cine lenses aimed at this market. We tested the first of these, the Fujinon MK18-55mm T2.9, and found it too be an outstanding lens, both in terms of image quality and build.

    At NAB, Fujifilm displayed the second lens in the series, the MK 50-135mm T2.9 lens. It shares the same weight and dimensions as the 18-55mm lens, as well as its parfocal design and E-mount for use on Sony cameras. The lens is expected to be available in July, and while pricing has not been announced, we expect it to be in the same ballpark as the 18-55mm model, or around $ 3,799.

    Fujifilm MK lenses in X-mount

    When Fujifilm announced the MK series of Fujinon lenses, there was initially some confusion about the fact that Fujifilm was releasing them for Sony E-mount. This actually made a lot of sense, considering how many Sony Super 35 cameras are in use professionally. However, the company made clear it would eventually release the MK lenses in Fujifilm’s own X-mount as well.

    At NAB, we got our first look at one of these X-mount lenses, the MK18-55mm T2.9, attached to a Fujifilm X-T2 body. Pricing and release date remain unannounced, but earlier this year Fujifilm told us the X-mount versions would be available ‘near the end’ of 2017.

    Zeiss CP.2 Primes get artsy

    Zeiss says that its Compact Prime CP.2 series of lenses are the most popular cine lenses it has ever produced. To commemorate this success, the company was busy creating a series of ‘art’ lenses (pardon me if that sounds a bit familiar…) by artist Joseph Ari Aloi. In fact, Aloi was in the Zeiss booth painting lenses in all shapes, colors and patterns.

    C’mon. You know you want it.

    Sigma Cine lenses

    Not to be left out of the cine lens game, Sigma was showing off the newest members of its Cine Prime line of lenses, the Cine FF High Speed 14mm T2 and the  Cine FF High Speed 135mm T2, which join five existing prime lenses in Sigma’s Cine Prime product line.

    The Sigma Cine Primes are based on existing Sigma lens designs, but are redesigned into cinema-friendly hardware, including high quality mechanical barrels with integrated gearing. In use, the new lenses feel very solid and should produce beautiful video. If you don’t like seeing your distances in feet, you can opt for a metric version. The lens markings even glow in the dark for low light use.

    Illuminati light and color meter

    The Illuminati light and color meter, from Illuminati Instruments Corporation, is a clever little device that provides all the functionality of a traditional meter, but uses Bluetooth communication and a mobile phone (or smartwatch) app as a user interface. This means it’s much smaller than traditional meters that have displays and controls integrated into a single unit.

    What’s even more helpful is that a phone can be paired with multiple meters, meaning they can be placed around a scene and accessed from a single app. The meter can continuously monitor both ambient exposure and color, and warn a photographer if any changes in brightness or color temperature occur. What’s more, additional software functionality can be added in the future through a simple app update.

    The Illuminati light meter is available for pre-order through a Kickstarter campaign with about three weeks remaining. This is an impressive little device, so I’m rooting for them.

    Manfrotto Nitrotech tripod head

    Manrotto’s new Nitrotech N8 tripod head uses an innovative design to provide good balance and smooth motion with a minimum of fuss. Where the horizontal axis of the head would usually be, the Nitrotech head uses what Manfrotto calls a ‘nitrogen piston mechanism’ to push up against the bottom of the mounting surface. It claims this will counteract movement of the head and the pull of gravity to product fluid and controlled motions.

    I was impressed at how well the Nitrotech head worked. With a large camera and lens mounted on it, it did an excellent job of maintaining balance no matter where I placed the center of gravity of the camera. Even with the weight moved forward on the tripod, the Nitrotech head stopped moving wherever I left it, with no downward creep. It also produced relatively smooth motion when panning and tilting, though it wasn’t as smooth as a very high quality fluid head. I suspect it would work nicely for still photography as well, particularly when using long telephoto lenses.

    Sennheiser MKE 2 Elements mic for GoPro Hero 4

    One of the downsides of using action cameras in waterproof cases is that audio can be truly horrible, with muffled sounds and rattles transmitted from equipment like bikes or snowboards.To solve this problem, Sennheiser designed the MKE 2 elements microphone for the GoPro Hero 4. As its name implies, the elements mic is built around Sennheiser’s very well-regarded MKE 2 lavalier microphone, but in a design created to be tough and withstand the elements, be it snow, water, or dust. The flexible stem of the mic also isolates it from vibrations for a rattle-free recording.

    After watching and listening to several videos show with the MKE 2 elements mic, I have to say that it seems like the real deal. Sound was noticeably better than I’m used to hearing through waterproof cases on action cams, and was very clear and realistic. The sound of water was particularly impressive, and added to the immersive sense of being right there in the waves with a surfer. Sennheiser even had a unit sitting in a tank of water to illustrate how elements-proof it actually is.

    HDR video

    For the last decade, improvements in video generally had to do with resolution, resolution, 3D (oops, not so much), and more resolution. Over the past couple years, however, there has been increased focus on dynamic range, and it seemed like everyone at NAB this year was talking about HDR video, which promises brighter brights, blacker blacks, and more realistic renditions of real world scenes.

    We’ll be exploring HDR video in more detail in future articles as it’s directly relevant to photographers as well. However, watching HDR demos illustrated that content creators are still learning how to use the technology. For example, while viewing some HDR film clips behind the sign in the above photo, I quickly discovered that in a dark environment, extremely bright specular highlights could be so bright as to make you squint. This is a technology that will only get better, though there’s still room for everyone to start speaking the same language and agree upon some conventions and standards. Stay tuned.

    8K/120p

    OK, you knew we’d get to it eventually. 8K video has been a hot topic at NAB for the past couple years, and of course that continued in 2017 as well. 8K holds great potential for content creators, but it’s clear the industry is pushing hard to move 8K into the living room as well. 

    I’m not convinced that consumers are quite ready to begin moving to 8K TVs yet, especially since most of them haven’t even gone 4K. However, the one 8K demo that absolutely blew my mind was watching a hockey game in 8K/120p. If you think 60p looks lifelike, 120p is even more so. And at 8K resolution it’s borderline amazing. In fact, if broadcasters can figure out how to deliver 8K/120p, it may be the thing that does convince people they need to upgrade once again, particularly if they’re sports fans.

    Articles: Digital Photography Review (dpreview.com)

  • 2017 Roundups: Fixed Prime Lens Cameras

    The fixed lens camera market may be a bit niche, but it’s here that you’ll find some of the best cameras you can buy. Sensors ranging from APS-C to full-frame are designed to match their lenses, which cover ranges from 28-75mm equiv., so image quality is top-notch.

    This segment includes both pocketable models without viewfinders to ‘best worn over your shoulder’ cameras with unique or ultra-high-resolution EVFs. There’s a gigantic spread in pricing, as well. The Fujifilm X70 and Ricoh GR II can be had for under $ 700, while the Leica Q sells for around $ 4250.

    For those who want to zoom with their feet, here are the fixed-lens cameras we think are worth a look:

    • Fujifilm X70
    • Fujifilm X100F
    • Leica Q (Typ 116)
    • Ricoh GR II
    • Sigma dp Quattro series
    • Sony Cyber-shot DSC-RX1R II

    Articles: Digital Photography Review (dpreview.com)

  • How to Use a Neutral Density Filter to Control Depth of Field

    If your photography isn’t focused around landscapes, there’s a fair chance you don’t have a set of neutral density filters. These accessories are mainly for landscape photographers as their use in long exposure photography is invaluable. Because they are most associated with slow shutter speeds, their application in other genres, like portrait photography, isn’t immediately apparent. A neutral density filter can, however, be vital to gain control over your depth of field in some situations.

    This tutorial will show a quick and dirty tip for two scenarios in which to use ND filters to control the depth of field in your photography; one outdoors in natural light and the other in a studio environment.

    What is a Neutral Density filter?

    At its most basic, a neutral density filter is a piece of material (usually plastic, resin, or glass depending on the quality) you place between your lens and subject to reduce the amount of light entering your camera. This will result in a slower shutter speed being required, a larger aperture, or a higher ISO in order to achieve the correct exposure. The filters come in different strengths, usually ranging from a loss of one stop to three stops of light. For example; if you are metering an exposure of f/8 at 1/250th and you place a 1-stop ND filter on your lens, to compensate you will need to change either your shutter speed to 1/125th or your aperture to f/5.6.

    How to Use a Neutral Density Filter to Control Depth of Field

    Neutral density filters are a valuable tool in landscape photography, but they are also useful in other genres.

    In terms of photographing landscapes in low light, you can probably see how they are useful. A 2-stop ND filter turns a 2-second exposure into an 8-second exposure. Alternatively, it turns an 8-second exposure into a 32-second exposure. If you’re trying to smooth out water or clouds on a windy day, an ND filter makes it a breeze.

    For portraits, however, you will almost never want to reduce the shutter speed. If anything, you will often want to increase it. Why, then, would you want to put something on your lens that reduces the amount of light coming in? The answer is simple – when you have too much light in the first place.

    Outdoors

    If you’re taking photographs outdoors on a bright sunny day, you may find yourself limited to smaller apertures like f/11 and f/16. This is great for capturing a high amount of detail, not so much if you would like a shallow depth of field.

    This is where a neutral density filter comes in. A 2-stop ND filter will turn an aperture of f/8 into f/4. A 3-stop ND filter will make it f/2.8, making it far easier to obscure a cluttered background with a shallow depth of field.

    How to Use a Neutral Density Filter to Control Depth of Field

    Both of these images were taken moments apart. Left: Shot at f/8 without an ND filter. Right: Shot at f/4 with a 2-stop ND filter.

    In the studio

    The idea behind using the ND filter in a studio environment is the same as it is outdoors. The main difference is that with natural light, you can always wait until later in the day. With high powered studio lights, that’s not always the case. If you’re aiming for soft light , you need to get your light source in close to your subject. If you have high-powered studio strobes, you may not be able to turn the power down low enough to use large apertures.

    Again, a quick solution is to pop a neutral density filter on your lens. By doing so, you don’t have to sacrifice the softness of your light and you gain the benefit of complete control over depth of field.

    How to Use a Neutral Density Filter to Control Depth of Field

    Taken in a studio environment at f/8

    How to Use a Neutral Density Filter to Control Depth of Field

    Adding a neutral density filter reduced the aperture to f/4 without changing anything else in the scene.

    Bonus round

    Chances are that throughout this tutorial, the problem-solving side of your brain has figured out that all of these scenarios have a multitude of other methods to solve them. Outdoors, you could use a diffuser that cuts down exposure, or you could move to an area of open shade where the intensity of the light is reduced. In a studio, it’s often easy enough to move a light backward or to move your subject. Using an ND filter just adds another potential tool, and like most techniques, it is neither a be all or end all, nor is it required. It’s just another option.

    That said, what do you do in a situation where you can’t control the intensity of your light and if you were to move it even an inch further away from the subject, everything in the frame would completely change? Same with diffusing it? I ran across this exact situation recently, as illustrated below, and it was a 2-stop ND filter that solved the problem.

    How to Use a Neutral Density Filter to Control Depth of Field

    Moving the light source in this instance, would have ruined the effect of the lighting. A neutral density filter allowed for a larger aperture while still allowing the camera to be handheld.

    That’s it

    In the end, if you want to have full control over your camera and the depth of field in your images, then neutral density filters deserve a place in your kit bag even if you never set eyes on a landscape.

    The post How to Use a Neutral Density Filter to Control Depth of Field by John McIntire appeared first on Digital Photography School.


    Digital Photography School

  • 7 Tips to Get Professional Results on Your Next Outdoor Fashion Photography Shoot

    Many photographers like to take portraits or fashion outdoors, as it does not require any huge investment such as owning a studio space and lights. Though it might look like an easy task, there are few things that you need to be aware of before and while doing fashion photography outdoors.

    Outdoor fashion photography 01

    You might have a good-looking model and expensive camera and lens, but you still may not be able to capture professional results. You need not worry, as the tips mentioned below would help you drastically improve your results during your next outdoor fashion photo shoot.

    1. Know the location well

    The location is one of the first things you should finalize while planning an outdoor photo shoot. Scout the location at least once before the day of the shoot to ensure that you do not waste time on the final day. It is even better if you take some photos of the places that you feel could be perfect for your images, and simply browse through them on the day of your shoot.

    If you follow these practices for your next outdoor photo shoot, you would surely save a lot of time as you would have already pre-planned and pre-visualized your frames.

    Outdoor fashion photography 4

    2. Choose the right time of the day

    Once you have finalized the location for the fashion photo shoot, you need to make sure that you choose the right time of the day to captured desired results. There is no fixed time of day that you should be shooting, it all depends on the weather conditions and how you want to use the ambient light.

    Try and avoid the time when the sun is at its peak as it would create hard shadows on your model’s face. The safest time to shoot outdoors is either just after the sunrise or a couple of hours before the sunset. During a cloudy day, the light would be soft and there would be less contrast in the background (depending on the backdrop) but it all depends on your choice. I you wish to capture photos with diffused light, you can go ahead and shoot during a cloudy day.

    Outdoor fashion photography 5b

    3. Choose the right background

    It is important to spend some time thinking about the background in your photo. You might see a beautiful location and simply pick up your camera and get started taking photos, without even visualizing whether the background will make or break your photo.

    You need to think, visualize, and then frame accordingly, making sure that the colors in the background and the colors of the model’s clothes are not getting merged. The colors in the background should not overpower the model, which is the main highlight of your photo.

    Outdoor fashion photography 05

    4. Try mixing ambient and flash light

    Go out of your comfort zone and do something different by using both ambient light as well as flash. This gives an extra dimension to your photos. You can use the sun as the key light falling on the subject and place the flash at the back of the model to give a rim light effect on their face or hair. Or you can use the sun light as the rim light or the kicker and the flash as the key light source, this allows you to control the shadows on the face.

    Outdoor fashion photography 02

    5. Make the model comfortable: Talk and Compliment

    Expressions and body language of the model are key ingredients in fashion photography. You need to make sure that your model is comfortable shooting outdoors, as sometimes there may be other people surrounding you as you work. If it’s possibility that you are shooting with a model who is not professional or has just started his/her career, you as a photographer have to make your model feel comfortable.

    You can do so by constantly interacting with your model, compliment them while he/she is posing and make them feel confident. You need to tell your model whether they are posing right, you must direct and get the best out of the model in the friendliest way possible.

    Outdoor fashion photography 08 Outdoor fashion photography 09

    6. Get the best possible exposure in camera

    Never shoot with the thought that the exposure can easily be adjusted during post-processing. You can adjust the exposure later during the post-processing stage but you might end up losing details in your photo, depending on the camera that you are using. If you have taken a photo which is 2-3 stops over/under exposed, adjusting the exposure during processing will not give details as good as a correct exposure would.

    If you adjust the exposure of an underexposed photo, remember that you may also be introducing noise. Similarly, if you adjust the exposure of an overexposed photo then you will not be able to retain as much details in the highlights as you would have in a correctly exposed photo.

    To ensure that you are capturing correctly exposed photos during the shoot, you should refer to the histogram in your camera.

    7. Shoot in RAW format

    Never be afraid of shooting in RAW. It may take up space on your memory card but it is really for your benefit. Shooting fashion in RAW format allows you to capture much more details as compared to the JPEG format, which helps in retouching the image during post-processing.

    Outdoor fashion photography 6

    Another benefit of RAW format is that it contains the maximum dynamic range possible from your camera and can be used to recover an overexposed or an underexposed image during the processing, as discussed in the previous point. You can also edit the same RAW file multiple times, without losing any details. Whereas, a JPEG file loses its quality every time you edit the image.

    Conclusion

    Being a photographer, you need to plan and stage the photo shoot so that you get the best possible results out of your model. From choosing the apt location to scheduling the shoot at the right time of the day, it is your job to get the things planned in advance to save time and energy. Try and get out of your comfort zone by adding more light sources such as the flash lights or strobes, this will help give you more professional results.

    You might be using the best possible camera and lens, but if you are not able to get good expressions and body language, your photos will not stand out. So, the next time you plan an outdoor fashion photo shoot, do keep these tips in mind to achieve the best possible results.

    Share your fashion photography tips and images below.

    The post 7 Tips to Get Professional Results on Your Next Outdoor Fashion Photography Shoot by Kunal Malhotra appeared first on Digital Photography School.


    Digital Photography School

  • How to Find the Best Locations for Landscape Photography

    Have you ever looked at the work of a good landscape photographer and wondered how they found such beautiful places to shoot? Or would you like to travel to a new place to do landscape photography but are unsure how to find the best locations?

    You are not alone. It takes work to find the best locations and most landscape photographers go through this process. The tips in this article will help you.

    Landscape photography locations

    1. Look at the work of other photographers

    The first step to finding great places to take landscape photos is to look at the work of other photographers. There are so many great photographers on 500px, Instagram, and Flickr that it should be relatively easy to find some who have worked in the areas that you have in mind.

    Looking at the work of other photographers helps you in two ways:

    1. It helps you find the most iconic, popular, and spectacular places to take photos.
    2. It gives you an idea of the potential of a place for the type of landscape photography you have in mind (for example, perhaps you are looking for somewhere to do long exposure photography, or perhaps you like to work in black and white).

    It’s a good idea to look for the work of a local photographer. Locals have a huge advantage over visitors. They know the area better and are familiar with photogenic but relatively unknown locations. They may have lived there for years and built up a substantial body of work. Their portfolios contain photos taken at different times of the year. All these things help build a picture in your mind of the location and its potential for landscape photography.

    I went through this process when I traveled to northern Spain last year. Looking at the work of local photographers helped me find locations like this.

    Landscape photography locations

    2. Go out and explore

    Once you’re on location, curiosity is the key to finding interesting things and places to photograph. If you’ve done your research you already know the most iconic and popular locations – they are probably what attracted you in the first place.

    But what about other locations? The not so well known ones? You can only find those by exploring. It’s only the desire to see what lies around the next corner, or where a lonely road takes you that allows you to find these places.

    I made this landscape photo while walking along footpaths near my parent’s house. This is not a well-known area and you’ll struggle to find other photos taken here. Yet it has a lot of potential and I was able to make photos like this.

    Landscape photography locations

    3. Make a bucket list of great locations

    As you look at other photographer’s work and read about landscape photography on websites like Digital Photography School you are bound to come across interesting places and locations.

    My suggestion is that you set up a spreadsheet or word processing file that contains a list of all the places you might like to visit one day. The world’s a big place and there are a lot of photos to look at online. If you don’t make a note when you find something interesting you may forget it and never find it again.

    As time goes by you can go back to your list and research the places that seem most interesting to you. For example, let’s say you have the city of Venice on your bucket list. Whenever you find an interesting photo or a good article about photography in Venice, add it to your file. Then, when the time comes that you finally get to go, you’ve already done most of the research required and have a good idea of what you’d like to achieve.

    Make your list

    Another approach is to write down a list of the places you’d like to visit. Don’t censor the list – they are ideas, not certainties. Then you can research them and make notes as you find out more information. This gives you time to think about how much time you need on location, and how to fit that into your schedule. You can think about time and money and gradually build your plans.

    Places on my bucket list include the mountains of Torre del Paines National Park in Patagonia, the Italian Dolomites, and the desert landscapes in the southwestern United States. How about you?

    The Picos de Europa in northern Spain, where this photo was taken, were also on my list.

    Landscape photography locations

    4. Find your personal vision

    One of the dangers of looking at the work of other photographers is that it creates a desire to take photos of the same places as other photographers. There’s nothing wrong with capturing photos of iconic locations, and sometimes it’s just an itch that has to be scratched before going on and finding the lesser known places. But the danger is that you forget to look elsewhere for good places to take photos.

    Photographer Cole Thompson has an interesting idea he calls photographic abstinence. He never looks at the work of other photographers as he wants to find his own locations and his own way of seeing the landscape. There’s a lot of merit to this idea and it’s something you might like to try for yourself. It’s the opposite approach to the advice given at the beginning of this article, and it may work well for you.

    Personalize it

    Last year I visited my family in Norfolk, England. Look up the work of local photographers and you’ll find lots of photos of sand dunes, wide beaches, and beach huts – the typical landscape of the local area.

    I stayed away from those places and walked around with my camera through the landscapes around the village where my family left. It wasn’t intentional to start, but as I did so I found that I was building a body of work photographing the elements of the landscape that were personal to me. I was ignoring the iconic locations, the ones you see photos of for sale in local galleries, and photographing the landscape in a much more personal and interpretive way.

    I ended up taking photos like the one above, and this one.

    Landscape photography locations

    Wherever you go to take landscape photos, and no matter how well known and iconic some of the locations there are, I encourage you to look for and find your own personal vision.

    Conclusion

    These ideas are just some of the ways that you can find interesting landscapes to photograph. Do you have any more? I’d love to hear them – please let me know in the comments.


    Andrew is the author of the ebook The Black & White Landscape.

    The post How to Find the Best Locations for Landscape Photography by Andrew S. Gibson appeared first on Digital Photography School.


    Digital Photography School

  • How to Photograph People Outdoors Without Using a Reflector

    How to Photograph Outdoors Without Using a Reflector

    Subject: Kota Wade

    You just got booked for a marvelous portrait photo shoot out in a gorgeous natural landscape. You run out the door, with camera gear in tow. Then you arrive at the location, the fresh air filling your nose, the beautiful natural world flourishing all around. You meet with your lovely portrait subject. The sun is beating down on you from above. Then it hits you… you forgot your reflector at home.

    Or maybe you don’t have a reflector, maybe you just never felt the need to spend money on one. All of this is totally okay because there are some tips and tricks to take stunning photographs without the use of a reflective disc! Keep reading to learn more.

    How to Photograph Outdoors Without Using a Reflector

    Subject: Bina Monique

    What is a reflector?

    A reflector is a simple tool that redirects existing light. A reflector does not illuminate, it merely allows you to manipulate the light that you already have.

    Photographers use reflectors to fill shadows, which is why you often see them used in outdoor settings where you cannot control the light. Being at the mercy of the sun, you add a level of control to your situation with the use of a reflector. However, there are ways to take advantage of your situation without one.

    How to Photograph Outdoors Without Using a Reflector

    Subject: Skylar Roberge

    Find even lighting

    Essentially, part of the trouble with shooting outdoors comes from the lighting. Clients often see a clear blue sky with the beaming sun and think that is an absolute joy for photographers. But we shooters silently scream in agony at the prospect of overblown highlights, underexposed shadows, and the dreaded contrast.

    What’s the best solution for this? Find some even lighting!

    Positioning your subject under a tree, in the shadow of a building, or simply positioning yourself so that the sun hides behind a mountain can all make for some nice even lighting. Although the background might be overexposed if you are simply using a small patch of shadow, try to change your perspective to make the most of the situation.

    How to Photograph Outdoors Without Using a Reflector

    ISO 400 – Shutter Speed: 1/100 – Aperture: f/2.8
    Even Lighting: Rooftop overhang

    Make even lighting

    Are you out in a field or a desert and don’t have access to any form of even lighting? Is the sun too bright to have on your subject’s face? Then it’s time to get creative!

    You can make your own even lighting utilizing things you may already have in your car. Use an umbrella and position that over your subject, or to block out the sun in your frame. You can use a vehicle windshield cover or shade to do the same.

    How to Photograph Outdoors Without Using a Reflector

    ISO 1250 – Shutter Speed: 1/500 – Aperture: f/2.8
    Even Lighting: Umbrella

    Use the contrast to your advantage

    Are neither of the aforementioned tips applicable to your scenario? Well then, this is where we get inventive.

    Photography is an art form, and artists are creative, imaginative, and inspired. Instead of fighting against the contrast, why not use it to your advantage? Work your shoot around the contrasting shadows and highlights, and create dramatic photographs. Several well-known clothing designers, such as Prada and Dolce & Gabbana, use contrast in their fashion editorials to stage a theatrical scene and illicit an intense response in the viewer.

    How to Photograph Outdoors Without Using a Reflector

    ISO 200 – Shutter Speed: 1/1000 – Aperture: f/2.8

    Shoot at the right time of day

    When a choice presents itself, shooting at the correct hour of the day can ease your lighting woes. The golden hour is infamous for being an excellent time to photograph. Aiming to photograph when the sun is low and producing a more even light removes the need for a reflector.

    How to Photograph Outdoors Without Using a Reflector

    ISO 1600 – Shutter Speed: 1/640 – Aperture: f/2.8

    Fill shadows by finding a natural reflector

    Various surfaces can double as reflectors, such as water or windows from a building. Positioning your model just right can garner the same effect as if you had a reflector yourself.

    How to Photograph Outdoors Without Using a Reflector

    ISO 2000 – Shutter Speed: 1/320 – Aperture: f/2.8
    Reflector: Car windshield, parked to his right side

    Fill the shadows in post-processing

    The computer is your friend, and it is okay to use programs to help you bring your vision to light (no pun intended). Shooting in RAW format (an image file that contains minimally processed data from the image sensor of a camera – Raw files are named so because they are not yet processed) gives you better control over your image when you edit it. RAW files have more shades of colors compared to JPEG files, higher image quality, significantly better control over editing lightness, white balance, hue, saturation, etc., and all of the changes made on a raw image file are non-destructive. You can use any post-production software to lighten the shadows in your image and darken the highlights.

    Original image before processing.

    How to Photograph Outdoors Without Using a Reflector

    After processing.

    There you have it, sounds like you have a solution to your no-reflector problem.

    The post How to Photograph People Outdoors Without Using a Reflector by Anabel DFlux appeared first on Digital Photography School.


    Digital Photography School

  • Novoflex ClassicBall ball heads can be mounted upside-down for level panoramas

    Novoflex has launched a trio of new Classicball tripod ball heads that can be mounted upside-down for producing level panoramas. The new lineup is comprised of the CB 2, CB 3 II and CB 5 II models, each able to accommodate cameras and gear weighing up to 5kg/11lbs, 8kg/17lbs and 12kg/26lbs, respectively. All three models feature a leveling bubble built into the base of the mount.

    According to Novoflex, all three new Classicball models are compatible with all ‘common’ tripods, and each can be used with optional quick-release accessories. A lever on the side of the ball head clamps the camera into position; users can also adjust the friction using the blue 5-stop friction dial. Each model features a trio of 90-degree openings for positioning the camera fully backward, forward, and to the side. The ball head’s design allows for 360-degree rotation, including in reversed (upside-down) mode, which itself supports optional L-bracket, plate and quick-release accessories.

    The new Classicball models are available on Novoflex’s website now for $ 495 (CB 2), $ 475 (CB 3 II) and $ 692 (CB 5 II).

    Via: DIY Photography

    Articles: Digital Photography Review (dpreview.com)

  • 3 Lighting Setups for Photographing Headshots

    I do a lot of corporate and actors headshots around Washington, DC and I wanted to share some of the simple but effective lighting setups that I use over and over, which you can easily copy and use yourself.

    lighting for headshots

    The One Light Wonder

    My standard setup consists of a large soft light source to the left or right of the subject, a reflector under the face, and another reflector opposite the main light source. I shoot hundreds of headshots per year using this simple setup. I use a Paul C. Buff Einstein unit with a large octabox in my studio, but you could easily put together something similar with a cheap speedlight, an umbrella, and a couple of $ 20 reflectors.

    You can see this setup in the photo below, with my poor wife Karen standing in as a subject. She was just coming downstairs to make some tea, and got ambushed!

    headshots lighting

    Reflectors and adjustments

    Once my subject is in place, I do some tweaking. First I will adjust the light source so it is slightly above their eye level. For most people, I think it looks best to have the light coming from above to cast subtle shadows under the chin, accentuating the jaw and helping to hide any double chin.

    Then I will adjust the reflector underneath their face and bring it up to about their mid-chest level. This reflector helps fill in shadows on the face and provides a really nice extra catch light in the eyes. Some folks will use another (powered) light source down here, but I find the reflector to be much simpler to set up, and it also has the virtue of being idiot proof.

    For example, if you have another light instead of a reflector below the subject, and you accidentally overpower it (so it is more powerful than the main light), you have created some horrible Frankenstein lighting! It is physically impossible to do this with a reflector, which can save from you from costly mistakes.

    headshots lightingYou can see the side reflector in my studio in this photo (it’s just to Karen’s left).
    Finally we have the reflector opposite the light source. For this one, I will often use a black-sided panel to create a darker shadow on that side of the face. This effect can be very dramatic, and has added benefit of slimming the face. The downside is that if your subject is very wrinkly, you’re not filling those wrinkles with light from that side. So it doesn’t work for everyone.

    Here’s an example where of a headshot where I used this effect to create a nice dramatic edge:

    headshots lighting

    Some additional tweaks

    With this simple setup, it’s very easy to make tweaks and see what works best with a particular person’s face. Often I will leave the basic setup in place with the black reflector, but a few examples where I might make changes are:

    1. The subject has a double chin, so I really want to define the jaw. In this case, I may raise the light up extra high to cast more shadow under the chin (make sure you don’t go too high and lose your catchlights), and/or lower or remove the under reflector.

    headshots lighting

    1. The subject has long dark hair. In this case, the dark reflector is not necessary because we already have a dark edge there from the hair. So in this case I would go with a white reflector on the side or bring in a hair light from behind (more on that in the next section)

    In the photo below, you can see a lot of detail in her hair on the shadow side. That’s because I brought my big white reflector in close.

    headshots lighting

    1. Subject has deep set eyes. We want to fire more light into those sockets or our poor subject will end up looking like a serial killer or a cave man! In this case, I might lower the main/soft light so it is right at eye level.

    Two Lights

    You could run a whole business just using the one light system, but if you’re anything like me you get bored and like to try new things. So let’s bring in a second light.

    The second light for me is usually a “kicker” (also called a rim or accent light) coming from behind and opposite the main light. I use this to accentuate the jaw, especially in men, or hair in women. It’s especially nice to create a little highlight on darker hair.

    In the photo below, I needed a way to separate this young man from the dark background. My kicker light did the trick!

    Headshots lighting

    In my studio, I use a strip softbox for this purpose, but you could also use a bare head with a grid or even an old speedlight with a paper towel roll taped to it to make a simple snoot. The important thing is that you want to control the light so it doesn’t spray into your lens and create flare or lack of contrast.

    You can see my kicker light in this setup shot with Karen.

    headshots

    Three and Four Lights

    I use lights three and four to create a clean white background. You can either use one light fired at the background from just behind the subject, or two lights off to either side.

    The white background is my favorite look these days for a lot of reasons. I think it looks super bright, modern and happy, and really pops on LinkedIn and other online profiles. It is also a great way to go for companies because it is easy to replicate and get a consistent look from shoot to shoot (for example, when photographing a new employee months after the initial shoot, or replicating the same look with shoots done across the country by different photographers).

    headshots lighting setups

    headshots lighting setups

    headshots lighting setups

    headshots lighting setups

    Whether you use one or two lights for the background depends on your budget and the space where you are working. Two lights can give you a larger more even spread of light, whereas with one light you might have some fall off around the edges that you need to clean up in post-production. So I usually stick to two lights unless I’m on location somewhere and space is tight.

    Conclusion

    So I hope you all found this article helpful and you can use the lighting setups for your headshot. I look forward to your comments and questions!

    The post 3 Lighting Setups for Photographing Headshots by Dennis Drenner appeared first on Digital Photography School.


    Digital Photography School

  • Harbortronics’ DigiSnap Pro is designed for long-term time-lapse photography

    Harbortronics has announced DigiSnap Pro, its new low-power complete system controller for long-term time-lapse photography. The controller supports both networked and autonomous operation and can be used with the company’s Cyclapse Pro, a time-lapse photography system that includes a camera housing and solar panel for use in locations where AC power is unavailable. 

    According to Harbortronics, the DigiSnap Pro controller can be used with ‘practically any modern high quality digital camera,’ which is said to include medium format models, mirrorless, and full-frame SLRs. When used with the Cyclapse Classic systems, the company says DigiSnap Pro replaces both the Cyclapse Power Module and the DigiSnap 2700, and that all the cables support the DigiSnap Pro. The new controller can be remotely configured using the company’s Android app and Bluetooth LE, and a network remote configuration option is being developed. 

    DigiSnap Pro itself offers all the functions one would typically need for long-term time-lapse photography, according to the company, including power management, automated image transfer and local data storage, and monitoring the system for issues. Status emails are sent when a problem is detected, including issues with the housing door, camera failure, low battery, temperature issues, and more.

    Articles: Digital Photography Review (dpreview.com)

  • End of Elevated Parks? UK Garden Bridge & US Pier 55 Projects in Doubt

    [ By WebUrbanist in Architecture & Cities & Urbanism. ]

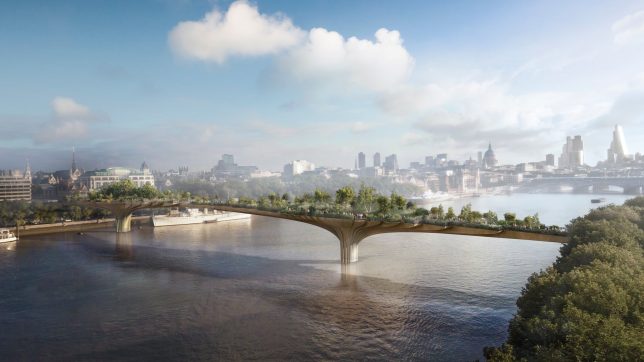
    It has been a challenging few weeks for architect Thomas Heatherwick, whose proposals for elevated green urban spaces in both London and New York City face uncertain futures. While the specifics vary, there may be lessons for elevated parks that spans both cases — and if these fail to move forward, it could spell the end of a decade-long trend for lofted public parks.

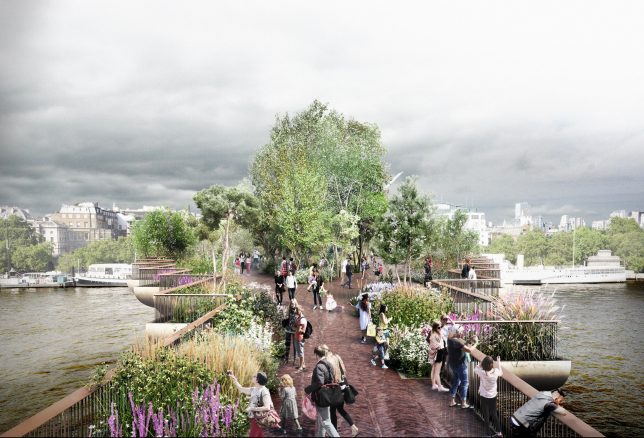
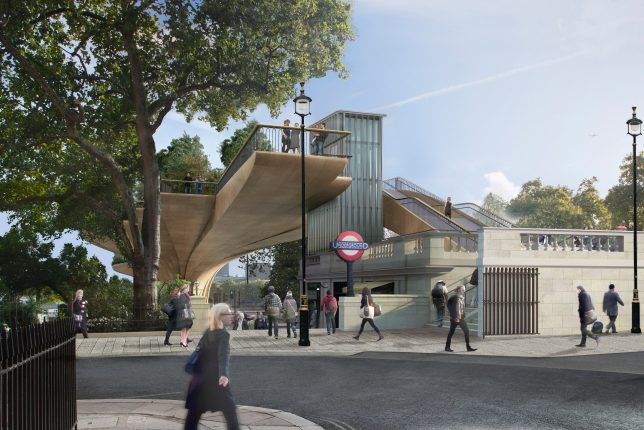
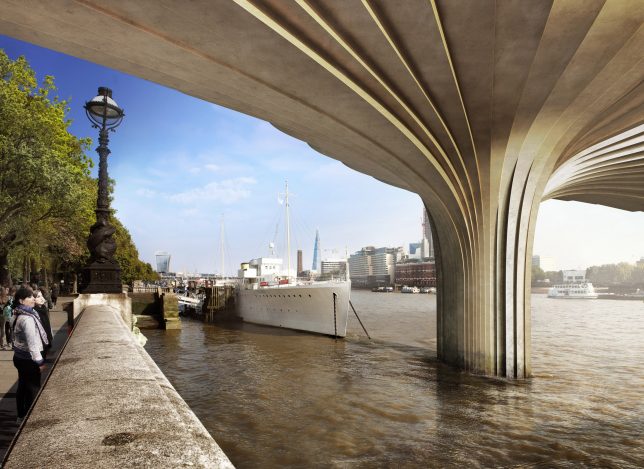
    The Garden Bridge project in London has long been criticized based on its cost and officials are getting serious about making sure the investment (especially tax dollars) will pay off. The design has been touted as a kind of High Line Park for England’s capital, but unlike the High Line it is a brand new construction project (not adaptive reuse) and not positioned to revitalize areas of its city.

    At the heart of the issue, unsurprisingly, is money: an initial projection of £60,000,000 has blossomed into an estimated cost of around £200,000,000. Shockingly, even cancelling the project now would result in a bill of over £40,000,000, despite the fact that construction has not even started. While £70,000,000 in private funding was secured at the outset, the rest would have to be covered by taxpayer money, which is less than popular with the public. As of now, the mayor’s financial inquiry has resulted in a recommendation to scrap the project.

    According to a governmental report on the project, “Decisions on the Garden Bridge were driven by electoral cycles rather than value for money,. From its inception when there was confusion as to its purpose, through a weak business case that was constructed after contracts had been let and money had been spent, little regard has been had to value for money.” It is unclear whether the project is stalled or slated for abandonment, but it looks unlikely to proceed at this point.

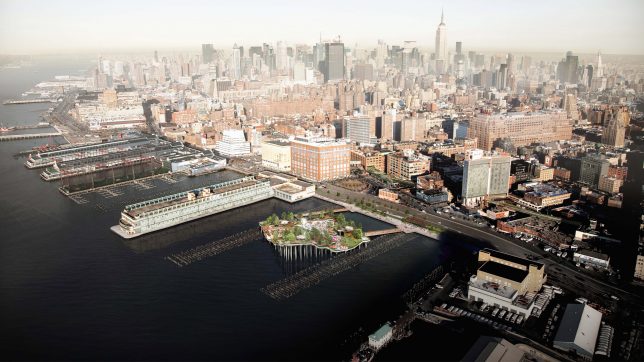
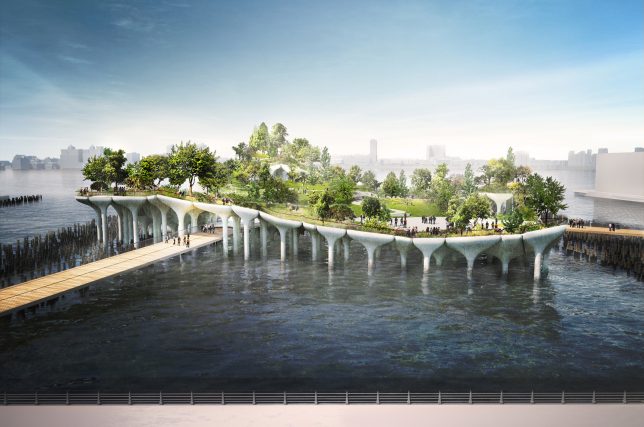
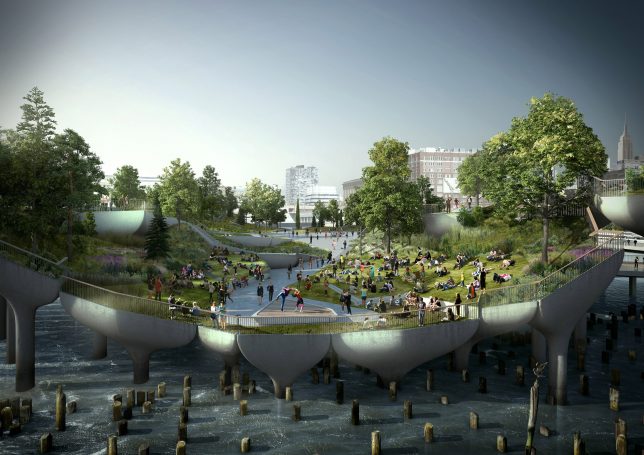
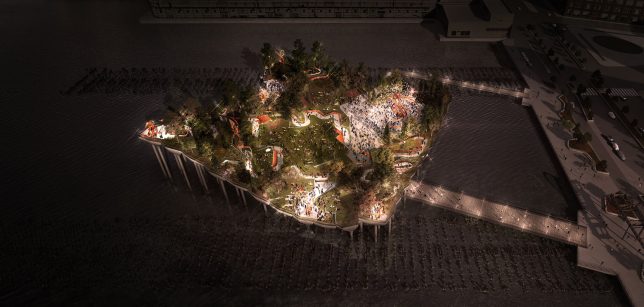
    Meanwhile, across the pond, Heatherwick’s proposed Pier 55 project (images by Luxigon), an elevated park stretching out over the water next to Manhattan, is also stalled out, at least for now. Its permit was recently revoked in part based on environmental studies that concluded it would disrupt local marine habitats. There are also concerns that it will block views along the waterfront.

    The 10,000-square-foot, $ 200,000,000 park was designed to replace a disused pier in the heart of New York City, but once again it lacks some of the conditions that made the High Line a viable solution, particularly its lack of reuse. Perhaps the elevated parks trend is coming to an end, or (more likely): it is too often pitched as a solution, even in cases where there is no obvious problem to be solved.

    Share on Facebook


    [ By WebUrbanist in Architecture & Cities & Urbanism. ]

    [ WebUrbanist | Archives | Galleries | Privacy | TOS ]


    WebUrbanist