Blog

  • Camera Bag Review – The Udee Backpack

    As a photographer, amateur or professional, you know the value of good, reliable gear. It is often said that we photographers value good gear more than expensive material things like jewelry, designer watches, and/or expensive clothes. If you don’t agree with me, just ask my husband. He is still perplexed about my choice of buying a 20+-year-old film camera for what it would have cost him to buy an Apple watch for my birthday! But considering that I am the one who works most with my gear, carries it around, and takes care of it, I want to make the best buying decisions when it comes to my photography business. So when I had the opportunity to review the Udee backpack, I was excited to give it a test run.

    Camera Bag Review - The Udee Backpack

    Udee Backpack

    As a somewhat petite female photographer who is generally lugging about 20+ lbs of gear, I am always on the lookout for a good, sturdy yet comfortable, camera bag that will last me a long time. I had the opportunity to test the Udee bag on several hiking trips with my family last month.

    This is where I want a bag that is durable and can last the rough wear and tear I generally put my gear through when I am hiking. For my wedding photography business, I already have a bag that is tried and tested and something that I will likely not change as my needs for that part of my business are very different.

    Camera Bag Review - The Udee Backpack

    The Udee bag was really comfortable to carry around while hiking and walking in the mountains.

    You can see the individual features of the Udee backpack on their Kickstarter project here.  My personal opinions of the Udee are based on a few factors that I feel are important to me when I am buying a camera bag.

    Appearance

    I have to say that when I first saw the Udee backpack I was very impressed with the appearance. It’s definitely one of the more stylish looking backpacks I have ever seen. The color combination of the gray flannel-type material with orange accents was attractive, and it appeared to be made of good and sturdy quality fabric. It did not feel like cheap construction and there were no telltale signs of poor workmanship in terms of loose threads, uneven seams, bad zippers, etc., at first glance.

    Camera Bag Review - The Udee Backpack

    The material felt strong and sturdy yet light-weight. The padding on the back of the pack also felt thick and soft. I prefer camera bags that don’t look and scream “here is a photographer with several thousand dollars worth of gear on their person” too much. On many occasions, I venture out on my own in a new place and I don’t want to attract too much attention.

    Camera Bag Review - The Udee Backpack

    Camera Bag Review - The Udee Backpack

    Comfort

    As per Udee, their bag touts a weight reduction system by improving weight distribution via an S-shaped buckle, and an X-shaped back support structure. I tested the bag when I went for a family hiking trip to Colorado and completely loved the weight reduction system. I hiked for a good two to three hours and did not feel the discomfort that I normally feel with other traditional backpacks.

    The back support made carrying the bag super comfortable and the straps did not dig into my shoulders with the weight of the bag. The combination of the X-shaped back padding and stiff back support made it easy to carry the camera bag for an extended period of time. I did not have any odd shaped gear poking into my back making it unfordable to carry. The bag straps were also wide enough to comfortably fit on my shoulder.

    Camera Bag Review - The Udee Backpack

    My seven-year-old son also carried the bag for a short period of time (minus the camera, as I was holding it taking pictures) and he did not complain about the weight. At that time it contained a few snacks, a 50mm prime lens, a 70-200mm and a water bottle.

    Camera Bag Review - The Udee Backpack

    Of his own accord, my son volunteered to carry the bag for me…with slight adjustments to the straps, it fit his small frame quite comfortably.

    Storage

    I used to carry a lot of gear with me during my travels but over time I have narrowed down my options to only carrying lens and gear that I know I will use. I plan out my excursions ahead of time so I know exactly what I will be using and when. The Udee backpack fit the following comfortably:

    • 1 camera body
    • 2 zoom and prime lenses
    • My Canon 70-200mm (with the lens case)
    • Camera battery charger
    • Memory cards
    • 3 camera batteries
    • And a 15in MacBook laptop

    I don’t carry additional bodies when I travel most of the time but sometimes I will carry an additional film camera body which is small enough to comfortably fit in the Udee.

    Padding

    Camera Bag Review - The Udee Backpack

    The padding inside the bag is thick and soft. I am very particular with my gear and always travel with the lenses in the bags they come in. Sometimes I will put two or more lens in a smaller padded zip bag and then put it in my backpack. It might seem like overkill, but I would rather do this than have damaged gear when I reach my destination.

    With the Udee backpack, I felt comfortable enough to just put my lenses in their bags directly into the bag. I did find it a little uncomfortable to fit my 70-200mm with its case in the bottom storage compartment but it fit perfectly in the top compartment. The main compartment of the Udee also had various smaller storage areas that hold traditional things like cards, a wallet, loose change and even had a padded place for sunglasses or eyeglasses.

    Camera Bag Review - The Udee Backpack

    On a side note, for those of you who travel on planes with the Udee, the dimensions are within the guidelines of the airlines and it actually fits perfectly in the flight overhead compartment.

    Camera Bag Review - The Udee Backpack

    Anti-theft device

    I found this to be a very unique and interesting feature of the Udee backpack. Call me paranoid, but I never ever leave my gear unattended. If I am traveling alone, it comes with me wherever I go. If I am with family, then I have someone watch my gear if I have to step away. My gear is what keeps my business afloat and even though I have insurance, I still behave like I don’t when it comes to safety and security with my gear.

    When I read about the anti-theft device in the Udee, I was intrigued. This is an interesting feature for travelers especially if you put your camera bag in an overhead rack when using public transportation or need to step away from your gear for a few minutes. The small, built-in combination lock and steel cable are long enough to keep your pack safe and the lock can also be used on some of the pack’s zippers.

    Camera Bag Review - The Udee Backpack

    Security pocket and luggage belt

    I love bags that have a luggage belt. This small but important feature is invaluable to me as it helps maintain my sanity when I am rushed and traveling through an airport with my kids. Those of you who travel with young ones can likely relate. Somehow you suddenly become the luggage porter just minutes before walking through security. Especially when they swore that they would carry their own bags the whole trip if you just let them take that extra book or that extra game!

    The luggage belt allowed me to hook the camera bag onto my carryon bag handle and gave me an extra hand to maneuver my kids through the crowded airport. I liked the security pocket too because it let me store and access my phone easily. However, I don’t see myself using this for anything other than a phone and maybe some money just in case I lose my wallet somewhere. It was easy to access even with both bag straps on my shoulder, which is a big plus in my mind.

    Camera Bag Review - The Udee Backpack

    LED Light

    I really loved this feature of the bag. I found it particularly useful when I was hiking with my family. We tend to stay out past sunset (generally because I am photographing something and get carried away) and we always carry flashlights with us. We have headlamps, but the fact that the bag could light up and replace my headlamp was particularly impressive.

    I can also see this as being very useful for people who walk along roadsides at night. With just the click of a button on each strap, the LED strips either blink slowly, blink quickly, or stay on continuously. The fact that each LED module can be removed from the strap and can be plugged into a standard micro-USB charger is also really practical as there are no batteries to replace.

    Camera Bag Review - The Udee Backpack

    Cons of the Udee backpack

    But there were a few things about the Udee backpack that I personally did not like. These are just my opinion based on my time with the Udee!

    No water bottle pocket

    Now I am very conscious of the environment and try to practice sustainability in my everyday life. To that end, I always carry my own water bottle everywhere I go. This is especially important when I am out hiking and camping with my family. This was a huge con in my mind as there is no storage spot for me to keep my water bottle on the Udee bag.

    I would have to use an external hook to clip the bottle to the shoulder straps, which I find extremely cumbersome and awkward as the bottle tends to hustle around when I am hiking. The other option would be to put the bottle inside the bag which makes me very nervous – liquid and electronic gear in close proximity is a disaster just waiting to happen!

    Accessibility to the bottom storage compartment is difficult

    I found accessibility to my camera very difficult when I stored it in the bottom compartment of the Udee backpack. This is the part of the bag that Udee calls the camera storage area. With the bag on both shoulders, it was impossible to reach the zipper of the bottom storage. I had to shift the bag onto one shoulder and even then, it was very challenging to open the zipper and take out the camera.

    Camera Bag Review - The Udee Backpack

    My arms could not reach the bottom storage while I was holding the bag. I had to put the bag down, take some stuff out of the top storage and then access the bottom camera storage area!

    The bottom storage compartment was stiff and did not open wide enough to take the camera out, especially when there were extra lenses in the top compartment weighing it down. This may not be an issue if you don’t anticipate taking pictures while you are getting to and from your destination. I like to stop and take some pictures along the way when I am hiking and/or walking around town. I don’t necessarily want to have the camera around my neck for easy access.

    Safety and security

    Especially when I am hiking a difficult terrain, I like to be safe with my expensive gear. I did notice that it is possible to access the lower compartment from the interior of the backpack since the divider has a zipper around it. However, that’s not practical if the upper compartment is also full of stuff.

    Camera Bag Review - The Udee Backpack

    But what surprised me was that the bottom storage was accessible easily when the bag was worn on the back. My son wanted to store his jacket (5 minutes into the hike of course) and was easily able to do so. Not so good for the security of camera gear.

    Quality of the zipper

    Through out my time with the Udee bag, some of the zippers were very difficult to use. Now, this could be just my copy of the bag and not really a problem in general.

    The orange zipper which opens to the compartment with the key hook (I kept the car keys and my wallet there) was particularly hard to operate. The key hook kept getting stuck in the zipper and it was hard to open. I had to press down on the front of the bag and then open it. So I could not open the bag and take my keys out super fast. I would have to try a couple of times before being able to get anything out. I did not have a problem with the other zippers so, as I said, it could be just an issue with my copy of the bag.

    Camera Bag Review - The Udee Backpack

    Overall thoughts on the Udee backpack

    Overall I think the Udee backpack is a very good looking bag that is generally well-built. Its list of features includes some really innovative things like the LED lights, anti-theft device, and portable charging.

    However, I feel that it also has some serious misses like the poorly designed lower-compartment in terms of accessibility and lack of beverage storage. I may be tempted to use this bag for light photography use and small day trips where I may not even take my camera or take just a point and shoot. I would not consider taking this on an extensive travel trip where I am constantly on the move, taking a lot of pictures along the way and need to take my camera out multiple times.

    Camera Bag Review - The Udee Backpack

    P.S. I really want to thank my kids for being such sports and testing out the Udee with me on our trip. The bribe of being photographed for an article really worked in my favor this time around!

    The post Camera Bag Review – The Udee Backpack by Karthika Gupta appeared first on Digital Photography School.


    Digital Photography School

  • EXIF.co uses smart watermarks and more to protect photographers’ images

    EXIF.co is a new service offering photographers paid photo hosting that automatically applies smart watermarks and other protections to images uploaded to the platform. It aims to allow photographers freedom to embed and share their images on the web while limiting the risk of someone re-using their work without attribution – or flat-out stealing it.

    EXIF.co enables customers to share their photos using an embed feature or to share it with others directly via a sharing tool. Anyone who tries to download the photo will be blocked, presented with copyright information, and/or a watermark will be automatically applied to the saved photo, depending on the photographer’s preferences.

    Users can opt to apply ‘smart watermarks’ that appear when someone tries to download or screenshot an image, add photo credits, block embeds on websites, enable sharing with websites and track the number of online views each photo receives. The service appears simple to use, requiring customers to first upload their images, then add details to them such as credits. The user sets the permissions they want for each image, then saves it to their account.

    You can see it in action below:


    The service is free to sign up for, and it is priced on a per-thousand views basis. The rate for 10,000 to 99k views is $ 0.30 per 1,000 views, the 100k to 499k rate is $ 0.25 per 1,000 views, the 500K to 999K is $ 0.20 and the 1m or greater rate is $ 0.15. For example, EXIF.co says 10,000 views of a photograph will cost the subscriber $ 3. Individuals who sign up for the beta service will receive 1,000 credits for free.

    The company acknowledged in a blog post yesterday that it’s service certainly isn’t foolproof. It stresses that its goal is to ‘add some friction’ to protect against casual theft. Would you find a service like this valuable? Let us know in the comments.

    Via: PetaPixel

    Articles: Digital Photography Review (dpreview.com)

  • 20 Tips for Getting People to Smile in Photos

    One of the biggest challenges every photographer faces it getting people to smile naturally for a photo. Sure, you can ask someone to say “cheese!” and he or she will likely comply. But you’ll also probably end up with a cheesy smile that doesn’t look natural or attractive. After all, there’s a HUGE difference between a genuine smile and a fake one.

    As a professional event photographer, spontaneously getting complete strangers to smile is a big part of my job, and I’ve picked up some proven techniques that I’ll share with you in this article. Note that I’ve broken up the sections into tips for photographing people by themselves, as couples, in groups, and children, but you can certainly mix and match. Also, be careful to always consider your audience and adjust your technique accordingly.

    For Singles

    1. Approach with a smile

    A smile and friendly demeanor are contagious. Before you ask someone else to smile, make sure that you’re smiling yourself and approach with a friendly tone. If you want to get a real smile out of someone, you need to set the tone by approaching them with a giant, genuine smile on your face.

    20 Tips for Getting People to Smile for a Photo

    2. Offer a compliment

    One of the quickest and easiest ways to get someone to smile is to boost their confidence. This is something you can easily do by offering a compliment based on a feature or quality you observe about them. Are they wearing an attractive outfit or an unusual piece of jewelry? Do they have a friendly smile or laugh? Offer a compliment!

    3.  Smile with your eyes

    How do you know if a smile is genuine or fake? It’s all in the eyes. A fake smile tends to only have the lower half of the face engaged, with the lips curled into a smile. But if the eyes aren’t squinting as well, you can tell the smile is forced and not very genuine. If your photo subject’s smile is looking a bit off and you can’t tell why, ask them to smile with their eyes, or “smize” as Tyra Banks would say.

    4. Fake laugh!

    To illicit a genuine smile, your photo subject needs to feel comfortable and relaxed. The best way to break the ice is to get them to laugh. Ask for a fake laugh, saying something like this, “Let’s see who’s got the biggest, loudest fake laugh! On the count of three, 1, 2, 3, LAUGH!” The whole point here is not to capture the fake laugh, but to get the resulting real laughs and smiles that you’ll get after the fact. It’s also important to note that your own enthusiasm for the activity and tone of voice is what makes this technique work.

    20 Tips for Getting People to Smile for a Photo

    5. Show me your happy face! Silly face! Sad face!

    Most photo subjects respond the best if you give them specific instructions. Help them loosen up and feel less self-conscious by having them go through a series of facial poses. You might think this one only works with kids, but certain types of adults will totally get into this exercise.

    6. Instead of “Say cheese,” say…

    Most people expect to hear “say cheese” before getting a photo. Surprise them by saying something else, such as, “money” or “whiskey” for adults, or “pickles” or “chocolate” for children. Use your discretion and pick a word that suits your audience.

    7. Tell them a joke (or ask them to tell you a joke)

    One of the most obvious ways to get people to laugh or smile is to tell a joke. The trick is finding a joke that is appropriate for the audience. Personally, I use the joke below all the time for my corporate event photo shoots, and it almost always gets a laugh out of people. But I wouldn’t use this joke with children; I’d maybe use a knock knock joke instead.  You can also flip the tables and ask your photo subject to tell you a joke.

    Q: “What’s the quickest way to make money as a photographer?”

    A: “Sell your camera!”

    20 Tips for Getting People to Smile for a Photo

    For Groups

    When photographing groups, you can use any of the above techniques for singles, but you can also add quite a few extra tricks to get creative, engaging shots.

    8. Whisper a secret to the person standing next to you.

    The idea is to get the people in your group engaging with each other. This technique can also elicit grins and giggles as people tend to whisper nonsensical noises to each other.

    9. Everyone look at each other.

    This works best for groups of at least three or more people. The reason why it works is that the instructions are vague. No one is really sure who to look at, and the resulting expressions tend to be smiles and laughs. This is great for capturing candid shots. Use it to loosen people up, and then move onto to the next few tips to work them into a more serious, smiling pose.

    20 Tips for Getting People to Smile for a Photo

    10. Everyone look at ____.

    It’s essential to know everyone’s names or titles for this one to work. By calling out someone specifically in a group, you’re making them the center of attention and it’s often funny to the rest of the group to see how that person reacts.

    11. Everyone look at me!

    Follow this up after #8 or #9. After getting the group to engage with each other and laugh, they’ve loosened up. At this point, you can turn their full attention back to the camera and get everyone looking at you with a real smile on their faces. You can also take it a step further by saying something playful and silly like, “You guys don’t look happy enough! Make those smiles bigger!”

    12. Action for a silly photo

    Almost every single group photo will result in the group wanting to take a silly picture after the serious one. The problem is, most groups don’t know what to do for a silly photo. Help them out by throwing out some suggestions. My favorites for adults are:

    • Everyone clink your glasses together and say, “cheers!” if they’re holding drinks.
    • Hands in the air and raise the roof!
    • Point at the camera!
    • Thumbs up!
    • Give me your best impression of ____ (a celebrity, animal, etc)

    20 Tips for Getting People to Smile for a Photo

    For Couples

    You can use many of the above group techniques for couples, but you’ll also want to have a few other tricks up your sleeve.

    13. Tell me about how you met / first knew you were in love.

    Talking about intimate, happy moments with couples is a great way to get them in-tune with each other and eliciting romantic smiles.

    14. Give her a kiss on the cheek/forehead/nose.

    Most happy couples will definitely smile when asked to be intimate with each other for the camera.

    20 Tips for Getting People to Smile for a Photo

    Photo by Jonathan Gipaya

    15. Ask them to dance.

    Get the couple moving and focus their attention away from the camera, especially if they are having a hard time relaxing. Almost any couple dancing together will be in good spirits. This also gives you a chance to grab some candid, action shots.

    For Children

    16. Stare at each other without laughing.

    The minute you tell kids to be serious without laughing, you’re more likely to get the opposite effect. This is a simple, yet highly effective way to get kids to smile.

    17. Play a game.

    If you have the time and the space to get kids to play a game, take advantage of it! Have them play Simon Says, Duck Duck Goose, tag, or any other age-appropriate games that will get them engaged and having fun.

    18. On the count of three, jump as high as you can!

    Jump shots are always fun for kids and even certain types of adults. Make it more fun and engaging by turning it into a jumping contest to see who can jump the highest.

    20 Tips for Getting People to Smile for a Photo

    19. Stick your tongue out.

    Admittedly, photos of kids sticking their tongues out often aren’t what you’re trying to achieve. But if you stick your tongue out at them or turn it into a game of who has the longest tongue, this can lead to laughs and smiles, which you definitely want to capture in photos.

    20. Bunny ears.

    You may not even have to ask kids to do this for you. Bunny ears seem to be a universal photo prank that even adults play on each other and seem to find funny.

    In Conclusion

    There you have it, 20 ideas to help people smile for a photo. Get out there and try some of these techniques and see how they go! But always be sure to gauge how your photo subjects are reacting to your suggestions. You might have to adjust your tone of voice and photo directions for different types of people.

    Have any ideas to add to the list? Mention them in the comments below!

    The post 20 Tips for Getting People to Smile in Photos by Suzi Pratt appeared first on Digital Photography School.


    Digital Photography School

  • Nikon in legal tussle with ASML and Carl Zeiss over alleged patent infringements

    On Monday this week Nikon initiated legal action against the Dutch company ASML Holding NV, which is one of the market leaders in the field of semiconductor lithography machines. Germany’s Carl Zeiss AG is ASML’s optical supplier. Nikon said both companies were using its lithography technology without permission and that it was seeking damages and to prevent ASML and Zeiss from selling the technology.

    Nikon and ASML have contested IP rights for more than fifteen years, as ASML has come to dominate several aspects of the market for semiconductor manufacturing equipment previously divided up primarily between Nikon and Canon.

    In first statements both companies called Nikon’s legal action unfounded and categorically denied any infringements. A spokesperson for ASML said the company had repeatedly attempted to negotiate an extension of a cross-license agreement with Nikon.

    Now ASML and Carl Zeiss have teamed up to counter-sue Nikon and are both filing legal claims against Nikon for the infringement of more than 10 patents. Peter Wennink, ASML President and Chief Executive Officer, said the following in the company’s issued statement:

    We have no choice but to file these countersuits. We have tried for many years to come to a cross-license agreement that reflects the increased strength of our patent portfolio. Unfortunately, Nikon has never seriously participated in negotiations. Now that Nikon has decided to take this dispute to court, we also have to enforce our patent portfolio, and we will do this as broadly as possible.

    Both ASML and Carl Zeiss have issued press releases on the matter. It seems this is a legal dispute that could go on for quite some time, and not the first one involving these three parties either. According to Nikon, ASML and Carl Zeiss paid it $ 87 million and $ 58 million respectively in 2004. We’ll keep you updated on any future developments.

    Articles: Digital Photography Review (dpreview.com)

  • Acer unveils 31.5″ 4K display for image editors and other creatives

    At its Acer Next event in New York City the Taiwanese electronics manufacturer has unveiled its new 31.5″ ProDesigner PE320QK display. The new monitor features super-thin bezels and, looking at the impressive specifications, is clearly targeted at image editors and other creatives. It offers 550 nits of brightness at 4K (3840 x 2160 pixels) resolution and has an enhanced color gamut, supporting 130 percent of the sRGB and 95 percent of the DCI-P3 color spaces. Response time of the display is 4 milliseconds, with a 100 million to 1 contrast ratio.

    In terms of connectivity there are two HDMI 2.0 ports, audio out, a DisplayPort 1.2, a USB 3.1 type C input, and four USB 3.1 Type C outputs which are suitable for peripherals and support power delivery of up to 85W. The display also comes with a pair of 2W speakers and a removable anti-glare hood. Unfortunately Acer has not provided any information on pricing and availability yet. 

    Articles: Digital Photography Review (dpreview.com)

  • How Understanding Your Learning Style Can Improve Your Photography

    Lady in the blue hat walked into my shot and I chose to include her to emphasize the size of the trees and the distance of the park

    Introduction

    It’s an exciting time, going to the camera shop, discussing options, making the final choice, parting with a reasonable sum of money. Finally the anticipation of getting home and unpacking your shiny new camera gear. Suddenly all the dials and buttons seem so much more confusing, the manual may not explain things enough. The menus are complicated so it’s easiest to switch over to Auto mode and leave it there while you try to figure it out.

    Six months later what’s happening with your camera? Are you still using it? Is it still on Auto or have you tried other modes? Did you decide it was too hard and the camera is gathering dust in a cupboard somewhere (this is more common than you may realize)?

    Toi Toi silhouetted by sunset – an experiment in backlighting.

    Learning to learn is a skill that also needs to be developed

    Learning a new skill is difficult. It takes commitment to put time and effort into the learning process. It requires you to admit you are at the beginner stage, where you will struggle to produce the quality of work that you want. Learning is a process which requires you to put some thought and structure into working out a process that is right for you. Different people learn in different ways, so it’s helpful for you to understand how you prefer to learn. Why?

    •  Value: If you are spending money on a course or a workshop, you want to make sure you are going to get the best value out of it.
    • Time: Learning takes time, so when choosing an option, knowing your preferences helps maximize your benefits.
    • Fun: It’s more fun if you are learning in a way that you enjoy.
    • Return: You are more likely to invest the time and effort into something that makes sense to you and shows a return on your investment.
    • Pain avoidance: No one enjoys doing something painful or difficult for the sake of it.
    • Find the best sources: Information is everywhere but varies in quality – you need to sift the good from the not so good.

    Narrow depth of field, focused on the sparrow using a 70-200mm lens at a distance.

    Learning styles

    While there are many theories on learning styles, there are three basic types that apply to most people:

    1. Auditory learners – learn by hearing and listening – you may prefer to read things out loud as you store information by the way it sounds to you.
    2. Visual learners – like to see what you are learning as either pictures or words – you understand and remember things that you see.  May use flash cards or similar for studying.
    3. Tactile learners – you learn best by being hands on – touching things, taking them apart, twiddling with the settings (probably not listening to a speaker while you are doing it).

    Of course, most people are a combination of all of these styles but you will likely have a preference for one or two. Understanding them can help you make choices around developing your own personal approach to learning photography. There are many options. Some don’t need lots of money but others might cost quite a lot, and it’s difficult to know in advance if it will be worth it.

    Swan Yoga – if you take time to sit and be with your subject, all sorts of interesting things might happen

    Opportunities for learning photography

    1. Books, magazines and other printed material – can be purchased, downloaded in digital format or borrowed from libraries.
    2. Online tutorials – short tutorials on a specific subject.
    3. Video courses – can be watched for free online or many options can be purchased.
    4. Short workshops (a day or less) – attend in person – usually listening to a speaker plus opportunities for questions and hands-on experimenting.
    5. Long workshops (several days) – attend in person – some travel may be involved, often with a specific focus, planned talks plus time for independent shooting, discussion sessions, editing sessions.
    6. One-on-one tutoring – customized service offered by some professionals where you can have a training session targeted to a particular subject.
    7. Small groups – similar to one-on-one tutoring but with 3-5 students.
    8. Camera clubs – often organize workshops or field trips for members with the aim of learning for everyone, often a safe place to ask questions.
    9. Photography forums – online forums where photographers gather to post images and share information, might be general or around a specific subject (landscapes or birds).
    10. Online courses – structured learning courses hosted online aimed at a range of capabilities from beginner to advanced (rather than random videos) on specific topics.
    11. Formal education – University Degree courses in photography and other tertiary institutes are available.
    12. Apprentice or intern – offering to work for free assisting a professional and learning on the job.
    13. Mentor – someone experienced who is happy to answer questions, go for a bit of a photo walk, give you tips and advice (be nice and buy them lunch).
    14. Organize your own DIY photography retreat focused on specific techniques.
    15. PRACTICE!! – take your camera out and use it as often as you can.

    Learning the hard way about photographing a subject in bright sunlight – washed out colors and harsh shadows as the result.

    How to choose?

    There are many choices listed above and even within just one of those options, there are many more choices – thousands of books available, tons of YouTube videos, loads of courses and workshop options. That workshop in Iceland might sound super exciting but are you okay with learning outside in some possibly dodgy weather, where you have to drive and hike for hours? Maybe you have to camp and will be tired and grumpy from getting up early in the morning to get the sunrise.

    Would you prefer a structured classroom environment, where you can interact with students and the teacher for questions and discussion? Does it suit you better to watch videos at home after work, when the kids are in bed and you can pause them to write notes, or play the same step over and over until you understand it?

    Practicing isolating a subject from the background and blurring with bokeh effect.

    We are all busy people, with limited spare time to dedicate to our hobbies and passions. So it makes sense to maximize the value of your time spent learning. Understand what your personal preferences are and then take the next steps.

    Learning factors

    •  If you like to read do you need to buy expensive printed books or magazines – does your library have them? Can you get them cheaper in digital format? Can you borrow them?
    • The voice of the person presenting a video course is important – do they speak in a language or an accent you can understand? Do they present in a style that you like? Are they to the point or do they waffle all over the place and take twice as long to get the point across? Is the video a “talking head” or are they demonstrating the subject matter in some way? Is it something you can listen to for hours without getting annoyed or a headache?
    • When attending a workshop is there time allocated for questions and discussion? What reviews do the workshop speakers get from other attendees?
    • Are there sample videos available for you to hear/see speakers present so you can get a feel for their delivery style and approach to the subject matter?
    • Do you get frustrated in a group of mixed ability? If you are new and need a lot of help do you feel uncomfortable asking questions, or if you are more advanced do you feel held back when beginners are present?
    • Is the subject matter relevant to what you want to achieve? Do you have a chance to clarify goals and outcomes with a workshop presenter or speaker in advance?
    • Do you have the time or money for more formal education? Is it really necessary or a nice to have in the overall scheme of things?
    • Does being in a group of strangers bother you or inspire you?
    • How much time or money do you have available?

    All these factors can have an affect on how well you will learn. It would be a real shame to spend several thousand dollars on a workshop in an exotic location to find that you get very little out of it. Or you might discover the most helpful channel on YouTube that really resonates with you.

    Using flash on a dull overcast day seemed like a good idea until you see the bright highlights in the final image

    How do we learn?

    Research tells us that the best way to learn is via a technique called “distributed practice” which is where you study in an intense burst and then take a break, and keep repeating this cycle. Photography lends itself well to this style as it is often taken up as a hobby to be done in spare time. So allocating a weekend or an evening when you have time to focus on a particular style or technique, and then having a break is actually okay.

    Applying some variety to your learning process improves outcomes as well. You could apply this easily with photography by changing the subject matter you are shooting. Or take your camera into different situations. Moving between similar topics can help you see connections or understand concepts in a different way. Bear in mind that getting out of your comfort zone is an important learning opportunity too, so be prepared to push your boundaries as well.

    NZ Native Tui – shot in an enclosure at a nature park

    Teaching someone else also helps you retain knowledge more effectively too. Writing things down after a learning session is also a recommended way to improve knowledge retention. Perhaps start a photography blog and share your learning journey with others? Keeping track of your achievements is important to give you a sense of scale (i.e. how far you have come from being a complete beginner) and it also motivates you to move forward, knowing that you have mastered some learning steps.

    Learning to see from a different viewpoint is important as a photographer, as is taking chances and experimenting – this is a chair

    Summary

    Ultimately everyone learns on their own but the learning doesn’t truly happen until there is a link between action and reflection (i.e. what was I trying to achieve and did I manage it?) You must be prepared to experiment, and with experimentation there comes failure.

    No one likes to fail as there is a lot of ego tied up in success. So to truly learn you must suspend your ego, embrace failure and admit to yourself that you can improve. These days with digital it’s more or less free to shoot as many frames as you want. So other than the cost of time, it’s never been more cost effective to get into photography (after the initial hardware purchase, of course).

    Both the foreground and background were important in this image, composition was a challenge

    Spend some time on this

    Learning also requires you to move out of your comfort zone and do different things, try new styles. It requires you to actively think about what you are doing, what outcomes you are trying to achieve, and analyzing how and why you did (or didn’t) achieve them. Yes, you can just go out and randomly shoot and put no more work into it than that. However, any improvement is likely to be slow. It’s difficult to produce work of a consistent quality if you don’t understand how you got there in the first place.

    Take a bit of time to understand your best learning style, look at the available options, try a few out. Maybe ask for recommendations from other beginners. Accept that it’s okay to say, “I’m new at this and I need some help.” In general, many people are happy to offer advice, after all, they were once new at it too.

    Playing with an old vintage lens with manual focus and odd imperfections that did strange things around the edges was a fun afternoon field trip.

    Conclusion

    Investing in your own personal learning process is important. Learning a new skill can happen via osmosis but improvement will be slow and the process is frustrating for many. So much so that they may give up completely as it was too hard. Having a considered structured approach gives you an achievable goal to aim for – it’s even better if you break it down into smaller milestones so you get some sense of accomplishment at each step.

    Learning a new skill takes time, so why not ensure that your time is well spent in the learning you are doing. Often there is a cost involved, so investing time in understanding a good learning choice for yourself is also important. Keep in mind that your learning journey will never be finished, don’t get lazy or complacent once you reach a certain level of mastery, there will always be something new to try.

    Most of all, it should be fun!

    Long exposure as the tide was going out after sunset.

    (Note:  All the images provided are ones taken by the author on her learning journey which started 10 years ago and is only now getting to the really fun stuff!)

    The post How Understanding Your Learning Style Can Improve Your Photography by Stacey Hill appeared first on Digital Photography School.


    Digital Photography School

  • How to Photograph the Images Needed For Focus Stacking

    This tutorial will help make it much easier for you to take the photographs needed for focus stacking. This is the best and the easiest way to achieve the results you want. There are a few details along the way, but the bonus is that there are also other photographic situations where you will be able to apply the same technique.

    How to Photograph the Images Needed For Focus Stacking

    What is focus stacking and why is it needed?

    When your camera is really close to the subject, depth of field will be very shallow. For example, if you are using a 100mm lens, at a distance of 50cm (nearly 10 inches from your subject) with an aperture as small as f/16, the area which is acceptably sharp is just 1.9 cm (about 3/4 of an inch). Reduce the distance to subject to only 25cm (less than 5 inches) and the depth of field reduces to only 0.36 cm (1/6th of an inch).

    How to Photograph the Images Needed For Focus Stacking
    The only way to conquer this issue in order to get a greater depth of acceptable sharpness in a final photograph is with computational photography. That means using software to blend together a number of photographs which have been taken with different points of focus. This computational process is called focus stacking.

    Input

    The recommendation made in this article is an application of the old computer acronym of GIGO. Garbage In, Garbage Out. If you input rubbish, the output will be rubbish. To achieve the best results with focus stacking, you need to produce the photographs which are technically the most suitable for the focus stacking process.

    How to Photograph the Images Needed For Focus Stacking

    Processing

    A while back, I decided that I wanted to make some images that would look good in a home or workplace, which would reflect the Filipino environment. With various adjustments, the five photographs shown in color above were combined to produce the image below (and a lot more like it!).

    How to Photograph the Images Needed For Focus Stacking

    If you like the idea of producing something like this, with sharp focus through the whole frame, it needs a little attention to start. This soon becomes quite easy, and you may find that it is actually a lot of fun. Find your own subject, then follow along with this method for producing your focus stacking images.

    The actual processing of the images is a sequence of steps, and I would be happy to go through my approach for you at another time. Although there are other specialist programs for producing a focus stacked image, you will most likely use Photoshop. Of course, there are tutorials on how to do this here on dPS; A Beginner’s Guide to Focus Stacking.

    How to Photograph the Images Needed For Focus Stacking

    The Method – Part One – It is a Surprise

    At this point in most focus stacking tutorials, you will see somebody holding a set of focusing rails. Forget it! No further expense is required here. They might then talk to you about focusing manually. Forget that too! No need for any delicate touch with this method. You do not even need a cable release. This is absolutely all you need.

    How to Photograph the Images Needed For Focus Stacking
    In the past, I had not even bothered to install Canon’s software offerings. Yes, the surprise news might just be that it is Canon EOS Utility which will serve you best for shooting focus stacking images.

    As far as I have been able to determine, Nikon users will find that Nikon Capture includes a Camera Control component. I do not have the facility to put that to the test, but I imagine it works just as well. If you shoot Nikon and give this a try, do tell us how it worked for you in the comments section below.

    The magic trick – the secret sauce – the silver bullet, for making images for focus stacking is the Canon EOS Utility program. It allows total remote control of the settings of your camera when shooting tethered to your computer.

    How to Photograph the Images Needed For Focus Stacking

    Plug and play!

    Once you have your shot set up, you can control everything from your computer. If that happens to be an adjacent laptop, that will work the best. However, the photographs which follow below were produced with everything controlled from a computer in another room, fully 10 meters, more than 30 feet away from the set.

    The Method – Part Two – The Mechanics

    This type of photography, which I think of as “constructed photography”, does take a little while to set up. Follow these steps:

    • Put your camera on a tripod.
    • Compose your shot.
    How to Photograph the Images Needed For Focus Stacking

    You need to make two measurements.

    • Measure from the focal plane of the camera (the mark indicated above) to the front of the object which you are photographing (A), as shown above.
    How to Photograph the Images Needed For Focus Stacking

    The circle with a line through it indicates the focus plane – this is where your lens focuses the image onto the sensor.

    • Measure the depth of the object, from the point which is nearest to the camera, to the point farthest away. I have found that a steel rule or tape measure works well enough for these tasks.

    Standard issue.

    • Now take a test shot.
    • Use a small aperture, like f/10, then check the exposure. I tend to look at the LCD screen which gives the RGB histograms. This allows you to judge the exposure, exposing to the right if you like, but also to check that none of the individual colour channels is overloaded. That is prone to happen in photographs which have one subject filling the major part of the screen. At this stage, exposure is not critical, you are only trying to achieve a guide shot.
    • Make a note of the settings which have given a reasonable exposure.
    • Cover the viewfinder to prevent possible light leakage.
    • Switch off image stabilization, it is always the best practice to do so when your camera is on a tripod.
    • It is not essential, but you might choose to put your camera into manual focus.
    How to Photograph the Images Needed For Focus Stacking

    Manual focus, stabilizer off.

    • Again, not essential, but you might choose to put your camera in Manual shooting mode.
    How to Photograph the Images Needed For Focus Stacking

    Switch to Manual Mode

    Now the magic begins, the bit which makes me smile at how brilliant and easy it is.

    The Method – Part Three – Computing

    Connect your camera to your personal computer using Wi-Fi, a USB or Ethernet cable, whatever works best for your setup. I like cables, so I use a USB cord.

    Run the EOS Utility software. Your camera should be discovered quite easily.

    How to Photograph the Images Needed For Focus Stacking

    The EOS Utility dashboard.

    Choose “Remote shooting” and the screen below will appear.

    How to Photograph the Images Needed For Focus Stacking

    You are in control

    From the comfort of your computer, you can release the shutter, the ultimate cable release, and do pretty much whatever else you like. As advised, you can switch off autofocus, and switch to Manual Mode without even touching the camera. In fact, adjustments can be made to all the usual camera settings for shooting. Most importantly for this exercise, you can switch to Live View shooting. Do so, and you will see a screen like this.

    How to Photograph the Images Needed For Focus Stacking

    The Remote Live View window. This is where the fine focusing happens.

    The first thing to do is to fine tune the exposure. Controlling your camera from EOS Utility soon becomes quite easy, and intuitive. You can actually learn a lot about exposure by experimenting with the exposure triangle of ISO, shutter speed, and aperture all from your computer, with the benefit of Live View in grand scale.

    One extra benefit of shooting in Live View is that you will have locked the mirror up, and removed any chance of vibrations from that source.

    How to Photograph the Images Needed For Focus Stacking

    You can click on the screen arrows, even use the scroll wheel on your mouse to make adjustments.

    Take a shot and it will soon appear on your screen. This is not an article on ETTR (Exposing To The Right), but there is a good one here; Exposing to the Right. You can now adjust the exposure to try and get as much data onto your sensor as possible (the premise of ETTR). Take your time and take as many shots as you like. Check the histogram, check what you can see on the screen, and get the exposure exactly to your liking.

    I do tend to prefer a shorter exposure. In the interests of sharpness, if I can get a compromise between ISO, and aperture which gives me an exposure of less than 1-second, I believe that is a good step in the direction of sharper photographs.

    For this particular exercise, there are all sorts of detailed decisions, but the most important part of this screen is the Focus Adjustment and the Zoom View.

    How to Photograph the Images Needed For Focus Stacking

    Double clicking on the area highlighted, shown towards the bottom of the screen capture of the Remote Zoom View window (shown above), will bring you to this window below.

    How to Photograph the Images Needed For Focus Stacking

    Zoom View – allow you to easily get the nearest point of the image sharp as possible.

    You now have turbocharged, hyper control of your focus. Not until you take the plunge and try this method, and find out that you can focus to the width of a hair, will you realize how brilliant it is. There is even the facility to zoom in further still.

    I believe you will find the focus adjustment intuitive. There are three different levels for adjusting focus in either direction, “<<< / << / <” and “> / >> / >>>”. This is very useful in a way that no focus rails or manual adjustment could ever be. The bonus is that you will have no physical contact with the camera whatsoever.

    The Method – Part Four – Finally

    Martin Bailey is a photographer who goes into admirable detail. He is of the opinion that if you start photographing to the rear of the object, and work forward, Photoshop handles the process better. I do not see the evidence so clearly but, experience tells me, he is very likely right.

    Another piece of advice would be to shoot a little wider, do not frame as tightly as you might usually. It gives you a little more room for maneuvering if you need to make adjustments.

    How to Photograph the Images Needed For Focus Stacking

    You now need a Depth of Field (DoF) calculator. There’s a wide choice, there are many that are readily available for your computer, phone, and for use online. I happen to use, Simple DoF (iOS only, see Android options here), as shown in the screenshots. Let’s apply it to a situation.

    How to Photograph the Images Needed For Focus Stacking

    The depth of field required for this scene is about 20cm (8 inches) To determine what you need, measure from the part of the object nearest the camera to the point furthest away. Divide that by the Depth of Field of 3.39cm (let’s call it 3.4cm), which tells us we will need 5.88 images. That means that we will need to take six evenly spaced images from the back to the front, in order to get every part of the image in focus. Here they are!

    How to Photograph the Images Needed For Focus Stacking

    Focused at the rear, on the plastic case of the ruler.

    How to Photograph the Images Needed For Focus Stacking

    Moving forward, picking a point about 3cms (just over an inch) closer each time.

    How to Photograph the Images Needed For Focus Stacking

    Focused between 6 and 7 inches.

    How to Photograph the Images Needed For Focus Stacking

    Shot 4.

    How to Photograph the Images Needed For Focus Stacking

    Coming forward.

    How to Photograph the Images Needed For Focus Stacking

    Focus closer 3cm, about an 1 inch, each time.

    How to Photograph the Images Needed For Focus Stacking

    Finally, focused sharply on the front edge of the ruler.

    You can go to whatever lengths of precision you like. Experience allows me to trust my judgment of distance, and I am happy to err on the side of taking too many shots. If I reached the front edge of the saucer and found that I had taken eight shots I would be perfectly happy with that. As it happens, it seems that I took seven.

    Here is the image produced from all the above by following the focus stacking processing routine in Photoshop.

    How to Photograph the Images Needed For Focus Stacking

    The final focus stacked image.

    You should always be looking for ways to improve. As I have said, better results from less effort is a good thing.

    Next

    I think that to be certain of producing the highest quality product, the next time I do a project like this, I would refine my technique a little further.

    I would actually put a rule next to the object but, unlike this time, do so temporarily. In this specific example, I would decide to take 3cm as my Depth of Field. I would then focus a shot on the 0cm mark of the ruler. I would then use the focus controls in EOS Utility to nudge the focus to 3cm and see how many clicks of the “>”, “>>” or “>>>” buttons it took to move the point of focus 3cm. It might, for example, be three clicks of the “>>>” button. Again, sticking with this example, I would then know that I needed to take seven shots. I would then take a shot focused on the back edge, click “>>>” three times, take another shot, click “>>>” three times again … and so on. As I said at the start, what could be easier?

    Summary

    This leaf was 10cm, that is 4 inches from front to rear. I do not think there is a way to produce this final image without using the technique of focus stacking. What you have read above is the best, and the easiest way to produce the shots.

    How to Photograph the Images Needed For Focus Stacking

    Waving goodbye?

    I am all for spontaneous, shooting on the run, shots. However, if you want to shoot in a more controlled way, I think you might find the control offered by Canon EOS Utility to be a lot of fun. I do!

    Once you have been introduced to it and learn some of the power of the software, you may well find yourself using it for other projects. This last week, I have used Canon’s EOS Utility to produce some product shots. The proof is in using it, and I hope you can see that it is something you can try if you want to do focus stacking.

    The post How to Photograph the Images Needed For Focus Stacking by Richard Messsenger appeared first on Digital Photography School.


    Digital Photography School

  • Nikon releases firmware update for 1 J5 mirrorless system camera

    Nikon has released a firmware update for its 1 J5 mirrorless system camera. Version 1.01 only comes with one modification over version 1.0 and fixes an issue that prevented additional deletions after multiple shots had been deleted in succession from a single burst of pictures.

    The Nikon 1 J5 captures images on a 1″ 21MP BSI CMOS sensor and was originally announced in April 2015. If you own the camera you can check your current firmware version by selecting Firmware version in the Setup menu. If you want to update, the new version is now available for download on the Nikon website. 

    Articles: Digital Photography Review (dpreview.com)

  • 6 Color Settings in Photoshop That You Need to Know

    Photoshop CC is a complex piece of software. Most of us barely scratch its surface in terms of the features we use. Thankfully, it doesn’t matter if we’re not familiar with every aspect of this vast program if only we achieve the results we want. One of the hurdles in Photoshop has always been understanding how it handles color and what effect different color settings have. This can be mind-boggling for new photographers and even catches a few seasoned ones out.

    There are 6 color settings to consider in Photoshop

    #1 – RGB Working Spaces

    Some basics

    Under “Color Settings” in Photoshop, the first item needing attention is choice of RGB working space. What is this? It’s your editing color set, if you like, where all the various tones of red, green and blue are split into values between 0 and 255 and blended to make 16.7 million possible colors. We can’t separate all these colors with our eyes, but mathematically they’re there.

    1b Simple RGB Color Wheel - 6 Color Settings in Photoshop That You Need to Know

    This simple RGB color wheel shows the relationship between primary (red, green, blue) and secondary (cyan, magenta, yellow) colors. For example, a fully saturated magenta tone contains no green (RGB 255,0,255), so sits opposite green on the wheel. Tertiary colors are created by blending adjacent primary and secondary colors.

    All RGB working spaces have the same number of colors; the gamut they cover is the main difference between them. Choice of RGB working space is, therefore, mainly about picking a gamut that suits your needs best.

    Standard RGB working spaces (e.g. sRGB, Adobe RGB or ProPhoto RGB) are used for editing because they are “well behaved”. In other words, we know what to expect from them when we edit our photos. To illustrate this, if all three red, green and blue (RGB) values are equal in any pixel, the tone will always be neutral, be it gray, black or white. Any adjustments made to shadows, mid-tones or highlights cause the same degree of change, too, so editing is always predictable.

    Choosing an RGB Working Space

    Here are the three main choices of RGB working space:

    sRGB

    sRGB might be a good choice of working space if all you ever do is publish photos on the Internet and get your prints done at the shopping mall (i.e. a commercial photo lab). It’s one way of keeping things simple, but does potentially forfeit a lot of color data between camera and Photoshop, especially if you shoot RAW.

    Some subjects are better suited to this color space than others, like portraits. Skin tones are likely to be encompassed by the sRGB color space, so you don’t lose data by editing in it. The types of subjects you shoot may play a part in choosing a working space.

    The popular assertion that this color space is the “Internet standard” is partly true, though slightly outmoded. Most people can’t see much color outside of sRGB because of the standard gamut of their monitors, so a bigger space would be largely wasted on your web audience.

    Adobe RGB

    Adobe RGB is recommended to anyone who does their printing at home or who supplies third parties with images for publishing. Even humble models of inkjet printer produce colors outside of the sRGB gamut, while only high-end printers exceed Adobe RGB in output.

    The Adobe RGB color space was designed to encompass the output of CMYK printers. It is often seen as a good all-rounder for the average photographer, and you can easily convert files to sRGB for the web at the end of editing if desired.

    Landscapes benefit particularly from Adobe RGB, largely because of the cyan and green colors lost when converting down to sRGB. To a lesser extent, yellows and oranges are also truncated.

    1a Working RGB space - 6 Color Settings in Photoshop That You Need to KnowSince most browsers are now color-managed by default, you can get away with saving photos in the larger Adobe RGB color space for the web. You must embed the profile into the image file if you do this, otherwise, your photos will look desaturated to most people. Only a minority of your audience will benefit from the bigger color space, alas, but it could be worth trying among a group of keen photographers with wide-gamut monitors.

    ProPhoto RGB

    ProPhoto RGB is the largest of the three commonly used RGB working spaces, and it’s the one that best preserves all color data between a RAW file and Photoshop. A purist would ask; why would you want to throw color away needlessly? You don’t always discard color with a smaller color space, of course, depending on the content of your photo.

    ProPhoto RGB is a good choice if you use a high-end inkjet printer capable of colors outside the Adobe RGB gamut, but there are caveats attached to its use:

    • Because ProPhoto is spread over such a wide gamut, you’re forced to work with larger 16-bit files to avoid posterization, or banding. (The opposite is true of a small working space like sRGB, which is ideally suited to 8-bit editing.)
    • Since ProPhoto RGB produces colors beyond the capabilities of any monitor or that of human vision, you’ll be working partially “blind” when you edit in this color space. This is a trade-off that many accept in return for extracting as much color as possible from their printer.

    Note: some photographic subjects, particularly those with a deep yellow color, lose detail straight away merely by opening them in Photoshop in a smaller color space (i.e. sRGB or Adobe RGB). It’s possible to see blotchy, posterized areas in photos of yellow flowers, for instance, in anything less than ProPhoto RGB, and the effect is worse the smaller a working space you select. This makes it desirable to print such subjects directly from ProPhoto RGB.

    Again, there’s nothing to stop you from editing your files in ProPhoto RGB and then converting down to smaller RGB color spaces when required. Remember; you can’t convert up to a bigger color space and get data back.

    ProPhoto RGB is not typically an in-camera option. You need a RAW > 16-bit workflow to make it a useful choice in Photoshop.

    1c RGB Color Space Gamuts - 6 Color Settings in Photoshop That You Need to Know

    A comparison of RGB color spaces. Note how the profile of an Epson 2200 printer with matt paper exceeds the Adobe RGB gamut.

    #2 – Monitor RGB (check your monitor profile)

    Also under the RGB working space menu you’ll see the “Monitor RGB” heading. This is not a profile you’ll want to use as a working space, because it effectively turns off color management in Photoshop. One thing the Monitor RGB selection is useful for is checking that Photoshop is accessing the correct monitor profile. The profile in current use is listed beside “Monitor RGB”.

    If you’ve created a custom monitor profile and notice that color is wayward in Photoshop, one thing you can do is temporarily switch the monitor profile back to sRGB in your OS settings (Adobe RGB for wide-gamut monitors). If this improves the color, your own custom profile is probably corrupt and you’ll need to delete it and create another. Again, the “Monitor RGB” working space option will verify the profile in use.

    #3 – Color Management Policies

    Under “Color Management Policies” in Color Settings, select “Preserve Embedded Profiles” in all three drop-down menus.

    3a Preserve Embedded Profiles - 6 Color Settings in Photoshop That You Need to Know

    There is a case for unchecking the 2 boxes next to “Profile Mismatches”, since you’re unlikely to act on the alerts they produce. The first box “Ask When Opening” might be useful if you want to be kept in the loop and know immediately if a file has a different profile embedded to the one you edit with. You can disregard the second box “Ask When Pasting”.

    3b Profile Checkboxes

    It’s desirable to check the box next to “Missing Profiles”. When opening an image file without a profile embedded, you can sometimes guess the correct color space based on where it came from and then assign that profile to the image. You may also choose to open the file without a profile and then assign different profiles in Photoshop to see which looks best.

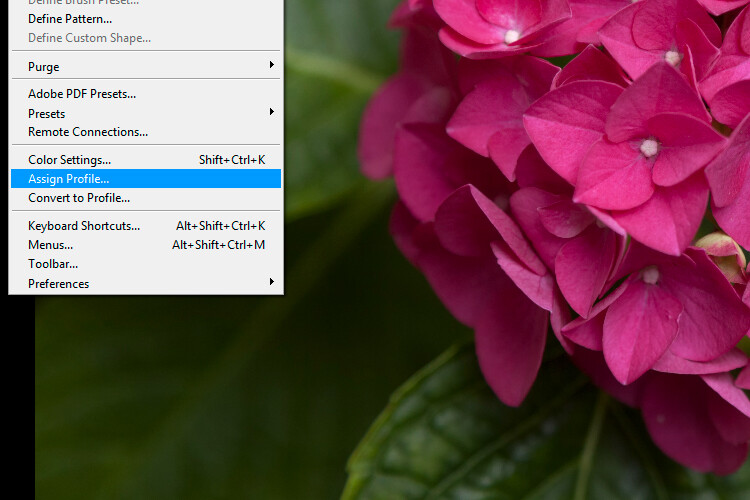
    #4 – Assign Profile

    The vital thing to learn about “Assign Profile” in Photoshop is that you should leave it alone in most situations. Many people don’t distinguish between this and “Convert to Profile”, which is a mistake.

    4a Assign Profile - 6 Color Settings in Photoshop That You Need to Know

    4b The Effect Of Misusing Assign Profile - 6 Color Settings in Photoshop That You Need to Know

    A color shift occurs when wrongly using “Assign Profile” to convert files from one known RGB color space to another. “Convert to Profile” uses a relative colorimetric rendering intent to match destination colors to source colors as closely as possible.

    Assign Profile applies the RGB values embedded in a photo to a different color space without any attempt to match color. This often causes a huge color shift. You’d only use this feature on a file that had no profile embedded or that had one assigned upon opening that you’d like to change.

    #5 – Convert to Profile

    If you need to convert a file from one RGB color space to another in Photoshop, “Convert to Profile” is the right tool for the job. A relative colorimetric rendering intent is used to match color between different color spaces. If you’re converting from Adobe RGB to sRGB, for instance, colors outside the sRGB gamut are matched to their nearest in-gamut equivalent.

    5 Convert to Profile - 6 Color Settings in Photoshop That You Need to Know

    Convert to Profile is typically used to convert between RGB color spaces, since most of us have no need to convert to printer or CMYK profiles within Photoshop. When converting between RGB files, “relative colorimetric” is always the rendering intent used, even though it’s possible to select other intents from the menu.

    #6 – Proof Colors

    You wouldn’t ordinarily check “Proof Colors” under the “View” menu unless previewing the color output of a printer or other device. The colors it displays are based on the selection made in the “Proof Setup” menu. Some people assume they should use Monitor RGB proof colors for editing, but, as we’ve already noted, this turns off color management in Photoshop.

    6 Proof Colors For Color Blindness - 6 Color Settings in Photoshop That You Need to Know

    Proof colors being used to simulate “Color Blindness – Protanopia-type”. More typically, you’d use this function to preview and edit print colors so they matched the original RGB screen image satisfactorily (a technique known as “soft-proofing”).

    The normal method for using “Proof Colors” is to open a duplicate image next to the original, apply the printer profile to the duplicate using proof colors and then edit so it closely matches the original. This is basic soft-proofing method, though a full description merits another article.

    Checklist

    • RGB Working Space: Choose Adobe RGB if in doubt. It’ll encompass the output of most monitors and inkjet printers.
    • RGB Working Space: Take note of the Monitor RGB selection to ensure Photoshop is using the right monitor profile.
    • Color Management Policies: Select “Preserve Embedded Profiles” in the three drop-down menus and check the “Ask When Opening” box next to “Missing Profiles”.
    • Don’t use “Assign Profile” to convert from one RGB space to another. It causes unwanted color shifts. Use it only when the original profile is unknown, which shouldn’t be often.
    • Use “Convert to Profile” to convert from one known RGB space to another. This matches color as closely as possible between the source and destination color space.
    • Proof Colors are used for previewing the color output of other programs or devices, or to see how an image will look to a color-blind viewer. For normal editing, this should be turned off.

    Conclusion

    I hope that clears up any confusion you have had around color settings in Photoshop. Please post any comments and questions below and I’ll try to answer them.

    The post 6 Color Settings in Photoshop That You Need to Know by Glenn Harper appeared first on Digital Photography School.


    Digital Photography School

  • Sekonic announces price and availability of ‘groundbreaking’ L-858D-U light meter

    Light meter manufacturer Sekonic has announced that its new L-858D-U light meter is now available and priced at $ 599/£599.

    This new meter offers a number of firsts, including the ability to measure flash duration and to work in HSS mode. It can read out the duration of a burst of light as short as 1/55500 sec and work with shutter speeds as short as 1/16000s ec, both of which will be useful for those working with high-speed photography or trying to balance bright daylight with flash.

    Designed for moviemakers as well as still photographers, the meter can display frame rates or shutter speeds under continuous lighting, and with more sensitivity than previous models it can now measure down to 0.1 lx of illuminance for low-light scenes and night photography.

    The L-858D-U is also compatible with the radio triggering and control systems of a range of studio and hotshoe flash units via drop-in modules for the PocketWizard, Elinchrom’s Skyport and Phottix Ares ll and Strato ll environments. This 2.7″ touchscreen meter offers reflected 1-degree spot metering as well as built-in filter factor modes, an ISO range of 3 – 13,107,200 and a shutter speed range for ambient light that runs from 30 minutes to 1/64000 sec. The wireless modules cost $ 159/£159 each – the Skyport and Phottix functionalities are combined into a single module.

    For more information see the Sekonic website.

    Press release:

    Now Available: The Sekonic L-858D-U Speedmaster

    The next generation of light measurement control

    Sekonic is proud to announce their ground breaking L-858D-U Speedmaster Light Meter is now available for purchase.

    As previewed at last year’s Photokina, the L-858D-U Speedmaster is the combination of Sekonic’s cutting-edge light measurement technology and 60 years of experience in the photographic and filmmaking industries. The meter has undergone significant design changes from previous models and has a feature set sure to meet and exceed the demands of today’s image-making professionals.

    The First of Its Kind
    The Sekonic L-858D-U Speedmaster is the first fully featured light meter to offer flash duration measurement from 1/40 to 1/55,500 sec. at t0.1 through t0.9, which can be changed in 0.1 steps. A long-held secret of some of the world’s most talented photographers, the key to freezing action consistently is found in being able to measure flash duration. Photographers are now able to do this easily for the first time, demystifying one of photography’s most challenging techniques.

    Wireless Freedom
    Having pioneered wireless exposure measurement, Sekonic has expanded upon this groundbreaking innovation by creating hot-swappable radio control modules for the L-858D-U Speedmaster. With the PocketWizard module, photographers can easily trigger any PocketWizard wirelessly and control the power of their lights with any Control TL compatible unit. With the combined Elinchrom & Phottix module, Phottix users have Strato II and Ares II triggering capabilities, while Elinchrom users have access to wireless triggering and Skyport’s full range of power-control capabilities.

    “The Sekonic L-858D-U Speedmaster has all the touchscreen features I love about my L-478D, with the added benefit of replacing my old spot meter. Now I only have to carry one meter, and have gained a lot of speed and convenience while on set.”
    Timur Civan, Director of Photography

    A Low Light Monster
    Increased ISO capabilities in today’s cameras have created a need for light meters to increase their ability to measure light in the dimmest of settings. With an additional 3-stops of light sensitivity for incident light, 2-stops of light sensitivity for reflected light (spot), and an ability to capture a reading down to 0.1 lx of illuminance, accurately metering candle-lit scenes or getting the right measurement for long-exposure night photography is now a possibility.

    Master High Speed Sync
    Like its name implies, the Sekonic L-858D-U Speedmaster is optimized for photographers looking to exceed the maximum sync speed of their camera. For the first time, a light meter can measure the stroboscopic pulses fired from strobes when they are used for High Speed Sync. Finally, photographers now have an accurate way of measuring their lights when they want to overpower the sun or achieve a very shallow depth of field through using HSS.

    Multifaceted
    The L-858D-U Speedmaster is an invaluable tool for image-makers of every kind. A HD Cine Mode for DSLRs and CINE Mode for Motion Picture Cameras gives filmmakers the ability to set the meter to collect the information relevant to the camera being utilized. Users can set frame rates from 1 to 1000 fps and choose to adjust either their shutter speed or change their shutter angle to acquire an accurate reading. Custom frame rates and shutter angles can also be set for an unprecedented amount of versatility. Now, a content creator can accurately measure their light regardless of the camera, or combination of cameras, they are using.

    Pricing and Availability:
    The Sekonic L-858D-U Speedmaster is now available for purchase at photographic retailers across the United States.
    Sekonic L-858D-U Speedmaster (Cat# 401-858) – $ 599
    RT-EL/PX Elinchrom & Phottix Transmitter Module (Cat# 401-626) – $ 159.95
    RT-20PW PocketWizard Transmitter Module (Cat# 401-627) – $ 159.95

    Additional Features:
    Full Information Spot Viewfinder

    The 1-degree spot meter has a broad reading range from EV 1 to EV 24.4 for ambient light and measures flash down to an amazing f/2.0

    Expanded Shutter Speed Range for Ambient Light
    Measure ambient light for shutter speeds between 30 min. to 1/64,000s

    Expanded Shutter Speed Range for Strobe
    Measure strobes for shutter speeds between 30 min. to 1/16,000s

    Extended ISO Range
    Additional ISO range from ISO 3 to ISO 13,107,200, with ISO 850 for cinema cameras

    Filter Compensation Mode
    Photographers and filmmakers using high-density ND filters now have a filter factor of up to 12EV. Save up to 30 “favorites,” to instantly know what exposure compensation needs to be considered.

    2.7” Color dot-matrix touch screen
    Allows users to quickly and easily change settings and read important information
    Connectivity with MAC/PC DTS Software

    Upgrade firmware, apply custom settings, and utilize exposure profiling
    All-Weather Design

    Dust-proof and Splash proof (JIS Standard Water Resistance Class 4, Splash-Proof Type) for continued reliability and durability on-set, in any location.

    For a full list of specs and features please visit sekonic.com

    Articles: Digital Photography Review (dpreview.com)