Month: December 2015

  • Byte sized: JPEGmini claims no loss of perceptual quality, up to 80% smaller files

    Most of us think of image compression as a necessary evil. It makes our files more manageable in terms of size, but reduces the quality of our images and can undo the incremental benefits of buying more pixels and better lenses. If offered the choice between more or less image compression, I suspect that most photographers would always go for less. Hence, the idea of buying a piece of software that aims to reduce the size of JPEG files by up to 80% might seem a little crazy. But that is exactly what Beamr, the company behind the JPEGmini application, is offering.

    Introduced in 2011, JPEGmini acts as a standalone product or as a plug-in for Lightroom and is a compression optimizer that takes in existing JPEG files and makes them smaller – without reducing the quality of the image, the company claims. The idea is to save space on hard drives, external storage devices, make websites run more quickly, deliver more manageable file sizes to clients and help reduce spending on cloud storage. We’ve read up on it and written about its desktop and mobile applications briefly, but Senior DPReview Contributor Damien Demolder recently had the chance to sit down with the company’s Chief Technology Officer to find out more about how it works.

    How it works

    Dror Gill, CTO and VP of Beamr, the company behind JPEGmini

    In an interview, Beamr’s CTO Dror Gill explains how JPEGmini works and how the company measures its claimed ‘no change’ in image quality.

    ‘JPEGmini works with standard JPEGs. The input is a standard JPEG and the output is a standard JPEG. We recompress that standard JPEG photo by up to 80%, and the resolution remains the same and the perceptual quality of the image remains the same. When we talk about ‘perceptual image quality’ we mean that if you took this photo and viewed it on your screen at Actual Pixels, or 100% magnification, and compared it to the original you wouldn’t be able to determine which was the original and which one was the optimized. That’s what we call ‘perceptually identical’ to the original.’

    I wanted to know who the ‘you’ was in that qualification – as the opinions of a general consumer, a photographer and a scientist will all be significantly different. Gill said that ‘99% of the population’ wouldn’t be able to tell the difference, including most photographers. 

    ‘Any JPEG compression introduces artefacts, but the question is,
    are these artefacts visible by humans or not?’

    ‘Most of our customers are professional photographers, and they have realised that the photos that they get out of JPEGmini are as good as the originals and that they can use them in the same situations and for the same uses. Of course, the JPEG process introduces artefacts that you don’t find in the RAW file, so any JPEG produced by Photoshop or Lightroom will have artefacts, but our claim is that our processed image will look the same as the original JPEG and the compression will not introduce further artefacts. Any JPEG compression introduces artefacts, but the question is, are these artefacts visible by humans or not? We have developed a quality measure that gives us that answer with very high accuracy. This quality measure has much better correlation with human results than other scientific quality measures.’

    The software works by analyzing the content of each image, and determining how much compression can be applied to each individual area. Images are broken down into tiles of a set number of pixels, and the degree of compression acceptable is assessed according to the level of information recorded in the tile. Gill wouldn’t say how the tiles interact with each other, but we worked on the presumption that the tiles were about 150 pixels square.

    If there isn’t much data recorded the content can be compressed more than if a tile contains a lot of data, so the savings are made via a more flexible process than the usual global compression ratios that most software applications and cameras work with. The software produces compression level ‘candidates’ for each tile, which basically means it tries different levels and determines the maximum that can be achieved without loss of the information in the tile – and then that amount is applied.

    $ (document).ready(function() { SampleGalleryV2({“targetContainerClass”:”sampleGalleryImageViewerContainer”,”galleryId”:”6536787672″,”isEmbeddedWidget”:true,”selectedImageIndex”:0,”startInCommentsView”:false,”isMobile”:false}) });

    Gill says camera manufacturers don’t like to use a lot of compression because too many reviewers and customers think that image quality and the amount of detail in an image can be determined by the size of the file created, and that people associate smaller file sizes with lower levels of picture information. Camera brands, he says, don’t want to produce files that are smaller than their competitors as some reviewers will immediately mark them down for it without studying the comparison images.

    ‘what we do is take that image and determine
    what is the exact optimal level of compression for that particular picture’

    Cameras don’t have any mechanism for evaluating the content of the image either, he says, so the compression has to be global and to err on the safe side. ‘This results in a relatively large JPEG,’ says Gill, ‘but what we do is take that image and determine what is the exact optimal level of compression for that particular picture. Some images are more easily compressed than others – some have very delicate textures and smoothly varying color gradients, and for those you need to use high quality settings. If the content is mainly smooth surfaces and busy backgrounds, that you can’t tell if they are degraded or not, you can use a higher compression ratio.’

    Gill says that out-of-focus backgrounds can be compressed more than focused areas, as the software analysis works by detecting the amount of detail and information present. This brings up the question of whether a poor lens will be made to look worse by the compression compared to the same area captured by a sharp lens, but Gill maintains that the difference wouldn’t show. Tests, I suppose, will give us the sure answer to that.

    If you view the optimized images at 800% Gill admits that you would see the differences, but at normal viewing and for normal use you won’t. ‘These optimised files are designed to be viewed at 100% and to be printed. In print it is even harder to see the differences than on screen.’

    ‘the inefficiency of normal JPEG compression pollutes the environment’

    The whole idea of JPEGmini, Gill explains, is to save space on laptops, hard disks, online and in external storage. ‘There are a lot of terabytes wasted by files that are larger than they need to be. There is no point using bytes and bits that are not visible to humans. The industry is doing it all the time. Maybe we should calculate how many exabytes are being wasted every day – the inefficiency of normal JPEG compression pollutes the environment’ he only half-jokes.

    Gill’s father is Aaron Gill, who was one of the chief scientists who worked on the original JPEG standard in the 1980s. I ask how he feels about his son tampering with the way JPEGs are created. ‘At first he was sceptical and asked me what I was doing getting mixed up with this company that wants to reduce file sizes, but after he tried it I think he was proud of me.’

    Trying it out

    JPEGmini supports JPEG files up to 28MP, while its JPEGmini pro and JPEGmini Server siblings support up to 60MP images. To give an idea of what JPEGmini does, I ran a 25.45MB Raw file through Lightroom and exported a ‘best quality’ JPEG of 10.12MB. After being exported again via the JPEGmini plug-in the file was compressed to 2.66MB, and still measured the same 4608×3456 (16MP) pixels it did originally – so the JPEGmini file is a quarter of the size of the normal JPEG.

    The software still makes considerable savings even if you don’t usually convert your images using the best quality settings. For comparison, that Raw file exported as a JPEG at 80% quality in Lightroom (not using JPEGmini) resulted in a 4.8MB file. The 2.6MB JPEGmini file is just over half the size.

    Although photographers might like the idea of saving space most are not interested in doing so at the cost of quality, and frankly I think most of us struggle to believe that such a dramatic file size reduction can be achieved without any detrimental effect on the content of the picture.

    Normal JPEG exported from Lightroom at best quality JPEG exported from Lightroom via the JPEGmini plug-in

    In my very brief tests I have been able to see slight differences in levels of micro contrast and the amount of very fine texture that is resolved when the images I used were viewed at 100% on screen. More tests will be required to see exactly what is lost and what is at stake, and I’m compelled to make those tests by the carrot of saving a massive amount of space in storage and by the prospect of having a website with large images that runs quickly. At this stage I can say that in the image I tested the plug-in with tiny differences could be seen when the images were compared at 100%, but at print size (33%) the differences were certainly not apparent.

    Normal JPEG converted from Raw at quality 11 – 2.2MB JPEG further compressed via JPEGmini app – 980KB

    If you can’t wait for the results of my testing you can download the $ 19.99 standard standalone version of JPEGmini for a free trial. JPEGmini Pro costs $ 149 but can work with images of up to 60MP, is up to 8x quicker and comes with the Lightroom plug-in option as well as the standalone application. At the moment however, JPEGmini only accepts JPEG files. That means even using the Lightroom plug-in, a Raw file must first be converted to JPEG to then be re-saved as a smaller JPEG by the application. 

    For more information visit the JPEGmini website.
    Articles: Digital Photography Review (dpreview.com)

  • 10 Tips for Taking Stunning Winter Portraits of Your Kids

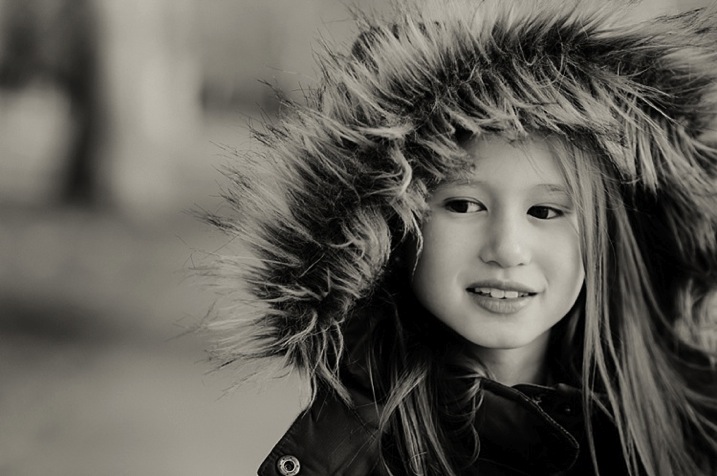
    Just because it’s winter doesn’t mean we can only shoot indoors. It may be cold (and rainy if you’re in London) most days, but when the winter sun shows its face, it fills the earth with a beautiful warm glow, especially late in the day. This bring us to what is known as the golden hour – typically about an hour before sunset. The further you are from the equator, the more time you would need, in my case about 1 – 1.5 hours, before sunset.

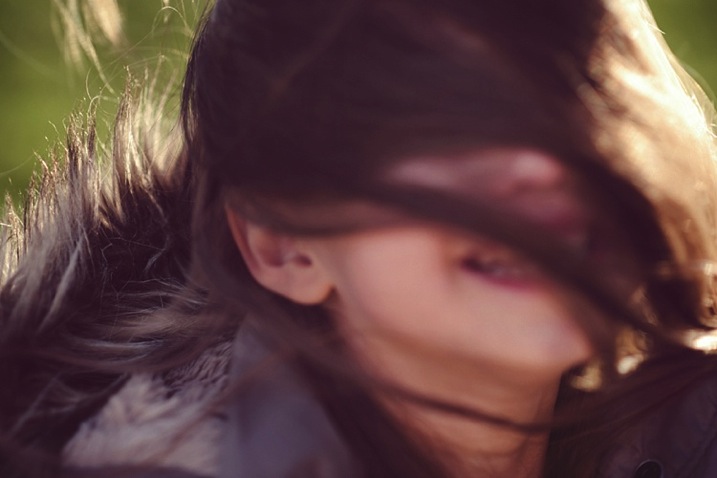
    Winter portrait1

    Here are my 10 top tips on how to get stunning winter portraits of your own kids:

    #1 Choose the right day and time

    Choose a sunny day and plan to get to your shooting location a good hour or so before sunset.

    #2 Dress them warmly and make it fun

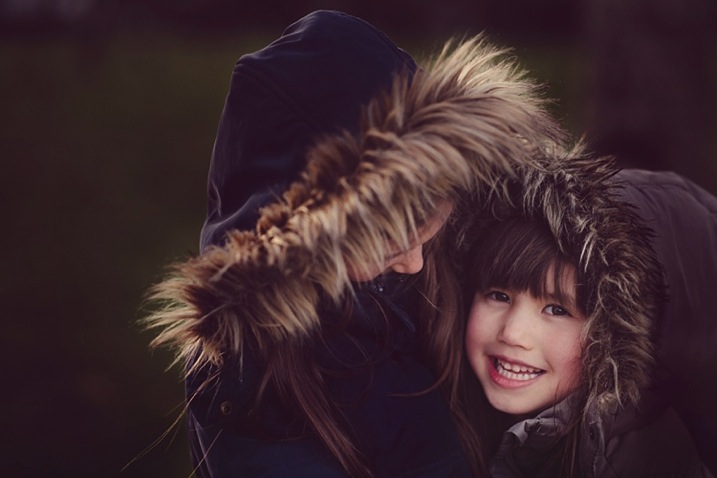
    Wrap your children up nice and toasty so they won’t complain. Tell them you are taking them out for one hour to the park or the playground (or your chosen location) but that you would like to take a few photos of them before you get to the actual promised site. The easiest for us was the playground, as we have to walk about 10 minutes from the entrance to the park to get to there. It is a good idea to choose a halfway point to stop.

    Winter portrait3

    #3 Have warm beverages during or after the session

    Either bring a snack or warm drinks in a thermos (keep it light and simple though), promise to take them for a nice warm drink in a nearby cafe after your little trip to the playground, or make them hot chocolates when you get home (whatever works for you).

    #4 Find the good light and start shooting

    Halfway to the playground, your kids would already have been having fun running and chasing each other. Remind them of the photos you want to take, and show them the light is so beautiful and perfect. Ask for their suggestions where you could stop and take some nice picture. Make sure there is light coming from one side, but that they are fully in the shade of a tree (open shade) to avoid hotspots and mottled faces.

    Winter portrait2

    #5 Be fast

    Keep it quick! Kids get bored if you take too long so just aim for a few portraits. Ask them to stand, cuddle and tickle, or make each other laugh, swap places, do their own poses and click away like nobody’s business.

    Techie tips: If shooting in semi-automatic mode, choose a wide aperture or set it to Aperture Priority (and choose a large aperture, small f-number) so you get the blurry background effect. Always focus on the child’s eyes if possible.

    Winter portrait5

    #6 Use backlight to your advantage

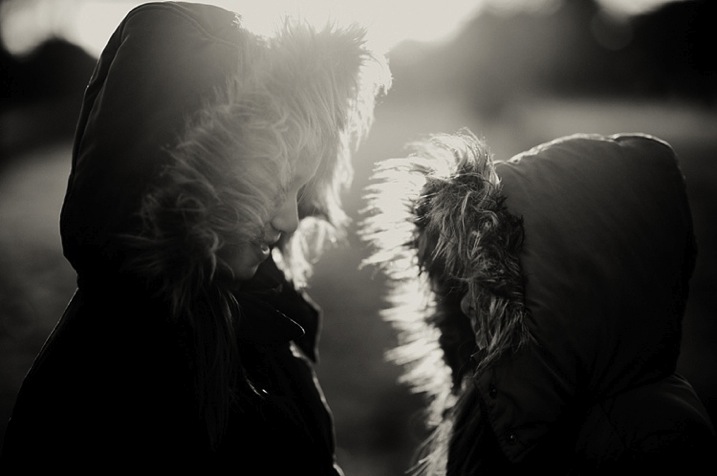
    Shoot with the kids backlit. The best time to do this is during the golden hour. The sun is low, the sky is a reddish blue and the light is softer, more diffused, and indirect.

    Shooting backlit is really quite a difficult technique which requires some mastering. This is when the sun or light source is in front of your camera, and behind your subject. The late sun gives stunning soft light, that illuminates your child’s hair or clothing like it has just been kissed by the sun.

    Winter portrait4

    You would also need either a really wide aperture, a flash, or a reflector to bring light back into your child’s face. A reflector can be a large white/silver/gold sheet that you angle towards their face, to bounce the light back into it. Or, you can choose a location with a natural reflector such as a white, or light coloured wall, facing the sunset and position your child in front of it, at an angle, so that part of their face gets the reflected light. I suggest a wide aperture for portraits as that helps give a nice glow to the skin, spot metered, and focused on the eyes.

    #7 Go for lens flare

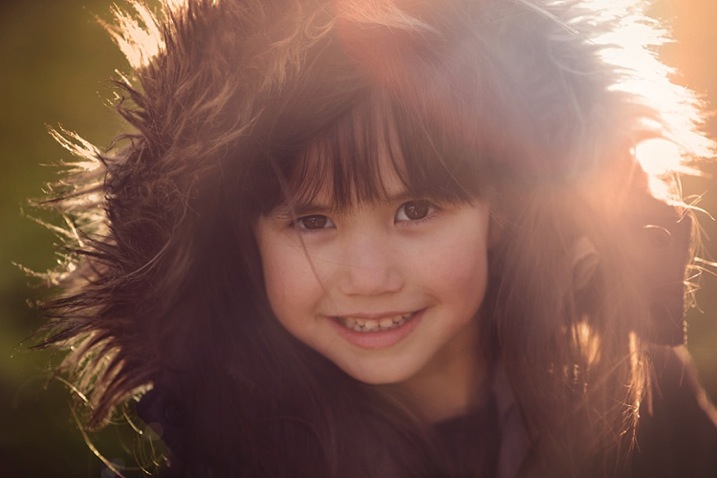
    This is really quite difficult as you don’t want to be looking straight at the sun. When you see the sun’s rays streaming through the viewfinder of your camera, that’s a sure sign that you are capturing flare. Flare floods your camera with light and everything else becomes a muddy, hazy silhouette. So try to get only a very small bit of flare right at the top or side of the viewfinder, and you will still get some good details, rather than a completely hazy image, devoid of any definition or detail.

    Winter portrait6

    #8 Embrace the imperfections

    From personal experience, my imperfections, mistakes, and lack of skills fuel creativity. So don’t be afraid to make mistakes and have imperfections; they are a blessing. Use them and learn from them.

    Winter portrait7

    #9 Capture some scene details after the portraits are done

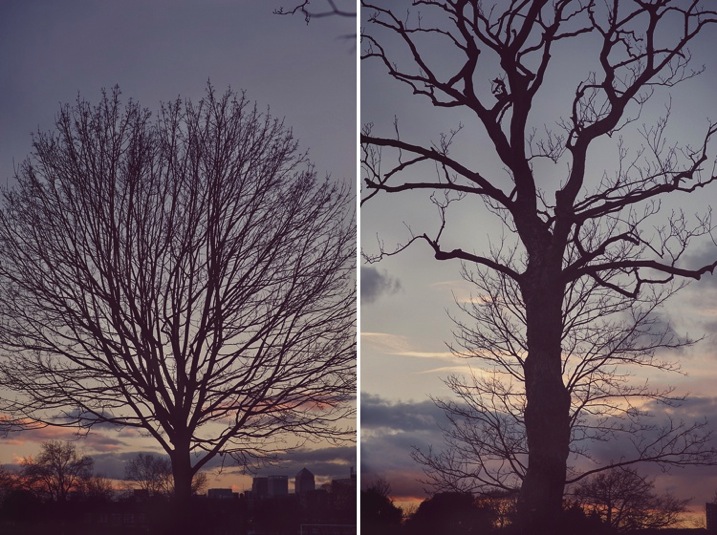
    When the portraits are done, capture some contextual details such as the sky, trees, plants, grass, flowers, etc. Years down the line, when you look back at these photographs, details will help you remember the mood, the time, and the emotions of that day. Now that there’s no need to rush and the kids are playing, take your time and choose which details grab you, and take your breath away.

    Techie tips: Don’t forget to change your aperture when shooting the sky and trees to a much smaller one, in this case around f/5.6 or smaller. I find that while you can shoot wide opened it is more prone to have chromatic aberration than if you shoot at a smaller aperture. Really, it’s personal preference, but this is what I recommend.

    Winter portrait10

    #10 Last but definitely not least, reward and celebrate

    Promise your kids not just the playground, but extra treats like snacks and hot drinks, and even a small surprise. It reinforces having a photoshoot as a positive experience, and ends it on a happy note. Then top it with a movie night at home!

    Have you done any winter portraits of your kids? Please share your images and any other tips you have in the comments below.

    googletag.cmd.push(function() {
    tablet_slots.push( googletag.defineSlot( “/1005424/_dPSv4_tab-all-article-bottom_(300×250)”, [300, 250], “pb-ad-78623” ).addService( googletag.pubads() ) ); } );

    googletag.cmd.push(function() {
    mobile_slots.push( googletag.defineSlot( “/1005424/_dPSv4_mob-all-article-bottom_(300×250)”, [300, 250], “pb-ad-78158” ).addService( googletag.pubads() ) ); } );

    The post 10 Tips for Taking Stunning Winter Portraits of Your Kids by Lily Sawyer appeared first on Digital Photography School.


    Digital Photography School

  • Wildes Island

    © Nicola Odemann

    Ein Beitrag von: Nicola Odemann

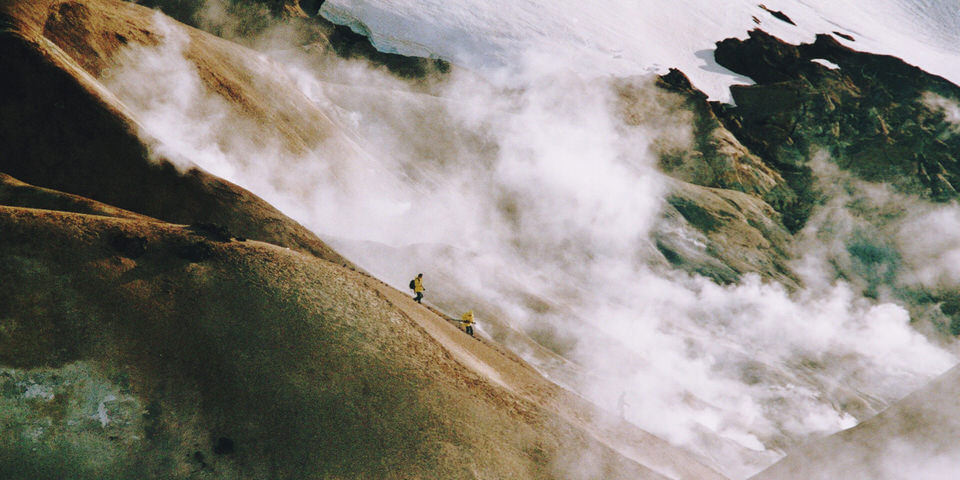
    Ich bin verrückt nach diesem Land. Nach dieser Weite. Dieser Unendlichkeit der Landschaft, die nie zu enden scheint und die doch so viel Sinn macht. Wie sie mich ausfüllt. Dampfende Erde und Eiszungen aus Bergen. Und türkise Seen, die sich in reißende Flüsse verwandeln. Und dazu eine Schotterwüste, aus der pyramidenartige Berge wachsen.
    kwerfeldein – Fotografie Magazin | Fotocommunity

  • Phase One buys Mamiya, gains ownership of camera and lens production

    Digital medium format brand Phase One has bought the whole of the Mamiya Digital Imaging Company and has taken over Mamiya’s Saku factory for its Japanese HQ. The Danish company has had a long-standing relationship with the Japanese camera and lens manufacturer, and since 2009 has owned 45% of the company’s shares. Phase One sold customised Mamiya bodies and redesigned lenses under its own brand name, with the 645DF+ being a very close relation to the Mamiya 645AFD III – cameras the two companies launched simultaneously in 2012. 

    For Phase One the move will almost certainly be about acquiring a closer control over the manufacturing side of its business so the company can enjoy a freer reign over what happens in the factory. What Phase One has been able to do in terms of the bodies it offers has so far been dependent on what Mamiya could or was prepared to do, and with no products of its own Mamiya may not have been able to invest sufficiently to develop significantly different new cameras. 

    The new president of Phase One Japan, Makoto Honda, hinted that optical design and lens upgrading would also be a major focus in comments in the press release: ‘Phase One Japan is committed to developing new and custom designed masterpiece leaf shutter optics in close partnership with top photographers, imaging companies and long term design partner Schneider Kreuznach.’ 

    At the moment lenses branded ‘Phase One’ are made by Mamiya and require in-body focal plane shutters. All the compatible leaf-shutter lenses are made with help from Schneider in Germany. That may not change, of course, but the buyout gives Phase One more control of what can and can’t be done. What the deal will mean for the future products of the company we’ll have to wait and see. 

    Mamiya was started by camera designer Seiichi Mamiya in 1940, and produced the wonderful Mamiya Six rangefinder series and then the equally fabulous Mamiyaflex TLRs in its first ten years. Having started in medium format the company went on to produce rangefinder and SLR cameras for 135 film, as well as slim pocket compacts for the miniature ‘spy’ 16mm format film. The modern 6×4.5cm format cameras were introduced in 1975, and it was these that went on to become the basis of the current Phase One digital bodies. Perhaps some of the best loved and revered models the company made were the RB and RZ 6x7cm studio cameras, which were big and heavy but lovely to use. 

    The company struggled on its own in the digital market and its 2004 ZD integrated digital camera, and the ZD back for Mamiya film bodies didn’t achieve great success. Phase One bought a large stake in the company in 2009, and in 2012 formed the Mamiya Leaf medium format brand. 

    The original company was also a producer of fishing rods and reels until 2000. 

    For more information on Phase One see the company’s website. 

    Press release: 

    Phase One acquires Mamiya Digital Imaging (MDI) assets & establishes Phase One Japan

    COPENHAGEN, December 2, 2015 — Phase One, A/S, the leading provider of open-platform, high-end camera systems and solutions, today announced that it has acquired the assets of Mamiya Digital Imaging Company, Ltd (MDI) and has appointed Makoto Honda as the new president of Phase One Japan. Terms of the transaction were not disclosed.

    Mamiya has held a long and established reputation in the camera sector.  As a 45 percent shareholder in MDI since 2009, Phase One has developed detailed insight into the camera & lens design and production process and engineered important improvements through its close collaboration with the MDI team in Japan. With this transaction, Phase One now also takes total ownership for all aspects of design and development of medium format camera systems, central shutters & lenses.

    “Phase One is now the only medium format camera company that has full internal control of all critical components in a world class imaging system,” says Niels V. Knudsen Phase One’s Image Professor. “This is the best news in many years for quality-focused photographers and imaging companies as Phase One works to consistently raise the bar in medium format photography.” 

    “The very successful introduction of the Phase One XF Camera System in June 2015 illustrates the power of our collaboration,” says Henrik Håkonsson Phase One President & CEO.  He added, “The Phase One XF Camera System is the new much improved standard for medium format photography, with the incorporation of significantly enhanced technology.”

    Phase One’s mission is to keep pushing the limits for ultimate camera systems and imaging quality, meeting the demand of the world’s leading photographers and industrial imaging companies. 

    Makoto Honda President of Phase One Japan said: “Phase One Japan is committed to developing new and custom designed masterpiece leaf shutter optics in close partnership with top photographers, imaging companies and long term design partner Schneider Kreuznach.” 

    About Phase One

    Phase One is the leading provider of open-platform, high-end camera systems and solutions. Phase One camera systems and lenses are designed to deliver superior quality image capture and investment value. Phase One’s Capture One Pro and Media Pro software help streamline capture and post-production processes for both medium format and 35mm cameras. Phase One products are known for their quality, flexibility and speed enabling pro photographers and industrial imaging companies shooting in a wide range of formats to achieve their creative visions without compromise. 

    Phase One is based in Copenhagen with offices in New York, London, Tokyo, Cologne, Hong Kong, Shanghai, and Tel Aviv. Phase One and Capture One are registered trademarks of Phase One A/S. Mamiya is a trademark licensed by Phase One A/S. All other brand or product names are trademarks or registered trademarks of their respective holders.

    About Mamiya Digital Imaging

    Mamiya Digital Imaging is the digital successor to the reputable Mamiya brand, an innovative company fresh with enthusiasm and dedicated to continuing a legacy of excellence. Mamiya has consistently been a forerunner in medium format camera design, and Mamiya lenses, manufactured following a tradition of precision and quality, are celebrated worldwide. Mamiya Digital Imaging is headquartered in Tokyo with a factory in Saku, Japan and totals a team of 80 dedicated engineers and technicians, and distributors in more than 100 countries. 

    Articles: Digital Photography Review (dpreview.com)

  • Sound Sculptures: Music Translated Into Transforming Objects

    [ By Steph in Gadgets & Geekery & Technology. ]

    sound sculptures 1

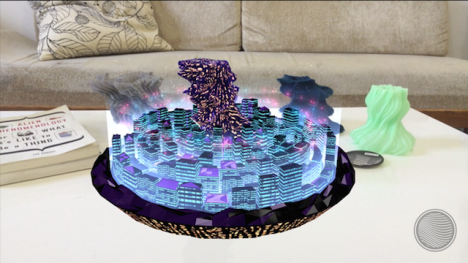
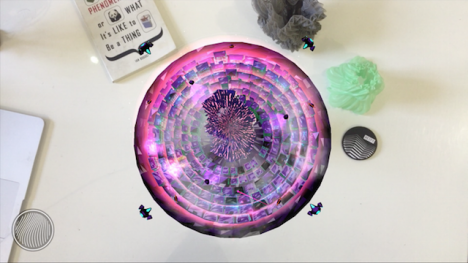
    An experiment in intentional synesthesia, this combination of sculpture, music and technology enables us to actually see the physical form of individual songs. ‘Reify’ is a collaborative project that creates a new way to experience music, transforming it into a tangible object that transforms before our eyes. So-called ‘totems’ are made to visually represent an artist’s song, and encoded with music and interactive visual experiences that can be viewed on a smartphone or tablet.

    sound sculptures 2

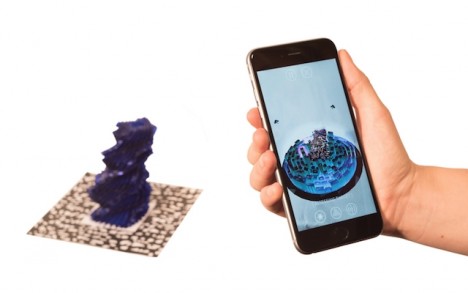
    Musicians, sculptors and app designers got together to build a platform that lets artists express their music in physical form. Each totem is a sculptural object in its own right, entirely unique in shape, 3D-printed from plastic or cast in bronze. Simply gazing upon these visual translations of sound is cool enough, but then comes the app that truly brings them to life.

    sound sculptures 3 sound sculptures 4

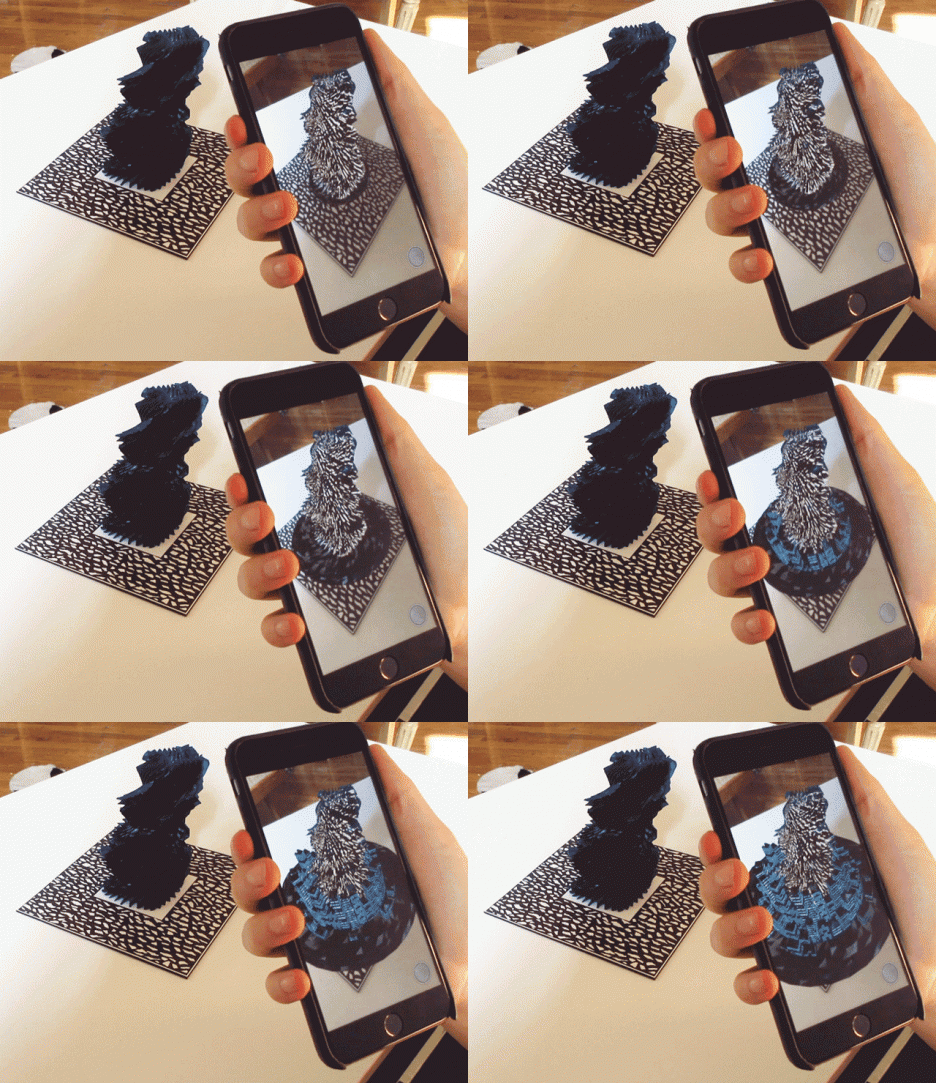
    Load up the Stylus app, point your mobile device at the totem and you’ll be treated to an interactive visual experience that plays along with the song. “Each experience is unique in style and content,” say the designers. “Some are game-like. Some are conceptual explorations. Others are both… and neither. All are direct expressions of the artist’s creative vision.”

    sound sculptures 5 sound sculptures 6

    While a Kickstarter campaign held in July didn’t raise enough funds to move forward with the project, it’s a really cool look into how various forms of creative expression will continue to evolve along with technology, and the potential for more crossover. Check out another cool project exploring what music looks like in 3D.

    Share on Facebook


    [ By Steph in Gadgets & Geekery & Technology. ]

    [ WebUrbanist | Archives | Galleries | Privacy | TOS ]


    WebUrbanist

  • Vallerret Photography Gloves are designed for outdoor winter shooting

    Vallerret, a Norway-based startup, is looking for funding on Kickstarter for some cold weather photography gloves. Currently in prototype form, the Vallerret Photography Gloves are designed for adventurous photographers who shoot outside in cold temperatures, aiming to eliminate the hassle that comes with bulky, cumbersome gloves while protecting hands from snow and ice.

    Vallerret’s gloves are made with ‘flip-tech’ finger caps that can be peeled back when it is time to adjust dials and change settings. The knuckles and cuff are made of neoprene, the interior features a merino wool liner and the palm and inner fingers are coated with a non-slip grip, though there’s no mention of capacitive touch screen capability, which is increasingly common. Catering specifically to photographers, the design includes an SD card pocket just above the cuff and a microfiber strip for cleaning a lens. Vallerret has partnered with a ski glove manufacturer, hoping to tailor the gloves to active photographers who might also wear them snowboarding.

    The campaign has raised more than half its funding goal, and offers a pair of Vallerret Photography Gloves for a pledge of 550 kroner, or about $ 64. Shipping is estimated to start in March 2016, assuming the campaign and manufacturing progress as planned.

    Articles: Digital Photography Review (dpreview.com)

  • New generation Samsung A7 and A5 launched with OIS and F1.9 lenses

    Samsung has today officially launched a new generation of its A-series smartphones, and although the new devices range below the high-end Galaxy S and Note models in the Samsung line-up, they come with promising-looking specifications – especially in the camera department. Read more

    Articles: Digital Photography Review (dpreview.com)

  • Mastering the Exposure Triangle for Newbies

    When I first got my digital camera, words like Aperture and ISO were foreign to me, and it took me a couple of weeks of reading and studying a lot before the lightbulb turned on in my head. You might be feeling a little confused, and you may even feel like you will never get your camera out of Auto mode, because it’s just too hard to understand.

    exposure-triangle.jpg

    So, if you are unfamiliar with your camera, or just starting out, you might appreciate a little explanation of the basics. Sometimes reading about these things in slightly different words helps something new to click each time.

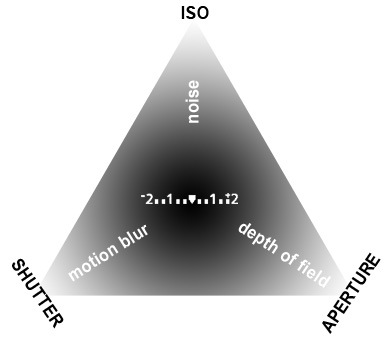
    Introducing the Exposure Triangle: Aperture, Shutter Speed, and ISO

    These three things work together to expose your picture perfectly, and after experimenting for a while, you may even find that you can use your knowledge of these three things to manipulate your picture for different effects.

    APERTURE

    The aperture or f-stop is how wide open your lens is. Imagine a hole: if it’s open just a teeny bit, there won’t be very much light coming through. If it’s a big hole, lots of light will come through. The tricky thing with aperture is that often confusing numbering system.

    • SMALL numbers (like f/1.8) = wide open aperture (large opening).
    • BIG numbers (like f/22) = small aperture (teeny opening).

    That confused the heck out of me at first, but now it’s second nature. It will become second nature to you too, after some practice!

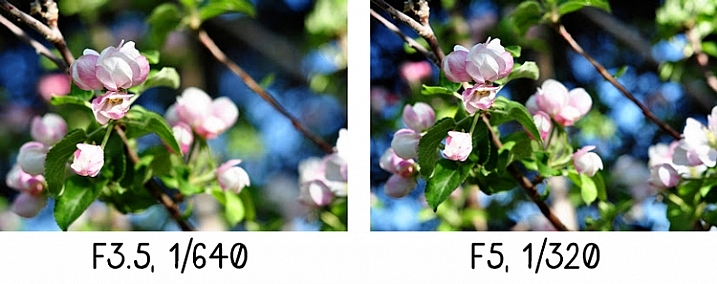
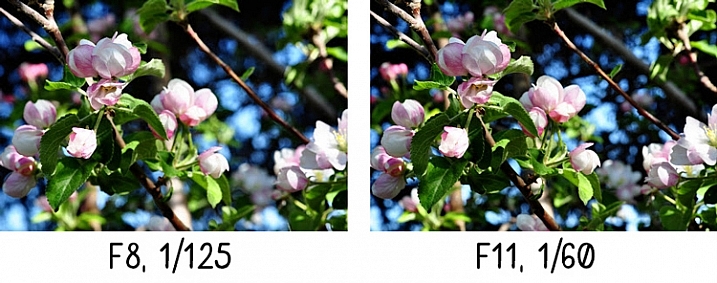
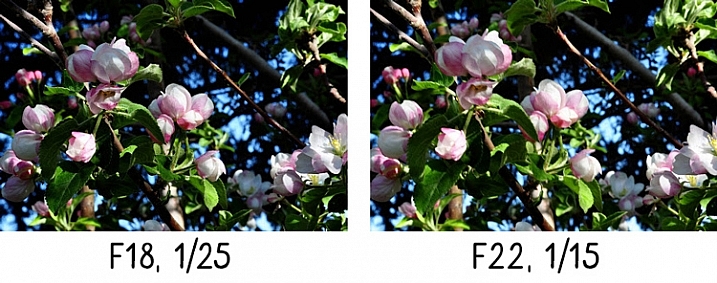
    Another thing that can be affected by aperture is depth of field, or how much of your picture is in sharp focus. A wide open aperture (small number) will make less in focus, and a closed down aperture (big number) will make more in focus. Let’s look at some photos that demonstrate depth of field:

    aperture-1

    With the aperture set to f/3.5 on the left, you have a blurrier background (my favorite). Also notice that the shutter speed (1/640th) is fairly HIGH, we’ll get to this later.

    aperture-2

    A little bit smaller aperture (bigger number), makes the background come into focus a bit more, and the shutter speed is slowed down.

    aperture-3

    See what I mean? If you want to play around with Aperture, try putting your camera in Aperture Priority mode (A on Nikon, Av on Canon – if you have a different camera, check your manual).

    Now, remember that all three parts work together? You probably started seeing how if you noticed the shutter speed changing with each of those different aperture values in the pictures above.

    SHUTTER SPEED

    The shutter speed is how fast the shutter opens and closes. If the shutter is open longer, more light is let into the camera. If it opens and closes really fast, less light is let in.

    If you have a wide open aperture, your shutter speed will need to be faster, because you’re already letting a lot of light in the lens opening. If your aperture is small, your shutter will need to move slower, so there is more time for light to get to the sensor.

    If you want to freeze the action, or hand-hold your camera, then a faster shutter speed is needed. If you want to create blur, then you need a slower shutter speed. For example:

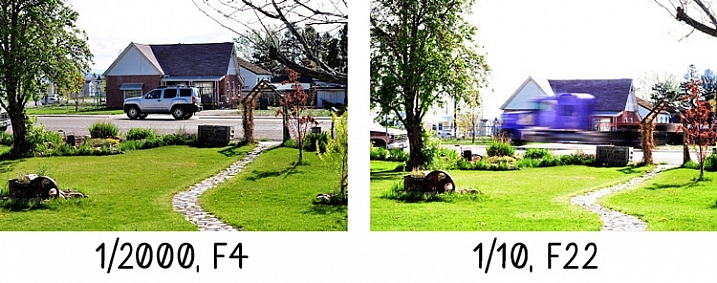
    Shutter-Speed

    The vehicle in the photo on the left was driving past my house quite fast, but since I had the shutter speed set to 1/2000th of a second, it froze the action. It looks like the vehicle could be sitting still in the middle of the road.

    The truck on the right is a blur going past, but everything else is still. 1/10th of a second was slow enough to blur the truck as it sped past. Notice the f-stop. Since the shutter was open for so long, the opening in the lens needed to be smaller to balance the exposure.

    Try putting your camera in Shutter Priority mode (S on Nikon, Tv (time value) on Canon) to experiment with different shutter speeds. As you play with these different priority modes, notice what the camera chooses for the rest of your settings. The more you pay attention to these things, the more knowledge you’ll have to be able to set everything yourself in the future.

    Okay, so now you’re probably asking, how does ISO fit into all of this?

    ISO

    The ISO is your camera’s mood. It can be all uptight and picky, or it can be easy-going and laid back. If you have the ISO set to a low number (100) your camera will want light, and plenty of it, because it’s going to take a smooth, crisp picture, and this requires perfect conditions. If you have your ISO set to a high number (3200) it can handle low light, because it’s not going to work as hard – a noisy (grainy) picture is good enough for Mr. High ISO.

    So, how does this apply to your photography? Let’s say you wanted to take a picture in the evening, and you don’t want to use a flash. Just bump the ISO up, and it will allow you to have a faster shutter speed, or a smaller aperture (bigger number) and still accept the light conditions to expose correctly. Or, if you’re taking pictures at a sporting event, and you want to make sure you catch that action, but the light isn’t great, bump the ISO up. Or you may even want that moody grainy effect (it can be really cool)!

    If you ever get frustrated because there’s just not enough light, and your pictures are blurry because the shutter speed isn’t fast enough, and you’re about to scream – just remember to bump the ISO. You could also leave this on Auto, but I usually don’t. My camera always seems to choose a higher ISO than I feel it needs. However, don’t forget to put it back down after you’re done. You don’t want to take a whole bunch of photos in the middle of the day at a 3200 ISO because you forgot to change it after your evening indoor party photos the night before.

    Here’s a little demonstration:

    ISO3200clock

    ISO 3200

    The photo above was taken in a very dimly lit room. Notice the digital noise?Notice the crispness of the photo below?

    ISO100clock

    ISO 100


    Conclusion

    Well, that’s the exposure triangle in a nutshell. I hope this helped, especially if these three exposure factors have been confusing to you in the past. Please ask any questions in the comments, and I’ll answer them the best I can.

    googletag.cmd.push(function() {
    tablet_slots.push( googletag.defineSlot( “/1005424/_dPSv4_tab-all-article-bottom_(300×250)”, [300, 250], “pb-ad-78623” ).addService( googletag.pubads() ) ); } );

    googletag.cmd.push(function() {
    mobile_slots.push( googletag.defineSlot( “/1005424/_dPSv4_mob-all-article-bottom_(300×250)”, [300, 250], “pb-ad-78158” ).addService( googletag.pubads() ) ); } );

    The post Mastering the Exposure Triangle for Newbies by Melinda Smith appeared first on Digital Photography School.


    Digital Photography School

  • Got Game? Canon EF 35mm F1.4L II USM gallery updated

    Fall in Seattle means two things – the return of cold drizzle and University of Washington Husky football. Veteran sports shooter and DPR staffer Jordan Stead recently took advantage of a sunny afternoon game to do a little more testing of the Canon 35mm F1.4L II USM. We’ve updated our initial sample gallery with a few more images that capture the unique energy of Husky Stadium as two rivals collided in the Apple Cup.

    Articles: Digital Photography Review (dpreview.com)

  • Knit Wit: 17 Fantastically Weird Fiber Art Creations

    [ By Steph in Art & Sculpture & Craft. ]

    weird knits my boyfriend

    Imagine your grandmother presenting  you with a knitted facehugger, dwarven helm or a life-sized boyfriend pillow for your birthday instead of a scratchy wool scarf. The world of knits goes far beyond beginner’s patterns for sweaters and caps, occasionally encompassing entire rooms or covering military tanks. This collection of weird knitted and crocheted things might even inspire you to break out a pair of needles yourself.

    Facehugger Mask
    weird knits facehugger

    Well, isn’t that cute. It’s a cozy little alien face hugger, just like you always wanted.

    Brutal Knitting by Tracy Widdess
    weird knits brutal

    weird knits brutal 2

    weird knits brutal 3

    weird knits brutal 5

    ‘Brutal Knitting’ is a fitting name for this ongoing project by artist Tracy Widdess, which stretches the craft far beyond its humble origins of warmth and practicality. Her highly unusual knit works include some of the most bizarre hats you’ve ever seen, and a replica of the Lament Configuration puzzle box from Hellraiser.

    The World’s Cutest Penguin Sweaters
    weird knits penguin sweaters

    weird knits penguin sweaters 2

    weird knits penguin sweaters 3

    Australia’s oldest man, 109-year-old Alfred Date, put his 80 years of knitting experience to work to create the world’s cutest sweaters for a bunch of oil-covered penguins after a spill on the Australian Phillip Island. The sweaters keep the penguins from ingesting toxins and prevent water from getting trapped under their oily feathers, which can cause them to freeze.

    Gimli’s Dwarven Helm
    weird knits dwarven helm

    “The helm I based directly on the helm that Gimli wears in the Lord of the Rings movies, the beard was my own design with massive creative input from my brother,” says DeviantArt member SadDaysCrochet of this creation.

    My Knitted Boyfriend
    weird knits my boyfriend 2

    weird knits boyfriend 3

    If it’s a little lonely in your bed, but you don’t have the patience that a real flesh-and-blood boyfriend requires, there’s a solution. ‘My Knitted Boyfriend’ can be worn like a terrifying bodysuit by a real person, or stuffed to create a life-sized man-shaped pillow.

    Surreal Knitted Room by Olek
    weird knits room oleksiak

    weird knits room oleksiak 2

    The fiber artist known as ‘Olek,’ who’s responsible for yarn bombing practically every surface you can think of, knitted an entire gallery space for a piece called ‘Keith Meets Arch of Hysteria,’ a tribute to artists Keith Haring, Annie Leibovitz and Louise Bourgeois.

    Next Page – Click Below to Read More:
    Knit Wit 17 Fantastically Weird Fiber Art Creations

    Share on Facebook


    [ By Steph in Art & Sculpture & Craft. ]

    [ WebUrbanist | Archives | Galleries | Privacy | TOS ]


    WebUrbanist