Month: December 2015

  • Pentax launches limited-circulation 645Z IR, an infrared version of its medium format camera

    Ricoh has announced it is to offer an infrared-sensitive version of its 645Z medium format camera, the 645Z IR. Sadly, the new model is not intended for public consumption, but will be aimed at museums and scientific establishments who will have to sign a usage agreement before they can make a purchase. 

    The camera will be made sensitive to infrared by removing the IR-cut filter that sits in front of the sensor. The photographer will then need to fit a filter over the lens to cut visible light according to the requirements of the occasion. With a hot mirror in place the camera will operate as a normal 645Z, but without one the sensor will be able to record wavelengths of up to 1100 nanometers. 

    Ricoh says that there is no provision for auto focusing when the camera is working with infrared light as the light focuses at a different distance to visible light, and advises owners to use the magnify function of the live view display on the rear tilting-LCD screen. 

    Other than the removal of the IR cut filter the 51.4MP camera will operate in exactly the same way as the normal version – including the scene modes, compatibility with Flucards, wireless control from a smartphone and the ability to shoot HD video. 

    Ricoh is offering the Pentax 645Z IR to museums, libraries, government agencies and research institutions for specialist operations, often involving forensic work or recording detail in artworks concealed by layers of paint or faded with time. Shooting with infrared sometimes makes visible what can’t be seen with the human eye. 

    The company hasn’t made public the price, but says the camera will be available from 15th January next year.  

    For more information see the Ricoh website (Japanese)

    Articles: Digital Photography Review (dpreview.com)

  • dPS Writer’s Favorite: Sigma 24-105mm F4 Lens

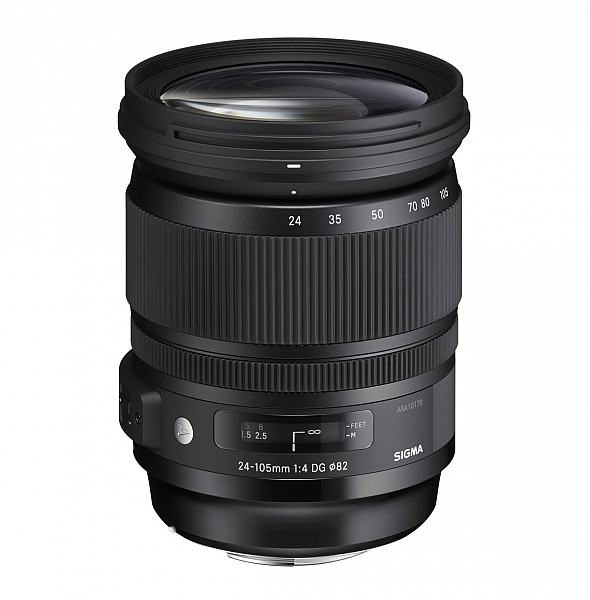
    24-105mm-f4-dg-os-hsm-a-635-e73

    Image: Sigma Photo

    Perhaps you’ve heard of Sigma’s Art series of lenses? After years spent making relatively mediocre lenses, the Japanese manufacturer has stepped up their game to create some beautiful gems that outshine the lenses made by the camera companies themselves.

    The 50mm f/1.4 and the 35mm f/1.4 were both on my list, but I seem to have ended up with the Sigma 24-105mm f/4 Art lens, and while my artistic conscience might try to persuade me of the superiority of prime lenses, it’s currently my favourite.

    Zoom versus Prime Lenses

    The prime lenses I like are big and heavy, because of the large maximum aperture. Assuming that my assistant carried them everywhere and could change them instantly, I might be less keen on the versatility of the Sigma. But that’s not the case, and often a zoom is the better choice. Zoom lenses used to be too much of a compromise. The Sigma 24-105mm lens compromises just enough, and delivers a lot. It’s a slow lens at f/4, but the optical stabilization is good, and the high ISO capabilities of current cameras means that I’ve never felt too limited by this. It’s certainly a compromise compared to a prime, but at f/8, I bet you couldn’t tell the difference. The bokeh for this zoom, necessarily a matter of personal taste, and not as amazing as some of the prime lenses, is good enough too.

    Sigma 24-105mm lens

    Bokeh at f/4, 105mm

    But I want Nikon/Canon, I want the best…

    Canon has an equivalent 24-105mm f/4 lens from their premium L-series. It’s a versatile lens, and I know several professional photographers who use it almost exclusively. I use Nikon, but I’ve seen comparisons that demonstrate that optically, the Sigma Art series lens is sharper. The Canon is weather-sealed though, which the Sigma is not. Nikon has a 24-120mm lens that isn’t as sharp as the Sigma either. If image quality is what you want most, the Sigma is the best among the three lenses. Of course, both Nikon and Canon make 24-70mm lenses that are sharper, though at the expense of the longer telephoto reach.

    Sigma 24-105mm lens

    We photographers love our lenses

    Why choose the 24-105mm focal length over a 24-70mm?

    Forgetting prime lenses, the main competition for my affections were the Nikon 24-70mm and the Tamron 24-70mm lenses. There’s also a Tokina 24-70mm available that I didn’t consider. I decided against the Nikon because it doesn’t have optical stabilization (OS). While the larger f/2.8 aperture is attractive, it doesn’t make as much difference in low light for static subjects as the OS on the Sigma. Moreover, the stabilization is useful for on-the-go filming too. The Tamron however, has the larger f/2.8 aperture and is also stabilized.

    I chose the Sigma lens because of the longer reach. 70mm, for me, is not as flattering for headshot portraits as the 85-105mm focal lengths that the Sigma provides. I find I use the extra reach quite often. On the other end, 24mm seems to be wide enough for the majority of situations on a full-frame body. If I need a larger field of view, or shallower depth of field, I can often stitch multiple photos together.

    Sigma 24-105mm lens

    That 105mm short telephoto is useful

    Space for a whinge

    It’s not a perfect lens, and there are a few omissions that I’d like to have a moan about to help round out the My Favourite Lens angle. While the lens is sharp, it does have noticeable distortion and a fair bit of vignetting too, especially at larger apertures. This is an issue that I’m happy to accept because the RAW photo conversion software does a good job of correcting these flaws.

    The bigger issue is the lack of weather sealing, which I’d have happily paid a bit more for. It makes you think twice when photographing in the rain or by the sea. The thoughts are usually, “I wonder if the lens will survive this?” and, “I wonder if I’ll buy the Nikon if it doesn’t?”. Showers aside, the lack of weather sealing does mean that the lens attracts more dust – it veritably sucks it up, and distributes it liberally amongst its inner optics, safe from my lens cleaning cloth. The build quality is good, but not as solid as the Canon L-series lens, for example, and after some abuse, the focal length numbers on mine wore off as they are not etched into the lens. Sigma were good about fixing this though.

    Sigma 24-105mm lens

    Distortion and Vignetting even At 62mm, f/8

    Conclusion

    I’ve tested a huge number of lenses, and also read pretty much most of reviews of the others, to keep up to date. I chose to buy the Sigma 24-105mm f/4 OS, and it lives on my camera pretty consistently. It’s photographed a range of genres from landscapes, to portraits, and fashion, and the image quality has been good.

    As photographers, there’s a tendency to fuss over MTF charts and such like; but having the right focal length available immediately is far more important, and as for overall sharpness and rendering compared to primes, it’s usually only experienced photographers who, occasionally, may notice the difference.

    DSC_2741

    googletag.cmd.push(function() {
    tablet_slots.push( googletag.defineSlot( “/1005424/_dPSv4_tab-all-article-bottom_(300×250)”, [300, 250], “pb-ad-78623” ).addService( googletag.pubads() ) ); } );

    googletag.cmd.push(function() {
    mobile_slots.push( googletag.defineSlot( “/1005424/_dPSv4_mob-all-article-bottom_(300×250)”, [300, 250], “pb-ad-78158” ).addService( googletag.pubads() ) ); } );

    The post dPS Writer’s Favorite: Sigma 24-105mm F4 Lens by Ben Evans appeared first on Digital Photography School.


    Digital Photography School

  • Apple iPhone 6s Plus camera review

    The iPhone 6s Plus is the iPhone 6s’ bigger brother and, apart from the larger 5.5-inch screen, mainly distinguishes itself from the smaller model by offering optical image stabilization system in its camera module. Compared to its predecessor, the 6s Plus ups camera resolution to 12MP, adds 50% more phase detection sensors and is capable of 4K footage. Our review tests its camera performance. Read more

    Articles: Digital Photography Review (dpreview.com)

  • How to Understand and Use Lightroom’s Loupe Info Overlay

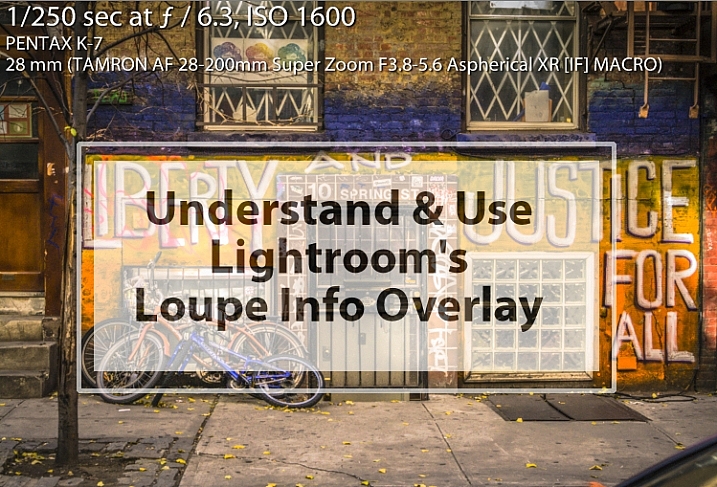
    Lightroom Loupe Info Overlay intro image

    The Lightroom Loupe Info Overlay feature provides valuable information about your photos. Used intelligently it can help you find your photos, and can even help you improve your photography skills. I’ll explain what it is, how to enable and disable it, how to configure it, and some reasons why the Loupe Info Overlay is such a valuable feature.

    What is the Loupe Info Overlay?

    Loupe Info Overlay is a small text overlay which appears in the top left corner of your images in the Develop module inside Lightroom, and when you are viewing images in Loupe view in the Library module. The Loupe Info Overlay confuses many first time Lightroom users when they turn it on, often accidentally, and then struggle to turn it off again.
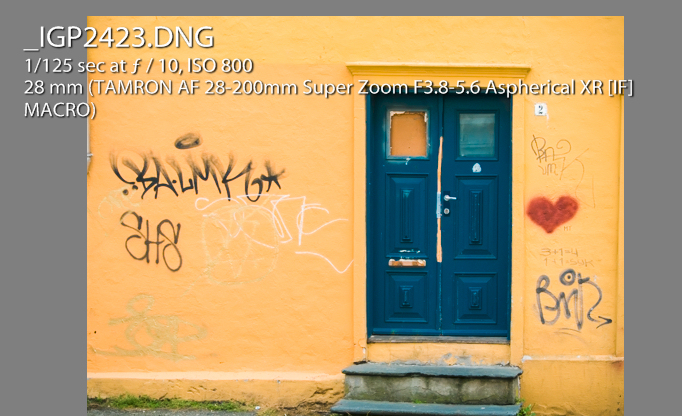
    What Lightroom Loupe info overlay looks like

    Turning the Overlay Off and On

    To view the Loupe Info Overlay you must be viewing an image in the Develop module, or in the Library module in Loupe (or single image) view. To display the Loupe Info Overlay, tap the I (i) key on your keyboard. Tap the i key repeatedly (but slowly so you can see what you are doing) to rotate through the three options for the Loupe Info Overlay.

    They are: (1) Loupe Info Overlay off; (2) Loupe Info 1; and (3) Loupe Info 2. You will see that there are two different overlays which can be separately configured to show a range of information about your images.
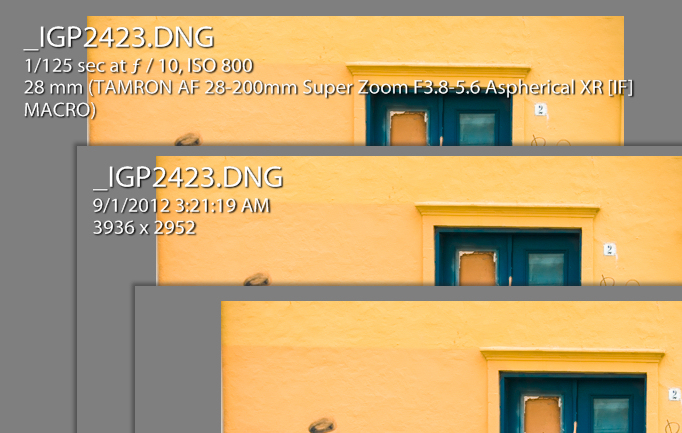
    The three states of the Lightroom Loupe Info Overlay

    You can also display the Loupe Info Overlay using the Lightroom menus: choose View > Loupe Info and then select Info 1 or Info 2 to display one of the two overlay options. If Show Info Overlay is selected then selecting it again will hide the Loupe Info Overlay.
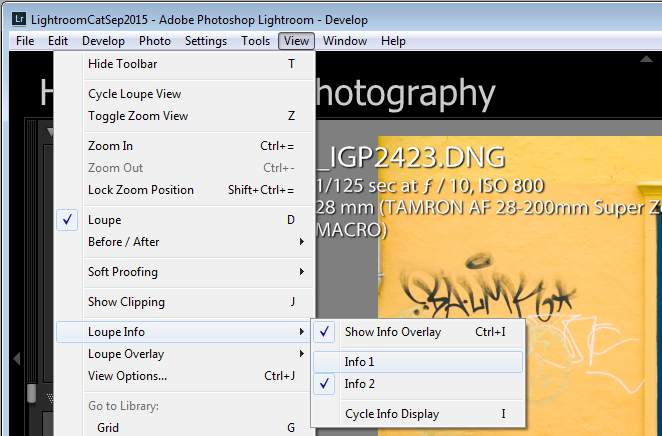
    How to turn the Loupe Info Overlay on and off

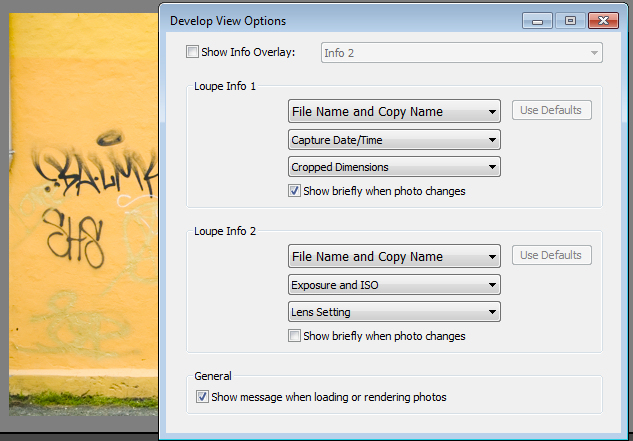
    Each Info Overlay is comprised of three lines of information, and you can select only one piece of information from a list of options for each line. The defaults for the Loupe Info Overlays are:

    Loupe Info Overlay 1:

    • File Name and Copy Name
    • Capture Date/ Time
    • Crop Dimensions

    Loupe Info Overlay 2:

    • File Name and Copy Name
    • Exposure and ISO
    • Lens Setting

    Default settings for the Loupe Info Overlay

    These items can be changed if you select View > View Options, and in the Library Module click the Loupe View tab. Select the Show Info Overlay checkbox and then choose the Info Overlay to show from the dropdown list – it’s a good idea to show the one you are going to change so you can see what it looks like and if the information you are seeing is what you want to see.

    To change the information that appears in any of the three lines of the Info Overlay click the appropriate dropdown list – there are three for Loupe Info 1 and three for Loupe Info 2, all in the order they appear on your screen.
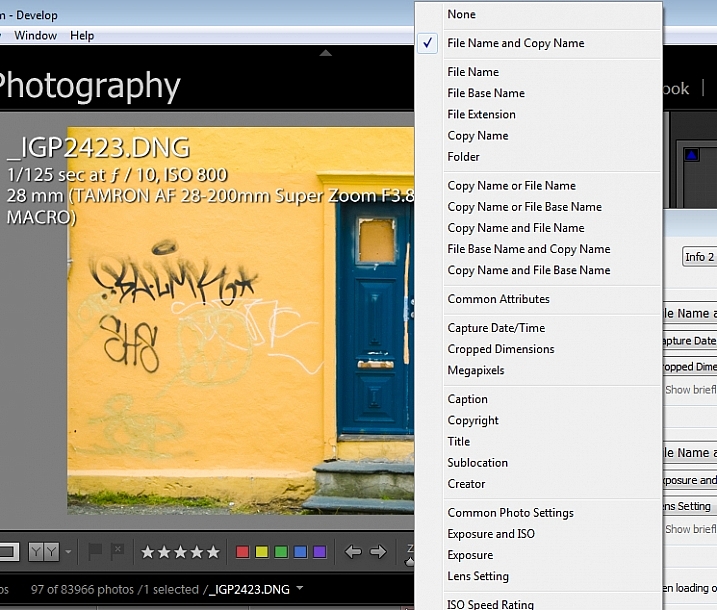
    Some settings for the lines of information in the Loupe info overlay

    From any of the lists you can select None to turn that line off so nothing displays there, or choose from any of the options on the list. These include a range of file name options, Common Attributes (whether the image is flagged, rated, has a label, or is a virtual copy), the crop dimensions and megapixels.

    Also in the list are various items which are extracted from the image metadata such as Copyright, Title, Creator, and Common Photo Settings which include Shutter Speed, Aperture, ISO, the Lens, and the Focal Length. These are also available as individual options so, if you don’t want to see all that detail, you can choose to see Exposure Time, ISO, F-stop, Exposure Bias, Exposure Program, Metering Mode, or Camera + Lens Settings.
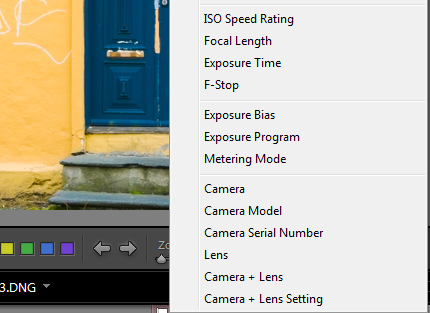
    More settings for the Loupe info overlay

    Of the options available, Common Photo Settings is a good one to use if you want to see a lot of information about each shot.

    How the Loupe Info Overlay can make you a better photographer

    If you plan to use the information from the Loupe Info Overlay to improve your photography, then consider setting the options for one of the Loupe Info Overlays to include Common Photo Settings, Exposure Program and, for example, Metering Mode. This will give you valuable insight into your camera settings at the time you took each shot.
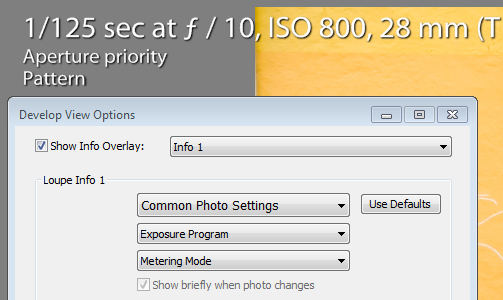
    Suggested settings for loupe info overlay that can help you troubleshoot problem shots

    I use the Info Overlay to help photographers who are having issues with their photos. If you set the Loupe Info Overlay to show the camera settings you can determine why, for example, an image is out of focus, too light, or too dark. An out of focus shot may be caused by a shutter speed that is too slow, so that the subject or camera has moved while the shot is being captured. Being able to see the shutter speed will help you determine if it is the reason your photos aren’t sharp.

    If you are shooting in manual mode and the shots are too dark (underexposed) it may be that you’re using too fast a shutter speed, too small an aperture, or a combination of both. An overly light (overexposed) image can be caused by too large an aperture, too slow a shutter speed, or both. Displaying aperture, shutter speed and ISO may help you troubleshoot your exposure issues.

    Overexposed and underexposed images can also be caused by an incorrect exposure compensation setting. It’s not uncommon for a beginner photographer to set an exposure compensation value without realizing the impact of what they have done. If you set the Loupe Info Overlay to display Exposure Bias you can see if exposure compensation is the cause of incorrect exposure.

    The Loupe Info Overlay is a useful tool which can display a wealth of information, some of which can help you troubleshoot problems you are having with your photos.

    Now it’s over to you: do you use the Lightroom Info Overlay and, if so, what information do you set it to display and why?

    googletag.cmd.push(function() {
    tablet_slots.push( googletag.defineSlot( “/1005424/_dPSv4_tab-all-article-bottom_(300×250)”, [300, 250], “pb-ad-78623” ).addService( googletag.pubads() ) ); } );

    googletag.cmd.push(function() {
    mobile_slots.push( googletag.defineSlot( “/1005424/_dPSv4_mob-all-article-bottom_(300×250)”, [300, 250], “pb-ad-78158” ).addService( googletag.pubads() ) ); } );

    The post How to Understand and Use Lightroom’s Loupe Info Overlay by Helen Bradley appeared first on Digital Photography School.


    Digital Photography School

  • DxO ONE gets 1/20,000sec top shutter speed and better handling via firmware version 1.2

    The DxO ONE smartphone companion camera is to benefit from a host of improvements and new features when the company releases new firmware early in December. General handling will be improved with what DxO vaguely describes as ‘instant access to advanced capture parameters and photo information with a simple swipe’ and ‘more control over the entire photo and video capture process’. The DxO ONE will also be compatible with the Apple Watch via a new app designed especially for it, and the DxO ONE will go on sale in Apple Stores. 

    New features in firmware version 1.2 include the broadening of the shutter speed range to encompass 30-1/20,000sec, and continuous shooting – though the company doesn’t say at what rate. The video mode will allow manual control of aperture, ISO, white balance and ‘more’. 

    DxO says that the changes have been instigated by user feedback from photographers, and that the new firmware will make the device ‘even more powerful’. For more information visit the DxO website.


    Press release:

    FOR IMMEDIATE RELEASE

    Powerful new features added to the DxO ONE connected camera via software update

    Version 1.2 available as a free download for existing DxO ONE users early December

    PARIS and SAN FRANCISCO—November 24th, 2015—DxO announced today the availability of the first major software update for the award-winning DxO ONE Professional Quality Connected Camera. The DxO ONE app version 1.2 will be available early December via the iTunes App Store, and will introduce new camera controls based on direct feedback from DxO’s rapidly expanding community of photographers. Version 1.2 makes the DxO ONE camera even more powerful, including new ways to view and interact with advanced photo info, and provides more control over the entire photo and video capture process including via a companion Apple Watch app. The DxO ONE connected camera is now also available in select Apple retail stores nationwide, as well as on Apple’s online store.

    “Using the camera has become second nature to me—it’s crazy good. I never imagined standing in a pit lane at a major motorsports event and immediately being able to provide a PR rep images of his team’s pit stop literally seconds after the car pulled away,” said John Thawley, whose images have been featured in print for companies such as Ferrari, Jaguar, Lexus, and Maserati. “I’ve been equally impressed with the DxO team and their responsiveness to feedback and suggestions. It’s nice working with a company that is listening, and I can’t wait to see what the DxO ONE team does next.”

    The way you interact with the DxO ONE is even better, thanks to new features that let users get instant access to advanced capture parameters and photo information with a simple swipe. Continuous shooting offers users the ability to shoot several photos in a row by simply depressing the shutter button. The manual focus mode now provides one tap access to hyper-focal distance, and the ability to reposition the magnification loupe for critical focusing. At the request of pro photographers, the shutter speed range has been expanded for capturing even faster motion (1/20000) and longer low-light exposures (30s). Users can now capture high quality video with full manual control of aperture, ISO, white balance and more. DxO ONE selfies are now available in every capture setting and mode, including the ability to record high quality video selfies, ready to share with the world. There’s even a new companion app that lets users remotely trigger a DxO ONE camera with their Apple Watch.

    The image scientists, engineers, and designers at DxO are committed to refining the connected camera experience. This relentless pursuit of perfection has been aided by the generous outpouring of support and direction provided by DxO ONE photographers, many of whom, like John Thawley, are established and respected members of the professional community. Thanks to this tight feedback loop, DxO ONE owners can expect to receive a regular cadence of exciting new features in the months and years to come.

    Pricing and availability

    The DxO ONE Professional Quality Connected Camera is available for purchase at dxo.com and photo retailers for a price of £449 (including VAT). Purchase price includes DxO FilmPack Elite, and for a limited time, DxO OpticsPro Elite (a £258 value). 

    The DxO ONE iOS app update, and companion Apple Watch app will both be available as free downloads via the iTunes App Store early December. New firmware, also available at the same time, can be easily downloaded via the app and installed on the DxO ONE. 

    Articles: Digital Photography Review (dpreview.com)

  • Von der Idee zum Bild mit Aida Pascual

    © Aida Pascual

    Ein Beitrag von: Aida Pascual

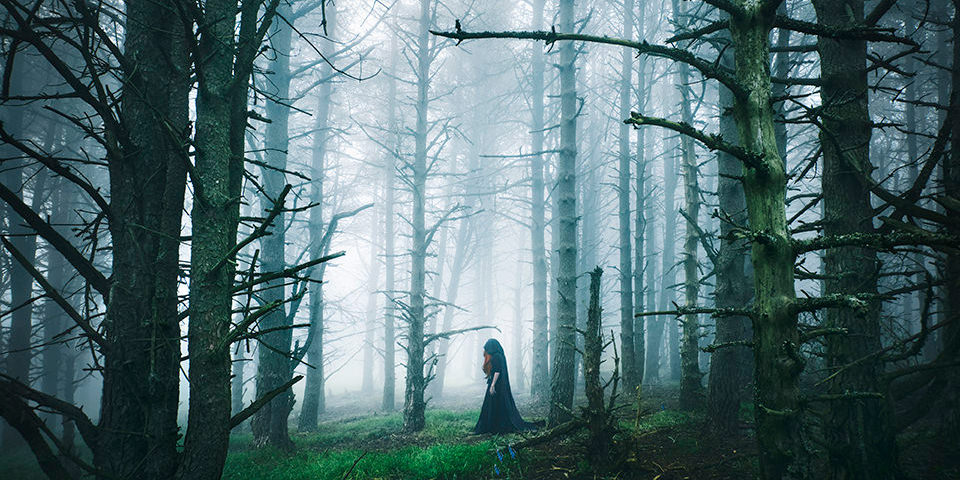
    Inspirationen kann man überall finden: in Büchern, Liedern, Filmen und Märchen. Mich inspirieren in den meisten Fällen Bilder und Texte aus der Romantik des späten 18. Jahrhunderts, vor allem David Caspar Friedrich. Wie seine Gemälde sind meine Fotografien von Landschaften dominiert und die Menschen stehen in Ehrfurcht vor der Weite der Natur.
    kwerfeldein – Fotografie Magazin | Fotocommunity

  • Behind the camera: Cristina Mittermeier, conservation photographer

    In this video we take a look at the work of Cristina Mittermeier, a conservation photographer who has dedicated her working life to documenting our changing environment and the roles of human communities around the world in protecting it. Founder of the International League of Conservation Photographers, Cristina delivered the keynote talk at our recent PIX 2015 show in Seattle. Check out our video to learn more about her work.  

    A look at the work of Cristina Mittermeier, conservation photographer 


    This is sponsored content, produced with the support of Sony. What does this mean?

    Articles: Digital Photography Review (dpreview.com)

  • Magic Circle: Laser-Cut Paper Sculptures Inspired by Nature

    [ By Steph in Art & Sculpture & Craft. ]

    paper bacteria 1

    An artist known for spending untold hours painstakingly hand-cutting tiny paper sculptures inspired by diatoms, bacteria, viruses, coral and other natural structures has augmented his process with the precision of lasers. Rogan Brown submerges himself in careful study of the tiniest of living things, such as the microbes and pathogens mimicked in his series ‘Outbreak.’ With ‘Magic Circle,’ Brown places collections of these cut-outs into a large circular display measuring about 40 inches across.

    paper bacteria 4

    paper bacteria 2

    In his paper cuts, Brown “explores the boundaries between observational study and artistic interpretation, existing somewhere between scientific accuracy and pure, unbridled imagination.” While previous works have focused mostly on one type of microscopic organisms at a time, ‘Magic Circle’ brings a variety of them together in one piece.

    paper bacteria 3

    paper bacteria 6

    paper bacteria 7

    “This piece is part of a new series of works that mixes hand and laser cutting to create an incredibly detailed and varied visual texture making multiple references: coral, bacteria, pathogens, diatoms, etc… each motif is however completely fictive and imagined; it is this interplay between the imagination and the ‘real’ world that fascinates me, reality is transformed and estranged through the creative process which paradoxically makes the finished work more real and unique.”

    paper bacteria 8

    paper bacteria 9

    ‘Magic Circle’ will be on display at Miami’s Aqua Art Fair, December 2nd through 6th. See more impressively intricate paper cuts in a range of styles, from dizzyingly complex patterns to tapestries that span several stories of a gallery.

    Share on Facebook


    [ By Steph in Art & Sculpture & Craft. ]

    [ WebUrbanist | Archives | Galleries | Privacy | TOS ]


    WebUrbanist

  • 30. November 2015

    Das Bild des Tages von: Ulli Bee

    © Ulli Bee

    Im Ausblick: RIP Holga, eine ungewöhnliche Tierfreundschaft und über Fotobücher.
    kwerfeldein – Fotografie Magazin | Fotocommunity

  • Ricoh continues to tease Pentax full-frame DSLR with new image and… not much else.

    Ricoh’s string of teaser coverage for its upcoming full-frame Pentax DSLR continues today with a new image of the camera and a press release – though not much in the way of more concrete information. Read more

    Articles: Digital Photography Review (dpreview.com)