Month: December 2015

  • Small Footprints: London’s First Pedestrian & Bicycle Bridges

    [ By WebUrbanist in Architecture & Cities & Urbanism. ]

    london minimalist bridge crossing

    Bucking the trend of extravagant elevated parks, this new walking-and-cycling-only bridge uses tight spirals on either side to minimize land usage with a slender tension-supported pathway (suspended from twin spires) stretched elegantly in between.

    london spiral foot bicycle

    Designed by Bystrup, a Danish firm, the crossing will span the River Thames in West London and beat out more lofty and complex proposals by other contributing architects.

    london bridge at night

    While certain other vehicular bridges accommodate non-motorized traffic in London, this one (if constructed before its close cousin, discussed below) is slated to be the first exclusively dedicated to walkers and bikers.

    london operable bridge

    This somewhat heftier structure is designed to be raised on demand, requiring a bit more bulk as a result (as well as waiting areas when the central portion is lifted to let boats pass).

    london brige raised

    Meanwhile, across town, another new bridge by ReForm is also in the works between Canary Wharf and Rotherhithe.

    From the architects: “Our design will do this, creating an internationally recognisable landmark. Its unique and elegant form and operation will become an attraction for visitors. It will enhance the views along and across the Thames, providing scale and interest in the way that the ships on the river itself do.”

    london night view

    This latter bridge is integrated to pathways and green spaces both extant and planned on either side of the Thames.

    london canary wharf bridge

    Both bridges will help cut commuting times across London and help make the city friendlier toward those on foot or traveling by bike. Each also aims to become a defining feature of the city, without overwhelming existing bridges or architecture.

    Share on Facebook


    [ By WebUrbanist in Architecture & Cities & Urbanism. ]

    [ WebUrbanist | Archives | Galleries | Privacy | TOS ]


    WebUrbanist

  • 5. Dezember 2015

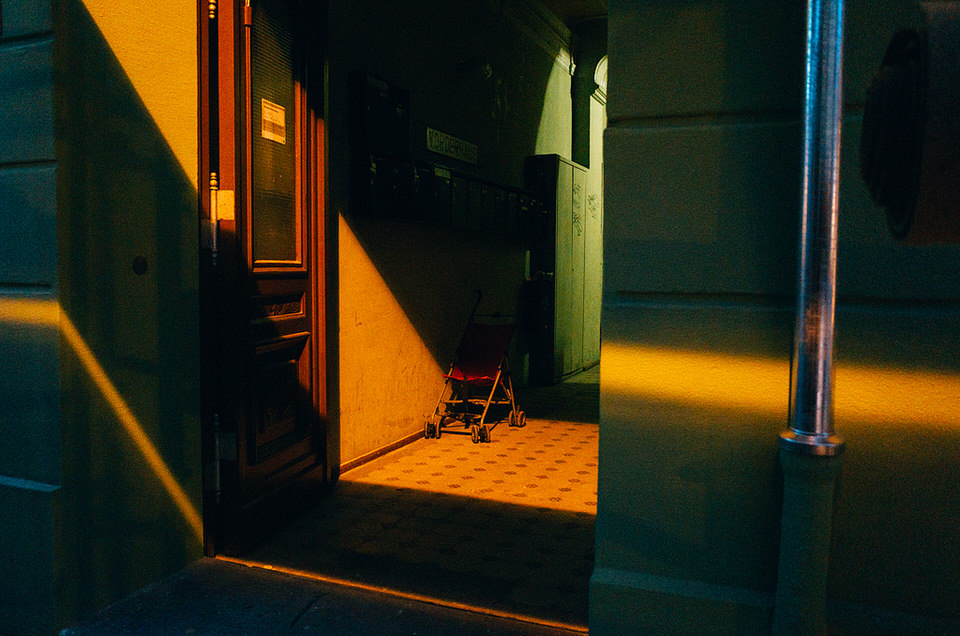
    Das Bild des Tages von: Nikit Akakij

    Nachtaufnahme mit buntem Lichteinfall.

    Bild des Tages: Farbkontrast galore!
    kwerfeldein – Fotografie Magazin | Fotocommunity

  • Your Guide to Creating Unique Conceptual Photography

    What is conceptual photography? Have you heard about it, but not been able to work out what it is? Who are the artists doing it? How can you do it? If you have asked yourself any of these questions, then read on and see if they can be answered for you.

    Conceptual photography is a type of fine art photography. Like the latter, everyone you ask will give you a different definition. It is an art form that has been around for as long as people have been making art. It seems to be something that people have only started talking about in the last 10 years or so.
    leanne-cole-conceptual-photography-046

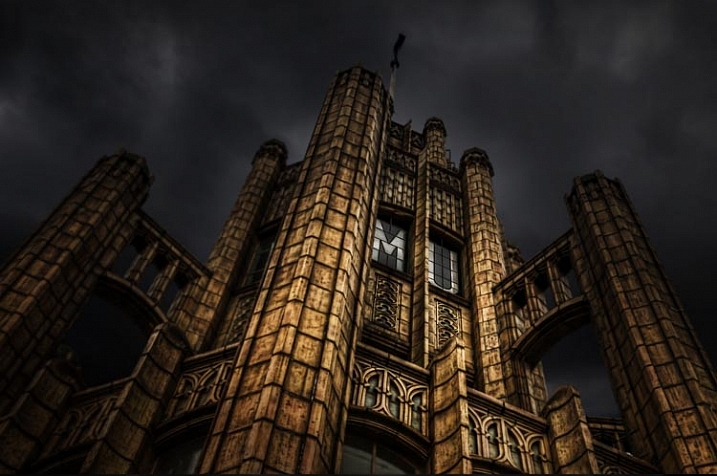
    The Tower of the Manchester Unity Building where the brief was to make it look like Batman lived there. So the sky was replaced and a lot of processing was done.

    What is Conceptual Photography?

    When I tell people about work that is conceptual the first thing many ask is, “What is it?”

    Conceptual photography is often very imaginative. It seems unreal. Often reality in the photos is distorted, and what you know as normal, is completely changed. Then there are also some people who are doing things that aren’t as imaginative. They are changing some things, or exaggerating reality to a lesser degree.

    Conceptual photography is about work that starts with a concept or an idea. In many instances, photography normally starts with an image or a place. You go out somewhere that you think will be interesting and take photos. Once you get home you put the photos on your computer, and for a lot of people, that is all besides some basic post-processing. There is nothing wrong with working that way, but conceptual photography starts out differently.

    In conceptual photography you start with an idea, or the concept, of what you want to do. At this stage you start working out what you want your final image to be about. You are working in the dark so to speak, as you won’t know the final result until you have processed it.
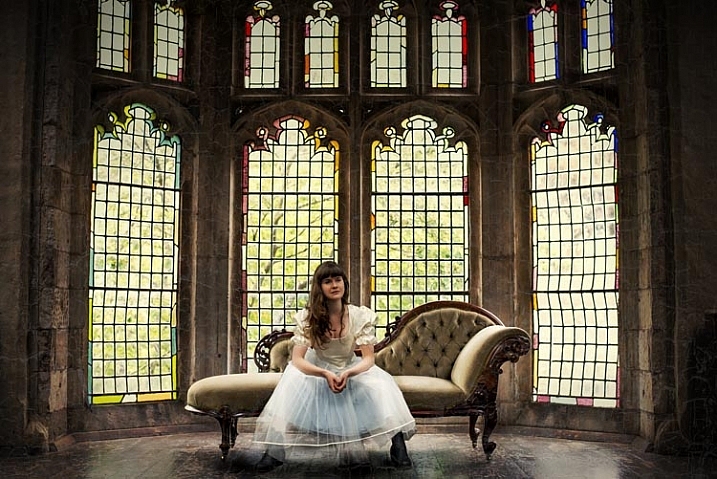
    leanne-cole-conceptual-photography-045

    A popular place in an artist retreat, but you can’t take photos with models. So this image was composited from the original, and one of the girl taken at a different time and place.

    Artists working conceptually

    Other artists (who aren’t photographers) often work this way. Sculptors have an idea of what they want to sculpt, but it isn’t until it is completed that they know if it will be any good. Many painters work the same way, especially abstract artists. The way they work can be fluid, but they have an idea of what they are trying to achieve. Again, it isn’t until the painting is finished, that the artist can judge whether it was successful.

    There is no reason why photographers cannot work the same way. Many photographers do, and if you like that kind of work, you can as well.

    It is about using your imagination, and seeing what you can envision. If you search Conceptual Photography in Google Images you will find many examples. There are some inspirational photos there as well. They are often clever, and usually highly processed. That does not mean you have to be really good at photo processing, but you do need to have a good imagination.

    Adobe Photoshop used to say, “If you can dream it you can create it with the software”. I don’t know how true that is, but you can do a lot in Photoshop, and if you can imagine it, then you should try to create it.
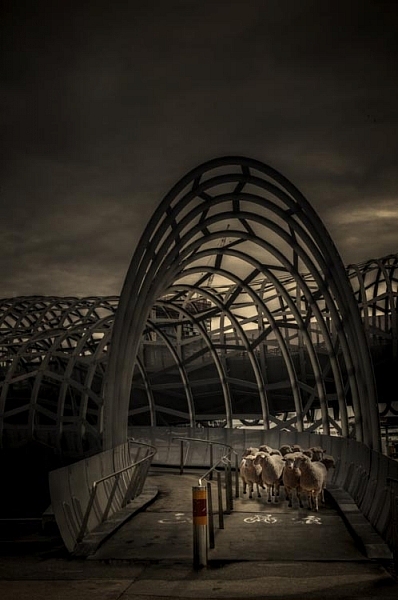
    leanne-cole-conceptual-photography-043

    Another composite of a popular walking bridge in the city and some sheep. The sheep were placed on the bridge in Photoshop.

    It’s all about imagination

    That is a big part of this type of photography. It is about imagination and ideas, planning and getting what you need to create the image, and finally the creation of the image.

    Most conceptual work you see is created around portraits. There are many photographers in the world who specialize in fine art portraiture. They would also be considered conceptual artists. You can’t take a person out and simply take their portrait, you need to plan the whole session. Long before you have your model, you need to have an idea of what you want to do; what costumes you may need, and where you want to take the photos. That is how it starts.

    leanne-cole-conceptual-photography-044

    Trying for a Wuthering Heights look. A hill was found on a windy day and the model put into a costume. The cloak was made to look larger as it blew in the wind.

    Not all conceptual work is portraiture though. There are many photographers working in landscape or architecture who are creating their own realities.

    You might want to put your cat on top of a large building, so it looks like King Kong. You may have seen images where there is a house floating in the air, or someone is put inside a glass jar. These all started with the artist thinking about “what if”.

    Some specific conceptual photographic artists

    There are some incredible conceptual photographers and artists who are working now.

    Rick Amor is an Australian painter. He often paints his environment around him, but not as we see it. He visits places and takes lots of photos. When he gets back to his studio, he goes through those photos to work out which ones he can paint. He will take a little from one image, and something from another, to create a new scene or a new reality. They aren’t straight copies, and he often distorts the sizes and views as well. A statue that is normally six feet tall might appear to be 30 feet tall in one his paintings.

    Brooke Shaden is a fine art photographer whose work also fits into the category of conceptual art. She does portrait style images, but they are all more than a portrait of a person sitting in front of the camera. Before she starts, she plans what she wants first. She works out: what the colour scheme will be, what props she will need, if any, and then the location. The model is also important, and has to be someone that will fit the mood of the image she wants to create. Finally, she finishes the image by using Photoshop to give it her unique look.

    Canadian Photographer Renee Robyn is also a conceptual artist. She does a lot of fantasy or ethereal images. Again, they would be images that start with an idea or concept. If you look at her website, you can see the before and after photos which makes it is clear that she works with a plan in mind. The models are photographed in a way so that they can then be put into other scenes on the computer.

    leanne-cole-conceptual-photography-048

    The Woodland Bride – Started with the idea of a bride dressed in rags in the forest. The bouquet of sticks came later.

    Another artist that is gaining popularity for his incredible conceptual images, is Erik Johansson. He has an amazing ability to turn the world around him upside down. He manages to turn the ordinary into something extraordinary, to make you see the world in a new way. His imagination is amazing. The ideas he comes up really show how talented he is.

    All these artists work differently. You may identify with one of them. You may want to find your own conceptual artists that work in a way that you admire, who you can gain inspiration from. It is important to find other photographers that give you motivation, to work and try new things. You shouldn’t copy them, except to learn, but look at the work and see if you can find your own style.

    How can you do conceptual photography?

    You need to start thinking conceptually. If you want to create images like the ones mentioned and shown here, then you need to start using your imagination. Think about how you can twist the world around you, or finding some interesting things you can do with it.

    Think about how you are going to achieve the final result that you are after. Do you have to take specific photos for it? You need to make sure when you are taking the photos that everything will work together. It should look like it really is possible.

    For most images you have to know how to composite. How to take something from one scene, then place it into another. As you put everything together, you start to see whether or not it has worked.
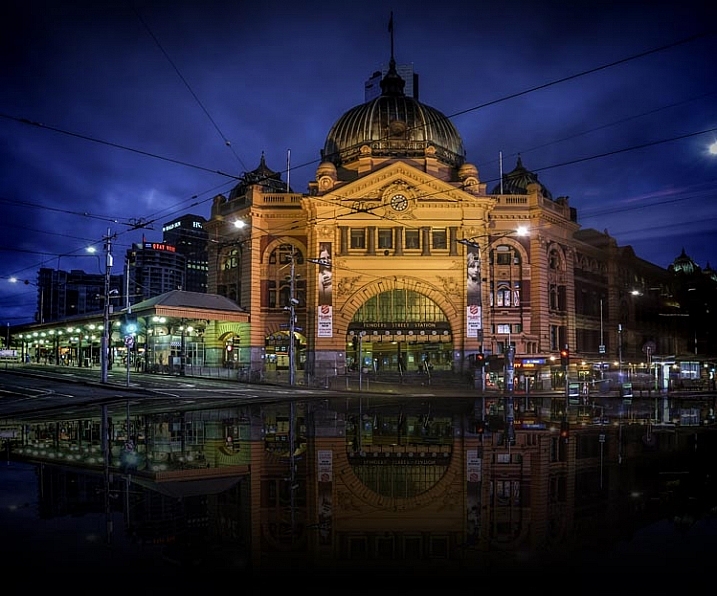
    leanne-cole-conceptual-photography-047

    Flinders Street in Melbourne Flooded. A process done on the computer to make a place look like water is everywhere.

    Working conceptually

    Making conceptual images can be a rewarding way of working. It can help you stand out from many other photographers. It is not easy to do, and patience and time are often needed to learn it. However, if you have the drive, then a whole new world could be there for you.

    Are you interested in learning more about how to do conceptual photography? What would you like to learn? Have you done any or have any favorite conceptual photographers you’d like to share? Please do so in the comments below.

    googletag.cmd.push(function() {
    tablet_slots.push( googletag.defineSlot( “/1005424/_dPSv4_tab-all-article-bottom_(300×250)”, [300, 250], “pb-ad-78623” ).addService( googletag.pubads() ) ); } );

    googletag.cmd.push(function() {
    mobile_slots.push( googletag.defineSlot( “/1005424/_dPSv4_mob-all-article-bottom_(300×250)”, [300, 250], “pb-ad-78158” ).addService( googletag.pubads() ) ); } );

    The post Your Guide to Creating Unique Conceptual Photography by Leanne Cole appeared first on Digital Photography School.


    Digital Photography School

  • Rede mit uns

    Frau sitzt auf dem Bett,

    Prosititution wird in Deutschland fast ausschließlich mit Menschenhandel und Zwangsprostitution in Verbindung gebracht, obwohl Sexarbeit 2002 legalisiert wurde. Helena Falabino hat sich mit Prostituierten getroffen, die angeben, selbstbestimmt und freiwillig in diesem Beruf tätig zu sein. Im Rahmen ihres Abschlussprojektes an der Ostkreuzschule in Berlin ging es ihr darum, sich mit der Thematik auseinanderzusetzen und Vorteile abzubauen.
    kwerfeldein – Fotografie Magazin | Fotocommunity

  • Review of the Wacom Intuos Photo Pen and Touch Tablet

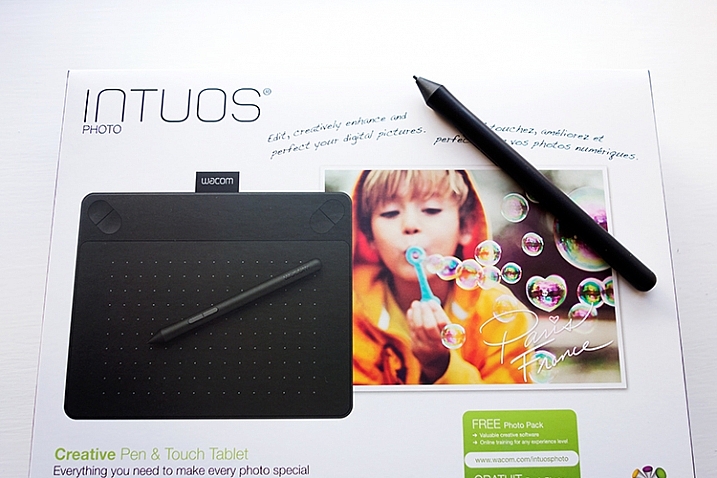
    Intuos Photo Creative Pen and Touch Tablet

    Intuos Photo Creative Pen and Touch Tablet

    In this article I’ll review the Wacom Intuos Photo Creative Tablet Small. Wacom brought out this model, and three other similar ones, back in September 2015. The only difference is they come bundled with different software. Otherwise the specs are the same.

    Can you benefit from using a tablet?

    The short answer to this question is, yes. Do you actually need one? Possibly not. But, if your workflow demands a lot of retouching to your images, then you will indeed benefit from using a tablet. The pen (stylus) essentially replaces your mouse, and allows for more precise actions where pinpoint accuracy, especially pressure sensitivity, are indispensable.

    I’ve being using a Wacom tablet for a number of years. Although, I will admit when I first got my Graphire4, I took it out of the box and thought, “Hmm that looks nice” and put it straight back into the box. Long story short, some time later, I was about to give it away when I decided I’ll give it another go. Initially, it did take a little bit of getting use to. Whereas now, I would find it difficult resorting back to a mouse for editing my images.

    The Graphire4 served me well even though it had only 512 levels of pressure sensitivity. So it was time for an upgrade.

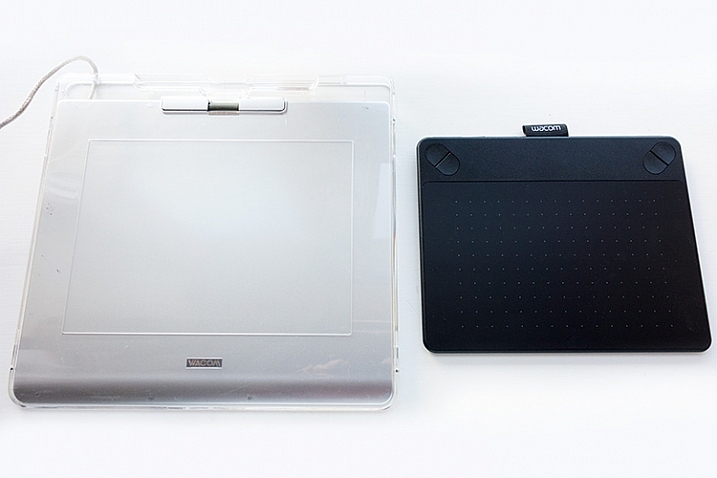
    two-tablets-side-by-side

    The Graphire4 tablet on the left versus the new Intuos Photo Small on the right

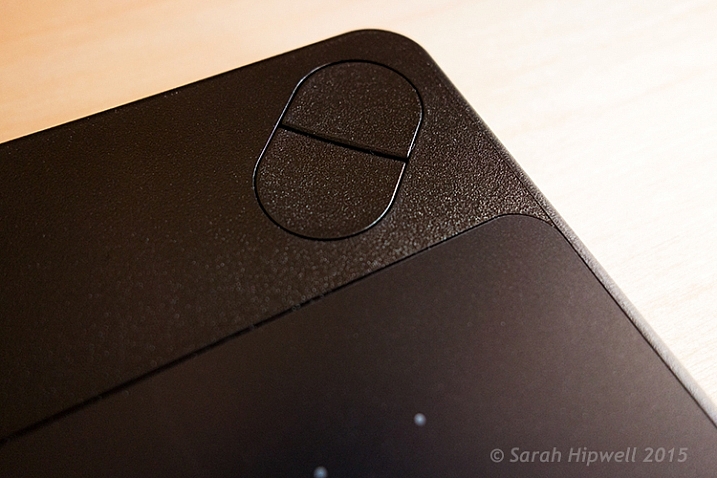
    The new Intuos Photo has 1024 levels of pressure, which was immediately noticeable, and very responsive. It has four Express Keys (the Graphire4 had only two) which you can configure to whatever shortcuts you choose. There also two buttons on the stylus, which offer the same customization.

    ExpressKey

    There are 4 ExpressKeys on this tablet, two on the left and two on the right, which can be customized for shortcuts.

    I didn’t notice any lag time when moving the stylus across the surface, and the pen feels so intuitive, just like a real pen. It’s is very responsive and doesn’t have that scratchy feel when using broad brush strokes, you might expect because the surface is matte.

    Features and design

    This tablet is small, slim, and lightweight, which makes it very portable. Although it is light, it does feel solid.

    slim-tablet

    I’m holding the Intuos Photo between my fingers to illustrate how slim it is.

    It has multi-touch gestures, which operate in the same manner as a trackpad. I wouldn’t use this feature, as I use my keyboard for shortcuts, but it’s cool nonetheless. There is a switch at the back to turn this feature off. My hand would activate the zoom feature, which was distracting.

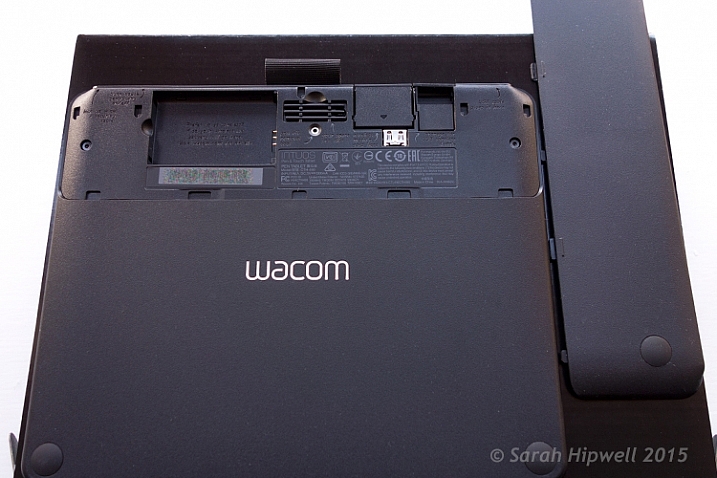
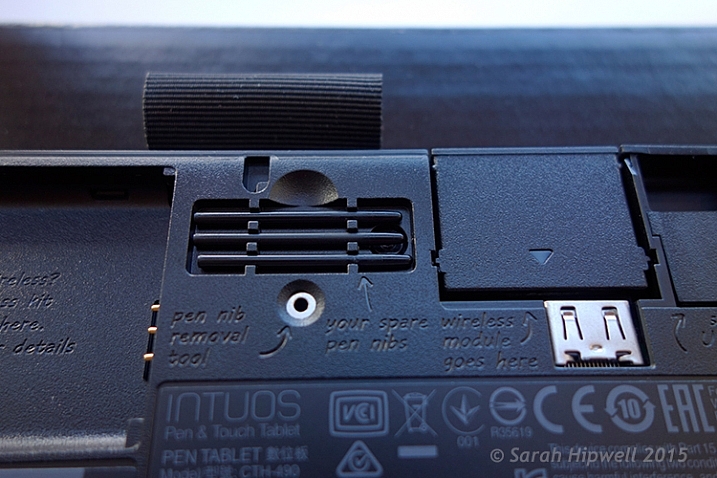
    If you turn the tablet upside down and slip this portion of the base off, you will find slots for the Wireless bits to go. You have to purchase the Wireless Accessory Kit separately. You get four spare pen nibs tucked away neatly, saved for when you need them.

    back-off

    Back of the Intuos Photo where the Wireless kit goes (sold separately).

    I did find the engraved instructions neat. It did appeal to my sense of aesthetics!

    stylus-spare-nibs

    Close up to show the four spare nibs for the pen (stylus). Notice the neat engraved instructions.

    Size can matter!

    Before I purchased the Intuos Photo Small, I wasn’t sure whether to choose this size (6 x 3.7 inches) or go for the medium size. The medium is called the Wacom Intuos Art Pen and Touch Tablet Medium (8.5 x 5.3 inch active area). The larger model retails at $ 199.95.

    The price wasn’t just the only determining factor for me. I have a 24” monitor so I wasn’t sure if this size tablet would match the monitor? I’ve found no issue, the size is good for me. However, if I had a bigger monitor, I would probably have gone with the medium tablet. Another factor to consider is how much space do you have on your desk? The Intuos Photo is small and compact.

    What software is included?

    • Macphun Creative Kit
    • Corel AfterShot Pro (Mac)

    In order to get the software, a download key is printed on the inside of the box. I have downloaded the Macphun Creative Kit (Tonality Pro, Intensify Pro, Snapheal Pro, Noiseless Pro) but that’s as far as I got. I haven’t tested out the software yet.

    My verdict

    Wacom tablets are a leading brand. Their Intuos Pro range are expensive. However, the Pro range offer 2048 levels of pen pressure sensitivity, wireless connectivity, and other features. So this makes the Intuos Photo Small a really good deal for the price. I find the pressure sensitivity levels suffice for my workflow.

    Another plus, if you suffer from RSI (Repetitive Stress Injury) issues, especially if you spend a considerable amount of time in front of your computer editing your images, I certainly find holding a pen preferable to gripping a mouse for any length of time.

    To sum up, if you have a (much) older Wacom tablet, I would recommend the Intuos Photo as an upgrade. If you haven’t used a tablet before and are thinking of buying one. This model is a good place to start and it is competitively priced.

    Cons (or maybe quirks)

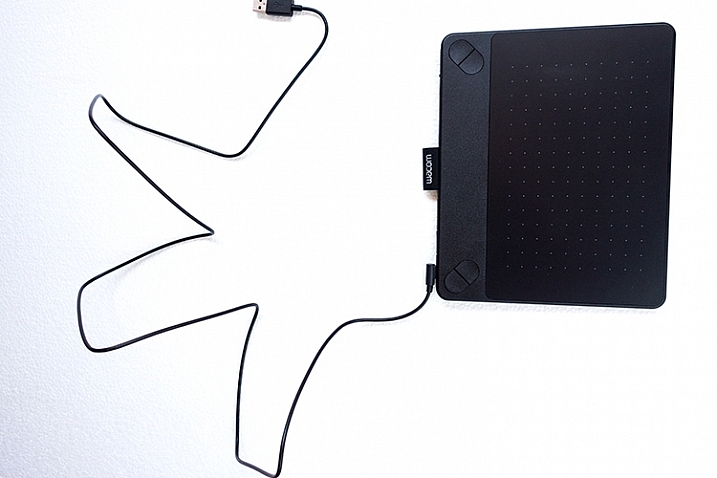
    This is more of an observation rather than a gripe. The USB cable supplied is 148cm (58 inches) in length! Not sure of the rationale behind this…maybe a ploy to get you to buy the Wireless Accessory Kit, which is sold separately.

    USB-cable-very-long

    USB cable measuring 148cm(58 inches) in length.

    The stylus is much lighter and slimmer compared to the chunkier and heavier model I was more use to. It does feel a little cheap.

    I’ve found the pen inclined to roll between my thumb and fingers, so that at times, I had to keep rolling the pen around again to where the two buttons are at the side to access them. This was getting quite irritating. I feel a rubberised moulding would help in preventing the pen from rolling around. Similar to the rubber grip found on ordinary pens. So I came up with my own inexpensive solution to modify the pen.

    DIY hack for the stylus

    I bought these pen grips at a local stationary shop. I cut one in half and rolled it up until it reached just below the two buttons. This way, I can grip the pen better, and roll it more easily, so that the two buttons rest next to my thumb for easy access. The four in a pack came to less than $ 2USD.

    pen-grips

    Ordinary biro pen grips that are sold in stationary shops.

    DIY stylus holder hack

    The Intuos Photo has a fabric sleeve to house the pen, which I presume is for when you’re transporting this tablet in your bag. The sleeve is tight fitting, so this is not practical for everyday use while sitting working at your desk. The tablet doesn’t come with a pen holder.

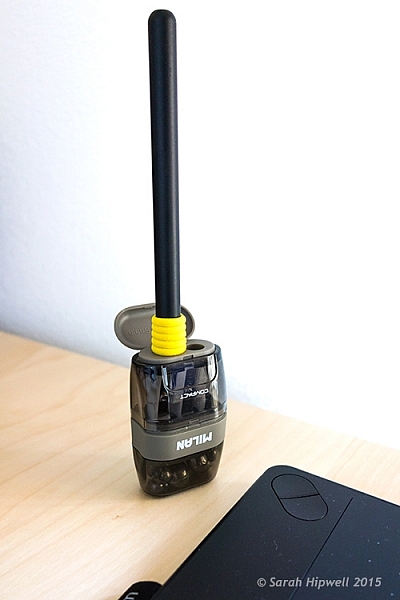
    So, while I was in the same stationary shop to get my pen grips, I spied this pencil sharpener with eraser holder and thought that would make a great stylus holder. It was a perfect fit (see photo below). Again, this item cost less than $ 2! Just to add a little weight stability, I put fishing lead balls in the bottom part, only because I had them anyway.

    Stylus-hack-holder

    DIY stylus holder hack from a pencil sharpener with an ordinary pen grip on the stylus.

    Do you use a tablet or a mouse? Which is your preference for editing your photos? Share in the comments below.

    googletag.cmd.push(function() {
    tablet_slots.push( googletag.defineSlot( “/1005424/_dPSv4_tab-all-article-bottom_(300×250)”, [300, 250], “pb-ad-78623” ).addService( googletag.pubads() ) ); } );

    googletag.cmd.push(function() {
    mobile_slots.push( googletag.defineSlot( “/1005424/_dPSv4_mob-all-article-bottom_(300×250)”, [300, 250], “pb-ad-78158” ).addService( googletag.pubads() ) ); } );

    The post Review of the Wacom Intuos Photo Pen and Touch Tablet by Sarah Hipwell appeared first on Digital Photography School.


    Digital Photography School

  • Behind the camera: Beauty photographer Lindsay Adler

    Lindsay Adler started her career as a portrait photographer very early. As a teenager, she took her classmates’ senior portraits, and later found that shooting portraits through each summer during college would help offset the costs of the school year. She’s now an author, educator and a leading fashion and studio photographer based in New York. We sat down with her recently to find out more about her early career, success and her evolving views on her own so-called ‘failures.’
    Articles: Digital Photography Review (dpreview.com)

  • Manfrotto launches bright and compact Lykos LED lighting panels

    $ (document).ready(function() { SampleGalleryV2({“targetContainerClass”:”sampleGalleryImageViewerContainer”,”galleryId”:”2759212496″,”isEmbeddedWidget”:true,”selectedImageIndex”:0,”startInCommentsView”:false,”isMobile”:false}) });

    Italian accessories manufacturer Manfrotto has announced it is to introduce a new range of LED light panels under the Lykos brand name. The Lykos Daylight and Lykos BiColor panels are small enough to hold in one hand but can also be mounted on a lighting stand, and can be powered by an L-type video-camera battery or via the included AC adapter. Both panels use surface-mounted LEDs which the company claims deliver better power efficiency, more consistent color, flicker-free illumination and an improved working life.

    The Daylight version has a color temperature of 5600K while the BiColor model uses white and warm LEDs. These can be mixed to produce anything from 3000-5600K, to match local lighting conditions or for color effects. The Daylight version can manage 1600lux@1m, while the BiColor is not quite as bright at 1500lux@1m. 

    All controls have separate knobs so that the panels can be left to produce the same temperature or brightness when they are switched off and on again, as the on/off function is not integrated into one of the dials. 

    An optional Bluetooth dongle allows the panels to be controlled individually or in groups via a Smartphone app that has a memory function to recall light levels and temperature. The app is also compatible with Litepanel’s Astra models, so both types can be controlled from one app simultaneously.

    Manfrotto has also introduced a softbox for the Lykos panels, as well as a set of filters for the Daylight model and a gel diffuser. 

    The Lykos Daylight will cost £299.95/$ 449.99 and the BiColor version will be £399.95/$ 514.99. The Bluetooth dongle will be £75.95/$ 99.99

    For more information visit the Manfrotto website.


    Press release: 

    December 2015 – Manfrotto, world leader in the photography, imaging equipment and accessories industry, announces the launch of the LYKOS portable light with new LED technology (Surface Mounted Technology). Available in Daylight and BiColor versions, the LYKOS guarantees the highest illuminance in compact size and is the best solution for the photographer and videographer on the go who needs a lightweight light source.

    LYKOS LED panels, powered by Litepanels, is part of the new, ready to use Manfrotto LED lights.

    POWERFUL LIGHT 

    Portable and compact light, LYKOS is designed to meet the needs of demanding professionals. The powerful light is capable of an output of 1600lux and exists in two versions. LYKOS Daylight is centered at 5600K and LYKOS BiColor has the option to change colour temperature from warm white (3000K) to cold white (5600K). A color LCD display on the back of the unit allows easy monitoring of the functions.

    Thanks to the new generation SMT technology, the LYKOS lights ensure long LED life, energy efficiency, consistent colour reproduction and flicker-free functionality. This light can be operated by L-Type Li-ion batteries or by mains through the AC adaptor included. 

    SMART CONNECTION

    All units are “Bluetooth-ready”. An optional Bluetooth dongle transforms LYKOS in a smart device and permits remote control through a downloadable iPhone App or via the Digital Director App. Controllable functions include the On/Off switch, dimming 0%-100%, colour temperature regulation, grouping of lights and recall of previously stored scene settings with new features to soon be implemented. Manfrotto LYKOS and Litepanels Astra will embed a compatible wireless technology which will mean it will be possible to control both through the same app. 

    KIT AND MORE

    The LYKOS pack includes a Ball head, gel diffuser (filters for the Daylight version) and a mains adaptor.

    Moreover, the Manfrotto LYKOS Softbox is a perfect optional accessory to be used in combination with LYKOS LED panels. It creates a beautifully soft lighting, softening shadows in the images. It can be set up in seconds without any tools and the diffuser film is specifically designed for LED Lighting and reduces the light output by 1.3 f-stops.

    The new portable LYKOS LED panels are a powerful, efficient and smart device ready to use for professional photographer and videographer.

    Articles: Digital Photography Review (dpreview.com)

  • Sony finalizes buyout of Toshiba’s sensor business

    Back in October, Sony announced its intention to buy out Toshiba’s sensor business, and today they’ve sealed the deal. Sony is spending ¥19 billion ($ 154 million) on the acquisition.

    Toshiba says that they will ‘transfer semiconductor fabrication facilities, equipment and related assets of Toshiba’s 300mm wafer production line, mainly located at its Oita Operations facility, to Sony Semiconductor as part of the deal’. The company’s 1,100 workers will be offered positions at Sony after the merger closes by the end of the first quarter 2016.

    This deal potentially affects every camera manufacturer that has used Sony and/or Toshiba APS-C (and smaller) sensors in the past – which is to say virtually all of them. Except for Canon and Samsung, both of which manufacture their own APS-C and larger sensors, every other camera manufacturer, including Nikon, will now pretty much have to rely on Sony.

    That is, assuming Samsung doesn’t become a supplier in its own right. With a question mark hanging over the future of the NX system and long-standing rumors about the company’s investment in full-frame, it is possible that Samsung could step in to provide Nikon, Ricoh and Fujifilm with an alternative to Sony. 


    Press release:

    Sony and Toshiba Sign Definitive Agreements for the Transfer of Semiconductor Fabrication Facilities

    Tokyo, Japan, December 4th, 2015 — Based on the memorandum of understanding entered into between Sony Corporation (“Sony”) and Toshiba Corporation (“Toshiba”) on October 28, 2015, the parties today announced that they have signed definitive agreements to transfer to Sony and to Sony Semiconductor Corporation (“SCK”), a wholly-owned subsidiary of Sony, certain Toshiba-owned semiconductor fabrication facilities, equipment and related assets in its Oita Operations facility, as well as other related equipment and assets owned by Toshiba (the “Transfer”). 

    Under the agreements, Toshiba will transfer semiconductor fabrication facilities, equipment and related assets of Toshiba’s 300mm wafer production line, mainly located at its Oita Operations facility. The purchase price of the Transfer is 19 billion yen. Sony and Toshiba aim to complete the Transfer within the fiscal year ending March 31, 2016, subject to any required regulatory approvals. 

    Following the Transfer, Sony and SCK plan to operate the semiconductor fabrication facilities as fabrication facilities of SCK, primarily for manufacturing CMOS image sensors. 

    The parties expect to offer the employees of Toshiba and its affiliates employed at the fabrication facilities to be transferred, as well as certain employees involved in areas such as CMOS image sensor engineering and design (approximately 1,100 employees in total), employment within the Sony Group, upon the completion of the Transfer.

    Outline of 300mm wafer fabrication facilities, Toshiba Oita Operations

    • Building completion: February, 2004
    • Location: 3500 Oaza Matsuoka, Oita City, Oita Prefecture, Japan
    • Building area: 24,100 m2
    • Total floor space: 48,800 m2
    • Main products: CMOS image sensors, memory controllers

    Articles: Digital Photography Review (dpreview.com)

  • Google launches Cardboard Camera VR app for Android

    As a followup to its Cardboard headset and Cardboard app, Google has launched a new VR content creation tool for Android called Cardboard Camera. With Cardboard Camera, users are able to record 360-degree panoramas for viewing with Cardboard VR headsets. Read more

    Articles: Digital Photography Review (dpreview.com)

  • Muji Huts: Affordable Pop-Up Modern Homes Made for Japan

    [ By Steph in Architecture & Houses & Residential. ]

    muji huts 1

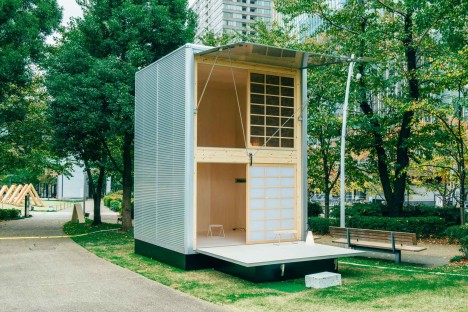
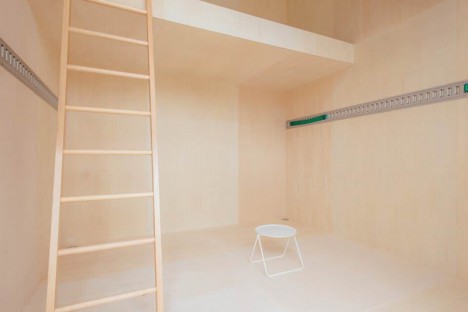
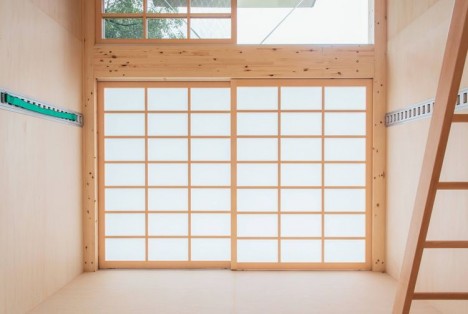
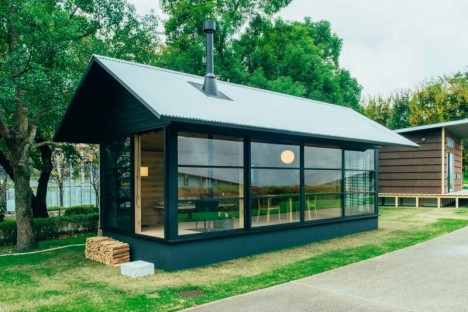
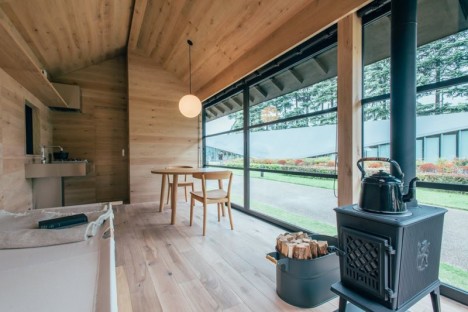
    The same Japanese retail chain selling household supplies like space-saving furniture, bed linens and travel toothbrushes will soon sell pop-up houses, too, so you can literally walk out with a kit for an entire, fully-outfitted home in one trip. The Muji Hut, designed by Konstantin Grcic, Jasper Morrison and Naoto Fukasawa for retailer Muji, comes in three variations starting at $ 25K. Each offers just enough space for one or two minimalist residents.

    muji huts 2

    muji hut 7

    The Japanese housing market is a little different from that of the U.S. and other parts of the world in that real estate doesn’t accrue value over time, and demand for preexisting houses is low. Not everybody has the money to knock down an old house and build a new one in its place, however, and lots tend to be tiny.

    muji huts 3

    muji huts 4

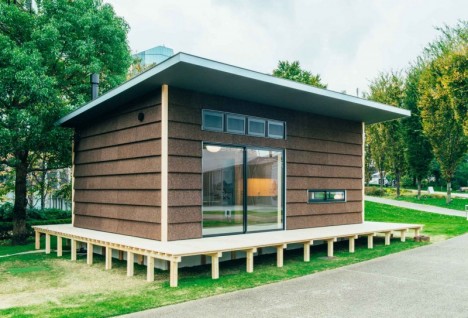
    Each designer created their own version of an affordable, no-frills structure that can be assembled in short order, including one made of aluminum, a two-story timber creation and a little cabin clad in cork. Each takes inspiration from kyosho jutaku, the Japanese style of micro homes that aims to squeeze as much function out of tiny footprints as possible.

    muji huts 5

    muji huts 6

    The Muji Huts are envisioned as weekend getaway destinations rather than full-time living spaces, but each contains a generous living room, bathroom and kitchen, and can be heated with a wood stove. The huts can be installed in virtually any location, from tight city lots to the banks of a river, and will be available for purchase in 2017.

    Share on Facebook


    [ By Steph in Architecture & Houses & Residential. ]

    [ WebUrbanist | Archives | Galleries | Privacy | TOS ]


    WebUrbanist