Month: December 2014

  • Old Glass: How to Use Old Film Lenses with New DSLR Cameras

    Do you want a sharp and well built lens? Of course you do. Everyone does. Think you can’t afford great glass? Think again. You may not be looking in the right place.

    If you’re like me, browsing through latest high-end lenses can be a little depressing. The cost of luxury grade glass can easily peak in the thousands of dollars. What if I told you that you could have excellent lenses without breaking the bank?

    Front View

    Recently I learned about a method for retrofitting older film lenses to function with our modern cameras. The possible bad news is that these are mostly manual focus prime lenses so your autofocus and metering won’t work (with one exception we’ll talk about later). The great news is that the majority of these lenses are built like photographic tanks and possess extremely capable optics. These lenses are also readily available and affordable on most any budget.

    So how is it done? How can you make a twenty, thirty, or even forty year old piece of gear work with today’s advanced camera bodies? Believe it or not, the answer is deceptively simple. For virtually every lens and camera combination there is an adapter that will enable you to use any lens with any camera – regardless of manufacturer. Here’s an example:

    I have an old analog Nikon F3 that was given to me by my father along with a couple of lenses: a Nikkor 85mm f/1.4 and a Nikkor 50mm f/1.8.

    50mm and 85mm

    The entire kit remained mostly forgotten in a camera bag, and in storage for years. One day I stumbled across some information about how a few photographers were using old M42 Zeiss screw-mount lenses with their DSLR’s using adapter rings and producing outstanding photographs. That got me thinking – if it were possible to find adapters for these old M42 lenses, could there also be manufacturers who produced similar adapters for other lens types? Almost instantly the old Nikon leaped from some distant corner of my memory. My main shooting body is a Canon 7D MkI. Could I possibly use those thirty year old Nikkor film lenses on my 7D Canon? Shockingly, the answer was yes! All I needed were these unassuming aluminium adapter rings which I sourced on eBay for about $ 12 USD each.

    One side of the ring matches the Nikkor mount.

    Adapter Nikon Side

    The other mates with the Canon body.

    Adapter Canon Side

    The entire process is very simple; the adapter simply snaps onto the lens.

    Nikkor Without
    Without the adapter.

    Nikkor With
    With the Canon adapter.

    Then it’s business as usual attaching the adapted lens to the camera. Just line up the indicator dot with the mounting dot on your camera body.

    Mount Point

    You’re done.

    Body Fit

    The adapters are also removable if you choose to do so later by depressing a small spring catch (most brands have these).

    As I said earlier, these are completely manual lenses. Meaning that you adjust your aperture by hand as well as focusing the lens.

    50mm

    Personally, I enjoy the deliberateness this action forces. You have to think about your composition so much more, and you get to experience the effects of aperture adjustment literally first hand.

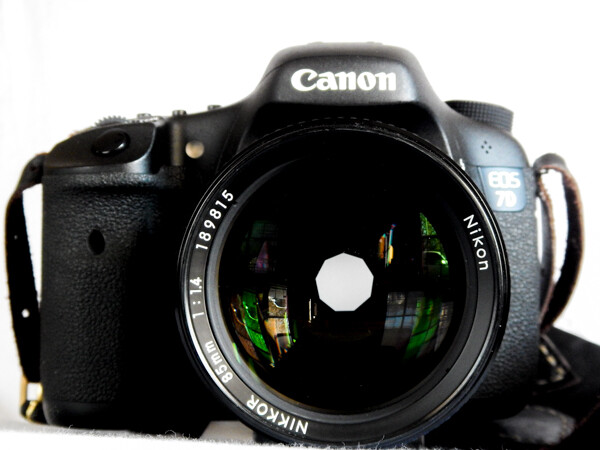
    Aperture Blades 85mm
    The impressive aperture blades on this beautiful Nikkor 85mm.

    Don’t worry if this manual operation doesn’t appeal to you. The exception concerning the adapter rings I spoke of is that some are now being made with focus indicator chips built into the adapter. While this chip doesn’t enable you to use autofocus, it does allow the lens to communicate to the camera when the selected point of focus has been obtained. This is complete personal preference. I opted for the non-autofocus indication adapters because I wasn’t comfortable using aftermarket electronics of that type with my camera. Again, this is a completely subjective.

    Please Note: Neither the author nor Digital Photography School are responsible for any damages to your camera or lens as a result of using aftermarket devices. Please be an informed photographer prior to attempting any modifications to your precious gear!

    Now, here are some images produced through a little Frankensteinish innovation.

    Bee

    Color Traffic

    Bw Traffic

    Grass

    Leaves

    Nothing Free

    Rain on Glass

    googletag.cmd.push(function() {
    tablet_slots.push( googletag.defineSlot( “/1005424/_dPSv4_tab-all-article-bottom_(300×250)”, [300, 250], “pb-ad-78623” ).addService( googletag.pubads() ) ); } );

    googletag.cmd.push(function() {
    mobile_slots.push( googletag.defineSlot( “/1005424/_dPSv4_mob-all-article-bottom_(300×250)”, [300, 250], “pb-ad-78158” ).addService( googletag.pubads() ) ); } );

    The post Old Glass: How to Use Old Film Lenses with New DSLR Cameras by Adam Welch appeared first on Digital Photography School.


    Digital Photography School

  • Macro Photography on a Budget

    This post is by Ed Verosky whose new Macro Photography eBook is 53% off today only.

    Img 1

    Close-up and macro photography continue to be popular with shooters of all levels. Practical applications include product detail shots, food photography, and technical illustration (see image below). But the fun and artistic motivations are undeniable; flowers, insects, creative abstract, and the excitement of discovering the hidden worlds found in everyday objects.

    If you’ve been interested in doing some close-up and macro work, but don’t quite know how to get started, this article will show you how, without blowing your budget. Macro, in particular, is often accomplished with high-end specialty lenses and equipment, but there are ways to take impressive close-up and macro shots with little more than the gear you already have.

    Img 2

    Food and recipe images are featured in editorial as well as event photography. Here, a close-up shot of this delicious-looking cupcake provides context for the macro shot that follows. This shows how the power of close-up and macro can draw the viewer in and capture the imagination.

    Here are three of my favorite low-cost techniques detailed in my new eBook, Introduction to Close-Up & Macro Photography:

    Reverse Your Lens

    If you’d like to get started right away, this technique works great and requires no extra investment. All you need is a camera that uses interchangeable lenses (most DSLRs do). Just remove the lens from the camera and hold it backward against the lens mount to get a high degree of magnification. Any lens will do, but a normal lens, or the lens that came with your camera will probably work best (e.g. 50mm or the 18-55mm kit lens).

    Although this is an effective solution, you should be aware that your camera and lens won’t be able to communicate with each other when using this technique. That means no f-stop adjustments or automatic focusing. Fortunately, focusing won’t be a problem using this technique, and you can preset your lens to a specific f-stop using the aperture-locking trick I’ll detail below.

    Here are the steps for using this technique:

    1. Press your camera’s lens release button to remove the lens from the
      lens mount.
    2. Turn the lens around in your hand so that the front of the lens is facing
      the camera mount.
    3. Carefully match up the front of the lens to the ring of the camera mount and hold it there when taking your shots as shown in the image below.
    4. As with many macro shooting solutions, the way you’ll focus on your subject is by moving the camera and lens toward, or away, from the subject, not by turning the focusing ring. You’ll be within two or three inchses of your subject (or less) when acquiring focus.
    Reverse lens handheld

    An 18-55mm lens held backward onto the camera’s lens mount.

    Reversing Rings

    You can also use an adapter called a reverse ring (or reversing ring) which will allow you to actually mount your lens onto your camera in the backward position. This inexpensive gadget (see image below) is made to screw onto the front of your lens, similar to a lens filter. The other side of the reversing ring fits onto your camera’s lens mount. Make sure to get a reversing ring that not only matches the filter size (thread diameter) of your lens, but also matches the lens mount of the type of camera you’re using.

    Reverse ring

    Reverse (reversing) ring fits onto the front of this 18-55mm lens via the lens filter thread.

    Aperture-Locking Trick

    Whether you’re using the handheld reverse lens technique, or a reversing ring adapter, you can set a specific f-stop, even though your lens is not electronically coupled to your camera. This technique may not work with your particular camera and lens combination, but it works with all of the DSLRs that I’ve used:

    1. 1. With the camera powered on, and the lens mounted onto the camera in the normal way, set the f-stop.
    2. 2. Press and hold the depth-of-field preview button.
    3. 3. While still holding the DOF preview button down, press the lens release button and remove the lens. The aperture will remain stopped down as shown below.
    Aperture

    Aperture locked-in at f/16 on this 85mm lens.

    Other Budget-Minded Ways to Achieve Macro

    Other ways to get good close-up and macro shots on a budget include the use of lens coupling rings, diopters, and extension tubes. Here’s an overview:

    Coupling Rings:

    A variation on the reverse lens technique is to use two lenses, connected front-to-front using another type of adapter called a coupling ring (below). In this case, one of the lenses is mounted to your camera normally, while the other is in the reverse orientation. The coupling ring features threading on both sides and fits on to the front of both lenses at the same time via the filter threads. Because coupling rings generally feature the same thread diameter on each side, the lenses you use with it will have to have the same filter diameter, or you’ll have to attach a step-up or step-down adapter to one or both lenses.

    Coupling ring

    Coupling Ring: (A) 58mm diameter coupling ring. (B) Two lenses connected via the coupling ring. Either lens can be mounted to the camera.

    Be aware that a heavy lens coupled to a camera-mounted lighter (or less solidly built) lens can result in damage to one or both lenses because of the weight and stress placed on their front ends. Also, your camera-mounted lens will maintain the electronic contact with your camera, but the reverse-coupled lens will not, so you’ll have nearly the same limitations as you would with a single reversed lens.

    Diopters:

    One of the easiest ways to magnify your subject is with a simple filter-like attachment called a diopter (below). You can think of a diopter as a magnifying glass for your lens. They’re very easy to use; just screw one or more diopters onto your lens just like you would with any lens filter. An inexpensive set of diopters (often available for under $ 15) will give you several magnification levels to choose from. You’ll have to move in very close to your subject to achieve focus, and optical quality won’t always be as good as some of the other options presented here, but you might be very pleased with the results. Because they don’t cost much, are easy to use, and take up very little room in your camera bag, you might consider a set. Make sure to purchase diopters that fit the filter thread diameter of the lens you’ll be using them with.

    Diopters

    Diopters: (A) This set of Vivitar diopters was purchased for under $ 15. (B) The “10X Macro” diopter mounts just like a lens filter onto this 18-55mm kit lens.

    Extension Tubes:

    Finally, my favorite solution for macro on a budget; extension tubes. Your lens mounts to one end of an extension tube, while the other end of the tube mounts directly to your camera’s lens mount. Extension tubes effectively increase the focal length of your lens without adding any glass elements that might reduce optical quality. By doing so, your lens will be able to focus on small objects, at very close distances.

    While a good set of extension tubes is going to cost significantly more than a cheap set of diopters, it’s still a bargain compared to an actual macro lens. Some sets feature manufacturer-specific electronic connectors that allow the camera and lens to communicate normally; this allows for aperture and focus control. Plus, your single set of extension tubes will work with all of your lenses; there’s no need for rings or adapters of different sizes for each lens diameter. Extension tubes can be purchased as a set with different lengths for varying degrees of magnification. The tubes can also be combined (stacked) for increased magnification as shown below.

    Ext tubes 1

    Extension Tubes: (A) Three extension tubes (13mm, 21mm, and 31mm) stacked onto an 18-55mm lens. (B) Set of extension tubes. (C) 50mm lens mounted onto all three extension tubes which are mounted onto a DSLR.

    Img 3

    The combination of colors, detail and depth-of-field of this photo, featuring a pollen covered anther of a flower, could have only been captured through macro photography. Extreme close-up and macro give you the opportunity to find amazing beauty in places your eyes might otherwise miss.

    In this article, I’ve only provided a small sampling of the many ways to achieve quality close-up and macro images. I encourage you to explore the possibilities using one or more of these techniques, and to consider learning about other types of macro gear and lenses. The world of close-up and macro just might become your next photography obsession!

    Get more great Macro Photography Tips from Ed by picking his new Close Up and Macro photography eBook with a 53% discount – today only.

    googletag.cmd.push(function() {
    tablet_slots.push( googletag.defineSlot( “/1005424/_dPSv4_tab-all-article-bottom_(300×250)”, [300, 250], “pb-ad-78623” ).addService( googletag.pubads() ) ); } );

    googletag.cmd.push(function() {
    mobile_slots.push( googletag.defineSlot( “/1005424/_dPSv4_mob-all-article-bottom_(300×250)”, [300, 250], “pb-ad-78158” ).addService( googletag.pubads() ) ); } );

    The post Macro Photography on a Budget by Ed Verosky appeared first on Digital Photography School.


    Digital Photography School
  • 78% Off Ed Verosky’s eBook Bundle (or His New Macro Ebook for just $7): Today Only

    As we announced yesterday – today is Day 1 in our 12 Days of Christmas dPS promotion – and we’re kicking things off with a cracker of a deal!

    The Deal

    Today’s deal has two options:

    1. 53% off Ed Verosky’s new Introduction to Close-Up and Macro Photography. Today is is yours for just $ 7.

    OR

    2. Ed’s entire 9 eBook Bundle with Bonus Mini-Guide for a whopping 78% off the regular price. That’s 9 eBooks on everything from Flash Photography, to Portraiture, to the Basics of DSLR and much more. They’re all yours today for just $ 29 (or just $ 3.20 per eBook).

    Shareable day1

    Ed Verosky will be no stranger to many dPS readers as we’ve featured his work as a guest author numerous times. See his latest guest post on Macro Photography here.

    In previous years of our 12 Days of Christmas his eBooks have been among the most popular we’ve ever featured but as he’s just launched his new Macro Photography eBook we invited him to come back.

    Don’t Miss This Deal: It’ll be Gone in Less than 24 Hours

    So whether you’ve got all his other eBooks and just need the new one for the crazy low price of $ 7 (normally $ 15) or whether you’re new to Ed’s work and want to pick up his whole bundle of 9 eBooks for just $ 29 (normally $ 135) – todays deal is for you.

    Need more information on what’s in todays deals? Check them out here.

    But don’t forget – this deal lasts for 24 hours only so grab yours today.

    Screen Shot 2014-12-13 at 1.43.52 pm

    googletag.cmd.push(function() {
    tablet_slots.push( googletag.defineSlot( “/1005424/_dPSv4_tab-all-article-bottom_(300×250)”, [300, 250], “pb-ad-78623” ).addService( googletag.pubads() ) ); } );

    googletag.cmd.push(function() {
    mobile_slots.push( googletag.defineSlot( “/1005424/_dPSv4_mob-all-article-bottom_(300×250)”, [300, 250], “pb-ad-78158” ).addService( googletag.pubads() ) ); } );

    The post 78% Off Ed Verosky’s eBook Bundle (or His New Macro Ebook for just $ 7): Today Only by Darren Rowse appeared first on Digital Photography School.


    Digital Photography School

  • Ich will alles festhalten

    William Gallagher of Martin+Joyce's Butcher shop, the last working premise in this block of Benburb Street, Dublin. Photograph taken in 1992, diptych assembly in 2014

    Ein Beitrag von: David Jazay

    Die Vergangenheit ist ein fremdes Land; sie machen dort alles anders. – L. P. Hartley

    In dieser Vergangheit, nämlich 1982, lebte ich für drei Monate als Austauschschüler in Dublin. Die verarmte und baufällige Innenstadt faszinierte mich an jenem Sonntagmorgen, an dem ich allein die Liffey Quays vom Zentrum stadtauswärts entlangwanderte, eine Strecke von etwa drei Kilometern. Trödler, Möbelgeschäfte, ein paar Pubs, viele der georgianischen Fassaden in leuchtenden Farben gestrichen.

    Es war eine Welt, die mich an amerikanische Krimiserien erinnerte, an Pop, an Freiheit. Kinder hielten mich (mit der Rolleiflex meines Vaters) an, um fotografiert zu werden; ich kam ins Gespräch mit Ladenbesitzern und Obdachlosen.

    Halbverfallene Ruinen luden zum Entdecken ein, lange bevor „Urbexing“ als Begriff existierte und der Herbsthimmel strahlte in einem stählernen Tiefdunkelblau, das selten in Dublin zu sehen ist.

    Fast forward. 1988, ich studiere an der Filmhochschule in München und drehe meinen ersten langen Dokumentarfilm: „Bargaintown – Dublin, Liffey Quays“. Ich will dieses Licht wiederhaben, den strahlend-dunklen Himmel, vor dem die immer verfalleneren Gebäude einen übernatürlichen Glamour erhalten.

    Eine Frau steht vor einem bunten Gebäude.

    Aber das Wetter will nicht, es ist bedeckt. Unser kleines Team aus zwei Mitstudenten wartet – gegen jede Vernunft – auf die letzte Woche, in der wir es tatsächlich schaffen, den Schwarzweißfilm mit den erwünschten grafischen Kontrasten zu drehen.

    Wie schon die Jahre davor fotografiere ich auch wieder. Oft die gleichen Orte, wie sie sich verändern. Ein alter Laden macht zu, ein anderer zieht um oder hängt neue Werbeschilder an die marode Fassade.

    Ich besuche Handwerker und Märkte, nehme neben Veduten, angelehnt an die klassischen Stiche des 18. Jahrhunderts und weitläufigen Panoramen auch Portraits der Bewohner auf: Händler, wie sie hinter ihren Ladentheken posieren und die Fassaden ihrer Läden.

    Ein Junge posiert mit zwei Münzen in North Dublins Linenhall Street, 1988.

    Beides „Schauseiten“, öffentliche Inszenierungen von Handwerkerstolz und Tradition. Es sind harte Zeiten in Dublin, über die Innenstadt liest man fast nur noch, wenn es um eine neue Heroinwelle geht. Mein Respekt für diese Menschen wächst, die sich nicht verdrängen lassen, auch nicht durch die häufigen Brände, mit denen gern mal „heiß entmietet“ wird.

    Meine anfängliche Begeisterung hat sich zu einer Obsession gesteigert, ich will eine umfassende Dokumentation dieses Viertels erstellen – den Plan zu einem Fotobuch hatte ich schon mit 16 Jahren in meinem Tagebuch skizziert.

    Ich will alles festhalten, was ich an Dublin liebe. Immer wieder fahre ich hin, erlebe den Wandel in den Jahren unmittelbar vor dem Celtic Tiger. 1992, ich lebe mittlerweile in Leeds, fotografiere ich die Stadt vorerst zum letzten Mal.

    Die Boomjahre zwischen 1995 und 2000 verändern das Stadtbild Dublins radikal. Ich werde erst 2013 nach Dublin zurückkehren.

    Straßenszenen in Bellana Heathers, Dublin

    Mein Langzeitprojekt „Dublin Before the Tiger“, das ich in diesem Jahr fertigstelle, soll eine neuartige Perspektive auf die Vergangenheit bieten, die wir allzu oft nur aus atmosphärischen Schwarzweißaufnahmen kennen, aus zufällig aufgefundenen Amateuraufnahmen oder aus Postkartenansichten bekannter Gebäude.

    Dafür habe ich systematisch ganze Gebäudeensembles in Einzelaufnahmen erfasst, die sich erst jetzt am Computer zu höchauflösenden Großbildern zusammensetzen lassen. Meine Arbeit handelt von Menschen und ihrer Umgebung, den Spuren, die vergangene Generationen hinterließen, der wechselnden Nutzung urbaner Räume.

    Aktionshuas und Lower Ormond Quay

    Aus hochauflösenden Scans von bis zu zwölf perspektivisch korrigierten Mittelformat-Negativen entstanden Tableaus, die diese unbeachteten und wenig dokumentierten Alltagsorte in großem Detailreichtum zeigen und die selbst mit Großbildtechnik so nicht zu fotografieren gewesen wären.

    Ein Schwarzweißpanorama einer Größe von 2 x 70 Metern zeigt die Liffey Quays in ihrer ganzen innerstädischen Länge. Es soll 2015 in Dublin im öffentlichen Raum installiert werden, nur wenige Meter von den ursprünglichen Aufnahmeorten entfernt.

    Da gerade eine junge Generation viele der vor zehn Jahren noch spärlich bewirtschafteten und verfallenden innerstädtischen Viertel für sich entdeckt, ist das öffentliche Interesse für diesen Blick auf die Stadt groß.

    Für Auflösungs-Zwecke

    Im Frühjahr 2014 veröffentliche ich das erste Mal eine Auswahl von Fotos, bewerbe das Projekt im Internet und besuche Dublin seit 18 Jahren wieder. Mit einem Dubliner Museum planen wir eine Ausstellung für 2015, bei der auch der Dokumentarfilm „Bargaintown“ wieder aufgeführt werden soll.

    Neben dem Einfluss von Bernd und Hilla Bechers großformatiger Dokumentarfotografie war für mich besonders die Arbeit der amerikanischen Fotorealisten prägend: Richard Estes, Ralph Goings, aber vor allem John Baeder (und seine Diner-Serien). So wollte ich immer schon Portraits von Menschen machen und von Häusern.

    Denn diese Gebäude sprechen in ihrer naiv gestalteten, liebevollen Buntheit für sich: Shopfronts, Schildermalerei und Werbetafeln, denen man die US-amerikanischen Vorbilder deutlich ansieht. Sie erzählen vom Leben in einem armen Land, einem traditionellen Auswanderungsland, in einem Europa vor der Globalisierung.


    kwerfeldein – Fotografie Magazin | Fotocommunity

  • Meet the Socialmaticfrom Polaroid


    Extra photos for bloggers: 1, 2, 3

    The camera of the future is here! Well, in the very near future of 2015 it will be. And you can be the first in line to snag one.

    The Socialmatic from Polaroid is half top-of-the-line digital camera, half instant-photo-printer, and half social-sharing machine. That’s too many halves! All this goodness cannot be constrained by math.

    This 14MP camera has a big ol’ touchscreen and Android built in. So you can edit using your favorite apps, print your masterpiece and post it online right then and there.

    There’s even a 2MP selfie-cam on the back! Polaroid really thought of everything.

    Order now and you’ll be first in line when they ship out. It’ll be worth the wait, even if you hand a Socialmatic IOU to your BFF this Xmas.
    Pre-Order the Socialmatic or Learn More
    $ 299 at the Photojojo Shop


    © laurel for Photojojo, 2014. |
    Permalink |
    No comment |
    Add to
    from Polaroid”>del.icio.us

    Post tags:


    Photojojo

  • Camera FV-5 update brings DNG Raw capture to Android

    The latest update for Camera FV-5, a third-party camera app, makes Android the second mobile OS to allow capture of Raw image files. The app has been rewritten to take advantage of the improved camera support under the latest Android version, 5.0 Lollipop, now offering an option to save a DNG file with your JPEG image. Read more

    Articles: Digital Photography Review (dpreview.com)

  • Sony Alpha 77 II firmware update improves AF speed

    Sony has released a firmware update for the SLT-a77 II, its 24MP semi-pro APS-C camera. Firmware 2.00 claims improved autofocus speed in all light conditions, but notably a 2.5x improvement in low light. Support for XAVC-S full HD video recording is also added. Read more

    Articles: Digital Photography Review (dpreview.com)

  • Adobe to acquire Fotolia for $800 million cash

    Adobe has announced plans to acquire stock photography service Fotolia. Once the acquisition is complete, Fotolia will be offered to Adobe users as a ‘single Creative Cloud marketplace experience’, as well as a standalone service to others. Read more

    Articles: Digital Photography Review (dpreview.com)

  • Weekly Photography Challenge – Graffiti Street Art

    In an earlier post I shared a set of some images of street art, also often referred to as graffiti.

    If you live an urban area or any city, than likely you have some of this type of art nearby. Graffiti artists range from ones who just seems to do vandalism, to other who are highly talented and skilled artists.

    Your job in this week’s photograph challenge is to seek out some street art in your area and photograph it in a manner fitting for the artwork. That could mean some grungy post-processing, a funky filter over the lens, or whatever creative idea you can come up with.

    Let’s see a few more examples of graffiti street art:

    Rob Schofield

    By Rob Schofield

    Pedro Ribeiro Simões

    By Pedro Ribeiro Simões

    Brent Pearson

    By Brent Pearson

    Charlón

    By Charlón

    Jason Taellious

    By Jason Taellious

    Share your graffiti street are images here:

    Simply upload your shot into the comment field (look for the little camera icon in the Disqus comments section) and they’ll get embedded for us all to see or if you’d prefer upload them to your favourite photo sharing site and leave the link to them. Show me your best images in this week’s challenge. Sometimes it takes a while for an image to appear so be patient and try not to post the same image twice.

    Need some help getting started? Try these dPS articles:

    • How to add a Grunge Effect to your Portraits using Lightroom (works on any kind of image also)
    • 4 Steps to Photoshop Artistry Using Fine Art Grunge Techniques
    • An Introduction to Urban Exploration
    • Urban Exploration Photography – Urbex
    • Focus on Scott Frederick – Urban Explorer
    Professor Bop

    By Professor Bop

    Brent Pearson

    By Brent Pearson

    Mamasuco ......un Peu Absent

    By mamasuco ……un peu absent

    Keoni Cabral

    By Keoni Cabral

    Badjonni

    By badjonni

    googletag.cmd.push(function() {
    tablet_slots.push( googletag.defineSlot( “/1005424/_dPSv4_tab-all-article-bottom_(300×250)”, [300, 250], “pb-ad-78623” ).addService( googletag.pubads() ) );
    } );

    googletag.cmd.push(function() {
    mobile_slots.push( googletag.defineSlot( “/1005424/_dPSv4_mob-all-article-bottom_(300×250)”, [300, 250], “pb-ad-78158” ).addService( googletag.pubads() ) );
    } );

    The post Weekly Photography Challenge – Graffiti Street Art by Darlene Hildebrandt appeared first on Digital Photography School.


    Digital Photography School

  • Shop in a Swimming Pool: Neglected Space Turned into a Store

    [ By Steph in Architecture & Offices & Commercial. ]

    swimming pool store aoyama 1

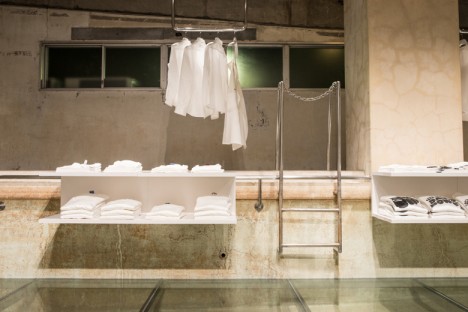
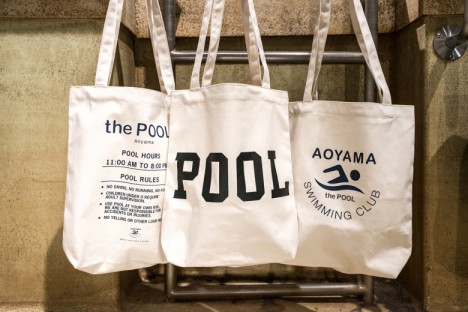
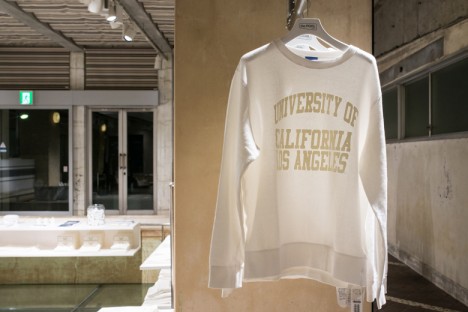
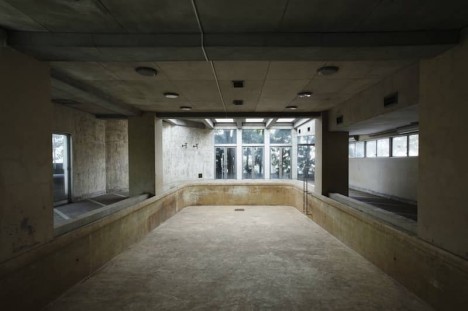
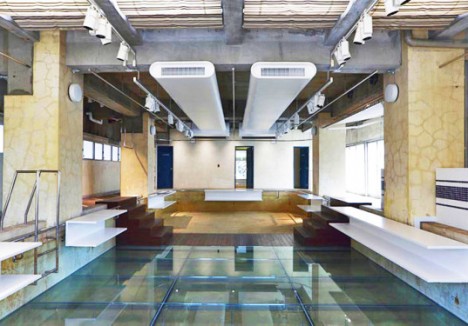
    Until recently, this indoor swimming pool on the vacant ground floor of a 1970s apartment building in Tokyo was just an empty space, dry and disused for years. Now it’s a pop-up shop by Nobuo Araki known as ‘The Pool Aoyama‘ hawking clothing, accessories and swim-themed promotional items. The designers left the pool almost entirely intact, installing a glass floor that mimics the look of water.
    swimming pool aoyama 5

    swimming pool store aoyama 8

    The shell of the abandoned pool and its steel ladder have become key elements of the final design, with the pool walls defining the space of the shop. Wooden stairs on either side of the pool meet to create a sort of bridge across the glass. White shelving units are mounted along the edges to display goods, and U-shaped stainless steel clothing racks hanging from the ceiling echo the look of pool hand rails.

    swimming pool store aoyama 2

    swimming pool store aoyama 3

    The designers were drawn to the soft light, charm and quirkiness of the space, and the shallow depth of the pool lends itself well for adaptation into a showroom. A newly installed glass ceiling floods the room with natural light, and the bathrooms were turned into fitting rooms.

    swimming pool aoyama 4

    swimming pool store aoyama 6

    swimming pool store aoyama 10

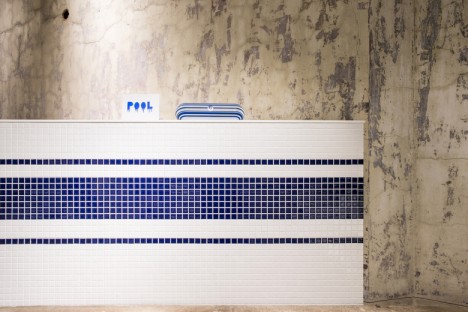
    Entering the shop feels a bit like gaining access to a secret underground space that few are savvy to, as the door is simply marked with an inconspicuous sign reading ‘The Pool.’

    Share on Facebook


    [ By Steph in Architecture & Offices & Commercial. ]

    [ WebUrbanist | Archives | Galleries | Privacy | TOS ]


    WebUrbanist