Month: December 2013

  • Foldio: A foldable, portable lightbox for product photography

    foldio.jpg

    A new product is Kickstarting its way into entry-level product photography. The Foldio lightbox aims to help inexperienced photographers on a budget capture their items in the best light possible. Folding down flat enough to fit in a briefcase, the Foldio easily props up with the use of magnets. Learn more at connect.dpreview.com.

    News: Digital Photography Review (dpreview.com)

  • DPReview Recommends: Interchangeable Lens Cameras for Under $1000

    under1000.jpg

    A few years ago, the idea of a DSLR under $ 1000 was just a distant dream, but these days the financial bar to entry is much lower than it was in the past. And DSLRs aren’t the only game in town anymore either – mirrorless interchangeable lens cameras are maturing quickly, and there are plenty of affordable options on the market. Here’s our list of the top five interchangeable lens cameras that we’d currently recommend for under $ 1000 – including a kit zoom lens.

    News: Digital Photography Review (dpreview.com)

  • Swimming with the Nikon 1 AW1

    PB010640.jpg

    One of the most interesting cameras of the year is the Nikon 1 AW1, which is the first rugged mirrorless interchangeable lens camera. The AW1 offers the same 1″ sensor as Nikon’s other 1 System cameras, but adds the ability to go underwater or survive a 2 meter drop. We spent some time with the AW1 in Hawaii, both above and under the sea, to test if it was up to task. Find out if it passed

    News: Digital Photography Review (dpreview.com)

  • Modern Gingerbread Museums: Realistic Edible Architecture

    [ By Steph in Art & Sculpture & Craft. ]

    Modern Gingerbread Museums 1

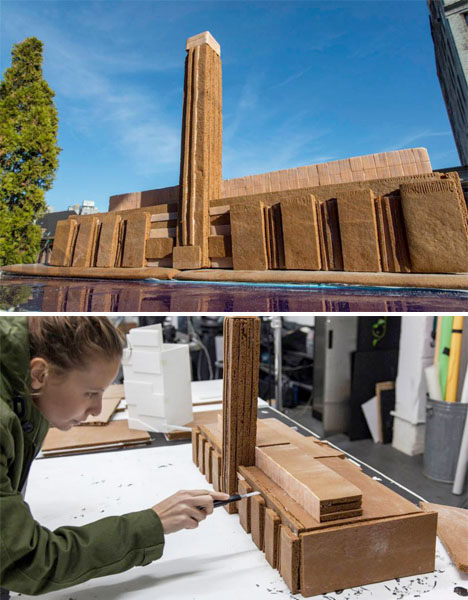
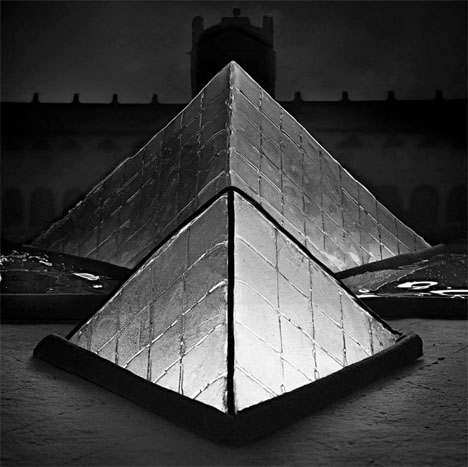
    The pyramids of the Louvre shine in hard candy, the Guggenheim gleams in solid sugar, and gingerbread makes for convincing concrete on Zaha Hadid’s Maxxi museum in this series of edible modern architecture. Photographed in black and white and illuminated from within, the collection of gingerbread museums by photographer Henry Hargreaves and food artist Caitlin Levin looks strikingly like the real deal.

    Modern Gingerbread Museums 2

    The landmark museums depicted also include the Tate Modern, the Museum Aan de Stroom, Mexico City’s Museo Soumaya and the Karuizawa Museum in Nagano, the latter of which is constructed almost entirely of Hershey’s chocolate.

    Modern Gingerbread Museums 3

    Modern Gingerbread Museums 4

    Bubble gum, candy balls, taffy, lollipop sticks, icing and licorice help create the illusion of bricks, textured stone, glazed walls and other architectural elements for the scale models.

    Modern Gingerbread Museums 5

    The pieces go on display today at Dylan’s Candy Bar in Miami for Art Basel 2013.

    Share on Facebook


    [ By Steph in Art & Sculpture & Craft. ]

    [ WebUrbanist | Archives | Galleries | Privacy | TOS ]


    WebUrbanist

  • DPReview is hiring! Senior UX Designer wanted!

    DPRlogo.png

    DPReview is hiring! We’re looking for a Senior UX designer to shape the next generation of content and community tools for our large and passionate audience of photographers and camera enthusiasts. Candidates will have the rare ability to influence the product at all levels and to create a new user experience for a top 1000 website. Click through for more details. 

    News: Digital Photography Review (dpreview.com)

  • Five Photography Bad Habits to Quit Today

    We can find ourselves pretty wrapped up in photography bad habits or behaviours long before we realize that maybe we should be trying to find another way. Sometimes, you don’t even see them and, if you’re lucky, you’ll have a friend who can kindly point them out. So let’s take a look today and see if I can be the friend who says, “ahem…you’ve got toilet paper on your shoe.”

    Five Photography Bad Habits to Quit Today

    1. Hesitation

    A habit you may find yourself in is hesitation. Hesitating too long in a situation can prevent you from getting that perfect shot. You may be hesitating for a couple different reasons:

    Hesitating can mean the difference between catching or missing moments of emotion.

    Hesitating can mean the difference between catching or missing moments of emotion.

    Fear of what people think

    You may be concerned about what people think. Are you feeling the urge to take a shot of your crying child? Those are completely valid moments that need to be captured from time to time. Or perhaps it’s a street shot of a perfect stranger and you hesitate just a split-second too long because you’re feeling vulnerable and on-stage.

    One of the best street photography series I’ve ever seen is the Zack Arias #de_VICE series. Even just now looking for that link and scanning over the shots again…they give me goosebumps. Zack made the images with a Fuji x100 camera which has a 23mm fixed lens (this is equivalent to 35mm on a cropped sensor camera). So you know he had to get really super, uncomfortably close, to those strangers to get those shots. He didn’t hesitate. Uncomfortable moments are over in a split second, but these images last forever, have the potential to change lives and get conversations going which would never otherwise have happened. It’s because of Zack’s series that I think twice about pulling out my device at inappropriate times (like eating out with my family). Further reading: 7 steps to get over the fear of street photography and Photographers: Embrace the Awkward Moment

    Not being ready

    Not having your camera ready can make you hesitate. You may not have it up and ready in shooting position (Jasmine Star talks about that in this video) or you may not have your settings right. Set your camera for the situation so you’re ready to shoot, but if your surroundings are constantly changing, then you have a couple options.

    1. You can shoot in auto or a semi-manual mode. I personally love aperture mode. This means you set the aperture and the camera meters the light for your shutter speed. While shooting in full manual is always preferable, doing what you need in order to get your shot is paramount, so do what it takes in terms of your settings to prevent hesitation.
    2. Shooting in RAW also helps you have a wider range of options in post-production so you can recover poorly exposed shots.

    Further reading: The Introvert Photographer (in this post I talk about my use of semi manual shooting modes).

    2. ISO too low

    A pretty nasty habit to kick can be using too low of an ISO setting. Many photographers say they did such-and-such because they “couldn’t take their ISO above 800″. The fear of using a high enough ISO can be pretty strong and lead you to get blurry shots from a shutter speed that is too slow, or even prevent you from trying to get a shot altogether. A few reasons you want to kick this habit today:

    • You may be surprised at how high you can actually push your camera. If you have a good ‘fast’ lens (one that handles a wide aperture), make every use you can of its capabilities. Then take your ISO as high as you need to get the shot.
    • Post editing software these days can minimize the noise resulting from extremely high ISO amazingly well.
    • Grain/noise isn’t totally bad. For some photographers, it’s actually desirable. Many of us actually add more grain. So if you have a high ISO shot that would look beautiful edited in B&W, try that out and visualize all that noise as beautiful grain.

    Now, there’s this thing out there about how sensors in full frame cameras produce less noise. It was this idea that stopped me from taking my cropped sensor camera to the high ISO I often needed, because it wasn’t a full frame camera. But when I did get a full frame camera, I did some cropped sensor vs full frame ISO comparisons and was really surprised to find that there wasn’t a difference substantial enough to have warranted all my worries.

    ISO 3200 and still nice and smooth

    ISO 3200 and still nice and smooth

    3. Pixel peeping

    A great subject to talk about next is the bad habit of pixel peeping, because it may be one of the reasons you’re afraid of shooting at high ISO numbers. If you blow your shots up to 100% in your computer and cry, “Oh, the noise! THE NOISE!” then you may be a bonafide pixel peeper. Unless you’re printing those shots to fit on the side of a bus, there’s no need to analyze every single pixel. This is what I suggest for recovering pixel peepers:

    • Stop zooming to 100% (1:1 in Lightroom). Fill your screen when editing, but resist the urge to inspect at 100%. Keep your finished product in mind and stick to that as your frame of reference.
    • Find an image that makes you have a pixel peeping meltdown and do a test print. Print it quite large (like 16×24) and when it comes in, you may be pleasantly surprised at how great it looks.
    • If you’re taking shots for the web, then you have even more of a reason to chill out. Many unprintable shots can still look great online.

    One of the reasons you may be blowing up your images in the first place is that this is what camera manufacturers do to show you how great their next model is and why you should buy it. Before embarking on heavy duty shooting of my own, I was shopping for gear and every time I looked at camera specs or reviews, they were filled with zoomed in portions of images. These images are used to say “look how awesome your next camera could be!” so naturally, we may feel that this is also the right way to be judging our photography. But please…quit this habit, because those images have nothing to do with photography and everything to do with cameras.

    4. Luck shooting

    Yes, I’m looking at you, Mr. and Mrs. Spray-and-Pray. We’ve all been guilty of switching off our brains and shooting like crazy, just hoping for something ‘good’ to be in there when we get home to our computers. Yes, you can physically create images this way. The same way you can plop a paint covered baby on a canvas and allow them to create ‘art’. The baby doesn’t know how he’s doing it and won’t be able to do it again. But hey, he did and that’s all that matters, right? Not exactly.

    There are a few problems with this habit and so here’s why you want quit it today:

    • You won’t know how you got those shots
    • …so you won’t be able to recreate them. This isn’t as large a problem in personal shooting as it will be if you’re trying to charge for your services or start a business. Your clients will be depending on your ability to give them what you gave everyone else.
    • Part of your journey as an artist is harnessing something from within and bringing this out into the world. Photography can be one of the ways this happens, but unless what you have inside of you is to let out chaos, shooting like this isn’t a way to create.
    • When you spray and pray you can’t recreate the process. I’ve said this already (it’s that important) but another reason this isn’t good is that it isn’t honest. Harnessing your camera as a tool (as a painter does a paint brush) give you a powerful edge as an artist. You should be controlling your camera, not the other way around.

    This habit isn’t too hard to kick once you acknowledge that you have it. Further reading: 5 ways to stop being a luck photographer and start taking pictures on purpose.

    5. Editing everything

    We can all be guilty of taking too many shots. That will change as you get further along in your journey. But one thing you can change today is the compulsion to actually edit every single shot. Here’s what you can do to kick that habit:

    • Cull your images. I do this in Lightroom. I keep my left finger on the ‘x’ key and my right on the ‘>’ key. I go along and hit ‘x’ for any shot that isn’t a keeper, then ‘>’ to move to the next image. I have far more of these rejects than I do keepers. After you’ve chosen them all, sort to show the rejects only, do a select all (control/command+A) and hit “delete”. This will give you the option to just remove your images from LR or delete them completely. I delete completely to save space.
    • After you cull, go through and do it again.
    • And then do it one more time. Now, you’ll have a good set of keepers to edit.
    • Trust me. Once you’ve gotten rid of those shots, they will no longer exist in your mind. When you focus on your keepers, the other ones no longer have a hold on you. I can say that there isn’t one single image I’ve culled away that I can remember. There are no regrets. I’m not mourning any lost images.

    Of all the habits listed here, this one may be the hardest to quit. Deleting images always hurts a little. I get a twinge in my chest when I do it, but I know from experience that it’s completely necessary to give you a concentrated body of amazing work. You can do it!

    Summary and comments

    Think you can lick these five photography bad habits?  What other bad habits have you hooked? Surely, there are more than just five!

    How do you banish them forever? Share your tips in the comments below.

    Watch for a follow up article next week, with some GOOD habits that you will want to start doing right away.

    Post originally from: Digital Photography Tips.

    Check out our more Photography Tips at Photography Tips for Beginners, Portrait Photography Tips and Wedding Photography Tips.

    Five Photography Bad Habits to Quit Today

    The post Five Photography Bad Habits to Quit Today by Elizabeth Halford appeared first on Digital Photography School.


    Digital Photography School

  • 4. Türchen: Stilpirat

    vier_650

    Steffen Böttcher ist den meisten sicher als Stilpirat bekannt. Der Tausendsassa ist nicht nur ein großartiger Fotograf, sondern auch ein guter Schreiber, was er immer wieder auf seinem Blog beweist.

    Als er im Frühjahr 2013 zu einer Reise nach Vietnam aufbrach, brachte er von dort nicht nur großartige Bilder mit, sondern auch wunderbare Geschichten. Im Bildband „Logbuch Vietnam“ sind diese versammelt und nehmen den Leser mit auf ein Abenteuer in dieses ferne Land.

    Logbuch Vietnam

    Locker und klug schreibt er von seinen glücklichen, aber auch schmerzenden Erlebnissen. Einige Fotos der Reise könnt Ihr auch online sehen.

    Für unseren Adventskalender hat Steffen gleich zwei Exemplare seines Buches ins Türchen gelegt. Wer bei unserer Verlosung kein Glück hat und diesen kleinen Schatz besitzen möchte, der kann ihn im Shop von Steffen für 49 € erwerben.

    Für diesen Preis bekommt man ein wunderbares Hardcoverbuch mit satten 184 Seiten im Querformat A4. Für den kleinen Geldbeutel gibt es das Buch auch als eBook für nur 25 €, auf dem sich zusätzlich Ton- und Videodokumente der Vietnam-Reise sowie diverse Bildbesprechungen befinden.

    Um einen der beiden Bildbände zu gewinnen, schreibe einen Kommentar unter bürgerlichem Namen und gültiger E-Mail-Adresse bis heute um 24 Uhr. Danach verlosen wir sie per Zufallsgenerator unter allen Kommentatoren. Die genauen Gewinnspielregeln findest Du hier. Viel Glück!


    kwerfeldein – Fotografie Magazin

  • Creative Ways to use Keywords in Lightroom 5

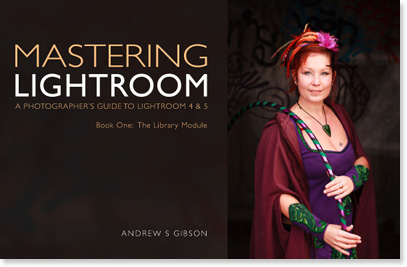
    Andrew S. Gibson is the author of Mastering Lightroom Book One: The Library Module, on offer now at Snapndeals for a limited time.
    Keywords in Lightroom 5

    One of the things about any software, such as Lightroom 5 that does a lot of things, is that many photographers tend to use only a small number of the available features. For example, I’ve never bothered to use the keywords feature much in Lightroom. I’ve always seen it as a waste of time. It takes time to add keywords to images and I don’t really need keywords to search for images – I know where to find them already.

    But since I started writing about Lightroom, and reading what other photographers have written about it, I’ve realised that there are a lot of good reasons to use keywords, and that used wisely they can actually save time.

    Like many things, it’s a matter of balance. The more keywords you use the harder it is to keep track of them all and the reasons that you added them, and to maintain a consistent approach (exception: if you shoot stock you will want to use lots of keywords as they are an essential part of your work).

    If you use just a few keywords, it’s easy to remember which ones you use and why.

    Let’s look at a couple of examples of creative ways to use keywords in Lightroom 5. Of course, if you have any suggestions, please leave them in the comments. I’m curious to see how you use keywords.

    Keep track of the kids

    I really like this one (thanks to Robert Taylor for the suggestion, he left in the comments on Using Lightroom Collections to Improve your Workflow). If you have children, add their name as a keyword when you import the images that you take of them. Then you can create a series of Smart Collections that searches for images with that keyword and organises them by year.

    Create a yearbook
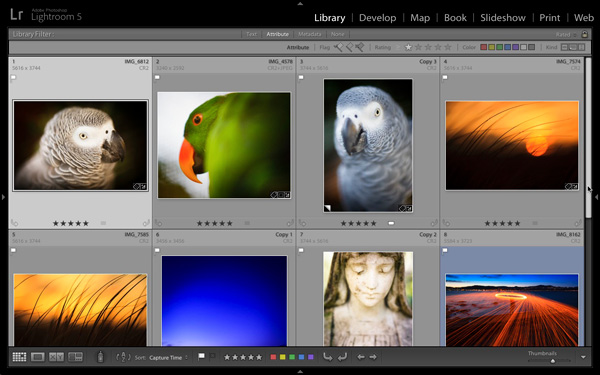
    Keywords in Lightroom 5

    Back before digital photography became the norm, a photographer’s best work ended up as prints or as slides. Today, the finished article is often a digital image stored on a hard drive or uploaded to a website. One of my current projects is organising my best images from every year since I’ve owned a digital camera, and picking the best to create a yearbook. The ultimate aim is to use Blurb to create a book creating my favourite photos taken each year, over the last eight years, and to carry this forward throughout my life. Not just for me, but for posterity. These books will hopefully make great gifts for younger family members.

    Method: add the keyword “yearbook” to suitable images, then create Collections to house those images.

    Taking it further: This could be applied to all sorts of ideas. For example, I could use it to create a book (or simply a collection) of my favourite images taken here in New Zealand. All I need to do is add the keywords “New Zealand” and “book” to candidate images, then perform a search.

    Using keywords

    Excited? I hope so, because the more you delve into Lightroom’s Library module ,the more you’ll find ways to simplify how you organise your images. Keywords are no exception. Now let’s look at the different ways you can actually apply keywords to your images in Lightroom. There are several options:
    Keywords in Lightroom 5

    Adding keywords when you import images

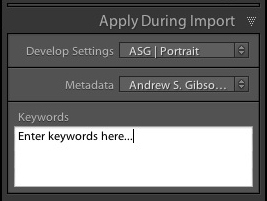
    This method works well if you tend to import images in groups, according to subject matter. For example, if you take some portraits one day, some landscapes the next, and import them all in one go you can’t really add subject specific keywords. But if you import the images from both shoots separately you can add keywords at the import stage (for example, the name of the model to the portraits, and the name of the location to the landscapes). You can do this in the Apply During Import panel on the right-hand side of the Import window.

    Use the painter tool

    Keywords in Lightroom 5

    The Painter tool is an easy way to add keywords to images while you are in Grid View. Click on the Painter icon in the Toolbar (it looks like a spray paint can – press the ‘T’ key to reveal the Toolbar if you don’t see it) and select ‘Keywords’ from the drop-down menu. Type in the keywords you want to add (in the box just to the right). Now all you have to do is click on a photo thumbnail to add those keywords to that image. It’s a very fast way of working in Grid View.

    Use the Keywording panel
    Keywords in Lightroom 5

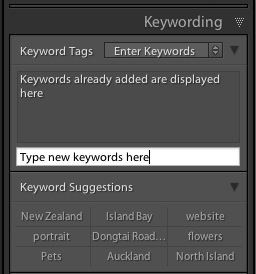
    The Keywording panel is located in the right-hand panel in the Library module. To add keywords, select the image (or a group of images) and type the new keywords into where it says ‘Click here to add keywords’. Any keywords already given to the image are displayed above. You can also add keywords by clicking on any that appear under Keyword Suggestions (populated by keywords you have used in the past).

    Use Keyword Sets

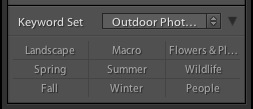
    Keyword Sets are found at the bottom of the Keywording panel. They are there to help you organise your keywords, and overcome the problem caused by the fact that it becomes more difficult to maintain consistency the more you use keywords.
    Keywords in Lightroom 5

    For example, I live in a suburb of Wellington called Island Bay. If I take photos here then I should keyword them with “Island Bay”. But what if one day I use the keyword “Wellington” instead? Or even forget to keyword them completely? Then the power of keywording is diminished, because those photos won’t be picked up in any search based on the keywords “Island Bay”.

    The solution is to use a Keyword Set. For instance, I could create a Keyword Set called Island Bay, and add Keywords such as Island Bay, Wellington, New Zealand, landscape, portrait. Then, when it comes to adding keywords, I can select the Island Bay keyword set first, then click on the appropriate additional keywords. This ensures consistency by ensuring that I select my keywords from a pre-determined pool.

    There are several Keyword Sets included with Lightroom, with titles such as Outdoor Photography, Portrait Photography and Wedding Photography. You can access them via the drop-down menu at the top of the Keyword Set section of the Keywording panel. This menu also gives you the options to create your own Keyword Sets.
    Keywords in Lightroom 5

    Keyword List

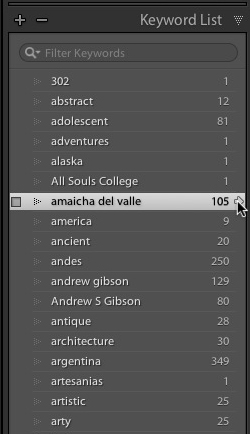
    The Keyword List panel lists all the keywords that you have applied to images in your Lightroom Catalog. If you want to see all the photos tagged with a specific keyword together, hover over the keyword and click on the white arrow that appears on the right-hand side. Lightroom brings them together in Grid View. This is one way of searching images by keyword.

    Finding keyworded images

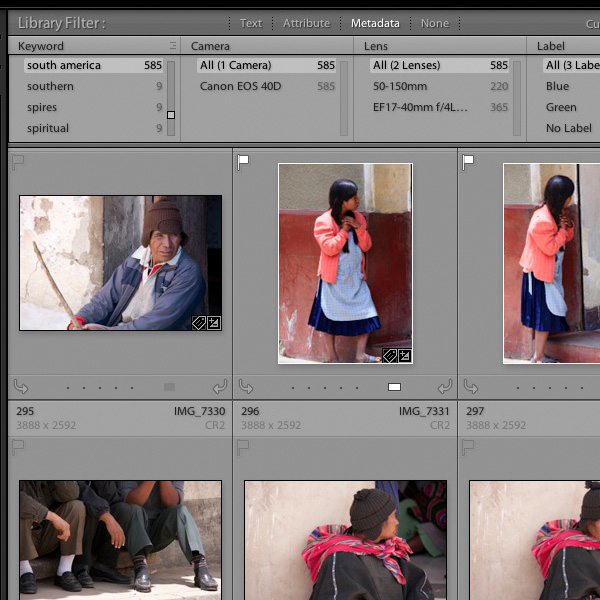
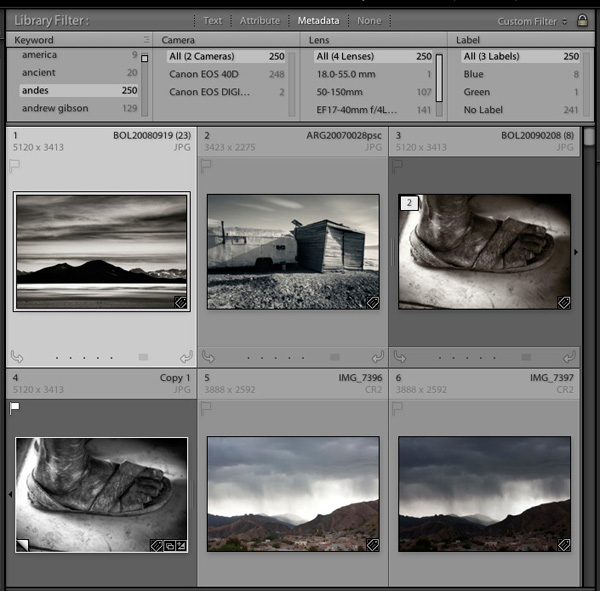
    The easiest way to find keyworded images is to go the Filter Bar (press the ‘\’ key if you don’t see it) in Grid View and click on the Metadata label. Select “Keyword” from the drop-down menu in the first column. Lightroom displays a list of keywords underneath. Click on a keyword – Lightroom gathers all images tagged with that keyword together. You can limit the search to specific Folders or Collections by selecting them in the left-hand panels (or select “All Photographs” to search your entire catalog).
    Keywords in Lightroom 5

    Using Smart Collections

    Keywords in Lightroom 5

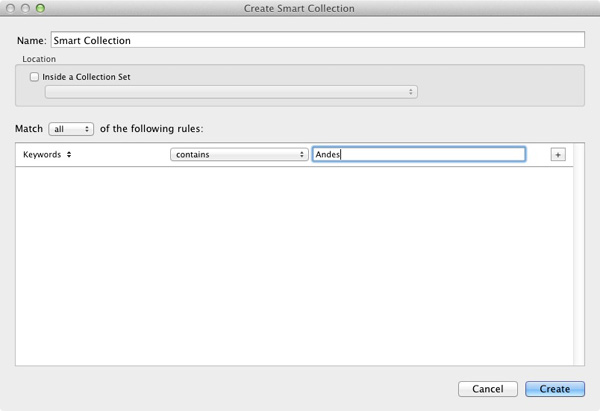
    Finally, you can use Smart Collections to gather together images tagged with specific keywords automatically. Go to the Collections panel, click on the ‘+’ icon in the top-right corner and select the Create Smart Collection option. Set Match to All, select ‘Other Metadata > Keywords’ from the drop-down menu in the first column and then type the required keyword in the blank space provided. The example shows a very simple Smart Collection, you can make it as complex as you like by adding extra rules (remember to give your Smart Collection a name, in the example above “Andes” would be applicable).

    Additional learning – Mastering Lightroom eBook
    Keywords in Lightroom 5

    My latest ebook Mastering Lightroom Book One: The Library Module is a complete guide to using Lightroom’s Library module to import, organise and search your photo files. You’ll learn how to tame your growing photo collection using Collections and Collection Sets, and how to save time so you can spend more time in the Develop module processing your photos. It’s available now for a special price at Snapndeals for a limited period.

    Post originally from: Digital Photography Tips.

    Check out our more Photography Tips at Photography Tips for Beginners, Portrait Photography Tips and Wedding Photography Tips.

    Creative Ways to use Keywords in Lightroom 5

    The post Creative Ways to use Keywords in Lightroom 5 by Andrew Gibson appeared first on Digital Photography School.


    Digital Photography School

  • 4. Dezember 2013

    Ein Beitrag von: Manfred g. g. Schröder

    alpen, analog, schwarzweiß, nebel, schnee, ausblick


    kwerfeldein – Fotografie Magazin

  • DPReview Gear of the Year Part 4: Sigma 18-35mm F1.8 DC HSM

    Sigma18-35.png

    A lot of equipment passes through our Seattle and London offices, everything from high-end cameras to inexpensive accessories. A lot of it gets reviewed, but we can’t cover everything. In this series of short articles, DPReview staff will be highlighting their personal standout products of the year. In part 4, Richard Butler discusses the Sigma 18-35mm F1.8 DC HSM and what it means for APS-C shooters.

    News: Digital Photography Review (dpreview.com)