Month: December 2013

  • Review: The ONA Bowery Bag for Everyday Photography

    Ona Bowery Camera Bag Review

    The Bowery by ONA Bags

    These days, no piece of photography equipment excites me more than a good camera bag.

    Or even better, a practical, light, good-looking camera bag.

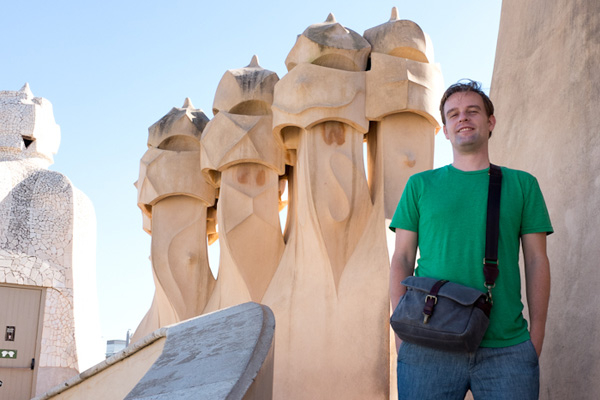
    I’ve been a fan of ONA bags for over a year now and the Bowery is one of my favourites.  It’s small and made for traveling light.  I carry it around almost daily.

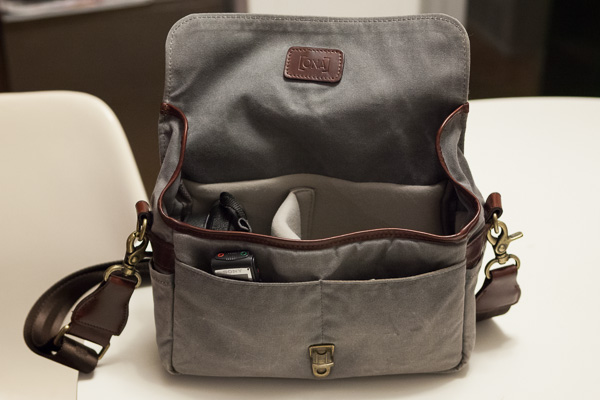
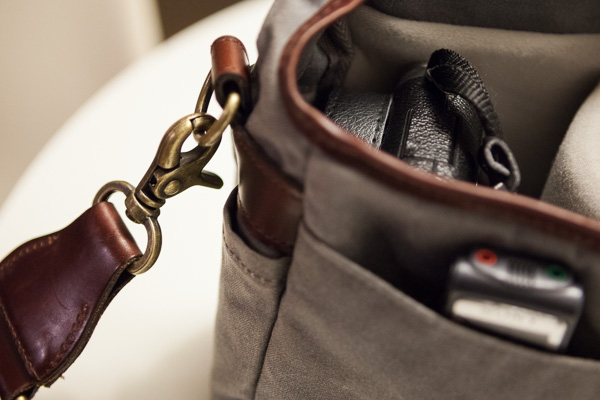
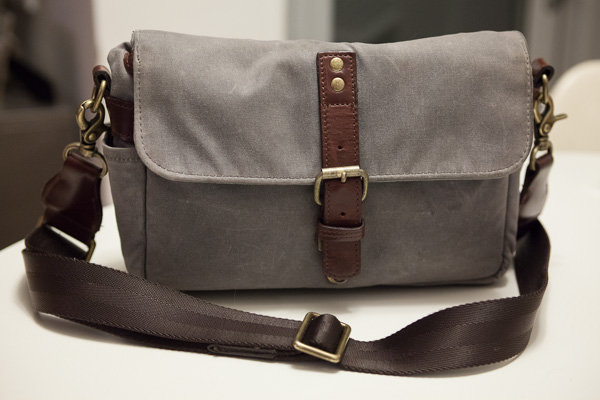
    Well padded and well made, the bag has water resistant, waxed canvas (and believe me, I’ve tested the water-resistant part out), leather details, and beautiful brass hardware.

    Ona Bowery Camera Bag Review

    Perfect for sightseeing, everyday use, and street photography

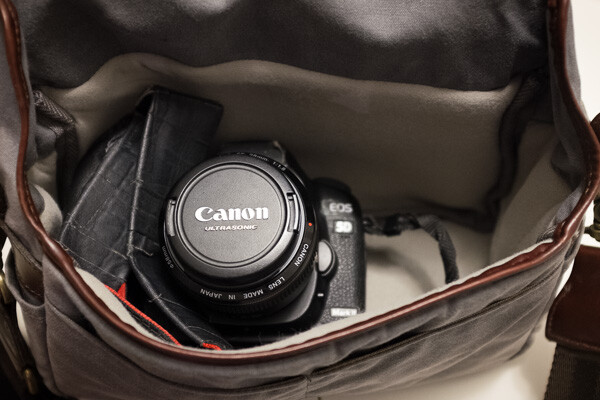
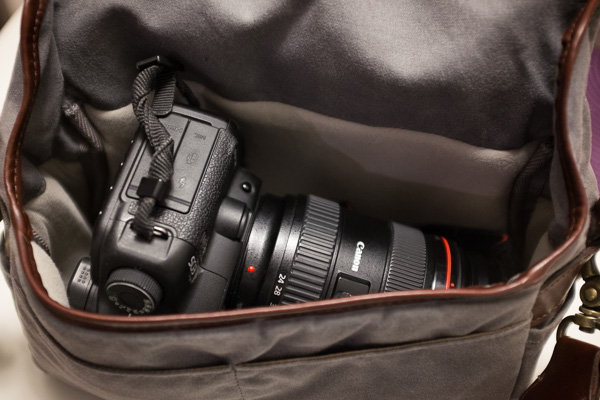
    The bag is made for the smaller sized camera, such as a rangefinder, mirror-less, micro four thirds, or a point-and-shoot.  I use it primarily with my Fuji X100s, however, it fits my Canon 5D Mark II and monster 24-70mm lens, and I use it somewhat frequently with the 5D Mark II and light 28mm prime lens.  Remove the small divider and it can fit an iPad Mini.

    ONA also describes the ONA Bowery Bag as an insert, which makes a lot of sense.  I recently took a trip where I flattened the bag into my luggage and used a larger camera bag to carry my equipment from place to place.  When I arrived, I popped the X100s and some batteries into the Bowery each day and it was a freeing experience for photography.

    A freeing experience for travel.

    A freeing experience for travel

    At $ 119, the bag is not necessarily cheap, but it is more than a good deal for the quality and functionality.  And when you factor in the wear and tear saved on your joints, it could save you a lot down the road.

    If your significant other lugs around too much equipment, then the ONA Bowery Bag is the perfect holiday gift to convince them to lighten the load.

    Ona Bowery Camera Bag Review, Interior Shot

    Fuji X100s, Digital Recorder, and three extra batteries. Insert can be removed to fit an iPad Mini

    Padded, waxed canvas, leather details, and brass clasps.

    Padded, waxed canvas, leather details, and brass clasps

    Fits a Canon 5D Mark II with 28mm lens.

    Fits a Canon 5D Mark II with 28mm lens

    If you are ambitious - 5D Mark II and 24-70mm EF lens.

    If you’re ambitious – Canon 5D Mark II and 24-70mm EF lens

    Post originally from: Digital Photography Tips.

    Check out our more Photography Tips at Photography Tips for Beginners, Portrait Photography Tips and Wedding Photography Tips.

    Review: The ONA Bowery Bag for Everyday Photography

    The post Review: The ONA Bowery Bag for Everyday Photography by James Maher appeared first on Digital Photography School.


    Digital Photography School

  • 100 Cubic Meters: Split-Level Urban Micro-Condo in Madrid

    [ By WebUrbanist in Design & Fixtures & Interiors. ]

    small vertical apartment

    Good home design is not just about a perfect product but about process and context, as illustrated in this case through diagrams, videos and photos of how to make a small space work on multiple levels in Madris, Spain (both physically and proverbially).

    small condo kitchen entry

    small unit dimension sections

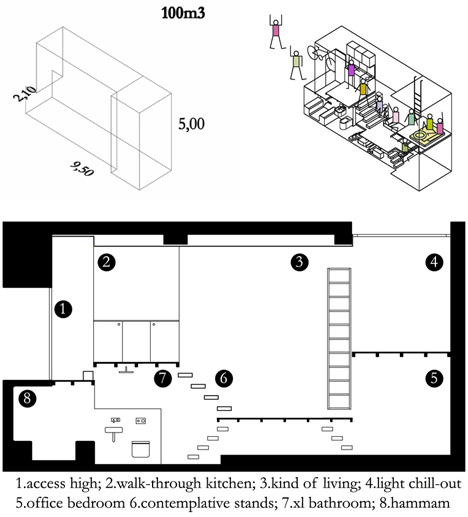
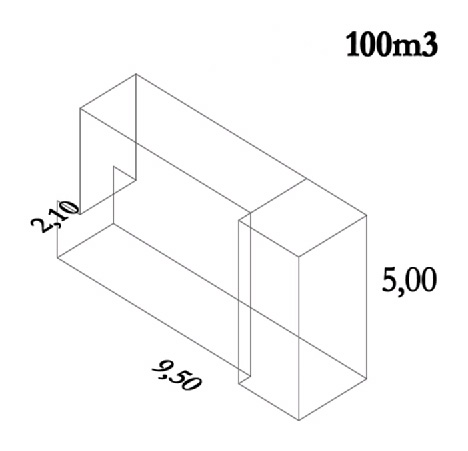
    MYCC (images by  Elena Almagro) managed to fit in a full bathroom, living room, kitchen, bedroom and office into this curiously-shaped urban shelter, narrow yet also relatively deep and tall (approximately: 2 meters wide, 10 meters long and 5 meters high).

    small design axon drawing

    A minimal combination of stairs and ladders connect the different platforms within the resulting studio, set out of the way and rendered partially transparent (staircase sans risers) or set off to the side (ladder along the wall) to help leave open lines of sight between various rooms.

    small unit split level

    small condo office bedroom

    A large skylight directly illuminates the work space, and, indirectly, the rest of the unit as well. The lack of horizontal space limited opportunities for plan-level complexity, but opened up spatial options in section as the dimensional diagram outline shows below.

    split micro condo levels

    A quirky animated video takes viewers on a short tour of the conceptual design process, starting with the entry level then splitting off to show how the various floors, nooks and crannies took shape.

    Share on Facebook


    [ By WebUrbanist in Design & Fixtures & Interiors. ]

    [ WebUrbanist | Archives | Galleries | Privacy | TOS ]


    WebUrbanist

  • Samyang announces 10mm F2.8 manual focus wide-angle prime

    Samyang_10mm_news-2.png

    Samyang has announced the 10mm F2.8 ED AS NCS SC, a wide-angle manual focus prime for APS-C format cameras. It’s the company’s first lens to feature nano crystal coating for increased light transmission and reduced internal reflections. With a 15mm equivalent angle of view (20mm equivalent on Micro Four Thirds), it’ll be made in mounts for all current SLR and mirrorless systems. It’ll go on sale at the end of January 2014 at an RRP of £469.99 for Nikon AE mount, or £429.99 for all other versions.

    News: Digital Photography Review (dpreview.com)

  • 5. Türchen: go2know

    5. Türchen

    Die Fototouren von go2know sind Euch vielleicht schon aus dem Adventskalender des Vorjahres bekannt, aber weil uns das Konzept so gut gefällt und es natürlich auch neue Orte zu entdecken gibt, freuen wir uns sehr, sie ein zweites Mal für unsere Verlosung gewonnen zu haben.

    Go2know bietet Fototouren in Berlin und Brandenburg zu den sogenannten „Lost Places“, zu denen man als Privatperson nur mit viel Geld eine Fotoerlaubnis erhält. Dabei achten sie auf eine begrenzte Teilnehmerzahl und dass sich die Fotografen mit genügend Zeit auch frei innerhalb der Location bewegen können. Gleichzeitig gibt es auch genügend Tipps und Hinweise für besonders gute Fotomotive, Informationen zur Historie sowie Gebäudegrundrisse zur Orientierung.

    FDJ-Hochschule © Go2know

    Ganz neu dabei sind zum Beispiel die Kinderheilstätten Hohenlychen in der Uckermark. Sie bestehen aus drei Gebäudekomplexen mit altem Schwimmbad und verbreiten bereits von außen einen wunderbar melancholischen Charme. Die Location ist zum Teil noch bewohnt und streng bewacht und kann nur noch Dank go2know betreten werden.

    Auch sehr bekannte Orte, wie die Beelitzer Heilstätten oder den verlassenen Vergnügungspark Spreepark im Plänterwald finden sich auf der Liste der Fototouren wieder.

    Hohenlychen © Go2know

    Die Preise sind dabei günstig mit etwa 40 Euro pro Tour. Für Auszubildende und Studenten gibt es sogar noch einen Rabatt.

    Mit dem Gutschein von 120 €, der heute in diesem Türchen liegt, könntet Ihr also drei Touren besuchen, Freunde auf eine Tour einladen oder auch einfach ein Modell mit zur Tour nehmen. Egal wie Ihr Euch entscheidet: Wir wünschen Euch viel Spaß beim Entdecken und natürlich gutes Licht.

    FDJ-Hochschule © Go2know

    Um den Gutschein zu gewinnen, schreibe einen Kommentar unter bürgerlichem Namen und gültiger E-Mail-Adresse bis heute um 24 Uhr. Danach verlosen wir ihn per Zufallsgenerator unter allen Kommentatoren. Die genauen Gewinnspielregeln findest Du hier. Viel Glück!


    kwerfeldein – Fotografie Magazin

  • 15 Gift Ideas For The Photographer In Your Life Or Yourself

    The post 15 Gift Ideas For The Photographer In Your Life Or Yourself appeared first on JMG-Galleries – Landscape, Nature & Travel Photography.


    Related Stories

    • The Old Guard – Bristlecone Pine Forest, California
    • The Old Guard – Bristlecone Pine Forest, California – Enclosure
    • Save 25% on my eBook and Star Trail Webinar Now Through Dec. 2nd
    Feed Ads by FeedBlitz
    powered by ad choices


    JMG-Galleries

  • Half Invisible: Deserted Desert Cabin Remixed with Mirrors

    [ By WebUrbanist in Art & Installation & Sound. ]

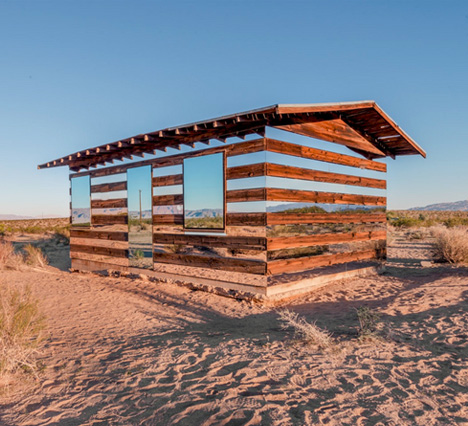
    see through cabin

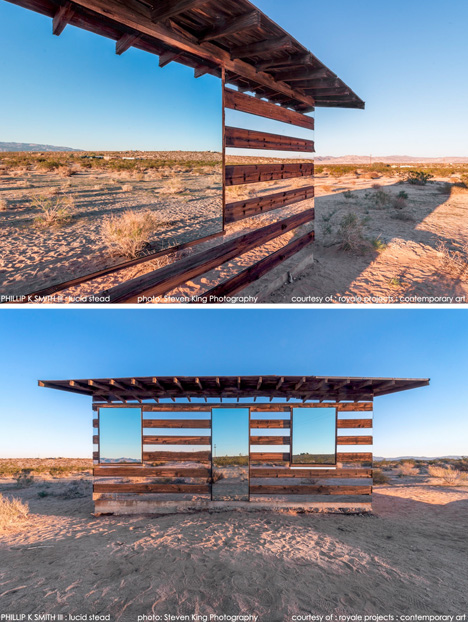
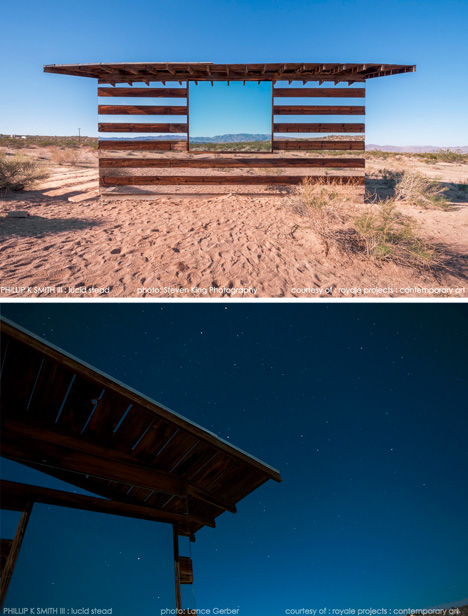
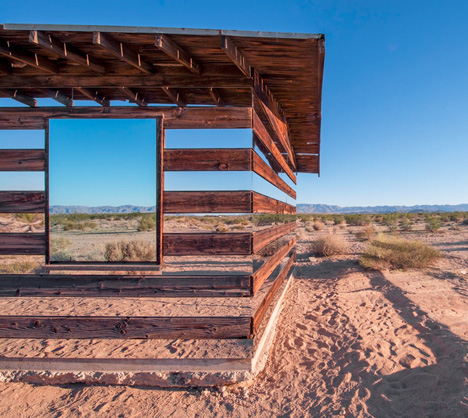
    Unlike a mirage on the horizon, this quaint little abode is entirely real, even if it seems to half-disappear through alternating wood and (seemingly) see-through slats.

    see through

    A project by Phillip K Smith III (images by Stephen King Photography and Lance Gerber), Lucid Stead modifies an existing abandoned home shape that is straightforward and familiar.

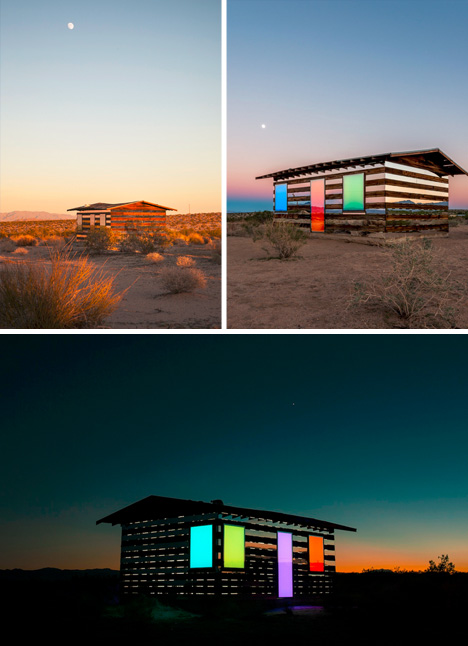
    see through night light

    Through its materials, however, the artist makes the building interact with the landscape in mind-bending ways, reflecting its surroundings via long horizontal siding and framed rectangular (faux) windows that slowly light up at night. The effect is a strange partial vanishing of the structure.

    see through house art

    Of the work, the artist writes: “Lucid Stead is about tapping into the quiet and the pace of change of the desert. When you slow down and align yourself with the desert, the project begins to unfold before you. It reveals that it is about light and shadow, reflected light, projected light, and change.”

    see through day stars

    From the portfolio page: “Composed of mirror, LED lighting, custom built electronic equipment and Arduino programming amalgamated with a preexisting structure, this architectural intervention, at first, seems alien in context to the bleak landscape.  In daylight the 70 year old homesteader shack, that serves as the armature of the piece, reflects and refracts the surrounding terrain like a mirage or an hallucination. As the sun tucks behind the mountains, slowly shifting, geometric color fields emerge until they hover in the desolate darkness.” 

    Share on Facebook


    [ By WebUrbanist in Art & Installation & Sound. ]

    [ WebUrbanist | Archives | Galleries | Privacy | TOS ]


    WebUrbanist

  • 5 Tips for Successful HDR Photos

    How do you create successful HDR photos? It’s a question that I’ve gotten from time to time, and before we get started with this post I do want to make clear that there’s no question that HDR photography is one of those never ending battle grounds in the photography world. Much like the Windows vs Apple battle of the PC world, HDR vs non-HDR is a battle that continues to stir the pot.

    Five tips for successful HDR photos – for those that wish to do it!

    While it’s always fun to add fuel to the fire from time to time, let’s put the argument of whether or not it’s a valid form of photography aside for a minute, and simply focus on trying to get those who wish to learn a new technique on the right track from the start.

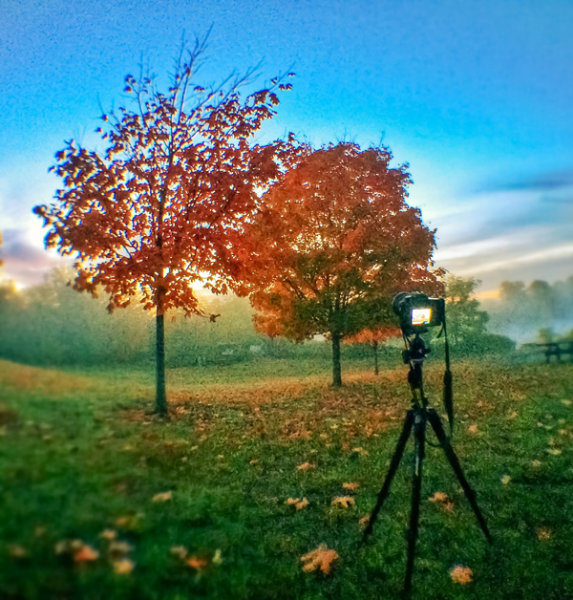
    Tip #1 – use a tripod
    HDR Photography Tip - Use a Tripod

    Using a tripod to photograph HDR brackets helps keep the frames from shifting between shots. (This image was taken with my iPhone using an Olloclip fisheye lens and processed using Snapseed)

    This should be a no brainer and I really didn’t even want to put it into this article, but alas, here it is.

    A tripod will not only allow you to stabilize each individual image (some of which may be fairly long shutter speeds), but in order to capture the full dynamic range of the scene you will need to take multiple exposures with your camera and it’s vital that these frames line up perfectly. A tripod will ensure that each frame you capture is identical to the previous one, with the only exception being the exposure times.

    Tip #2 – don’t tone map a single exposure and call it HDR

    I see this all the time, and while I understand it’s a great way to get more out of a single exposure, it’s not really an HDR image. Yes you can create an underexposed, neutral, and over exposed image in Lightroom from the same RAW file, and then merge those three images into one HDR photo, but it’s really not the same as capturing individual images.

    Why you ask? Simple. When you capture one exposure at a given set of settings (Exposure Values) on the exposure triangle you are recording data within that given range. No matter what you do to that file in post production the data captured by the camera doesn’t change – you’re only changing the way in which that data is output into an image.

    When you capture three or more images at different exposures (EV), then those three images are all going to have different levels of data from which you can pull; allowing for a truly high dynamic range photograph. The more images you capture the more data you’ll have at your disposal. That being said there’s the law of diminishing returns, which basically means that there comes a point when adding more data to the pile doesn’t help improve the photograph.

    Tip #3 – know when you need it and when you don’t
    hdr-photography-tips-01

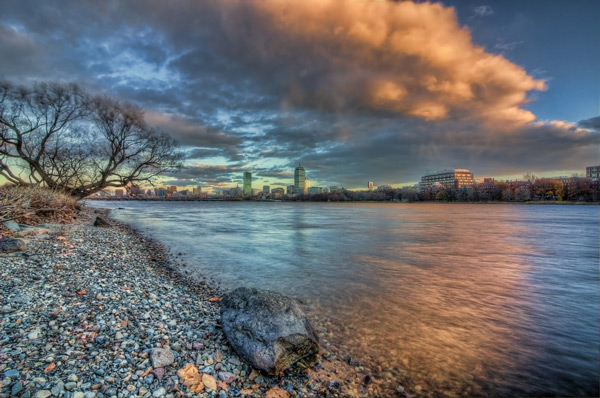
    Use HDR only when you need it (IE: when the light range of your scene is too large to capture in a single exposure)

    Some people use HDR for every photograph they take. In fact it’s step two on this list of 10 Steps Every HDR Photographer Goes Through. You do not have to do this.

    HDR stands for ‘high dynamic range’ so if you’re photographing a scene where the lighting is fairly even from shadows to highlights (the scene fits nicely on the histogram, with nothing clipped at either end of the scale) you don’t need to do HDR. Your camera is capable of pulling out enough detail from the highlights and shadows to cover the scene in its entirety with one exposure. It’s also probably not worth it to try capturing moving objects or people in HDR as they typically don’t look right when they get tonemapped.

    So when should you use HDR?

    Use it during sunrise or sunset, especially when you are photographing into the sun. Use it to photograph during the middle of the day. Use it to photograph architecture or man-made objects, as HDR has a way of really bringing out the detail of craftsmanship.

    Tip #4 – invest in a good tone mapping program

    Once you capture your bracketed set of photos you’re going to want to put them together in the best way possible. There are a ton of great programs out there to do this, but I recommend using either HDR Soft’s Photomatix Pro or Nik Software’s HDR Efex Pro. There are free alternatives out there, but I find that they don’t do as good of a job at tone mapping. Remember the tone mapping process is done algorithmically so the more powerful the software’s algorithms, the better the end results.

    Tip #5 – control the urge to go big
    HDR Tip - Avoid Going Too Big

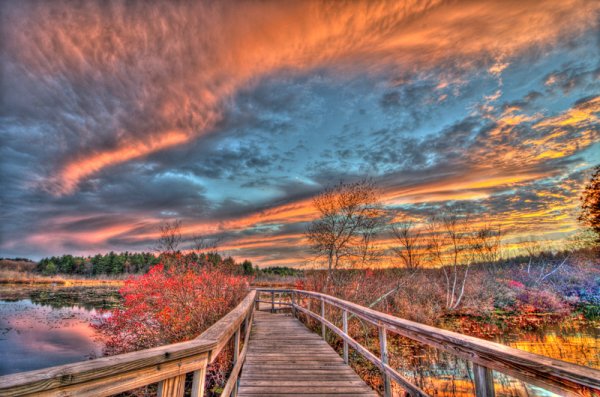
    Avoid the urge to create surrealistic photos (unless this is truly the style you wish to go in).

    This is where HDR really becomes a touchy subject. Some people say that it’s their style to create over the top, surrealistic style, HDR photography and other’s say that they are destroying the world of photography by creating these highly saturated and oddly lit photographs.

    It’s easy to get carried away with tone mapping your images, but if your goal is to recreate what you saw, the best way to do this is to remember to tone it down a bit before you press that process button. It’s also a good idea to watch out for haloing which takes place typically along tree lines (as you see in the photo above above the dark trees on the left side of the image).
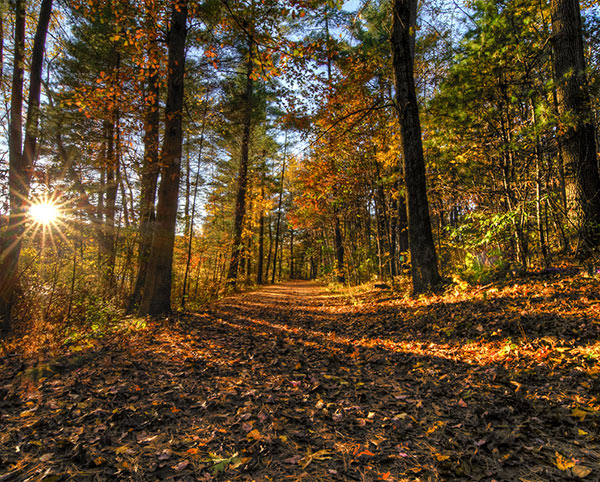
    hdr-photography-tips-02

    Final word

    While this is not an exhaustive list of HDR tips, it is a good start to get you on the right track to capture your first high dynamic range photos. That said, if you’re a bit more experienced with HDR and are looking to take your HDR photography to the next level, check out this post Creating HDR Panoramic Photographs written by one of my buddies on his HDR workflow process for creating massive HDR Panoramic images.

    Do you have some tips to add to the list? Leave one in the comments below!

    Post originally from: Digital Photography Tips.

    Check out our more Photography Tips at Photography Tips for Beginners, Portrait Photography Tips and Wedding Photography Tips.

    5 Tips for Successful HDR Photos

    The post 5 Tips for Successful HDR Photos by John Davenport appeared first on Digital Photography School.


    Digital Photography School
  • Photojojo’s Holiday Gift Guide 2013, Part 2!

    We’ve got gifts galore: A hyper-intelligent camera that takes photos all on its own, deliciously cool looking lens caps, #jewelry for the Instagram lover in your life and more.
    With 7 ALL NEW items, it’s our brand newest gift guide yet!

    Plus, we’ve just introduced a new shipping option, that we think your nose is really going to like…


    The Autographer is a super intelligent wearable camera with 6 sensors (GPS, compass, accelerometer, thermometer, color sensor and motion detector). It logs your life as you live it. Then uploads the photos and data straight to your iPhone.

    In the Shop for $ 399


    A juicy burger or delish donut protect your lens from scratches and add a bit of fun to your favorite gear. *Warning* Snack caps are not guaranteed to protect your lenses from being licked. In fact, they just might invite it. Yummy. Yummy.

    In the Shop for $ 15
     

    The latest and greatest Instax Mini Camera straight from Japan gives you more creative control than ever before. It has six shooting modes including long and double exposure that no other Instax cam has!
    In the Shop for $ 225


    The dreamy look that Diana lenses have been bringing to 120mm film is now available for your DSLR. This glass version of the iconic Diana lens gives you all the dreaminess higher contrast.
    In the Shop for $ 60


    This remote let’s you take photos on your Android or iPhone from up to 30 feet away! Perfect for outstretched-arm free selfies and starting/stopping videos without wiggling your phone.

    In the Shop for $ 40


    Bring back the family slide show! The Projecteo Gift Box comes with one mini projector and a gift card to order a wheel of slides from your (or a pal’s) very own Instagram pix.

    In the Shop for $ 35 


    You’ve hashtagged all of your photos. What next? Your friends! Give them a laser-cut acrylic #selfie, #nofilter or Like icon necklace.

    In the Shop for $ 25


    If you love something you pin it, right? So pin your love for Photoshop, Instagram and Pinterest onto your sweater, hat, bag or friend.

    In the Shop for $ 12


    Tiny gifts starting at $ 6They’ll fit well in your budget and in a sock!
     

    Phone-o-Chrome Filter

    $ 15 ? BUY

    Instant Camera iPhone Decal

    $ 6 ? BUY

    The iPhone Wrist Strap

    $ 35 ? BUY

    Smartphone Spy Lens

    $ 20 ? BUY

    Super Fisheye Smartphone Lens

    $ 25 ? BUY


    Polarizing Smartphone Lens

    $ 25 ? BUY


    © laurel for Photojojo, 2013. |
    Permalink |
    No comment |
    Add to
    del.icio.us

    Post tags:


    Photojojo

  • Straßenfotografie in Japan

    Ein Beitrag von: Shin Noguchi

    Es war das Buch „A L’est De Magnum 1945-1990“ von Magnum Fotos. Ich sah es in meiner Jugend und es machte mich zum ersten Mal auf die Straßenfotografie aufmerksam.

    © Shin Noguchi

    Bevor ich das Buch kannte, dachte ich, dass Kunst und Dokumentation das jeweilige Gegenteil voneinander wären.

    Als ich jedoch diese Bilder sah, überraschte mich, dass die Fotografen meisterhaft ihre künstlerische Meinung als Straßenfotografen äußerten, indem sie Elemente wie Komposition und den richtigen Augenblick sowie Licht und Schatten dafür benutzten.

    © Shin Noguchi

    Und das, während sie über unser alltägliches Leben mit seinen vielen überbordenden Emotionen wie Freude und Leid reflektierten. Ich selbst versuche heute so oft wie möglich, Farben als Hauptelement zu benutzen, um die Straße zu zeigen, wie sie ist.

    © Shin Noguchi

    Meine Bilder erklären oberflächlich, dass dies unser Leben und nicht irgendein spezieller Ort ist. Damit möchte ich Folgendes erreichen:

    Und zwar, dass Betrachter meiner Bilder die Schönheit der lebenden Menschen, der Elemente wie Licht und Schatten und die Verbindung all dieser Komponenten sehen und zu schätzen lernen. Durch verschiedene Ebenen im Bild kann das erreicht werden.

    © Shin Noguchi

    Ich vermute, dass es unter Straßenenfotografen weltweit üblich ist, umherzuwandern und ein besonderes Licht, Schatten, spannende Momente und fotogene Charaktäre zu suchen.

    Ich habe jedoch andere Prioritäten. Ich baue in meine Aufnahmen die Merkmale ein, durch die Japan als Nation und Zusammenschluss vieler Charaktäre gesehenen werden kann.

    © Shin Noguchi

    Und obwohl es sich hier um besonders spezielle Komponenten handelt, die in anderen Ländern in dieser Form nicht vorhanden sind, ist es gefährlich, den Charme eines Bildes nur aufgrund der subjektiven Perspektive zu beurteilen.

    Wenn wir zu viel von uns selbst ausdrücken, können wir den Betrachtern aus anderen Ländern diese Eigenheiten nicht vermitteln. Was zur Folge hat, dass ihre Anziehungskraft in den Bildern (und die faszinierenden Verbindungen der Elemente) aus globaler Perspektive nicht verstanden wird.

    © Shin Noguchi

    Durch das Aufnehmen der Straßenszenen vom objektiven und zugleich subjektiven Standpunkt kann ich Fotografien anfertigen, die leichter zu interpretieren sind. Das ist mir wichtig. 

    Dieser Artikel wurde von Martin Gommel aus dem Englischen ins Deutsche übersetzt.


    kwerfeldein – Fotografie Magazin