Category: Uncategorized

  • Summer Paddling near Fort Collins and Loveland

    Horsetooth Reservoir

    Horsetooth Reservoir is very busy as usual in the middle of summer and boating season. Fortunately, it is possible at least to avoid using boat ramps to launch a kayak or canoe. I am using a newly reopened Sunrise Area. You can now drive down to a swimming beach and park close to water.

    Numerous fishing reservoir provide opportunity for a more calm paddling. I often paddle Boedecker and Lonetree Reservoir southwest from Loveland (below Carter Lake). Pictures below were taken on two recent trips to the Lonetree Reservoir. Water level is still high. There is a lot of water vegetation in coves, but not yet too dense to stop paddling. I usually like to squeeze around trees and log jams to explore the supplying ditch all the way to the main road. The bridge has a pretty low clearance at this water level.

    Lonetree Reservoir
    Lonetree Reservoir
    Lonetree Reservoir
    Lonetree Reservoir

    ch_client = “mmuliasz”;
    ch_type = “mpu”;
    ch_width = 550;
    ch_height = 120;
    ch_color_title = “3c78a7”;
    ch_color_site_link = “3c78a7″;
    ch_non_contextual = 4;
    ch_vertical =”premium”;
    ch_sid = “Chitika Premium”;
    var ch_queries = new Array( );
    var ch_selected=Math.floor((Math.random()*ch_queries.length));
    if ( ch_selected < ch_queries.length ) { ch_query = ch_queries[ch_selected]; }

    Related posts:
    Fisheye Lens Perspective for Paddling?
    Springtime Paddling on the Horsetooth Reservoir
    Icy Horsetooth Reservoir – Opening Lake Paddling Season
    Paddling Horsetooth Reservoir in Winter Scenery
    Early Morning Shot of the Horsetooth Reservoir and Paddling Links
    160 Lakes and Reservoirs of Colorado
    Horsetooth Reservoir map
    WSBS Thunderbolt-X Kayak on the Lonetree Reservoir
    Paddling through Forest and Irrigation Ditches


    paddling with a camera

  • Through the Layers Looking Glass with Dave Hill

    LA-based photographer Dave Hill is known for lighting and shooting each segment of his photos separately, then later combining them with mad Photoshop skills to create the final image. That also gives him the ability to do something you have probably never seen before — expand the layers after-the-fact for a 3-D trip through his 2-D images with the video above.

    Created for the launch of the redesign of his website, this video is made from images in his “Adventure Girl” series. If you follow Dave you’ll definitely want to head over for more, including new images and plenty of behind-the-scenes footage from his shoots.

    As you’ll see in the BTS vids, Dave lights the crap out of everything. How he keeps track of the lighting continuity is completely beyond me.

    For those interested in knowing how someone goes from shooting local skateboarders in Nashville to doing this kinda of stuff, check out this interview from 2008.

    -30-


    Strobist

  • DIY Photography Ring Flash Review

    DIY Ring flash + ambient light sources. Flash at 1/32 power, 1/160sec F7.1 ISO320, 51mm.

    The assembled DIY Ring Flash with my Canon 580EX and Cybersync radio trigger.

    Ring flashes are famous from the fashion world, where the classical make-up ad often uses the light frequently. By surrounding the lens with the light source, a cool ’shadowless’ light gives a unique look. But even when not used as the primary source of light, a ring flash can be an excellent on-axis fill, as championed by David Hobby of strobist.com.

    The only problem for the hobbyist photographer is the price. Ring flash units cost hundreds or thousands of dollars. In recent years a string of new products let the photographer use their speedlights with a ring flash modifier to achieve the same effect for $ 200-300 – I own an Orbis ring flash myself. Even so, $ 200 is a big investment for a student, or a photographer who doesn’t know if they’ll get enough use out of a ring flash.

    DIY Ring Flash

    Enter DIY Photography with their flat-pack, self-assembly ring flash for $ 24.95. You might think that a ring flash modifier at that price can’t deliver on its promises, or must sacrifice too much. Having used it in a few shoots now, I can tell you it’s the real deal.

    Though the DIYP Ring Flash is not without it’s problems and compromises, it is an amazing piece of equipment that can deliver exactly what it promises with only the necessary compromises. In short, every photographer who can get their speedlight off their camera should have one of these!

    The Compromises

    I’m going to be thorough and list every problem I could find with the DIYP Ring Flash, and there were a few. If you’re expecting to get a $ 200 product for $ 25 you’ll be disappointed. But if you’re aware of the following, then you can judge for yourself if the minimal cost is worth it.

    • Must be assembled. This is to keep the costs as low as possible and allow for easy shipping, but it only takes about 15 minutes, and isn’t too challenging.
    • Though greatly exaggerated in this photo with an extreme close-up, the unevenness of the catchlight is apparent. This typically is difficult to see, as in the photo at top.

    • Not very durable. The ring flash is made of a combination of plastic sheets and cardboard, and naturally isn’t going to last forever. Transport could be difficult as it could easily get crushed. It is also vulnerable to water damage. Of course this isn’t a problem if you’re only shooting in a studio.
    • Uneven catchlights. The light distribution can be a bit uneven, and may vary slightly from shot to shot. This is only apparent in reflections, such as catchlights in the eye. Illumination across the frame of your photo will appear even.
    • It’s physically quite large. It’s not practical to make a self-assembled modifier curved, so the corners protrude a bit, and might make it tricky to get very close for macro photos for which ring flashes are often preferred.
    • Less efficient. When compared with my Orbis ring flash ($ 200) using the same flash (Canon 580EX) and settings, the DIYP Ring Flash delivers approximately 1.3 stops less light.
    • Cooler WB. Also when compared to my Orbis, the DIYP Ring Flash delivers a significantly cooler colour balance (5350K vs 6450K). Green/Magenta WB was the same.
    • With identical settings on the camera and flash power, the DIY Ring Flash (left) exposes approx 1.3 stops under the Orbis (right), and has a 1100K cooler white balance.

    • Can’t accept very large flash heads. The opening into which the speedlight is inserted is small, and larger flashes such as my 580EX require the corners of the opening to be cut to make room. My LP160 wouldn’t fit without cutting the cardboard further than I personally felt comfortable (but does into the Orbis). Good luck getting a Vivitar 285HV into this, or the Orbis.
    • The flash isn’t held firmly. The cardboard opening doesn’t provide much grip on the flash, so it’s a little tricky to hold. An optional metal flash bracket is available ($ 9.95) for this purpose, but I found it to be a little bulky and preferred to handle it without. Also, the provided rubber bands to attach the flash to the bracket are a rather bright (and I think unattractive) pale blue.

    The Advantages

    • It’s a ring flash! For $ 25! It’s hard to argue with the price, and the results are absolutely what you would expect when you use a ring flash.
    • It’s light. Due to the flat pack low cost nature of the ring flash, it’s very light. Shooting for more than 15 minutes hand-holding my Orbis can be very tiring and painful. The DIYP Ring Flash weighs only grams.
    • It works. Despite the lower efficiency and cooler WB, the resulting light is fantastic. If you are aware of these problems you can adapt and easily correct in post processing. Functionally, when corrected for, the light from the $ 25 ring flash is equal to that from my $ 200 Orbis.

    When the differences are corrected, the results of the DIY Ring Flash (right) compare very well to the Orbis (left) which is eight times the price. The only apparent difference is the greater contribution of ambient light to the scene shot with the DIY ring flash, resulting from opening the aperture to compensate for the lower power. Alternatively the flash power could be increased to match the Orbis completely.

    Get One!

    I find a ring flash an invaluable tool in my lighting gear. Follow the link above to see how David Hobby uses ring flash, and you’ll open up a whole new realm of lighting possibilities. But do I recommend the DIYP Ring Flash as THE ring flash you should get? Well I won’t be giving up my Orbis. I use ring flash often enough that I need the durability of the tough plastic construction that comes with a more expensive solution.

    However, unless you have a better ring flash, or are certain you need one, get this. If you are curious about ring flashes and want to try one out before you decide to get a more expensive model, get this. If you want to play with ring flash lighting but don’t have the budget for a more expensive model, get this. When you can get honest-to-goodness ring flash light for $ 25, why wouldn’t you?

    You can purchase the DIY Photography Ring Flash here: http://www.diy-lighting-kits.com/ring-flash/

    DIY Photography also stock a number of other products that will be of interest to photographers on a budget. Their product page can be found here.


    Digital Photography School

  • OnOne Software Reduce Prices by up to 61% [Summer Sale]

    One of the most popular ranges of post production tools among our community is that produced by onOne Software who produce a number of excellent individual tools for overcoming a variety of common problems in digital photography as well as their overall Perfect Photo Suite (a collection of 7 tools).

    onOne Summer Savings!.jpeg

    Late last week I received an email from the onOne team who let me know that they’ve just drastically reduced prices across their range for a special Summer promotion. The reductions are significant (up to 61%) and include:

    • Perfect Photo Suite 5.5 – $ 299.95 (normally $ 499.95)
    • Perfect Resize 7 Standard Edition – $ 99.95 (normally $ 159.95)
    • PhotoTools 2.6 Professional Edition – $ 99.95 (normally $ 259.95)
    • PhotoFrame 4.6 Professional Edition – $ 99.95 (normally $ 259.95)
    • FocalPoint 2 – $ 99.95 (normally $ 159.95)
    • Mask Pro 4 – $ 99.95 (normally $ 159.95)
    • PhotoTune 3 – $ 99.95 (normally $ 159.95)

    OnOne’s tools can be used from within Photoshop, Lightroom, Aperture and in most cases as stand alone applications.

    Take a further 10% off:

    As a special promotion to dPS readers we’ve also got a coupon code that will get you a further 10% discount on any purchase. To get the discount simply use the code:

    DPSDISCOUNT

    It’s a great time to buy – so if you’re looking for some good great post production tools check out onOne Software today.

    Post from: Digital Photography School’s Photography Tips. Check out our resources on Portrait Photography Tips, Travel Photography Tips and Understanding Digital Cameras.

    NYIP_DPschool468x60.jpeg

    OnOne Software Reduce Prices by up to 61% [Summer Sale]


    Digital Photography School

  • Pint-Sized Power to Go: Paul Buff Hits One Out of the Park


    Three months into heavy use of the Paul Buff Vagabond Mini Lithium, I have found the battery I want to marry.

    Short version: If you shoot AlienBees, White Lightning or Einstein, this pack is a no-brainer. But it is small enough — and powerful enough — to see much more varied use in our house.
    __________

    I’ve owned and used both earlier generations of Paul Buff Vagabond batteries, to mixed result. The v.1 was serviceable, but the required grounding cable made it pretty inconvenient.

    The v.2 model, of which I owned two, was more user friendly. But one of the two packs was chronically unreliable, even after repair. And they were all really heavy.

    They actually worked pretty well as a stand-in for a sand bag, which is a back-handed compliment for any battery system. No surprise, as seal lead acid (SLA) batteries are all about the pounds.

    So when the new Vagabond Mini Lithium came out, I was both intrigued and suspicious. Okay, it’s tiny and lightweight. But what about capacity? What about reliability?

    Then I read Rob Galbraith’s comprehensive road test post (which sounded almost too-good-to-be-true) and had to see for myself.

    That it powers AB’s and Einsteins well should come as no surprise. That’s what it was designed to do. But it also will run a Profoto Acute pack, which is designed to suck a lot more current than Buff’s models.

    I have a pair of (battery-powered) Profoto B600’s, but they only drive one head each. The Vagabond Mini allows me to add an AC Acute pack to that mix to added multiple outdoor heads whenever I need.

    It will drive an Acute 1200 — if you are very patient. It needs about 10 secs to recycle if you are using it at full power, so not real practical at 1200ws. But my main outdoor pack has grown to be a Profoto Acute 600e generator, which I got used, along with two heads, extension cables and soft box rings for $ 900.

    (I know, right? A dentist listed it on eBay with a buy-it-now price of $ 900. Heh.)

    Anyway, the 600 pack can drive up to three more heads. It usually gets used symmetrically, driving a pair of rim lights. The Vagabond works great for that, allowing me to use the B600s for key and fill.

    The number of pops this little battery gives me is amazing. Rob has a full grid of results on his post (definitely read it of you are considering the Mini) and my results mesh with his.

    Like Rob, we have found that the Mini is convenient enough to where it gets used for far more than big strobes. I learned long ago that the limiting factor when you are traveling and trying to get online is more often AC power than ‘net signal. So the Mini travels with me. It’ll greatly improve your battery time for a laptop, for instance, or recharge your camera batts.

    The kids use it as a near bottomless pit of power for iPods when on the road — and also to power the pay-as-you-go Virgin Atlantic Mi-Fi we all use to connect to the ‘net. (Ben pretty much monopolized it on the last trip.)

    Even though it does not have the memory issues of an SLA battery, I keep it topped off at home in case of a power outage. It’ll easily drive a couple household lamps with CFL bulbs.

    The lithium-based battery is rated as safe for air travel, but I have not tried to run the TSA gauntlet with it yet. Hopefully, they won’t be jerks about it. On the plane, a Mini and a charged laptop would give you tons of time. And once arrived, and an Einstein and a Vagabond Mini is a lightweight match made in heaven.

    If you shoot AB/Einstein/WL, I cannot recommend this pack enough. It’s tiny, lightweight and runs like a horse. Reliability has reportedly been great, too. In fact, if I shot primarily with Paul Buff lights I would probably get one for each flash head. That would give you the faster recycles and more capacity. And at $ 239.95 ea., still would not break the bank.
    __________

    More info:

    :: Paul Buff Vagabond Mini :: (product page)
    :: Rob Galbraith’s Comprehensive Tests::


    Strobist

  • TGIF: Here’s Your Weird Al BTS Video

    I love Weird Al Yankovic. I also love behind-the-scenes photo shoot videos. So how can I not love a Weird Al Yankovic BTS vid?

    The video, after the jump, features music form the album. It’s Weird Al parodying Lady Gaga Weird Al parodying Lady Gaga ripping off Madonna…
    __________

    L.A.-based photographer Robyn Von Swank shoots a lot of promotional materials for film, TV, etc. She shot Weird Al knowing the photos would be cut out and dropped into a composite. So along with the obligatory Big Octa key and soft ring fill, she edge-lit Weird Al & co. with a couple of strip lights for nice, crisp edges. Profoto lights all around, with nice big flags to keep those strip lights from screwing up her contrast.

    Weird Al, of course, needs no introduction. And you can sample the parody-ladened Alpocalypse, here.

    (via @aard)


    Strobist

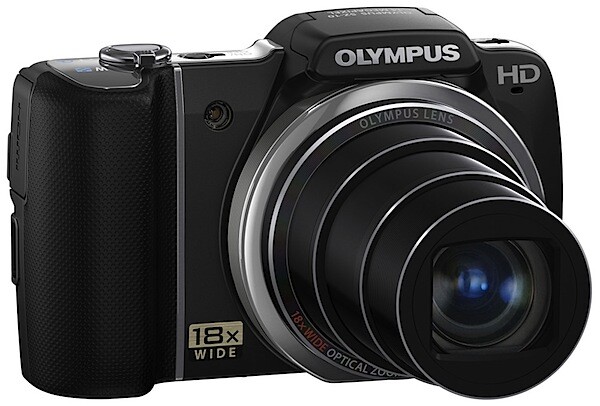
  • Olympus SZ-10 Review

    And on they come! Compact maxi zoom digicams.
    Olympus SZ-10.jpg

    This one has an 18x optical zoom, equating to a 28-504mm lens as 35 SLR equivalent, As I’ve said before, try to fit out a DSLR with an 18x zoom and you hit a brick wall!

    Olympus SZ-10-Top.jpg

    The SZ-10 is nicely configured and slips easily into any pocket, thanks to its 38mm slimness. It’s only when the power button is tapped that the lens emerges, nearly doubling the body depth.

    Olympus-sx-10-back.jpg

    Olympus SZ-10 Features

    The maximum aperture is only f3.1, shrinking to f4.4 when the tele is fully extended, so you may need to dial in a slightly higher than normal ISO setting for out and about photography. Or lug a tripod with you to use a lower ISO and benefit from less noise in the image.

    Kids' ride.JPG

    The CCD captures 14 megapixels of picture data and creates a maximum image size of 4288×3216 pixels, or 36×27cm as a print. Olympus continues to disappoint in the movie department with a maximum video res of 1280×720 pixels — not Full HD — but then many people are quite happy with this maximum figure, as their videos often go no further than a YouTube posting.

    Menu.jpg

    The 7.6cm LCD screen swallows most of the camera’s rear surface, leaving room only for a four way ‘wheel controller’, the movie record button and an extra couple of buttons. A nice touch is a textured pad at the top corner to rest your thumb while shooting.

    The big news is a collection of New Magic Filters to glamourise your stills or movie work. These include Pop Art, Pin Hole, Punk, Fish-Eye lens, Soft Focus, Drawing (which converts the image into a sketch outline), Watercolor and a new one — Sparkle lights.

    What makes this feature differ from Olympus highly-trumpeted Art Filters, installed in some other models, is that you get an on screen preview of the effect on the intended subject before you press the shutter.

    In addition is a collection of scene modes which are really shooting enablers and can be selected to optimise the camera when shooting sports, low light indoors, portraits etc. There’s even a face recognition mode for pets!

    And then there’s 3D! Using the MPO format, the camera can be set up to shoot auto, leaving the camera to shoot the left and right image pair… or in manual, where you actually trigger the second image. 3D viewing is on a compatible TV.

    pano 2.JPG

    Allied with this feature is panoramic mode, with the camera taking the necessary segments as you pan across or up/down the scene. Following on Sony’s lead, the SZ-10 stitches the separate images into a whole panorama… but the implementation is very elegant, with a tiny on-screen pointer helping you line up the series. Brilliant!

    The SZ-10 talks to Eye-Fi SD cards, adding Wi-Fi capability so you can auto upload images to your computer — or direct to the Internet — as you take them.

    The camera uses a dual stabiliser arrangement: a mechanical shift of the sensor plus digital stabilisation. I’m not so sure of the latter as I believe it employs magnification of the sensor image to steady the picture.

    Movie Mode

    The auto focus can be set up to track and keep the picture sharp in movie mode, so I could quite happily move around and capture steady video.

    A welcome feature is a canceling option to ensure sound is not recorded while shooting.

    One odd item: you must cancel the sound recording option if you want to use the optical zoom while shooting video. Thought I’d mention it!

    And no, sorry, you can’t shoot stills while recording video.

    ISO Tests

    Olympus SZ-10 ISO 64.JPG

    Olympus SZ-10 ISO 400.JPG

    Olympus SZ-10 ISO 800.JPG

    Olympus SZ-10 ISO 1600.JPG

    Quality and noise levels hold up to ISO 800, with only ISO 1600 showing signs of deterioration.

    Startup

    In spite of the longish zoom the camera was ready for its first shot just two seconds after startup, then it took about a second ’tween shots.

    Distortion

    In terms of distortion, the SZ-10’s zoom performed very well with little sign of any distortion at either end of the zoom.

    Olympus SZ-10 Verdict

    Again, I found the buttons on the SZ-10’s rear surface very hard to read, except in bright light: small and dullish.

    Diamonds.JPG

    Quality: about average. OK for casual snapshooters.
    Why you’d buy it: the 18x zoom is mighty appealing in such a small camera.
    Why you wouldn’t: you want to zoom and record sound.

    Olympus SZ-10 Specifications

    Image Sensor: 14 million effective pixels.
    Sensor Size: 11mm CCD.
    Metering: Digital ESP, spot.
    Lens: f3.1-4.4/5.0-90mm (28-504mm as 35 SLR equivalent).
    Shutter Speeds: 4 secs to 1/2000 sec.
    Memory: SD, SDHC, SDXC plus 59MB internal memory.
    Image Sizes (pixels): 4288×3216 to 640×480. Movies: 1280×720, 640×480, 320×240.
    File Formats: JPEG, Motion JPEG.
    ISO Sensitivity: 100 to 1600.
    Viewfinder: 7.6cm LCD screen (460,000 pixels).
    Interface: USB 2.0, AV, HDMI, DC.
    Power: Rechargeable lithium ion battery.
    Dimensions: 105.9×67.3×37.9 WHDmm.
    Weight: Approx. 215 g (inc battery and card).
    Price: Get a price on the Olympus SZ-10 at Amazon (currently discounted by 21%).

    Post from: Digital Photography School’s Photography Tips. Check out our resources on Portrait Photography Tips, Travel Photography Tips and Understanding Digital Cameras.

    NYIP_DPschool468x60.jpeg

    Olympus SZ-10 Review


    Digital Photography School

  • Part of the the Full Picture: Weekly Photography Challenge

    This week your photography challenge is to take and share an image of ‘part of the full picture’.

    Image by John A Ryan

    The theme was suggested by AnnMarie King on our Facebook page and I’ve chosen it because it’s actually a pretty good approach to photography – particularly when you’re looking for a new way to photograph a subject that you (or others) have photographed a lot.

    Honing in on just a part of what is often a full scene can create interest and draw out the detail in that subject that might otherwise have gone unseen. This technique can be applied to almost any type of photography. For example:

    • Weddings – focus in on the detail of the brides dress
    • Baby Portrait (I’ve had a little practice of this one this week) – focus in on the hand or feet of the baby
    • Architecture – zoom in on the detail in an archway
    • Landscapes – zoom in on the road that winds through the rolling hills and show the patterns it creates
    • Family Portrait – compose it just to show the group’s feet (see example)
    • Animals – photograph the foot of that elephant
    • Portraits – focus in on the weathered hands on the walking stick of your elderly subject

    You get the picture (I hope). In some cases it might be about using your zoom lens or in others it might be about you changing your position as a photographer to shoot from closer or from a different perspective.

    Once you’ve taken your ‘Part of the Full Picture’ Images – choose your best 1-2, upload them to your favourite photo sharing site and either share a link to them or – embed them in the comments using the our new tool to do so.

    If you tag your photos on Flickr, Instagram, Twitter or other sites with Tagging tag them as #DPSNOTFULLPIC to help others find them. Linking back to this page might also help others know what you’re doing so that they can share in the fun.

    Also – don’t forget to check out some of the great shots posted in last weeks Red White and Blue challenge where there were 100+ great shots submitted

    Post from: Digital Photography School’s Photography Tips. Check out our resources on Portrait Photography Tips, Travel Photography Tips and Understanding Digital Cameras.

    NYIP_DPschool468x60.jpeg

    Part of the the Full Picture: Weekly Photography Challenge


    Digital Photography School

  • Toy Cameras Creative Photos [Book Review]

    Toy Cameras book 1.jpgMany notable 20th century photographers began their snapping with a very basic box or folding camera. The attractions were simplicity, a large original image plus, unexpectedly and ‘unwantedly’, a wild and woolly capture.

    So, today, we find many exploratory photographers on the search for the feral rendering capability of their youth, as do many younger lens-people, in the search for the unusual.

    The gift these days is that digital imaging and flatbed scanners can readily transform these oddball images, captured on all sizes of film, from 120 to lengthy 35mm strips.

    Kevin Meredith’s book describes 40 ‘toy cameras’ that emulate the untamed imagery of the early box cameras. These you can buy now, from manufacturers such as Holga and LOMO.

    The author adds “Toy cameras are ideal for photographers who don’t want to capture a polished version of the world.” They produce images with overlapping frames, light flare, lens distortions, soft focus and off-colour, qualities that are almost impossibly to replicate in software.

    Toy Cameras book 2.JPG One of my favourites is the 35mm LOMO Fisheye, with a 180 degree view that can be lined up with considerable inaccuracy, thanks to the clip-on viewfinder. But What You See is Definitely Not What You Get.

    The Spinner 360 is a wind-up panoramic camera that pulls the 35mm film through as the camera spins upon the handle. You end up with a picture length of six exposures, with the image spilling over on to the edge perforations. It’s sturdy and made from thick plastic!

    The classic Diana is included of course, both in 120 and 35mm versions plus a multi-pinhole snapper.

    There are also some digital cameras and a re-useable underwater camera that should fire up even the most laggardly creative.

    Then you move onto accessories designed to be used on ‘normal’ cameras, such as the Bokeh Master Kit and the Lensbaby Composer.

    Finally, rounding out a comprehensive coverage of image mangling methods, there’s even a six page coverage of smart phone apps so you can digitally replicate the output of the plastic brigade.

    Put down your Nikon or Canon DSLR: this is the wild way forward in image creativity. But be careful what you wish for, lest it come true.

    Author: Kevin Meredith.

    Publisher: RotoVision.

    Length: 176 pages.

    ISBN 978 2 88893 118 8.

    Price: Get a price on Toy Cameras Creative Photos at Amazon UK

    Post from: Digital Photography School’s Photography Tips. Check out our resources on Portrait Photography Tips, Travel Photography Tips and Understanding Digital Cameras.

    NYIP_DPschool468x60.jpeg

    Toy Cameras Creative Photos [Book Review]


    Digital Photography School