Category: Uncategorized

  • Parabolic Activity

    Ever have a problem with onlookers nosey-ing around on a shoot?

    Photographer Radu Dumitrescu (that’s his voice on the tape) was shooting in an abandoned house in Bucharest, Romania when a couple of intrepid guys noticed flashing lights inside the house and decided to investigate. When they raised their cell phones to capture hard proof of the afterlife, Radu laid down on the remote trigger and gave them a show.

    They only got one reaction on tape, but Radu said the guys repeatedly came back to the house only to be scared back off again by the flashes. Anyone who can have this much fun with a flash trigger is truly a man after my own heart.

    -30-


    Strobist

  • Panning: Weekly Photography Challenge

    Image by Sam Javanrouh

    This week your photographic challenge is to take and share a photo that uses the technique of panning. We’ve written a tutorial previous on how to master the art of panning (also check out this one on panning too)so you may like to go read that one first – but the challenge essentially revolves around photographing a moving subject and attempting to keep it in focus by panning your camera along with it. The result is hopefully a relatively in focus and sharp subject with some lovely motion blur around it.

    The technique can be applied to almost any moving subject – from racing cars, to trains, to bikes, to flying birds, running animals or even to any toddler who has gathered up a little speed.

    Once you’ve taken your ‘Panning’ Images – choose your best 1-2, upload them to your favourite photo sharing site and either share a link to them or – embed them in the comments using the our new tool to do so.

    If you tag your photos on Flickr, Instagram, Twitter or other sites with Tagging tag them as #DPSPANNING to help others find them. Linking back to this page might also help others know what you’re doing so that they can share in the fun.

    Note: while we don’t mind you posting previous images that you’ve taken that fit this topic – the real point of these ‘challenges’ is to inspire you to go out and take NEW photos. So perhaps instead of just trawling through your old photos to find one that fits – grab that camera and go use it too!

    Also – don’t forget to check out some of the great shots posted in last weeks Photographer in the Picture challenge where there were some great shots submitted.

    Image by Paco CT

    Image by ram reddy

    Image by Thomas Helbig

    Image by Gerald Yuvallos

    Post originally from: Digital Photography Tips.

    Check out our more Photography Tips at Photography Tips for Beginners, Portrait Photography Tips and Wedding Photography Tips.

    Panning: Weekly Photography Challenge


    Digital Photography School

  • baselining your strobe for quick exposures

    Digital cameras have been a great boon to photographers working with off-camera lights.  The ability to review an image instantly on an LCD (with histogram!) has obviated the need for tedious polaroiding and exhaustive metering of every inch of a scene to ensure correct light ratios and eliminate unwanted shadows.    So much so, in fact, that many photographers have begun to eschew the use of a flash meter entirely – relying on the LCD and histogram via trial and error to set their lights correctly.   Now while quick and easy, this method has it’s drawbacks, particularly for young photographers.   The question that frequently arises is:

    “well, I’m essentially just guessing what power to set my flash on then chimping the exposure and adjusting accordingly but how do I know *where* to start with my flash”

    Essentially this comes down to a combination of making an educated guess about the exposure and *knowing how much light your flash will put out*.

    The beauty of light is that it is predictable.  Whether from the sun, a lightbulb, or a flash, given the same source and conditions, you will always get the same light.    We can use this to our advantage!

    When working with flash, we have fundamentally 2 variable that we control to determine how much light falls on our subject – power and distance.   Power meaning how much actual light our flash is outputting and distance meaning how far away it is from the subject (remember that light falls off predictably according the inverse square law).    Since we know that light always behaves the same, we can be certain that at a given power and a given distance from our subject our flash will give the same result every time.

    Now also remember that light from a flash behaves linearly – going from 1/4 power to 1/2 power is doubling the amount of light that it puts out and vica versa.  Thus if our flash exposes properly at f/8 at 1/8 power, it will give us f/11 at 1/4 power, f/5.6 at 1/16 and so forth (given the same distance to the subject).

    Armed with this knowledge, we can quickly and easily estimate a “starting point” for exposure in almost any situation.  We do this by establishing a “reference point” at which we *know* the exposure of our flash, and can calculate from there.  I like to call this “baselining” the flash.  To do this:

    1. start with the flash on a medium power, which gives room to adjust up or down.  1/8 power is a good starting place
    2. now we need to ensure that we can replicate a consistent flash->subject distance.  You could carry around a tape measure but a fantastic trick I learned from the inimitable Don Giannatti is to measure using your outstretched arms.  Given that the average (male) photographer is probably between 5’5″ and 6′something, your outstretched armspan or “wingspan” is somewhere around 6′, which is a comfortable working distance for lights.   This also has the advantage of being quickly and easily reproducable “on set” – you simply stretch our your arms from subject and place the light at the end.
    3. Meter your light at your set power, at “wingspan”  – if you don’t have a flash meter, you can approximate by photographing an 18% greycard till the histogram spikes dead center and recording the appropriate aperture.
    4. adjust your light till you get a “comfortable” baseline.   Let’s assume that at “wingspan” we find our flash gives us f/8 at 1/8 power.   This is our baseline – we write it down (or just remember it).

    Now lets put this info to use!

    Let’s say we’re in the studio.   We want to do a shot with a key and fill light in a 2:1 ratio.   We want to shoot at f/11 to give  good depth of field for our subject.  What do we do?  We place our lights in the desired position, both at “wingspan”.   We know that each of them gives f/8 at 1/8 power at that distance.  f/11 is one stop up from f/8, so we set our main light to 1/4 power (one stop more power).  Our main light is now already double the light of our second, so we have our ratio right there – the second light stays at 1/8.   We shoot at f/11,  and our main light should be spot on with the second 1 stop under.   now if we want to “blow out the background” we simply add another light on the background at 1/2 power, giving us an exposure of f/16 – one stop over main. Of course this is not as “exact” as using a meter, but this gives us our starting place and we can adjust the lights from there based on the histogram.

    It’s that easy!

    This technique becomes particularly powerful when balancing ambient and flash outside.   Combined with the sunny/16 rule, we can use our baseline to roughly estimate the combined exposure of flash and ambient without chimping a single frame!

    consider the common situation:  We are shooting outside and want to drop the ambient by 1 stop.  We see that it is mildly overcast – the sunny/16 rule says that our exposure should be approximately f/11@1/100 sec.   Again, we know our flash give f/8 at 1/8 power, so we set it at arms length from our subject.  In order to drop our ambient by a stop we increase our shutter speed to 1/200 (still at f/11) and adjust our flash up one stop to 1/4 power to give us f/11.    Done and Done.  Chimp, and adjust as needed.  If we are in situation where we can’t drop the ambient by shutter speed (already at sync limit), we can simply adjust the flash power to compensate.   Assume the same situation (ambient is f/11).   to keep the shutter speed the same and still drop the ambient by 1 stop, we need to shoot at f/16.   Again, knowing our flash gives f/8 at 1/8 we simply bump it up 2 stops to 1/2 power (f/8->f/11->f/16 = 1/8->1/4->1/2)

    This may sound complicated, but once you  are comfortable estimating these exposure, it becomes almost second nature.  by using your baseline you will find yourself able to get exposure dead on within 1 or 2 “chimping” shots.

    Tweet This Post Stumble This Post


    F/1.0

  • new site

    New look for edzstudios… cleaner and more minimalistic… also galleries changed to a jquery based setup rather than flash (hey gotta be iPad compatible right?)  If you are reading this through rss, click on through and check out the new site design.   Will be going through a few tweaks in the next few days, but pretty happy with things overall.

    Tweet This Post Stumble This Post


    F/1.0

  • Giving Back With Your Camera


    It's Thanksgiving, a day when many people in the US will eat way too much food and then collapse on the couch to watch the Baltimore Ravens beat the San Francisco 49ers on the teevee. (Heh.)

    But thoughts of giving thanks often prompt thoughts of giving back. And there is a lot of collective talent among the readers of this site. So today, a bit of an open thread on ideas for giving back with your camera.

    I'll start off with a few specific suggestions from my own experience, but I would love to hear your thoughts in the comments. Read more »


    Strobist

  • hand coloring in lightroom

    I’ve always loved hand-colored photos.   They have such a great look, very unique, very interesting.  For those who don’t know, “hand coloring” refers to any process where a photographer uses pigment, dye or paint of some sort to manually add color to a black and white photo.   Historically this was done in the 1800s by photographers using pigment and gum arabic on daguerreotypes!  The technique persisted in one  form or another throughout the years until it was supplanted by actual color photography.  Of course, just because it is no longer necessary to get color in such a way doesn’t mean it can’t be used for asthetic effect.

    I shoot a lot of black and white film, which I generally scan and process in lightroom rather than wet printing.  Now if you’ve used lightroom, you are probably familiar with the brush tools for things like exposure, clarity or even skin smoothing.  However, the oft overlooked “tint” option can be used to easily paint in color to a black and white image for a “hand colored” effect.

    let’s take this image.

    This was shot on film (with a holga!) during a vintage pin-up shoot.  In other words, there is no actual color information in the file etc…

    Now I’m going to hand color it to approximate the actual colors of the scene.  First we start by going into the lightroom brush tools.  Make sure all the adjustment sliders are set to zero (we are just painting on color here, not adjusting the photo itself)   Click on the tint box at the bottom right to bring up the color picker.

    A little trick with the color picker is that if you hold the mouse button down you can drag the eyedropper out of the little selection window and  sample color from *anything* on screen.  One useful trick with this is to have a “reference photo” open separately and sample your colors for hand coloring from that.

    Since the couch in this shot was a green color, I grab a nice rich green and begin painting my mask.  I find it more accurate to paint with the red overlay on (click “O” to toggle the overlay on or off).  You’ll want to use a separate mask for each area of color.  Here’s the green mask for the couch all done.

    yeah, it’s not perfect, but close enough :-)

    I then do separate masks for her shirt (pink) and her skin.   With hand coloring, I like to leave a portion of the image uncolored which gives it it’s signature b/w+color look, different from “selective coloring”

    and the final result:

    Now this may be kind of a “niche” technique, and certainly not suited for all photos but it’s quick and easy and yields a very unique effect.  Overall it’s a nice trick to have in one’s toolbox.

    Tweet This Post Stumble This Post


    F/1.0

  • A Bird’s-Eye View of Kayaking with GoPro Hero Camera

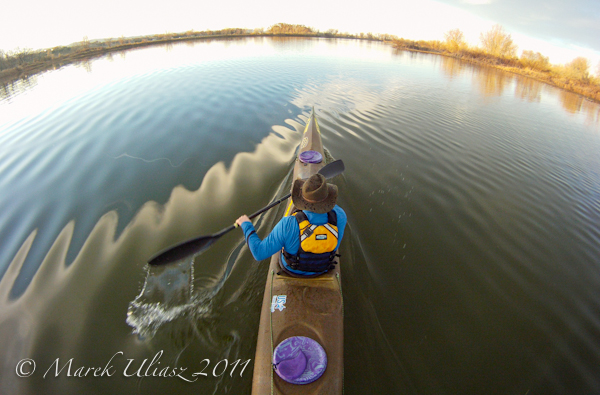
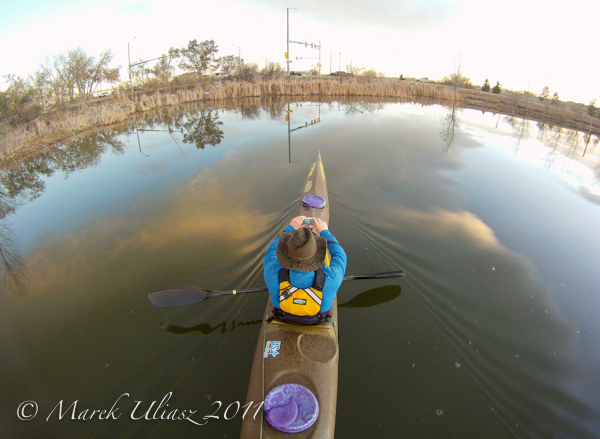
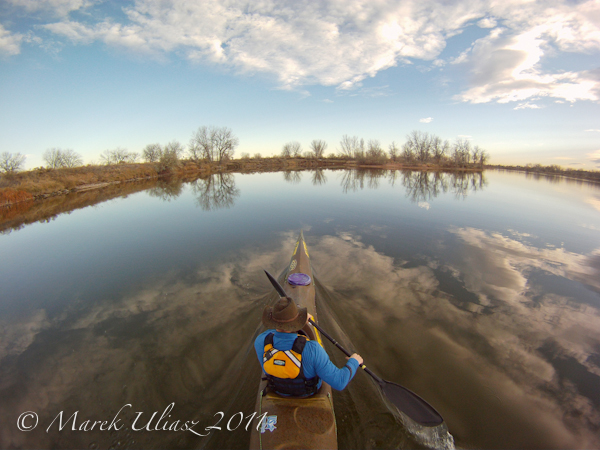
    A bird’s-eye view? Well, it’s more like a low flying goose perspective.

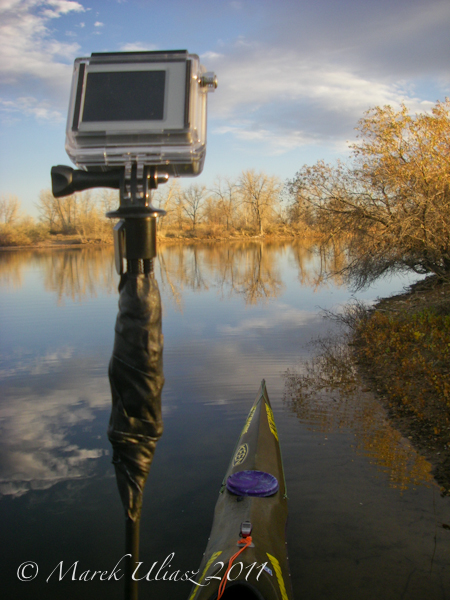
    I am testing GoPro HD Hero camera mounted on a telescoping mast a few feet above kayak deck. My <"http://photokayaker.fit2paddle.com/kayak-video-camera-mast-sticky-pod-combined-with-monopod/">camera mast remains the same as described a couple years ago in this blog. A reversed Gitzo monopod is mounted on My Sticky Pod platform with three suction cups. I am using a toy table tripod at the top end of monopod as a tripod mount for a camera. I used plastic ties and gaffer tape there, so no permanent modifications or damages to my carbon fiber monopod were made.

    GoPro HD Hero Camera

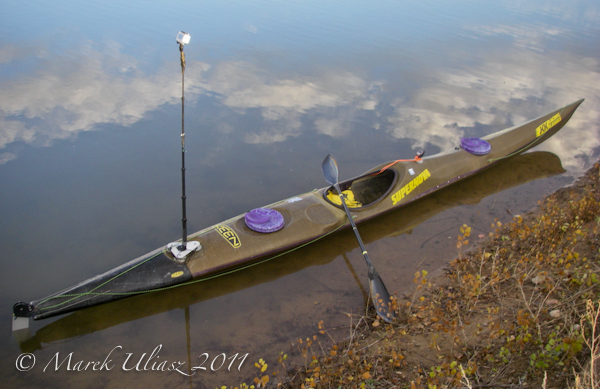
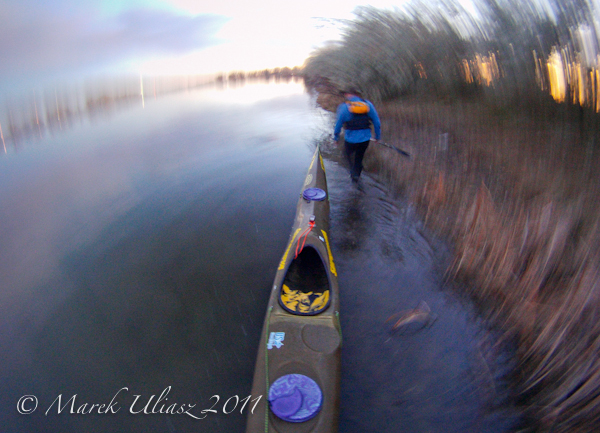
    The pictures come from a recent paddling on Beaver Pond (Arapaho Bend Natural Area, Fort Collins) with JKK Supernova sea kayak. The camera mast was set up on a back deck of the kayak. I cannot mount the sticky pod platform on the steep front deck with a center ridge. I would have to figure out some more creative approach. I mounted the GoPro Hero with a single suction cup in my recent paddling with this kayak.

    GoPro HD Hero Camera

    GoPro LCD Bacpac, a detachable LCD screen is really helpful in setting up the camera and reviewing shots.

    GoPro HD Hero Camera

    The camera was setup on a fully extended mast, i.e., about 60″ (152cm) above the deck. The stability of Supernova was not really affected. It was a different story with a more tippy Thunderbolt kayak. I wish I could place my DSLR camera, Canon 5D, that high in a kayak.

    GoPro HD Hero Camera

    The camera was automatically shooting pictures every 30 seconds. It’s possible to select some decent shots from 700 frames. Of course, had also my Pentax Optio W30 handy. I am getting ready to shoot video.

    GoPro HD Hero Camera

    The same position of the mast, but the camera was lowered by 4″.

    GoPro HD Hero Camera

    The last frame with a 0.5s long exposure: finishing my paddling after the sunset.


    ch_client = “mmuliasz”;
    ch_type = “mpu”;
    ch_width = 550;
    ch_height = 120;
    ch_color_title = “3c78a7”;
    ch_color_site_link = “3c78a7″;
    ch_non_contextual = 4;
    ch_vertical =”premium”;
    ch_sid = “Chitika Premium”;
    var ch_queries = new Array( );
    var ch_selected=Math.floor((Math.random()*ch_queries.length));
    if ( ch_selected < ch_queries.length ) { ch_query = ch_queries[ch_selected]; }

    Related posts:
    Kayak Video Camera Mast – Sticky Pod Combined with Monopod
    Paddling with Canon PowerShot G11 Camera on a Monopod Mast
    A New Shooting Angle – Camera Video Mast on Thunderbolt Kayak
    Sticky Pod Review – A Suction Cup Camera Mount for Kayak Photography
    South Platte River with GoPro Hero HD Camera and Thunderbolt Kayak


    paddling with a camera

  • Nick Fancher: Run-and-Gun with Hard Lights

    Columbus, Ohio-based photographer Nick Fancher shoots for JackThreads, which means manic spurts of product, apparel and shoe photos. To that end he shoots guerilla-style, scrounging multiple locations and setups on the quick.

    Which is no problem, as he travels light with RadioPoppers and speedlights, preferring to work without modifiers. This means he can light at modest ranges and easily match or overpower the sun as needed.

    Check out the vid above, in which we follow Nick through a typical multi-product day of shooting. Neat stuff — I like the multi hard-light look. He tends to crank the flashes to 105mm for extra punch, which also restricts the beam for a cool fall-off.

    And if the name sounds familiar, Nick was featured a little ways back for his Mad Men-themed engagement shoot. If you haven’t seen that, it’s worth a look.

    (Thanks, Mark!)

    -30-


    Strobist

  • Using the ‘Dark Side’: Thinking Outside the Box with Darkness

    A Guest Post by Judd Green

    Photographers have spent years studying light, how to use it, manipulate it, hey, I’m sure some have even tried to bend it! Don’t get me wrong, light is our best friend in the photography world. But what about crossing over to the ‘Dark Side’ for a different effect? Use darkness to your advantage! How do we do this?

    IMG_4329.jpg

    Learn your camera limits

    Understand your camera. Study it’s limits, it’s ISO, shutter speed and White Balance. WB is one thing people tend to brush over, but is important in getting skin tones etc. correct. In low light people tend to turn into Umpa Lumpas (orange skin).

    The rule of thumb also, is to shoot to your lens’ limits, depending on how wide the aperture is. But this is something you can experiment with, so have a play.
    IMG_3068.jpg

    Light?

    Ok so you DO need light to take photos. Look out for available light. When I was studying this topic, I noticed one of my boys went to bed and fell asleep with his torch on. Great opportunity for photos! Another time they were playing games on the iPad under their blanket, so I grabbed my camera and jumped under with them! –On a side note, you want great kids photos and to learn your camera? Never turn it off! Mine is always easily accessible and on ready to go.
    So be on the lookout for available light, streetlights are good, windows etc.

    IMG_8437.jpg

    No light?

    Then OCF (off camera flash) works a treat. But for better effect, experiment with the position of it. I documented a wedding where we ran out of light (with it raining also), by the time we got away to do the bridal party shoot. So I played with my flash, with GREAT results. I gave the couple an umbrella to use and we went for a walk out into the open, I placed the Speedlight behind them to create a silhouette of them. The light ended up bouncing around the umbrella creating a ‘glowing’ effect for the photo.

    The digital photography world is constantly evolving and doing unbelievable things. The best way to keep up? Keep shooting, never turn your camera off and think outside of the box.

    See more from Brisbane photographer Judd Green at Juddric Photography.

    Post originally from: Digital Photography Tips.

    Check out our more Photography Tips at Photography Tips for Beginners, Portrait Photography Tips and Wedding Photography Tips.

    Using the ‘Dark Side’: Thinking Outside the Box with Darkness


    Digital Photography School

  • an ode to the normals

    Ah, the humble normal lens… in a day and age where all the glory goes to the 70-200/2.8s and the ultrawides, it is easy to overlook the humble elegance of the unassuming normal.  Traditionally the 50mm in 35mm terms, but may vary depending on format.

    The normal is small, light, fast, sharp and versatile.

    It does portraits, it does landscapes, it does street, event, low light…

    Need to get in closer? take a step forward.  Need to get  wider? take a step back.   Unlike many other focal lengths the normal is almost chameleon-like in it’s ability to adapt itself to different situations, rendering tightly framed shots as well as “wider” with equal aplomb.  (yes I know the actual focal length and field of view don’t change, I refer only to it’s apparent versatility in framing).

    In fact, I would estimate probably 75% of my shots overall are taken with a normal lens (50mm on my Nikon, 20mm on my gf1, 75mm on my Mamiya).

    The normal lens has a long and influential life in the history of photography.  Many of the seminal images of the 20th century were made with the 50mm.

    There is a kind of “Zen Like” simplicity to shooting with a normal as well – maybe it has something to do with the fact that it approximates the normal human field of view, but previsualizing the shot becomes almost unconscious.  As if one of the barriers between concept and image just falls away…

    And then there’s the beautiful, beautiful depth of field.  Opening up to f/1.4 (or more!) just creates a whole new world of depth of field effects.

    Of course the normal is not a *replacement* for your zoom – especially a telephoto or ultrawide, but if you’re a zoom shooter primarily, give it a shot – spend a couple of weeks with just a normal on your camera.  You might just find it addictive…

    Tweet This Post Stumble This Post


    F/1.0