Category: Uncategorized

  • 7 Ways to Get More Out of a Wide-angle Lens

    This article was written by Andrew S Gibson, the author of Understanding Lenses: Part I, and is the second in a series of lessons about camera lenses. You can read the first article link to first article here.

    Wide angle lenses 1

    If you were to only ever use one lens a wide-angle would be an excellent choice. For many years, before I switched to digital, I used a 24mm lens almost exclusively with a simple film SLR. I loved that lens because it helped me take many beautiful and dramatic images.

    The good news is that you can do the same with your wide-angle lenses, or the widest focal lengths on a kit lens. All that’s needed is an understanding of how to make the most out of that wonderful piece of glass attached to your camera.

    What is a wide-angle lens?

    A wide-angle lens provides a wider angle of view that what you can see with your own eyes. On a full-frame or film camera that’s any focal length wider than about 40mm. On an APS-C camera that’s focal lengths wider than around 25mm, or 20mm with the micro four-thirds format.

    Wide-angle lenses have a couple of characteristics that you can exploit to take better photos:

    1. They exaggerate perspective, making things close to the lens look nearer than they are, and things in the distance look smaller. This stretches the sense of distance and scale. The shorter the focal length, the greater the effect.
    2. They have more depth-of-field at any given aperture than longer lenses. This helps you keep everything within the frame, or at least the most important elements, in sharp focus. It also means that accurate focusing isn’t so critical.

    Making the most out of wide-angle lenses

    Here are my tips for making the most out of your wide-angle lenses. If you’ve got any tips of your own, why not add them to the comments? I’m curious to see how readers use their wide-angles, and I’m expecting some links to some amazing images.

    1. Foreground interest

    Wide angle lenses 2

    This applies primarily to landscape photography. It’s a good idea to make sure there is something interesting in the foreground for the viewer to look at. Otherwise there may be too much empty space and the image becomes boring. The photo above is a good example. Can you imagine how it would look without the people in the foreground? Without the human figures, there is no photo – just a monotonous expanse of white.

    2. Environmental portraiture

    Wide angle lenses 3

    Wide-angle lenses let you take portraits and include the model’s surroundings at the same time. It’s a technique used by portrait, documentary and fashion photographers to tell a story. The setting is just as interesting as the person in the photo. It’s the opposite approach of using a telephoto lens and a wide aperture to blur the background.

    3. Take photos inside your car

    Wide angle lenses 4

    It’s been done dozens of times before, but I couldn’t resist trying it for myself. To create this photo I attached my camera to a tripod, leant the whole thing against the passenger seat and wrapped the tripod and camera straps around the seat to hold it steady. I drove around our local area at dusk using a remote release to take photos.

    Wide-angle lenses are idea for taking photos in any enclosed space, where it would be impossible to capture an image with a longer focal length.

    4. Using lines

    Wide angle lenses 5

    Lines are a powerful compositional tool. The lines in this image take the viewer’s eye from the front of the image to the back and the mountains on the horizon. The wide-angle lens exaggerates the sense of scale and adds to the power of the lines. Training yourself to look for lines, and exploiting them in your photos with a wide-angle lens will help you create more dramatic images.

    5. Converging verticals

    Wide angle lenses 6

    In a similar way to exploiting line, you can tip your camera backwards when taking photos of buildings to utilise the effect of converging verticals to add drama and interest to the image. You can tip the camera back a little, like I’ve done here, or a lot to get a snail’s eye view and really take advantage of the effect.

    6. The human element

    Wide angle lenses 7

    Wide-angle lenses help you place a human element in a landscape photo. Here, the people in this seascape are small in the frame, adding a sense of scale and mystery. I asked my model to remain still throughout the 30 second exposure, so the sea and the children playing on the rocks in the distance were rendered as a blur.

    7. Documentary photography

    Wide angle lenses 8

    Finally, wide-angle lenses are also useful for documentary photography. I took this photo during a parade in a remote town in South America. The wide-angle lens helped me capture the scene by fitting lots into the frame. The lens was fairly small, so I was able to take photos without anybody taking any notice of me. I stopped down so accurate focusing wasn’t critical which gave me the freedom to concentrate on composition and capturing the moment.

    Understanding Lenses: Part I

    Wide angle lenses 9

    If you liked this article then take a look at my latest eBook, Understanding Lenses: Part I – A guide to Canon wide-angle and kit lenses. If you hurry, you’ll get a discount – scroll down for details.

    In the next lesson I’m going to look at lens aberrations – what they are and how to correct them in-camera or in Raw processing.

    Post originally from: Digital Photography Tips.

    Check out our more Photography Tips at Photography Tips for Beginners, Portrait Photography Tips and Wedding Photography Tips.

    7 Ways to Get More Out of a Wide-angle Lens


    Digital Photography School

  • Could Klout Become a New Personalized, Cross Platform, Engagement Ranked, Relationship Weighted Media Feed?

    The New Klout Dashboard
    The New Klout Dashboard

    Klout. Most of my friends tell me that they never check Klout, but secretly I know they all do. The website so many love to hate. Why do people hate it? Mostly because people don’t like the idea of a company presenting their value to the world based on something as superficial as popularity, even worse, *online* popularity. We are individuals, damnit, not a score on a website.

    People also hate the idea that they are being judged by a number from a company that gets an awful lot of things wrong about you. Stories pop up about people getting turned down for jobs because their Klout score wasn’t high enough and this makes our eyes bleed red.

    Most of all though, people hate the idea of Klout because it means work. The way to get your Klout score higher is to do more work, work, work on your social media accounts. Ugh. We barely have time as it is. People complain that they can’t go on vacation because they worry about their Klout score going down if they don’t tweet enough. Lame.

    In the same way that folks groan when yet another social network comes along that they feel compeled to maintain, they dislike the idea that now they are going to have to put even *more* work into their existing networks in order to keep on top of yet one more thing.

    Especially if someone is in PR or evangelism or marketing or advertising or really promotion of any kind for a living, they worry that that Klout could affect their perceived value in the marketplace. If someone is really, really good at PR (maybe even *because* they are not wasting time on Twitter 24 hours a day) do they really deserve that low score of 32?

    For all these reasons Klout has a lot of haters out there. I’m not really one of the Klout haters though (even if they did recently downgrade my score from 86 to 78). I think free stuff (as long as it’s disclosed) is sort of cool. You’ll never see me say no to that free sample from the Costco lady handing out those sea salt and vinegar chips. I got a free airline ticket and a free computer from Klout. Klout gave me a Klout tshirt when I showed up at their cool SOMA offices to pick up the computer.

    Klout Analyzes My Most Influential Social Media Posts in the Last 90 Days
    Klout Analyzes My Most Influential Social Media Posts in the Last 90 Days

    Michael Arrington blogged that earlier this year he wrote a post titled “My Detailed Thoughts On Klout” that contained a single word in the post itself: “Why?” — but now Michael Arrington has had a change of heart and has actually invested money into Klout.

    I spent some time poking around the new Klout preview today and I think Arrington may be on to something.

    Klout still gets a lot of things wrong. It says Verizon and Sprint influence me when they don’t. It thinks I’m influential about Friendfeed, even though Facebook bought them what feels like eons ago. It bases 60% of my score on Facebook, 14% of my score on Google+ and 0% of my score based on Flickr. My Google+ account is much more active than my Facebook account and I’m pretty active on Flickr too.

    However.

    Despite these flaws I think the new Klout may be the start of something much bigger than free moo cards. I think Klout could potentially become a powerful aggregator of the most engaged and popular media published across all networks by your friends. More than anything, to me the new Klout is starting to feel like a content discovery system in progress.

    Kelli Seeger Kim's Influential Moments From the Past 90 Days
    Kelli Seeger Kim’s Influential Moments From the Past 90 Days

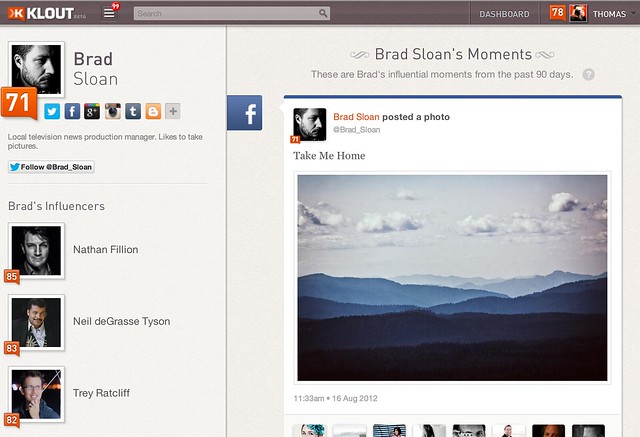
    Brad Sloan's Influential Moments from the Last 90 Days
    Brad Sloan’s Influential Moments from the Last 90 Days

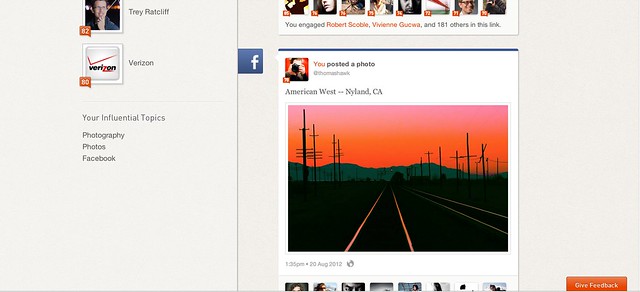
    The new Klout has a new feature called “These are your influential moments from the past 90 days.” Here Klout tries to rank my content across various networks based on engagement. In my case they don’t do a very good job across all networks, it’s mostly all Facebook stuff when I’ve had more engagement on my G+ stuff, but it’s a start. They did cherry pick out some of my most highly engaged Facebook content.

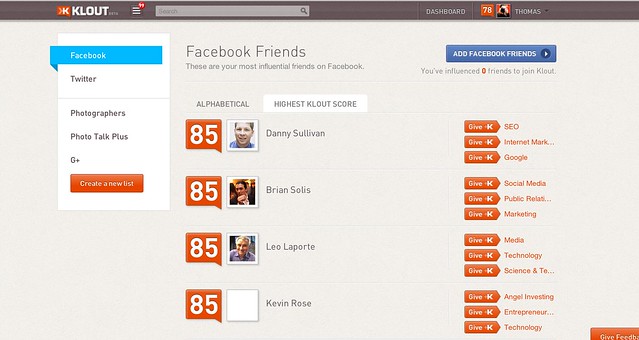
    Klout already knows who I follow on Twitter. They also already know who my Facebook friends are. I’ve also created a few lists on Klout which are likely some of my strongest relationships. So Klout knows a lot of the people who are important to me. They are also indexing the most engaging content by *these* folks as well on all platforms.

    Now, how much harder would it be for Klout to mash up all of the most popular content by all of my Facebook Friends, Flickr Friends, folks I follow on G+, people I follow on Twitter, etc. and present me a feed of the most popular content by all of these folks across all platforms in a single feed?

    What if… I then had a slider that I could use to set the time critera — the most engaged posts by my friends in the last 6 hours, 12 hours, 24 hours, week, month, whatever. Klout could also analyze my cross platform relationships and my frequency interaction with various contacts to further refine and rank a Facebook type algorithm for what I might want to see.

    There is no cross platform feed like this that exists today. Flickr has Explore where they aggregate popular content indiscriminately across all of Flickr, but it’s lame. It’s all stuff by people I don’t know and don’t care about and has tons of watermarks that I hate.

    What if Klout gave me a personalized version of Flickr Explore, mashed up with my facebook feed, mashed up with a personalized “what’s hot” on G+ and the most popular tweets by my friends.

    Klout’s new feed of my own popular content feels much more like a Facebook, G+ or Flickrstream feed than anything. Big, oversized versions of my photos and posts filtered by popularity.

    Klout is suddenly starting to feel a little more interesting to me. How cool would it be if, in addition to claiming my perk box of Little Debbie honey bun snack cakes, I could also stay on top of all the best content by all my friends across all networks. That would be quite the pivot if they could pull it off.

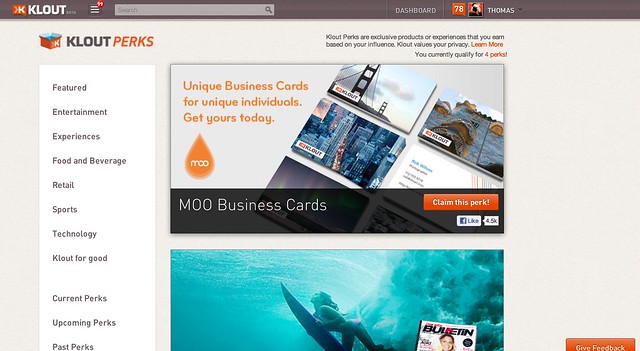
    Hey, Free Moo Cards!
    Hey, Free Moo Cards!

    In Arrington’s post about Klout he shares part of an email exchange he had with Klout CEO Joe Fernandaz, “In the end, my goal is to build a product that goes beyond the gimmicks and drives real value for everyone. I believe that every person who creates content online has influence to some group of people and on some topic. Everyone also wants to feel listened to and interesting and I think we can do this in a way that empowers people to become better, more effective, online citizens.”

    A personalized, cross platform, engagement ranked and relationship weighted media feed sounds like it could fit right in with Fernandez’s description of the new Klout. Or maybe I should just lay off the crack pipe for a while.

    Klout Knows Who My Facebook and Twitter Friends Are
    Klout Knows Who My Facebook and Twitter Friends Are


    Thomas Hawk Digital Connection

  • SBPD Booking Mug Booth is a Pretty Good Little Headshot Studio, Actually

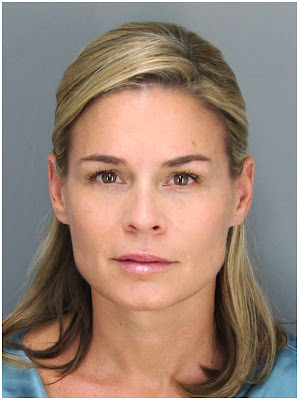
    Live in Southern California, and can't afford a decent headshot? Maybe you should get yourself booked by the Santa Barbara Police Dept. Because their mugshots are actually … pretty decent.

    And better yet, it's something that any home studio DIY'er could duplicate. Read more »


    Strobist

  • DSLR Camera Focusing Tips for Beginners

    New to DSLR photography and want a good basic lesson in focusing? This video by Phil Steele gives a good introduction to five different focusing techniques.

    Post originally from: Digital Photography Tips.

    Check out our more Photography Tips at Photography Tips for Beginners, Portrait Photography Tips and Wedding Photography Tips.

    DSLR Camera Focusing Tips for Beginners


    Digital Photography School

  • How to Photograph the Stars

    A guest post by John Davenport

    Photography in general is easy – right? You pick up your camera, point it in the direction of what interests you, and depress the shutter button. However, there are many levels of photography, and I’m sure many of you are aware of the basics.

    Today I’m going to focus on something a bit more advanced, photographing the star filled sky, also known as astrophotography.

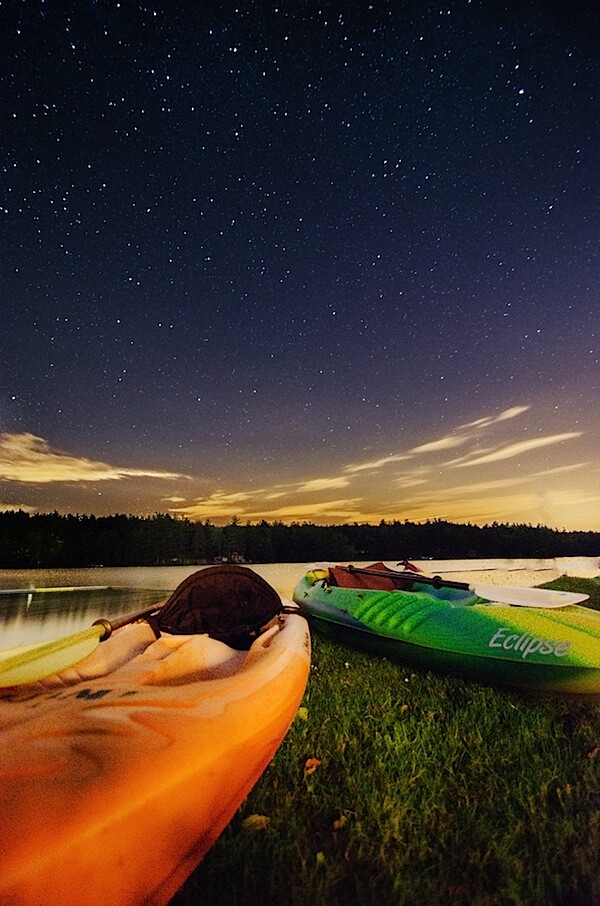
    kayak under the stars.jpg

    For astrophotography you will be delving a bit deeper into the use of some of the manual controls of your camera like shutter speed, aperture, and ISO control. I also highly recommend shooting in RAW for night photography, as it will allow more control when editing the final image. If you’re not sure what RAW is and why it is important I wrote a bit about RAW photography here.

    Let’s Start With What You’ll Need

    • Tripod – We’re going to be dealing with exposures in the tens of seconds and I don’t care who you are, you’re going to need something to stabilize your camera.
    • A Camera With Manual Controls – Manual control of your ISO and shutter speed are going to be essential for photographing the stars.
    • A Wide Aperture Lens – You’ll need a lot of light and f/2.8 seems to be the butter zone for astrophotography. Combine this with an ultra-wide lens and depth of field won’t be a problem.

    With these three pieces of gear you’ll be off to a great start, but of course, there’s a lot more out there that you could potentially add down the line, which I’m sure you can discuss in the comments below.

    Location, Location, Location

    Now, it’s not enough to just get all the gear, you need to find the right places to photograph the night sky as well. Light pollution is a serious problem for astrophotography and if you’re anywhere near a large city you’re going to have to travel at least an hour to get away from the lights.

    I live just outside of Boston MA and am pretty much locked into one of the most light polluted areas of the United States – southern New England.

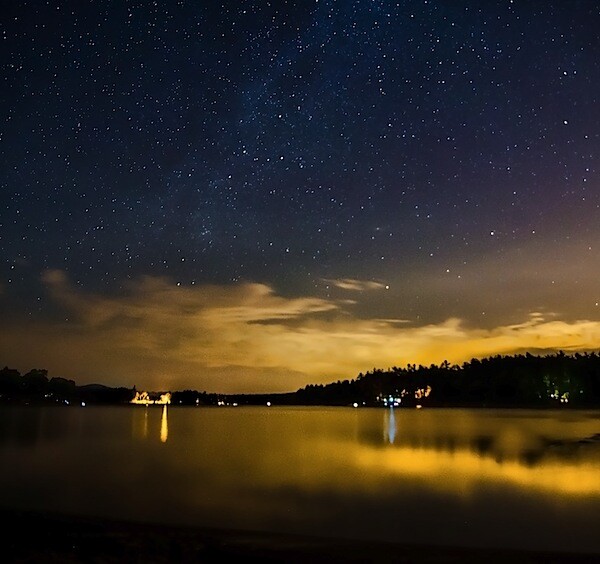
    However, as seen in this image below, even a town of only about 30,000 people and over ten miles away can still result in some obstructive light pollution.

    lightpollution.jpg

    On top of finding the right location on Earth, you’ll want to have some idea of the location of various stars and constellations for your photography. I use an app called Starwalk for my iPhone to track these down as well as locating the core of the Milky Way, which can be amazing when photographed.

    The Basic Set-up

    When photographing these tiny pinholes of light you will need as much light to hit your sensor as possible. Therefore it’s important to use combination of high ISO, wide apertures, and long shutter speeds.

    For the Kayaks Under the Stars photo above I used an ISO of 1250 an aperture of f/2.8 and an exposure of 30 seconds. As you’ll notice in the bottom right of the photograph there’s a bit of light pollution from a city about 30 minutes away.

    One thing to do to try and minimize the light pollution is to find out where it is in a timely manner. To do this I typically will fire off successive shots all around the horizon using an absurdly high ISO (typically the highest my camera will go) simply to limit the time it takes for each shot to expose. These shots won’t be used in the final process, but they are valuable in letting me know which parts of the horizon are off-limits.

    As far as exposure time goes, it’s better to keep it as short as possible, otherwise you’ll end up with movement in your stars as the Earth rotates. As an example, my kayak photograph was shot at 30 seconds, which was actually a bit long and if you look closely you can see some movement in the stars.

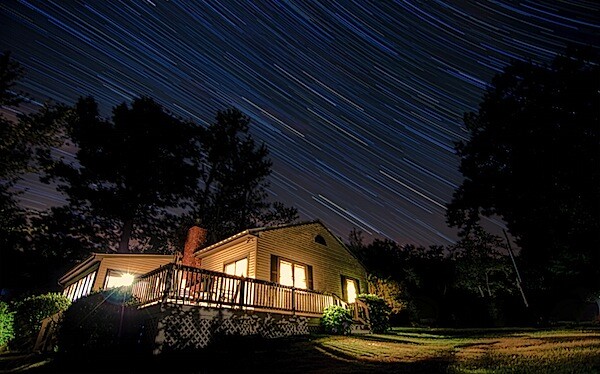
    Now, don’t get me wrong, this can be an extremely cool style of photography in and of itself, referred to most often as creating star-trails like this shot below.

    startrailphoto.jpg

    There’s a great post here on dPS about shooting star-trails, which you should check out for more information if you’re interesting in creating this kinds of photographs.

    Processing the Photo

    Processing these night sky photographs can be a bit intimidating, as at first they won’t look like much. As I mentioned above, I’d highly recommend shooting in the RAW format if your camera offers it, as it will allow you to do a lot more when it comes to this step.

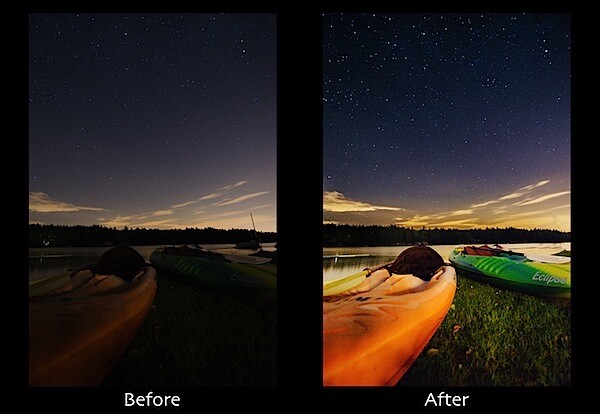
    BEFORE AND AFTER.jpg

    For the shot featured at the top of this post I broke up the photograph into two zones to process, the sky and the foreground. I used LR4′s adjustment tool to selectively tweak each region until I was satisfied with the end result. 

    For more on how I edited this photograph watch this quick video walkthrough I made of the process.

    John Davenport is an enthusiastic amateur photographer and blogger who shares daily photos on his site Phogropathy. You can also find him on Facebook and Twitter.

    Post originally from: Digital Photography Tips.

    Check out our more Photography Tips at Photography Tips for Beginners, Portrait Photography Tips and Wedding Photography Tips.

    How to Photograph the Stars


    Digital Photography School

  • Wide Angle: Weekly Photography Challenge

    This week your photographic challenge is to take and share a picture taken with the widest available focal length to you.

    Wide-Angle-Lens-1-1Photo by WanderingtheWorld – 10mm

    This challenge builds upon our recent tutorial – 7 Ways to Get More out of a Wide-Angle Lens which gives some practical tips on shooting this way. While not everyone has a true wide-angle lens to shoot with we challenge you to use whatever you have available. If your camera has a zoom lens – resist the temptation to zoom in this week and shoot as much as you can at the wider end of the zoom.

    A few other posts that might help you tackle this wide angle challenge include:

    • Using Wide Angle Lens Distortion Creatively
    • 17 Amazing Wide Angle Images
    • 6 Winning Ways to Work Wide
    • How to Get the Best Results from Ultra-Wide Lenses
    • Wide, Wider, Widest – Wide Angle Photography

    Once you’ve taken and selected the ‘Wide Angle’ image that you’d like to share – upload it to your favourite photo sharing site or blog and either share a link to it or – embed them in the comments using the our new tool to do so.

    If you tag your photos on Flickr, Instagram, Twitter or other sites with Tagging tag them as #DPSWIDE to help others find them. Linking back to this page might also help others know what you’re doing so that they can share in the fun.

    Also – don’t forget to check out some of the great shots posted in last weeks challenge – Green challenge where there were some great shots submitted.

    I’m looking forward to seeing your shots!

    Post originally from: Digital Photography Tips.

    Check out our more Photography Tips at Photography Tips for Beginners, Portrait Photography Tips and Wedding Photography Tips.

    Wide Angle: Weekly Photography Challenge


    Digital Photography School

  • When Less is Really More: Minimalism in Photography [70+ Examples]

    Who does understand minimalism as a form of art? I guess, quite less people than those who like it. Have you ever noticed that you like a photo, music, video or any other artwork, but you can’t explain why it is so attractive for you? It excites your mind and you can’t take your eyes off of it. Minimalist photography Continue Reading
    Photodoto

  • The Latest Innovations in Photography

    Technology has never failed to amaze us with its continuous advancements. It has been applied to many different fields including the field of photography. Photography has been improved dramatically through time and more photography advancements are still being developed till present. Before there was only still photograph or pictures but now, a camera can shoot and record videos as well Continue Reading
    Photodoto

  • Taking The Best Holiday Photos: Smartphone or Digital Camera?

    Capturing quality photos on holiday is almost important when remember those great memories. In recent years the Smartphone has battled it out with the digital camera for the title of the most portable photo capturing device. Both have improved significantly with the development of technology and turned the nation into lovers of photography.

    Using a Smartphone is perhaps more convenient than carrying an extra bit of kit. A camera is an essential piece of holiday kit that allows us to share our memories and print them for generations to remember. So why use a real camera?

    holiday-photos-smartphone-or-digital-camera

    © Scott Wyden Kivowitz

    This purely depends on the user requirements. Both need to be appealing, offer high quality photographs and be portable. They also must sustain tough environments where battery life is imperative.

    Quality v Convenience

    Digital cameras are now smaller and sleeker than ever. With amazing quality they can offer high resolution pictures even if you’ve zoomed in for a macro shot. However, it can often be more convenient to carry around a Smartphone which offers multi-functionality.

    Functionality

    Digital cameras have become feature rich offering optical zoom, image stabilization, face recognition and also a better ISO range. For the more experienced photographer there are adjustable shutter speeds as well as ranges for long exposure shots.

    Optical Zoom v Physical Zoom

    With most digital cameras offering a huge 14x zoom, long range shots can still remain in high quality. The typical quality on a Smartphone can be anything from 2x up to 5x zoom which doesn’t give the same range or quality as a well-priced digital camera.  There is a crucial difference in that a Smartphone’s digital zoom enlarges the image which compromises the quality whereas a digital camera’s physical zoom get closer to the actual image.

    Roaming Charges

    During your holiday it is important to remember that you will be charged for roaming charges. Whether you are making calls or taking photos, it will still do damage to your phone bill.

    Multi- Function

    Many users will feel that a Smartphone’s multi-functional uses will put it on top however its main selling points are focused on making calls and communication rather than photography. It’s always the digital camera that comes up trumps when it comes to taking high quality visual images and that is because it has been designed to do one thing well – take memorable photos for some all important occasions.


    Chris Lee is a former music student who enjoys blogging on a range of topics. This post was written on behalf of Sony Electronics.

    dslrBlog

  • Photo Talk Plus, EP36 with Special Guest Tom Hogarty

    Lotus Carroll and I had a great time this past Wednesday with panelists Chris Chabot, Jan Kabili, Joe Azure, Karen Hutton, Keith Barrett, and our special guest Tom Hogarty, Adobe Lightroom Product Manager.

    We discussed news stories, including 20 Pro Tips for Photographers on Google+ (http://goo.gl/2tLsx), the new Android Powered Nikon, and hidden view counts for your photos on Google+ (hint: you have to go to Picasa).

    Tom gave us some cool demos in LR4 and answered questions for us about everyone’s favorite photo editing program. If you’re not using Lighroom 4, well, you should be.

    After you watch the show, enter our contest to win one of two copies of Lightroom 4 from Adobe (each will come with a free copy of Trey Ratcliff‘s new and amazing LR4 Presets!). To enter all you need to do is make a post on Google+ and tell us either: your favorite feature we discussed on the show, make a feature request, or talk about how you will use LR4 if you win it. You must include the hashtag #LightroomPlus  in your post. You have until next Wednesday when we’ll pick the two best and announce those winners on our show that day at 8PM Pacific.

    Congratulations to Billy Wilson, who won a copy of LR4 and Trey’s presets live on the show, courtesy of SmugMug (who also threw in a free year of their Pro Service) because they are one of our fantastic sponsors, who are also well integrated with Lightroom. We love them!

    Big thanks to our other amazing sponsors, Adorama / http://adorama.com, Drobo / http://drobo.com, and Blurb Books / http://blurb.com

    Subscribe to YouTube here: http://goo.gl/JTyHn
    Subscribe to our Podcast on iTunes: http://goo.gl/RBd0g
    Follow us at Photo Talk Plus for more!


    Thomas Hawk Digital Connection