Category: Photography

  • How to Match Exposures when Stitching Panoramas in Photoshop

    Since the introduction of Photoshop CS2, Adobe’s image editing software has shipped with the ability to easily merge a series of photographs into a panorama.  Often, it is incredibly simple: once you have the images you want to stitch together, it only takes a few clicks to produce the blended panorama.  However, whilst Photoshop may be able to seamlessly merge your images 90% of the time, on occasion it may struggle to perfectly match the exposures across the input images resulting in a final panorama with obvious joins between the individual photographs.

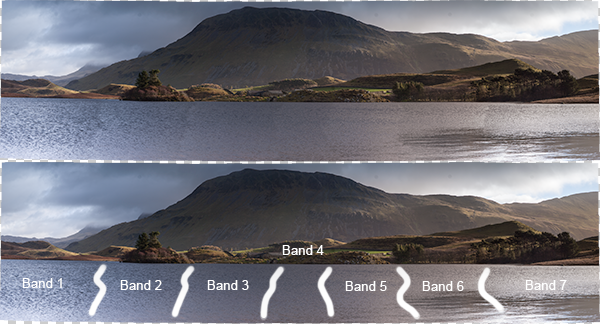
    To see what I mean, have a look at the image below.  This is a 7 shot panorama, straight out of Photomerge, and you can see obvious banding in the water of the lake, as the exposure/colour tone subtly change between images.
    panorama_exposure_match_image-3

    Top: The panorama fresh out of Photomerge. Bottom: I've highlighted the joins between the individual input images where the blending of exposures was not sufficient

    This article walks through a series of fairly simple steps to edit the above panorama to remove the obvious joins and give a perfectly blended panoramic image  (note: I am only going to discuss processing the panorama once it has been stitched by Photomerge.  For tips on how to take the images, prepare them for stitching and on use of Photoshop to stitch them, see this recent article by Jason Weddington).

    It is worth mentioning that the images I started with were a challenge to shoot for a panorama as the exposure differed greatly between the far left of the image, where I was shooting away from the sun, and to the far right, where I was shooting towards the sun.  Therefore, before blending the images into the panorama, the individual images were processed in Adobe Lightroom to try and match the exposures as closely as possible first.  Once complete, the selected images were exported to Photoshop to ‘merge as a panorama’, using the ‘auto’ setting.

    On to the steps…

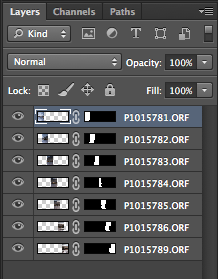
    1.  Once the images have been merged, the output image will consist of several layers (one for each input image, in this case 7) with a mask applied to each layer.  In many cases, these layers can be flattened at this point to give the final panorama, however, we’re going to make a few edits first.
    panorama_exposure_match_image-2

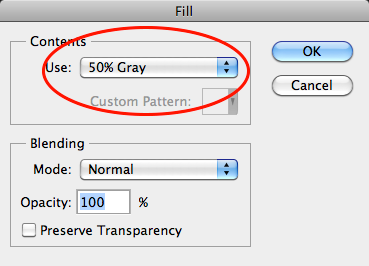
    2.  Create a new layer, on top of all other layers.  Fill the layer (Edit > Fill) with 50% grey:
    panorama_exposure_match_image-4

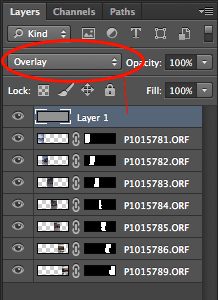
    3.  Set the blending mode of the ‘grey layer’ to ‘overlay’.  When set to overlay, a 50% grey layer will appear transparent, so initially this layer will make no difference:
    panorama_exposure_match_image-5

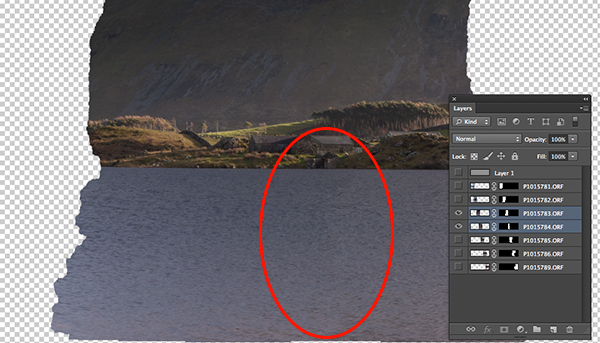
    4.  Find one of the joins where the exposure needs to be tweaked, for example, below, there is an obvious join between the two images.  The left hand image needs to be a little lighter and the right hand image needs to be a little darker.  Let’s address the left hand image first.
    panorama_exposure_match_image-6

    Only the two layers of interest are selected here. The left hand image needs to be lightened, whilst the right hand image needs to be darkened

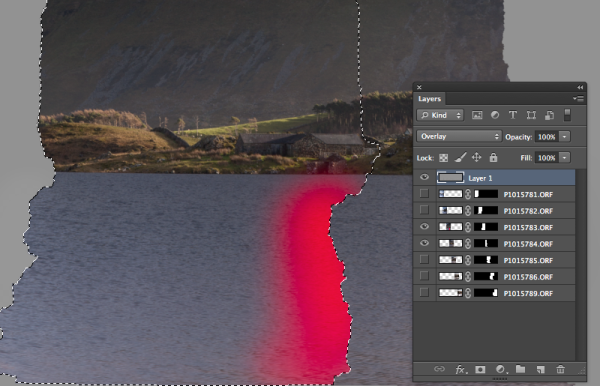
    5.  If we ctrl+click/cmd+click the mask of the appropriate layer (i.e. click on the black/white rectangle in the layer bar), we will bring the portion of the image to be edited into an active selection (we only want to edit inside of that selection for the time being).

    6.  Ensure the ‘grey layer’ is highlighted

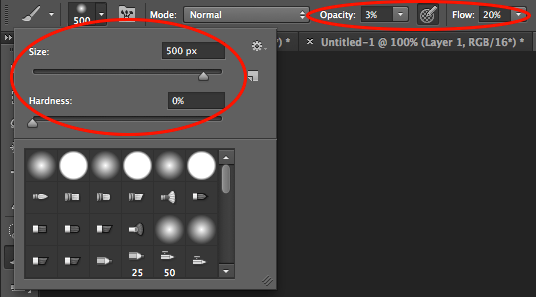
    7.  Select the brush tool.  You will want a large, soft brush so set the size to be a few hundred pixels (I used 500 px in this instance, but the size is relative to the size of your panorama) and set the hardness to 0%.  Set the opacity to 3% and the flow to 20%:
    panorama_exposure_match_image-7

    8.  To lighten the layer we want to select the colour white (if we wanted to darken the layer, we would select black).

    9.  Using the brush, liberally brush over the join and back towards the centre of the image.  This will paint white onto the grey layer, but only within the current selection.  As the brush is very soft the edits should be subtle, but as you brush you should be able to see the area under where you have painted white gradually begin to get lighter.
    panorama_exposure_match_image-8

    An active selection of the mask of the left hand image is required so that any edits are only applied within that selection. The idea is to paint white onto the 'grey layer' in the region highlighted by red in the above image.

    10.  In order to get seamless joins, I find that is is a compromise between lightening one image and darkening the other in order to maintain a smooth transition of tone/exposure across each image.  Therefore to edit the right hand image, you repeat steps 5 to 9, but ensure that the right hand image is within your active selection, and that the colour black has been selected for your brush.

    Initially it is a slow process that involves carefully modifying each image at the join in order to match the exposure, however once you get a feeling for the brush it can become quite quick.

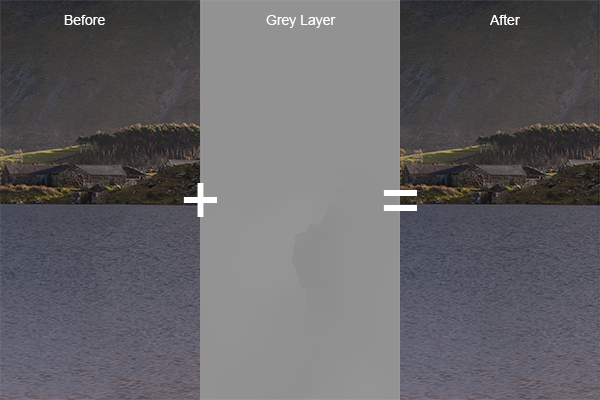
    If we change the blend mode of our ‘grey layer’ back to ‘normal’ you will be left with something similar to the middle image below, where you can see the result of the white/black brush strokes on the grey layer and the difference it makes to the actual join.
    panorama_exposure_blending_9

    A composite showing the starting image, the modified 'grey layer' and the final image, when the 'grey layer' is set to 'overlay'.

    If you repeat that for each join across the panorama, you will end up with grey layer that looks like the image below (with the blend mode set to ‘normal’).

    panorama_exposure_match_image-10

    The 'grey layer' for the entire panorama showing the white/black brush strokes around each join

    Once you set the blending mode back to ‘overlay’, all of the joins should disappear, and you should be left with a perfectly blended panorama with no tell tale signs of the joins:
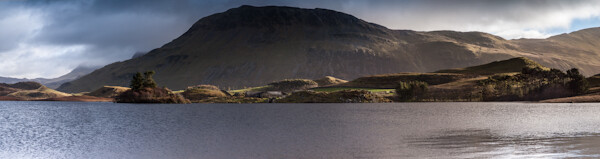
    panorama_exposure_match_image-11

    The entire panorama when the 'grey layer' is set to 'overlay'. The joins between the images are no longer visible in the water of the lake

    As the edits have been made to the ‘grey layer’ no permanent edits have yet been made to the actual images, so any mistakes are easily rectified or any further modifications can easily be made.  Once you are happy with the blending of the individual images, you can flatten the layers to produce your final panorama and make any further finishing touches:
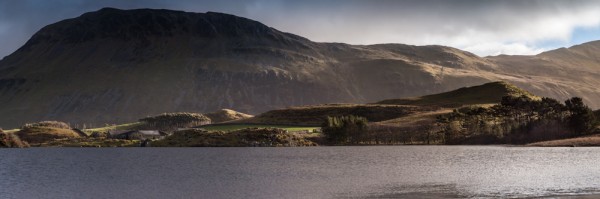
    panorama_exposure_match_image-12

    The final panorama: Llyn Cregennen, North Wales, UK

    I hope those steps were easy enough to follow.  Ultimately, this is just one application of a the use of a 50% grey layer, set to ‘overlay’, in order to modify the exposure of an image in a non-destructive manner (until the layers are flattened, that is).  So if you try to blend a panorama in Photoshop but didn’t quite get the results you were after, you dont have to jump for the clone brush straight away or send the image to the trash.  Give these steps a try and see if you can manually match your exposures where Photoshop can’t.

    Please let me know if you have any feedback, I welcome any comments and, as always, I’ll try to respond when I can.


    Post originally from: Digital Photography Tips.

    Check out our more Photography Tips at Photography Tips for Beginners, Portrait Photography Tips and Wedding Photography Tips.

    How to Match Exposures when Stitching Panoramas in Photoshop


    Digital Photography School

  • How To Keep Your Memory Cards Healthy

    In this post, Steve Berardi from PhotoNaturalist explains how to keep your memory cards healthy.

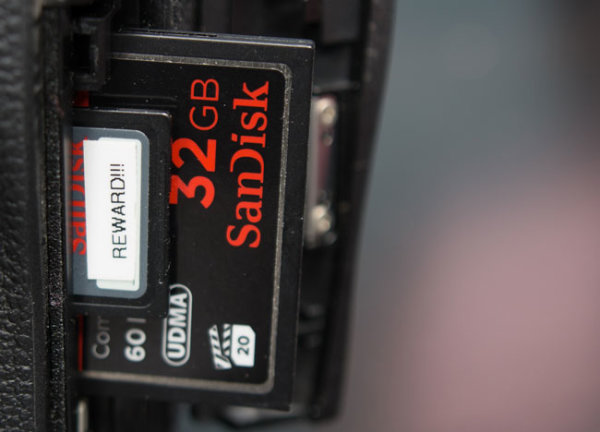
    Memcard

    Memory cards are one of the most often neglected parts of digital photography. But, they’re extremely important because they’re responsible for safely storing your photos until you get them to your computer.

    So, it’s important to take care of them properly. Here are a few tips for keeping them healthy:

    1. Format new cards as soon as you get them

    Many memory cards are advertised as “pre-formatted” and “ready to use,” but it’s always a good idea to reformat the card again when you receive it, since some cameras have special requirements for the file system of memory cards. Formatting the card with the camera you’ll be using it with will ensure that the card is in a format that the camera recognizes.

    2. Never fill your cards completely

    Most cameras have some kind of indicator on the LCD screen that tells you how many more photos you can shoot before filling the card. Keep an eye on this number and make sure you never get too close to filling the card, because if you happen to shoot a photo when the card is already full, there’s a chance your camera will still try to write part of the photo to the card (and potentially triggering a write error).

    3. Never let your batteries drain completely

    It’s also important to never let your batteries drain completely, because if your camera runs out of energy at the exact moment that it’s trying to write a photo to the memory card, then there’s a good chance that the camera will only write part of the file (which could corrupt the rest of the card).

    4. Reformat your cards instead of deleting all the photos

    Instead of deleting the photos on the card from your computer, always reformat the card from within the camera. This will ensure the card is in a format that the camera expects.

    5. Use good quality memory cards

    With all those camera bodies and lenses being so expensive, it’s tempting to save some money by getting inexpensive off-brand memory cards. But, remember the importance of these cards: they’re responsible for safely storing your photos. It’s worth a few dollars more to ensure your photos arrive safely at your computer :) Two brands that I can personally recommend are SanDisk and Lexar (if you’ve had good experience with another brand, please let us know by leaving a comment!).
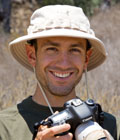
    Steveb2About the Author: Steve Berardi is a nature photographer and software engineer. You can usually find him hiking in the beautiful mountains and deserts of southern California.
    Read more of his articles on nature photography at PhotoNaturalist.

    Post originally from: Digital Photography Tips.

    Check out our more Photography Tips at Photography Tips for Beginners, Portrait Photography Tips and Wedding Photography Tips.

    How To Keep Your Memory Cards Healthy


    Digital Photography School

  • Bokeh: Weekly Photography Challenge

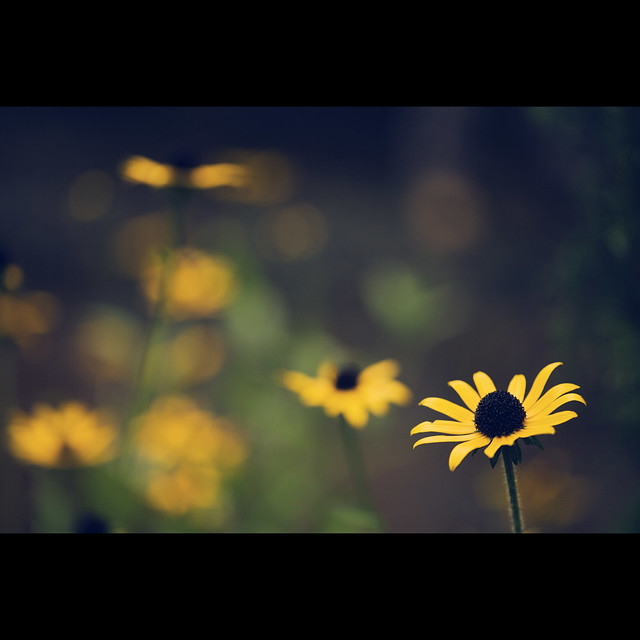
    Earlier today we published a plain english guide to achieving nice Bokeh in your shots – so lets put the teaching into practice and make Bokeh our theme for this week’s photography challenge.

    Beauty In-Focus | Explored

    We want to see you grabbing your camera over the next day or two and setting out to take some wonderful shots with Bokeh in them (i.e. some lovely out of focus areas in your shots).

    You can take Bokeh shots in portraits, macro work, still life, nature… really any type of photography you like – so hopefully there’s something for everyone!

    Learn how to take shots with Bokeh

    In addition to todays guide to shooting Bokeh check out:

    • How to Achieve Better Bokeh – 4 Simple Steps
    • How to Achieve Blurred Backgrounds in Portraits
    • 17 Beautiful Images with Shallow Depth of Field
    • How to Take Beautiful Bokeh Christmas Images (with 39 Examples)
    • Once you’ve taken and selected your best Bokeh shot upload it to your favourite photo sharing site and either share a link to it or – embed it in the comments using the our new tool to do so.

      If you tag your photos on Flickr, Instagram, Twitter or other sites with Tagging tag them as #DPSBOKEH to help others find them. Linking back to this page might also help others know what you’re doing so that they can share in the fun.

      Also – don’t forget to check out some of the great shots posted in our last challenge – Best Shot of 2012 challenge where there were some beautiful shots submitted.

    Post originally from: Digital Photography Tips.

    Check out our more Photography Tips at Photography Tips for Beginners, Portrait Photography Tips and Wedding Photography Tips.

    Bokeh: Weekly Photography Challenge


    Digital Photography School

  • 50 Sweet Valentine Gifts for Photographers and Their Sweethearts

    Season of love is here. Love is in the air and it makes everyone rack his or her brains on a perfect gift for their lovers. Whether you’re an amateur photographer or a real pro, you can give your sweetheart a photography Valentine gift that would be a winner for sure. Of course, you’re beating your head on the gift Continue Reading

    The post 50 Sweet Valentine Gifts for Photographers and Their Sweethearts appeared first on Photodoto.


    Photodoto

  • Four Tips on Your Image Data Safety Procedures

    Introduction

    The following is an excerpt from the SLR Lounge Lightroom Workflow System Workshop on DVD, a system designed to increase your post production speed by 5 to 10 times. Click here to learn more.

    I was attending a workshop last year in Los Angeles where the instructor talked about the importance of having backup gear for an important shoot. His mantra was that during a shoot, “something always goes wrong.” Gear redundancy is important, especially when you are on the client’s clock. Without a doubt, not having a backup to your gear can potentially derail a photoshoot if something were to break.

    However, the most important and expensive component of your photoshoot is indeed not your camera gear. Unlike your gear, which you carry insurance for and can be replaced, the images from the shoot may not be replaceable and are therefore the most critical component of a paid photoshoot.

    Not only would it be far more expensive to setup a reshoot, for photojournalists shooting a wedding or a Presidential inauguration, a reshoot is simply impossible.

    So just like your gear, it is important to have duplicate copies of your client’s images from the shoot to your computer. Here are four tips that you can integrate into your shooting workflow.

    1. Back up the Images in Camera

    Ideally, when you are working professionally, it is best to shoot with a DSLR that can record onto two cards on the fly. It is the most convenient and most portable method of creating backups of your images as you can simply set the camera to “duplicate” the images onto each card as they are recorded. If you are in need of frequent high speed burst shooting for action/sports, this may not be possible since using dual cards can often fill your cameras buffer too quickly. But, wherever possible, using two cards in camera will automatically add an additional level of security to your workflow.

    The majority of the full-frame DSLRs such as the Nikon D600, Sony A99, Canon 5D mkIII, Canon 1D Series, Nikon D800 and the Nikon D4 Series have this capability already. Currently, the Nikon D7000 is the only APS-C DSLR that has two card slots.

    Additionally, we recommend that for your most important shoots to only use memory cards from established manufacturers such as Sandisk and Lexar. There are also many fake Sandisk and Lexar cards out there, so be wary of them. For Amazon shoppers, be sure to buy directly from Amazon itself and not a third-party seller on Amazon. Often times these counterfeit cards are virtually impossible to differentiate from packaging alone. For those that want the extra peace of mind there are also “zero failure” memory card brands out there such as Hoodman. However, in sticking with the major name brands, I have never had a card failure and thus never really felt like it was worth the 5x-10x premium price for zero failure memory.

    It is also a good idea to have a standardized system of storing your cards in order to know which memory cards have been used. An example of a straightforward system is to place any used card face down in the wallet.

    2. Back up the Images at the Shoot

    Another method of backing up your images during the shoot is by backing up the images to either a laptop or a portable media storage drive such as the Sanho Hyperdrive Colorspace UDMA. This is especially useful when you are shooting with a single-card camera or if you have a second shooter with you

    The laptop is easier if you are in a controlled environment such as a studio or a private photoshoot, but it is not recommended when you have to be in a less-secure environment such as a wedding where you may be running around everywhere. This is where a portable media drive can attract less attention, while also being far more portable than a laptop.

    3. Safeguard the Memory Card on the Trip Back

    The trip from the shoot is another part of the day where having a contingency plan can keep the client’s images safe in case something happens on the way home or to the studio.

    One way to ensure the safety of the images is to keep both copies of the images in two separate places. I usually carry the primary cards in my card wallet which is attached to my belt loop and kept in my pocket. The back-up cards, laptop, hard drive, or portable media storage stays in the trunk.

    If someone rear ends the car and damages the gear, or if someone breaks into the car while I’m eating at a restaurant, I still have at least one set of the images with me. Additionally, if the memory cards in my pocket somehow fall out, I still have the backup in the trunk.

    4. Back up to Images to at Least Two Locations on the Computer

    Once you returned to your studio or home, be sure to back up your images to your computer and into the backup hard drive. For additional security, you can also upload the images as either the original RAW or the finished images on to an online storage site like Amazon’s Glacier or Crashplan.

    Thankfully, hard drives are relatively cheap nowadays, and additionally, there are plenty of online storage options as well. It pays to research the brand names and websites to know which hard drives and online storage sites are the most reliable. I personally use 1TB Silicon Power Rugged Armor A80 portable hard drives because they can take a beating (literally). The current online storage solution that I use is Crashplan.

    Conclusion

    Remember, gear can be replaced, but the client’s images may not be replaceable, so it is important to work image redundancy into your shooting workflow. The good news is that it does not take that much more effort to safeguard your images, just good habits and awareness.

    The SLR Lounge Workflow System Workshop on DVD

    The SLR Lounge Workflow System Workshop on DVD takes everything that we taught in the Lightroom 4 A to Z Workshop on DVD and builds by teaching you how to maximize your shooting and post processing efficiency and workflow. This 7 hour DVD covers data safety procedures, file management, culling standards and overall develop techniques to increase your post production efficiency by up to 15x! In fact, using this Workflow System we can cull and edit over 1,500 images per hour! Don’t believe us, watch the teaser video! The Workflow System is also available as a part of the Lightroom 4 Workshop Collection. To learn more click this link.

    Post originally from: Digital Photography Tips.

    Check out our more Photography Tips at Photography Tips for Beginners, Portrait Photography Tips and Wedding Photography Tips.

    Four Tips on Your Image Data Safety Procedures


    Digital Photography School

  • Street Photography: Exploitative vs Respect

    Over the last couple of years we’ve seen a rise in interest by many dPS readers (and around the web) in the topic of street photography and street portraiture.

    While I love the idea of documenting what’s going on in a neighbourhood there are times when I view some street photographers work that I can’t help but feel a little… uncomfortable at what is being presented.

    By no means is it in all street photography but there are times where what is presented is very confronting – not only to those viewing the images but sometimes the act of taking some street photography seems quite confronting, intrusive and even at times exploitative to the subjects of photos.

    While I think there’s certainly a place for using photography to document our culture (both the good and the bad) I’ve increasingly been worrying that some photographers might be overstepping the mark of late and in the process are almost exploiting the people and neighbourhoods that they photograph.

    Today I came across the following video which tells the story of two street photographers taking a different approach as they photograph the Tenderloin neighbourhood in San Fransisco – an area that is often known for being a rough and dangerous part of the city.

    Photographers Brad Evans and Travis Jensen share in the video about how some street photographers have photographed that neighbourhood in a way that focuses upon the negative aspects of the area and that exploit the people there in the way that they go about their photography – but with their project they wanted to photograph the neighbourhood in a way that respected everyone that they photographed.

    The other aspect of this book and magazine project that emerged from this is that profits were shared with a community group to put something back into the neighbourhood.

    I love the philosophy of street photography expressed in this video – it’s well worth watching.

    More than photography from sidewalktalk.dk on Vimeo.

    I’d love to hear what you think on this topic. By no means am I arguing against street photography or even using photography to document some of the challenges and hardships that some people face – rather I’m wondering if this can be done in a more respectful and caring way – a way that not only highlights the issues but which also treats people with respect and dignity through the process.

    Over to you – what do you think?

    Post originally from: Digital Photography Tips.

    Check out our more Photography Tips at Photography Tips for Beginners, Portrait Photography Tips and Wedding Photography Tips.

    Street Photography: Exploitative vs Respect


    Digital Photography School

  • Create an Image Watermark in Photoshop

    Create an Image Watermark in Photoshop

    In a recent post I talked about using an image watermark in Lightroom to apply to your images. This post I’ll show you how to create the watermark image to use.

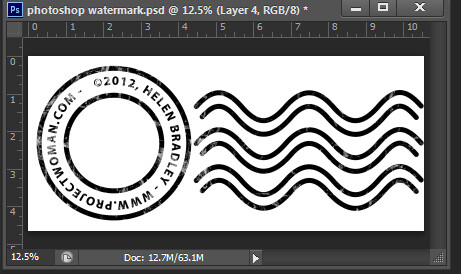
    This watermark has two concentric circles with text between them and a set of wavy lines making it reminiscent of a post office stamp cancellation. The watermark also has a slightly grunge look.

    To make it, start in Photoshop with a letter size image. I set mine to landscape orientation with a white background. This will make it easy to create a black watermark and I will be able to see it as I work.

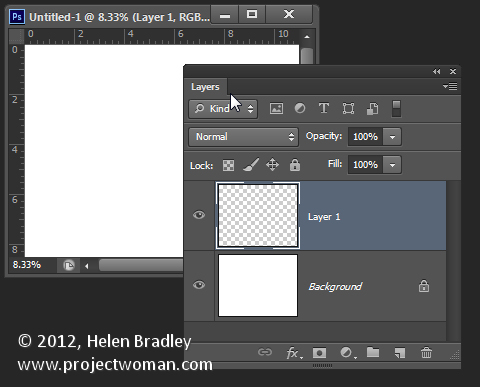
    Add a new layer by choosing Layer > New > Layer. This is a transparent layer on which you’ll place the circles.

    Make a watermark image in photoshop step1

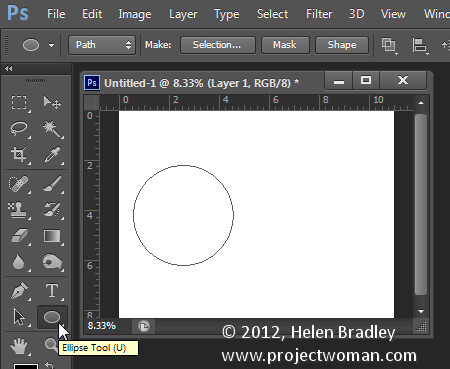
    Start with the Ellipsis Tool which shares a position in the Tools with the Rectangle tool – it is a shape tool – don’t use the Elliptical Marquee Tool.

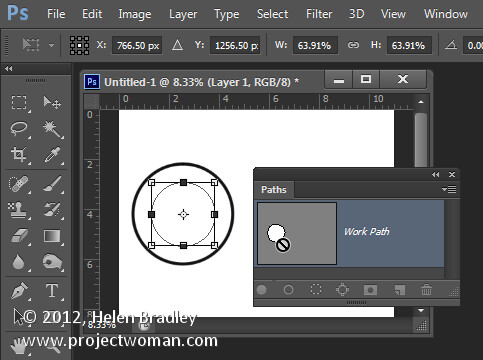
    Make sure that the option on the Tool Option bar is set to Path and hold Shift as you drag a circle on the screen.

    Make a watermark image in photoshop step2

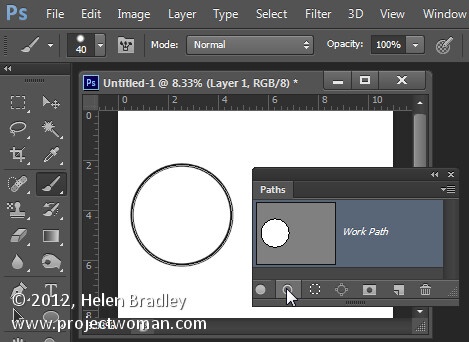
    When the circle is in position choose Window > Paths to view the Paths palette.

    Select the Brush tool and select a brush. I used a Hard Round brush sized down to around 40 pixels.

    Set the foreground color to black, click the Work Path in the Paths palette to select it and then click the Stroke Path with Brush icon at the foot of the Paths palette. This strokes the path with the current brush.

    Make a watermark image in photoshop step3

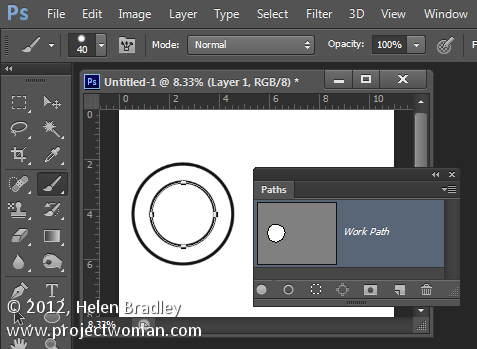
    Click the Path Selection Tool which shares a position in the Tools palette with the Direct Selection Tool. Click on the path and it will select the entire path.

    If the transformation handles do not appear press Ctrl + T (Command + T on the Mac). Hold Shift and Alt (Shift and Option on the Mac) and drag inwards to create a circle which is concentric with the previous circle.

    Make a watermark image in photoshop step4

    Repeat the process of selecting the Brush, click on the path so it is selected and click to Stroke Path with Brush.

    Make a watermark image in photoshop step5

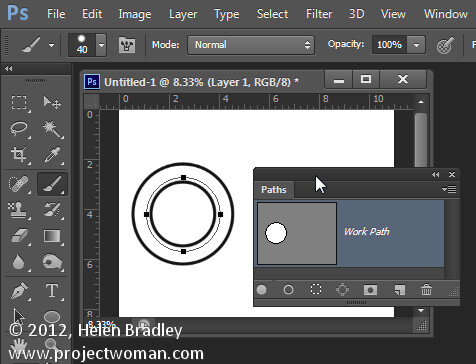
    Click the Path Selection Tool and, with this smaller circle selected, press Ctrl + T (Command + T on the Mac). Hold Shift and Alt (Shift and Option on the Mac) and drag a little outwards to create a circle path for typing the text along.

    Make a watermark image in photoshop step6

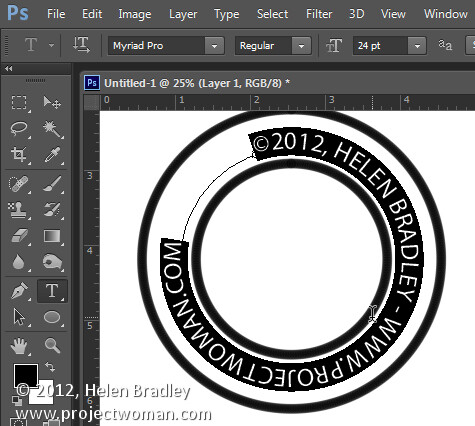
    Select the Text tool and hold the mouse over this third path.

    Look for the text tool to show as an I-beam pointer with a bent line through it – this tells you Photoshop will align the text along the path.

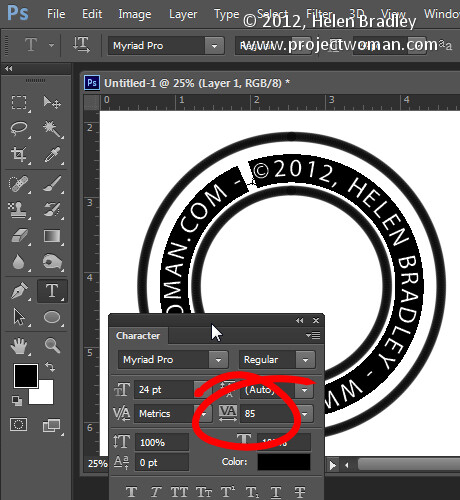
    Click once to anchor the Text tool to the path. Select the text color – in my case I chose black – and select the font and font size – I used Myriad Pro – 24 points. Type the text to use – I typed:

    © 2012, Helen Bradley – projectwoman.com –

    To enter © hold Alt and type 0169.
    ?Make a watermark image in photoshop step7

    With the text selected display the Character palette by choosing Window > Character and adjust the tracking to expand the text so it wraps all the way around the shape.

    Make a watermark image in photoshop step8

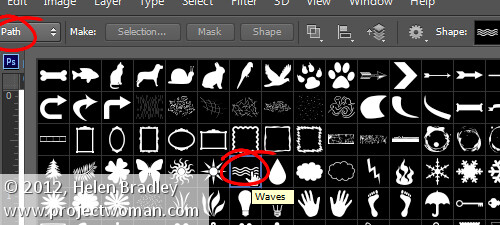
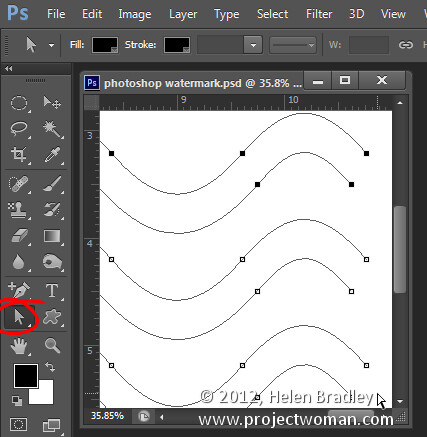
    You can draw your own lines for the cancellation lines using the Custom Shape Tool. First create a new layer then select the Wave shape and on the Tool Options bar make sure that it is set to Path.

    Make a watermark image in photoshop step9

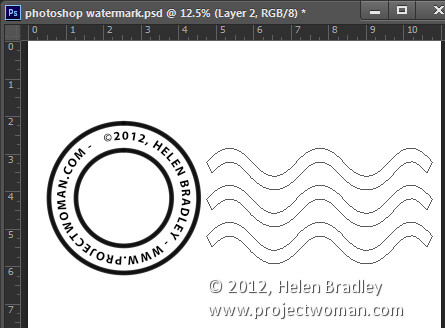
    Drag to make your curved lines.

    Make a watermark image in photoshop step10

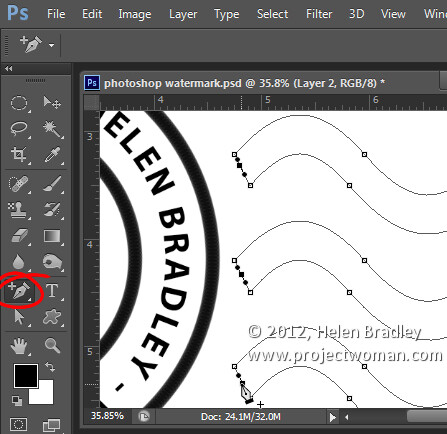
    Select the Add Anchor Point Tool (it shares a position with the Pen tool) and click once in the middle of each end of the path to add a point.

    Make a watermark image in photoshop step11

    Target the Direct Selection Tool, click one at a time on the Anchor points you just added and press Delete – this breaks the 3 paths in half to make 6 paths. When the Anchor is selected it will show as a dark filled square.

    Make a watermark image in photoshop step12

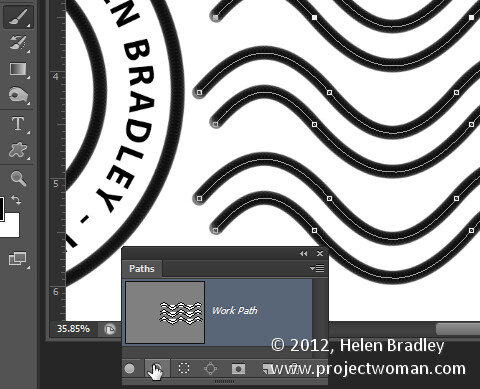
    Select your Brush and black paint and select the path in the Paths palette and click the Stroke Path with Brush icon.

    Make a watermark image in photoshop step13

    Once you’ve done this you can add a grunge effect.

    Start by hiding the background layer, target the top layer and press Control + Alt + Shift + E to create a flattened layer with transparency. Hide all layers but this top one.

    If the lines aren’t dark enough duplicate this layer a few times and they will darken. Then merge all these duplicated layers

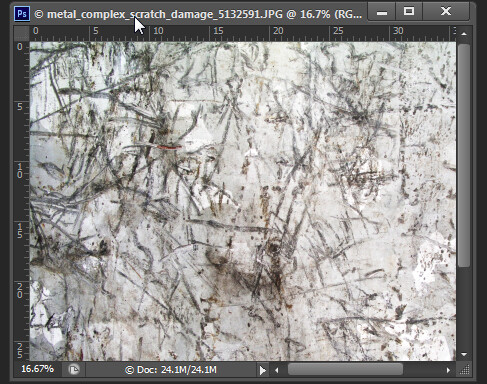
    To add the grunge effect click Add a Layer Mask icon at the foot of the layers palette to add a mask to the layer. Locate an interesting texture image to use such as this one from www.mayang.com/textures.

    Make a watermark image in photoshop step14

    Make it the same size as your image by choosing Image > Resize, deselect the Constrain Proportions checkbox and click Window and click your copyright image file to use its dimensions. Click Ok.

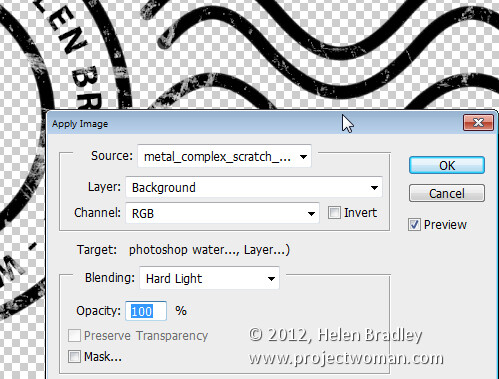
    Now return to your Copyright image, click the mask to target it and choose Image > Apply Image. From the Source box select the texture image (it won’t appear in the list if it isn’t the right size), and then set the other options to suit so you get a distressed look to your copyright symbol. Click Ok.

    Make a watermark image in photoshop step15

    Add a new layer and press Control + Alt + Shift + E to create a flattened version of the image on this layer but maintaining its transparency. Make all other layers invisible and crop the image close around your shape.

    Then choose File > Save As and save it as a .PNG image to use in Photoshop or Lightroom as a copyright overlay.

    If you select the top layer and press Control + I you’ll invert it to make a white version of the copyright image that you can then save as a second .png file.

    Make a watermark image in photoshop step16

    Make sure to also save your file as a .psd file if you think you might need to make changes to it – for example, to change the date – a .png file is flattened so it won’t be easy to edit – a .psd file will be much easier to update.

    Post originally from: Digital Photography Tips.

    Check out our more Photography Tips at Photography Tips for Beginners, Portrait Photography Tips and Wedding Photography Tips.

    Create an Image Watermark in Photoshop


    Digital Photography School

  • On Assignment: Cheap Portable Studio, Pt. 1

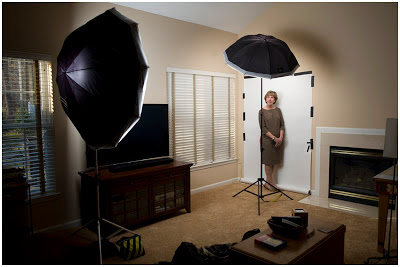
    Still riffing on Monday's post about studio-vs.-location, here's another reason I am not a big fan of studios. You can replicate them damn-near anywhere, and for almost nothing.

    So let's switch things up and start with the BTS this time, to show you the "studio" used to photograph consultant Laurie Reuben last week.

    It's a minimalist, two-speedlight setup that yields an elegant, painterly light—without the expensive studio part. Read more »
    Strobist

  • Retouching with Cloning Tools: Part 1

    If you look closely at commercial photographs, you will probably notice that they rarely contain random power lines or vehicles in the way of the shot. You’ll probably also notice that the models always have flawless skin, and iconic tourist locations are tourist-free. Photographers don’t spend all of their time searching for perfect-looking models or visiting deserted cities. Instead, they typically Continue Reading

    The post Retouching with Cloning Tools: Part 1 appeared first on Photodoto.


    Photodoto

  • LowePro Rover Pro 35L AW Camera Backpack [Review]

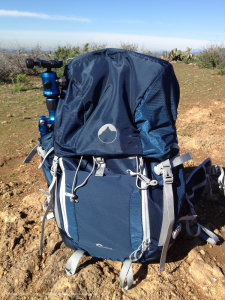
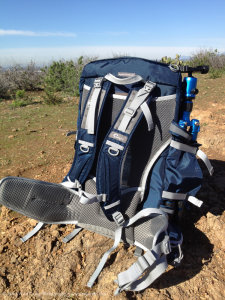
    Finally! Finally LowePro is making backpacks that carry cameras, not camera bags that happen to be carried on your back. Not only that, the Rover Pro is a versatile bag when you aren’t carrying your camera with ample room for a long day hike. I have used this bag on a couple of short trips and a 6 mile slog through a wet and tangle arroyo and am here to report and the good and the bad.
    Specifications

    Capacity:

    • Pro DSLR with attached 24-70mm lens
    • 1 extra lens or flash
    • Tripod or monopod
    • 2 liter hydration reservoir
    • Sleeping pad, small tent, ice axe/trekking poles, and other personal items

    Size(Interior):
    5.7W X 6.2D X 12.4H in./
    14.5 X 15.8 X 31.5 cm

    Size(Exterior):
    12.6W X 10.6D X 19.7H in./
    32 X 27 X 50 cm

    Weight:
    5.07lbs/2.3kg

    Features

    The concept of the Rover Pro AW is a backpack first and a camera bag second. This works well for active photographers, but there are some snags.

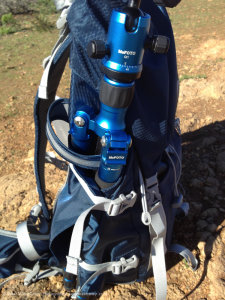
    First, the bag is actually two bags. The first is the main backpack body. It comes complete with full suspension system, water bladder/bottle pocket, tripod straps/sleeve, compression straps, and a couple of pockets in the back and top for odds and ends. It also has two loops for ice axes (yes, I might actually use them as such) or trekking poles.

    The rear pocket is perfect sized for a guide book or iPad/tablet and the water bottle/bladder pocket comes with compression straps and a covered outlet to you’re your bladder hose. These days, that is just about required. There are small pockets on the hip belt and they will hold a memory card wallet or smart phone (my iPhone 4 fits with extra room). Although, with a phone in the hip pocket and my hands in my pants pockets, it wasn’t comfortable as the hip-belt pockets got in the way, but only with a phone in them. If you never hike with your hands in your pockets, no worries.
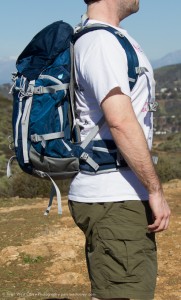
    The suspension system is good and I was happy the waist belt reached my hips unlike many packs. I am 6’1” and often need a slightly longer pack so the weight rests on my hips and not my shoulders. This is hard to find in camera bags but the Rover Pro 35L was very comfortable in this sense. Calling it a waist belt would be wrong, I guess, it is more of a proper hip belt as that is where the weight should rest.

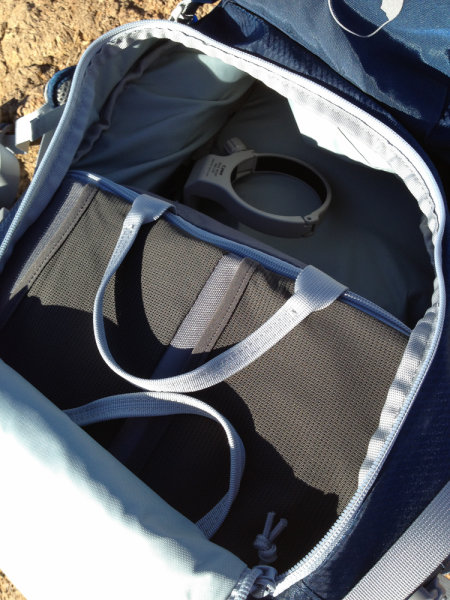
    Inside the main compartment is a removable camera bag. It is not big, but can hold a full size DSLR with battery grip and long lens. In my case, I was able to hold a Canon 7D, grip and 28-300mm L lens. There is a slot section in the bag for memory, hard drive, flash or what not. The 45L version of this bag comes with another internal bag for a long lens. This internal bag also has elastic pouches on the outside and two zippered pockets on the inside for filters, gels, memory cards, etc… Lastly, it has a top loop and side carry handles as it can be used by itself outside the bag.

    Oh, and as this is the AW (All Weather) version, it comes with a rain cover.

    In Real Life

    One important thing to realize about this bag, is it is not intended to be a fast action bag. It is meant to carry a lot over a long distance comfortably. Truth be told, you might be better served with your regular overnight backpack and put your camera in an insert. What this bag helps with that your overnight pack might not, is access. While it is not intended for quick access to a camera like most camera bags with their integrated organization, it does allow for either top or back panel access. From here, the camera insert bag is removed and away you go.
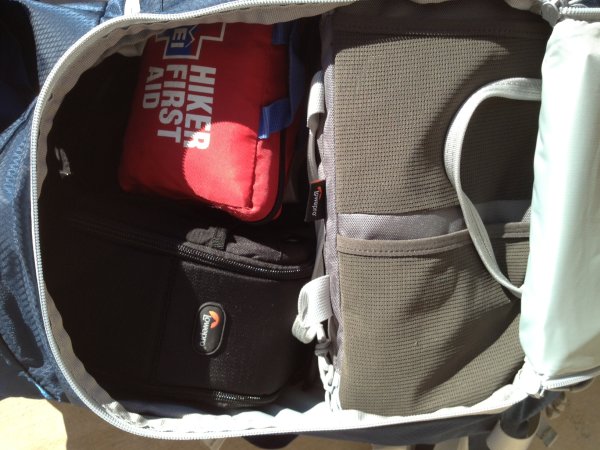
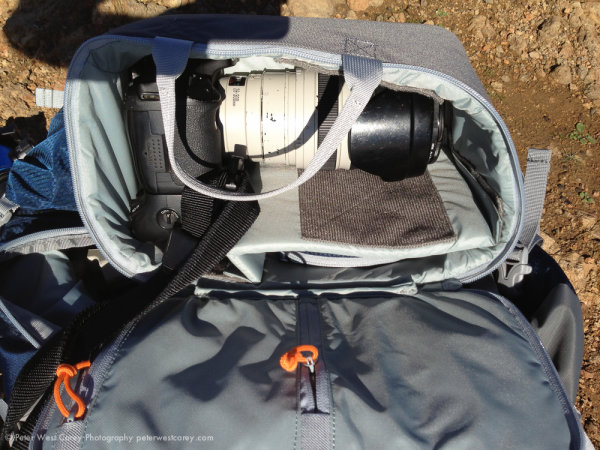
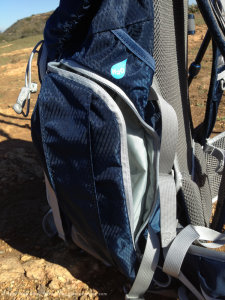
    I would rate the 35L version as a great day trip pack and the 45L as an overnight bag, possibly. Not for winter use, but I can see how a sleeping bag, pad, and small tent can fit in an on this bag (straps on the bottom help with gear haulage). When accessing the camera insert, I often found items would shift and it would take a few extra steps to put the insert back in the main bag after shooting. This make sense and is a fair trade off for not having wasted space as you would with a integrated bag.

    I thought the hip belt adjustment was lackluster. I could tighten it easily enough with the extra long pulls (good for those with a larger belly) but loosening the straps was unduly difficult and took two hands to sort of ‘jog’ the strap back. Not a deal breaker, but it can use improvement. It took me a couple of tries to figure out how to adjust the shoulder straps for my height (hint: push against the velcro hard) and I was very happy that it adjusted to my length. The metal stays and semi-rigid frame is of quality design and the ‘trmpoline’ backing did keep the pack away from my back and cool.

    The zippers are average, nothing to rave about and they work. The rain cover, oh the rain cover…the rain cover finally DETACHES!! Thank you, LowePro! There is a pocket for it on the bottom of the bag and it doesn’t interfere with the bottom sleeping pad straps, which is nice. A strip of velcro helps keep the cover with the bag if you like, but once wet, the cover can be detached to dry. It also has a couple of compression straps on the top to form fit. Nice touch. I have not long term tested the cover, though.

    Conclusion

    When I realize how this bag is to be used, to get stuff to the shoot after a long hike over varied terrain, I appreciated it more. The camera bag is not of the quality of the f-stop bags, such as the Satori EXP, but the price is also less. While not set up for quick access, the pack does well to keep gear comfortable on my back over longer distances. The rain cover and tripod straps work well and I like that they didn’t try to make this a computer carrier too. The 35L has a lot of space and the 45L would be even larger.

    Adjustable shoulder straps help this bag fit a range of torso sizes and the straps for gear are not excessive just for looks like some bags. What’s more, take the camera bag insert out and the pack functions as a very useful ‘regular’ 35L backpack for an overnight hike. I would recommend this bag for some someone wanting a more comfortable pack, but it also competes with standard, traditional day packs which can fit a right-sized camera insert. It’s not the only bag in this niche, but it does its job very well.


    Post originally from: Digital Photography Tips.

    Check out our more Photography Tips at Photography Tips for Beginners, Portrait Photography Tips and Wedding Photography Tips.

    LowePro Rover Pro 35L AW Camera Backpack [Review]


    Digital Photography School