Category: Photography

  • Grab Our New eBook and Win a New Lens and a Personal Portraiture Mentoring Package!

    It has been two weeks since we announced our brand new eBook – Portraits: Making the Shot by Gina Milicia.

    The feedback from readers has been wonderful and many have snapped up our launch offer that gets you a second ‘portrait recipes’ eBook by Gina for free when you buy the first.

    Today I’m excited to announce a further bonus for anyone (anywhere in the world) who buys this eBook in the next 2 weeks (and anyone who has already picked it up).

    One person who grabs Gina’s eBook is going to win $ 1000 towards a new lens/lenses and some personal mentoring by Gina herself.

    Here’s the Deal in a Nutshell:

    Buy Portraits: Making the Shot in the next two weeks and on top of this great new eBook you’ll get:

    • The bonus eBook ‘14 Recipes for Amazing Portraits‘ worth $ 10 for free
    • $ 1000 USD to go towards any lens (or combination of lenses) you choose
    • 3 hours worth of mentoring and a folio review from Gina via Skype (details below) – worth $ 600

    The Mentoring sessions with Gina includes:

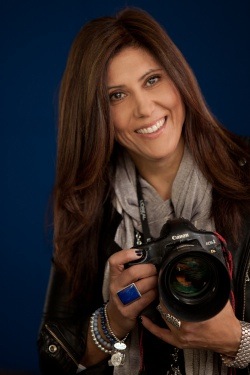
    GinaMilica12-1WEB.jpgThis is your opportunity for some one on one time with the author of our eBook to work on your portrait photography!

    Gina Milicia has photographed some of the world’s most powerful and famous people including royalty and heads of state, billionaires and a-list celebrities and been on location in some of the world’s most exotic places.

    Your mentoring with Gina will include:

    • initial 1.5 hours skype introduction and coaching
    • folio review (you send in your images and Gina will review them, then give you personalised exercises to help you improve your portrait photography
    • followed up with a 1.5 hour further mentoring and coaching

    The $ 1000 towards a new lens/lenses:

    You choose any lens or lenses to the value of $ 1000 at a local (to you) online camera outlet and we’ll foot the bill.

    You can put it all towards a high end lens (like a Canon 24-105mm L series lens) or perhaps may choose 2 or 3 cheaper lenses. We’re also willing for you to go for a more expensive lens if you’d like to pay for whatever it costs above $ 1000.

    This competition is open to everyone who purchases this eBook during its launch and includes our international readers too!

    And yes – if you’ve already got the eBook you’re already in the draw with nothing more to do!

    Grab Your Copy Today

    Ready to see a marked improvement in your portrait photography and pick up these great bonuses?

    Learn more about the eBook here or grab a copy directly by clicking the ‘download it now’ button below.

    // < ![CDATA[ function EJEJC_lc(th) { return false; }

    // ]]>

    Post originally from: Digital Photography Tips.

    Check out our more Photography Tips at Photography Tips for Beginners, Portrait Photography Tips and Wedding Photography Tips.

    Grab Our New eBook and Win a New Lens and a Personal Portraiture Mentoring Package!


    Digital Photography School

  • Introducing the Creative Triangle

    This is the first in a series of articles by Andrew S Gibson, the author of Understanding EOS: A Beginner’s Guide to Canon EOS cameras.

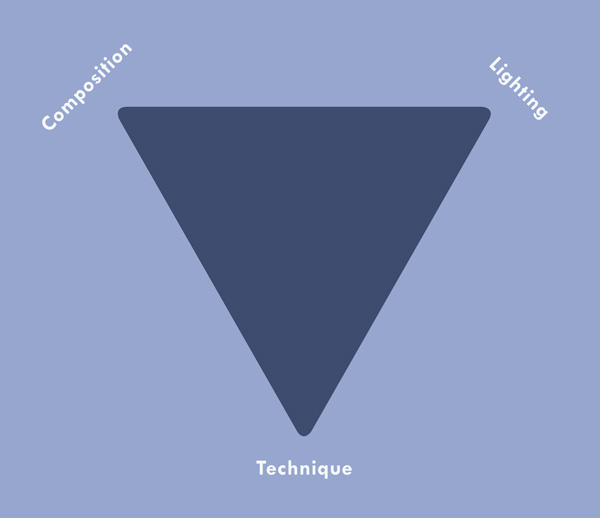
    Creative triangle 01

    The ‘creative triangle’ is my term for the idea that great photos are made from a combination of good composition, an understanding of beautiful lighting and the technical ability to control your camera.

    You could even think of this as another version of the rule-of-thirds. A good photo is comprised of one-third the composition, one-third the lighting and one-third the technical ability of the photographer.

    Creative triangle 02

    It’s not enough to learn what the various buttons, modes and functions on your camera do, important though that is. You also need to cultivate your eye for a good photo and an appreciation of the beauty of great lighting.

    How can you do this? One way is to look at the work of your favourite photographers with a critical eye. It’s not enough just to say that you like particular photo. Go deeper. Why do you like it? What are the elements of composition and light that help make the photo? Why has the photographer chosen to use the camera settings that he has? What lens did he use? How can you apply these ideas to your own photos?

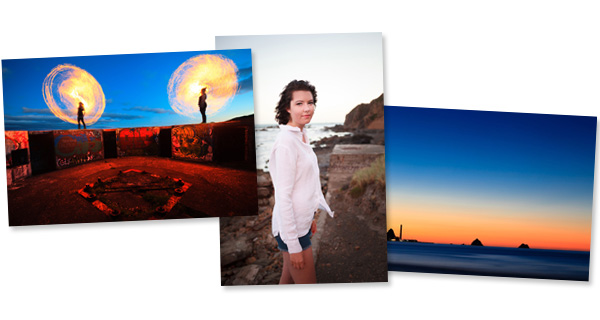
    To help you out I’m going to take a deeper look at three of my own images:

    Creative triangle 03

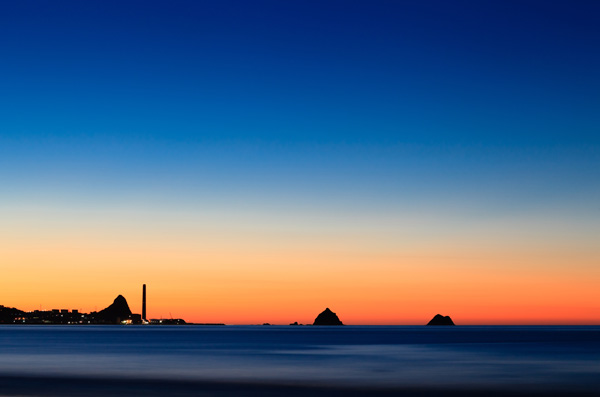
    Image #1: New Plymouth Sunset

    Camera: EOS 5D Mark II
    Lens: Canon EF 85mm f1.8
    Exposure: 219 seconds @ f11, ISO 200

    Focal length. I was drawn to this scene by the silhouettes of the rock stacks and the chimney. I needed to use an 85mm lens to ensure that they were large enough to have impact. A wider focal length would have made the rocks and chimney too small.

    Shutter speed. I used a shutter speed of 219 seconds. Mainly due to necessity – it was taken some time after sunset so light levels were low. I stopped down to f11 to ensure good depth-of-field and used a relatively low ISO for good image quality. The sea has recorded as a misty blur. This adds mood.

    Light. I took the photo after the sun had set. If you try to take the photo with the sun above the horizon, the contrast is too high. It’s much easier to take photos after the sun has disappeared. The colours are often better and as the sky gets darker you may see some stars.

    Colour contrast. The light from the sunset has split the image into three bands of colour. Blue and orange are contrasting colours and they give the photo impact. Colour temperature comes into play here. Blue light is cool, orange light is warm and the contrast between the two creates atmosphere.

    Creative triangle 04

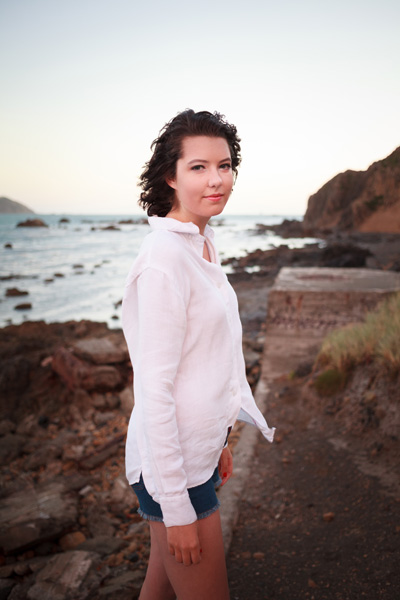
    Image #2: Evening Portrait

    Camera: EOS 5D Mark II
    Lens: Canon EF 40mm f2.8
    Exposure: 1/180 second @ f2.8, ISO 800

    Focal length. I took this photo with my 40mm pancake lens. This lens is a moderate wide-angle on a full-frame camera. I like to use it for portraits, as the perspective is wide enough to include the background without too much distortion.

    Aperture. I set the aperture to f2.8 (the widest on this lens) to throw the background out of focus. This helps concentrate attention on the model. A sharp background competes with the model, which may be useful if you are trying to tell a story in the way that photojournalists do, but can be a distraction with photos like this.

    Light. This photo was taken late in the evening. The shoot was delayed so were were out later than I had intended, but I was rewarded with beautiful light. The sun had disappeared beneath the horizon, but the light still had a red glow and a beautiful, soft quality ideal for portraits.

    Creative triangle 05

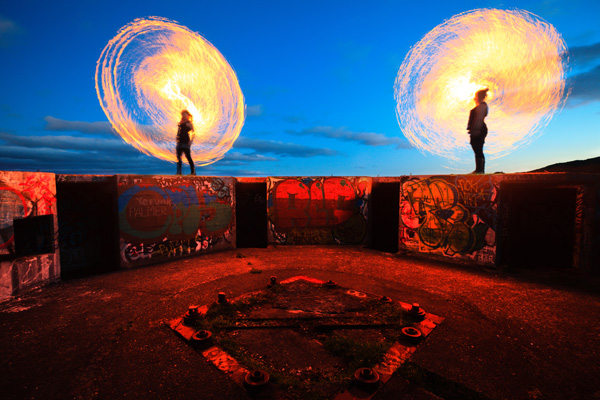
    Image #3: Fire Spinning

    Camera: EOS 5D Mark II
    Lens: Canon EF 17-40mm f4L lens @ 17mm
    Exposure: 6 seconds @ f5.6, ISO 400

    Focal length. This photo is different from the other two because it is taken with an ultra wide-angle focal length of 17mm (equivalent to around 11mm on an APS-C camera). There is a real sense of distance between the metal bars set into the concrete in the foreground and the performers standing on the wall.

    Unusual subject: The two women in the photo are fire performers. They are spinning kevlar whips dipped in flammable fuel and set alight.

    By the way, don’t try this at home. These women are trained fire performers and know how to handle these whips safely. If you want to try something similar, find someone who knows what they are doing to spin the whips.

    Shutter speed: I used a slow shutter speed of six seconds so that the spinning whips created circles of fire.

    Composition: I opted for a symmetrical composition. I like the way there are two circles of fire, one on either side of the frame. I could have moved closer to take the photo, but I preferred to stay back and include more of the setting.

    Light. I shot this photo at dusk. Partly from necessity – it’s easier to see the flames when it’s dark. I also wanted some colour in the sky. I didn’t want it to be completely black.

    Colour contrast. The cool colour of the blue sky contrasts with the orange flames and the red glow in the foreground. This is colour temperature in action again. The sky is lit by the fading daylight, which has a deep blue colour. The light from the flames is orange, like the light from a tungsten bulb.

    Conclusion

    When it comes to evaluating photos, camera settings (aperture, shutter speed, Picture Style, white balance etc) are only part of the story. A camera is just a lightproof box that records light. It has no heart or soul. That comes from the photographer and their understanding of light and composition. Hopefully the way that I’ve analysed my own images in this article will help you understand how deconstructing photos taken by other photographers can help you take better photos.

    This article is the first in a series. The next one will take a close-up look at your camera’s Mode Dial. Why are there so many exposure modes and do we need them all? I don’t think so – and I’ll tell you why.

    Creative triangle 06

    Understanding EOS

    Andrew S Gibson is the author of Understanding EOS: A Beginner’s Guide to Canon EOS cameras. The creative triangle is one of many concepts discussed in the ebook.

    Post originally from: Digital Photography Tips.

    Check out our more Photography Tips at Photography Tips for Beginners, Portrait Photography Tips and Wedding Photography Tips.

    Introducing the Creative Triangle


    Digital Photography School

  • Sony NEX-5R Review

    Sony NEX-5R Review.jpg
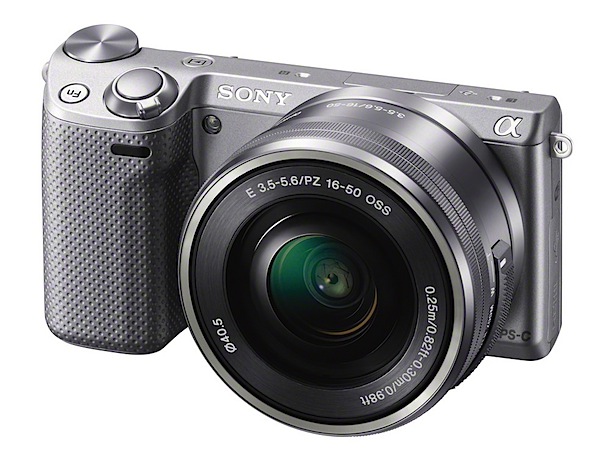
    Now here’s another one: a deliciously tiny, mirrorless, interchangeable lens camera that can almost replace many DSLRs on themarket. Sony was one of the early entrants in this game and, in typical fashion, continues to refine the bloodline with this third generation product in the 5 series.

    In a press release introducing the camera the company asked:

    ‘Are DSLR cameras too big and too hard?’

    The NEX-5R attempts to make a reply and only NEX-5R users will be able to confirm the real answer.

    Sony NEX-5R Review screen.jpg

    In looks the camera is tiny and appears further dwarfed by attaching the f3.5/16-50mm kit lens (supplied for this review) but the bulk, handling and overall weight is far from intimidating. With this lens attached it is only just pocketable.

    Sony NEX-5R Features

    If you’re looking for external controls, stop right now!

    Top deck: on/off switch, replay and Function button that accesses a customisable menu and, depending on which shooting mode you’re in, alters aperture and/or shutter speed; there’s also a control wheel that sets aperture value and shutter speed in the appropriate modes. Set back a little is the familiar red video record button.

    Rear: to the right of the LCD screen (which dominates this area) is a four way control wheel that accesses continuous shooting, exposure, ISO and screen display options. This is accompanied by two assignable soft key buttons that access menu options.

    Menu 1.jpg

    Menu 2.jpg

    Menu 3.jpg

    Most camera controls can be accessed via the sensitive touch screen. Those who are thick-fingered amongst us will have trouble tho’!

    A novel plus of the touch screen is the ability to take vertical format self portraits with the camera held at arm’s length!

    For many the camera has an important add-on with its integrated Wi-Fi capabilities and in-camera apps. By installing the appropriate (Windows) app on your iOS or Android mobile device it allows you to transfer files from the camera to the device.
    Facebook menu.jpg

    Text input.jpg

    I had little difficulty in transferring my images to Facebook and my own Wi-Fi network, aside from the tedious finger work involved in the necessary data input.

    By installing the Smart Remote Control application, users can do a remote check on the image on their camera display, adjust camera exposure, and even take a picture — all from their Xperia smartphones.
    Exterior 1.JPG

    Stained glass window.JPG

    The 16.1 megapixel capture can shoot maximum 4912×3264 pixel images and make 42x28cm prints. The sweep panorama function will please many brave enough to search out suitable subjects and the patience and resourcefulness to take them to the print stage.

    Full HD movies can be captured in either AVHCD or MPEG. Maximum res is 1920×1080 pixels. A good thing in one way is that you cannot capture a still whilst in record video mode, so no breaks in your movie!
    Level Indicator.jpg

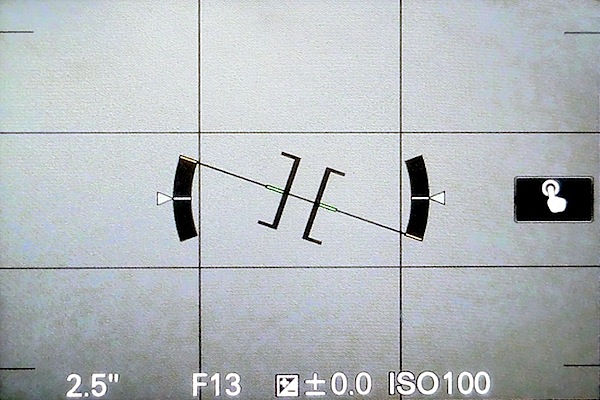
    I know I’ve said it before but the switchable on-screen level gauge is a mighty help when you’re shooting in a hurry and likely to miss this important factor.

    For many, the deal breaker when considering this camera is the vari-angle screen that tilts up, down and even forward for self-portraits; however, the latter will not work if you attach an optional flash unit to the camera’s top deck.

    Sony NEX-5R ISO Tests

    Sony NEX-5R ISO 100.JPG

    Sony NEX-5R ISO 400.JPG

    Sony NEX-5R ISO 800.JPG

    Sony NEX-5R ISO 1600.JPG

    Sony NEX-5R ISO 3200.JPG

    Sony NEX-5R ISO 6400.JPG

    Sony NEX-5R ISO 12800.JPG

    Sony NEX-5R ISO 25600.JPG
    Noise begins to creep in at ISO 3200. More so at ISO 6400. Images at ISO 12800 are useable. High noise level at ISO 25600.

    Sony NEX-5R Review Verdict

    Quality: above average.

    Why you’d buy the Sony NEX-5R: compact, high quality picture maker.

    Why you wouldn’t: too basic — you need more features.

    Welcome to another in the NEX line!

    Sony NEX-5R Specifications

    Image Sensor: 16.1 million effective pixels.
    Metering: multi zone, centre-weighted, spot.
    Lens Mount: Sony E-mount.
    Exposure Modes: iAuto, Program AE, shutter and aperture priority, manual.
    Effective Sensor Size: 23.5×15.6mm CMOS.
    35 SLR Lens Factor: 1.5x.
    Shutter Speed (stills): 30 to 1/4000 second and Bulb.
    Continuous Shooting: up to 10 fps.
    Memory: SD/SDHC/SDXC, Memory Stick Pro Duo cards.
    Image Sizes (pixels): Stills: 4912×3264 to 2448×1376.
    Movies: 1920×1080 (AVCHD), 1440×1080 and 640×480 (MPEG4).
    Viewfinder: 7.5cm LCD screen (921,600 pixels).
    File Formats: JPEG, RAW (Sony ARW 2.2), JPEG+RAW, AVCHD, MPEG4.
    Colour Space: sRGB, Adobe RGB.
    ISO Sensitivity: Auto, 200 to 25600.
    Interface: USB 2.0, HDMI mini, Wi-Fi.
    Power: Rechargeable lithium ion battery, DC input.
    Dimensions: 111x59x39 WHDmm.
    Weight: 276 g (inc card and battery).
    Price: Get a price on the Sony NEX-5R(Body Only) or the Sony NEX-5R with 18-55mm Lens.

    Post originally from: Digital Photography Tips.

    Check out our more Photography Tips at Photography Tips for Beginners, Portrait Photography Tips and Wedding Photography Tips.

    Sony NEX-5R Review


    Digital Photography School

  • Anatomy of a Modeling Session

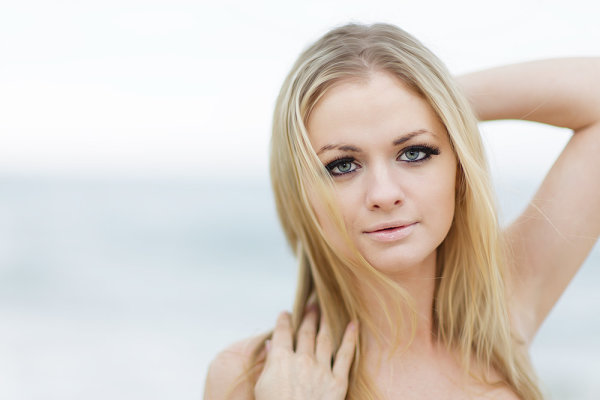
    This was taken with the Canon EOS-1D X and EF 85mm f/1.2L II. I had a 600EX-RT speedlite on camera to provide just a touch of fill. Exposure was 1/250, f/1.2, ISO 100.

    I am often contacted by people who are interested in modeling, either as a hobby, or to build a portfolio to try and model professionally. It’s one of the more fun things I get to do with a camera, as it allows me to be creative and really direct things a bit.  Models can be great to work with- both to build their portfolio as well as your own.  Aspiring models are often looking to diversify their portfolio, and are willing to trade time for images. I’ve developed working relationships with several models so that when I want to try something new, they are usually game.  In addition, they will call me when they have an idea they want to add to their portfolio.  This type of relationship can be liberating, since you are creating portraits for a client who is paying, and depending on your for an image.  Rather, it’s a joint collaborative effort that yield phenomenal results.
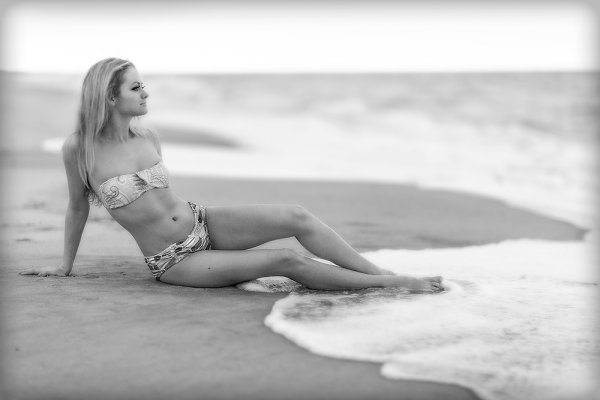
    The headshot above was taken within the first few shots of the session. This one was the next sequence. I backed off to shoot her full length. Exposure 1/1250, f/1.2, ISO 100. Lens was the EF 85mm f/1.2.

    I enjoy working on location with models because locations can offer a variety of settings. They also offer their own set of challenges.  When I begin planning a model session, I propose several locations, as well as an overall concept.  It’s important to agree on these things ahead of time so you are both on the same page for overall direction.

    Once the shoot and location is agreed on, I always hold a discussion with my subject, discussing the goals of the shoot, as well as any ideas I had.  I would ask the model to let me know if he or she had any ideas or shots in particular as well. Once the general concept is down, we discuss outfits. Many times the model will send me photos of outfits they have or want to try, and this will lead to more discussion.  Generally, by the time this exchange happens, both myself and the model have a very good idea of what we want, and what the plan is, that when the day of the shoot comes, we’re ready to go with no questions.  By the way, this process works great for my portrait sessions as well.
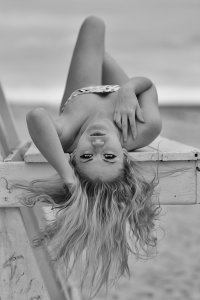
    Locations present their own benefits. In this case, the lifeguard stand offered some nice options for posing. A reflector to the right of the model helped kick a bit more light into her face. EOS-1D X, EF 85mm f/1.2L II. Exposure is 1/640, f/2.8, ISO 100.

    So we’ve discussed outfits, concepts, and location. Once I know what the model is looking for and what we want to do, I pack my bag.  Camera body, speedlites, spare batteries, lenses.  Which lenses? Depends on the shots I’m looking for, but  my go-to lenses for portraits and models are pretty much the EF 85mm f/1.2L II, the EF 100mm f/2.8L IS Macro, and the EF 70-200 f/2.8L IS II. Depending on what else I’m looking for, I’ll use a EF 24-70mm f/2.8L II for wider shots that become more of a landscape with a model in it than a portrait.  If I’m planning on using off camera speedlites, I’ll also bring however many I plan to use- usually two or three- as well as modifiers such as soft boxes. In addition, I ALWAYS have a reflector with me to use with both speedlites or natural light.  Right now, my camera of choice is the Canon EOS-1D X.

    You’ll notice my go-to lenses are all f/2.8 or faster.  The ability to blur the background using a wide aperture is important to me, so anything distracting or unimportant can simply be blurred out.  I like to show a context without being literal about it.  So while you’ll see the sand and water in the background, it doesn’t have to be sharp. The furthest I’ll stop down, generally, is about f/5.6, but I normally will shoot at anywhere from f/1.2 to f/4.

    When I do a model portfolio, or even a portrait shoot, I generally go in with an idea of the look I want to achieve. I try to maintain the same look for every file. When shooting on location, this assumes the light and the weather cooperate.  Invariably, there are times when the weather does not cooperate and you have to adjust.  The shoot that produced the accompanying photos are a case in point.  I planned a sunrise shoot.  I envisioned soft, warm, light on the model’s face, with orange glows on the sand and soft pink sunrise skies.  Instead I got fog and flat grey clouds.  Change of plans.

    I pretty much decided when I arrived at the location that I was going to go for a monochromatic look.  The light was flat, the sky was grey, everything just “felt” black and white.  That’s not to say I didn’t do any color- but overall the look was for black and white.  Generally when I’m shooting a model my goal is variety.  If it’s for a portfolio, I want to be able to get several shots they can use for their book.  I’ll work wider for full body shots, then close in for tighter head shots.  I’ll generally let the model pose as he or she feels comfortable, tweaking the poses when I see something that needs to change- a tip or turn of the head, a repositioned hand, a stray hair.

    I always have a reflector on hand. Even on a dull, cloudy day, a reflector can add enough punch to the light to create catch lights in the eyes, fill in the soft shadows around the eye sockets, and generally just make things pop better.  I use a two-sided reflector by Westcott, with one side silver and the other side uncoated muslin. On a day like the one the accompanying photos were taken on, I used the silver side of the reflector since it kicked more like back up than simply using the white side.
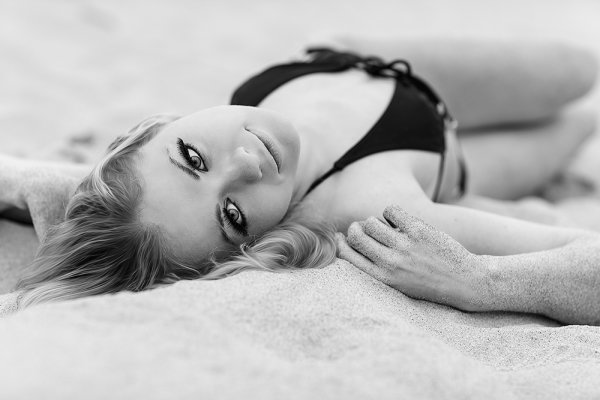
    For this shot, I asked Yuliya to just pose in the sand. Rather than have her move, I moved around her 360°. She did her thing and we ended up with a few nice images. EOS-1D X, EF 85mm f/1.2L II. 1/250, f/2.8, ISO 100.

    During the session, I try to mix full-length shots with tight closeups.  Once I think we’ve captured the essence of the current outfit, I’ll quickly ask the model if there was anything else he or she wanted from it that we didn’t do, and then suggest a change to next one. This avoids belaboring one outfit or using so much time on one outfit that you don’t get to the rest.

    I will show the model what I’m getting periodically so they know what we’ve got.  The last thing I want to hear is that they wanted something we didn’t get, after the fact.  This feedback is valuable because if the model doesn’t feel they look right, it can be changed before it’s too late.  It also gives them an idea of what you’re capturing and allows them to modify their posing accordingly.

    When it comes to processing the images, I try to make sure the look of all the files is fairly uniform.  I want each session to stand alone as its own body of work.  I do vary certain things, but generally I will use the same styles.   Once all images are downloaded, I go through and choose the keepers.  Then I process each, retouching the skin, the hair, and the eyes.  To me, portraits and model photography isn’t about reality.  It’s about flattery. You want to make your subject look good.
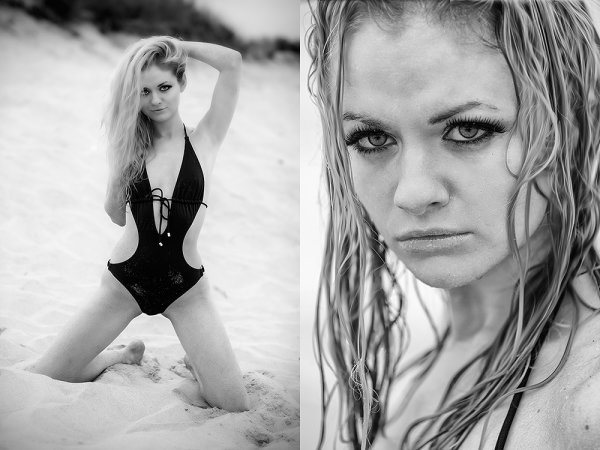
    These two images were taken with the EF 70-200 f/2.8L IS II on the 1D X. It's one of my favorite lenses because it allows me to start off loose and then go in tight without being in the model's personal space.

    Post originally from: Digital Photography Tips.

    Check out our more Photography Tips at Photography Tips for Beginners, Portrait Photography Tips and Wedding Photography Tips.

    Anatomy of a Modeling Session


    Digital Photography School

  • How to Charge for Your Work: Making the Leap from “Favor” to “Job”

    So you’ve got a passion for photography, a slew of great photos that show you’ve really got talent and the desire to transition your photography skills from something that has been strictly a hobby into something that will allow you to earn money. What happens next? If you’re like most folks, you may start by offering to take photos of Continue Reading

    The post How to Charge for Your Work: Making the Leap from “Favor” to “Job” appeared first on Photodoto.


    Photodoto

  • On Assignment: Cheap Portable Studio, Pt. 2

    Picking up where we left off last week in our impromptu living room studio, let's swap the lighting around to make a different style of photo which is designed to fulfill a different purpose.

    The first photo was more in-house—think PR. It's the kind of photo you would get if the subject were more in control of both the process and the edit. The photo above is more of a third-person perspective, skewed toward objectivity and with a goal of being more interesting.

    So let's keep our same white-papered alcove and swap up the lighting a bit. Read more »
    Strobist

  • Using AutoPano Giga To Create Panoramas With Gigapan Heads Or Freehand Shooting Grids

    I know, it’s a long title but I want to show how easy it can be to assemble panoramas with either a Gigapan head or by shooting freehand, gridded panoramas. AutoPano Giga has been my panorama product of choice after starting with huggin, a free option that does quite well it its own right.

    One ability AutoPano Giga excels at is the ability to take images and information from a number of automated shooting heads, such as Kolor’s own PanoGear or even other brands, such as the GigaPan EPIC Pro, which I reviewed for DPS two years ago. I noted in that post that Gigapan’s software was in its first stages and was quite basic and while the software has been upgrade over the intervening two years, it’s still not as robust as Kolor’s AutoPano Giga. Plus, it can not handle freehand panoramas

    Utilizing AutoPano Giga to produce stunning panoramas shot with Gigapan’s heads (mine were shot with the EPIC Pro) is fairly simple.

    Shoot

    Shooting with the Gigapan EPIC Pro is explained in the previously mentioned post. That much hasn’t changed.

    Import

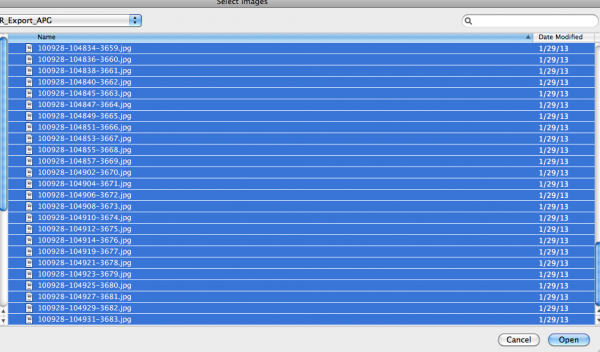
    Bringing images into your computer is no different than your normal shooting method. The nice thing about AutpoPano Giga is it will understand your RAW files no problem, so there is no need to convert (but you can if you are impatient and want smaller file sizes). I have found it handy to shoot panoramas, especially large ones, on a separate memory card reserved just for panoramas. That makes finding the files all the easier.

    With all your panorama files in one location, it is time to use the stitching wizard in AutoPano Giga.

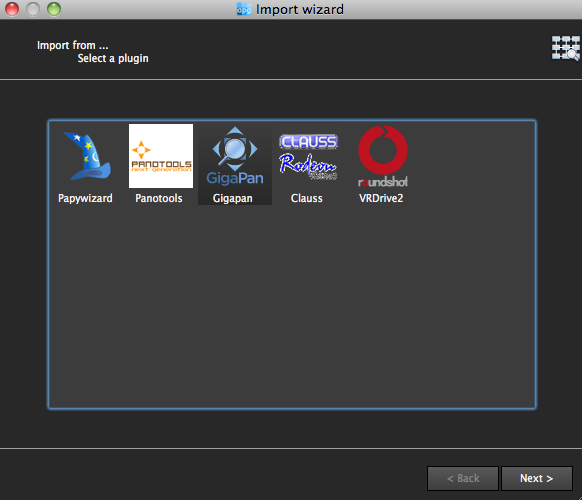
    Wizard

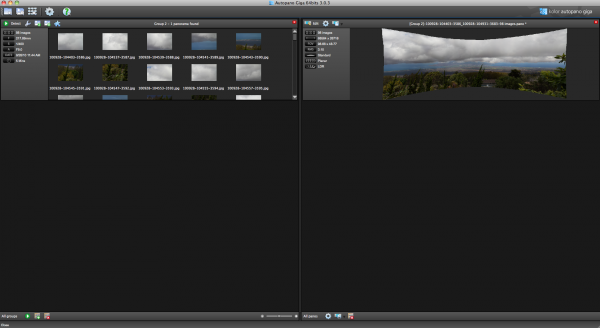
    The first step in the wizard is to pick the device that was used, in this case we select Gigapan.

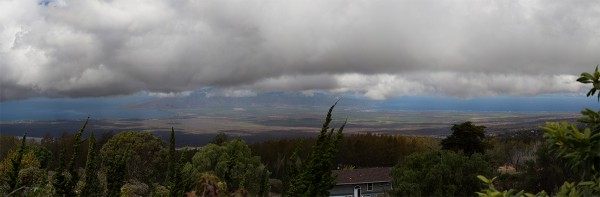
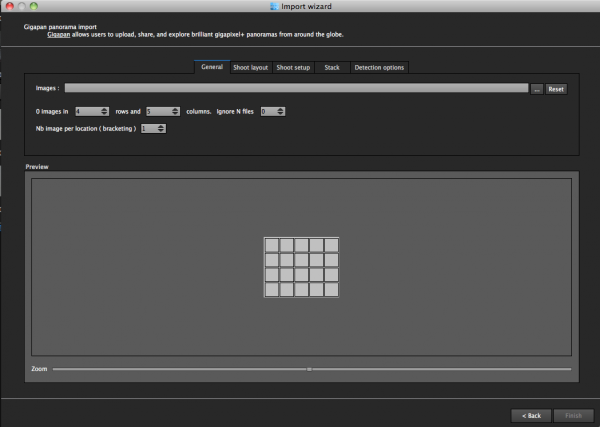
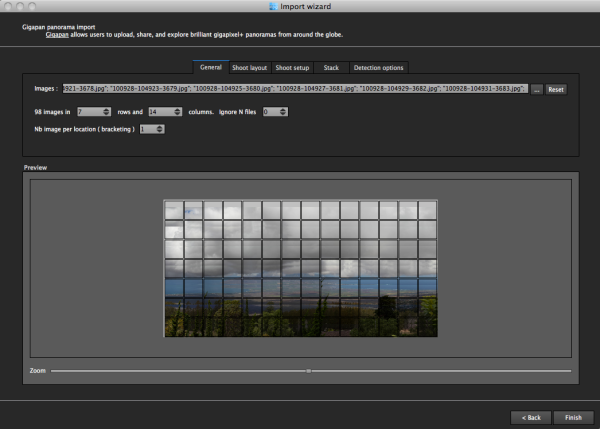
    The next screen asks for input. If your shot went off without a hitch and you have a nice grid of images, AutoPano should know this. For instance, when I select the 98 images from my demonstration shot from Maui, Hawaii at the Ali’i Kula Lavender Farms, AutoPano knows this shot was 7 rows and 14 columns. The nice thing about this method is there is no need to import a control file that explains the grid to the software. This is also why, with careful execution, freehand panoramas can be imported.

    With a straightforward shot like this, there is little else for me to do, but let me show you what the other screens do, if you are curious.

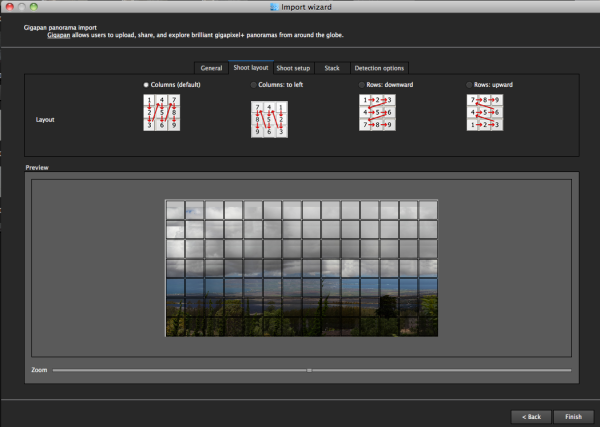
    The next screen allows for changing of the panorama shooting direction. One thing I wish this screen had is the ability to pick a grid shot top to bottom, then back up the next column, down the next, and so on, for those times when I shoot a panorama freehand, such as this 2.2 gigapixel image of the Taj Mahal (shot without a tripod and head because they are restricted).

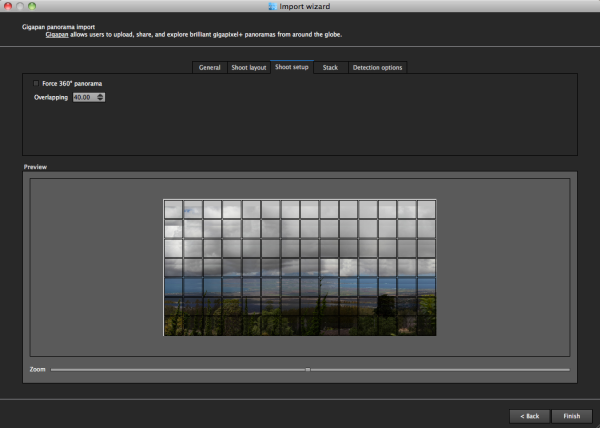
    After that screen, custom overlap or forcing a 360 degree view can be selected.

    The last two screens deal with control points and that can be left on auto unless you have a particularly good reason to change them. This software works quite well on auto (with some manual tweaks to come).

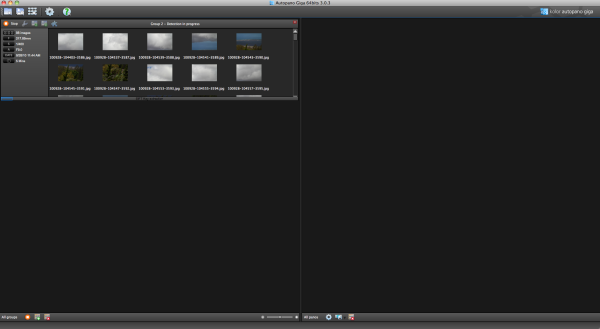
    Press “Finish” and AutoPano takes you to the main screen and starts detecting and stitching. I like that, while I can tell the program the pattern of a shoot and the amount of overlay, it will still automatically detect control points and I can even set this number to 200 by default, to ensure the best matching.

    Output

    Things aren’t always perfect right out of the box because the software doesn’t know which type of projection you want. Below you will see the resultant output on the right, which has a planar projection.

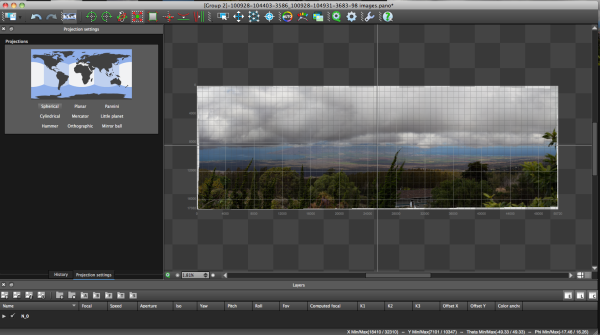
    This is easily changed in the Edit screen, where a number of adjustments can be made if desired. I decided on a spherical projection to keep my sides straight.

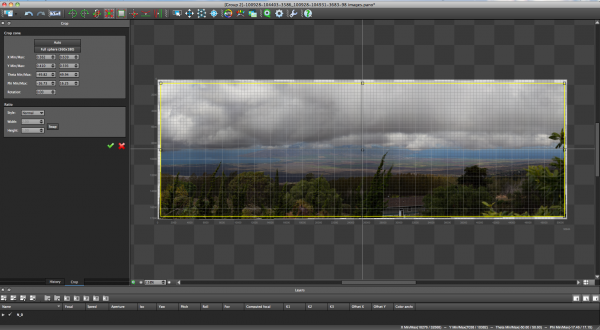
    From there, the only change I saw that needed to be made was to crop the image, which is dead easy: click on the crop tool and it automatically selects the crop dimensions. Changes are made by dragging corners or sides and rotations can be made (in case your tripod wasn’t level when shooting).

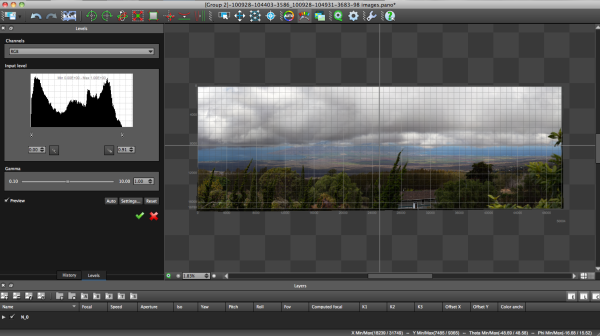
    The last bit of editing I tend to do in the program is to set the levels, which is as easy as setting them in Photoshop or other programs.

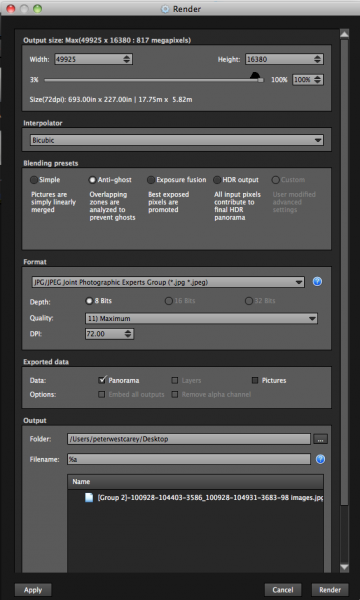
    Before being completely done, we need to get the resultant image out of AutoPano Giga and that is done by clicking on the gear in the main screen in order to render the image. Settings on this screen allow for the resizing of the image once rendered (handy if you are sending this out as a JPEG as the max dimension for those is 30,000 pixels) as well as file type, compression, color depth and more.

    What Else Can Be Done?

    AutoPano Giga is a robust panoramic creation and editing program. This post is not intended to be a complete review of all the features as that list is rather long. Some of the highlights include:

    • Ability to handle HDR bracketed shots (it is available in the first screen of the wizard and is labeled Nb image per location (bracketing)
    • Manual removal of ghosts via masking(although the automatic option works well)
    • Saving results in a variety of file types, including .PSB and .TIFF
    • Batch processing
    • Editing vanishing points and pitch, roll and yaw

    Results

    How did it come out? Great! But…unfortunately DPS isn’t set up to show case large panoramas but I have hosted the resulting image on my blog. The final image is 43MB large and will take a little time to download with the amount of traffic DPS typically sees.

    Click here to be taken to the image. Zoom in and use Full Screen mode for the best experience. Can you spot the airplane taking off? What about people surfing?

    For references sake, the panorama was made with a Canon 7D and 28-300mm L lens. It was composed of 98 images shot in Manual Mode at ISO 100, 135mm, f/9, 1/400. The Gigapan EPIC Pro was lent to me from Borrowlenses.com.

    AutoPano Giga is available for free trial download here.

    Post originally from: Digital Photography Tips.

    Check out our more Photography Tips at Photography Tips for Beginners, Portrait Photography Tips and Wedding Photography Tips.

    Using AutoPano Giga To Create Panoramas With Gigapan Heads Or Freehand Shooting Grids


    Digital Photography School

  • Meet The Photographers Who Write For Digital Photography School ~ James Maher

    You’ve been reading their articles for months or years, have you ever wondered “Who are the photographers who write for dPS”? We thought it would be a good time to introduce them to you through a series of interviews.

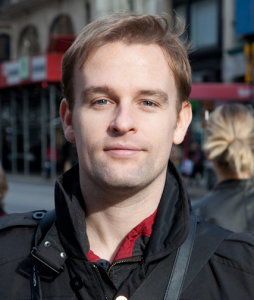
    Today meet James Maher, New York City based photographer and author of The Essentials Of Street Photography.

    1. How long have you been shooting?

    James Maher

    I became interested in photography in 2002 and enrolled in photography courses in 2003.  I assisted for a commercial photographer in 2005 and 2006 and started my business soon after that.

    2. Do you have a full time job or are you a full time photographer?

    I’ve been on my own as a full time photographer since late 2006.  The first couple of years were fairly lean times, but I’ve steadily grown a clientele since then and business has begun to take off over the last four years.  Because of the rent here in Manhattan, I operate my ‘studio’ out of my apartment, which has a lot of benefits and a lot of downfalls – the biggest downfall being that our refrigerator is about 20 feet from where I work.  It would be nice to have more space for portraiture, but I make do.  And honestly, the beautiful streets outside of my apartment make for stunning backgrounds with so many unique colors and textures.

    3. If you had to limit yourself to one genre of photography, what would it be and why?

    I’m not sure I could do that to be honest.  I have the most fun with street photography, where I get to walk around and explore.  That’s how I got started with photography in the first place, because I had so much fun walking around and seeking out interesting places and people.  I love to people watch.  However, I love portraiture as well and connecting with people and learning about them.  I guess if I have to pick one, it would be any type of photography that has to do with meeting or observing interesting people.

    4. When did you start writing for dPS and why?

    I wrote my first article for DPS in November of 2010, titled 14 Tips to be a Successful Freelance Photographer.  I generally try to write for myself and then hope that other people connect with it.  That article was a personal reminder of all the mistakes I’ve made and things I’ve learned to help me from falling back into the traps that I used to fall into.  I find each article to be a learning experience.  I’ve always loved to write and when I first found DPS I knew that I wanted to work with them.  I can’t believe it’s been that long since the first article.

    5. What do you shoot with and what is your favorite lens?

    I shoot with a Canon 5D Mark II.  My three primary lenses are the Canon 24-70mm, the Canon 70-200mm, and the Canon 28mm prime.  I love them all, but I couldn’t live without the light 28mm.  That’s my street photography lens and it’s so light and easy to use and 28mm is one of my favorite focal lengths.  It’s not what I will use on most paid photo jobs, but it’s my everyday walk around lens.

    6. What would be your number one tip to any new photographer?

    Wow, only one tip – that’s tough.  I guess it would be to spend a lot of time looking at photography and art.  You need to develop your eye.  Educate yourself.  Go to galleries, hang out in bookstores or go to the library, and search through photographer portfolios on the web.  Spend a lot of time doing this and maybe even make a digital scrapbook of your favorite photos to come back to over time.  Also, this is a second tip, but don’t be afraid of failing or people not liking your work.  Most good artists take criticism pretty hard but they’re not afraid of putting themselves in a position where they might fail.  It can take years of failure to become a success.

    7. What’s your next big project?

    Last year’s big project was writing a book, so I’m a little burned out on big projects at the moment.  I want to buckle down and allocate more time for shooting and writing.  But I guess my next big project will be to focus myself to do more of my own portraits, where I control the outcome.  When you become a photographer, your portraiture tends to only be done for clients who want to look as good and happy as possible.  When you do portraiture for yourself, you can do whatever you want.  So I guess my next big project is to spend more time and resources on this.  I stopped doing this over the last five years as I focused on building a business.

    8. Where can people go to find out more about you and your work?

    Everything is on my website. You can view my street photography, my urban landscape and travel work, my portraiture and commercial work, join my mailing list, and learn more about my book.  And if you have any questions, feel free to send me an email.


    Post originally from: Digital Photography Tips.

    Check out our more Photography Tips at Photography Tips for Beginners, Portrait Photography Tips and Wedding Photography Tips.

    Meet The Photographers Who Write For Digital Photography School ~ James Maher


    Digital Photography School

  • Canon EOS M Review

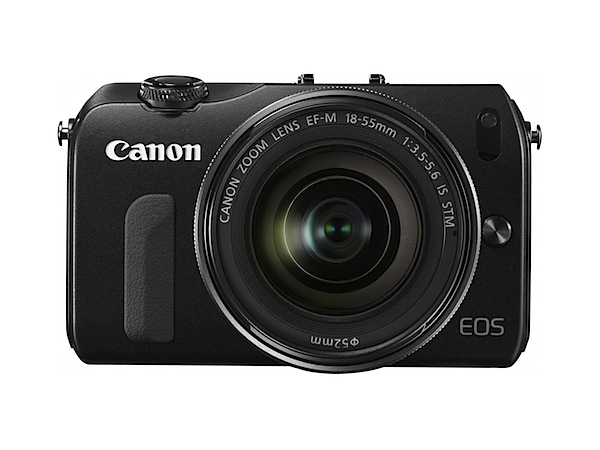
    Canon EOS M.jpg

    It was late on the scene but its arrival still surprised many. After all, it is four years since Panasonic appeared with the first model in this guise.

    Canon’s first MILC (Mirrorless Interchangeable Lens Camera) or CSC (Compact System Camera) magnesium alloy body model followed many other marques’ entries but differed to some by immediately offering an adaptor that accepted the mainstream Canon EF lens range. Using 35 SLR lenses the magnification factor is 1.6x, surely not a deterrent factor.

    Canon EOS M_black.jpg

    Canon EOS M_red_BACK.jpg

    Canon EOS M_white side.jpg

    At first glance, it’s a strange beast. The review camera was stark black in colour, with only the control labels picked out in off white — and few they are! It was tested with the f3.5/18-55mm lens.

    I immediately looked for the exposure modes and quickly found only three on the top mode dial: intelligent auto, still photos and video. Where’s Program, aperture and shutter priority I queried?

    Where? They’re accessible via a touch screen system that at first I found foreign, then quickly settled into its style.
    Exposure modes.jpg

    Tap the upper left corner of the LCD screen and you’re presented with an array of M, Av, Tv, P: manual, aperture and shutter priority and Program. Easy!
    Next to the mode dial is the on/off button — and tass all!
    Main menu.JPG

    Metering modes.jpg

    At the rear there is nowt else but menu and info buttons plus replay and the main dial with options for single/continuous shooting, a central Q-set button, erase and exposure lock (if your focus area differs from the main metering area).

    As I mentioned, the text labels are in off white … and they are sure hard to see in dim light!
    Goldfish 1.JPG

    Dolphins 3.jpg

    Dolls 3.JPG

    Canon EOS M Features

    The 18 megapixel CMOS can capture a maximum 5184×3456 pixel image, enough to make a 44x29cm image.

    Movies? Full HGD MPEG4 video at 1920×1080 pixel resolution is within its capabilities and can be happily recorded to SD cards rated as Class 6. You can shoot stills mid-video but the latter is interrupted.

    Interestingly, the EOS-M kit is supplied with the new Speedlite 90EX flash unit as standard. A wireless master function allows the control of multiple flash guns wirelessly.

    There some factors which seem to indicate that the EOS-M is not designed to attract the pros out there: the screen-driven control is one of them; another is the provision of a range of creative filters that includes toy camera, grainy B&W, fish eye distortion etc.

    Overall, the camera appeals due to its compact dimensions, light weight and (once you get used to it), simple touch screen operation.

    Canon EOS M ISO Tests

    Canon EOS-M ISO 100.JPG

    Canon EOS-M ISO 400.JPG

    Canon EOS-M ISO 800.JPG

    Canon EOS-M ISO 1600.JPG

    Canon EOS-M ISO 3200.JPG

    Canon EOS-M ISO 6400.JPG

    Canon EOS-M ISO 12800.JPG

    Clean performance al the way to ISO 3200. BY ISO 6400 noise is starting to appear but not badly so. At ISO 12800 noise is obvious but certain shots will accept it.

    Canon EOS M Review Verdict

    Quality: above average.

    Why you’d buy the Canon EOS-M: compact camera with access to Canon’s full frame lens range.

    Why you wouldn’t: touch screen operation deters you; a long tele, full size lens would look silly on the EOS-M; no vari angle screen.

    The Canon EOS M is available in black, silver, white, red.

    Welcome to another MILC! A lightweight, compact camera. Maybe the more ambitious out there should await for the next, higher specced model to arrive.

    Canon EOS M Specifications

    Image Sensor: 18 million effective pixels.
    Metering: Multi pattern, centre-weighted averaging, spot, partial.
    Exposure Modes: Auto, Program AE, shutter and aperture priority, manual.
    Sensor: 22.3×14.9mm CMOS.
    Lens Mount: Canon EF-M, EF (with adaptor).
    35 SLR Lens Factor: 1.6x.
    Shutter Speed: 60 to 1/4000 second. Flashy sync: 1/200 sec.
    Memory: SD/SDHC/SDXC.
    Image Sizes (pixels): 3456×2304 to 720×480. Movies: 1920×1080 (30, 25, 24 fps), 1280×720 (60, 50 fps), 640×480 60/50 fps.
    LCD Screen: 7.7cm LCD (1,040,000 pixels).
    File Formats: JPEG, RAW (14-bit), JPEG+RAW, MPEG4.
    Continuous Shooting: up to 4.3 fps.
    Colour Space: sRGB, Adobe RGB.
    ISO Sensitivity: Auto, 100 to 12800; 25600 (with expansion).
    Interface: USB 2.0, HDMI mini, AV output, mic input, Eye-Fi.
    Power: Rechargeable lithium ion battery, DC input.
    Dimensions: 109x66x32 WHDmm.
    Weight: 298 g (inc battery).
    Prices: Get a price on the Canon EOS M with EF-M18-55mm IS STM Lens or the Canon EOS Mwith a EF-M 22mm STM Lensat Amazon.

    Post originally from: Digital Photography Tips.

    Check out our more Photography Tips at Photography Tips for Beginners, Portrait Photography Tips and Wedding Photography Tips.

    Canon EOS M Review


    Digital Photography School

  • How To Achieve Nice Bokeh [In Plain English]

    By Annie Tao

    Want to take portraits that have nice bokeh?  First, what is it?

    BOKEH = noun.  a Japanese term for the subjective aesthetic quality of out-of-focus areas of a photographic image.

    Below is a photo I took just the other day.  It is an example of an image with nice bokeh and how to use it effectively.

    Annie Tao Photography bokeh Ex1

    By blurring out the background, the entire image looks visually pleasing. You can’t even see she is standing on a sidewalk next to a parking lot!

    HOW TO ACHIEVE NICE BOKEH (in plain English!)

    1.  Use the right lens.

    All lenses can create some kind of bokeh, but the REALLY nice, drool-worthy bokeh is from prime lenses with large apertures, like f/1.4 and f/1.8.

    2.  Select a large aperture.

    The larger the aperture (the smaller the aperture number) = a narrower depth of field and more bokeh!  Usually f/2.8, 1.8 and 1.4 create the best results.

    3.  Get close to your subject.

    4.  Focus on what you want to have sharp.

    I know, I know…. duh.  But there may be someone out there who isn’t sure!  

    5.  Put your subject far from the background you want blurred out.

    In the image above, there is beautiful green bokeh because there were bushes on the far side of the parking lot.  I took the shot from a lower angle (shooting upwards) to intentionally miss the cars in the parking lot, which were directly behind her. 

    The result is a deliciously smooth wash of color in the background, which made it look more like the little girl was standing in a meadow than a parking lot.

    MORE EXAMPLES OF BOKEH

    Annie Tao Photography bokeh Ex2

    Annie Tao Photography bokeh Ex4

    Annie Tao Photography bokeh Ex3

    Sometimes I create bokeh in the FOREGROUND because it tells a different story…

    Annie Tao Photography foreground bokeh

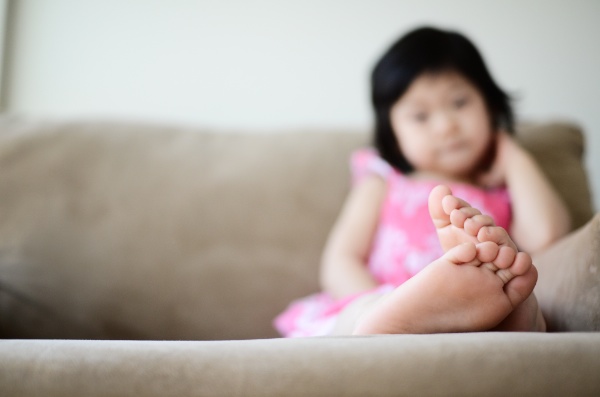
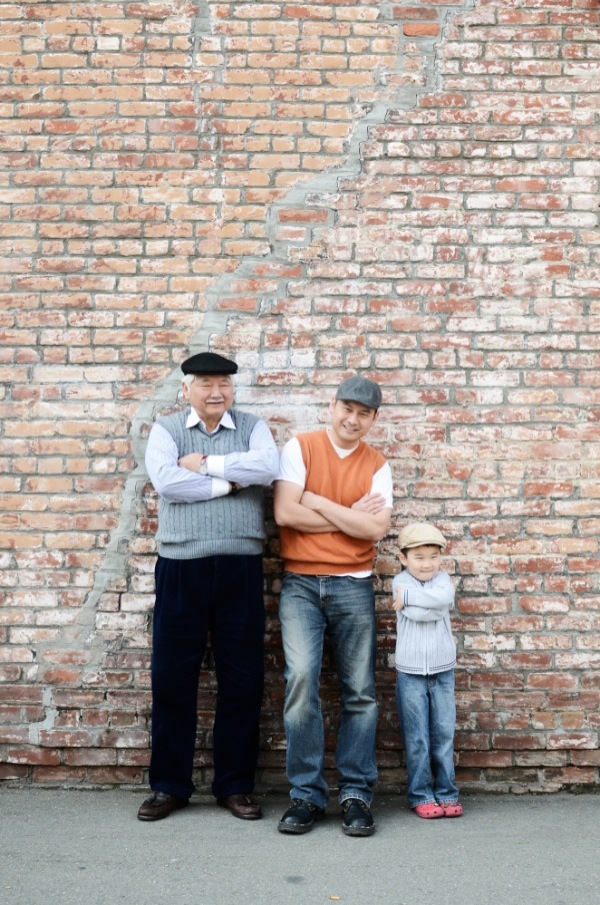
    And sometimes I don’t want any bokeh at all. I want to see all the details, like the textures of these walls, so I place my subjects close to the background and have my camera set at a smaller aperture.

    Annie Tao Photography No Bokeh Ex2

    Annie Tao Photography No Bokeh Ex1

    Annie Tao is a lifestyle, commercial and event photographer in the San Francisco Bay Area. You can get more tips or inspiration at www.annietaophotography.com and stay connected with Annie at https://www.facebook.com/annietaophotography

    Post originally from: Digital Photography Tips.

    Check out our more Photography Tips at Photography Tips for Beginners, Portrait Photography Tips and Wedding Photography Tips.

    How To Achieve Nice Bokeh [In Plain English]


    Digital Photography School