Category: Photography

  • LAST CHANCE to Get these Free Bonuses with Our new Portraits eBook

    Portraits_cover-3501.jpegOver the last few weeks we’ve launched our brand new Portraits eBook – Portraits: Making the Shot – written by Aussie celebrity photographer Gina Milicia.

    But our launch special is about to end in the next 48 hours (details below).

    The eBook has already become one of the best-sellers in our library and we’ve had some lovely bits of feedback like these:

    “Absolutely brilliant book – I am so glad I bought it! It was worth every penny. There are so many good things in it and I feel completed validated as a new photographer, spending the last 3 years learning as I go! Just lovely! And so helpful. Thank you.” – Christina Dithmar

    “Just finished reading your ebook and really enjoyed its simplicity. It’s a great place to start for those new to portrait photography and something I will refer to often for good overall basic knowledge. Thank you.” – Tracy Wilkinson

    “just wanted to let you know l really enjoyed your book – especially your style of writing and the way you de-mystified lighting especially!” – Gabbie Hine

    We’ve also seen some great coverage on other blogs and even in the media about the eBook. Here’s one we saw in the Sydney Sunday Telegraph:

    MTS_ST_FEB2013.jpeg

    Launch Special: Ending in 48 Hours

    As a launch special we have two bonuses on offer that both end in 48 hours:

    1. We are throwing in a free bonus eBook from Gina called ’14 Recipes for Amazing Portraits’ in which Gina walks you through 14 of her favourite shots and gives you tips and techniques on how to recreate them.
    2. Everyone who picks up Gina’s eBook goes in the draw to win $ 1000 worth of lenses (you choose what you want to the value of $ 1000) PLUS 3 hours of personal mentoring with Gina to help you improve your portrait photography

    Both of these bonuses end at midnight US Eastern time on Friday 22nd February.

    Grab Your Copy Today

    As with all our eBooks Portraits: Making the Shot is covered by a 60 day money back guarantee (if you don’t find it helpful just let us know and we’ll refund your money) so you can have confidence that it and the bonus Recipes eBook will be a worthwhile investment in your photographic learning.

    Learn more about the eBook here or pick up a copy by clicking the ‘Download it Now’ button below.

    // < ![CDATA[ function EJEJC_lc(th) { return false; }

    // ]]>

    Post originally from: Digital Photography Tips.

    Check out our more Photography Tips at Photography Tips for Beginners, Portrait Photography Tips and Wedding Photography Tips.

    LAST CHANCE to Get these Free Bonuses with Our new Portraits eBook


    Digital Photography School

  • The Remarkable Vivian Maier Story [Documentary Coming Soon]

    vivian-Maier.jpeg
    I love the story of Vivian Maier – a prolific and talented street photographer who who took over 100,000 images over her life yet showed nobody her work.

    Her images were only uncovered and purchased by John Maloof in an auction after her storage locker was repossessed shortly before her death.

    At the time of buying a box of Vivian’s negatives John didn’t even know the photographers name and had no idea about her talent – however as he began to examine and scan the images he realised he’d stumbled upon an amazing hidden archive of photos.

    He tracked down more of her work that others had purchased in the auction and in doing so discovered Vivian’s name and began to also uncover pieces of her story. Viviane – who worked as a nanny – had taken up photography in 1949. She took most of her photos on days off, at first around New York and in Chicago where she moved in 1956.

    She continued to shoot right through into the late 1990s but also shot film and recorded audio. When her work was discovered in 2007 there were over 100,000 negatives and many hundreds of rolls of unprocessed film in the collection. John began to scan and collate her work and shared some of it on a blog and later a website dedicated to the project.

    In doing so the photography community around the world became aware of this previously undiscovered talent. Exhibitions around the world followed and more recently John started a Kickstarter project to create a documentary about Vivian Maier.

    In the last week a Movie trailer for this full feature length documentary was released which tells more of Vivian’s story and the project.

    The documentary is expected to be finished later this year and release dates will come soon. Follow more news of the release on Facebook or on the Finding Vivian Maier site.

    You might also like to view this earlier video from Chicago tonight which also tells the story.

    Post originally from: Digital Photography Tips.

    Check out our more Photography Tips at Photography Tips for Beginners, Portrait Photography Tips and Wedding Photography Tips.

    The Remarkable Vivian Maier Story [Documentary Coming Soon]


    Digital Photography School

  • Photography Tips That You Should Try Today!

    On top of being an awesome hobby, photography is also a magnificent art form. You can produce professional quality photographs by experimenting with your camera’s setting, taking shots from different perspectives and using a variety of natural and artificial lighting techniques.

    When preparing for a trip, pack your equipment carefully. Take all different kinds of lenses, and make sure you take cleaning accessories and enough batteries. You should avoid taking any equipment you will not use, and consider how each item you bring will be useful to your goals.

    You do not want to risk missing a fantastic photo because you do not know which camera setting to use or how to adjust it properly. Do not pick a preset because you need to modify your settings. Experiment with your camera’s features to see how different settings affect your photos.

    When you go travelling, look around for new ideas on all the different things you can shoot. If you do not know where to start, take a look at some postcards. There are also postcards highlighting the major attractions in town, so make sure you include these on your subject list.

    Even with drastic technological improvements in cell phone cameras, lighting is still an issue for most of them. Cell phone cameras generally lack a flash. Therefore, you’ll need to compose your shot to take advantage of the available lighting. Zooming in is a great way to cut out some of the shade or shadows around the user.

    One technique for capturing a great shot is to start taking pictures at a distance and then move forward, taking additional photos, until your subject fills the frame. The viewer will have the ability to more clearly see a shot’s details. Sometimes, these details can increase the interest of the shot to the viewer.

    Always hold your camera at your eye level, or adjust your body so that the camera’s perspective is level with your own. This is a great way to pull the viewer to the photo because it creates a personal atmosphere. If you want to take pictures of children, kneel to their eye level.

    If you are photographing a bride or another person wearing white clothing, make sure to use a contrasting background color. Majority of cameras have auto focus, so it takes in all the shades present in the full shot. White is almost always “washed out” in shots like this.

    You can get free photo editing software, and have a little fun with it. All photographers use some type of photo editor, so you don’t need to feel bad about using it. It can make the difference between a so-so photo, and one you want to frame. with only a few minor modifications.

    Though you may not think you need a flash outside, take a look and make sure. Bright sunlight can create harsh, dark shadows on your subjects’ faces. Set your camera to the setting that allows you to use a technique called “fill flash” when you see shadows. This setting will eliminate the shadows that appear in deep facial folds.

    Don’t be afraid to break some photography rules with your camera. Good photography takes unique style, and you want to show the world a new view through your lens. Try to stay away from taking pictures that are described as ‘classic’. Experiment with new angles, and be creative.

    Your photography skills will improve from a mere hobby to a work of art. Produce photographs that you are proud of and wish to share with the world by utilizing some of the tips here. It will take a lot of practice, but take some of these tips and give it a go.

    Thanks for reading. The author is an editor at camerashq

    dslrBlog

  • Welcome to the Newly Updated dPS Forum

    Within days of starting dPS – back in April 2006 – I began to get requests from readers that they wanted a forum area on the site where they could:

    • Share photos that they were taking
    • Get critiques from other readers on their shots
    • Ask (and answer) questions of other photographers
    • Share their own tips
    • Meet, network with and have a little fun with other photographers

    A few months later we did add a little forum to the site. It started very small with just a few sections and members but from day 1 was a place where dPS readers could do all of the above – and more.

    Dps forums

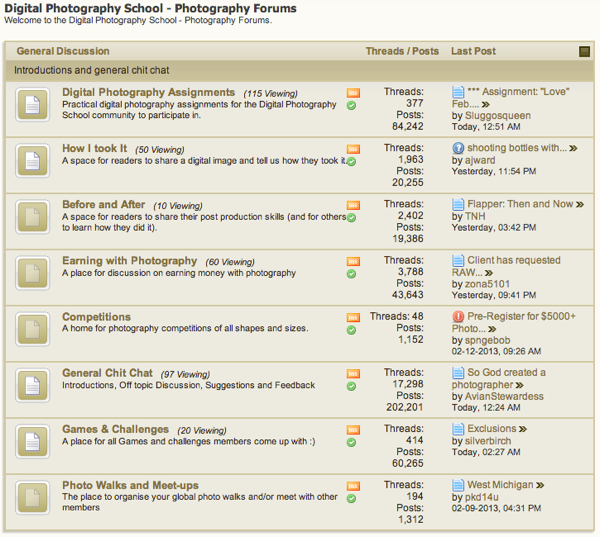
    Since that time our forums have continued to grow and evolve. We have over 235,000 members and our categories of discussion have grown from just a handful to cover many topics including:

    • Assignments – where we give members a weekly assigment to shoot
    • How I Took it – share a shot and give the behind the scenes info on how it was taken
    • Before and After – show off your post processing sculls
    • Earning with Photography – an area for discussion of monetization of photography
    • Share Your Shots – how off some of your best shots (in a range of categories)
    • Critique – submit an image and get feedback from other members
    • Lighting – discussion on how to light your images
    • Tutorials – share and read tutorials from other members
    • Photography Equipment and Gear – discussion, reviews and questions on different brands of cameras and gear

    There is a lot more than that too!

    Over the last few months we’ve been planning a forum upgrade as a result of some broken features and an inundation of spammers and in the last week have completed the upgrade to a new version of the forum software.

    It took an enormous effort from our developers (who are still working to iron out a few bugs) but things are much more stable now and if you’re looking for a place to ask a question, interact with other photographer or share your own tips we’d love to welcome you to the dPS forum.

    Over the coming months we intend to roll out more changes both to the forum and blog part of dPS – so stay tuned for some more fun developments that we hope will make our site even more useful to you.

    Join here today!

    Post originally from: Digital Photography Tips.

    Check out our more Photography Tips at Photography Tips for Beginners, Portrait Photography Tips and Wedding Photography Tips.

    Welcome to the Newly Updated dPS Forum


    Digital Photography School

  • Sun Too Harsh? Modify It!

    For guys, a little harshness in the light can be a good thing.  So for this shot, I positioned the sun over his left shoulder, and a reflector to the right and in front of him. EOS-1D X, EF 85mm f/1.2L II. 1/320, f4, ISO 100.

    For guys, a little harshness in the light can be a good thing. So for this shot, I positioned the sun over his left shoulder, and a reflector to the right and in front of him. EOS-1D X, EF 85mm f/1.2L II. 1/320, f4, ISO 100.

    I’m big on shooting portraits outdoors.  I love the natural light, the variety of locations available, and the more natural feel.  I think for the average subject, a studio can be an intimidating place.  The problem with shooting outdoors is that you are at the mercy of Mother Nature, for the most part, when it comes to light.  But not to worry.  Just as a simple speedlite can be modified, so can the sun.

    When the sun is harsh, there are a few things I can do to soften it. I will use fill-flash outdoors when I have to, but I’m not a fan of straight, on camera flash of any kind if I can help it.  And some situations it’s just not possible to move the flash off camera to act as fill.  I these situations, I go with one of two options. First, I can use a reflector kick light back into the subject’s face.  I will place the sun behind my subject, at an angle so I’m not shooting straight into it. The reflector, I will position the reflector to the exact opposite of the sun, in front of my subject, and to the side. The beauty of using a reflector with the sun is that you can see the effect immediately, unlike with flash.  Have someone hold the reflector and move it around so you can see the effect with it as it moves.  If I have no one available to hold the reflector, I will use a light stand with a reflector holder.  Additionally, a weight of some kind may be helpful if it’s breezy since the reflector will act as a sail.  Your camera back can work for this, or sandbags are ideal. The drawback with a reflector will also be an equally bright object in the eyes of your subject, and could cause him to squint.

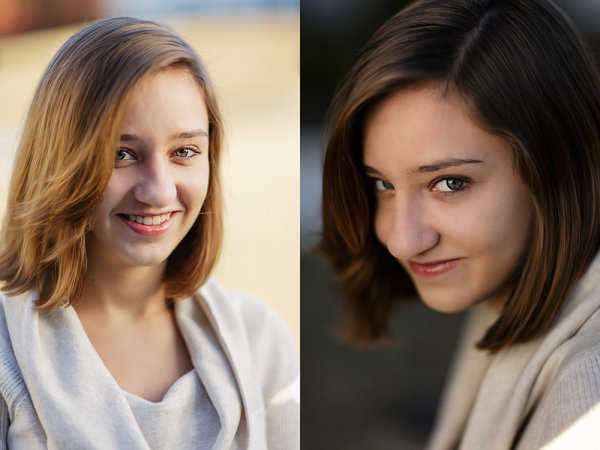
    Here you can see the difference with and without a scrim. On the left is straight sunlight with no modifiers.  It's not terrible, but harsher than I wanted on her face. I turned her around to face the sun, and used a scrim to soften the light on her. The result, in my eyes, was much more pleasing. EOS-1D X, EF 85mm f/1.2L II. Exposure for the image without the scrim was 1/1000, f/1.2, ISO 100 with +1 exposure compensation.  For the image on the right, 1/3200, ISO 100, f/1.2.

    Here you can see the difference with and without a scrim. On the left is straight sunlight with no modifiers. It’s not terrible, but harsher than I wanted on her face. I turned her around to face the sun, and used a scrim to soften the light on her. The result, in my eyes, was much more pleasing. EOS-1D X, EF 85mm f/1.2L II. Exposure for the image without the scrim was 1/1000, f/1.2, ISO 100 with +1 exposure compensation. For the image on the right, 1/3200, ISO 100, f/1.2.

    Sometimes, even with a reflctor, the light is much too harsh for what I’m looking for. In cases like this, I will use a scrim. In my case, my reflector and scrim are part of the same tool.  I currently use a Westcott 5-in-1 40-inch reflector.  It has a gold side, silver side, black side, white side, and a translucent disc as the center when the outer casing (which makes up the other four sides) is removed.  Using a tool like this means I always have both the reflector and the scrim with me, so I’m able to use whichever best suits the lighting conditions.

    When using a scrim, I will position my subject so they are looking into the sun, and place the scrim between them and the sun. The scrim is the translucent part of reflector, and will allow the light to come through, although more diffuse than unmodified sunlight.   It’s easy to make a homemade scrim as well, using PVC piping or a wood frame, with nylon from a fabric store.  When making your own, it’s important to get neutral fabric, or else it will create a color cast on your subject.

    The sunlight on her face was far too harsh for the effect I wanted.  I had her friend hold a scrim up to soften the light on her face, which gave me just what I was looking for.  EOS-1D X, EF 85mm f/1.2L II. ISO 100, 1/1000, f/1.2.

    The sunlight on her face was far too harsh for the effect I wanted. I had her friend hold a scrim up to soften the light on her face, which gave me just what I was looking for. EOS-1D X, EF 85mm f/1.2L II. ISO 100, 1/1000, f/1.2.


    Post originally from: Digital Photography Tips.

    Check out our more Photography Tips at Photography Tips for Beginners, Portrait Photography Tips and Wedding Photography Tips.

    Sun Too Harsh? Modify It!


    Digital Photography School

  • Travel Photography Inspiration Project: Argentina

    From the seemingly timeless Southern areas to the modern heart of Buenos Aires, Argentina is a lively county with wide spaces, soaring peaks and a unique culture.

    Let’s wander around Argentina in today’s installment of the DPS Travel Photography Inspiration Project.

    And if you would like to be involved in the next country’s post, drop me a line here.

    PageImage-512483-3672802-FloridaStBuenosAiresJuly2011

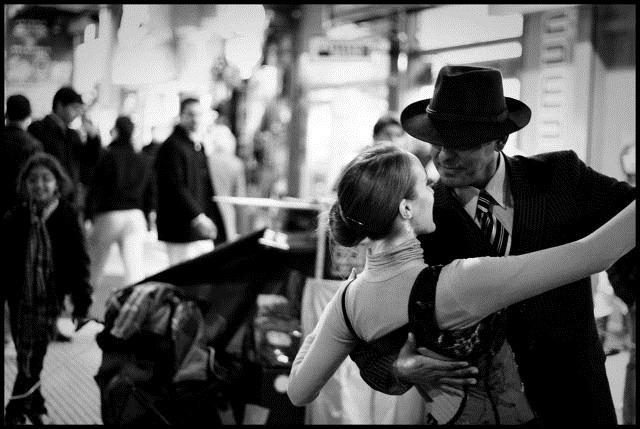
    Street Tango in Buenos Aires  by Anand Gopol

    Tango dancers strike a pose on Florida Street in Buenos Aires.

    Tip: While in Buenos Aires, walk, walk, walk. It’s a great walking city and downtown is drizzled with street artists and dancers. On many street corners, one can find a tango troupe such as this one with a speaker busting out some music and a hat that’s being passed around.

    DSC04313

    Local young couple in colourful La Boca, Buenos Aires by Joshua Raif

    IMG_0041copy

    This is Buenos Aires’ iconic national historic monument, the obelisk, located in Plaza de la Republica by Ken Duquaine

    We were in Argentina for a few days between Christmas and New Years Day this past year before leaving on a trip to Antarctica.  There is a considerable difference in weather conditions between Buenos Aires (very warm) and Ushuaia (much cooler), so anyone traveling to Argentina and planning on seeing both areas would do well to pack clothing that will accommodate a fairly wide range of temperatures. 

    Glacier

    Glacier trekking at Perito Moreno by Will Villiers-Tuthill

    ARGENTINA-michael-robert-powell_1

    rain-clouds over bariloche by Michael Robert Powell

    I was above the town of Bariloche in Patagonia; bad weather can bring nice shots, too. The image was a bit flat so I tweaked it to make the image pop more (without getting too HDR).

    DSC07209

    Enjoying the local Mate by Joshua Raif

    Colourful local characters on San Telmo square are usually happy to be photographed. In good weather the square is full of action: crafts stands, musicians, tango dancers, and is surrounded by old and beautiful architecture.

    IMG_0158copy

    A window with character in La Boca by Ken Duquaine

    Right Whale Breeching

    Right Whale Breeching: Puerto Madryn by Will Villiers-Tuthill

    ARGENTINA-michael-robert-powell_4

    girl staring into rainbow – iguazu falls by Michael Robert Powell

    A lucky few seconds, in which I took a few shots and this was the best. Simply, have your camera ready.

    DSC04914

    Upsala Glacier Viewpoint, Patagonia by Joshua Raif

    Since boat access has been blocked by the melting glaciers, this remote site now requires a full day trip which combines a boat ride on Argentina lake together with a 4X4 dirt road drive from Estancia Cristina. This full day trip contains a wide variety of photo opportunities which include icebergs on the lake, the old ranch itself, sculptured trees, rock formations recently sculpted by the melting glaciers and the panoramic viewpoint itself.

    IMG_0110copy

    Plaza de Mayo, the scene of the May 25, 1810, revolution leading to Argentina’s independence, and a major center for political activity in Buenos Aires by Ken Duquaine

    Nest Building

    Birds building nests outside Ushuaia by Will Villiers-Tuthill

    quiet streets of downtown – buenos aires by Michael Robert Powell

    DSC04353

    A modern neighborhood of Buenos Aires by Joshua Raif

    Ushuaia20111231_2327copy

    Ushuaia, known in Argentina as the “End of the World” owing to its being the southernmost city in the world and the staging area for boat trips through the Drake Passage to Antarctica by Ken Duquaine

    Ushuaia

    Ushuaia – the coordinates are on the signposts by Will Villiers-Tuthill

    ARGENTINA-michael-robert-powell_3

    changing the guards – buenos aires by Michael Robert Powell

    Get low for some shots. This was taken years ago on a video camera and hence is only a low-res still image (but better than nothing). I played with the lighting later.

    DSC07238

    A 19th century coffee shop on San Telmo square, still in operation by Joshua Raif

    Buenos Aires still boasts 19th & early 20th century architecture and establishments which appear more authentic than those found in Europe or the U.S.


    IMG_0140copy

    The very colorful La Boca neighborhood of Buenos Aires where the sights, smells and activity complement the “over the top” colors of the buildings by Ken Duquaine

    HDR tonemapped

    snowy mountains behind ushuaia by Michael Robert Powell

    Apart from the great scenery, the inclusion of a person (bottom left) gives it a real sense of scale. This is close-to straight out of the camera; a near-monochrome shot.

    Thank you again to all the DPS reader-contributors who participated. If you would like to be involved in the next country’s post, drop me a line here.

    Post originally from: Digital Photography Tips.

    Check out our more Photography Tips at Photography Tips for Beginners, Portrait Photography Tips and Wedding Photography Tips.

    Travel Photography Inspiration Project: Argentina


    Digital Photography School

  • 5 Tips on How to Choose the Right Lens

    Lens lust is a terrible thing. It didn’t quite make the list of the 7 Deadly Sins, but can still be an agonizing process that will have your significant other wondering if Zeiss Prime is the codename for an escort service. Choosing the right lenses is also a lonely decision. I get questions almost daily from people wondering which lens Continue Reading

    The post 5 Tips on How to Choose the Right Lens appeared first on Photodoto.


    Photodoto

  • How To: Easily Fine Tune Your Flash Right From the Camera

    Strobist reader (and relative lighting newb) Ron Ibarra of New York City asks, via Twitter:

    "I can't control the flash through the PC cord. Am I doing something wrong?"

    Nope, Ron, you are not. A PC cord is what we call a "dumb sync," meaning it only triggers the flash but does not otherwise control it. And if you are a smart photographer, all you really need is a dumb sync.

    That's because you can control everything right from the camera itself. And today's follow-the-bouncing-ball post will show you the super-easy way to do just that.

    Read more »
    Strobist

  • Coming Soon: Inexpensive Cactus Laser Triggers?

    Well this is interesting. Georgia-based photographer Brian Hursey has been testing an advance set of laser “trip-triggers” to be released by Cactus.

    These are the types of triggers designed not for syncing but for motion-stopping photography. I.e., when something passes through the laser it trips the flash. They have a variable delay mechanism, and being from Cactus should be reasonably cheap.

    For more info, see Brian’s tests, or the Strobist Flickr Group discussion.

    -30-


    Strobist

  • Dragging The Shutter: Balancing Fill Flash With Ambient Light

    Wedding receptions are notoriously dimly lit places that make use of a flash a must. In this shot, I wanted to balance the ambient light from the stage with my flash to create more depth to the image. EOS-1D X, EF 24-70 f/2.8L II. 600EX-RT Speedlite. 1/60, f/2.8, ISO 800.

    Wedding receptions are notoriously dimly lit places that make use of a flash a must. In this shot, I wanted to balance the ambient light from the stage with my flash to create more depth to the image. EOS-1D X, EF 24-70 f/2.8L II. 600EX-RT Speedlite. 1/60, f/2.8, ISO 800. Photo by Rick Berk/kNot Photography

    Shooting indoors with a flash can challenge the best of photographers. Many times, the goal is simply to create enough light to illuminate your subject, and background be damned.  The results, however, tend to be less than pleasing when we allow the flash to be the only light source.  Assuming there is some ambient light in the room, adjusting the settings in your camera can help allow that ambient light into your exposure and create more depth in your image.

    Most cameras typically sync with a flash at around 1/200 or 1/250 of a second.  While this speed is fine for the flash alone, it is generally too fast a shutter speed to allow ambient light to factor into the exposure. This creates images with a brightly lit subject and a very dark background.  To allow more ambient light in, you’ll want to slow your shutter down.  Putting the camera into Manual mode will allow you to adjust your shutter speed to do this.  You can then also open your aperture as wide as it can go to allow as much light as possible into the scene.  This technique is typically known as “dragging the shutter”.

    The problem with dragging the shutter is that if the shutter speed is too slow, any movement can cause a ghost image, ruining the shot.  So you’ll need to keep the shutter speed fast enough to avoid that.  This may not allow enough ambient light in, so you have one last option to allow more light in.  Adjusting the ISO.  By raising the ISO speed, you make the camera’s imaging sensor more sensitive to light, allowing that ambient light to show in the image.

    For the image above, the stage lighting for the band created a nice background light, but my flash was too powerful and my shutter speed too fast at the maximum sync speed of 1/250. By slowing down the shutter speed to 1/60, I gained two stops of light sensitivity.  I also raised the ISO to 800 to allow the sensor to be even more sensitive.  This allowed the flash to illuminate the bride and groom, and the stage lighting to show brightly in the background.

    Another way to do this is to change the shooting mode on your camera. For most cameras, shooting in Program or Automatic means the camera will treat the flash as the only light source, and disregard the ambient light for exposure. However, if you change the mode on your camera to Aperture Priority, the camera then sets the exposure based on the ambient lighting, and flash is simply treated as fill.  The one caveat with this is that the camera could choose a shutter speed that is too slow to safely hand-hold, creating ghosting or blur in your image.  You’ll want to keep an eye on the shutter speed, and if necessary, raise the ISO to give you a faster shutter speed.  Many cameras also have a setting, allowing you set a minimum shutter speed when using flash in Aperture Priority mode to help avoid ghosting.

    Post originally from: Digital Photography Tips.

    Check out our more Photography Tips at Photography Tips for Beginners, Portrait Photography Tips and Wedding Photography Tips.

    Dragging The Shutter: Balancing Fill Flash With Ambient Light


    Digital Photography School