Category: Photography

  • QA: Lighting a 1,300-Person Group Shot [Magnum Opus]

    Reader Albert Yee asks, via Twitter:

    Ever shoot a group of 1,300 before? Trying to wrap my head around a possible assignment: Teachers and staff in a basketball arena.

    1,300? 1,300. Hmm.

    Lighting 1,300 people indoors is a Herculean task, no matter how you slice it. Can you do it? Do you wanna do it? How would you charge for it? Lotsa questions.

    Let's jump in.

    Read more »
    Strobist

  • The Beautiful Square

    Square format photography

    This article is written by Andrew S. Gibson, the author of Square, on sale now at Snap N Deals for a limited time.

    The square format seems to have gone in and out of fashion over the decades – and there’s no doubt that it’s currently experiencing a resurgence in popularity. This is at least partly due to the popularity of toy cameras like the Holga and smartphone apps like Instagram. But it’s also got a lot to do ease of access. With film cameras, cropping aside, the camera you purchased determined the aspect ratio you worked in. With digital cameras you can take a photo and crop it to any aspect ratio you desire. That makes working in the square format a whole lot easier.

    84 years of history

    The first square format camera was made by Rollei in 1929. Square format cameras have been used by venerable names such as Richard Avedon, Irving Penn and Diane Arbus. Hasselblad, the mark of choice for many professional photographers in the film age, used the square format in its film cameras from 1948 to 2002. There are no current digital cameras (to my knowledge) that have a square sensor. But digital photography makes it easy to crop your images to any aspect ratio you want.

    By the way, it’s well worth taking some time to study the works of the masters mentioned above. It will teach you a lot about composition, and hopefully inspire you to try out the square format. Click on the links to learn more about each photographer:

    Square format photography

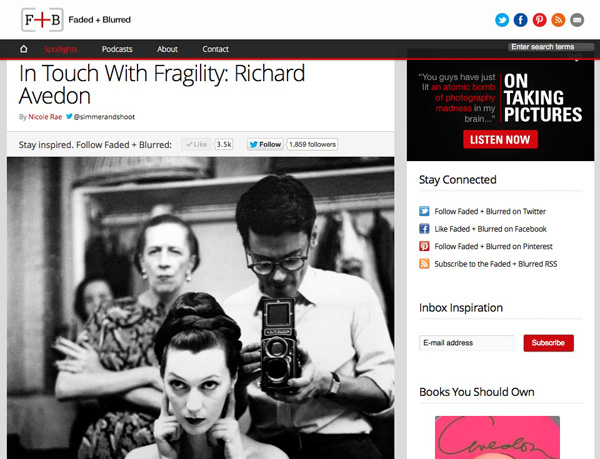
    Richard Avedon was known for his stark, minimalist portraits. His approach changed the way fashion photos were taken forever. The first image in this article shows Avedon using a Rolleiflex camera.

    Irving Penn is another famous fashion photographer who used minimalism and the square format to make his mark. His photos are known for their formal, graphic composition and stark use of white space.

    Diane Arbus took the opposite approach to that of photographers like Irving Penn. She photographed outcasts and people on the margins of society, celebrating the ugly and unusual rather than the beautiful.

    If you’d like to see the work of some of the modern exponents of square format photography, then take a look at my article 40 Beautiful Square Photos. I’ve collated a series of beautiful images from some of the best photographers around today.

    Using the square format

    Hopefully the above links have whetted your appetite for the square format. There are four main ways you can explore this aspect ratio:

    1. Use a medium format film camera. These can be surprisingly inexpensive on the second-hand market. Look for brands such as Rolleiflex, Mamiya, Bronica or Hasselblad. Get the best quality scan you can of the negatives so you can work on them in Photoshop.

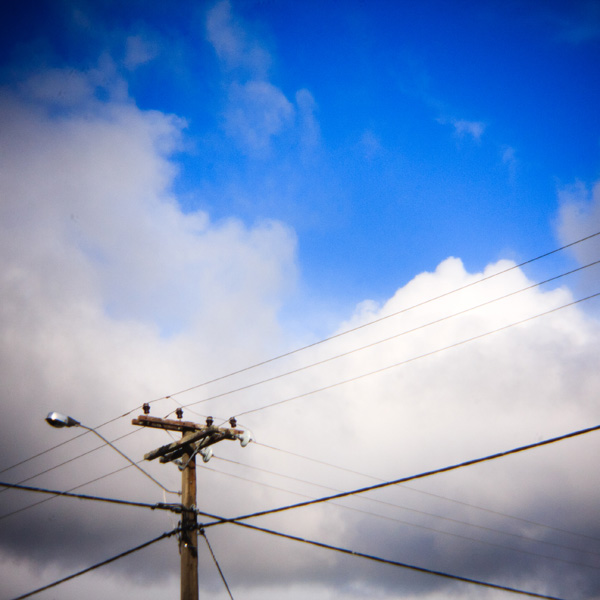
    2. Use a toy film camera like a Holga. Again, a good quality scan is essential to make the most out of the negatives. If you don’t want to use film you can buy Holga lenses for digital cameras and crop the image to a square. That’s how I created this image:

    Square format photography

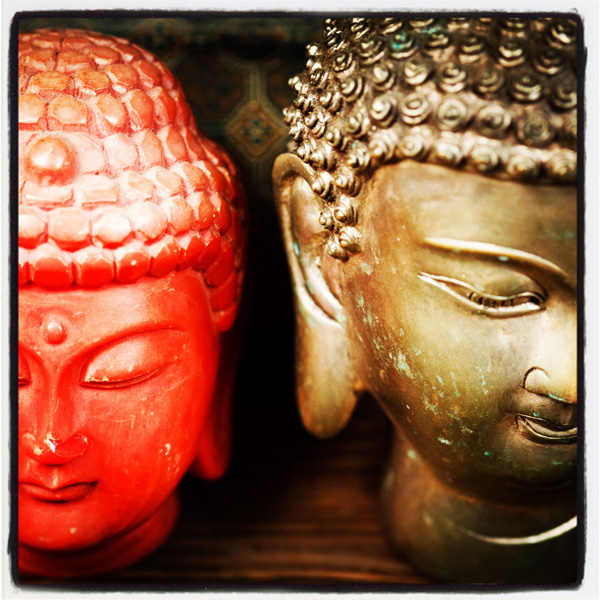
    3. Use a smartphone camera and convert the photos to square format using an app like Instagram. Another approach is load photos that you already have taken onto your phone or tablet and run them through Instagram. I used that method to create this photo:

    Square format photography

    4. Use a digital camera and crop the images to the square format when you process the Raw files. Many recent models let you take square images in Live View. I’m sure this is the method that the majority of readers of this website will use.

    The appeal of the square format

    I think of the square format as the fine art photographer’s format. It has a venerable history and has been used by some of the great names of 20th century photography. Now, in the digital age, photographers are using the square format in fields as diverse as long exposure photography and iphoneography. Here are some more reasons that I like the square format:

    • It changes my approach to composition. The square format is different, and there seems to be a certain inherent beauty to well composed square format photos that other aspect ratios lack. Shapes become more prominent, there is little wasted space and the balance between the elements changes. The subject of composition within the square format is so interesting that I will write an entire article about it.
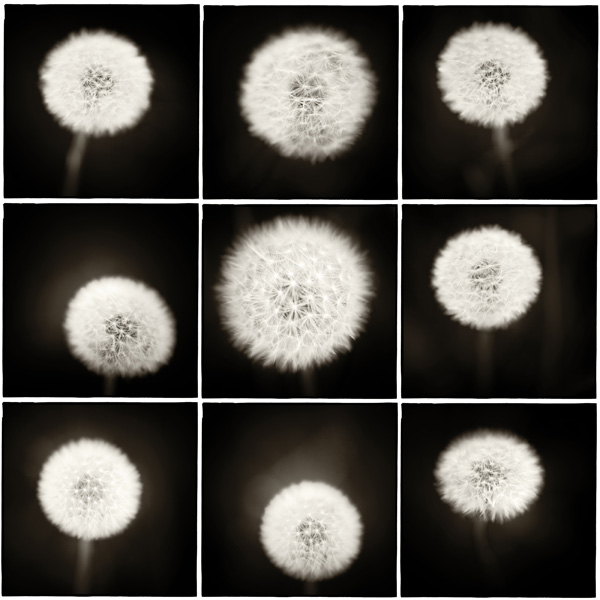
    • It works well in black and white. There’s something magical about the combination of black and white and the square format. The lack of colour lends emphasis to graphic shapes and textures within the frame.

    Square format photography

    • The square format seems to suit certain subjects. It seems to work best with subjects like portraits, the nude, landscape, still life, architecture, details and abstracts. These are all artistic subjects, and they all work well in black and white – which is perhaps why the square format is popular with fine art photographers.
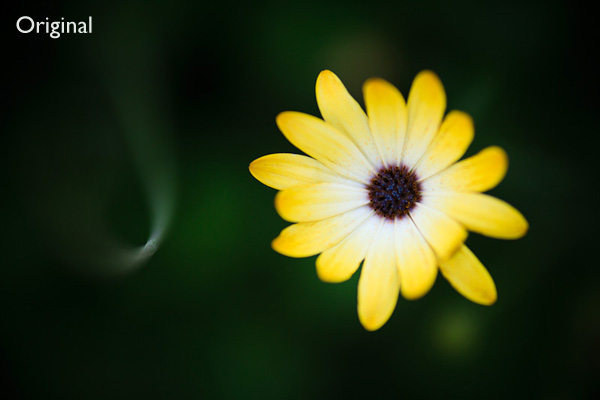
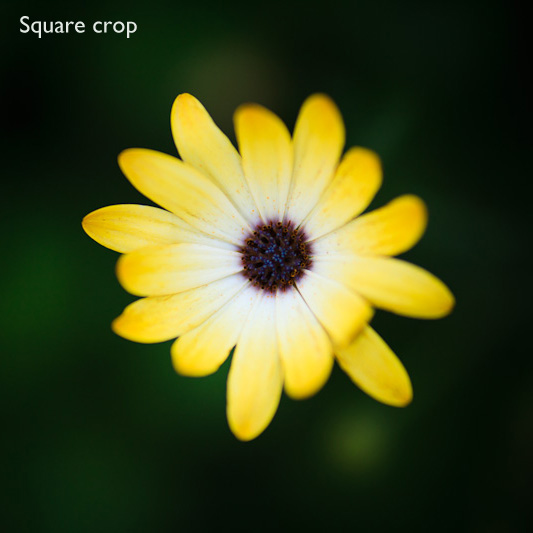
    • It’s fun. I enjoy going through my old images and seeing which ones can be improved by cropping to the square format. It may seem like an abstract exercise but it has taught me a lot about composition. Thinking about whether an image could be improved by cropping to a square makes me thing about whether I composed the image in the best possible way in the first place. Here’s an example. Cropping the image to the square format, and placing the flower in the centre of the frame, has created an new image with a different dynamic.

    Square format photography

    Square format photography

    Conclusion

    If you’ve never used the square format before, it’s well worth the effort. It’s so easy to crop your existing images in Lightroom or Photoshop that anyone can try it. It can give new life to old images – and the process will teach you a lot about composition and the use of space within the frame.

    Square

    Square format photography

    My ebook Square explores the square format from the digital photographer’s perspective. It shows you how to use the square format on your camera, and how to make the most out of what I think of as the fine art photographer’s format.It’s available now at Snap N Deals for a special price for a limited period.

    Post originally from: Digital Photography Tips.

    Check out our more Photography Tips at Photography Tips for Beginners, Portrait Photography Tips and Wedding Photography Tips.

    The Beautiful Square


    Digital Photography School

  • Create Dramatic Lighting in your Photography by Introducing Darkness

    Every professional photographer that you’ll ever talk to, will tell you that light is the most important part of photography. These people, myself included, are absolutely right, it is! Without it our photographs would be dull sheets of empty paper! Using dramatic lighting to a photographer’s advantage is the universal lesson preached to every photography student on the planet! But Continue Reading

    The post Create Dramatic Lighting in your Photography by Introducing Darkness appeared first on Photodoto.


    Photodoto

  • Textures Made Simple

    A contribution from Lori Peterson

    One of the most intimidating editing for some photographers is integrating textures. Textures can transform the mood and overall effect of an image. It can bring about a change that makes the image go from a nice photograph to a piece of fine art. There are an abundance of textures that can be found on the Internet and yet photographers are sometimes hesitant to use them because they feel overwhelmed or don’t understand that using them can actually be very simple. Once you get used to using textures you can usually decide what tones you want to bring in and how you want to use them.

    We are going to do two edits on the same image with the same texture but use two different techniques. Typically I will change the technique I use based on the amount of editing I think the image needs in order to really use the texture. You can use multiple textures and stack them in Photoshop and change their opacity. You can even vary which technique you use on each layer. The fun thing about Photoshop is that if you use layers you can play around with your image. If you don’t like the effect, you simply delete the layer!

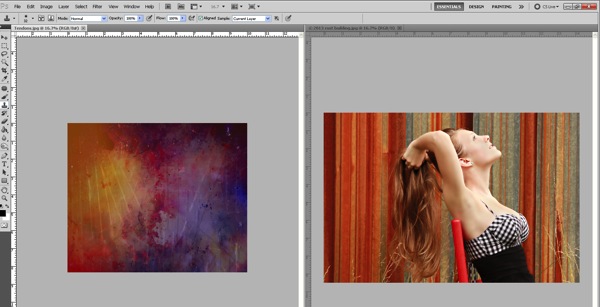
    We are going to start by opening and image and a texture.

    Image 1

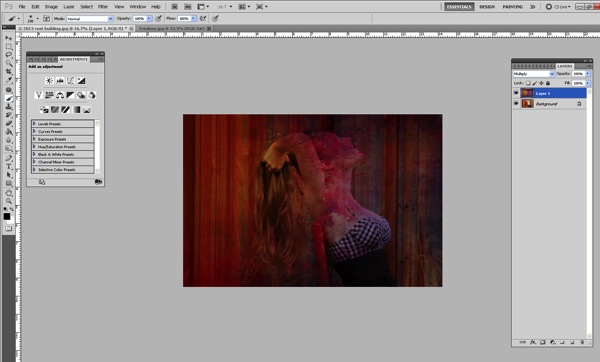
    Now we will just drag the texture on top of our image.  Size it over your image by using CTRL + T and dragging the corner to make it fit.

    Image 2

    I typically will change my blending mode to screen or multiply (depending on the image) so that I can see the image underneath.

    Image 3a

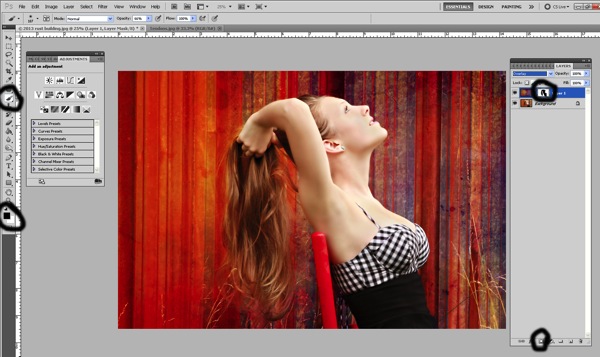
    Now we need to remove the texture off her and her skin. We can do this one of two ways.

    First of all we can just add a layer mask and then remove it off of her and her skin using a soft brush.

    Image 4

    It can be tedious to do it that way because as you get into parts of hair and closer to where her skin meets the texture you will need to make your brush smaller. 

    If you prefer, you can remove the texture this way instead:

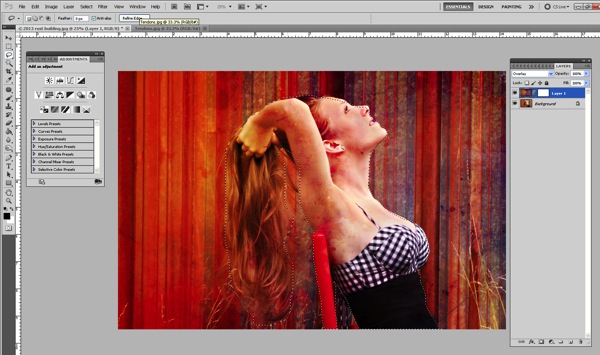
    Once you overlay your texture, go ahead and change the opacity so that you can see underneath the texture. Add your layer mask, you will need that to correct any mistakes or to refine the technique we are about to do.

    Make sure that the texture itself is what is highlighted. Select your lasso tool and then go around your subject. It doesn’t have to be perfect, but it will take you a little practice to get the hang of it!

    Image 5

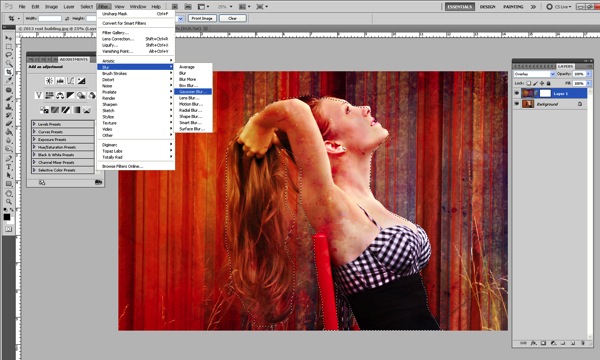
    Once you have your subject highlighted using the lasso tool, then go up to Filter > Blur > Gaussian Blur.

    Image 6

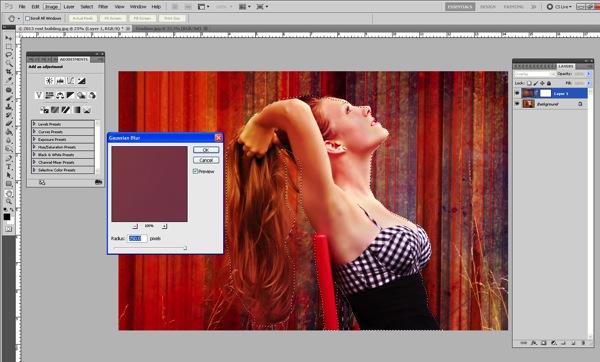
    Push the slider all the way over to the right.

    Image 7

    This will blur the texture on the subject. It doesn’t blur the subject!

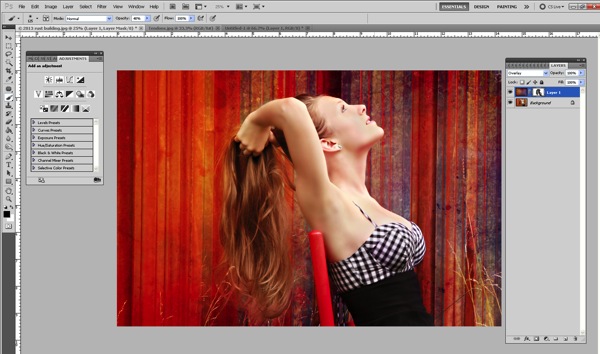
    Now we need to refine the removal of the texture off our subject, which is much easier now that the texture is blurred.

    Click on the layer mask and use your soft brush at a lower opacity to take off the parts of the texture you really want to remove. Since it has been blurred already, it’s not as difficult and tedious to remove.

    Image 8

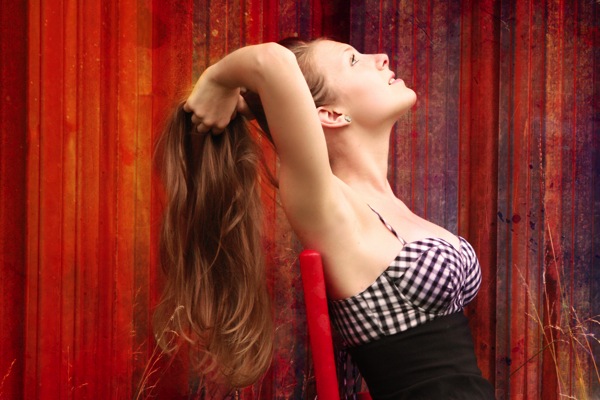
    Then you can change your blending modes to fit the look you are trying to get for your image. You can also stack textures and leave the parts that you want or remove the parts you don’t.

    Textures can really enhance and change the look of your overall image. They can bring more depth and more color. They can change the mood. They are fun to experiment with and once you learn how to use them fluidly you can really do a lot in Photoshop to change your images.

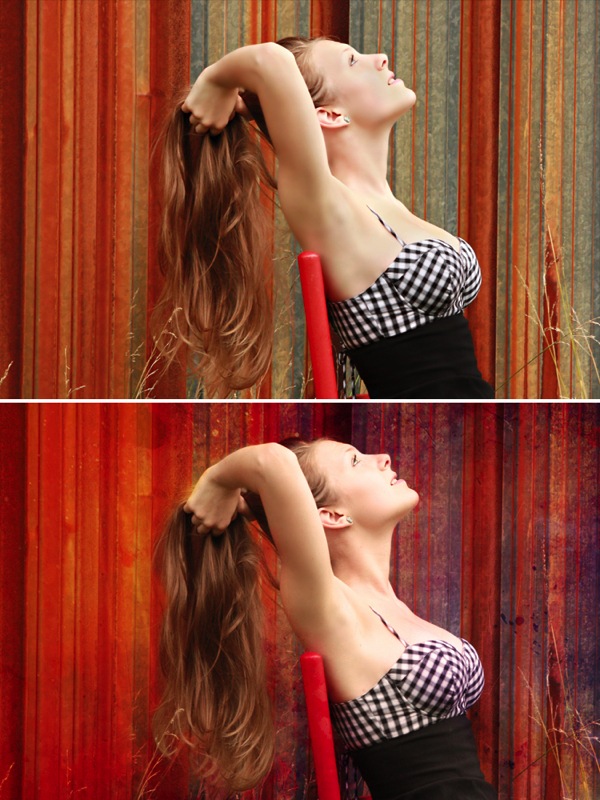
    This was my final image using the Tendons texture overlay. 
    ?
    Image 9

    Here’s the before and after so you can really see how the image changed. 

    Before After Image

    Lori Peterson is an award winning photographer based out of the St. Louis Metro Area. Her dynamic work ranges from creative portraits to very unique fine art photography. Lori’s work can be seen at www.loripetersonphotography.com and also on her blog at www.loripetersonphotographyblog.com. You can follow her on Facebook at https://www.facebook.com/LoriPetersonPhotography.

    Post originally from: Digital Photography Tips.

    Check out our more Photography Tips at Photography Tips for Beginners, Portrait Photography Tips and Wedding Photography Tips.

    Textures Made Simple


    Digital Photography School

  • Taking Your Photography Outside of Your Comfort Zone

    A contribution from Lori Peterson

    New photographers sometimes jump in and photograph everything they can. They will photograph a wedding one-day and commercial real estate on another. It isn’t until later on that they realize the importance of finding their niche and concentrating on the things that fuel their art and their passion and still manage to pay their bills. 

    Life can bring you lessons you didn’t even know you needed to be taught. I have been present as a photographer in hospital situations and you have to expect the unexpected. Whether it’s shooting images at a birth or documenting a medical procedure for a family, you should always be prepared for things to change.

    If you are planning on being a birth photographer, not only is it important for you to discuss expectations from your client, but you should also find out what the doctor and hospital will allow. Your client might want you to photograph parts of the delivery, but the hospital or doctor may have very strict rules about photography.   Births aren’t always smooth, quick, and without drama. You might plan on being at a birth for a few hours, but if labor stalls, you might be there longer. Expect the unexpected.

    If you are allowed to photograph the birth you should be mindful of the doctor, the nurses, and all the other hospital staff that need to be in the room to take care of your client and the baby. Your job is to document, not to be in the way. 

    01

    If complications arise and there is a need to go to the OR for a cesarean, make sure that your client has discussed this possibility with the doctor. The doctor and the anesthesiologist have the final say so as to whether or not you can go back with your client. Be polite and respectful. If you can’t go back to the OR, make plans to photograph the baby as soon as possible so that your client can still have those early moments recorded.

    If you are allowed back in the OR, ask the anesthesiologist about where you can shoot from. Don’t badger them with questions and chitchat. Don’t try shooting over the screen to get shots of the surgery itself.

    Once the baby is born just remember to keep documenting those moments. Mom is missing out on some of those and Dad might need to be with her. Don’t forget to capture the interactions of the new baby when they bring him or her over to Mom for the first time.

    Image 02

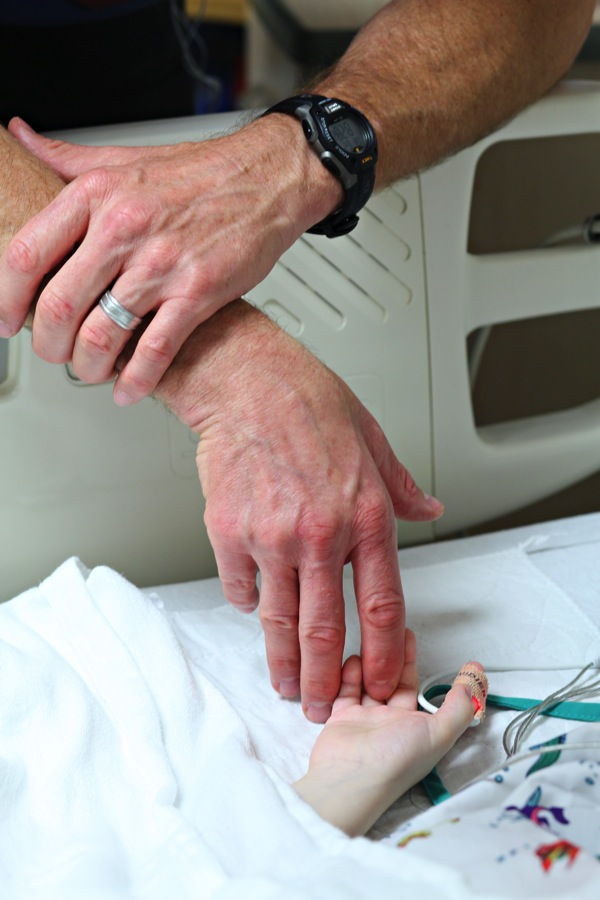
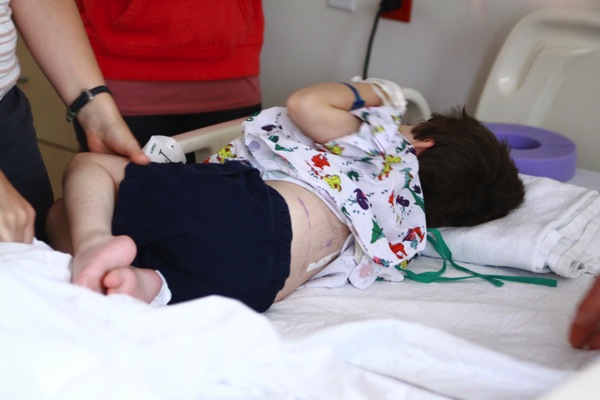
    Learning to expect the unexpected has helped me when doing more photojournalism type shoots as well. Most recently I was hired to help a family document their six-year-old son’s Selective Dorsal Rhizotomy surgery. Surgery time was pushed back a bit and then waiting time was also pushed back. There was a lot of waiting. 

    After his surgery he did a lot of sleeping. There was a lot of pacing and worrying from family members and from me as well. His parents just wanted to stick close by and be there in case he woke up. They talked to him, they held his hand and they waited.

    Image 03

    I shot images during his first time getting out of bed, his first time in physical therapy, and his first time crawling and standing after his surgery. Some of the moments when he was crying were so difficult for me, but I had to remind myself to keep documenting this for him and his parents to look back on. Lighting changed. People walked in. People walked out. He was awake. He slept. The situation changed routinely, but what was expected of me didn’t.

    04

    For some photographers shooting in a hospital setting might not be ideal, but I can tell you from personal experience that helping families to document their lives is one of the most rewarding types of photography you can do.

    Stepping outside of your comfort zone can bring you a new awareness of the world around you and remind you of how wonderful photography can be to document life events. It will physically and emotionally challenge you. You will have to learn to move fast. You will have to learn that sometimes the shot doesn’t have to be technically perfect to tell the story. It’s very different than portrait photography because you aren’t in control of everything. You have to learn to give up some of that control and trust your instincts. Capturing those moments are such a precious gift you are giving to your clients, and you will reap the rewards by adding to your skill-set for future endeavors.

    Lori Peterson is an award winning photographer based out of the St. Louis Metro Area. Her dynamic work ranges from creative portraits to very unique fine art photography. Lori’s work can be seen at www.loripetersonphotography.com and also on her blog at www.loripetersonphotographyblog.com. You can follow her on Facebook at https://www.facebook.com/LoriPetersonPhotography.

    Post originally from: Digital Photography Tips.

    Check out our more Photography Tips at Photography Tips for Beginners, Portrait Photography Tips and Wedding Photography Tips.

    Taking Your Photography Outside of Your Comfort Zone


    Digital Photography School

  • Lenses and Seeing

    Lenses and Seeing article

    The lens is the ‘eye’ of the camera. The selected focal length and aperture determine the look of the photo. The lens you are using may also have other characteristics that contribute to the look.

    These influence your approach to composition. The idea is to work with the visual characteristics of the lens you are using rather than fight against them. Ask yourself how you can get the best out of the lens you are using.

    To start, you will need to understand why a telephoto lens is different from a wide-angle, and how depth-of-field is affected by aperture choice and focal length.

    Let’s look at some examples taken with lenses that I have owned:

    Sigma 50-150mm f2.8 lens

    Lenses and Seeing article

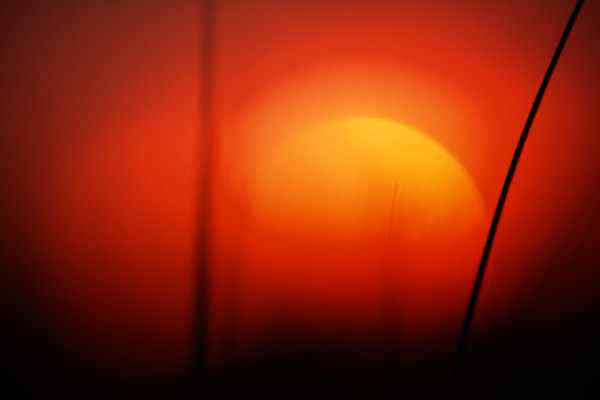
    I created this image by setting the focal length of the lens to 150mm and the aperture to f2.8. I focused on the grass in the foreground to throw the setting sun out of focus. By the way, I didn’t look through the viewfinder at the setting sun. That’s potentially dangerous. I used Live View to compose the image instead.

    This is how the lens and aperture choice affected the photo:

    Narrow depth-of-field: The combination of wide aperture, long focal length and close focusing means the depth-of-field is extremely shallow. Anything other than the blade of grass I focused on is out of focus, including the setting sun.

    Compression: The long focal length appears to compress perspective, making the sun look bigger and closer to the foreground than it really is.

    Narrow field-of-view: The telephoto lens has a narrow field-of-view and captures just part of the subject. This focal length is good for capturing detail, but not for including the entire scene.

    Canon 18-55mm f3.5-5.6 kit lens

    Lenses and Seeing article

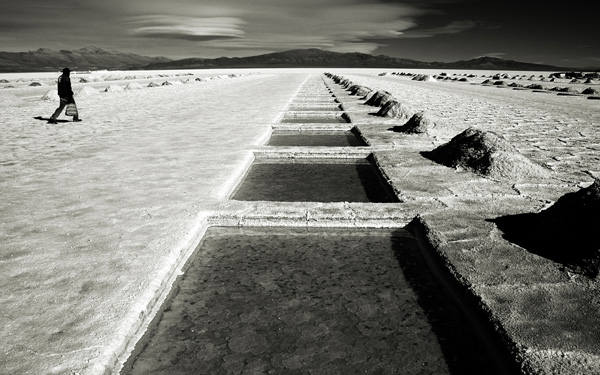
    I set the focal length of the lens to 18mm, its widest setting, and the aperture to f11 when I made this image. These are the effects:

    Depth-of-field: The small aperture was required because of the bright sun, but it also ensures that the entire scene is in focus. Every detail has been captured by the camera.

    Perspective: I was drawn to this scene by the holes cut in the salt, and the lines created as they disappear into the distance towards the mountains. The focal length emphasises the lines and pushes the horizon into the distance, making it seem further away than it really is.

    Wide field-of-view: The 18mm focal length has a wide field-of-view, which enabled me to capture the entire scene.

    In many ways the focal lengths used to create the photos above are opposites. The telephoto lens brings the subject closer. Only part of the scene is in focus thanks to the wide aperture.

    The wide-angle end of the kit lens, on the other hand, captures the entire scene and creates a sense of space by making the horizon seem further away that it really is. A narrow aperture ensures everything is in focus.

    Canon 85mm f1.8 lens

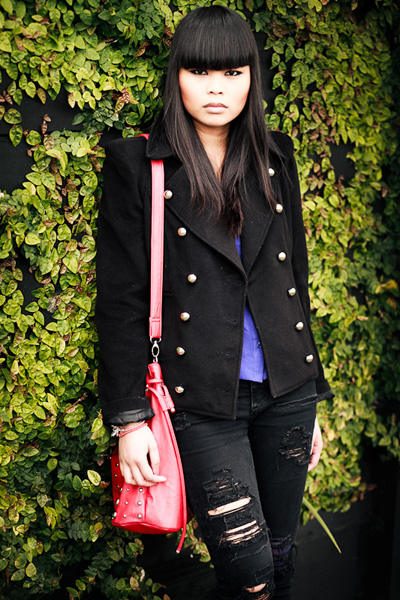
    Here’s a portrait taken with another of my favourite lens, an 85mm prime set to f2.8:

    Lenses and Seeing article

    Depth-of-field: My model is in focus, and so is part of the background. There is more depth-of-field than there is in the photo taken with the 50-150mm lens set to 150mm. And there is less than in the photo taken with the wide-angle lens.

    Perspective: The 85mm lens is a short telephoto lens and it records perspective accordingly. Again, it falls somewhere in-between the 150mm and 18mm focal lengths. Like the telephoto lens the 85mm lens is good for capturing details. You cannot capture as much of the scene as you can with a wide-angle.

    Holga lens

    Finally, I’d like to show you a photo taken with a Holga lens. You can buy these plastic lenses for digital cameras from Holga Direct. This really is a good example of how the lens determines the look of the photo:

    Lenses and Seeing article

    Holga lenses have the following characteristics:

    Lack of sharpness: A Holga lens is made from plastic and is not intended to give a good quality image.

    Vignetting: Photos taken with this lens are characterised by heavy vignetting at the edges.

    Conclusion

    Hopefully the examples in this article have drawn your attention to how the focal length of the lens you are using and the aperture affect the look of the photo. The lens is the camera’s eye, and the characteristics of the focal lens you choose determine the look of the photo. With practise, you will learn to make the best use of your lenses.

    Mastering Photography

    Lenses and Seeing article

    My latest ebook, Mastering Photography: A Beginner’s Guide to Using Digital Cameras introduces you to digital photography and helps you make the most out of your digital camera. It covers concepts such as lighting and composition as well as the camera settings you need to master to take creative photos like the ones in this article.

    Post originally from: Digital Photography Tips.

    Check out our more Photography Tips at Photography Tips for Beginners, Portrait Photography Tips and Wedding Photography Tips.

    Lenses and Seeing


    Digital Photography School

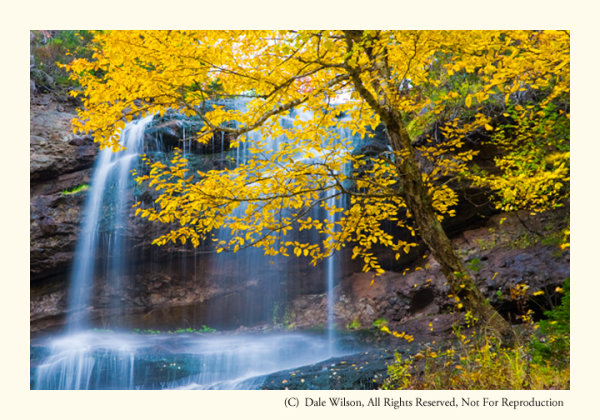
  • Canadian Travelogue: Nova Scotia – Cape Breton Highlands National Park

    The autumn foliage of Cape Breton Highlands National Park offers a more exciting colour palette than anywhere else in Canada, and quite possibly in North America.

    The best time to visit is immediately after Thanksgiving weekend in October. The holiday weekend itself can be nightmarish, with hordes of people and endless lines of tour buses. Restaurants are filled to capacity and accommodations are hard to find unless you have made reservations well in advance. On the Monday immediately following the holiday weekend, you will pretty much have the entire Highlands region and the National Park to yourself.

    Beulach Ban Falls in the 2nd week of October.

    Beulach Ban Falls in the 2nd week of October.

    The park is enclosed by the northern section of the famed 300Km long Cabot Trail, a loop of highway that starts and ends at Baddeck. I prefer to enter the Park at the western terminus, near the Acadian village of Cheticamp, and tour the park in a by driving in a clockwise direction along the Cabot Trail.

    For those who enjoy American history, the original residents of Cheticamp are repatriated families who had previously been extradited to the United States during the Great Expulsion (Le Grand Dérangement) of 1755.  The word Cajun, which is a common term used to identify the French residents of Louisiana, for example, is actually an anglicized mispronunciation of the French word Acadien. This is a topic for another day, but Cheticamp is a fabulous place to base a few days and listen to the residents speak a very unique and distinct dialect of French and English languages.

    One cannot leave the Cape Breton without the classic Cabot Trail photo, and the opportunity comes early in the trip. Park your car at the Cap Rouge pull-off and look southwest back toward the village of Cheticamp – you will instantly recognize the view and potential for a great post card picture. This is an afternoon shot, unless you are looking for a photographic challenge. A sunset photo from this location can be breathtaking, but it can also be difficult to pull-off. The sun will be slight to the right-centre of the frame so you will most likely have to contend with lens flare, and make your images thinking of a final HDR treatment.

    Two particular locations in the park that call me back each year are Mary Ann Falls and Beulach Ban Falls. Beulach Ban Falls is at the eastern base of North Mountain, near the most northerly point on the Cabot Trail. It is reached by way of a gravel laneway that passes a warden’s cabin, on the opposite side of the road from the Big Intervale Campground. About 2 kilometres on this gravel laneway will get you to a small picnic park, and to the base of the falls. You should hear the falls from the parking lot. As with any waterfall, the option to include the entire waterfall, or selective portions, is an entirely personal choice – let the muses direct your creativity.

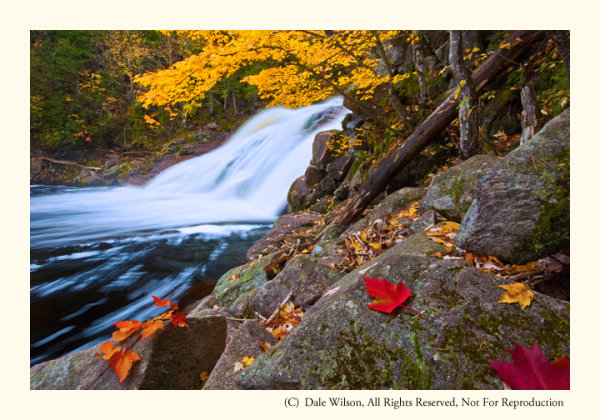
    Mary Ann Falls in 2nd week of October. Yes, I placed the leaves; however, I later heard a photographer swear up and down that those leaves in his picture were exactly as he found them!

    Mary Ann Falls in 2nd week of October. Yes, I placed the leaves; however, I later heard a photographer swear up and down that those leaves in his picture were exactly as he found them!

    On the Park’s eastern limits, and about a 5 kilometre drive west from the town of Ingonish, you will come to a gravel road leading inland to the Marrach Group Campground. Continue along this road, following the signs to Mary Ann Falls, for about 7 kilometres until you come to a gated wooden bridge – Mary Ann Falls is immediately to your right, or downstream.

    Successful images can be made at several vantage points, but the weather will often decide your ideal location along this relatively small but photogenic waterfall. Like most watercourses, the ideal time to make photographs at either Mary Ann Falls or Beulach Ban Falls is during a light drizzle or with overcast skies, thus lowering the overall contrast. Shutter speeds below 1/15th of a second should produce the often sought after “bridal veil” effect, suggesting water movement.

    There are many other locations in Cape Breton Highlands National Park that deserve your attention: there is a fantastic panoramic image looking up MacKenzie River from a pull-off near the top of MacKenzie Mountain, the Coastal Trail offers some really unique Jack Pine stands (an uncommon tree in Cape Breton) as well as several vantage points for great views along the Gulf of St. Lawrence shoreline, and a really easy hike among the hardwoods of the Lone Shieling Trail.

    As with most national parks, there is much to offer and explore. You simply have to allow yourself the time and flexibility to maximize your efforts in this park due to its maritime environment – if you don’t like the weather, wait an hour.

    The Highlands of Cape Breton, in autumn, is a world-class destination. Plan to spend at least four days to appreciate its splendour.

    Post originally from: Digital Photography Tips.

    Check out our more Photography Tips at Photography Tips for Beginners, Portrait Photography Tips and Wedding Photography Tips.

    Canadian Travelogue: Nova Scotia – Cape Breton Highlands National Park


    Digital Photography School

  • Posing Guide for Photographing Women: 7 More Poses to Get You 21 Different Photos [Part III]

    A post by Kaspars Grinvalds from Posing App.

    This is the third article in the series. You may want to look at the previous ones here: 7 standing poses [Part I] and 7 sitting poses [Part II].

    Let’s move on with 7 lying down poses for women. And again I’ll briefly try to describe the process, how I tried to slightly adjust these poses in order to get three different photos for each pose.

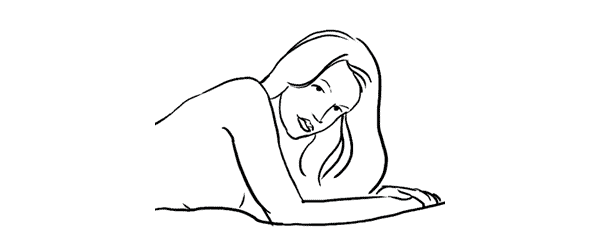
    Pose 1
    Pose1

    Very simple pose to start with. After getting the model into initial position, ask her to raise the upper body as high as she comfortably can.
    7poses3 1

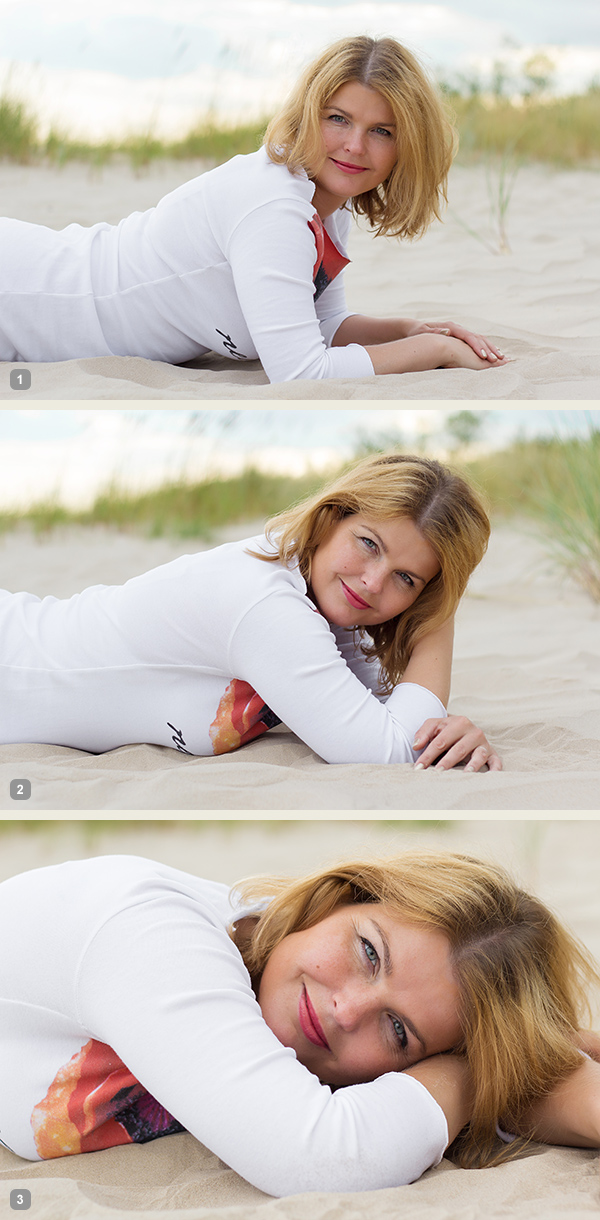
    Photo 1: The first picture is the result of recreating this simple pose. Notice that you should shoot from very low angle, nearly from the ground level.

    Photo 2: With such a basic pose as this one, you always have different options to variate – different hand placements, head tilts, eye directions and face expressions. In this shot the only difference is hand placement and slightly lowered upper body.

    Photo 3: And I continued by asking the model to lower down even more. Notice that tighter crop is also a nice option to differentiate your shots.

    Pose 2
    Pose2

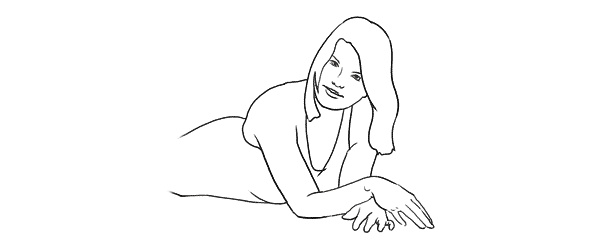
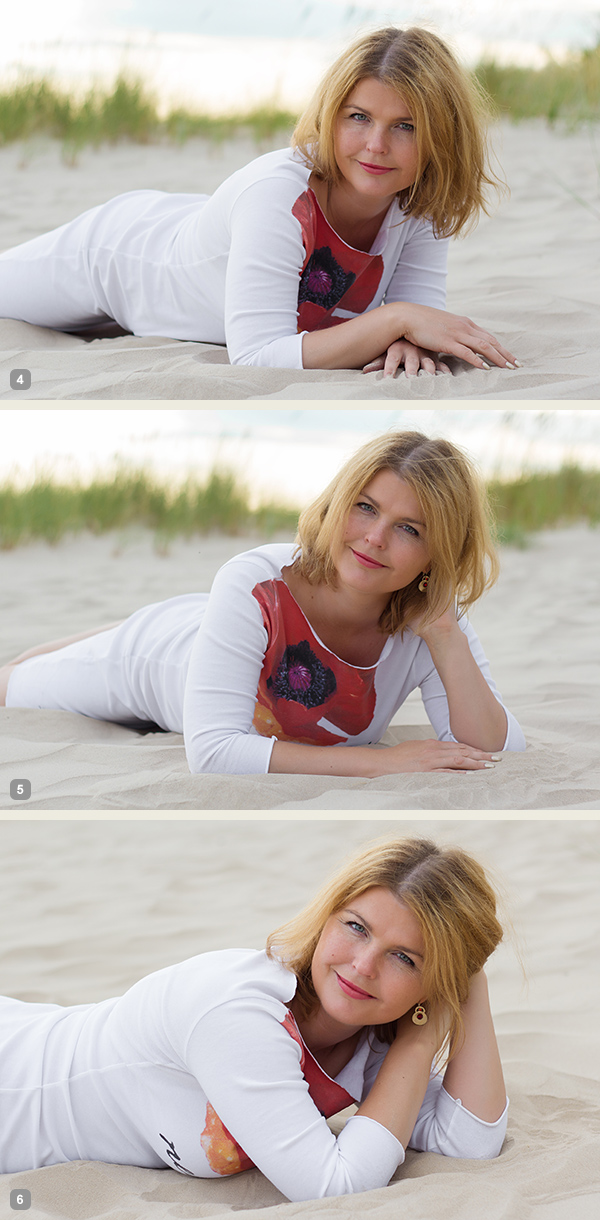
    Very similar pose as the first one, but this angle is better for including longer model’s body line in the frame. And notice that one of the model’s legs is bent in the knee. This helps to raise her bum up for a better looking body shape.
    7poses3 2

    Photo 4: If you compare this shot with the first one, you will notice that it is nearly the same pose, but the changed angle gives different look to the image.

    Photo 5: And again I continued with different hand placement. Note that hand doesn’t support the head, it actually doesn’t support anything, it’s just placed in the hair.

    Photo 6: And one more hand placement variation and tighter cropping.

    Pose 3
    Pose3

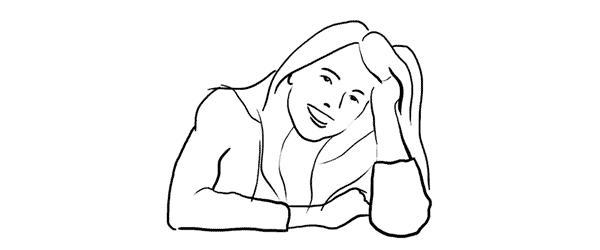
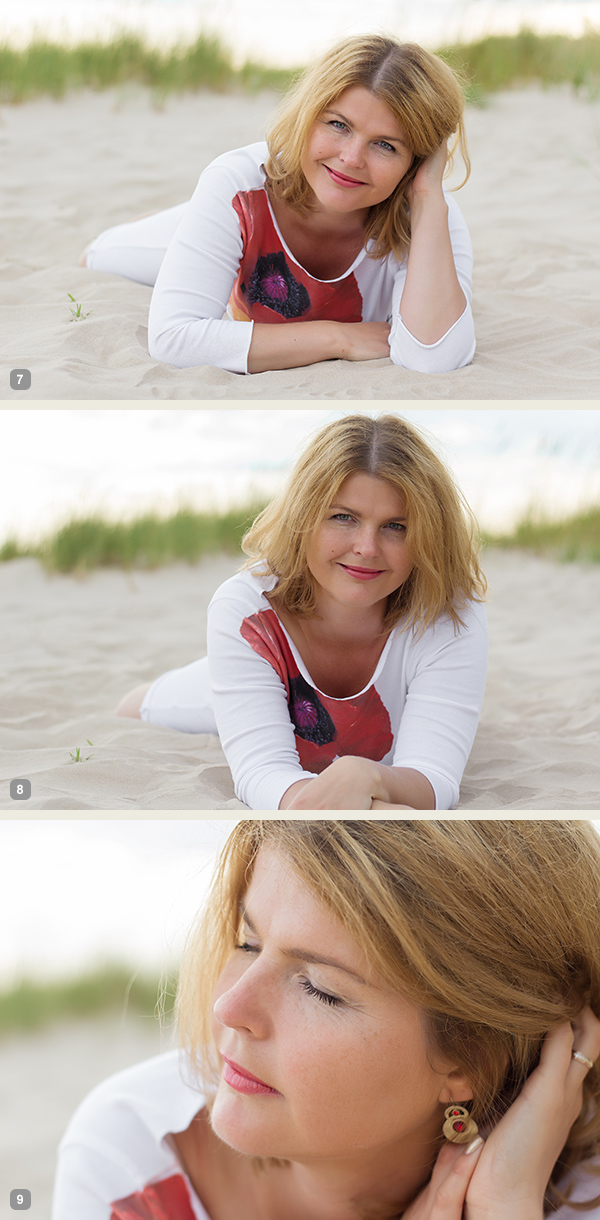
    Another very similar pose to the previous ones, the main difference again is the shooting angle – right from the front. At this point the model hasn’t even moved from the initial position, it’s the photographer who moves gradually around her.
    7poses3 3

    Photo 7: Here the model already started to repeat the gestures from earlier shots. Don’t be afraid to take these nearly similar poses as these minor variations might be invaluable when selecting the final choice of images in post production.

    Photo 8: The variations with both hands stretched in front.

    Photo 9: And close-up crop again, but this time with the eyes closed.

    Pose 4
    Pose4

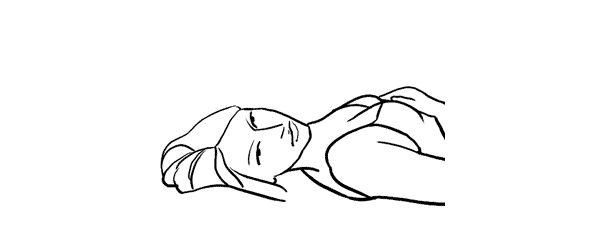
    We continued with the next easy and straightforward lying down pose.
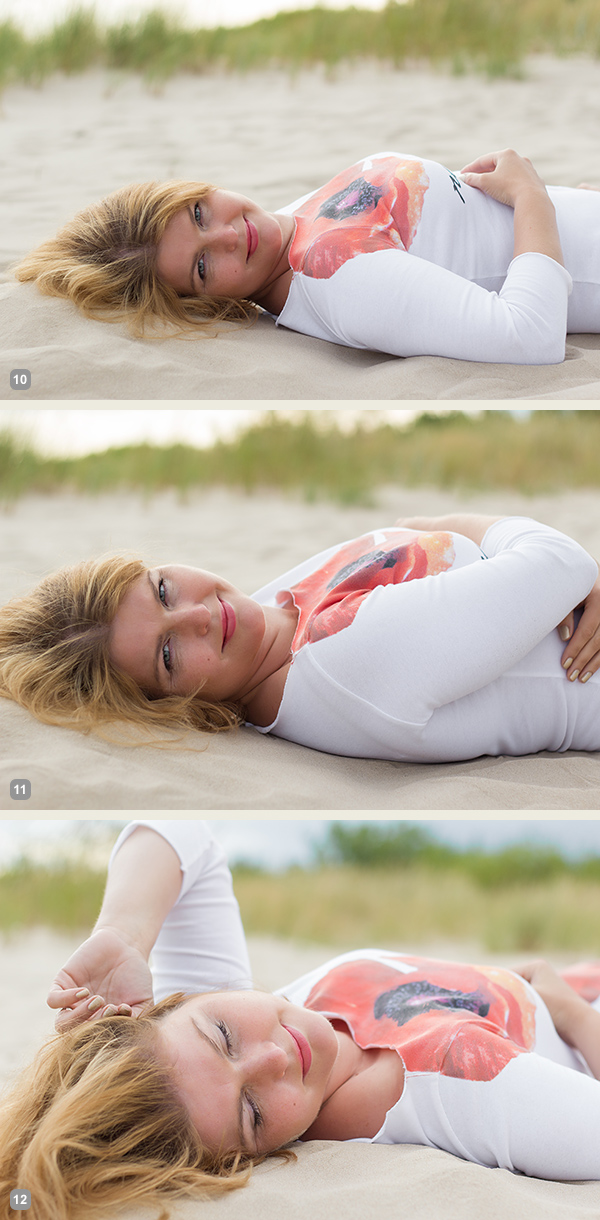
    7poses3 4

    Photo 10: An easy to describe and really easy to execute pose.

    Photo 11: Again, only couple of options to change here. Arms could be connected under the breast line as in this example. The arms could also be stretched back behind the head for another variation.

    Photo 12: And in this photo the model tried to achieve kind of dreamy look with eyes closed and hands placed asymmetrically.

    Pose 5
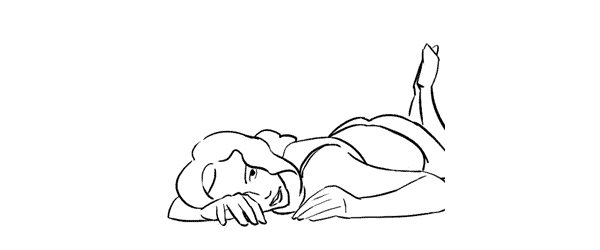
    Pose5

    Lying down very low. Works very good as well for close-up portrait shots.
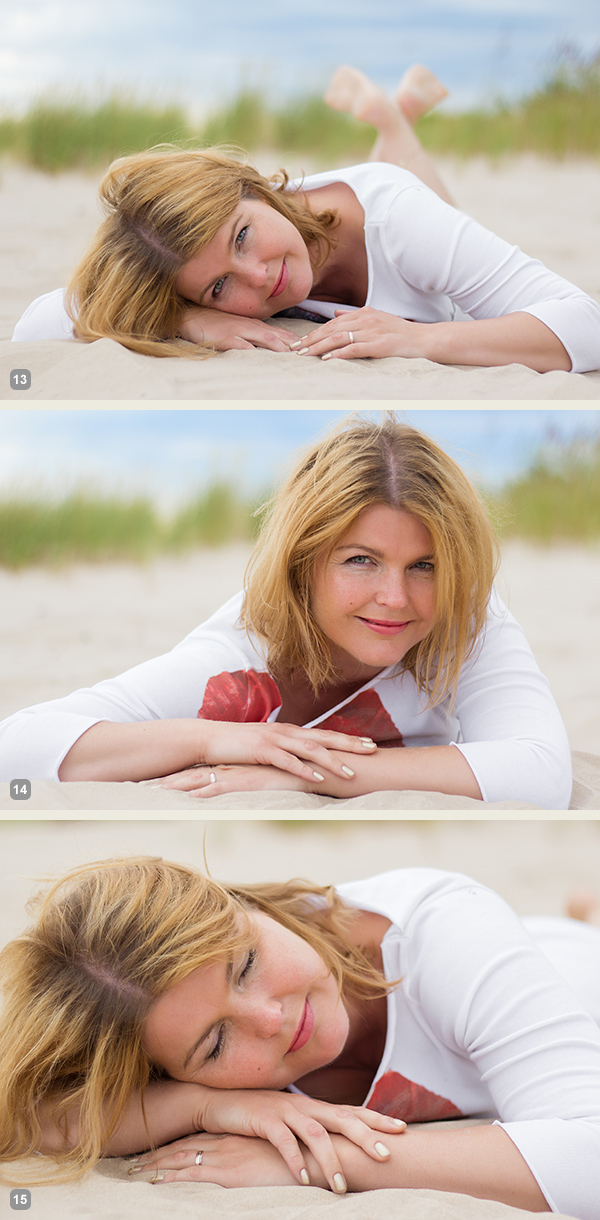
    7poses3 5

    Photo 13: As my model was lying on the sandy beach, I asked her to support the head on the hand, but in other settings the head might as well touch the ground.

    Photo 14: Here I asked the model to raise the head higher and keep the hands placed asymmetrically.

    Photo 15: And the next variation was sleeping pose with eyes closed.

    Pose 6
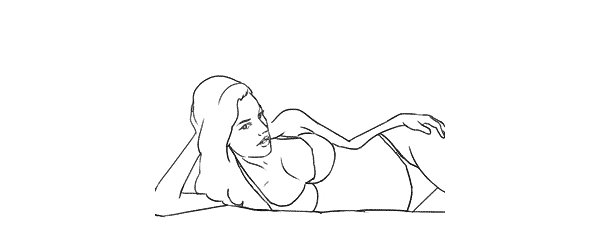
    Pose6

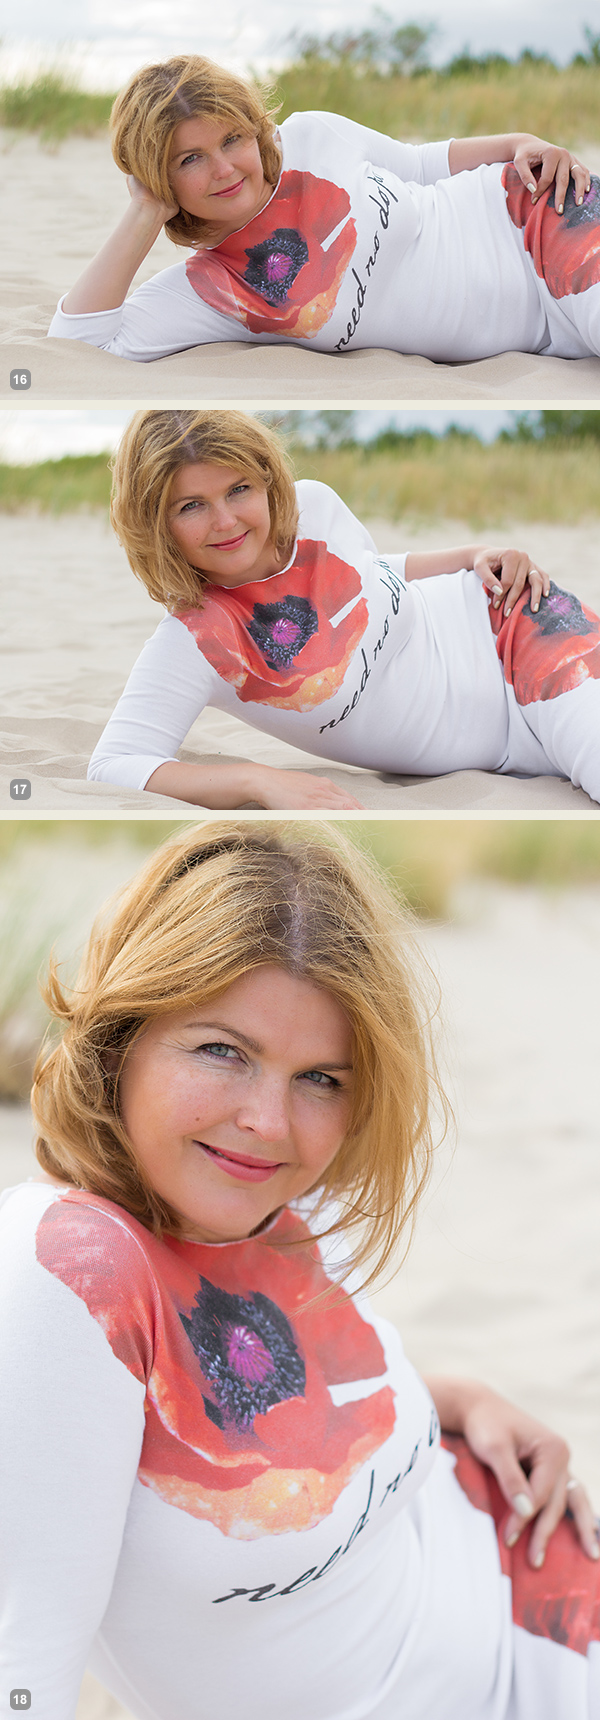
    Lying down on the side. Couple of points to check. The left leg is crossed over the right. The left arm is rested on the hip and partly hidden behind the body. The right hand is placed under the head but it supports it with only the tips of the fingers. If the model’s head would be fully supported by the hand the pose would just indicate tiredness.
    7poses3 6

    Photo 16: Following the previously described instructions, the model easily recreated the sample pose.

    Photo 17: Here basically only the right hand’s placement is different. And placing it down on the ground instantly raises her upper body higher.

    Photo 18: From there she straightened the supporting hand and raised the body even more higher.

    Pose 7
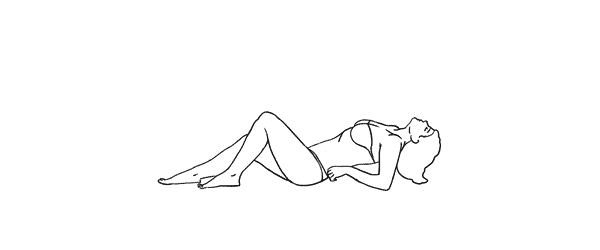
    Pose7

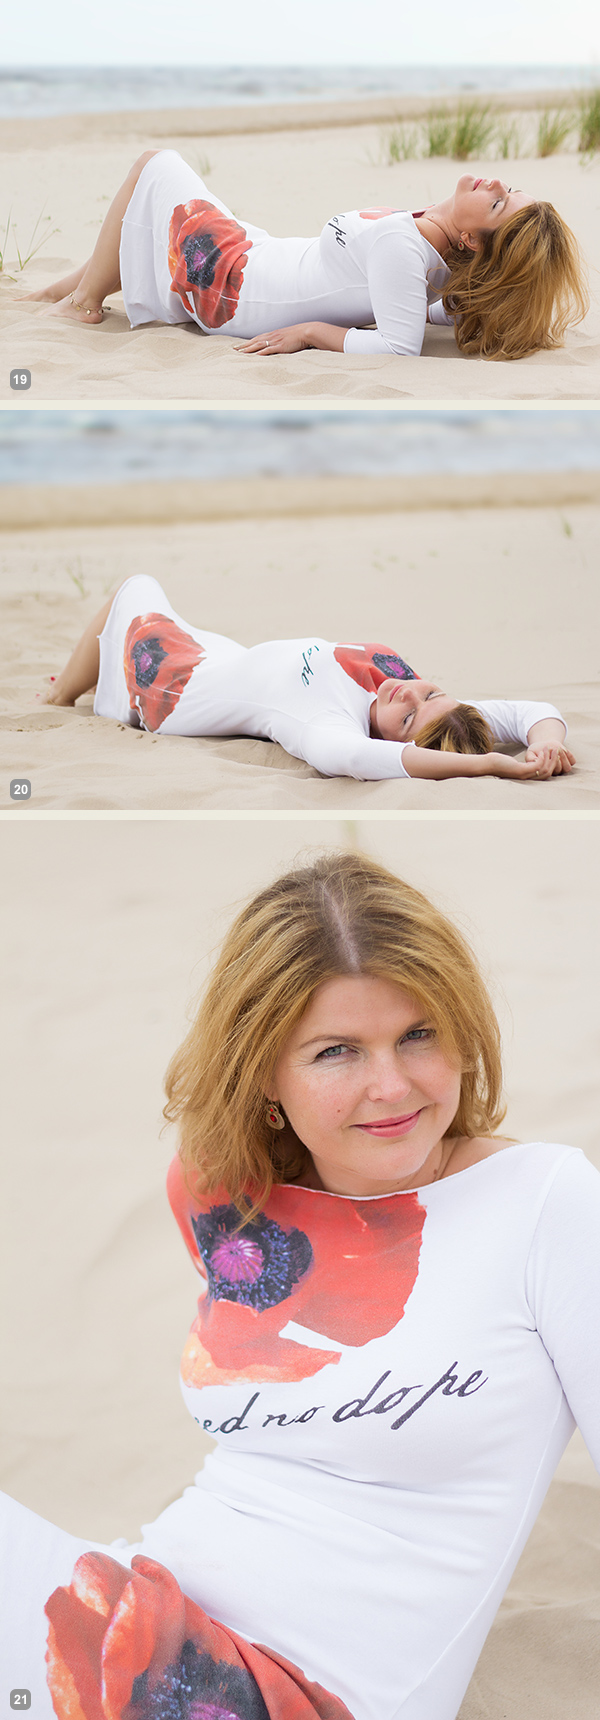
    And finally a bit more demanding pose. The biggest challenge for the model is to keep an air of relaxation. Ask her to fold her head back as far as possible while slightly facing it to the camera. And this posture for sure works best with eyes closed.
    7poses3 7

    Photo 19: If the model can manage to look relaxed, the results will be rewarding.

    Photo 20: This pose is a nice variation to the previous one as it’s far more simple for the model to recreate.

    Photo 21: And here I asked the model to raise higher up and took the shot from above.

    So, together with the previous articles – 7 standing poses [Part I] and 7 sitting poses [Part II] – you now have lots of poses to choose from. For more variation and a more dynamic result I would suggest to choose a few from each article and mix them in a single shoot. You will very soon discover that even a small number of starting poses is more than enough to have a great, productive session.

    All of these illustrations and many more posing samples are available on Posing App for your mobile devices.

    Kaspars Grinvalds is a photographer working and living in Riga, Latvia. He is the author of Posing App where more poses and tips about people photography are available.

    Post originally from: Digital Photography Tips.

    Check out our more Photography Tips at Photography Tips for Beginners, Portrait Photography Tips and Wedding Photography Tips.

    Posing Guide for Photographing Women: 7 More Poses to Get You 21 Different Photos [Part III]


    Digital Photography School

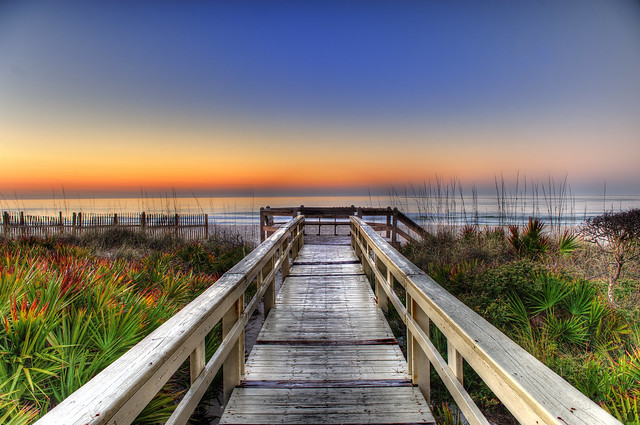
  • Leading Lines: Weekly Photography Challenge

    Sunrise on the Boardwalk

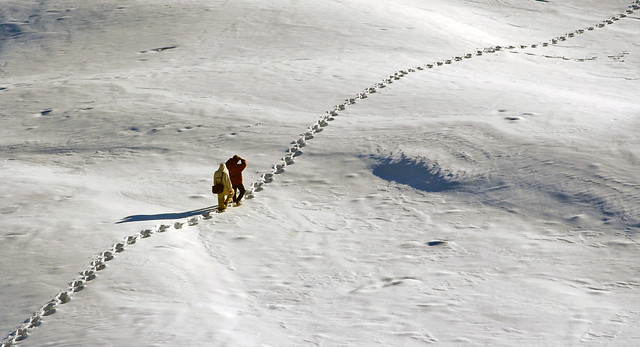
    This week your photographic challenge is to take and share an image that uses the compositional tool of ‘Leading Lines’ – as written about in our recent post How to Use Leading Lines for Better Compositions.

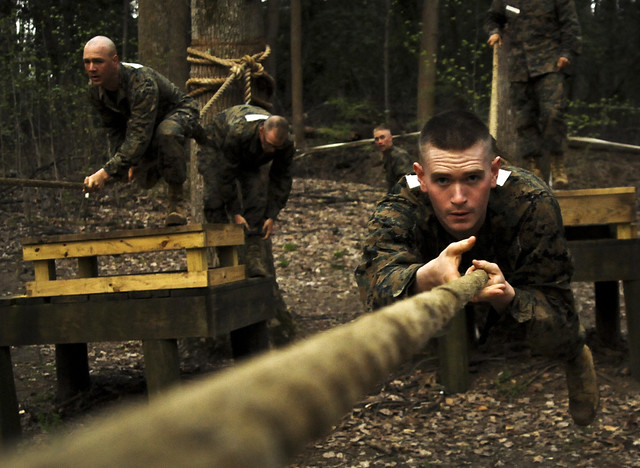
    Rope Slide

    This technique can be used in a variety of types of photography including landscapes, architectural photography, street photography and more.

    So read our leading lines post and head out with your camera to practice the technique.

    Qadmoun K Nishan Khud He Manzil Ka Pata Dengay

    Once you’ve taken your ‘Leading Lines’ photos upload your best ones to your favourite photo sharing site either share a link to them even better – embed them in the comments using the our new tool to do so.

    If you tag your photos on Flickr, Instagram, Twitter or other sites with Tagging tag them as #DPSLEADINGLINES to help others find them. Linking back to this page might also help others know what you’re doing so that they can share in the fun.

    Also – don’t forget to check out some of the great shots posted in last weeks Before and After challenge – there were some great shots submitted.

    Post originally from: Digital Photography Tips.

    Check out our more Photography Tips at Photography Tips for Beginners, Portrait Photography Tips and Wedding Photography Tips.

    Leading Lines: Weekly Photography Challenge


    Digital Photography School
  • Celebrity Interview – Roof Topping: Standing on the Edge with Tom Ryaboi

    As a photographer and aspiring writer, I’ve asked myself a few times before, “What subject or person in photography hasn’t been done to death, and is worthy of an article I’d actually read myself?” The answer, I found, is a formula. Take a young, talented photographer. Give him an idea, unlike any other you’ve encountered in the field. Make him Continue Reading

    The post Celebrity Interview – Roof Topping: Standing on the Edge with Tom Ryaboi appeared first on Photodoto.


    Photodoto