Category: Photography

  • Bursting the Burst Mode Myth: [What I Learned from Shooting with Film]

    Over the next week we’ll be featuring a mini-series of posts from Rachel Devine (author of our kids photography eBook) in which she’ll be talking about five reasons learning photography on film cameras made her the digital photographer that she is today.

    Here’s today’s on Busting the Burst Mode Myth.

    no burst mode here

    There are a few things I hear as top advice for budding children’s photographers and parents who want to take better photos of their children. I think that setting the camera to burst mode and holding the shutter down while taking photos is the one I hear most often and makes me cringe hardest. Called the “spray and pray” method, lots of digital photographers rely on taking hundreds of images (I have actually heard of thousands of frames shot for one portrait session) at a sitting to get a handful of good shots.

    When keen new photographers ask for advice on how to get better photos of kids (their own or for a client) and are told, “It is digital, it will not cost you anything, just put the camera in burst mode and take as many as you can and you are bound to get a good one in there” they are being fed bad advice…or rather non-advice.

    I started my photography career on film 16 years ago and when I did, those who swear by the spray and pray method may be shocked to learn that there were lots of other kid and family photographers who had to get the entire session worth of images for their clients on just a few rolls of film. And they did…every time.

    Here is why shooting in burst mode not best for everyone and what I think is better advice for those really wanting to get better at taking photos of kids.

    Burst Mode does actually cost something

    Time:: It takes time on your end to weed through those hundreds of resulting shots. Culling images is a time sucking and soul zapping process where you will be tied to your computer for hours sorting, comparing and slitting hairs. It may be fun the first few times you go through your images, but it will wear on you over time and if you get into the habit of having to shoot this way, you will also have to allow time for sorting and editing all of those images.

    Not learning to see:: If you do have to resort to shooting in burst mode, then things really are on auto. Burst mode does not allow for the photographer to make changes to the image and exposure settings while they are taking the shots. With single images taken thoughtfully, the photographer can fine tune the exposure settings and compose carefully. Learn to recognize what makes a great image and then set out to purposefully shoot that.

    no burst mode here

    Missing Details:: When the camera is set to burst mode, the focus is on quantity and quality tends to take a back seat. People tend to forget to scan the shot for details and end up with an entire series of cute expressions on a child who seemingly has a tree growing out of the top of their head. That photographer can now tack extra time onto their post processing routine to edit that sucker out. I have seen tags left on clothes, dirty faces, cars parked prominently in the background. Things get missed easily in the rapid fire fury.

    Connection with the subject:: Finally, I have heard an argument in favor of burst mode that it helps avoid missing any special moments. Really, the wham-bam-thank you ma’am approach to photography may seem like a good idea for kids because they are fast and have short attention spans, but getting them involved in the whole experience is so much more enriching for both photographer and subject. These are not wild animals on safari, but tiny human beings who can and should bring personality to the table when they are active participants in your sessions, not just being shot at. This is especially true for people who enjoy documenting their own children over and over again. Slow down, take a moment to breathe, observe and photograph and then breathe again…it is then when you will not only be photographing the special moments, but also participating in them.

    If that all does not speak to you, let’s talk cash…

    Shutter actuations:: Your camera does have a shelf life and it really is not determined by when the latest and greatest new model is released, but more by how many times the shutter has actually clicked. While the total end number can vary by camera model and may seem really quite high, it will be reached faster if you are taking hundreds of images each time you go to use your camera.

    Where burst mode does come in handy

    no burst mode here

    Shooting big group portraits :: Great for getting extra shots of the same scene (especially when mounted on a tripod) where you may need to do a head swap because someone closed their eyes.

    Sports :: That is pretty much why it is called Sports Mode

    Portraits with a point and shoot camera :: The shutter lag present in point and shoot cameras (the time it takes the camera to actually capture the shot from when you press the shutter button is called shutter lag and is very apparent in point and shoot cameras) can cause you to miss the moment even when you are shooting carefully and are ready for it. Setting the little compact cameras to sports mode can help overcome this technical hurdle.

    Back in the days of film, we were limited by budget as we had to pay cash money for the film and processing. That made it necessary to shoot mindfully. We ended up with more images that we loved and fewer wasted frames. Today with digital, the costs are hidden, but there are still costs. Take the time to set up the sessions, meter the light, compose and be present while you are photographing your little subjects. Practice shooting digital with the discipline of film. You just may find that you enjoy the act of photographing kids even more than you thought possible.

    For more on the topic of Kids Photogrpahy – Check out Rachel’s eBook Click! How to Take Gorgeous Photos of Your Kids.

    kids photography tips

    Post originally from: Digital Photography Tips.

    Check out our more Photography Tips at Photography Tips for Beginners, Portrait Photography Tips and Wedding Photography Tips.

    Bursting the Burst Mode Myth: [What I Learned from Shooting with Film]


    Digital Photography School

  • Take Your Creativity to New Heights with Self-Portrait Photography

    Self-portrait photography, since the beginnings of the industry, has always been popular among photographers. I mean what is there not to love? Finally you get to work with a model that does exactly what you ask of them! Aside from the ego obvious elements, It’s also great for learning how to get to grips with a new camera, practicing newly Continue Reading

    The post Take Your Creativity to New Heights with Self-Portrait Photography appeared first on Photodoto.


    Photodoto

  • On Assignment: Scout and a Shoot Pt. 1

    Gonna do something a little different today.

    If at all possible, before a job I try to get to the location a day or two in advance and do a quick scout. This helps me to think a little in the interim and to anticipate any problems I might have during the shoot. It also helps me to decide what gear to bring — i.e., not to overpack.

    So let's do a quick scout together. In the next post, we'll walk through the shoot itself.

    Read more »
    Strobist

  • 6 Lessons the Square Format Can Teach You About Composition

    Square format composition

    In another article I wrote that one of the main attractions of the square format for me is composition. Today I’m going to elaborate on that idea.

    Composition in the square format is a different process than within a rectangular frame. The benefit of understanding of why that is so is that you will be able to apply the lessons learnt to improving the composition of your images in any aspect ratio. Even if you never intend to use it in earnest, it’s worthwhile playing around with the square format for this reason alone.

    Let’s take a look at some of these factors:

    1. Balance

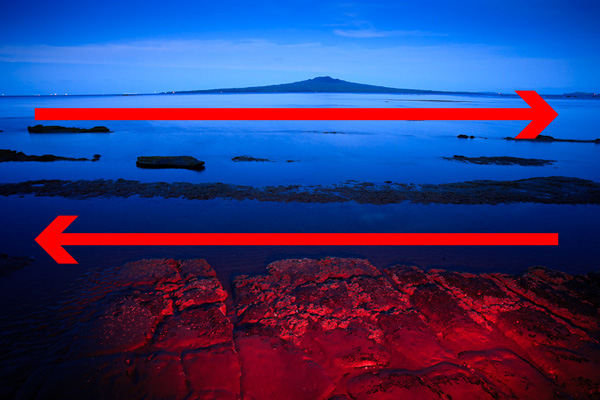
    A square is a perfectly balanced shape. Each side is equal in length. Using the square format encourages the eye to move around the frame in a circle. This is different to the rectangular frame, where the eye is encouraged to move from side to side (in the landscape format) or up and down (in the portrait format). There are many factors that influence the way the eye moves around a photo, including the use of line, texture, colour, selective focus and negative space. But the shape of the frame is a major factor.

    In this landscape, composed within the 3:2 aspect ratio of my 35mm camera, the eye is encouraged to move from side to side by the shape of the frame and the horizontal lines:

    Square format composition

    In this square format photo, the eye is encouraged to move around the frame in a circle:

    Square format composition

    2. Space

    Negative space is the term used to describe the empty space in an image around the subject. Composition is often improved by getting closer to the subject. But sometimes you can create atmosphere or emphasise the shape of the subject by including negative space around it. In the rectangular frame, this can be difficult to do as it results in a lot of empty space. But it can be very effective in the square format.

    Here is a photo that I took of a lizard in the 3:2 aspect ratio:

    Square format composition

    And here is the same photo cropped to a square:

    Square format composition

    Which do you prefer? There is no right answer – it’s entirely subjective. But it’s interesting how the dynamic of the image is changed by a single crop.

    3. Simplicity

    The square format lends itself to a simple approach. There is less room within the square frame than the rectangular one, therefore simplifying the composition becomes a necessity.

    Creating a simple composition is often much harder than it seems. But it’s a very useful exercise. For your photos to have impact, you want to eliminate as many distractions as possible. The focus should be on your subject. If there are other elements within the frame that pull the viewer’s eye away from the subject that can lessen the strength of the image.

    The composition of this image is about as simple as it is possible to get:

    Square format composition

    4. Shape

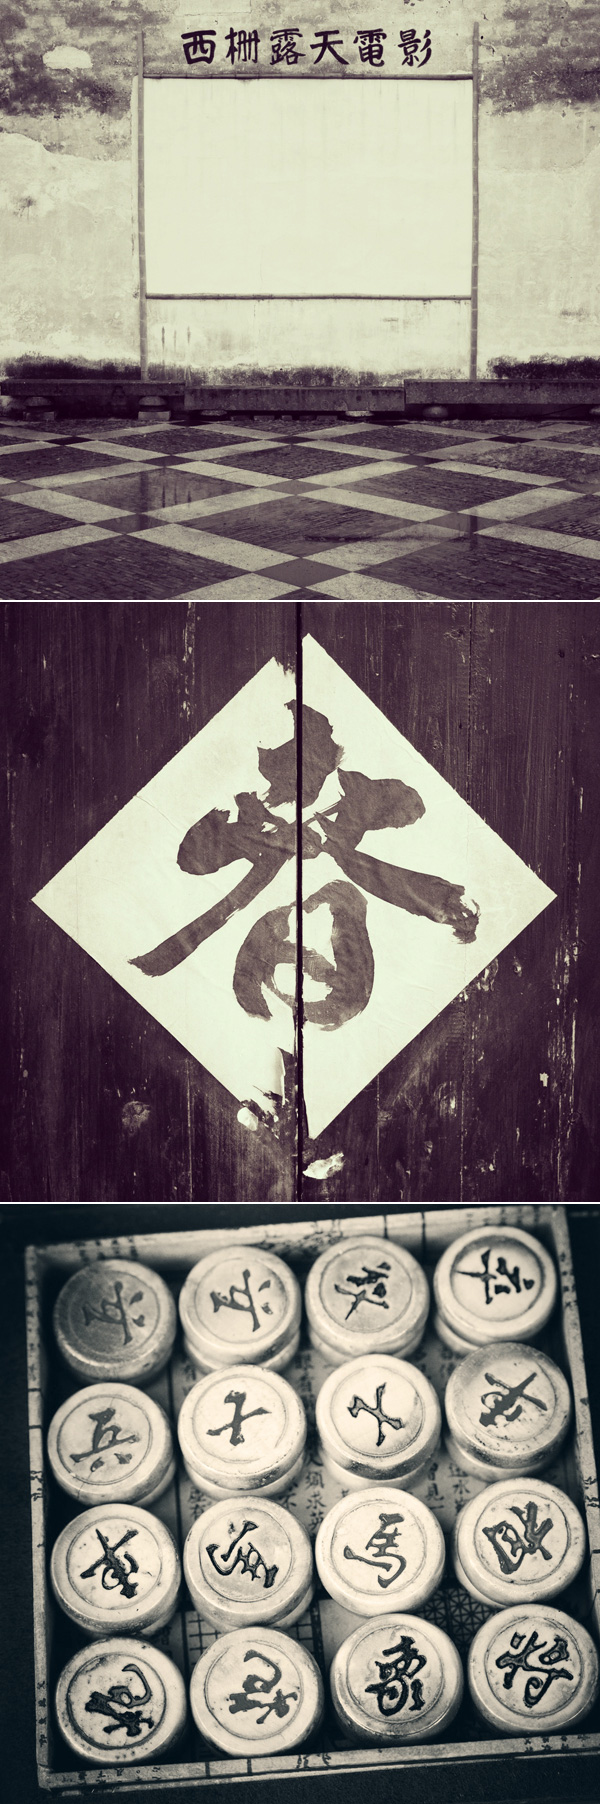
    How many shapes can you see in the images below? There are circles, squares, diamonds, rectangles and triangles within these photos. The square format lends itself to this style of composition. I think that’s because the square is such a powerful shape in itself, that it emphasises other shapes within it. Linked with this are the ideas of balance and simplicity. Simplifying the composition emphasises shape, and so does placing shapes within a square frame. Converting to black and white emphasises them further.

    Square format composition

    5. Central composition

    In the square format you can often place the subject in the centre of the frame for an effective composition. Generally speaking, many photographers tend to avoid place the subject off-centre for a more interesting composition.The rule-of-thirds is a reminder of this. But in the square format that doesn’t apply.

    It’s even more true when the image is simple. The less distractions there are in the frame, the more effective a central composition becomes. If the subject has a strong shape, the empty space around it emphasises the shape. And the square format provides the perfect, balanced frame:

    Square format composition

    6. Black and white

    Take away colour and what do you have? An image that relies on tonal contrast for impact and that emphases visual elements such as line, texture and shape. The square format and black and white seem made for each other, which perhaps explains its popularity with fine art photographers.

    Take another look at the photos in this article. Do you prefer the colour images or the monochrome ones? The answer may give you an idea for future photo projects.

    Final thought: Have fun

    Whether you shoot with the intention of utilising the square format, or go back over old images to see whether they can be improved by cropping to a square, the most important thing is to have fun with the process. Enjoy the challenge of getting to grips with the square format and its implications for composition. Don’t take it too seriously. You’ll create some beautiful images and the lessons you learn about composition along the way will help you create better images in the future.


    Post originally from: Digital Photography Tips.

    Check out our more Photography Tips at Photography Tips for Beginners, Portrait Photography Tips and Wedding Photography Tips.

    6 Lessons the Square Format Can Teach You About Composition


    Digital Photography School

  • Setting The Mood With Low Key Lighting

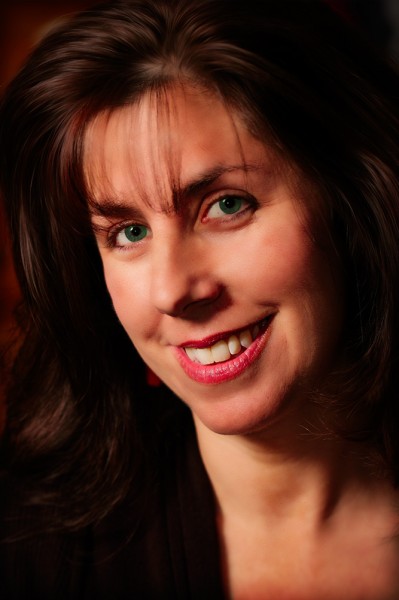
    This image was made using a flash on camera, bounced into an uncoated muslin reflector.  The uncoated muslin warms the light up about 400 degrees Kelvin.  The reflector was positioned above and to the left of the camera, with the flash aimed into it.  EOS-1D Mark IV, EF 100mm f/2.8L Macro. ISO 100, 1/250, f/4.

    This image was made using a flash on camera, bounced into an uncoated muslin reflector. The uncoated muslin warms the light up about 400 degrees Kelvin. The reflector was positioned above and to the left of the camera, with the flash aimed into it. EOS-1D Mark IV, EF 100mm f/2.8L Macro. ISO 100, 1/250, f/4.

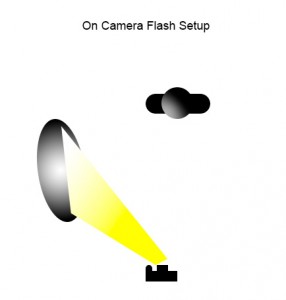
    This diagram shows the lighting for the image above.  The uncoated muslin reflector is positioned above and to the left of the camera, with the flash bounced into it. Play with the angle of the reflector to get the lighting just right.

    This diagram shows the lighting for the image above. The uncoated muslin reflector is positioned above and to the left of the camera, with the flash bounced into it. Play with the angle of the reflector to get the lighting just right.

    Last week I wrote about high key portrait lighting and how it creates a very upbeat feel in images lit that way.  The opposite end of the spectrum is low key lighting, which creates a more moody feeling in images.  Low key lighting tends to be lit with one light on the subject, using reflectors or fill light if necessary to fill in shadows. Because only one light is required, it can be a bit easier to light a subject in the low key style, and certainly less costly indoors.

    Light reveals your subject, and shadows define your subject.  The shadows you create are equally as important as the light you use to expose your subject.  Low key lighting will have a high lighting ration from main to fill, typically as high as 8:1.  High key, by comparison, will approach 1:1.

    Indoors, the simplest way to achieve low key lighting is to use a speedlite on camera, bounced off a wall, or into a reflector angled to catch your subject in the face. Adjusting the flash output will help you get the softness in light, as well as using a larger reflector. Another reflector on the opposite side of your subject can be used to throw reflected light back where it came from for fill if desired.  Using a silver or gold reflector will create a harsher light, while using uncoated muslin or soft white will create a softer light.

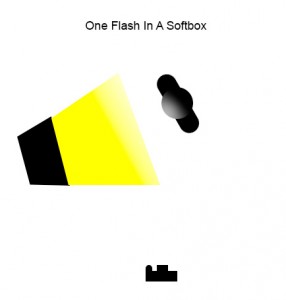
    If you’re able, and want to get the flash off camera, using a wireless trigger on your speedlite, while placing it in a softbox gives you another option to light your subject.  A softbox gives you soft, directional light, without spilling the light into the background.  Softboxes work by enlarging your light source.  The larger the light source, the softer the light will be.   I use several softboxes depending on what I need.  The first is a Westcott Bruce Dorn 18×42 assymetrical strip box.  This is great for

    lighting a full length figure, with a natural falloff at the feet.  The rest I use are Westcott Apollo softboxes. I have the 16″,  28″ and 50″ softboxes, depending on what the situation calls for.  The 50″ creates light very similar to window light, with a nice soft wraparound effect.  The 28″ is a bit harsher, and the 16″ harsher still.

    For this image, I used a Westcott 28" Apollo softbox, with a speedlite off camera. I turned down the flash output slightly to give a more moody feel. EOS 5D Mark II, EF 24-70 f/2.8L. ISO 100, 1/200, f/8.

    For this image, I used a Westcott 28″ Apollo softbox, with a speedlite off camera. I turned down the flash output slightly to give a more moody feel. EOS 5D Mark II, EF 24-70 f/2.8L. ISO 100, 1/200, f/8.

    The softbox is positioned to the left of the camera and aimed at the subject as the subject is turned toward the light. The camera shoots from the shadow side of the subject, allowing the light to just kiss the contour of the subject from the side.

    The softbox is positioned to the left of the camera and aimed at the subject as the subject is turned toward the light. The camera shoots from the shadow side of the subject, allowing the light to just kiss the contour of the subject from the side.

    Outdoors, to get a low key lighting effect, you’ll need to catch the sun when it’s low in the sky, just as it’s setting, or in the morning as the sun rises. Alternatively, standing at the edge of deep shade can help create a low key effect as well.  If needed, a scrim can help soften the light hitting your subject, but generally a sun low in the sky creates a soft warm lighting on your subject.

    Low key lighting is great for setting a mood. Add it as another option in your lighting toolbox and see what happens.  Share your favorite low key images in the comments too!


    This shot was taken using only late afternoon sun, just before sunset. When the sun sets it becomes directional, and all I had to do was instruct my model to face the light, watching the soft shadows it created. EOS-1D X with EF 85mm f/1.2L II. 1/320, f/4, ISO 320.

    This shot was taken using only late afternoon sun, just before sunset. When the sun sets it becomes directional, and all I had to do was instruct my model to face the light, watching the soft shadows it created. EOS-1D X with EF 85mm f/1.2L II. 1/320, f/4, ISO 320.

    Post originally from: Digital Photography Tips.

    Check out our more Photography Tips at Photography Tips for Beginners, Portrait Photography Tips and Wedding Photography Tips.

    Setting The Mood With Low Key Lighting


    Digital Photography School

  • Disney’s Invisible Flashes

    While visiting Disneyland Paris, long-time reader Paul Mason of Hartlepool, UK watched a Disney staff photographer work a room doing shots of kids with the characters.

    He noticed a remote on the photographer's camera, but saw no flashes anywhere — until they went off.

    Read more »
    Strobist

  • Yongnuo YN622C TTL Flash Trigger Review

    Phil Steele from Steele Training has put together this good review of the Yongnuo YN622C TTL Flash Trigger.

    Get more from Phil Steele in his great course – How to Shoot Professional looking head shots on a budget with Small Flashes.

    Post originally from: Digital Photography Tips.

    Check out our more Photography Tips at Photography Tips for Beginners, Portrait Photography Tips and Wedding Photography Tips.

    Yongnuo YN622C TTL Flash Trigger Review


    Digital Photography School

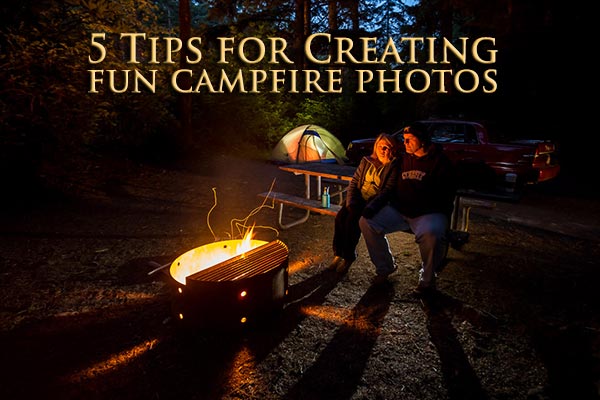
  • 5 Tips for Creating fun Campfire Photos

    night-campfire-photography-featured

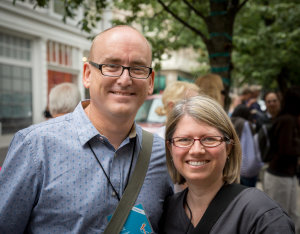
    A couple of weeks ago I had the pleasure of meeting the Digital Photography School headmaster, Darren Rowse, in person at a conference we both attended called the World Domination Summit in Portland, OR. The message of the conference (yes, the name invokes much curiosity) is simple: community, adventure, and service. It’s a large group of people that enjoy life, live adventures constantly and give back in service of others. That’s one of the reasons why I love writing on this site so much, I get to share my experience and knowledge and help you!

    Me and Darren Rowse

    Me and Darren Rowse

    Darren was one of the keynote speakers and he most of the attendees (3000+) inspired to move forward and live our dreams. He even fulfilled one of his childhood dreams on stage, but I’ll leave that for Darren to share with you!

    One thing I’ve always wanted to do is visit the Sea Lion Caves in Oregon. So after the conference my husband and I headed to the coast for a few days. We camped in one of the state parks, in the middle of the woods and sand dunes, it was awesome being in nature. But, being a photographer I couldn’t just sit around the campfire and do nothing, so out came the camera!

    It’s really not that hard to create some really cool images that will impress your friends. I’m going to walk you through my process for creating the image above and how I adjusted as I went to get the desired result. Remember photography is a journey, not a destination, don’t expect to get it perfect on the first shot – I never do!

    Here are my 5 tips for you on creating some fun campfire images.

    #1 USE A TRIPOD & SELF TIMER OR REMOTE TRIGGER

    A tripod is essential for doing this type of photography as you’ll be dealing with some really long exposures, mine ranged from two to ten full seconds. Make sure you have a sturdy tripod and if you want to get in some of the photos you can either use the self timer, as I did and run into the scene, or get yourself a handy wireless remote you can put in your pocket and fire the camera from your spot in the image.

    #2 WAIT UNTIL IT’S DARK ENOUGH OUTSIDE

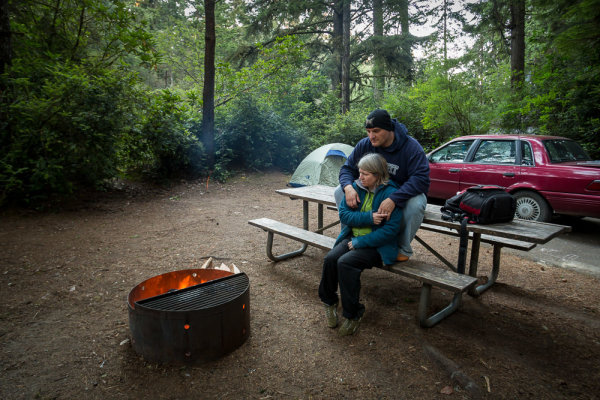
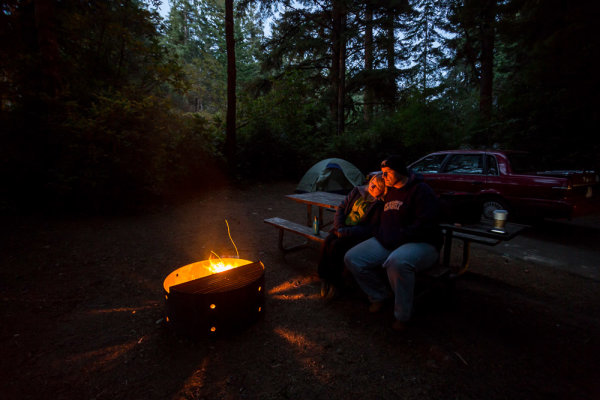
    night-campfire-photography-002

    ISO 400, f/4, 1/8th of a second

    The image above is the first one I made and I wasn’t happy with it. It didn’t have the mood I wanted and the sky was too light. So I had a snack and waited about an hour then made the following image. I’ve given the exposure data for each shot so you can see how I adjusted it as the sun went down and the amount of light diminished.

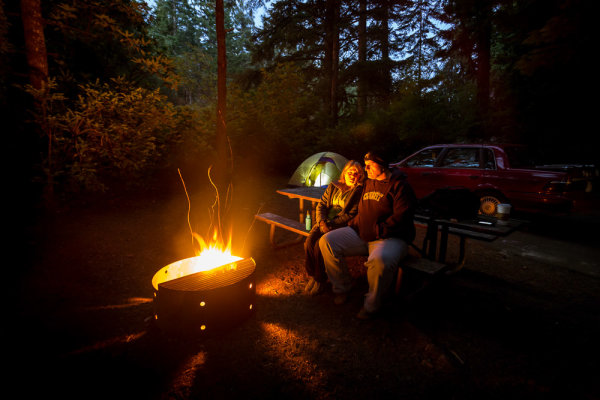
    #3 EXPOSE FOR THE BACKGROUND, KEEP IT DARK

    night-campfire-photography-003

    ISO 1600, f/4, 2 seconds

    Okay, so that’s way better but I felt it was still missing something. I really liked how the light was streaming out of the holes in the rim of the fire pit. The exposure is just right on the background but it seemed a bit boring.

    Notice also that I increased the ISO to 1600. If I hadn’t my exposure at ISO 400 would have been 8 seconds. It’s pretty hard to keep perfectly still for 8 seconds so I sacrificed gaining a little bit of noise to get what I felt was a more reasonable 2 second exposure time.

    #4 ADD SOME ADDITIONAL LIGHT INTO THE SCENE

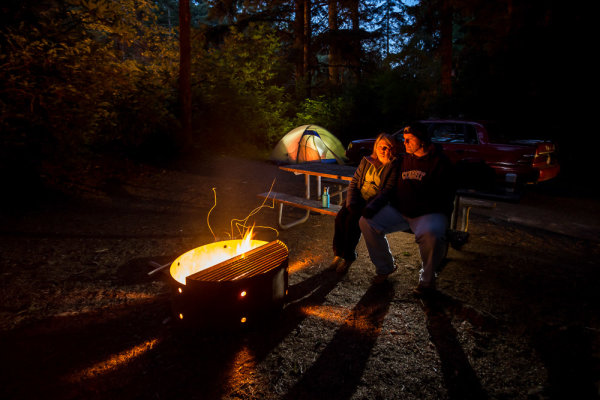
    Going from the last image, I knew wanted to add a bit of a light to to the tent, to make it look like it was glowing. So I took my headlamp (get one at a camping supply store or use a flashlight) and turned it on inside the tent. I aimed it at the back wall facing away from the camera so I didn’t get a hot spot, and it lit up the whole tent quite evenly. If you have a larger tent you may need more than one light inside.

    **NOTE:  do NOT put fire or a gas lantern inside your tent! Please practice good fire safety habits at all times.**

    night-campfire-photography-005

    ISO 1600, f/4, 2 seconds

    Okay almost perfect, except for a couple of little things. As we had just put a log on the fire it was pretty intense and bright. That brings me to the last tip.

    #5 SHOOT WHEN THE FIRE BURNS DOWN IF IT’S TOO BRIGHT

    There’s no way to control the intensity of the fire except by darkening the whole image, but if I do that then my background will basically disappear into a black abyss. So we waited a while before doing the next image. I also added a second head lamp, this time on the picnic table seat behind us. It is pointed back towards us and I placed it careful so we’d be in front of it and the light itself wasn’t hitting the lens directly.

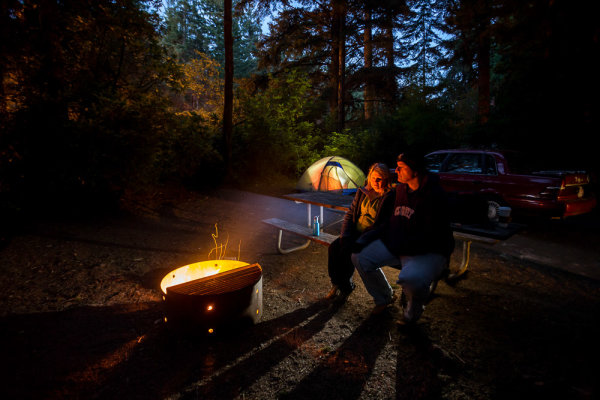
    Here’s a couple of the final shots, with which I was quite pleased. I changed my camera angle a bit and re-cropped but otherwise they are very similar. Notice these last exposures were a bit longer. The light in the sky was almost completely gone so in order to get any detail in the background I had to increase the overall exposure, taking care to not overexpose the fire.

    night-campfire-photography-010

    ISO 1600, f/4, 5 seconds

    night-campfire-photography-009

    ISO 1600, f/4, 5 seconds

    #6 BONUS TIP – MAKE SURE TO FOCUS THEN TURN IT OFF

    Focusing at night is very tricky because your camera can’t see in the dark, neither can you! The best way to focus is to have your friend hold a light where you’re going to sit (or put it on a chair). Aim the light directly at the lens, which will allow the camera to “see” it and lock focus on that spot. Once it’s locked, just switch to manual focus, taking care not to bump the camera or accidentally turn the focusing ring. If you move the camera or recompose the scene, just do the same procedure over again.

    ADDITIONAL READING

    If you want to read more about other night photography techniques I’ve done a couple of article on Light Painting and some special effects. Links to them below:

    • Light Painting Part one – the photography
    • Light Painting Part two – photoshop
    • Three Special Effects for Night Photography

    ACTION PLAN

    Since we still have a little bit of summer left in the Northern Hemisphere, if you plan on doing a little camping take the camera gear along and give this a try! You may find your travel companions get into it and have a little fun with it as well. Also gives you a great way to do some fun group photos. You can also use flash if you’re so inclined and skilled. Please do share your images with us and any other tips you want to add that I may have missed.

    Cheers, Darlene

    Post originally from: Digital Photography Tips.

    Check out our more Photography Tips at Photography Tips for Beginners, Portrait Photography Tips and Wedding Photography Tips.

    5 Tips for Creating fun Campfire Photos


    Digital Photography School

  • 5 Important Components of a Powerful Image

    A Contribution by Mitchell Kanashkevich – author of Powerful Imagery.

    Quite often people have asked me: “What are the components of a powerful image?” I gave the question a lot of thought and decided that there’s so much in it that a whole eBook could be written on the topic, which is exactly what I did, with lots of practical examples to illustrate the points. This post is something of a sneak peak and an overview of some of the most important components that make up a powerful image.

    1. Subject

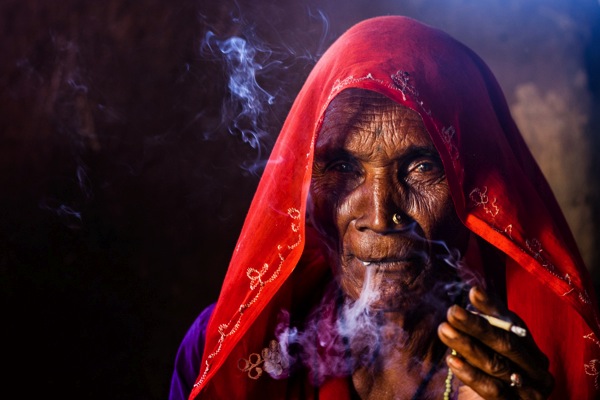
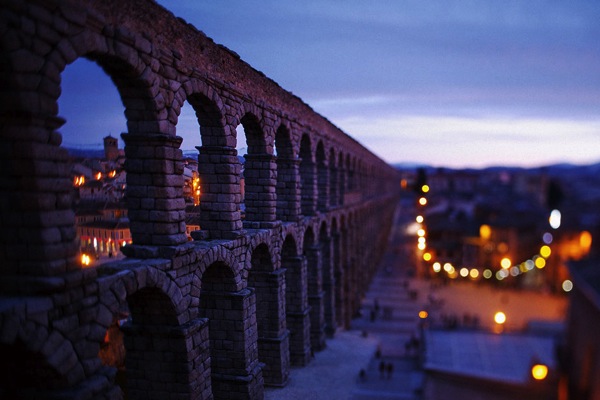
    Most would agree that a powerful photograph needs a subject that resonates with us for some reason. The kind of thing that makes us say “Wow!” or “I want to know more!” or “Isn’t that beautiful!”.

    Woman smoker

    This woman’s wrinkled face, full of character and stories is one example of a strong or special subject that resonates with the viewer.

    Segovia Aquaduct

    The beautiful aqueduct in Segovia, Spain is a completely different, yet also powerful example.

    I’m not saying that an obviously special subject is an absolute must to make a powerful photograph. We can photograph more subtle things that might not usually stand out in everyday life and make them look amazing in photographs. It’s also true that a special subject alone doesn’t make a powerful image. I am however going to put things in perspective. A special, captivating subject is definitely a good start. Ultimately, even a badly executed photograph of that special subject will, to at least some extent interest the viewer, while a masterfully executed image of something that nobody finds interesting might not do the same.

    2. Strong Composition

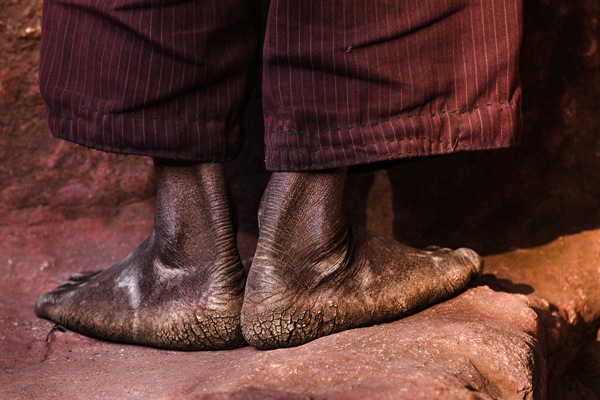
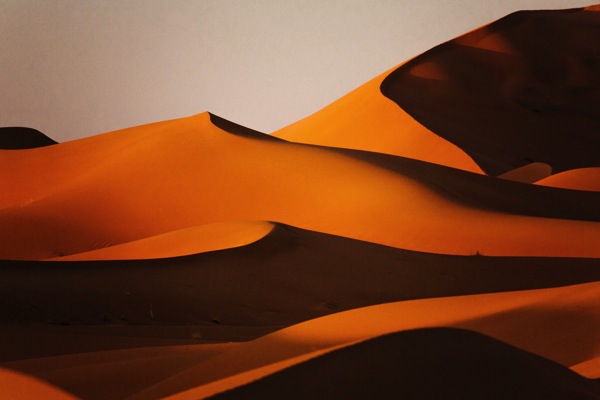
    What makes a strong composition? It’s not necessarily a framing which strictly follows the rule of thirds, or any other of the usual rules for that matter. The rules help, but they’re a means to a bigger aim, which is to make it clear what the image is about–what you are trying to communicate. Before anything else it is important that everything that does’t matter to what you’re trying to communicate is framed out, then we can think about how to position all that does matter within the frame for maximum impact. This is where the rule of thirds, use of geometry and all the other compositional theories come in.

    Pilgrim Feet

    The image above is a good example of framing out everything that doesn’t add to the story. The story is about a pilgrim’s physical sacrifice to make the journey to the sacred town of Lalibela, Ethiopia.These are feet that have walked a lot of miles. To communicate effectively, a minimalist approach was the best one, I got in very close to the feet with a long zoom lens and framed absolutely everything else out. Imagine if I had something else in the image, we’d be distracted from the main story and as a result the impact wouldn’t be the same.

    Desert Geometry

    This image is about the beauty of the geometry in the landscape. Again, to make it abundantly clear that this is what I’m trying to communicate, I composed the photograph in such a way that the curves and triangles dominate the frame. Everything that doesn’t say geometry or that breaks up the rhythm is excluded. The curvy lines lead the eye around and through the photograph and that’s what makes the composition work.

    And so, all in all a strong composition is one that makes it clear what it is you, the photographer are trying to communicate. No matter whether the subject is a pilgrim’s worn out feet, or curvy sand dunes.

    3. Moment

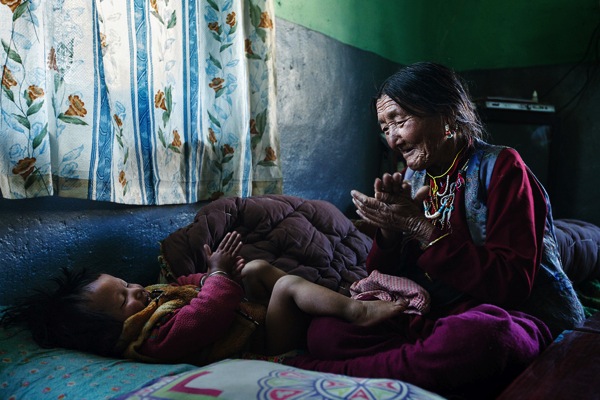
    Granma and Child

    Capturing a moment can mean a few things – capturing an expression (a smile for example), or the wind blowing and moving the trees, or it can be a tender moment, like the one between the grandmother and her grandaughter in in the photo above.

    Stork Building a Nest

    A moment can be that of an action frozen in time, like this stork bringing a twig to build a nest.

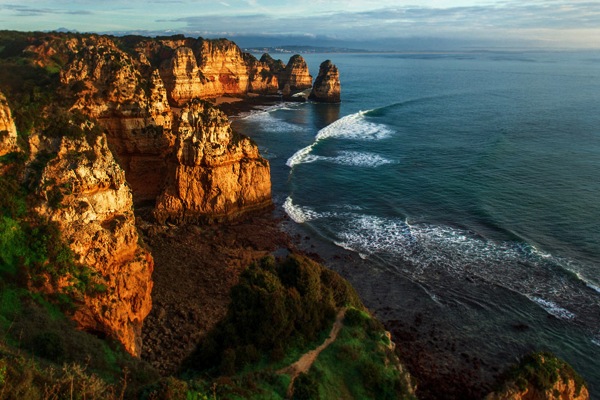
    Beautiful Seaside

    Of course a moment can also be an instance during the day, for example an instance during the golden hour, when the light from the setting or rising sun makes everything look warm, vivid and generally more beautiful. What makes the photograph above powerful is the fact that I captured it at that moment. The landscape looks beautiful and lively. The same photo at a different moment could produce a much lesser result.

    To conclude on this point, capturing a moment which is somehow special or different from what most of us consider mundane definitely contributes to the creation of a powerful image.

    4. Light

    Light needs a further, more detailed mention in this post. It can be crucial to creating a powerful image. Light is capable of creating a strong sense of mood, it can add to the story and, it can even become a subject in its own right, which often leads to dramatic, powerful images.

    Ethiopian Kitchen

    This image of Ethiopian women cooking in a traditional kitchen is a good example of light adding a strong sense of mood to the photograph. It also adds to the story by accentuating the smoky conditions in the kitchen. The image would be decent without the light beam, but with it, the photograph goes to another level, where we not only see, but feel what we see to an extent.

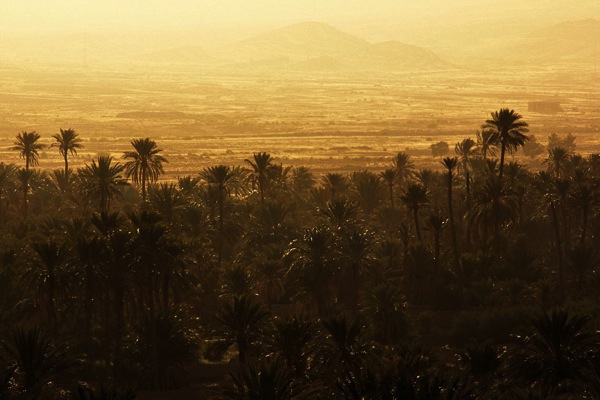
    Moroccan Landscape

    In this landscape from Morocco you could say that the trees and the hills in the background are the subject, but, the light and its’ effect is equally prominent, hence, this is an example of light actually becoming a subject in its own right. An image of the trees and the hills in a different lighting scenario would not have nearly the same impact as it does when the light is so distinct and prominent that it becomes a subject itself.

    Editors Note: for a comprehensive exploration of the topic of light check out Mitchell’s best selling eBook on Natural Light.

    5. Emotional Impact

    Emotional impact is probably the main factor that makes an image powerful, but, it isn’t something that’s always obviously tangible. It’s sometimes hard to pin-point exactly what causes the emotional impact. It can be that the subject captures you, or that the light really sets a strong mood, or, that the moment captured is fascinating, maybe even rare. Of course, it can be a combination of all the factors I’ve mentioned here and this makes for truly powerful imagery.

    You can learn more about making Powerful photographs with Mitchell’s new eBook “Powerful Imagery” released through Eyevoyage, currently on sale with our sister site SnapnDeals.

    Mitchell is a travel/documentary photographer. He has an online project called Eyevoyage – a site for anyone interested in travel photography and improving their travel photos. You can learn more about making Powerful photographs with Mitchell’s new eBook “Powerful Imagery” released through Eyevoyage, currently on sale with our sister site SnapnDeals. To further your learning visit Eyevoyage Facebook page.

    Post originally from: Digital Photography Tips.

    Check out our more Photography Tips at Photography Tips for Beginners, Portrait Photography Tips and Wedding Photography Tips.

    5 Important Components of a Powerful Image


    Digital Photography School

  • Sunset/Sunrise Landscapes: Weekly Photography Challenge

    Over the next few weeks – to celebrate the launch of our brand new Landscape Photography eBook (which is currently 33% off) – we are going to be issuing landscape photography challenges as our weekly challenge.

    Image by Todd Sisson: Author of our Living Landscapes eBook

    Image by Todd Sisson: Author of our Living Landscapes eBook

    This week your challenge is to take and share a landscape photo taken at either Sunrise or Sunset.

    There’s a section on photographing landscapes at sunset in the eBook to help you with this but whether you’ve read it or not we challenge you to get your camera out over the next few days and to head out early in the morning or at twilight to shoot with it!

    Feel free to shoot a landscape in whatever setting you can get to. It might be a rural area, a seascape or even an urban landscape – it is totally up to you!

    Once you’ve taken your ‘Sunset Landscapes’ photos upload your best ones to your favourite photo sharing site either share a link to them even better – embed them in the comments using the our new tool to do so.

    If you tag your photos on Flickr, Instagram, Twitter or other sites with Tagging tag them as #DPSSUNSET to help others find them. Linking back to this page might also help others know what you’re doing so that they can share in the fun.

    Also – don’t forget to check out some of the great shots posted in last weeks Leading Lines challenge – there were some great shots submitted.

    Post originally from: Digital Photography Tips.

    Check out our more Photography Tips at Photography Tips for Beginners, Portrait Photography Tips and Wedding Photography Tips.

    Sunset/Sunrise Landscapes: Weekly Photography Challenge


    Digital Photography School