Category: Photography

  • How to go Beyond the Regular Composition Advice for Getting the Best Shots of your Kids

    A Guest post by Rachel Devine – author of Click! How to Take Beautiful Photos of Your Kids.

    dps_rd_post_image3c.jpg

    If you search for advice on how to take better pictures of children there are certain gems that are sure to appear on any list of tips. “Get on their level” and “Get Closer”, are the two that come to mind right away and they are both solid ways to improve your kid shots. Let’s look first at why these work and then how to expand those ideas to create infinitely more interesting images.

    The top tip on any list you find is often going to be “Get on their level”. There is a reason that it should be as it is great advice and will make a big difference immediately. If you get down on the same level as a child to take their portrait, you give them power by allowing them to look into the camera straight on. Kneel down so that you become the same height as the child. Chat with your subject and engage them before just going right into taking their photograph. When the time is right, lift your camera and ask the kids if they can see themselves (or a fairy or a pony or any other magical subject) in your lens to get direct eye contact.

    Photography is a visual language and the angle with which you shoot the photograph is an integral part of the structure of your story you are telling. Think of composition as part of the “grammar” of this language and that the choices that you make should serve a purpose. Photography is a common language that even kids can understand and when you make the effort to physically go down to their level you are showing them a certain respect.

    Tech tip: Use a long lens so that you can put some distance between the camera and the child’s face. That is just another layer of respect.

    Once you have begun to incorporate the “Get on their level” angle into your regular routine, here are four other ideas to break the cycle of the adult eye level shots:

    dps_rd_post_image1.jpg

    Over Their Shoulder: You are down on their level, you have taken a straight on portrait, now move around the child and have a look at what they are doing. Immerse yourself in their world and let your camera see what they see.

    Tech tip: If you have a fast 50mm lens, use it now and include some of the child in the frame. If they are busy, you will need to use a faster shutter speed to freeze the motion. Using a fast 50mm lens means you will be able to open up the aperture to allow you to use that faster shutter speed indoors and avoid triggering your flash.

    dps_rd_post_image2.jpg

    dps_rd_post_image2b.jpg

    Go Low: Kids are short and you may have gotten on your knees to get their eye level, but now, go further. Come on, you can do it, lie down. You may be amazed at what the world looks like from the ground. Babies tend to hate tummy time, but if you get down with them, they may even enjoy it more and you can end up with some wonderfully funny faces. Or, how about that mountain of toys on the playroom floor? You think it looks bad from where you are standing? It is massive from down here!

    Tech tip: Keep your aperture as wide as your lens will let you go so you can blur some of the floor in the foreground of these shots. That will help you isolate your subject even more.

    dps_rd_post_image3.jpg

    dps_rd_post_image3b.jpg

    Bird’s Eye: Breaking the adult’s eye level angle is not always just about sitting “criss-cross applesauce” or laying on the floor. It is about carefully observing the world that your child inhabits. It may be the same one as you, but it sure can appear different when you make an effort to look from unexpected points of view. Climb (carefully!) up above the kids and shoot directly down on mealtime, playtime, naptime, story time or bath time…anytime really. I have balanced (carefully! yet precariously) on the edges of various bathtubs, crib railings and dinner tables to get some of my favorite shots. It may be easier to grab a step stool though.

    Tech tip: Use the widest focal length that you have and really get a sweeping scope of the children in their environment. Just watch out for your own feet getting into the frame.

    dps_rd_post_image4.jpg

    dps_rd_post_image4b.jpg

    Reflections: Use reflections to not only capture yourself with kids, but to catch their expression when they don’t realize the camera is trained on them. You don’t need a house full of mirrors to do this either. When you start looking, you will find shiny surfaces all around you.

    Tech Tip: Show yourself in the shot. Set the camera to closest subject auto focus mode and take the camera away from your face before you press the shutter button.

    dps_rd_post_image5.jpg

    dps_rd_post_image5b.jpg

    Almost as often, when searching for ways to improve your photos of children, you will be told to “Get closer.” Children’s faces are so perfect and beautiful that it is great advice for you to fill the frame with them. Isolate the tiniest of details by photographing in close on things like newborn lashes, pursed toddler lips going in for a kiss or the drips of a juicy orange picked right from the tree. These shots make for beautiful additions to your collection of images.

    Tech tip: Use a macro lens, close-up adapter (or the little flower icon for point and shooters) to get the closest focus possible.

    dps_rd_post_image6.jpg

    dps_rd_post_image6b.jpg

    Far Away: Now that you have that powerful and fantastic full frame eye contact shot of your child, step back and let the kids in your photos breathe. You will need to really step back and feature the children in their big world. This angle will emphasize their smallness, but their confidence at being alone in the frame will be their strength.

    Tech tip: Use color and negative space well. A messy shot will not be as powerful.

    Image by Peta Mazey

    Enjoy this post? Check out Rachel’s new eBook – CLICK! How to Take Beautiful Photos of Your Kids

    Rachel Devine is an international commercial kid photographer and daily life photo blogger from the states. She currently lives in Melbourne, Australia. Rachel and Peta Mazey are the photography duo behind “Beyond Snapshots”. They teach and mentor (in person and online) photographers of all levels on how to take better photographs of life. Their book will be published next year on Amphoto/Random House.

    Post originally from: Digital Photography Tips.

    Check out our more Photography Tips at Photography Tips for Beginners, Portrait Photography Tips and Wedding Photography Tips.

    How to go Beyond the Regular Composition Advice for Getting the Best Shots of your Kids


    Digital Photography School

  • 5 Amazing Accessories to Pimp Your DSLR

    How much money do you need to keep your photographic creativeness high? $ 1000? Or maybe $ 3000? Sure, there are quite a few things that cost that much and even more–and they are strong boosters of the creative process though unfortunately not a panacea. Having their eyes fixed on premium lenses and bodies, photographers often oversee many useful things that can Continue Reading

    The post 5 Amazing Accessories to Pimp Your DSLR appeared first on Photodoto.


    Photodoto

  • An Introduction to Blend Modes in Photoshop

    This week I had a number of readers email to ask about the topic of ‘blend modes’ in Photoshop. So I thought I’d see what our friends at Phlearn have on the topic with their great videos. Here’s a great introduction to the different types of blend modes in Photoshop:

    Enjoy this video? Check out the tutorials Phlearn have created on their website.

    Post originally from: Digital Photography Tips.

    Check out our more Photography Tips at Photography Tips for Beginners, Portrait Photography Tips and Wedding Photography Tips.

    An Introduction to Blend Modes in Photoshop


    Digital Photography School

  • A Review of Think Tank Photo’s “My 2nd Brain”

    Think Tank has just launched a new line of bags, setting their sights this time not only on the photographic community, but on the Mac-obsessed public at large. My 2nd Brain is a laptop/iPad case that comes in four sizes and three colors (Black, Harbor Blue, and Green Mist), and is designed specifically around the dimensions of Apple products like the 15″ and 13″ MacBook Pros, the 11″ MacBook Air, iPad, iPhone, and all of the cords, cables, chargers, converters, and other accessories that have to travel along with them. Unless you drop in a small point-and-shoot, this is one Think Tank bag that’s not for cameras.

    M2B-003-dPS

    First Impressions

    If you have ever owned a Think Tank camera bag this is going to sound very familiar. Fresh out of the box, you know you are holding a quality product in your hands that has been thoughtfully designed and built to last. High-quality, reinforced stitching, a comfortable shoulder strap, and the best zippers around help make up a durable, water-resistant exterior that’s sure to protect what’s inside without adding any unnecessary added bulk.  At first glance, you’re going to think that this bag can’t possibly hold very much. Then you are going to open it and be proven pleasantly wrong. The same attention to detail extends to the inside of the bag, where you’ll find dedicated pockets specifically for your iPad, iPhone, and laptop.

    M2B-001-dPS

    The accessory section of the bag takes up the most room, and has both see-through zippered and open-mesh pockets– plenty of room for power adapters and cords, as well as chargers, ear buds, keys, wallet, and just about any other reasonably sized item you might need to pack. An exterior zippered pocket on the front of the bag keeps pens, business cards, and small paperwork organized, while a pocket on the back is perfect for file folders, note pads, or magazines. This bag makes an awesome first impression.

    M2B-005-dPS

    Second Impressions

    There are a few minor areas where I see room for a little bit of improvement in Version 2. I always have my phone in either a pants or jacket pocket, so I can at least feel it vibrate, even if I am someplace where I won’t be able to hear it. Unless I’m in a fairly quiet location, there is no way for me to hear my phone ring while in the M2B15, even at a pretty high volume. Additionally, the bag hangs in a vertical orientation. Another D-ring at the other end of the bag would be welcome, giving the user the added option of changing the connecting points for the strap, thus allowing it to be carried in a horizontal position as well.

    My only other criticism stems from the very fact that this line of bags was designed around specific products with very specific dimensions. For instance, while a 15″ MacBook Pro fits perfectly in the laptop section of the bag, virtually any other 15″ laptop is going to be too thick for the zipper to close without a fight.  Think Tank’s Artificial Intelligence line of laptop cases is a viable option for non-Apple users, but that leaves out the “hybrid consumer” who uses an iPad and a non-Apple laptop. I think that leaving just a little bit of extra room could have accomplished the goal just as effectively without sacrificing anything in the way of padding and protection.

    M2B-004-dPS

    Overall

    This bag is yet another great addition to the Think Tank family. Quality construction and convenience have always been Think Tank trademarks and the M2B is no exception. It is designed to keep you organized and mobile, without skimping on security or peace of mind. It does exactly what it says it does and it does it well.  In the final analysis, how much more can you ask of it?

    Check out the video for more information on My 2nd Brain.

    Post originally from: Digital Photography Tips.

    Check out our more Photography Tips at Photography Tips for Beginners, Portrait Photography Tips and Wedding Photography Tips.

    A Review of Think Tank Photo’s “My 2nd Brain”


    Digital Photography School

  • What’s new in Photoshop CC for Photographers

    Photoshopcc for photographers opener

    The new Photoshop CC hasn’t launched without a lot of controversy. There are some very valid reasons not to like the fact that the only way to get your hands on this new release is via the Creative Cloud. However, putting delivery methods and subscription software issues aside, let’s look at what is in the new Photoshop CC for photographers so you can see what you’ll get if you upgrade or what you’re foregoing access to if you don’t.

    Photoshop CC has a few new additions and one update that will be of interests to photographers. There’s little here that you can’t live without but some of these additions you may want to live with!

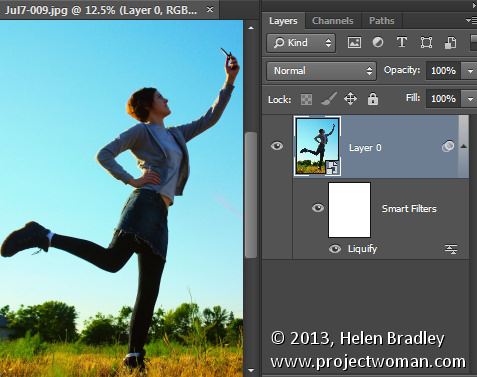
    Liquify as a Smart Object

    In previous versions of Photoshop the Liquify filter was one of the few filters that you could not apply to a Smart Object layer. That meant that any changes that you made using the Liquify Filter were permanent changes to the image which could not be undone, and they couldn’t be easily altered or blended back into the image in a non-destructive way. Now it’s possible to apply the Liquify Filter to a Smart Object layer so that the edits that you make to the image using the liquify filter can be edited later on if desired. They can be removed by disabling the filter, they can be blended using a layer blend mode, masked and edited.

    Photoshopcc for photographers 1

    ACR as a Filter

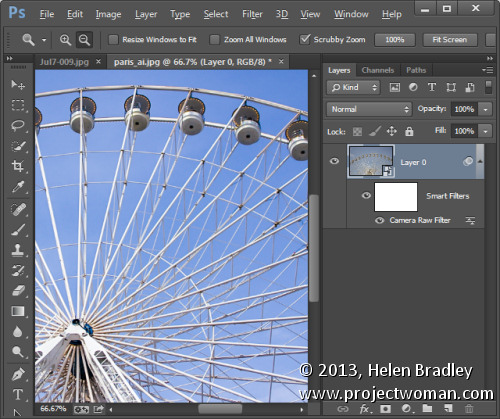
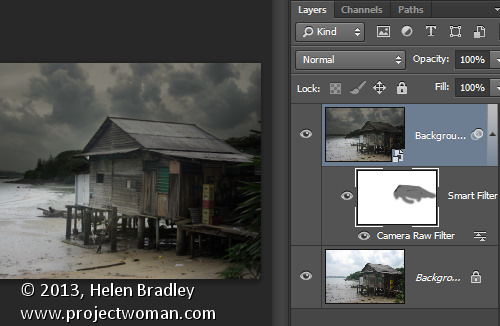
    New to Photoshop CC is the ability to apply changes which previously could only be made in Adobe Camera Raw (ACR) to an image from inside Photoshop. The new Camera Raw Filter lets you apply ACR edits to a layer and even to a Smart Object layer in Photoshop. This makes almost all the tools in ACR available to be used in Photoshop as an editable filter. To access this feature, choose Filter > Camera Raw filter.

    Photoshopcc for photographers 2

    Squaring up objects with Upright

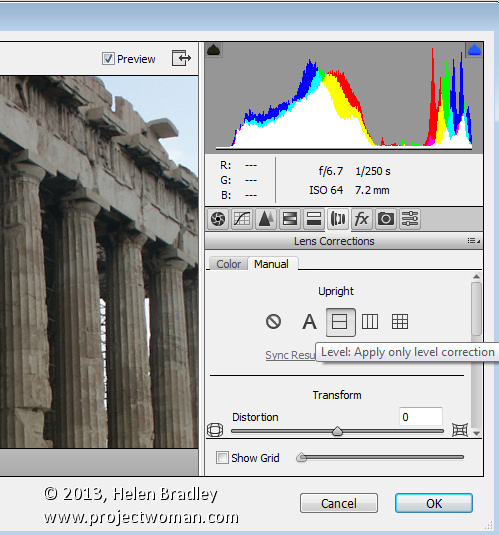
    While not technically an addition to Photoshop, the Upright feature is new to Adobe Camera Raw (ACR) for Photoshop CC. So, if you have Photoshop CC, you have access to Upright in ACR (and as a filter adjustment via the Camera Raw filter too).

    The Upright tool can automatically straighten an image and remove keystone distortion which is apparent when shooting tall buildings, for example. It is found in ACR in the Lens Correction panel – click the Manual tab.

    Photoshopcc for photographers 3

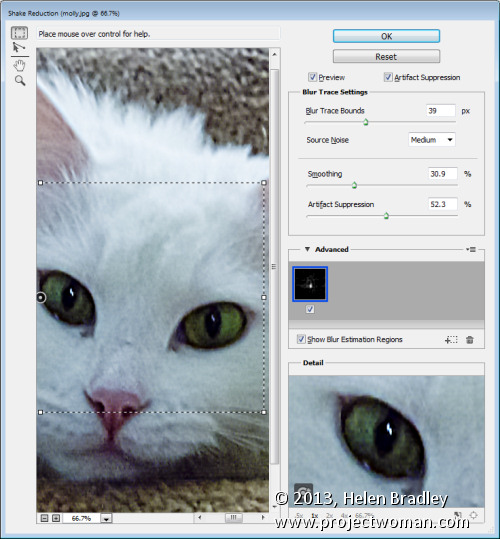
    Fix blurry images

    The new Shake Reduction filter in Photoshop CC helps deal with blurry images. It won’t fix them all and, of course it’s always preferable to get the image sharp in camera, but it can fix some burry shots particularly those captured in good light with a zoom lens and it can help sharpen text in images.

    To find the tool, choose Filter > Sharpen > Shake Reduction.

    Photoshopcc for photographers 4

    ACR features in Photoshop CC

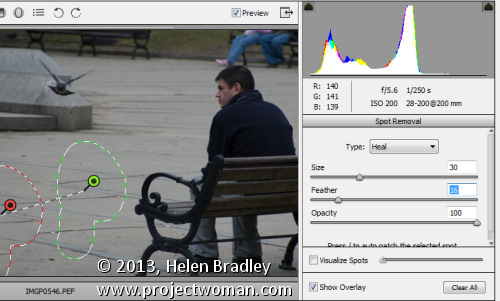
    In addition to the Upright feature available in ACR there are other new and improved features in ACR that you can access if you have Photoshop CC. These include the improved Spot Removal tool which can be used like a paintbrush to select an element in an image to fix – this makes it easier to use where the problem area is not circular. In addition the new Radial Gradient tool lets you add a radial gradient to an image to apply fixes and creative effects.

    Photoshopcc for photographers 5

    A Better Upsampling algorithm

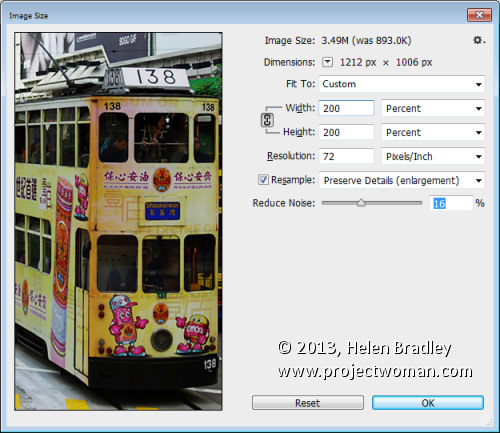
    You may already know that there are problems inherent in enlarging images because Photoshop needs to make additional pixels where pixels did not previously exist. The new resizing algorithm in Photoshop CC improves the results when you are enlarging an image.

    Choose Image > Image Size and enlarge the dialog so that you can see things clearly on the screen. Set the final image size, for example if you want to enlarge by 200 percent set 200 percent as the width and height. Click the Resample checkbox and from the dropdown list choose the new Preserve Details (Enlargement) option. The preview image shows the result of upsizing using this option.

    This new algorithm helps you enlarge images for printing retaining the sharpness in the image and avoiding pixelated edges.

    Photoshopcc for photographers 6

    Updated Smart Sharpen Filter

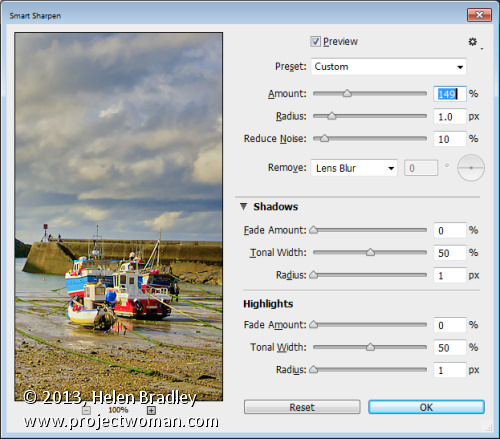
    Sharpening has been improved in Photoshop CC with changes to the Smart Sharpen filter. To see it at work choose Filter > Sharpen > Smart Sharpen and again enlarge the dialog so that you can see the effect on the image. You can now adjust the Amount and the Radius for the sharpening. Typically radius should be in the region of 0.5 to 1.5 pixels for most images. You can also choose to reduce noise as you sharpen. The shadows and highlights area allows you to fade sharpening, for example, in the shadow areas applying it more strongly to the highlights where noise will be less visible. You can also select to remove Gaussian blur, Lens blur or Motion blur if these blur issues affect your image.

    Photoshopcc for photographers 7

    Adaptive wide angle

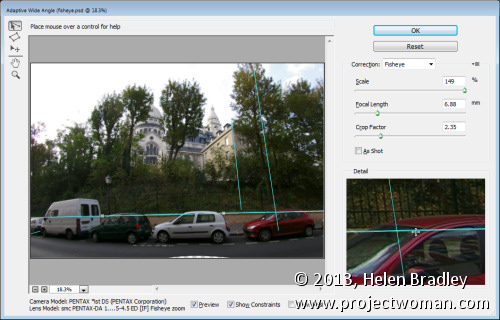
    The new Adaptive Wide Angle Filter helps you remove problems encountered when shooting with wide angle lenses. Choose Filter > Adaptive Wide Angle and choose the problem to correct from the Correction dropdown list. Set the sliders for the Focal Length and Crop factor to remove distortion. You can also draw on the image to add constraints. These lines should be positioned over objects in the image that you want to be straight. Photoshop will use the constraints to determine the correction to apply to the image and, as a result, you can remove much of the distortion problems with an image. This filter can be applied using a Smart Object layer so that the results will be editable.

    Photoshopcc for photographers 8

    Behance integration

    Behance is a community where you can showcase your work so that others, including businesses looking to find creatives, can find you and examples of your work. If you use, or plan to use, the Behance online creative community then you will appreciate that you can now post images from Photoshop CC direct to Behance. To do this you choose File > Share to Behance.

    Photoshopcc for photographers 9

    Regular Program Updates

    One benefit of the new Photoshop CC which Adobe is encouraging is program updates. Delivery via the Creative Cloud means that Adobe can now deliver program updates as they become available rather than having to wait for the next new release. This means that fixes for problems can be rolled out more quickly. Of course this can be a double edge sword – if you’re on a slow connection or you have a capped internet service – the frequency and size of these can be time consuming and expensive to download and install.

    Photoshopcc for photographers 10

    New Pricing for Photographers

    Adobe copped a lot of flak from users over the bundling and pricing of its Creative Cloud applications. As a result, it was recently announced that users with Photoshop CS3 or later could sign up for the Photoshop Photograph Program. This limited time offer (it expires December 31, 2013), gives you access to Photoshop CC, Lightroom 5, Bridge CC, 20GB of cloud storage and a Behance ProSite. It requires an annual commitment and is USD $ 9.99 plus taxes billed monthly (check the website for the cost in your local currency).

    Photoshopcc for photographers 11

    Post originally from: Digital Photography Tips.

    Check out our more Photography Tips at Photography Tips for Beginners, Portrait Photography Tips and Wedding Photography Tips.

    What’s new in Photoshop CC for Photographers


    Digital Photography School

  • Maternity Photography – 7 Tips for Taking Great Shots

    In this tutorial Natalie Norton shares 7 great tips for great Maternity Photography.

    7 Tips for Creative Maternity Photography

    When I first began doing maternity work I made a pledge. A commitment I swore I’d stand by through thick and thin. I promised myself I’d never take “the maternity picture.” You know the one. Daddy’s arms around mommy’s belly with hands affectionately forming… gag… excuse me… a heart. There’s NOTHING wrong with this photo. AT ALL. Calm your rage oh you who just did this exact shot this afternoon.

    It’s just that I didn’t want to do the typical maternity image that every mother who’s every had her belly photographed has in one of her 9 baby albums (9 for the first child that is… 1 for the second…a few images in an envelope somewhere for the third… and oh, that poor fourth child, he has to borrow pictures from his brother when he’s highlighted on the bulletin board in Kindergarten). I marched right into that first session ready to stand by my commitment to creativity! I’d no sooner pulled out my camera than mom, all giddy with excitement, said “Woo! Can we do that shot with Daddy’s arms around me and our hands forming a heart over my belly button?!?” I stood by that pledge of mine for a full… well, 2.4 seconds. Of course I did the shot. But guess what? I did a lot of other stuff that she’d never have dreamed of. Guess which image DID NOT get purchased. Belly button heart.

    7 Maternity Photography Tips

    Here’s 7 tips toward creative maternity photography:

    1. The Great Outdoors:

    So many maternity sessions are done in studio. I understand the reasons behind this. I’ve been pregnant. 3 times over. I’m not the petite and pretty pregnant. I’m the gal you find wedged between the double doors at The Sizzler. Studio shoots are great because there’s privacy. I can’t argue with that. Particularly if you’re going to do anything in less than a fully clothed state (that’s my PC way of saying naked). But there’s something about being outside. Taking that natural beauty of a woman who’s ready to bring new life into the world and placing her in the majesty of the great outdoors is simply breathtaking.

    maternity photography-1

    Maternity Photography

    2. At Home:

    When you shoot a mommy-to-be in her own home she’s comfortable to let go in a way that she may not be otherwise. This is a fantastic reason to hold maternity sessions at home. This is not however why I do it. As a photographer I feel like it’s my responsibility to help my subjects feel comfortable and capable of giving me their best, no matter where we’re shooting. I pride myself on my ability to do this. To me, it’s a HUGE part of my success as a photographer (Uh oh. I feel a post in this regard coming on… check back soon). I shoot maternity sessions at home primarily because it’s wonderful for a couple to have a capture that truly shows what their life was like at the time their baby came to be a part of their family. I’m a second generation photographer so I’ve got some really lovely shots of my sweet momma awaiting my arrival. My favorite however is a simple picture of her standing by my bassinet with her hand on her tummy. I CHERISH it.

    maternity photography-2

    3. Simplify:

    No matter where you shoot, studio, home, outside, 7Eleven, you’ve got to simplify your surroundings. The beauty of a mother anticipating the arrival of her child should be captured in a way that allows the miracle to speak for itself. Pregnancy doesn’t require anything “else” to be present in a photograph to help tell it’s story. Everything in the frame that may not belong will simply serve to distract from the story that’s already being told, naturally. Pay attention to background.

    maternity photography-3

    4. Help Her Feel Beautiful

    Women don’t generally feel very sexy when they’re pregnant. Understandably so, and trust me I connect with this feeling as much as the next gal. But just because an expectant mother doesn’t feel sexy, that doesn’t mean she’s not totally knock out. Bring that out in her. Pull that beauty out of her. A good way to do this is by talking as you shoot. It’s perfectly appropriate to say things like: “That’s beautiful!” “Yes, perfect!” “Oh that’s just LOVELY.” “Pregnancy looks good on you girl!” Whatever works! If you’re a male photographer you’ll need to be careful about what you say in this crazy world of sexual harassment, but you’re even more capable of pulling the beauty out of her than a female photographer. It’s one thing when your girlfriend tells you you’re beautiful, but when your girlfriend’s brother tells you that you’re looking good, you actually believe it. Obviously be careful and be genuine. The success of this tip will depend on your personality, but you can help her help herself. If she feels pretty she’ll look a whole heck of a lot better. It’s that simple.

    maternity photography-4

    5. Highlight Relationship:

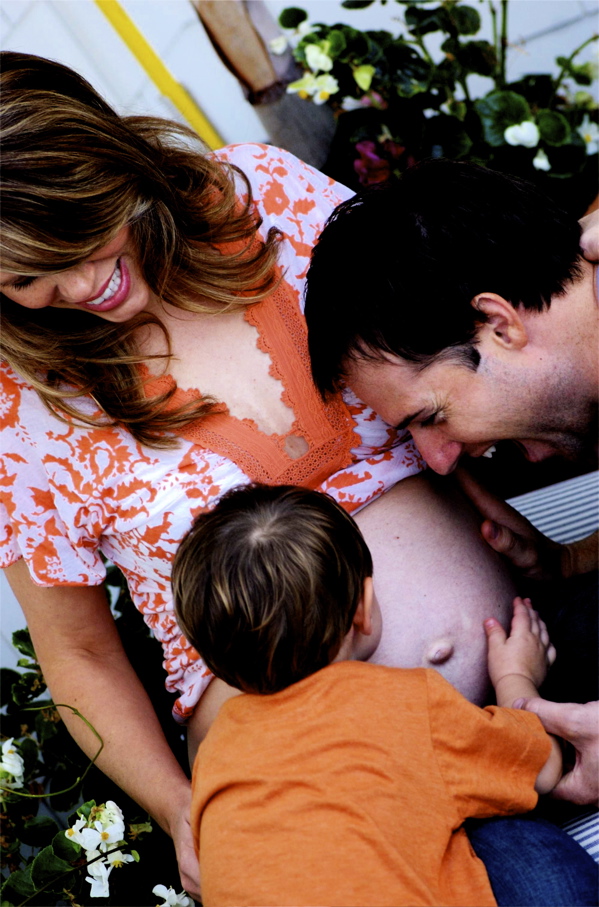
    Hopefully new babies are coming into a loving home. I always try to include photographs that highlight the tender relationship between mom and dad, because bringing a child into the world with someone is arguably love in it’s purest form.

    maternity photography-5

    6. Don’t Forget the Siblings… or the dog for that matter:

    Remember that often a baby is coming into an established family unit (not to say that Mom and Dad alone aren’t an “established family unit” but for the sake of my point, go with me on this one). If the siblings are available, make sure to include them in at least a few frames. I have to mention the dog, because I’ve got a sister-in-law who’s dog, Wanda (seriously that’s her name) is her pride and joy. When she and her hubby have kids, you can trust that Wanda will be right there in at least a handful of her maternity photos. She’s as much a part of the family as the next guy.

    maternity photography-6

    7. Give ‘em Something Different:

    Don’t just shoot what’s always been shot. This is a good general rule of photography. I really try to be “consistently inconsistent” (I recently heard another photographer, Nate Kaiser of theimageisfound.com, use this term and I had to pirate it). Let me explain, you’ve got to approach each shoot as it’s own. I’m very committed as a photographer to tailoring each shoot for the subject I’m photographing. Like I said before, this is a good general rule that applies particularly to maternity photography. Even though millions and millions of mothers have given birth to millions and millions of babies for millions and millions of years, a momma-to-be needs to feel like her pregnancy is miraculous, special and sacred, that the things she’s experiencing are unique only to her. Because they are.

    maternity photography-7

    Happy Shooting!!

    Post originally from: Digital Photography Tips.

    Check out our more Photography Tips at Photography Tips for Beginners, Portrait Photography Tips and Wedding Photography Tips.

    Maternity Photography – 7 Tips for Taking Great Shots


    Digital Photography School

  • Backlight: Weekly Photography Challenge

    The Stories

    This week we explored the technique of back lighting subjects in a blog post so thought it might make a good challenge topic.

    Paris Saint Germain

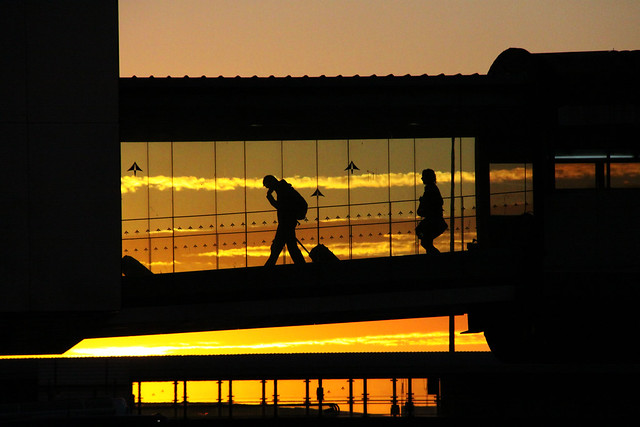
    Backlighting is something that can add impact to many types of photography – portraits, landscapes, wildlife etc and it can be done with both natural and artificial light – so you should have lots of scope to take some great shots this week.

    There's a light that never goes out

    Once you’ve taken your ‘Back Lighting’ shots, upload your best ones to your favourite photo sharing site either share a link to them even better – embed them in the comments using the our comments tool to do so.

    devendra banhart:dragonflies

    If you tag your photos on Flickr, Instagram, Twitter or other sites with Tagging tag them as #DPSBACKLIGHT to help others find them. Linking back to this page might also help others know what you’re doing so that they can share in the fun.

    Also – don’t forget to check out some of the great shots posted in last weeks In Motion challenge – there were some great shots submitted.

    Post originally from: Digital Photography Tips.

    Check out our more Photography Tips at Photography Tips for Beginners, Portrait Photography Tips and Wedding Photography Tips.

    Backlight: Weekly Photography Challenge


    Digital Photography School

  • Painting with Light in the Landscape

    Painting with light

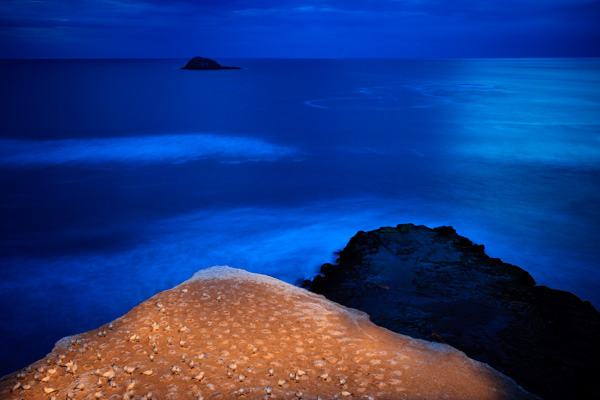
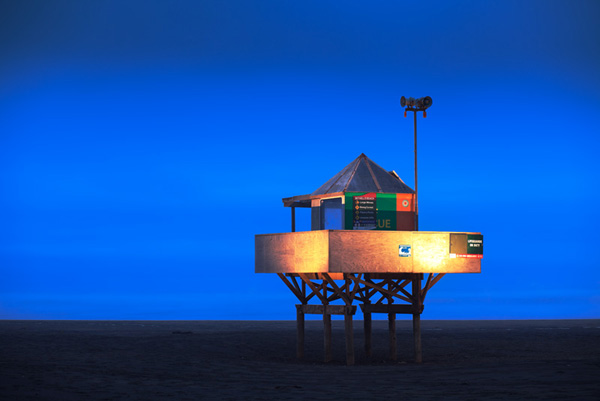
    Most of the articles I’ve written about light so far have explored the use of natural light. Painting with light in the landscape takes that idea further by mixing artificial light, provided by the photographer, with the ambient light to create surreal and dramatic images.

    Painting with light is an effective technique because it works with two ideas that, when combined, become very powerful:

    • Painting with light usually takes place at dusk. The main reason for this is entirely practical. You use either a torch or a portable flash to paint with light, and they are not bright enough to use during the day. The light is very beautiful during twilight, so this turns out to be a benefit.
    • Painting with light uses two colours that work very well together – orange and blue. Now, you may use coloured gels to paint with other colours, but these should still be colours like red, green and yellow that contrast nicely with the natural blue colour of the light you get at twilight.

    The tools

    Let’s take a look at the tools you can use to paint with light. First is my favourite, a hand-held rechargeable lantern that I bought from a local hardware store (just like this one). It’s powerful – the light has a strength of one million candlepower (you can buy models with two or five million candlepower). It wasn’t expensive, and also comes in useful to keep around the house or in the car. It has a tungsten bulb.

    Using the lantern is easy. First, you need a spectacular landscape.

    For example, these cliffs at Muriwai, a beach near Auckland in New Zealand, are a dramatic scene:

    Painting with light

    I was curious to see what happened if I used the lantern to paint the cliffs with light. I returned another evening to try it, here’s the result:

    Painting with light

    The technique itself is quite simple. Turn the lantern on, point it at the scene you want to paint, then gently move the lantern so the light from its beam covers the surface of the subject. You do this while the camera’s shutter is open.

    You’ll need a shutter speed that gives you enough time to paint the subject, so you’re looking at at least ten seconds. Thirty seconds is easier (hence the need for low light). Don’t use neutral density filters to obtain these shutter speeds, as they also block the light from the lantern. You need to wait until the ambient light is low enough to obtain these shutter speeds through a combination of low ISO and small aperture (such as f11 and f16, but preferably not f22 as diffusion will soften the image).

    The crucial aspect is timing. Try it too early, when the light is bright, and the light from the torch won’t be strong enough to overpower the daylight. Leave it too late and it will be too dark. The sky will be black, and you won’t have any background detail.

    What you’re looking for is the sweet spot between these two extremes. When the light is low enough to give you a shutter speed of around 30 seconds, and the light from the torch balances with the ambient light, and it is still light enough to get good background detail.

    The best way of finding the sweet spot is to test it out. Put your camera on a tripod, decide how you will compose the image and then wait for the light to fade. Take a test shot when the light is low enough for a shutter speed of ten seconds or so. Then look at the result on your camera’s screen.

    Does the ambient light overpower the light from the torch? Then you need to wait until it gets darker. Did you cover the subject evenly with the torch light? This may take several attempts to get right. Hopefully, the moment that you figure out how to paint the subject with light will coincide with the moment the ambient light and torch light balance each other perfectly.

    When you find the sweet spot, keep going until the ambient light fades away. You can decide which image you prefer when you view the results on the computer.

    Painting with light

    This is a photo taken earlier. You can see that it’s too early to work yet – the light from the lantern is overpowered by the ambient light. It also needs more work to get the coverage right.

    Using portable flash

    Another way to paint with light is to use portable flash. Using a lantern is simple, and a good way to get started. But if you’d like to take up the challenge, portable flash gives you some interesting options. Here’s why:

    • You can use portable flash to fire multiple bursts of light at the subject, building up the exposure over time.
    • You can use coloured gels to give light of different colours.
    • You can shoot at night, rather than at dusk, using portable flash to fire multiple bursts of light, building up an exposure over time. You can use multiple flashes, or the same flash with different coloured gels, to do so. There are lots of good examples here at Troy Paiva’s Lost America website.

    The essence of the technique is again simple. Switch your flash unit to manual, and use the highest powered setting (1:1). Work out your composition in advance, preferably while there is still enough light to see. Wait until the light gets low, then start using your flash to illuminate the subject.

    If you are going to be in the frame yourself, make sure you are wearing black clothes. Don’t stand still – keep moving so that you don’t register in the frame. Keep your body between the flash unit and the camera so that the light from the flash head itself doesn’t appear in the frame, just the light that illuminates the subject. Keep checking the camera’s LCD screen to see how the images are coming out, and adjust your technique accordingly.

    Here’s a photo I created using a portable flash unit fitted with an orange gel (CTO – Colour Temperature Orange) to imitate the look of a tungsten bulb.

    Painting with light

    Mastering Photography

    Painting with light

    My ebook Mastering Photography: A Beginner’s Guide to Using Digital Cameras introduces you to digital photography and helps you make the most out of your digital cameras. It covers concepts such as lighting and composition as well as the camera settings you need to master to take photos like the ones in this article.

    Post originally from: Digital Photography Tips.

    Check out our more Photography Tips at Photography Tips for Beginners, Portrait Photography Tips and Wedding Photography Tips.

    Painting with Light in the Landscape


    Digital Photography School

  • Get Started with the Beautiful World of Film Photography in 7 Easy Steps

    Ahh, film photography.  The cool kid on the block.  The “old” thing that’s suddenly the “new” thing.  In recent years, it’s been popular opinion that it was an identifying trademark of hipsters, and only then for an artistic flair that digital photography has failed to capture for them.  The reason Instagram has been such an enormous success recently is our Continue Reading

    The post Get Started with the Beautiful World of Film Photography in 7 Easy Steps appeared first on Photodoto.


    Photodoto