Category: Photography

  • Newborn Photography Black and White Conversion in Lightroom

    Introduction

    The Following is an excerpt from the SLR Lounge Lightroom Preset System v5 and accompanying workshop.  The Lightroom Preset System is designed to take you from Ordinary to Extraordinary photos in just a few seconds and clicks. In this tutorial we’re going to be creating a nice soft black and white portrait for a newborn baby captured from the Newborn Photography Workshop where we teach photographers how to take beautiful newborn with any camera using simply natural window light and a reflector.

    The complete written tutorial is below, and you can also watched the video tutorial at the end of this article. Here’s a sneak peak at what our image will look like before and after our edit.
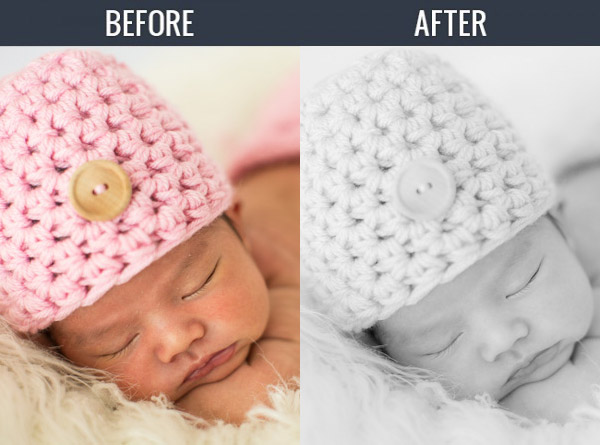
    newbeforeafter


    Black and White Conversion for Newborns

    The first thing we did to this image was adjust our Color Tempurature to taste, and in this case we used the Eye Dropper Tool (W) taking a reading from the fur that the newborn is sleeping on.

    After our Color Temperature adjustment we used our “01-10 Base – Soft: 12b Super Soft – B&W” preset to edit our photo. This preset does all of our work for us and after this preset is applied our photo edit is pretty much finished. So let’s go over exactly what this preset did.

    First, the Highlights and Whites have been taken down to -60 and -40. This is to smooth out highlights by bringing them closer to the mid-tones and shadows. This adjustment has the effect of softening highlights over skin tones giving us much more evenly lit skin.

    Next, Clarity is being dropped to -20 in order to reduce mid-tone contrast. The reduction of mid-tone contrast again helps us achieve a softer and more flattering look. However, I would caution not to take the Clarity slider down too far as it can create an overly-soft looking image completely lacking in contrast and mid-tone detail.

    In this black and white conversion the Reds, Oranges, and Yellows in the HSL are being raised, which again is primarily for skin tones. This brightens up the skin tones, further enhancing the soft flattering look.

    We have our standard amount of Sharpening for portraits applied to this image which you can see below.

    Also worth noting, the preset we selected dialed in a Noise Reduction Luminance setting of +30. Noise reduction was added to the preset in order to quickly reduce a little bit of the pore detail in the skin giving it a slightly smoother overall look. At an amount of +30, we will see a nice smoothing effect over skin, while retaining the majority of our fine detail in the hair, eyes and so forth.

    Below is a snapshot of all of our final settings to achieve this look.
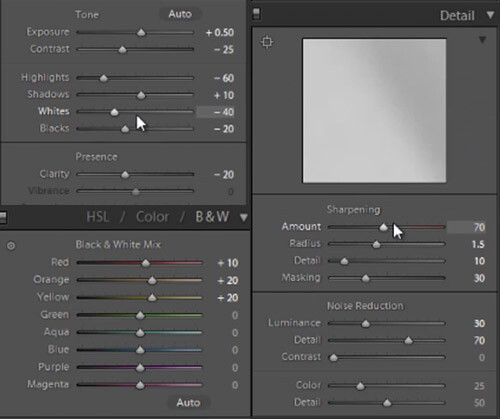
    developsettings

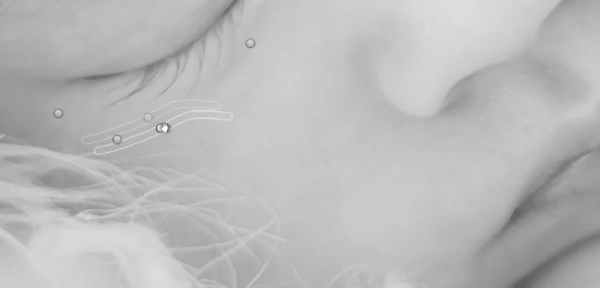
    To clean up the skin a little we can use the Lightroom 5 Spot Removal Tool to remove some of the more obvious bits of dry skin and hair. Adobe has modified the Spot Removal Tool in Lightroom 5 to operate more like a brush making the tool much more powerful than in previous editions of Lightroom.

    Just remember to keep your Spot Removal Tool size small and just large enough for the area you are working so that it doesn’t look unnatural.
    Screen-Shot-2013-07-30-at-9.59.27-PM-650x313

    Black and White Conversion for Newborns

    Here’s  a look at the final before and after of our newborn black and white portrait.

    Before

    lightroom-5-tutorial-soft-black-and-white-newborn-0001

    After

    lightroom-5-tutorial-soft-black-and-white-newborn-0002

    Watch the Video Tutorial

    If you would like to see exactly how all of the settings and adjustments were applied, please watch the video below from the SLR Lounge YouTube Channel.

    Conclusion and Learn More

    We hope you all enjoyed this tutorial. If you are interested in learning more or purchasing the SLR Lounge Lightroom Preset System v5 or the newly released Lightroom Workshop Collection v5, please click any of the links in this article. If you are interested in Newborn Photography Workshop please also check out our Newborn Workshop Collection and Lightroom Presets now available via digital download.

    Post originally from: Digital Photography Tips.

    Check out our more Photography Tips at Photography Tips for Beginners, Portrait Photography Tips and Wedding Photography Tips.

    Newborn Photography Black and White Conversion in Lightroom

    The post Newborn Photography Black and White Conversion in Lightroom by Post Production Pye appeared first on Digital Photography School.


    Digital Photography School

  • Anticipating Great Images

    A contribution by Dan Bailey – author of the eBook Zen Photographer (currently 13% off at SnapnDeals here).

    What if you could predict the future? Wouldn’t that make you a much better photographer?

    Think about it: Photography is largely about capturing the moment. Not just any moment, though. We’re talking that singular instant when light, expression, movement and environment all converge in one significant fraction of a second. That’s when the dirt’s flying, the action’s peaking and that ray of golden sunlight is turning your subject into a hero. If you knew exactly when that moment of truth was going to happen, you’d be a true camera master.

    S308665

    Of course, most of us don’t have psychic abilities, but we do possess a minor form of clairvoyance that allows us to see into the future. It’s called anticipation.

    In photography, looking into the future involves imagining with high probability how the scene will play out in a time that’s later than “right now.” It’s seeing a convergence of light, moment and subject in your mind that might happen, and then working backwards to make it happen.

    Most great images some form of of anticipation, whether it’s noticing how the light will hit your subject in a few minutes, paying attention to how your subject and background will look when lined up as a two-dimensional image, or recognizing when and where the height of action of expression might occur.

    AK BIK DNL 00340

    You may not be able to predict exactly how the future will play out, but by gauging the scene and all of the elements in your immediate surroundings, you can get a pretty good idea of what’s likely to happen, and in the world of image making, that’s as good as gold.

    Once you have that information, you can then put yourself in the optimum location, direct your subjects as needed, and set your gear accordingly in order to nail the shot that you now have in your mind. This is active image making, and it’s almost always more effective than trying to grab a shot that’s already started to unfold.

    Let’s say you’re shooting a trail runner. With one eye, you watch the runner follow a certain path through the landscape. With the other, you’re, you’re looking for something that might make for a compelling background, all the while, checking the position of the sun.

    TRN AK 2372

    When you see a potential convergence, you move to the ideal vantage point that will let you capture the scene in the most powerful way, figure out the technical details, such as lens choice, exposure mode, EV compensation, and then wait for the right moment. When the runner reaches the right spot, you press the shutter and nail the shot.

    You didn’t just stand there and snap away, hoping for something good, though. That would be passive. You got the shot because you used your imagination and anticipated a potentially great image before it actually came together. You took an active part in the image making process. You looked. You imagined. You reacted, and maybe even sprinted with your backpack full of camera gear over rough terrain so that you could get to the right vantage point. Active image making.

    I call this thinking and acting geometrically, and it’s a process that’s hard wired into our brains. We use these skills whenever we get behind the wheel of a car, or when navigating a stressful situation. In traffic, they keep you alive. In photography, they keep you tuned into all the elements of your scene.

    So the next time you’re out shooting, look into the future. Imagine a great image, anticipate how your scene might play out, and then work geometrically and bring the shot to life.

    For more creative insight like this, be sure and check out my brand new ebook, ZEN PHOTOGRAPHER: Turning Your Passion into Focus (13% off for the next few days at SnapnDeals).

    Dan Bailey is a full time professional outdoor, adventure and travel photographer based in Alaska. When he’s not off exploring in the mountains, writing about photography, or flying his little yellow bush plane, he can sometimes be found lurking in the forums right here at DPS. Check out his blog and find him on Facebook and Google+.

    Post originally from: Digital Photography Tips.

    Check out our more Photography Tips at Photography Tips for Beginners, Portrait Photography Tips and Wedding Photography Tips.

    Anticipating Great Images

    The post Anticipating Great Images by Guest Contributor appeared first on Digital Photography School.


    Digital Photography School

  • 10 Best Photography Books Bursting With Inspiration for Every Photographer

    Every passion in life begins with an inspiration. This is especially true in the arts, where inspiration is such a huge part of the artist mindset. One great piece of art can change someone’s world and set them on the right path. Many photographers today—from nature photographers to portrait photographers—have started out this way. Beautiful photographs incited in them a Continue Reading

    The post 10 Best Photography Books Bursting With Inspiration for Every Photographer appeared first on Photodoto.


    Photodoto

  • Making Your Stock Photography Sell Like Crazy

    Photographers get into stock photography in order to sell their pictures and make a respectable amount of extra money. Unfortunately, this is easier said than done since so many things can get in the way. For many photographers, their experimentations with stock photography simply amount to a waste of time and effort, which is unproductive. However, setting up and editing Continue Reading

    The post Making Your Stock Photography Sell Like Crazy appeared first on Photodoto.


    Photodoto

  • Polarizing and Neutral Density Filters: Essentials for Landscape Photography

    In landscape photography, just as in portraits, fashion, products, or any other subject matter, accurate color capture is crucial. What makes it so much more difficult with landscapes, however, is the wider disparity in dynamic range, not only between foreground and background elements, but primarily between the upper and lower halves of the frame– between the earth and the sky. If you are into shooting landscapes, overcoming this hurdle will require you to have one of two filters (if not both) in your arsenal, even if you don’t use filters in any of your other photography.

    Polarizing Filter

    Polarizing filters– sometimes called the secret weapon of professional landscape photographers– create richer, more vivid colors. The filter pulls double duty by (1) cutting down on reflections from bright surfaces like water and rocks, and (2) adding rich blues to skies by darkening them and increasing the color and tonal saturation throughout the frame. Polarizing filters are most effective when shooting at a 90-degree angle to the sun. It will therefore be least effective when the sun is either in front of or behind you. Polarizing filters will also enhance clouds, but you have you to be careful with your lens choice. Just like you can overdo it in post production, it’s quite possible to overdo it in-camera if you use a polarizing filter on a super-wide-angle lens. The result will be uneven shades of blue in an over-saturated sky.

    Without a polarizing filter

    Without a polarizing filter

    With a polarizing filter

    With a polarizing filter

    Neutral Density Filter

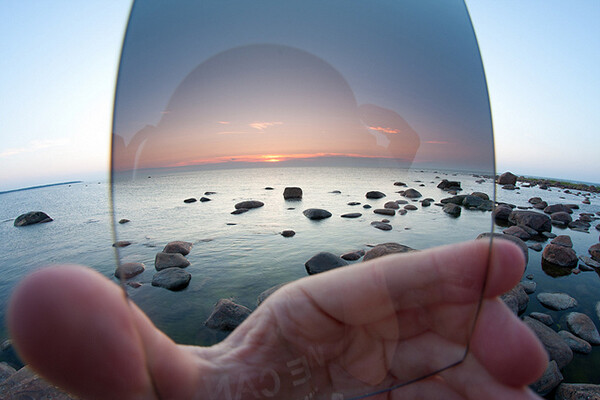
    Neutral density gradient filters help balance the exposure between the ground and sky to capture a range of exposure that the camera cannot possibly handle on its own. If you expose for the ground, you’ll get a gray or white washed-out sky. Exposing for those awesome blues and soft, billowy clouds, on the other hand, will make the ground so dark you’ll lose much of the detail you set out to capture in the first place.

    A wide view of a hand-held graduated neutral density filter illustrates how valuable it is to capturing accurate colors in landscape photography.

    A wide view of a hand-held graduated neutral density filter illustrates how valuable it is in capturing accurate colors in landscape photography.

    The filter itself is dark at the top, completely clear at the bottom, and essentially shades of gray in between. Available in two varieties, the circular version attaches to the front of the lens like any other traditional filter. The other type is a square or rectangular filter that you hand-hold in front of your lens. Both work the same way, darkening the sky to avoid blowouts, while leaving the ground untouched and unfiltered. It’s a seamless transition that ensures proper exposure throughout the frame– making sure you get vibrant, saturated, and (most importantly) accurate colors in all of your landscape shots.

    Neutral Density Photo Credit: Flickr Creative Commons User Kain Kalju.

    Post originally from: Digital Photography Tips.

    Check out our more Photography Tips at Photography Tips for Beginners, Portrait Photography Tips and Wedding Photography Tips.

    Polarizing and Neutral Density Filters: Essentials for Landscape Photography

    The post Polarizing and Neutral Density Filters: Essentials for Landscape Photography by Jeff Guyer appeared first on Digital Photography School.


    Digital Photography School

  • Reflectors: Your Secret Weapon for Amazing Portrait Photography

    By: Oded Wagenstein

    There is no doubt that using natural light in portrait photography can get you the best results.

    However sometimes, as you all probably know, natural light does not do what he’s told. So here comes into action what I like to call my secret weapon in outdoor Portrait Photography.

    It is cheap, easy to carry and especially does not frightens my subjects, who themselves can be a little intimidating at times.

    Reflector

     
    It is just that! It reflects light. There are hundreds of different types of reflectors, which differ in sizes and colors (i.e. white, silver, gold, etc.). A reflector is usually a reflective fabric, stretched over a bendy ring, allowing it to fold, and easy to carry.

    With so many types of reflectors on the market, I cannot review them all. This mini-guide will focus on the main reflector I use for my work.

    12 ” in size, and costs less than a movie theatre ticket.

    I sometimes use other larger reflectors (mainly in cinematography productions), but this 12? reflector suits my needs in travel photography; mainly because it is small enough, allowing me to hold it with one hand and the camera with the other.

    To Fill up Shadows:

    We all love taking pictures at sunrise and sunset. But when dealing with the harsh mid-day light, a reflector is almost a must.

    Fstop of 2.8, shutter speed@ 1/100 and ISO 200

    Fstop of 2.8, shutter speed@ 1/100 and ISO 200

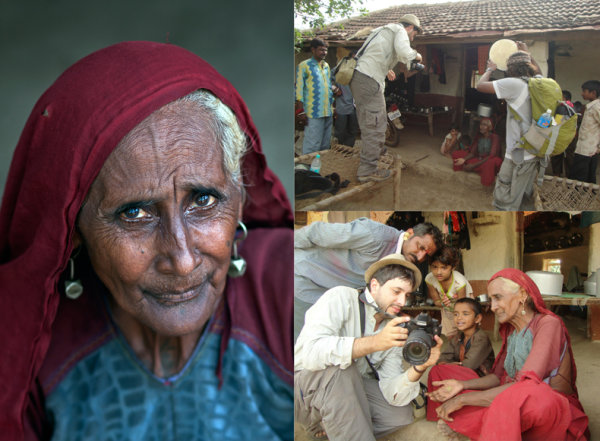
    In the above picture, taken in the western Indian Rabari tribe, for the National Geographic Traveler magazine (Israeli edition), our model was sitting in a dark mud house. He was sick; therefore it was not an option to move him outside.  On the left wall of the house, there was a small window (as can beautifully seen illuminating in the background), My trusty camera assistant Hardik Pandaya, held a silver colored reflector below the subject ‘s face in order to fill any shaded areas such as under the eyes.

    reflectors portraits 2

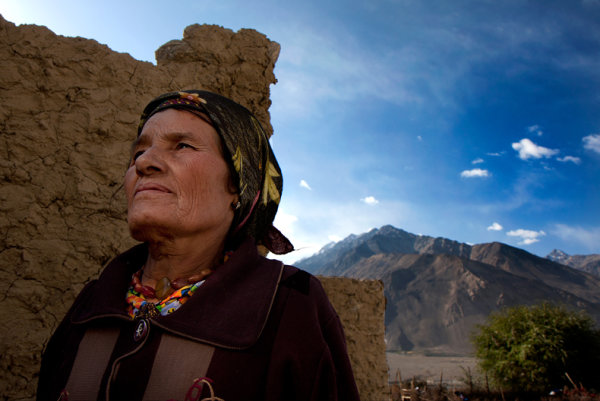
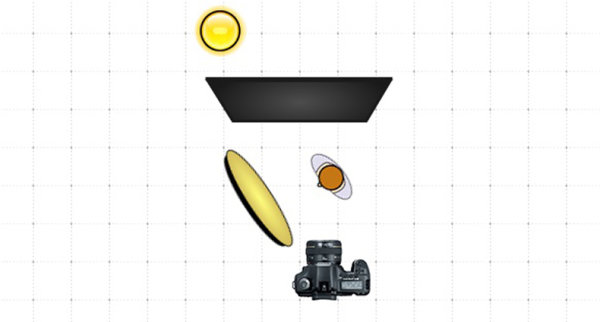
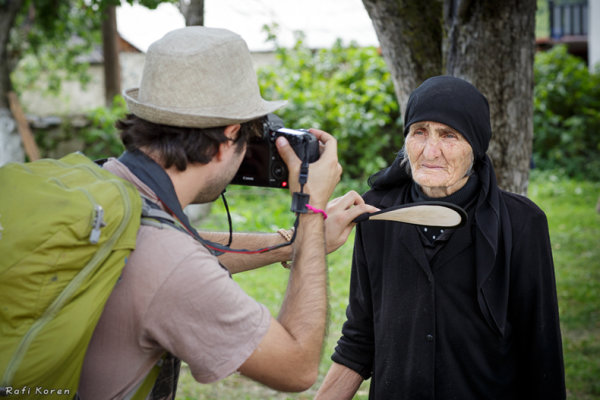
    The above picture was taken on the border of Afghanistan and Tajikistan. Please note that although the woman is standing in the shade and the background is bright, the woman is not a black silhouette and the background is not burned out.  I measured the light from the background (using spot metering). In such a situation, without using a reflector, the character will turn out completely black (silhouette) but with a reflector held on my left hand, I was able to light up her face.

    Fstop of 8, shutter speed@ 1/250 and ISO 100

    Fstop of 8, shutter speed@ 1/250 and ISO 100

    reflectors portraits 4

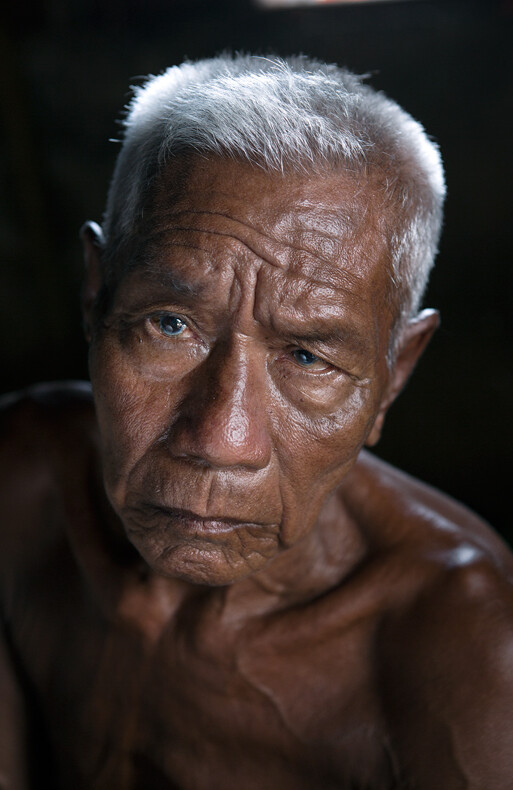
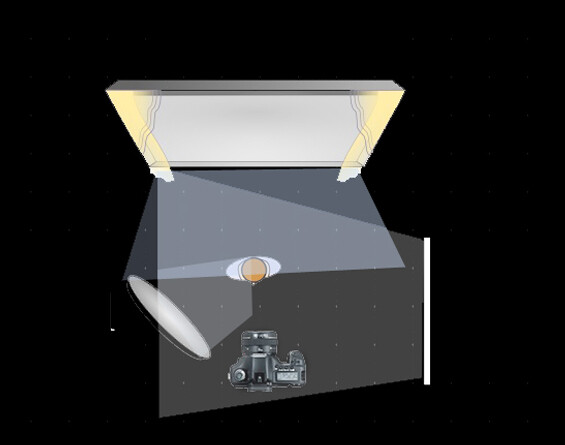
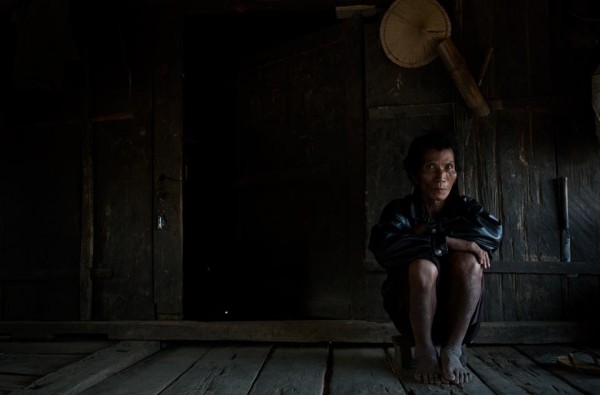
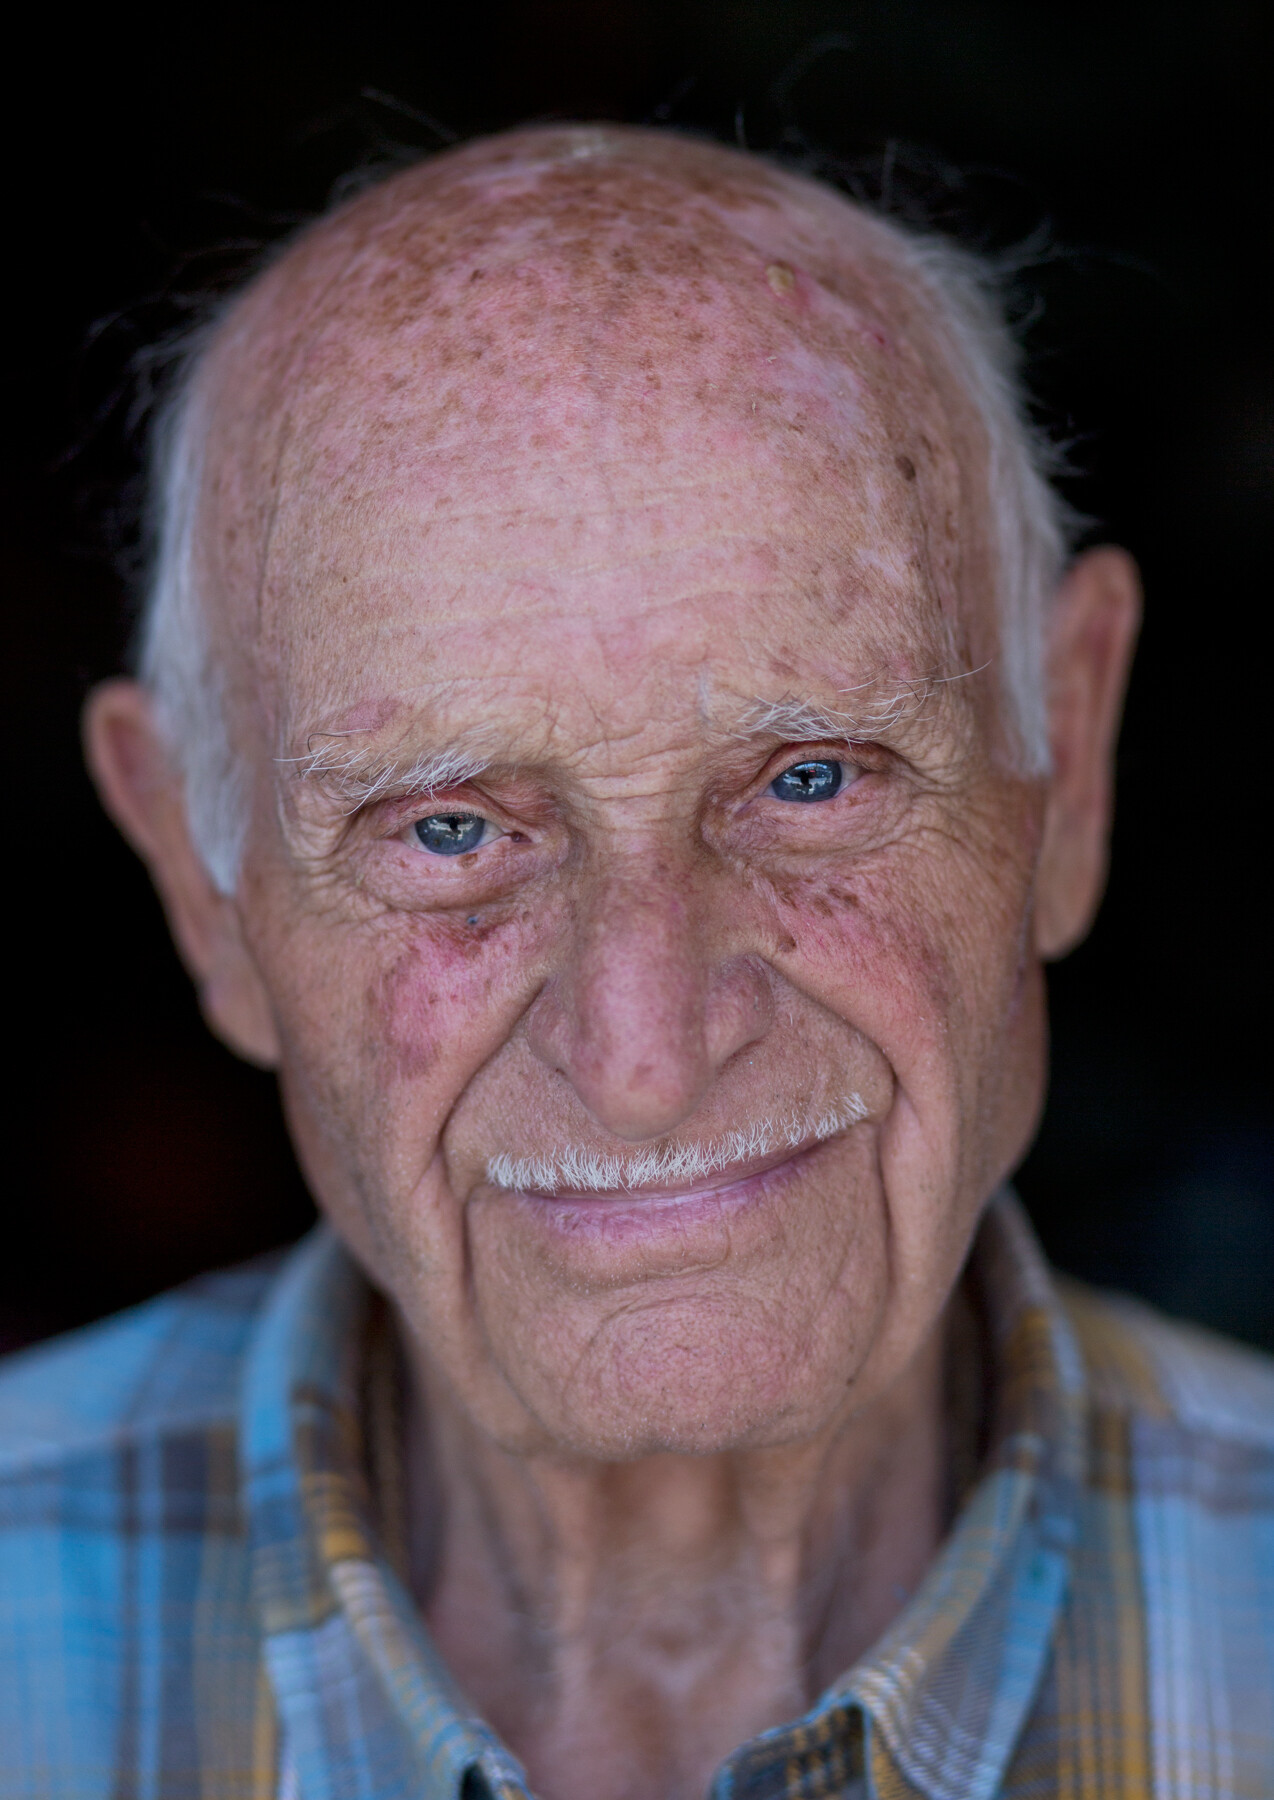
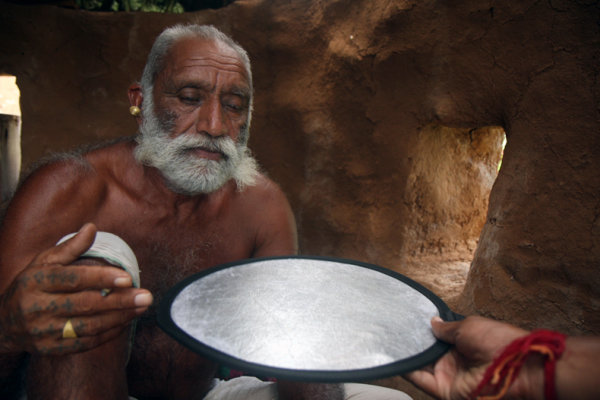
    Below is 80 years old Getho. A fisherman from the small community of Sea Gypsy living in, Thailand. This image is a little bit complex in terms of lighting, because there are three sources of lighting here. Just like in the studio, my main light source (key light) was the house door (right side of the frame). The light was coming from a 45 degree angle, creating this dramatic volume on Getho’s face (you can read more about “sculpturing” with 45 degrees light in this post here).

    In my left hand I held the small Silver color reflector, filling the shadows (fill light) on his face? and behind him was an open window for additional  light on his beautiful white hair (back light).

    Fstop of 4, shutter speed@ 1/100 and ISO 320

    Fstop of 4, shutter speed@ 1/100 and ISO 320

    refectors portraits 6

    Sometimes a reflector is the only option to shoot under strong sunlight, as you can see in this picture.

    reflectors portraits 7

    Choose the Right Color

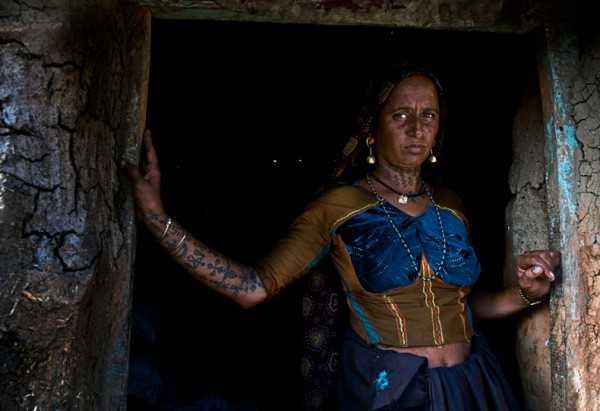
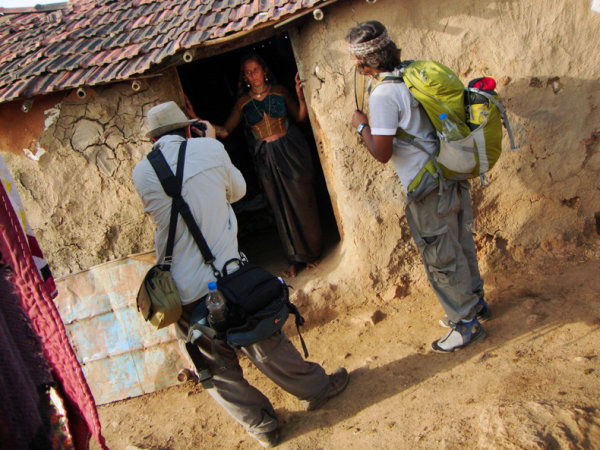
    Most reflectors come in multiple colors. In this picture, taken in Western India for the National Geographic Traveler magazine (Israeli Edition), I wanted to preserve the golden- brown color which was dominate in this scene. So I asked Hardik to hold the reflector on its golden side giving the woman’s face a golden glow.

    Fstop of 4.5, shutter speed@ 1/80 and ISO 100

    Fstop of 4.5, shutter speed@ 1/80 and ISO 100

    reflectors portraits 9

    Choosing the right distance

    It is important to keep in mind that the closer the light source is to the photographed subject, the stronger and less soften it will appear. Thus, a small reflector is easier to carry and hold; however it will be not as soft as a large reflector.

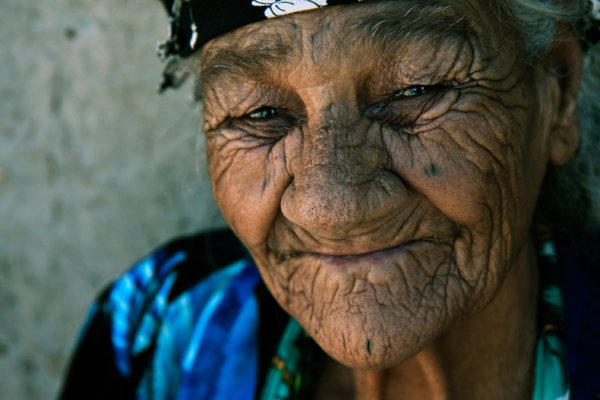
    A “catch light” is an interesting spark in the eyes of the subject, “pulling” the audience to look straight at them. There are lots of methods to create a catch light in the subject’s eyes. For example using a flash or a flashlight. However, as we are discussing on the usage of natural light, a reflector can become a great tool for creating a catch light. Just place the reflector under the person’s face.

    You can see some catch light examples here:

    Fstop of 3.5, shutter speed@ 1/640 and ISO 250

    Fstop of 3.5, shutter speed@ 1/640 and ISO 250

    reflectors portraits 11

    Fstop of 2.8, shutter speed@ 1/200 and ISO 100

    Fstop of 2.8, shutter speed@ 1/200 and ISO 100

    One of the most useful techniques, in order learn how to work with natural light in my opinion, is by observing the images of other photographers. Try to guess the direction of the light and the position and color of the reflector in the images below:

    Fstop of 2.8, shutter speed@ 1/320 and ISO 3200

    Fstop of 2.8, shutter speed@ 1/320 and ISO 3200

    Fstop of 4.5, shutter speed@ 1/160 and ISO 100

    Fstop of 4.5, shutter speed@ 1/160 and ISO 100

    Fstop of 3.5, shutter speed@ 1/320 and ISO 1000

    Fstop of 3.5, shutter speed@ 1/320 and ISO 1000

    Fstop of 2.8, shutter speed@ 1/15 and ISO 200

    Fstop of 2.8, shutter speed@ 1/15 and ISO 200

    Fstop of 3.5, shutter speed@ 1/320 and ISO 160

    Fstop of 3.5, shutter speed@ 1/320 and ISO 160

    Fstop of 2.5, shutter speed@ 1/1000 and ISO 250

    Fstop of 2.5, shutter speed@ 1/1000 and ISO 250

    The diagrams were created by http://www.lightingdiagrams.com

    Oded Wagenstein is a Travel photographer and writer. He is a regular contributor to the National Geographic Traveler magazine (Israeli Edition) and he is known for his intimate portraits from around the world. You can join his Portrait & Travel Photography Facebook page and continue to discuss on travel and people photography and get more amazing tips! –

    Post originally from: Digital Photography Tips.

    Check out our more Photography Tips at Photography Tips for Beginners, Portrait Photography Tips and Wedding Photography Tips.

    Reflectors: Your Secret Weapon for Amazing Portrait Photography

    The post Reflectors: Your Secret Weapon for Amazing Portrait Photography by Guest Contributor appeared first on Digital Photography School.

    Digital Photography School

  • An All-Nighter at The Vista: Greg Heisler’s 50 Portraits

    As cool as Gulf Photo Plus is in Dubai is every year, perhaps the very best part of the experience is the late-night conversation over beers at the nearby rooftop bar, the Vista. There, people leave the classes (and instructor/student roles) behind and simply talk photo until the wee hours of the morning.

    An assumption is made that all at the table are just photographers. So the f/stops and shutter speed stuff is dispensed with in favor of everything that is the tapestry of photography. The resulting conversations are long, in-depth, very Inside Baseball and often funny as hell.

    And a night at the Vista what Heisler's new book, 50 Portraits: Stories and Techniques from a Photographer's Photographer, feels like.

    Read more »
    Strobist

  • Making Sense of Lightroom’s Grid View

    Using Lightroom's Grid View

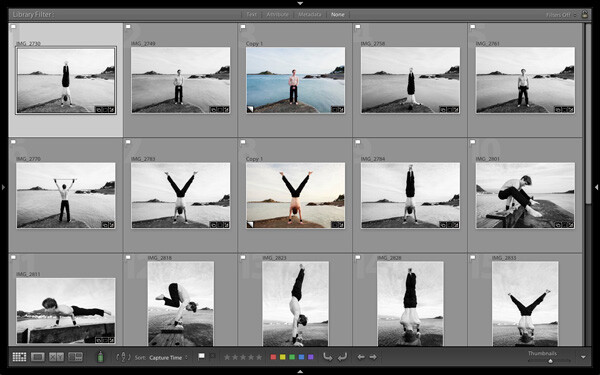
    In last week’s article about Lightroom you learnt how to use Collections and Smart Collections to organise your images. Today, I’m going to take a closer look at the Grid View (part of the Library module) and show you how to customise the display.

    If you’re not in Grid view, just press the ‘G’ key. It’s a keyboard shortcut that will take you to the Grid view from any part of Lightroom.

    The Grid View displays thumbnails of photos contained in the currently selected Folders, Collections or search results. Here, I used the Shift+Tab shortcut to remove the left-and right-hand panels, the filmstrip and the module picker button panels from the view:

    Using Lightroom's Grid View

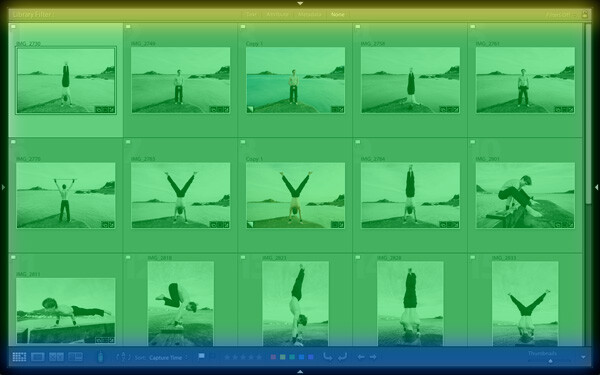
    These are the three main sections of the Grid View:

    Using Lightroom's Grid View

    The Filter bar: marked in yellow. Press the backward slash (‘\’) key to reveal the Filter bar if you don’t see it. You can use the same key to hide it.

    The Content window: marked in green. This is where Lightroom displays the image thumbnails.

    The Toolbar: marked in blue. Press ‘T’ to reveal it if you don’t see it. The same key also hides the Toolbar.

    The Toolbar

    There are several items on the Toolbar of immediate interest:

    Using Lightroom's Grid View

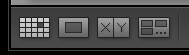
    These icons represent the four view modes of the Library module. From left to right they are Grid View, Loupe View, Compare View and Survey view. The Grid view icon is highlighted to indicate that it is the active view mode (I will look at the other view modes in future articles).

    Using Lightroom's Grid View

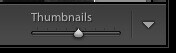
    The Thumbnails slider is on the right-hand side of the Toolbar. Use it to set the size of the thumbnails in the Content window.

    Using Lightroom's Grid View

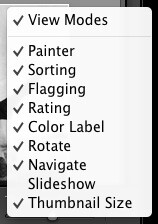
    Finally, if you click the white arrow on the very right of the Toolbar, you’ll see the above menu. Each menu item corresponds to an item on the Toolbar. The ticks indicate which items are displayed on the Toolbar. Click on any of the menu items to add or remove them.

    The Content window

    The Content window is where Lightroom displays thumbnails. Each thumbnail, plus the grey border around it, is called a cell. There are two types of display: Compact cells and Expanded cells.

    Compact cells

    This is what the Compact cell display looks like:

    Using Lightroom's Grid View

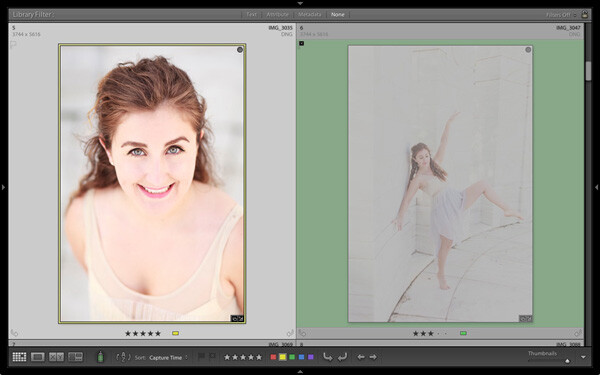
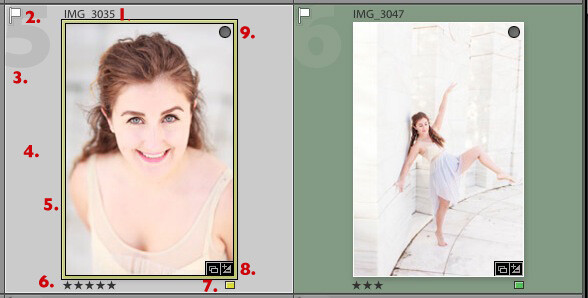
    I’ve numbered the important parts:

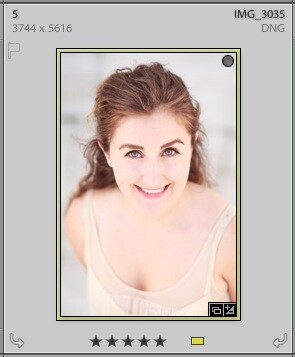
    1. The filename of the photo.

    2. The white flag indicates this photo has been flagged as a pick.

    3. The big number 5 shows this image is the fifth in the sequence in the currently selected folders or Collections.

    4. The light grey border means this photo is selected.

    5. The yellow border shows that the yellow colour label has been applied to this image. This photo is selected, so Lightroom displays a thin border. If the image is not selected, Lightroom applies the colour label to the entire border. That is why the thumbnail on the right is surrounded by a thick green border.

    6. These stars show that the image has a five star rating.

    7. The yellow square also indicates the colour label.

    8. There are two icons at the bottom right of the photo (you may see different icons depending on what you have done to the image). The icon on the left indicates that the photo has been added to at least one Collection. The icon on the right tells you that the photo has Develop adjustments.

    Tip: If you hover the mouse over an icon and keep it still, Lightroom will display a label telling you what the icon means. It appears after about two seconds.

    9. The grey circle in the top right indicates that the photo has been added to at least one Collection.

    Tip: To see what Collections the photo has been added to right-click on the thumbnail and go to the ‘Go to Collection’ option. Click on a Collection name to open that Collection in Grid View.

    Expanded cells

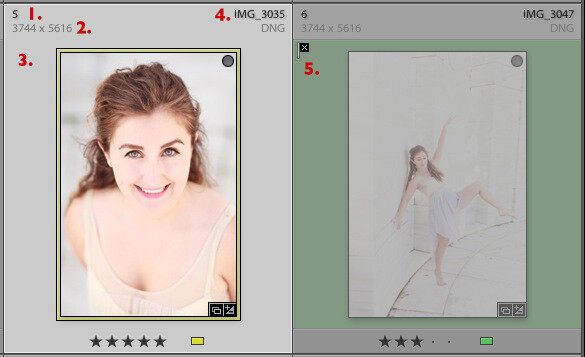
    Here is the Expanded cell display. The cells are larger than the Compact cells, and contain a little more information. I’ve marked the parts that are different:

    Using Lightroom's Grid View

    1. The size of the number indicating that this is the fifth photo in the currently selected folders or Collections has changed.

    2. These figures show the dimensions of the photo in pixels.

    3. There is no flag here, indicating that this photo hasn’t been flagged as a pick or flagged as a reject.

    4. The filename of the photo, with the file type (in this case, DNG) underneath.

    5. The black flag indicates that this photo has been flagged as a reject. Lightroom fades out the thumbnail so you can see it has been rejected.

    View Options

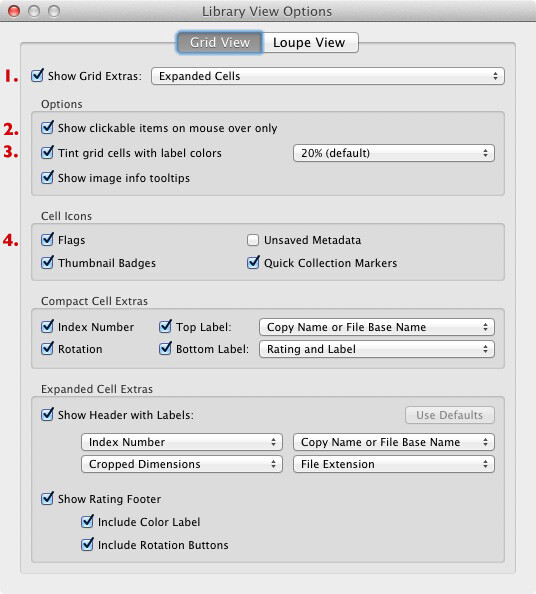
    Lightroom lets you customise the layout of the cells so the display shows as much or as little as you wish. Go to View > View options (or use the keyboard shortcuts PC: Ctrl+J, Mac: Cmd+J) to bring up the Library View Options window. Again, I’ve marked some of the interesting menu options:

    Using Lightroom's Grid View

    1. Show Grid Extras. This is where you chose between Compact Cells and Expanded Cells. Untick the Show Grid Extras box if you want to simplify your display. Doing so removes the information displayed around the thumbnails in Grid View.

    2. Show clickable items on mouseover only. If you untick this box every thumbnail is displayed with arrows in the bottom corners that you click to rotate the image, and a grey flag if the image is unflagged. With this box ticked, these icons are only displayed when you move the mouse over the image:

    Using Lightroom's Grid View

    3. If the colour labels annoy you, or you just don’t use them, untick this box to turn them off. The menu on the right lets you adjust the intensity of the colour tint.

    4. The rest of the View Options let you customise what icons and information are displayed alongside the thumbnails.

    Your thoughts

    How do you customise Lightroom? I’d be interested to hear your thoughts, whether they are about the Grid View or another part of Lightroom. Leave a note in the comments if you have anything to share.

    Mastering Lightroom Book One: The Library Module

    Using Lightroom's Grid View

    My latest ebook Mastering Lightroom Book One: The Library Module is a complete guide to using Lightroom’s Library module to import, organise and search your photo files. You’ll learn how to tame your growing photo collection using Collections and Collection Sets, and how to save time so you can spend more time in the Develop module processing your photos.

    Post originally from: Digital Photography Tips.

    Check out our more Photography Tips at Photography Tips for Beginners, Portrait Photography Tips and Wedding Photography Tips.

    Making Sense of Lightroom’s Grid View

    The post Making Sense of Lightroom’s Grid View by Andrew Gibson appeared first on Digital Photography School.


    Digital Photography School

  • Your Essential Guide to Photographing Cats and Dogs: Snapn Paws

    Do you have a cat or a dog in your life?

    SnapnPaws coverIf so, we’ve just released a great pet photography guide on our
    sister site snapnguides.com you’ll definitely want to check out.

    It is called Sanpn Paws and it’s all about creating adorable photos of your furry little friends.

    As an Early Bird special… it’s just $ 7 for a limited time!

    Pet photography presents the photographer with a load of wonderful opportunities and some real challenges.

    On the one hand pets are not self-conscious and can be really playful – but on the other hand they are not always known for taking direction well and can take a lot of patience to work with.

    This mini-guide will equip you to work through the challenges and create some beautiful images.

    It will teach you to:

    • pose your pets to show them off at their best
    • position yourself and leverage backgrounds
    • choosing locations
    • use the right camera and gear
    • shoot moving subjects
    • make the most of light – both indoor and outdoor with natural and artificial light
    • get your pets attention

    Snapn Paws is designed to be a quick read that gets straight to the point and present you with actionable information that you can apply straight away.

    While it’s focused on photographing cats and dogs, there’s no
    reason you can’t apply what you’ll learn to other pets as well.

    About the Author

    Snapn Paws is written and beautifully illustrated by Erin McNulty. Erin’s twin passions of photography and animals made her the perfect author for this eBook and makes her a wonderful pet photographer (it is her business).

    Erin has been featured in in numerous magazines, newspapers and TV-shows for her pet photography and you may have even seen some of them on the packaging of pet food in your supermarkets.

    She’s a great teacher and her images in the book will give you loads of inspiration.

    Grab Your Copy Today and Save 33%

    As an early bird special you can grab your copy of Snapn Paws today for just $ 7.

    Get yours here today and start taking beautiful shots of your cats and dogs.

    Post originally from: Digital Photography Tips.

    Check out our more Photography Tips at Photography Tips for Beginners, Portrait Photography Tips and Wedding Photography Tips.

    Your Essential Guide to Photographing Cats and Dogs: Snapn Paws

    The post Your Essential Guide to Photographing Cats and Dogs: Snapn Paws by Darren Rowse appeared first on Digital Photography School.

    Digital Photography School

  • Converting from Android Back to the iPhone, Initial Observations

    I’ve been using smartphones for a long time. I was an original owner of what I believe was the very first smart phone, the Kyocera PDQ 800 back in 2000. I had a couple of Microsoft Windows based phones after that. I waited in line down in Palo Alto with my pal Robert Scoble to get the very first iPhone when it was launched back in 2007. I then upgraded to an iPhone 3G, then an iPhone 3Gs. I skipped the iPhone 4 opting instead to give Android a run for the money. I switched to a Samsung Vibrant in 2010 and then in 2011 to a Samsung Galaxy Nexus.

    On Friday my new iPhone 5s arrived.

    I returned to the dark side of Apple for a lot of different reasons. I hated the poor battery life on both of my previous Android phones. I hated that it felt like the only way to get updates on Android phones was to buy a new Android phone. I thought it sucked how difficult it was getting updated software and I thought Google didn’t do enough to pressure the hardware manufacturers and carriers to better support Android updates in the aftermarket.

    A lot of things felt broken on my Android phones all the time. Things crashed, didn’t work, etc. People kept suggesting that I “root” my phone to fix things — but I didn’t want to root my phone. I’m not a phone geek. I just want something really good that consistently works with little effort.

    On my recent trip to New York City last month, I felt like I spent the whole trip apologizing to people who couldn’t get a hold of me on my Nexus because it was constantly dead. I didn’t dare listen to music on it or it would die even faster.

    It’s totally unfair to compare my new iPhone with a 2 year old Galaxy Nexus, but I’m going to do it anyways. Maybe Android’s come a long way since my Nexus, but I’m not interested in shelling out $ 500 to see if in fact this is the case — not after feeling like I’ve been burned twice with my last two Android phones.

    I’ve only been using my new iPhone for a few days, but here are my initial observations.

    1. The iPhone battery is wayyy better than my old phone. Last night I went to bed with my iPhone fully charged, but unplugged. This morning it had 98% of it’s battery life still. That was amazing to me. My Nexus would have been dead. It’s so nice having a phone that actually has a battery life.

    2. The internet reception is better on this phone than my Nexus. For the last two years I’ve thought that Verizon just had really crappy internet service in the Ferry Building here in San Francisco. It turns out it was my phone! All the places in the Ferry Building where I couldn’t get Verizon LTE service on my Android, now work perfectly with Verizon LTE on my iPhone. I was so frustrated all the time when my LTE connection wouldn’t work on my old phone. I was constantly blaming Verizon when the real culprit was MY PHONE! Verizon LTE works GREAT. I just needed the right phone.

    3. I didn’t care about the fingerprint technology on the new iPhone. I never locked my Nexus and didn’t think I’d lock this one — I’m one of those optimists who never thinks they will lose their phone. It turns out that the fingerprint tech is so easy that I do now lock my iPhone. I totally get that the NSA likely now has my fingerprint, but I don’t care about stuff like that.

    4. It’s nice to be able to hear my music again. One of the things that I disliked about my old Nexus was the music volume. It was too low at max volume. Sometimes when you are on a train or something you want the music louder. The iPhone music can go louder and that’s nice.

    5. It’s nice having my iPhone sync with my iTunes. I transferred about 7,000 of my favorite songs on it. I tried downloading doubleTwist to somehow port my iTunes to my old Nexus, but I could never get it working. I think my music library was too large for doubleTwist or something. Letting iTunes manage my music flawlessly with my iPhone is great.

    6. My new iPhone just feels better. I don’t know how to describe it. It feels more responsive, more accurate, faster. It feels smoother. The Flickr and Google+ apps flow easier on it.

    7. The first shocker for me was how much smaller the phone and the screen felt to me. I got over this quickly and barely notice at this point.

    8. I don’t really feel like I’m missing the best Google stuff from my Nexus. I can get Google Maps on my iPhone. I can get Gmail on my iPhone. I can get Google Chrome on my iPhone. All of the best things that sort of set Google apart initially for me as an incentive to go Android feel like they are now on iPhone.

    9. Setting up my new iPhone took me a lot longer than I thought it would. Some of this was my fault and some was the phone’s I think. I couldn’t activate it at first. My phone couldn’t connect to the activation server. I finally got it activated and it wouldn’t connect with my wifi at home initially (now it works fine). I had to download all of my favorite apps. It seemed to take longer to download my apps than I would have liked. I had to reset some passwords because I’m always forgetting my passwords (on Flickr now your password must include upper and lowercase letters, a number, a special character AND be at least 8 digits!) I spent about an hour trying to figure out how to get my Google Calendar into my iPhone calendar. It turns out what was screwing me up was two step authentication. Once I turned that off at Google it worked.

    Thanks to everyone online on Twitter, Google+, Facebook, etc. who gave me input on what phone I should buy next. Rosa Golijan was especially helpful. :)


    Thomas Hawk Digital Connection